Every region has a confidential foe, a legendary beast you can encounter by completing enough Expedition World Intel events, and while the Corel region is aberrant in many ways, at least in this regard it conforms to the norm. The confidential foe in the Corel region, ![]() Tonberry King, is not only a series staple but a notoriously dangerous monster whose comical and unassuming appearance belies the lethality of its iconic chef’s knife and the murderous retaliatory grudges it bears. This page will help you locate and defeat the
Tonberry King, is not only a series staple but a notoriously dangerous monster whose comical and unassuming appearance belies the lethality of its iconic chef’s knife and the murderous retaliatory grudges it bears. This page will help you locate and defeat the ![]() Tonberry King in Final Fantasy VII Rebirth and will also provide info on stealing his legendary Tonberry King’s Crown!
Tonberry King in Final Fantasy VII Rebirth and will also provide info on stealing his legendary Tonberry King’s Crown!
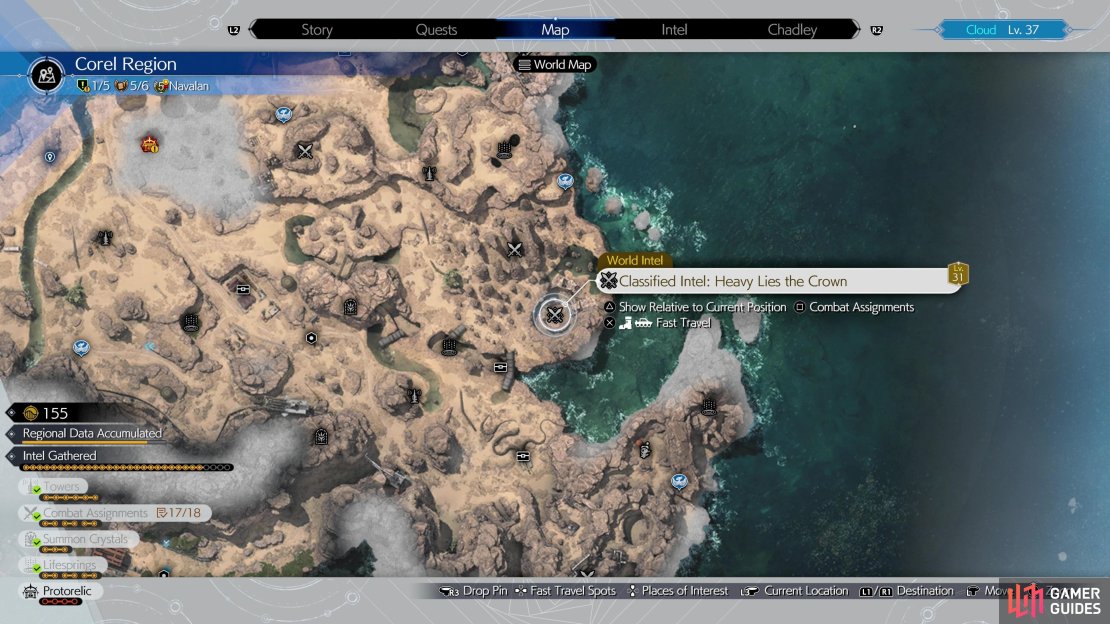
The location of the Tonberry King on the map.
How to Find the Tonberry King - Final Fantasy VII Rebirth
As mentioned earlier, to locate the Tonberry King you must complete Expedition Intel events in the Corel region. There are six such Expedition Intel events in the Corel region, two in the northern part (around the environs of Costa del Sol) and four in the southern part (in the desert outside of the ![]() Gold Saucer), and the latter bit complicates matters somewhat. You can explore the northern part of Corel starting in Chapter 7, but the southern part can’t be fully explored until Chapter 9, which is the earliest you’ll be able to fight the Tonberry King.
Gold Saucer), and the latter bit complicates matters somewhat. You can explore the northern part of Corel starting in Chapter 7, but the southern part can’t be fully explored until Chapter 9, which is the earliest you’ll be able to fight the Tonberry King.
Once you’re free to explore southern Corel in Chapter 9, hunt down the remaining Expedition Intel locations and eventually a Confidential Intel marker should appear in some ruins along the eastern coast of the Corel region. Head there to confront the Tonberry King.
Tonberry King Strategies - Final Fantasy VII Rebirth
Final Fantasy veterans may be prepared for the misery they’re about to endure. One could almost call Tonberrys “joke” monsters if it weren’t for their high damage output and penchant for instant death attacks - a perfect case of “don’t judge a book by its cover”. Before you start the fight, make sure you’re protected from 1) ![]() Instant Death, 2)
Instant Death, 2) ![]() Stop, and 3)
Stop, and 3) ![]() Slow, in that order, if possible. The
Slow, in that order, if possible. The ![]() Safety Bit you could have found in Chapter 8 will make this fight much, much easier. Failing that,
Safety Bit you could have found in Chapter 8 will make this fight much, much easier. Failing that, ![]() Protective Boots are a good option.
Protective Boots are a good option.
The Tonberry King’s attacks generally fall into two categories: restrictive, and instant death. If it doesn’t kill you outright, it’ll probably inflict Slow, Stop, or ![]() Stun. Either way, it’ll likely deal damage, and the Tonberry King isn’t just a heavy hitter, if you’re debilitated and can’t fight back or dodge you’ll likely take repeated hits. Suffice it to say that in such a situation things are probably going to end poorly. With that out of the way, here are the Tonberry King’s attacks:
Stun. Either way, it’ll likely deal damage, and the Tonberry King isn’t just a heavy hitter, if you’re debilitated and can’t fight back or dodge you’ll likely take repeated hits. Suffice it to say that in such a situation things are probably going to end poorly. With that out of the way, here are the Tonberry King’s attacks:
-
Royal Treatment: The Tonberry King will always open the fight with this debuff, which inflicts Slow on all characters. It covers the entire battlefield, so either you’re immune or you’re playing with an ATB handicap.
-
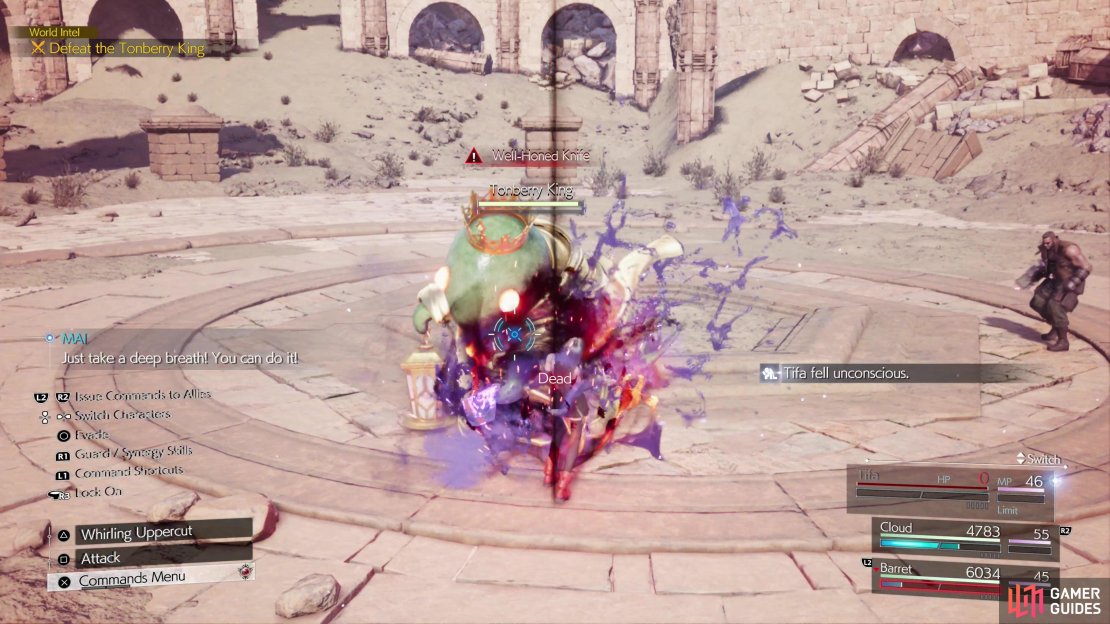
Well-Honed Knife: A lunging stab with the Tonberry King’s knife. It’ll hit for around 800 damage and inflict Instant Death. The Tonberry King won’t use this as reliably as his underlings will, but you’ll still see it often enough that you need to watch out for it. Honestly safer to keep characters who aren’t immune to Instant Death out of melee combat altogether.
-
Bone-Deep Grudge: If you pressure the Tonberry King too much in melee it’ll respond with this, an AoE that inflicts a low duration Stop effect on every character in a radius around the Tonberry King. Dodge away from the Tonberry King when you see the text announcing this attack.
-
Hopping Mad: Tonberry King seems to retaliate with this attack whenever his stagger gauge is significantly increased. During this bout of frustration, pans will wall from the sky, dealing around 200~ damage if they doink you on the head. Should multiple pans strike you in succession, you’ll be Stunned.
-
Rancor: The Tonberry King shakes his lantern and shoots out three orbs of light that seek out their target. While they’re not terribly damaging in the grand scheme of things (expect 300~ damage per hit) they’ll stun you if they hit. The stun only lasts a few moments, but it’s enough for the Tonberry King to pull off another attack, and if it’s an instant death attack against an unprotected character, they’re dead. The Tonberry King often follows Rancor up with a second Rancor attack, and getting stunned will likely mean you’re taking nearly 2,000 damage. The orbs track, but you can avoid them easily enough by dodging or just running to the side.
-
Doom and Gloom: While the Tonberry King is more dangerous in melee combat, he’s got some ways to make you miserable at range. This is the Tonberry’s King’s ranged Instant Death attack, conjuring a purplish orb that will kill unprotected characters if it hits, and even if you’re resistant you’ll still take around 250 damage. Fortunately, it’s pretty easy to dodge.
-
 Decree of Exile: If any of your characters end up KO’d, you only have a brief window to revive them, as inevitably the Tonberry King will use Decree of Exile, which prevents a KO’d character from being revived. If you see blue flame effects around a downed character, this ability has afflicted them and they’re out of the fight for good.
 -
Call for Friends: What’s a king without subjects? Unfortunately, the Tonberry King is no poser, and he can call forth members of his retinue by using this ability. Each summon will draw forth one Tonberry, and this foe is slow, not terribly sturdy, and capable of only using one attack - the dreaded Chef’s Knife. This attack deals moderate damage (around 200~) and inflicts Instant Death. Unlike the Tonberry King they will almost always counterattack with this when sustaining a frontal assault, but if you dodge it, they’ll become pressured. If you’re immune to Instant Death, these enemies are of marginal concern, but if not they’re basically landmines just waiting for the game’s lock-on to fail you and drive you to your doom. They’re a separate scan from the Tonberry King, so be sure to Assess them.
As you should be able to gather from the Tonberry King’s attack, being resistant to Instant Death makes this fight much, much easier, as it’ll prevent you from being one-shotted by Doom and Gloom, Well-Honed Knife, and Chef’s Knife. You’ll still have to deal with dangerous nuisances like Stop, Slow, and Stun, as well as the damage output of your foes, but all of these are more manageable and, in most cases, more forgiving if you fail.
Cloud’s relative speed and ability to mix it up at close range and with blade beams makes him a great character to manage this fight with, as is Yuffie for largely the same reasons. Barret and Aerith are also handy due to their ranged proclivities, and while they’re not the best dodgers, the Tonberry King’s own ranged attacks are easy enough for anybody to evade, and the anemic rate of Tonberrys in general make it easy to keep your distance. If Tifa and ![]() Red XIII contribute they’re best played cautiously, attacking when they can circle around to the side and rare of their target.
Red XIII contribute they’re best played cautiously, attacking when they can circle around to the side and rare of their target.
Keep dishing out damage, use abilities to build up synergies, and dodge the Tonberry King’s attacks enough and he’ll become pressured, losing his crown in the process. This is your time to try to stagger the boss, where you’ll be able to dish out big damage. This should be a familiar gameplay loop, it’s the Tonberry King’s ability to inflict Instant Death, Slow, Stop, and Stun that makes the fight potentially tricky.
(1 of 3) Pressuring the Tonberry King will cause the crown to fall off his head.
How to Steal the Tonberry King’s Crown
If you defeat the Tonberry King you’ll obtain the ![]() Tonberry King’s Robe and a
Tonberry King’s Robe and a ![]() Marred Crown, the former of which can be used to craft a
Marred Crown, the former of which can be used to craft a ![]() Karmic Cowl, which boosts the wearer’s
Karmic Cowl, which boosts the wearer’s ![]() Vitality and
Vitality and ![]() Spirit by 30 each and renders the wearer immune to Instant Death and Slow. Ironically this will make subsequent fights against the Tonberry King easier. During the side quest The Saga of the Seaside Inn you’ll be tasked with obtaining a Pristine Crown, which the Tonberry King possesses.
Spirit by 30 each and renders the wearer immune to Instant Death and Slow. Ironically this will make subsequent fights against the Tonberry King easier. During the side quest The Saga of the Seaside Inn you’ll be tasked with obtaining a Pristine Crown, which the Tonberry King possesses.
In order to get ahold of this crown, you’ll need to steal it from the Tonberry King, but you can’t just pluck it off its head. Instead, you’ll have to pressure this foe, during which the crown will fall off the Tonberry King’s brow. At this point you must use ![]() Steal Materia to steal it from the Tonberry King, but note that you must target the crown itself with Steal, and you must do so before the Tonberry King can amble over to its displaced jewelry and reclaim its symbol of authority.
Steal Materia to steal it from the Tonberry King, but note that you must target the crown itself with Steal, and you must do so before the Tonberry King can amble over to its displaced jewelry and reclaim its symbol of authority.








No Comments