
Upon reaching Chapter 12 of the main story in Final Fantasy VII Rebirth, a bunch of extra content will unlock. This includes new quests, as well as harder versions of various minigames. One of these is the Card Carnival over at Costa del Sol, which will have new puzzles for you. If you plan on doing all of the Queen’s Blood content, then you will want to do these, as most of the puzzles will reward you with some nice cards. This page will detail all of the Card Carnival Advanced Puzzle solutions.
Card Carnival - One Shot, One Kill
The premise of this puzzle is to use the Dyne card to basically eliminate some cards, which will set off a chain reaction. You start with two ![]() Bomb cards, a
Bomb cards, a ![]() Bloatfloat, a Scrutineye, and the Dyne card. Your first move will be to place pretty much every card in your hand in specific spots, save for the Dyne card, as that will be the final piece. Put one of the Bombs in the middle row, on the far right side, then place the other one on the right side in the top row.
Bloatfloat, a Scrutineye, and the Dyne card. Your first move will be to place pretty much every card in your hand in specific spots, save for the Dyne card, as that will be the final piece. Put one of the Bombs in the middle row, on the far right side, then place the other one on the right side in the top row.


(1 of 2) Set up your cards, except for Dyne, as shown here.
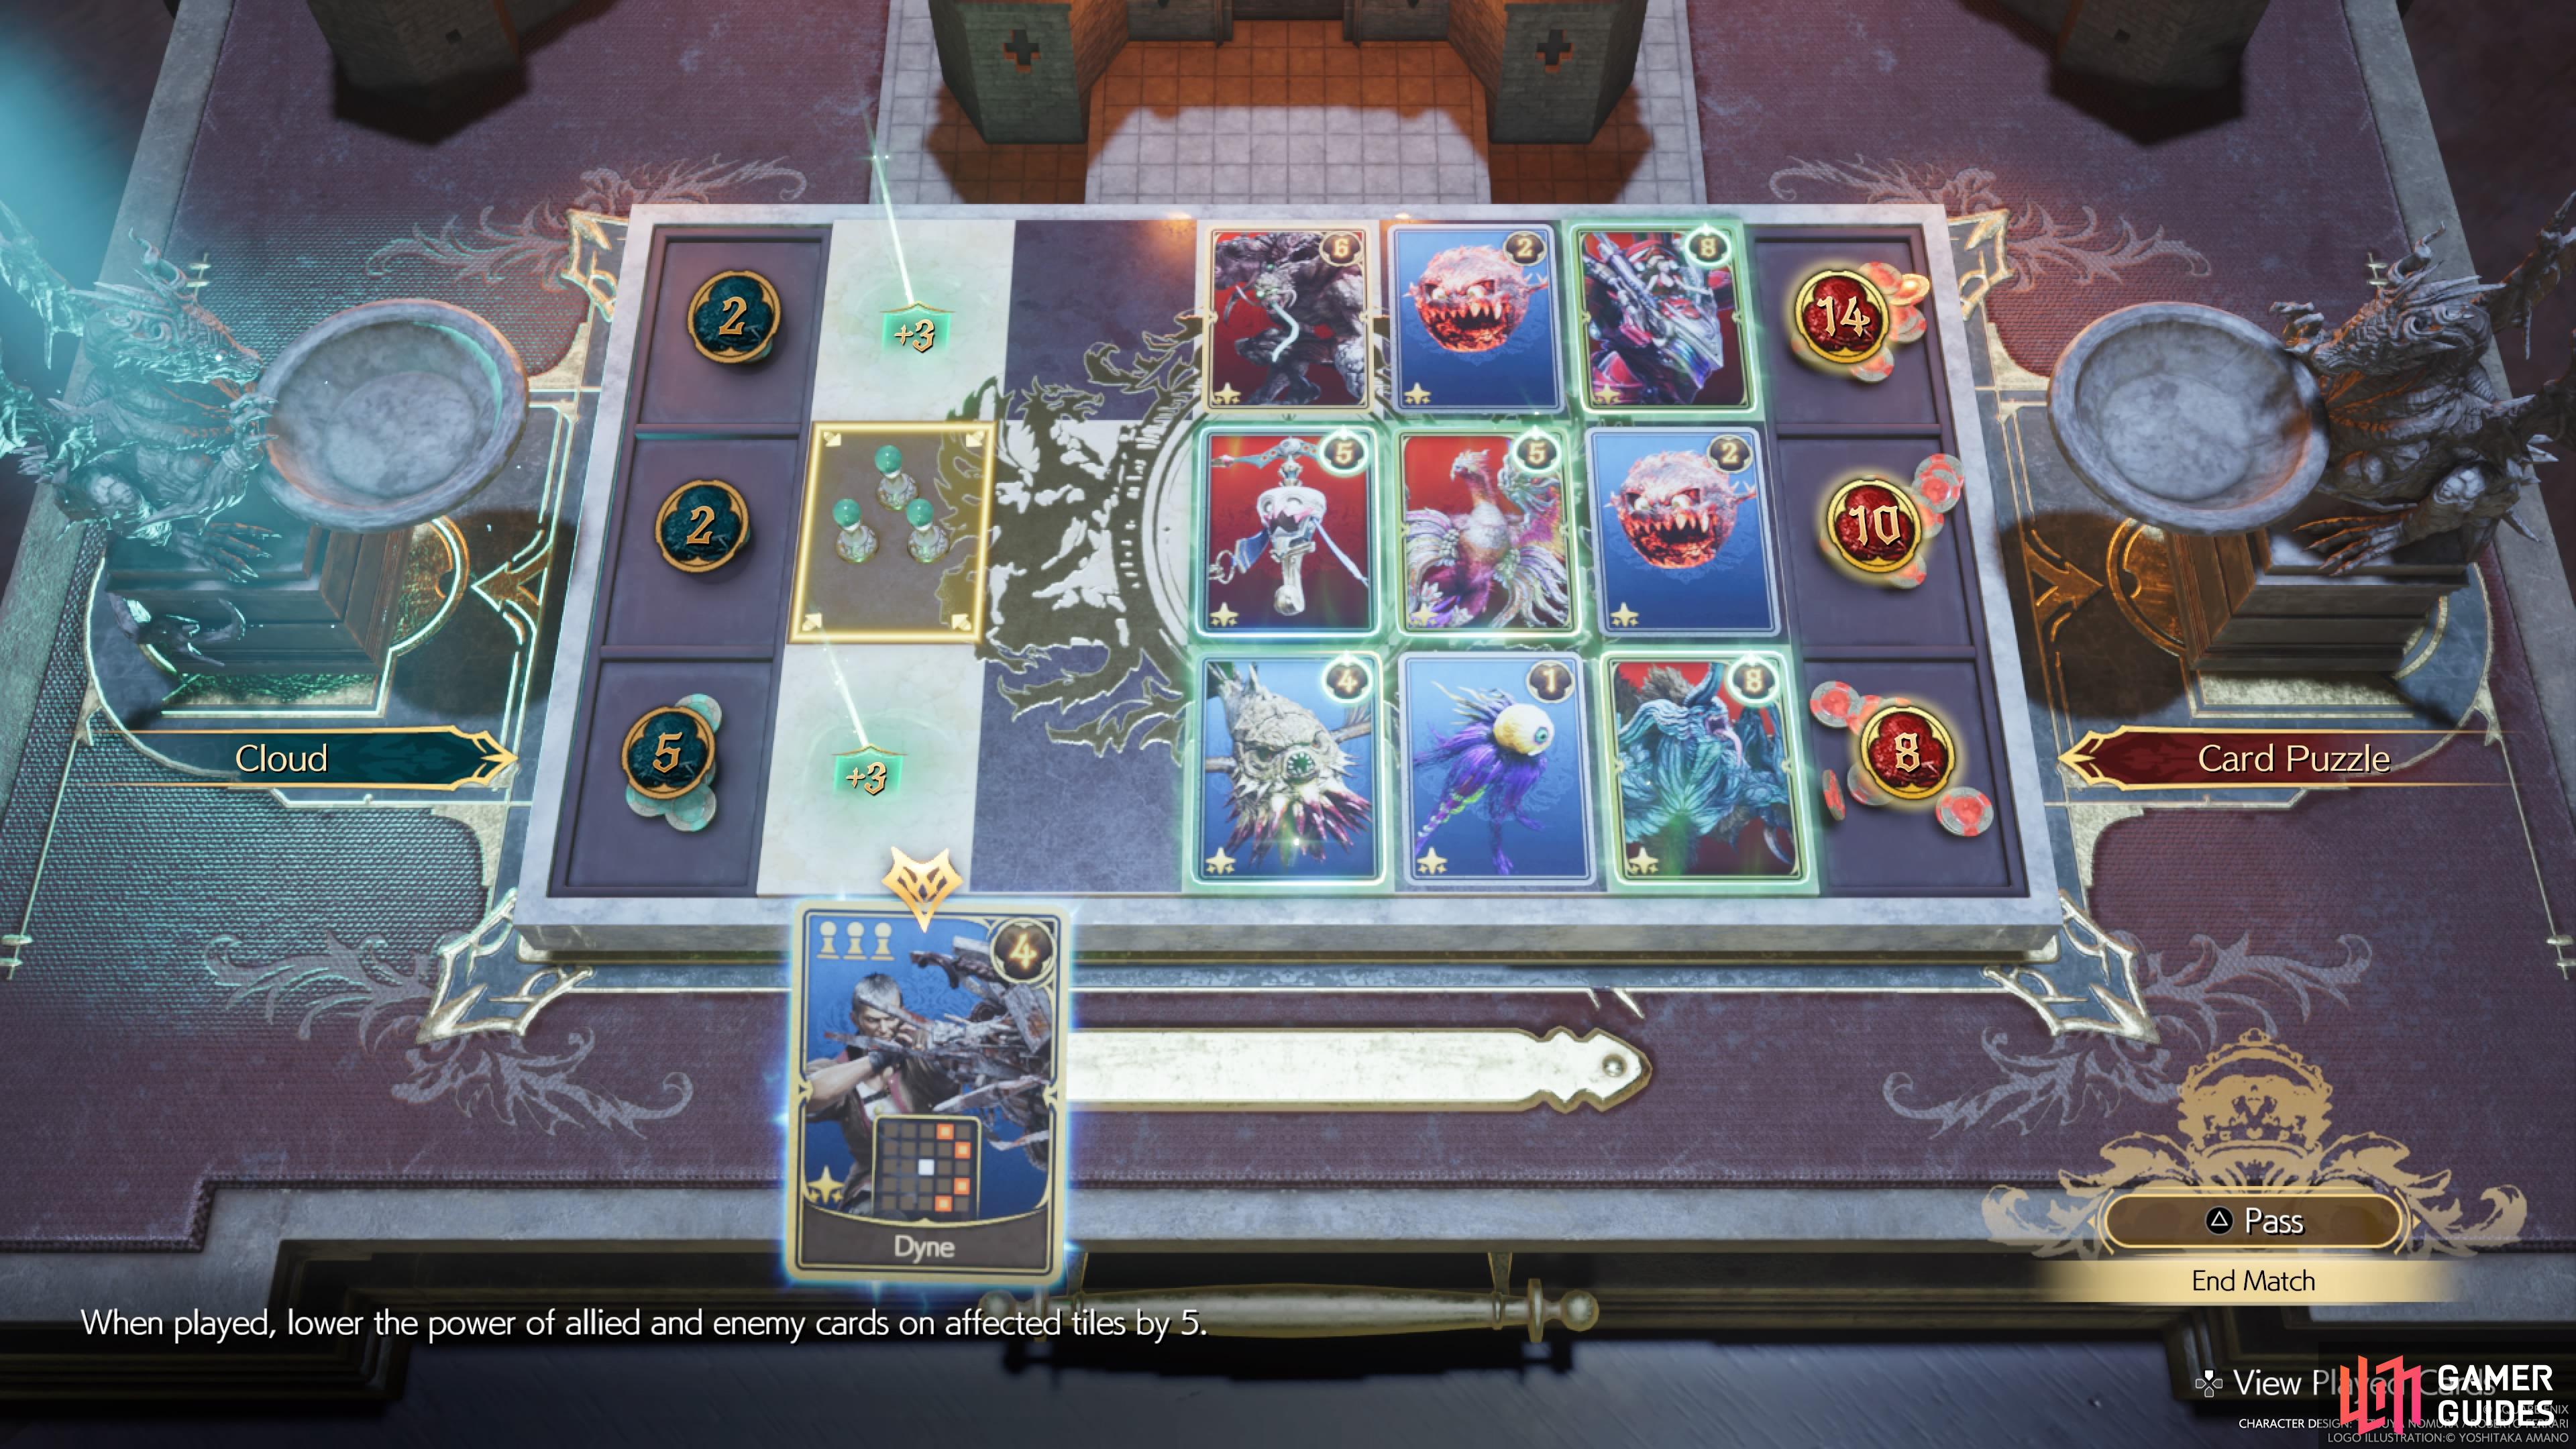
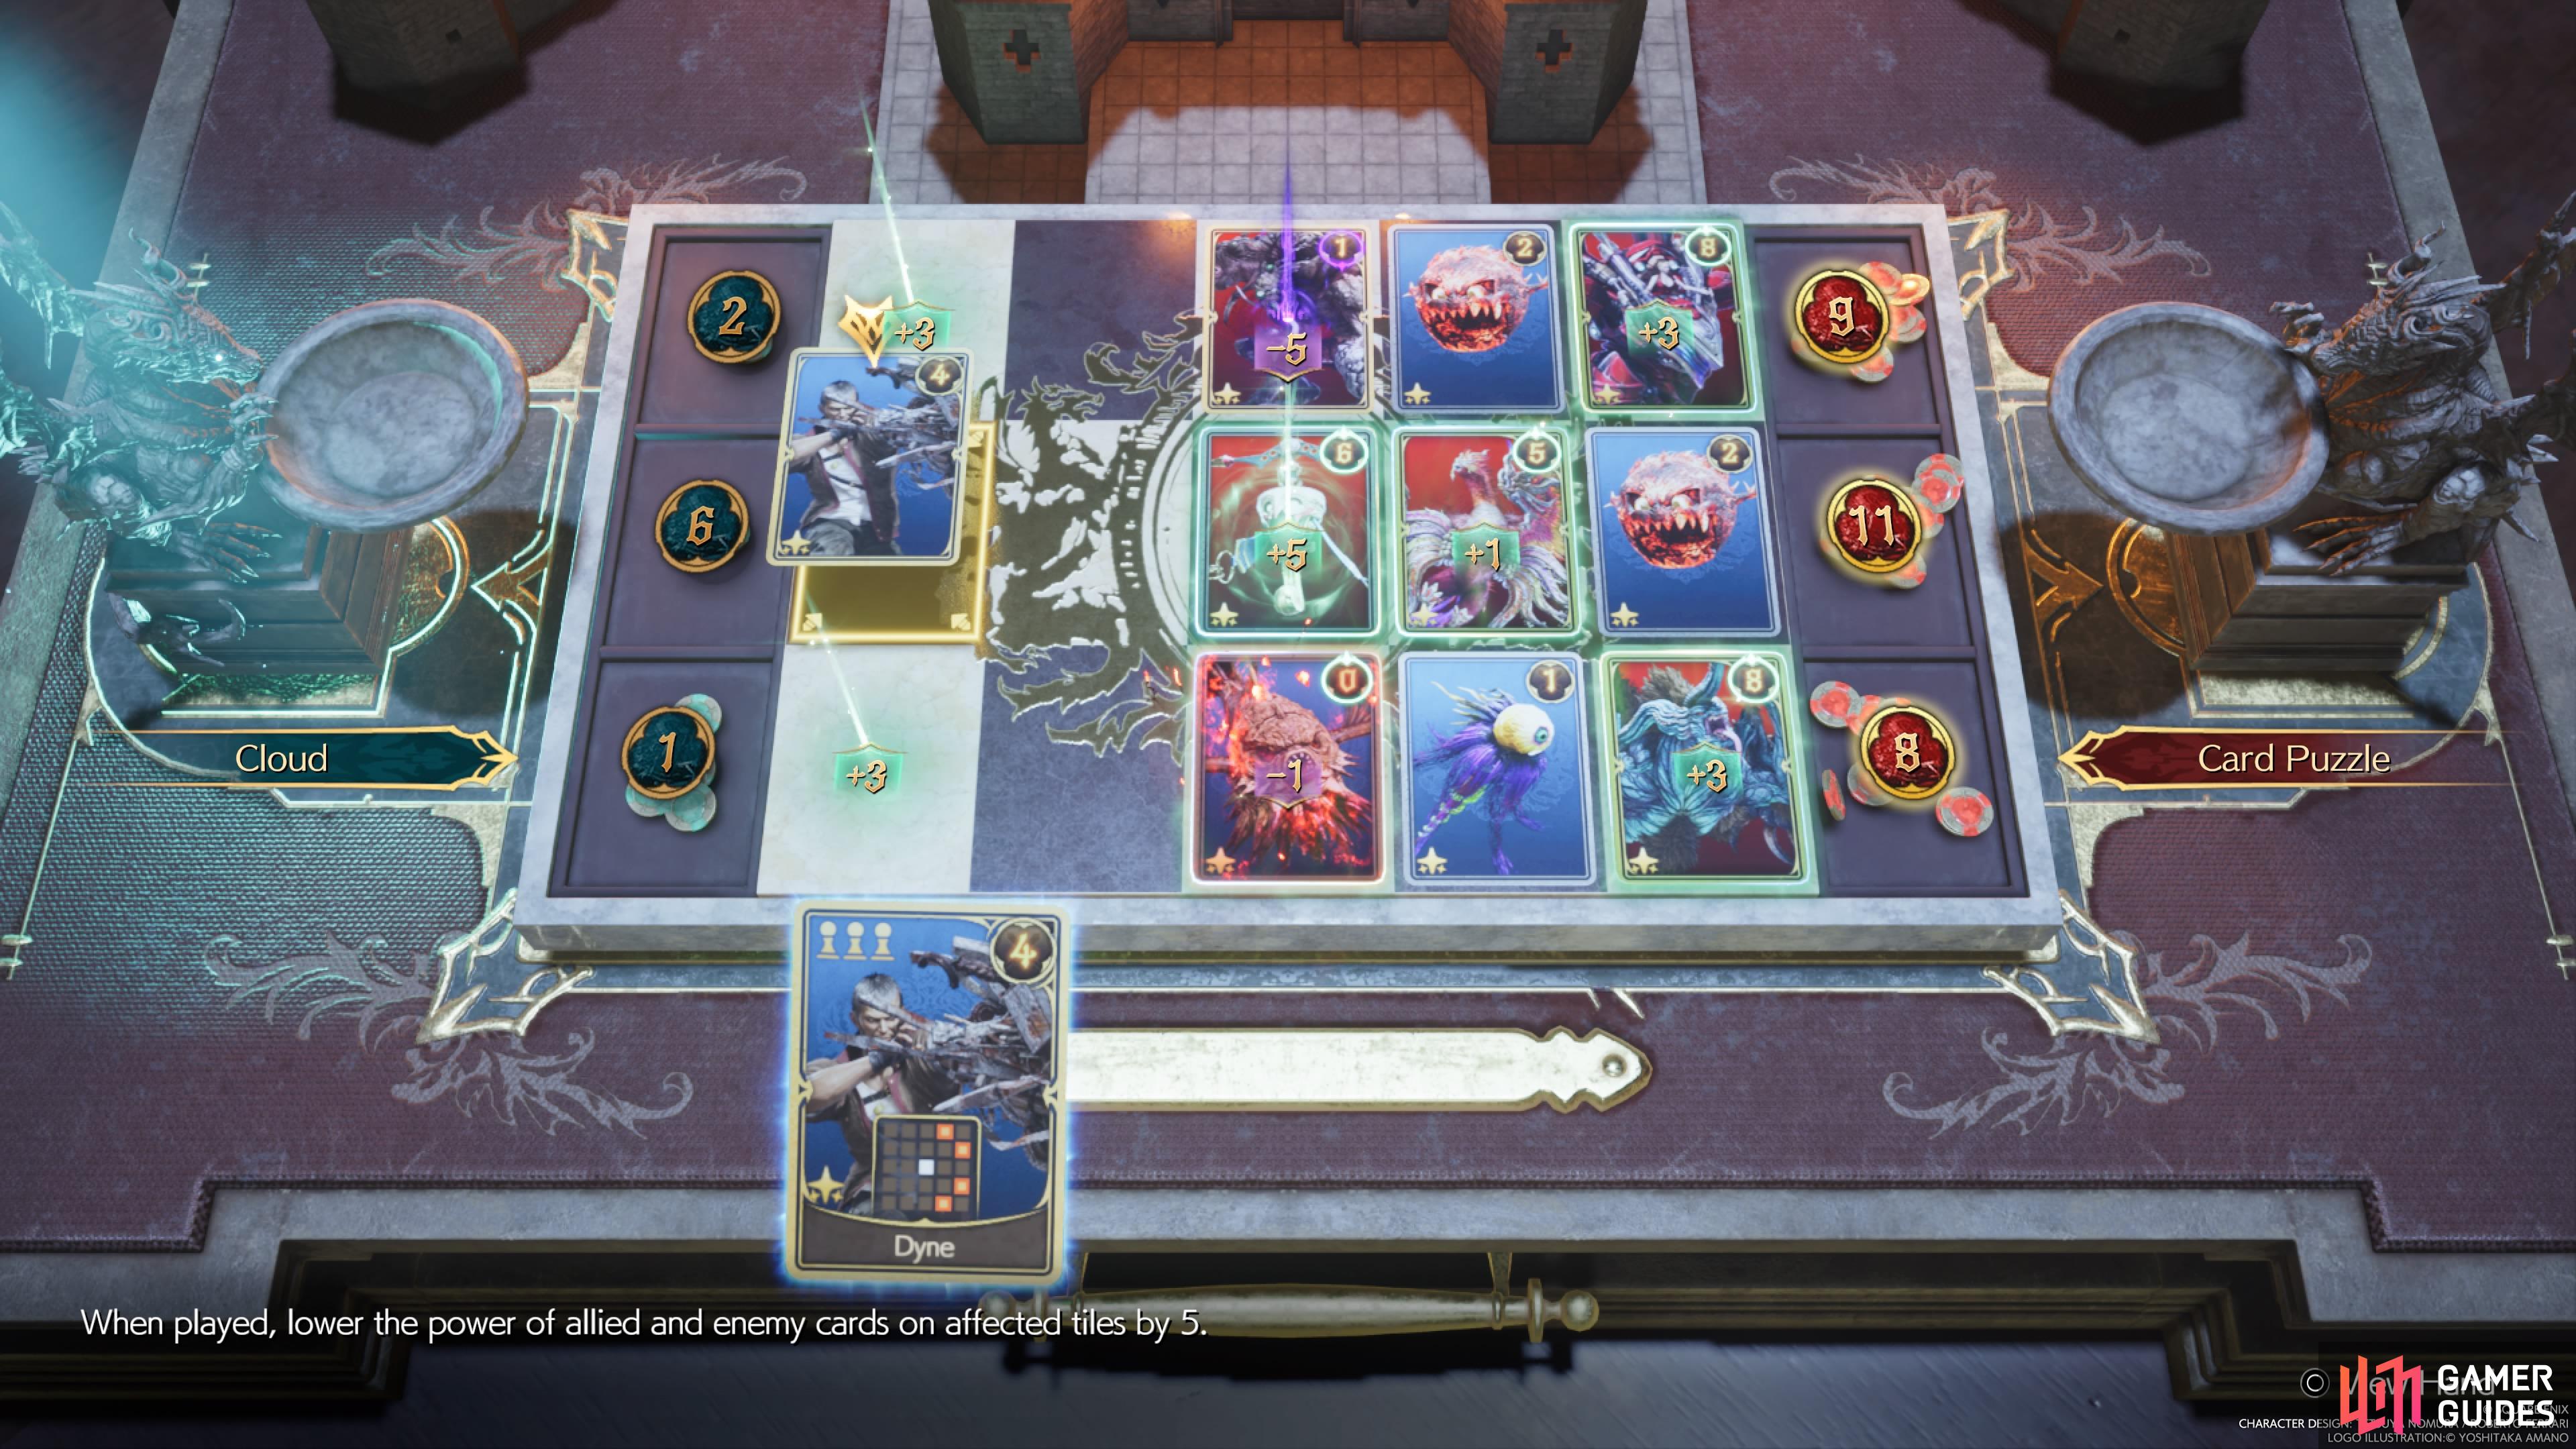
Set up your cards, except for Dyne, as shown here. (left), Once you do that, you can put Dyne here to cause a chain reaction that results in a win. (right)
From there, you can place the Scrutineye on the right side in the bottom row, then the Bloatfloat just to the left of the Scrutineye. That’s the setup, so the final piece will be putting the Dyne card on the left side, in the middle row. This will basically set off a chain reaction, with every single card on the board being destroyed, except for Dyne. That means you will win with just that card alone. If you’re curious about the chain reaction, here is what happens:
- Dyne destroys Bloatfloat, which debuffs the
 Materia Guardian
 - That card destroys the Bomb in the top row, as well as
 Specimen H1024
 - Bomb’s ability destroys/debuffs cards all around it, including the second Bomb
- Second Bomb destroys the rest of the cards, leaving only Dyne
Card Carnival - Curse of the Gi
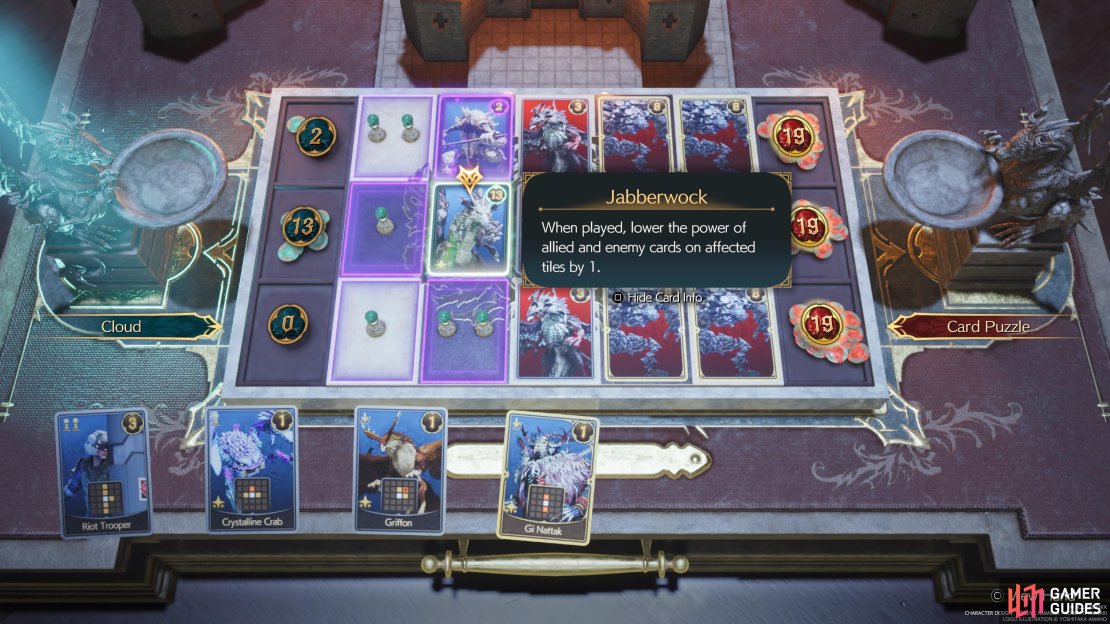
This puzzle certainly looks overwhelming, as the opponent has six ![]() Mythril Golem cards and three
Mythril Golem cards and three ![]() Quetzalcoatls on the board. You will have a
Quetzalcoatls on the board. You will have a ![]() Riot Trooper,
Riot Trooper, ![]() Crystalline Crab,
Crystalline Crab, ![]() Desert Sahagin,
Desert Sahagin, ![]() Sandhog Pie,
Sandhog Pie, ![]() Griffon, Jabberwock, and Gi Nattak. The last two cards are the keys to solving this puzzle, by the way, so they are going to be important. Your first move is placing the Sandhog Pie in the middle row, and the Desert Sahagin on the right in the top row.
Griffon, Jabberwock, and Gi Nattak. The last two cards are the keys to solving this puzzle, by the way, so they are going to be important. Your first move is placing the Sandhog Pie in the middle row, and the Desert Sahagin on the right in the top row.


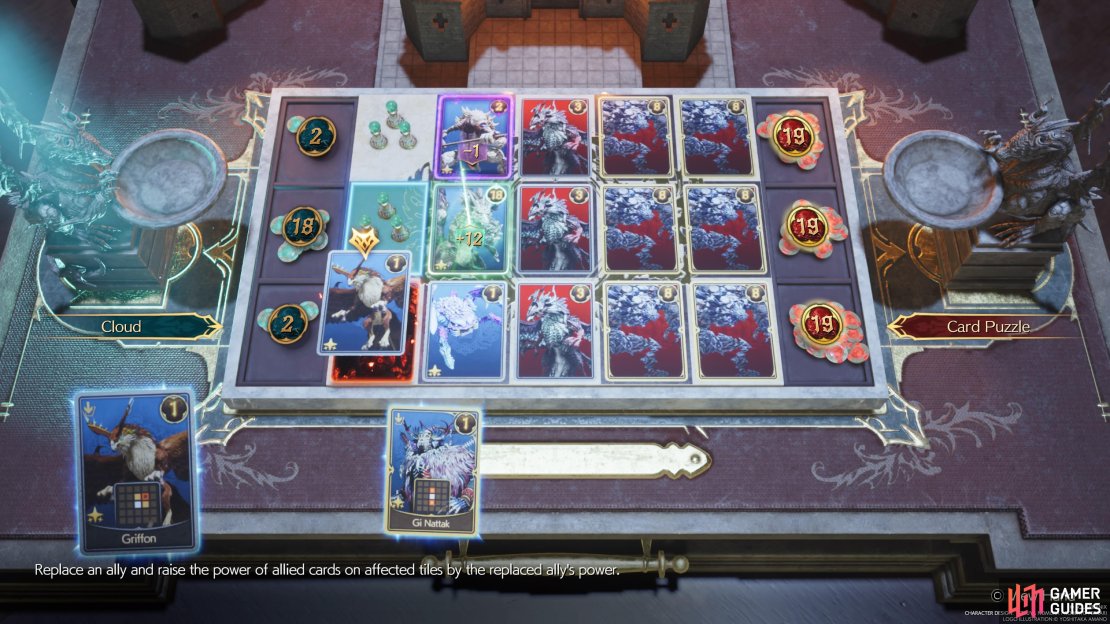
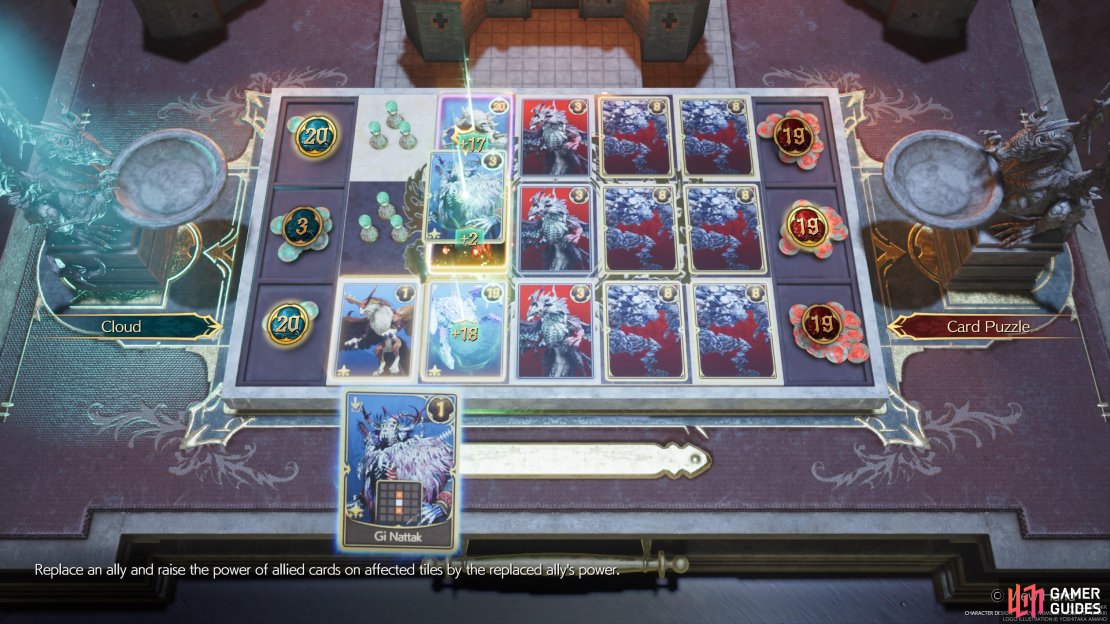
Put the Jabberwock to the right of the Sandhog Pie, which will cause the Jabberwock to get buffed to 13 power. Now, place the Crystalline Crab just below the Jabberwock to buff it more, and the Riot Trooper in the lower left corner. The Griffon will replace the Riot Trooper, putting the Jabberwock at 18 power. The last thing to do now is replace the Jabberwock with the Gi Nattak card, which will power up both the Desert Sahagin and Crystalline Crab. This will put your top and bottom rows at 20 points, allowing you to win.
Collector’s Card: Cloud
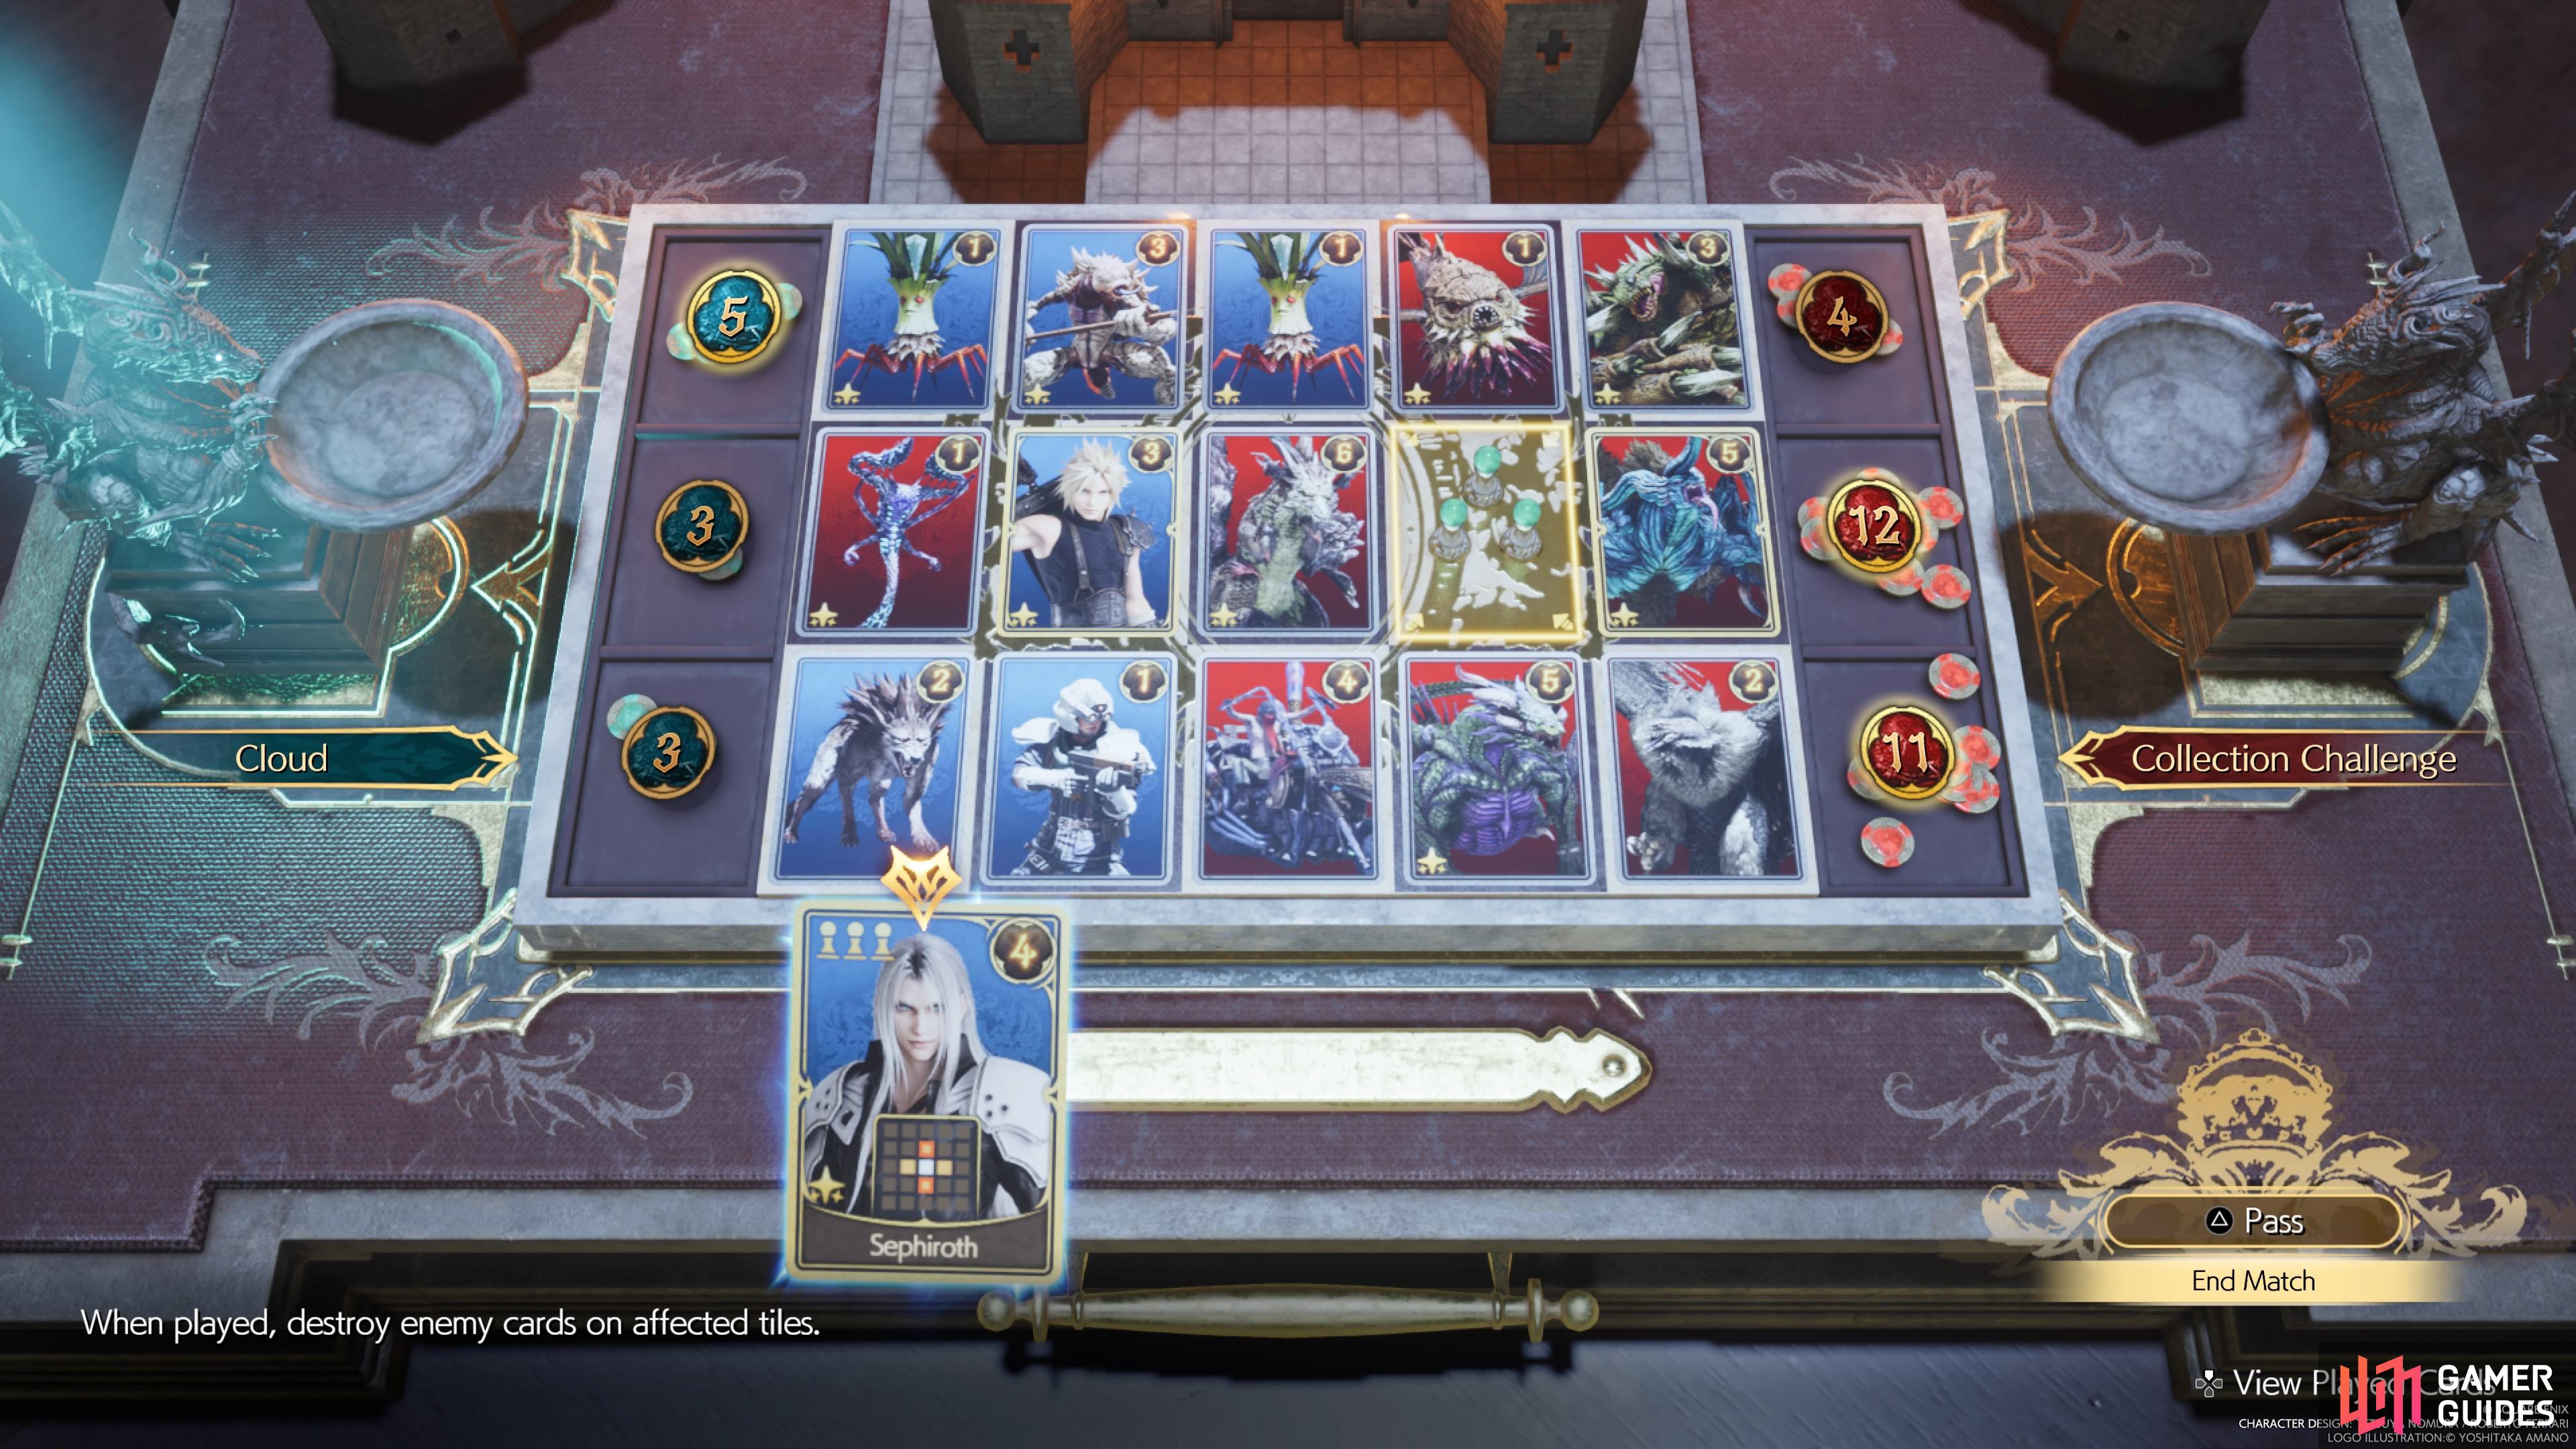
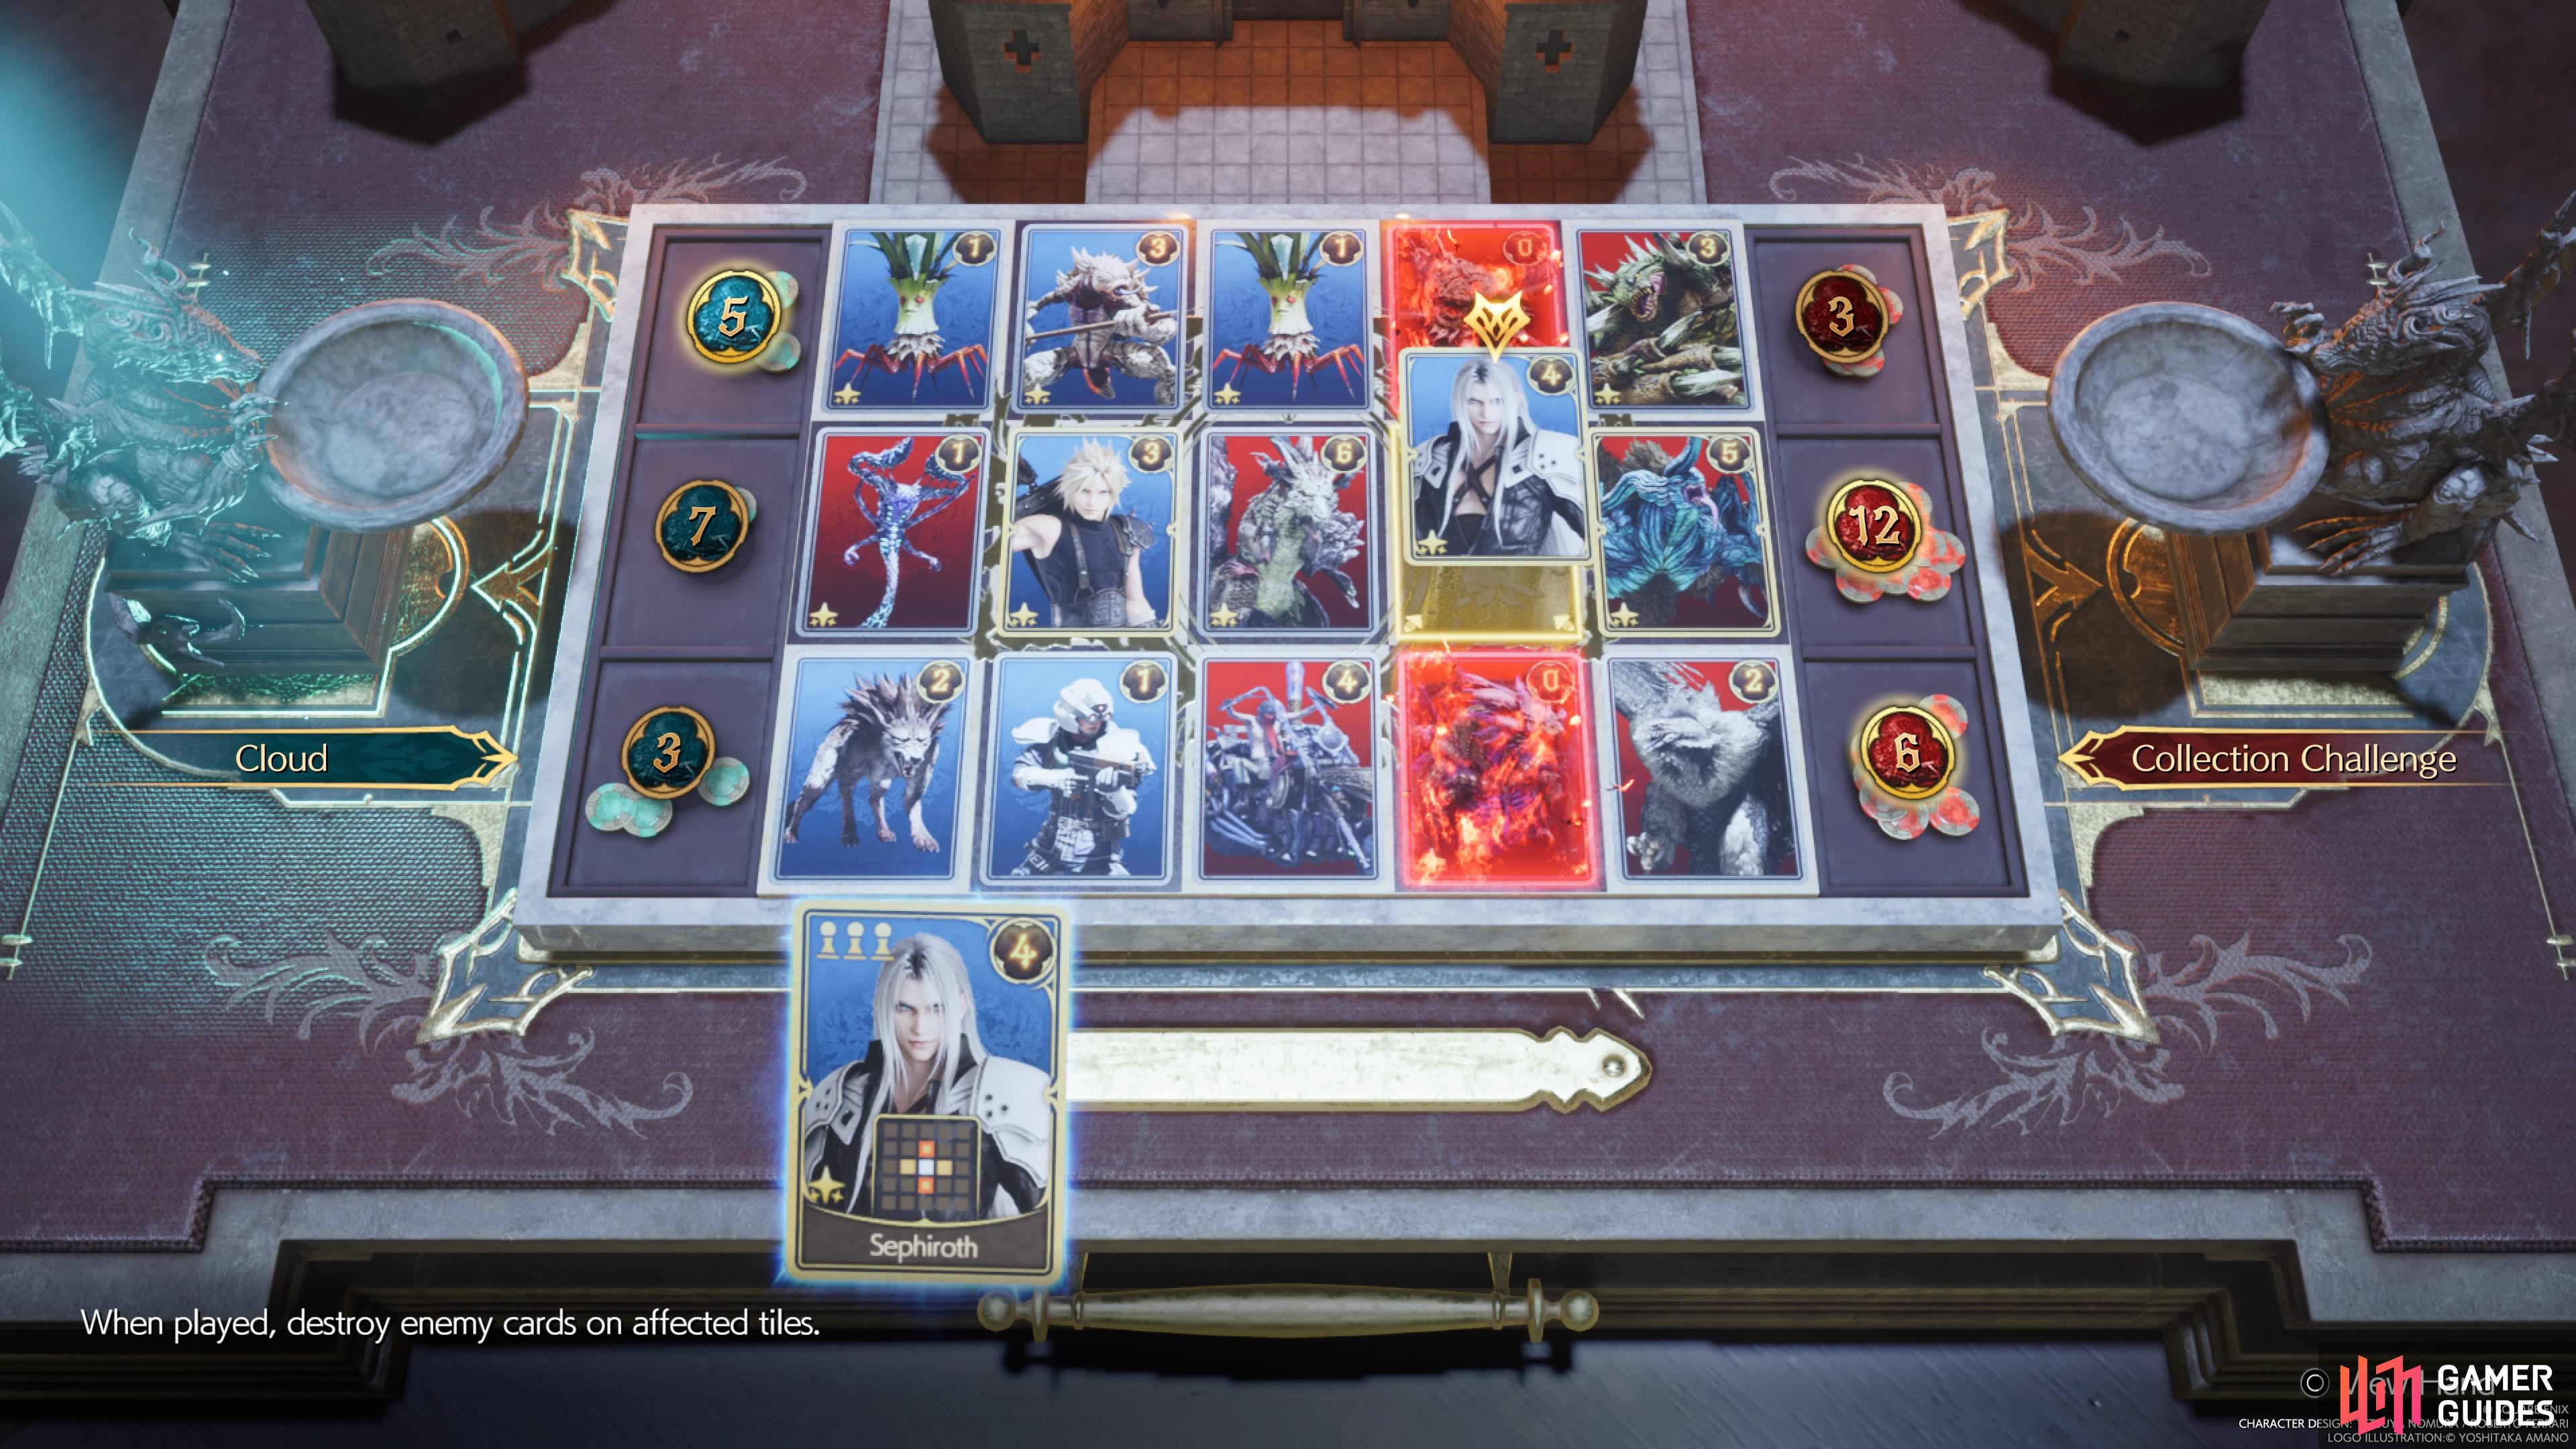
The goal of this challenge is to get the Cloud card to 7 power, which will then buff all other allied cards around it. You only have three spots in which to play the three cards in your hand. Start by placing the Security Officer in the bottom row, which will allow you to put Cloud right above it. The only move left is to put Sephiroth in the last spot remaining on the board. He will destroy the Bloatfloat (and Dragon, but that won’t do anything), which will enfeeble the Desert Sahagin and give four power to Cloud.

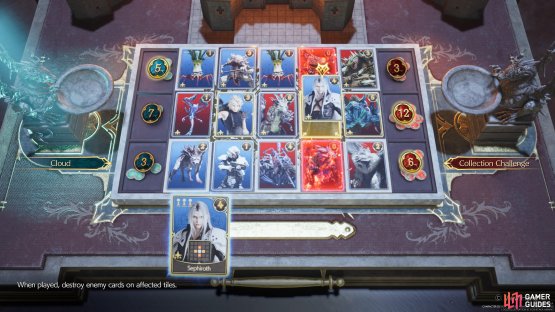
(1 of 2) Place the Security Officer and Cloud cards down as your first moves.
Place the Security Officer and Cloud cards down as your first moves. (left), The Sephiroth card will be put down last to trigger abilities. (right)
This will give Cloud the four power needed to give him seven altogether, which in turn will buff all allied cards around him. That will give you the points to just eek out a victory.
Collector’s Card: Barret
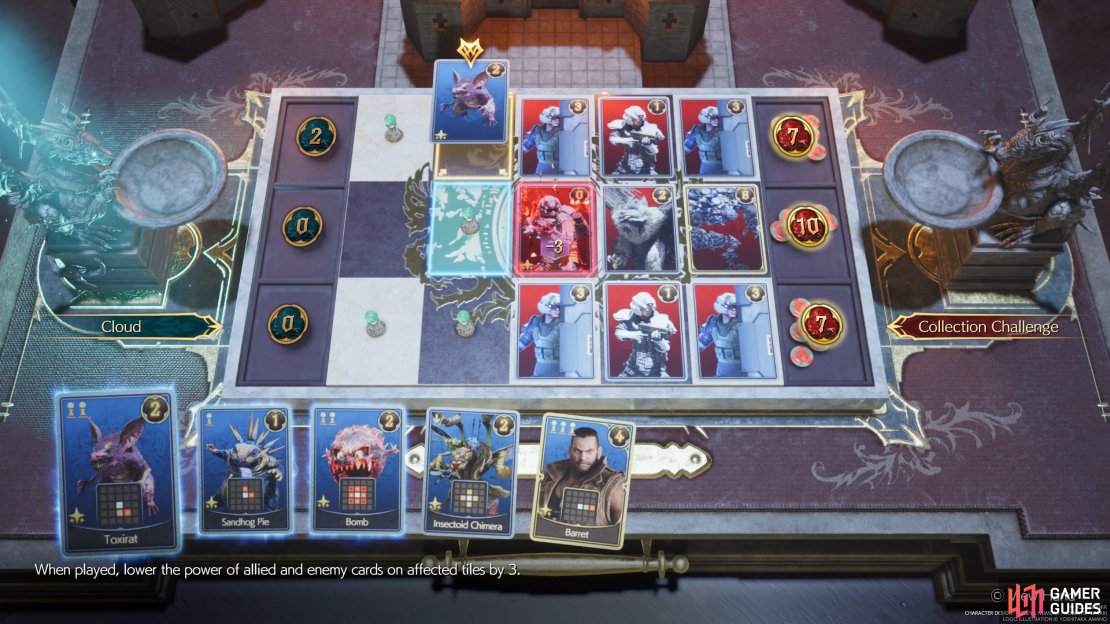
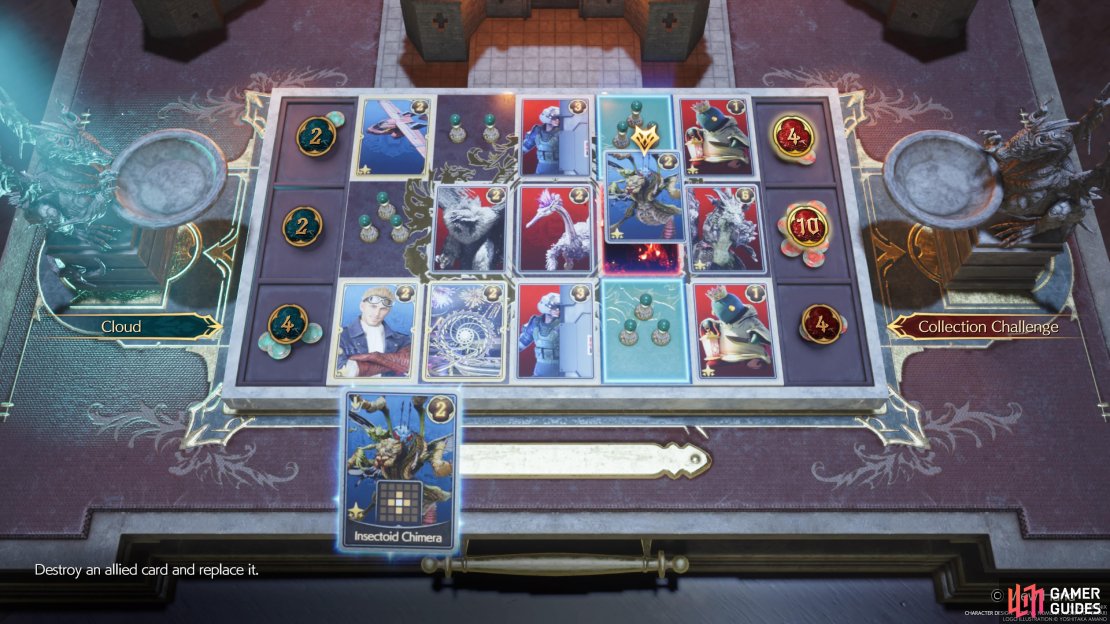
The focal point of this challenge is to use the Barret card to enfeeble an enemy, specifically, the Mythril Golem. You have a ![]() Toxirat, Sandhog Pie, Bomb,
Toxirat, Sandhog Pie, Bomb, ![]() Insectoid Chimera, and the Barret cards in your hand. Start by playing the Toxirat on the two-pawn tile. This will destroy the Flametrooper, which will then destroy the three cards in the column to the right of it. For the next move, place the Sandhog Pie in the bottom row, on the right, then put the Bomb in between the Toxirat and Sandhog Pie.
Insectoid Chimera, and the Barret cards in your hand. Start by playing the Toxirat on the two-pawn tile. This will destroy the Flametrooper, which will then destroy the three cards in the column to the right of it. For the next move, place the Sandhog Pie in the bottom row, on the right, then put the Bomb in between the Toxirat and Sandhog Pie.
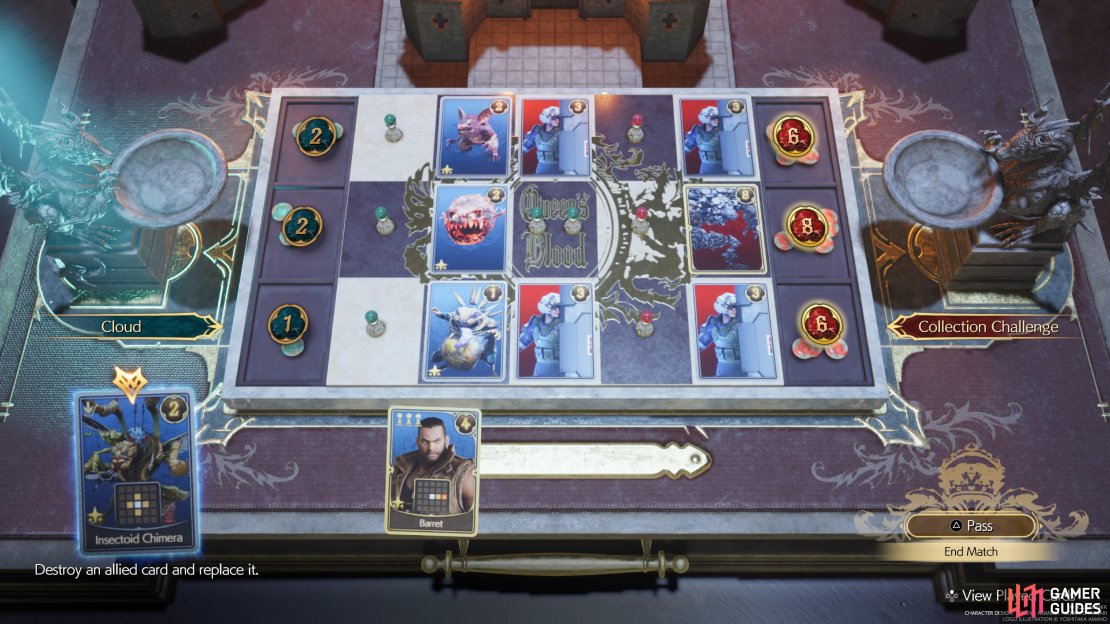
(1 of 4) The Toxirat will be your first move, so place it on the spot shown.
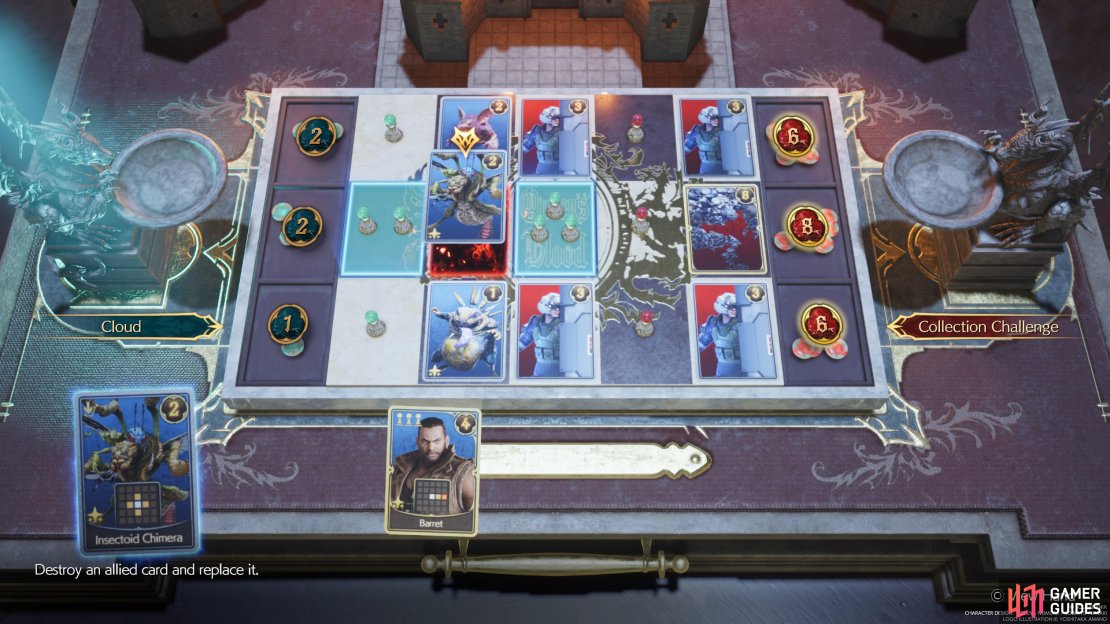
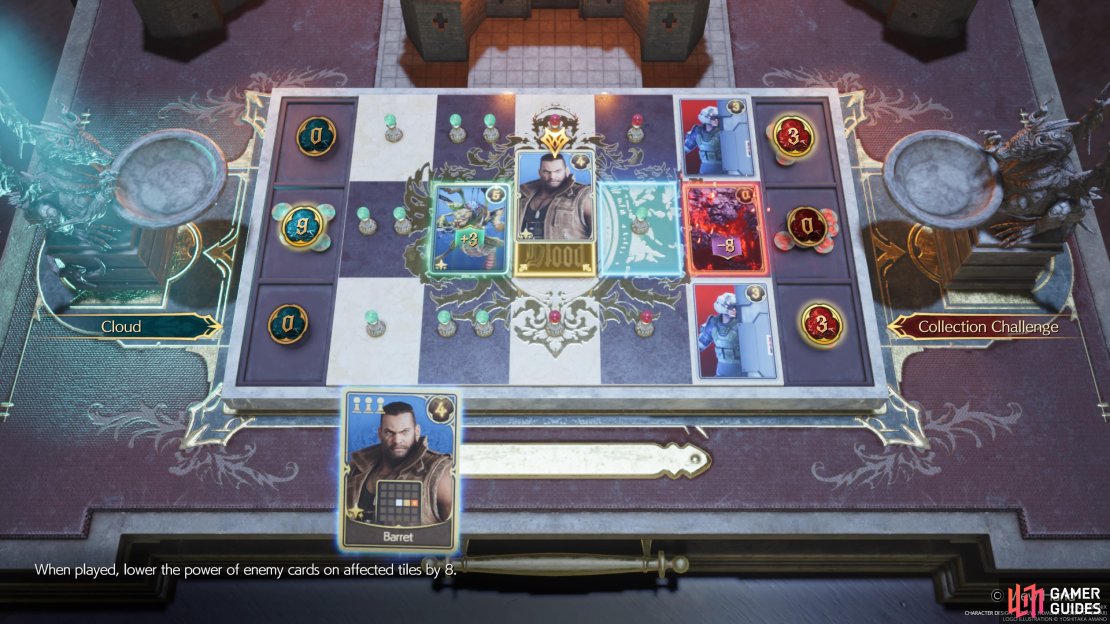
Take your Insectoid ![]() Chimera now and replace the Bomb with it, triggering the latter’s ability to enfeeble/destroy the cards around it. So, this will destroy all cards on the field, except the rightmost column and the Chimera. It will also create a three-pawn tile to the right of the Chimera, which is where you will place the Barret card. This destroys the Mythril Golem and gets you enough points to win.
Chimera now and replace the Bomb with it, triggering the latter’s ability to enfeeble/destroy the cards around it. So, this will destroy all cards on the field, except the rightmost column and the Chimera. It will also create a three-pawn tile to the right of the Chimera, which is where you will place the Barret card. This destroys the Mythril Golem and gets you enough points to win.
Collector’s Card: Tifa
The enemy has two ![]() Maloceros cards, which have the ability to give an extra ten points to a lane whenever they win it. You will have the
Maloceros cards, which have the ability to give an extra ten points to a lane whenever they win it. You will have the ![]() Cactuar,
Cactuar, ![]() Deathwheel,
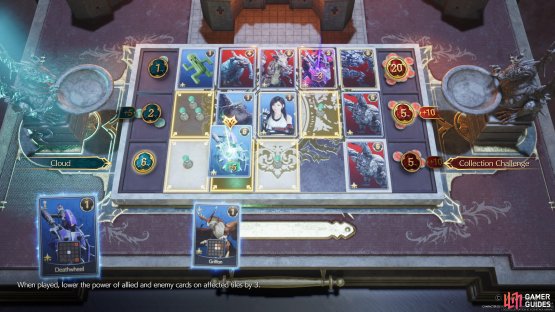
Deathwheel, ![]() Spearhawk, Tifa, and Griffon cards in your hand. The first two moves will be to place the Cactuar card in the upper left corner, then place the Spearhawk below the opponent’s
Spearhawk, Tifa, and Griffon cards in your hand. The first two moves will be to place the Cactuar card in the upper left corner, then place the Spearhawk below the opponent’s ![]() Elphadunk. Place Tifa to the right of the Spearhawk, then the Deathwheel below the Spearhawk. Now, two things will happen here, as the Deathwheel will enfeeble the opponent’s Crimson Mare Mk. II card.
Elphadunk. Place Tifa to the right of the Spearhawk, then the Deathwheel below the Spearhawk. Now, two things will happen here, as the Deathwheel will enfeeble the opponent’s Crimson Mare Mk. II card.
(1 of 2) Place all of the cards as shown here, saving the Griffon for last.

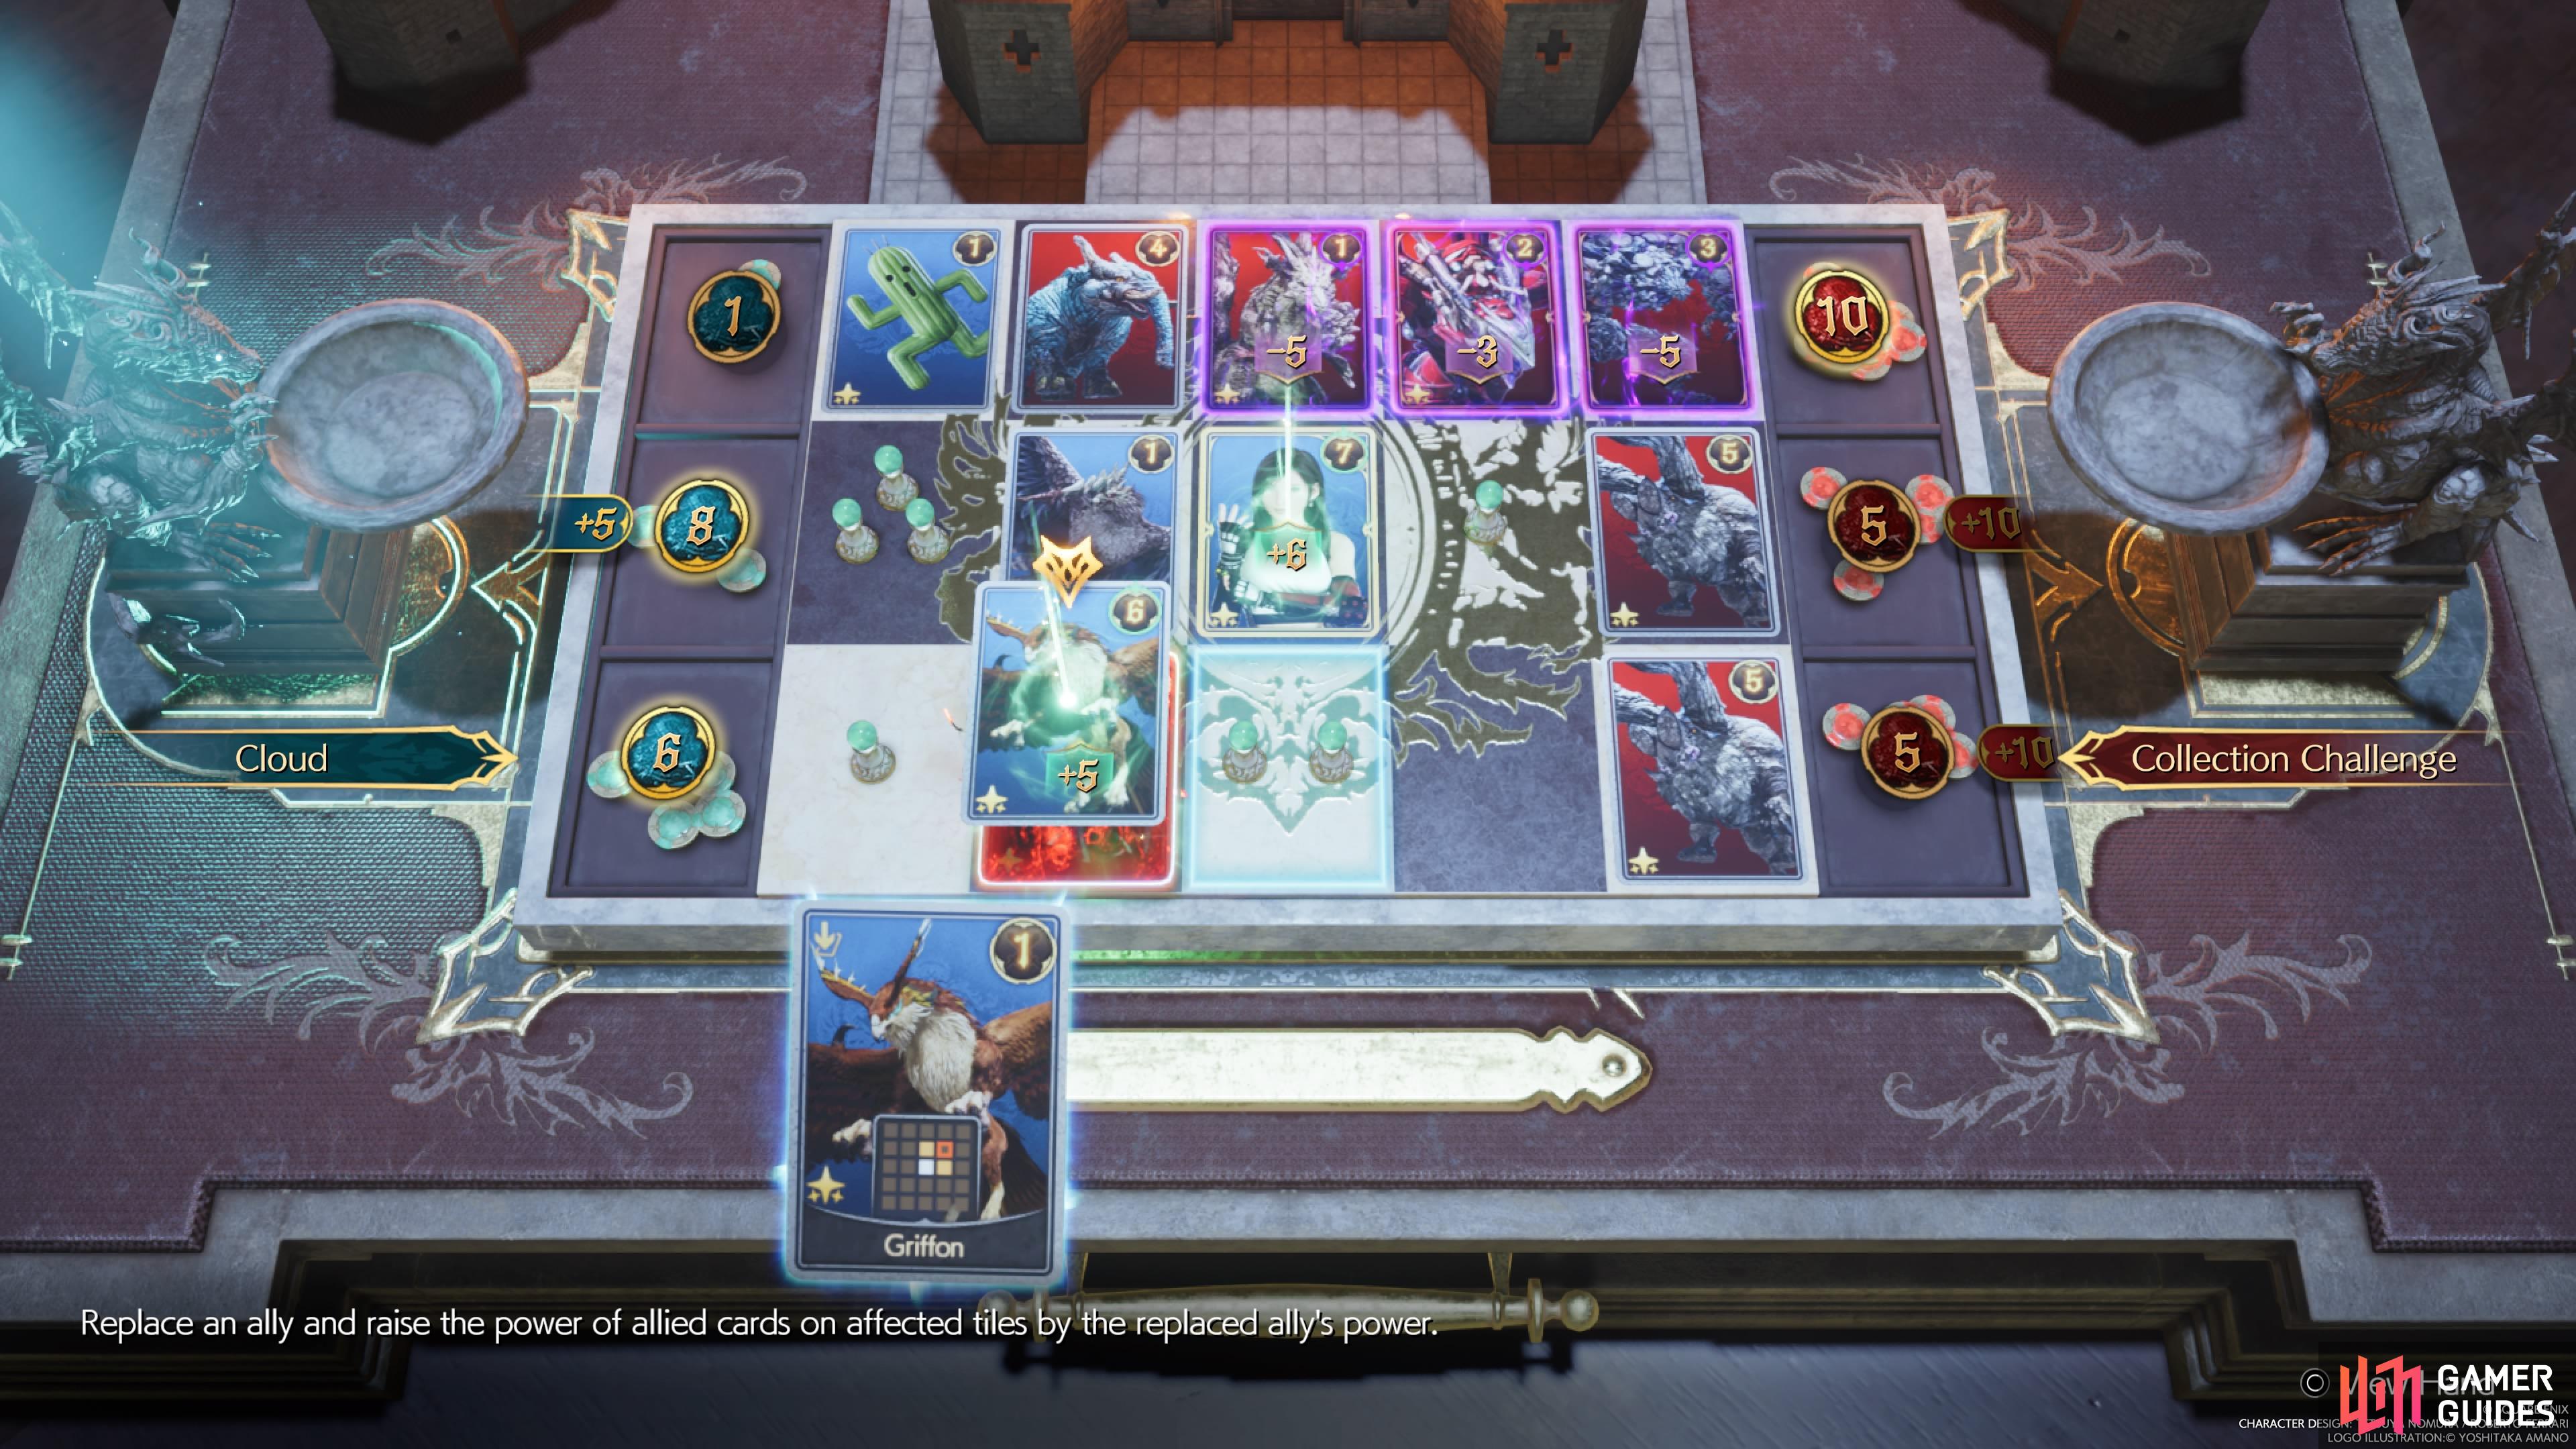
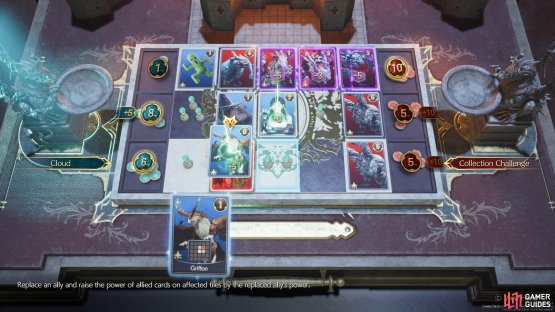
Place all of the cards as shown here, saving the Griffon for last. (left), Replace the Deathwheel with the Griffon to complete the puzzle. (right)
In turn, this will trigger its ability, which will enfeeble the two cards to the left and right of it (both your opponent’s cards, too). The Deathwheel will also gain a boost from the first two cards you played, so its power will be six now. The last move will be to replace the Deathwheel with your Griffon, keeping the same power and also giving Tifa an extra six power. You will win the middle and bottom rows, which are enough to complete the puzzle.
Collector’s Card: Aerith
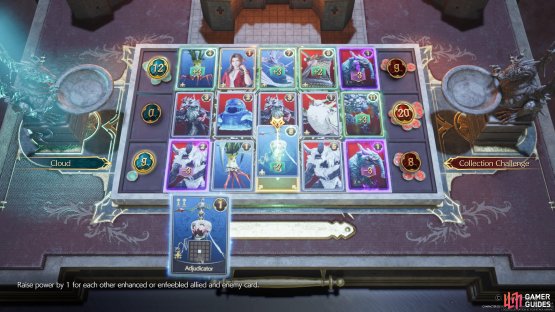
You start with four cards in your hand, but there are only three open slots on the board. The cards you get are a ![]() Mandragora, an Adjudicator, Aerith, and Leviathan. Begin by placing Aerith on the left of the two open slots in the top row, then place Leviathan next to her. This card will receive a boost from Aerith, while also enfeebling five enemy cards, destroying two in the process. Place the Mandragora to the left of Aerith, spawning a minion card of it in your hand.
Mandragora, an Adjudicator, Aerith, and Leviathan. Begin by placing Aerith on the left of the two open slots in the top row, then place Leviathan next to her. This card will receive a boost from Aerith, while also enfeebling five enemy cards, destroying two in the process. Place the Mandragora to the left of Aerith, spawning a minion card of it in your hand.

(1 of 2) Put the Aerith card first, then place Leviathan to the right of it.
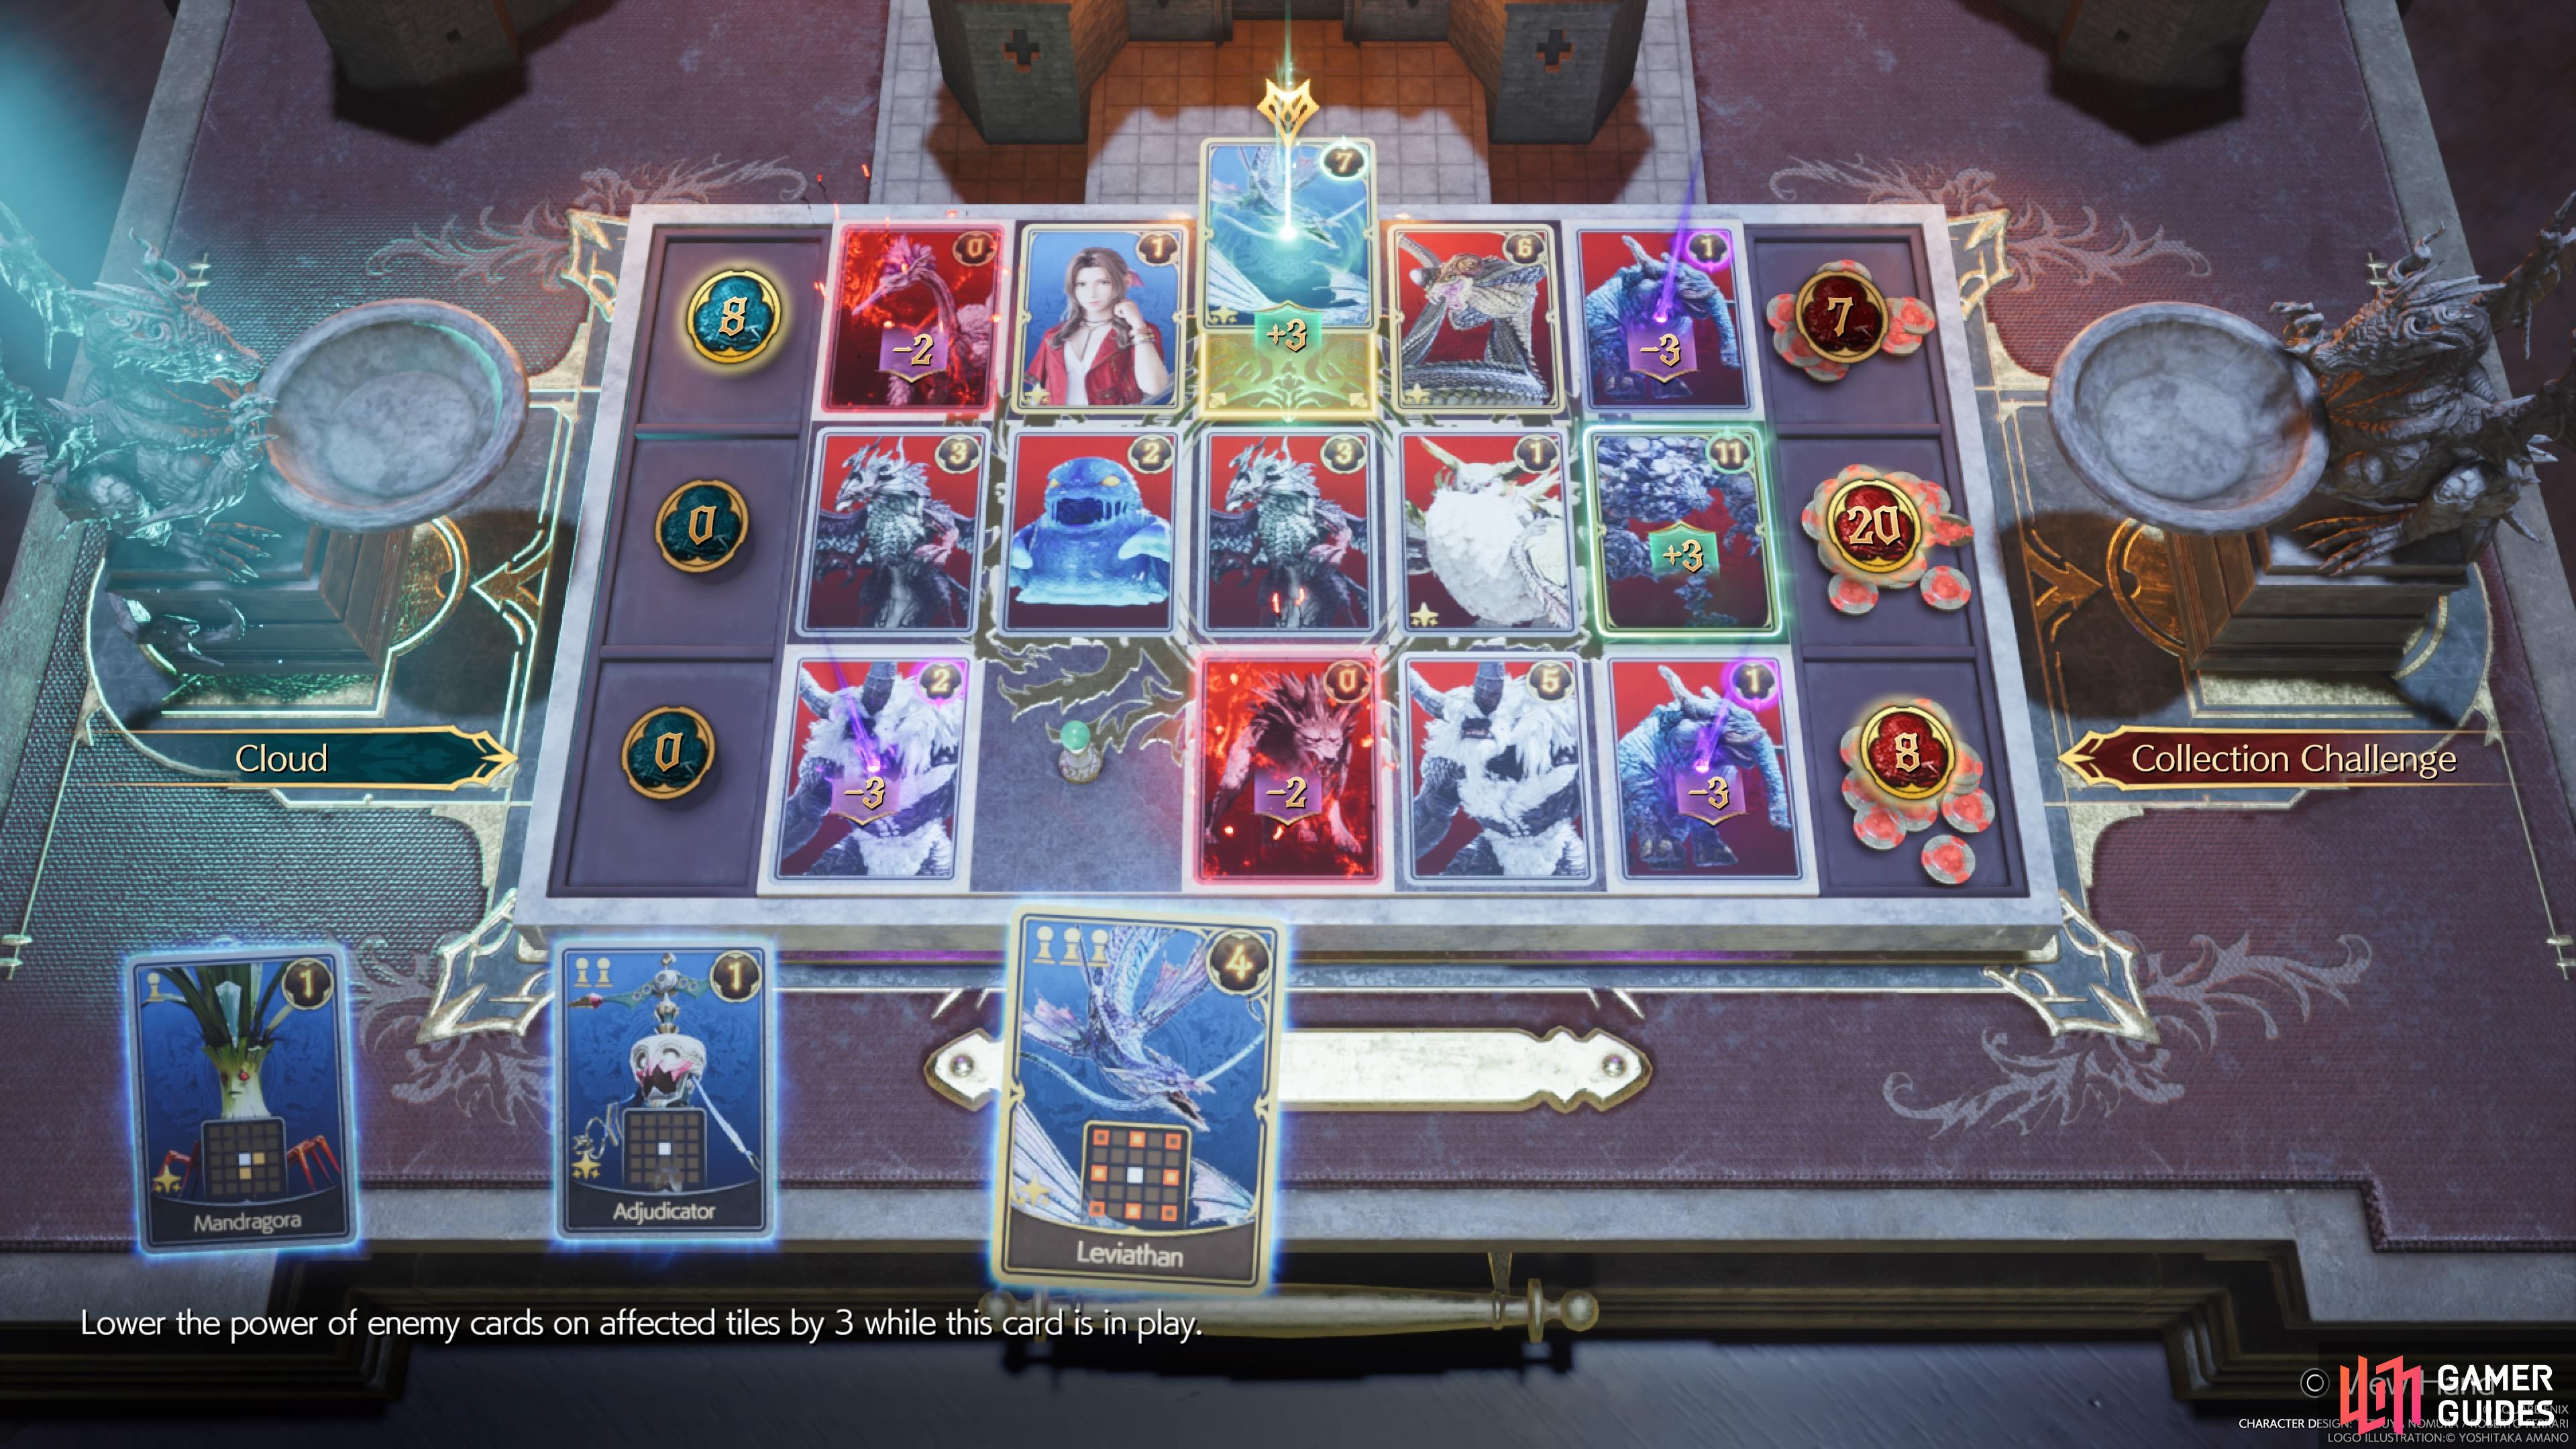
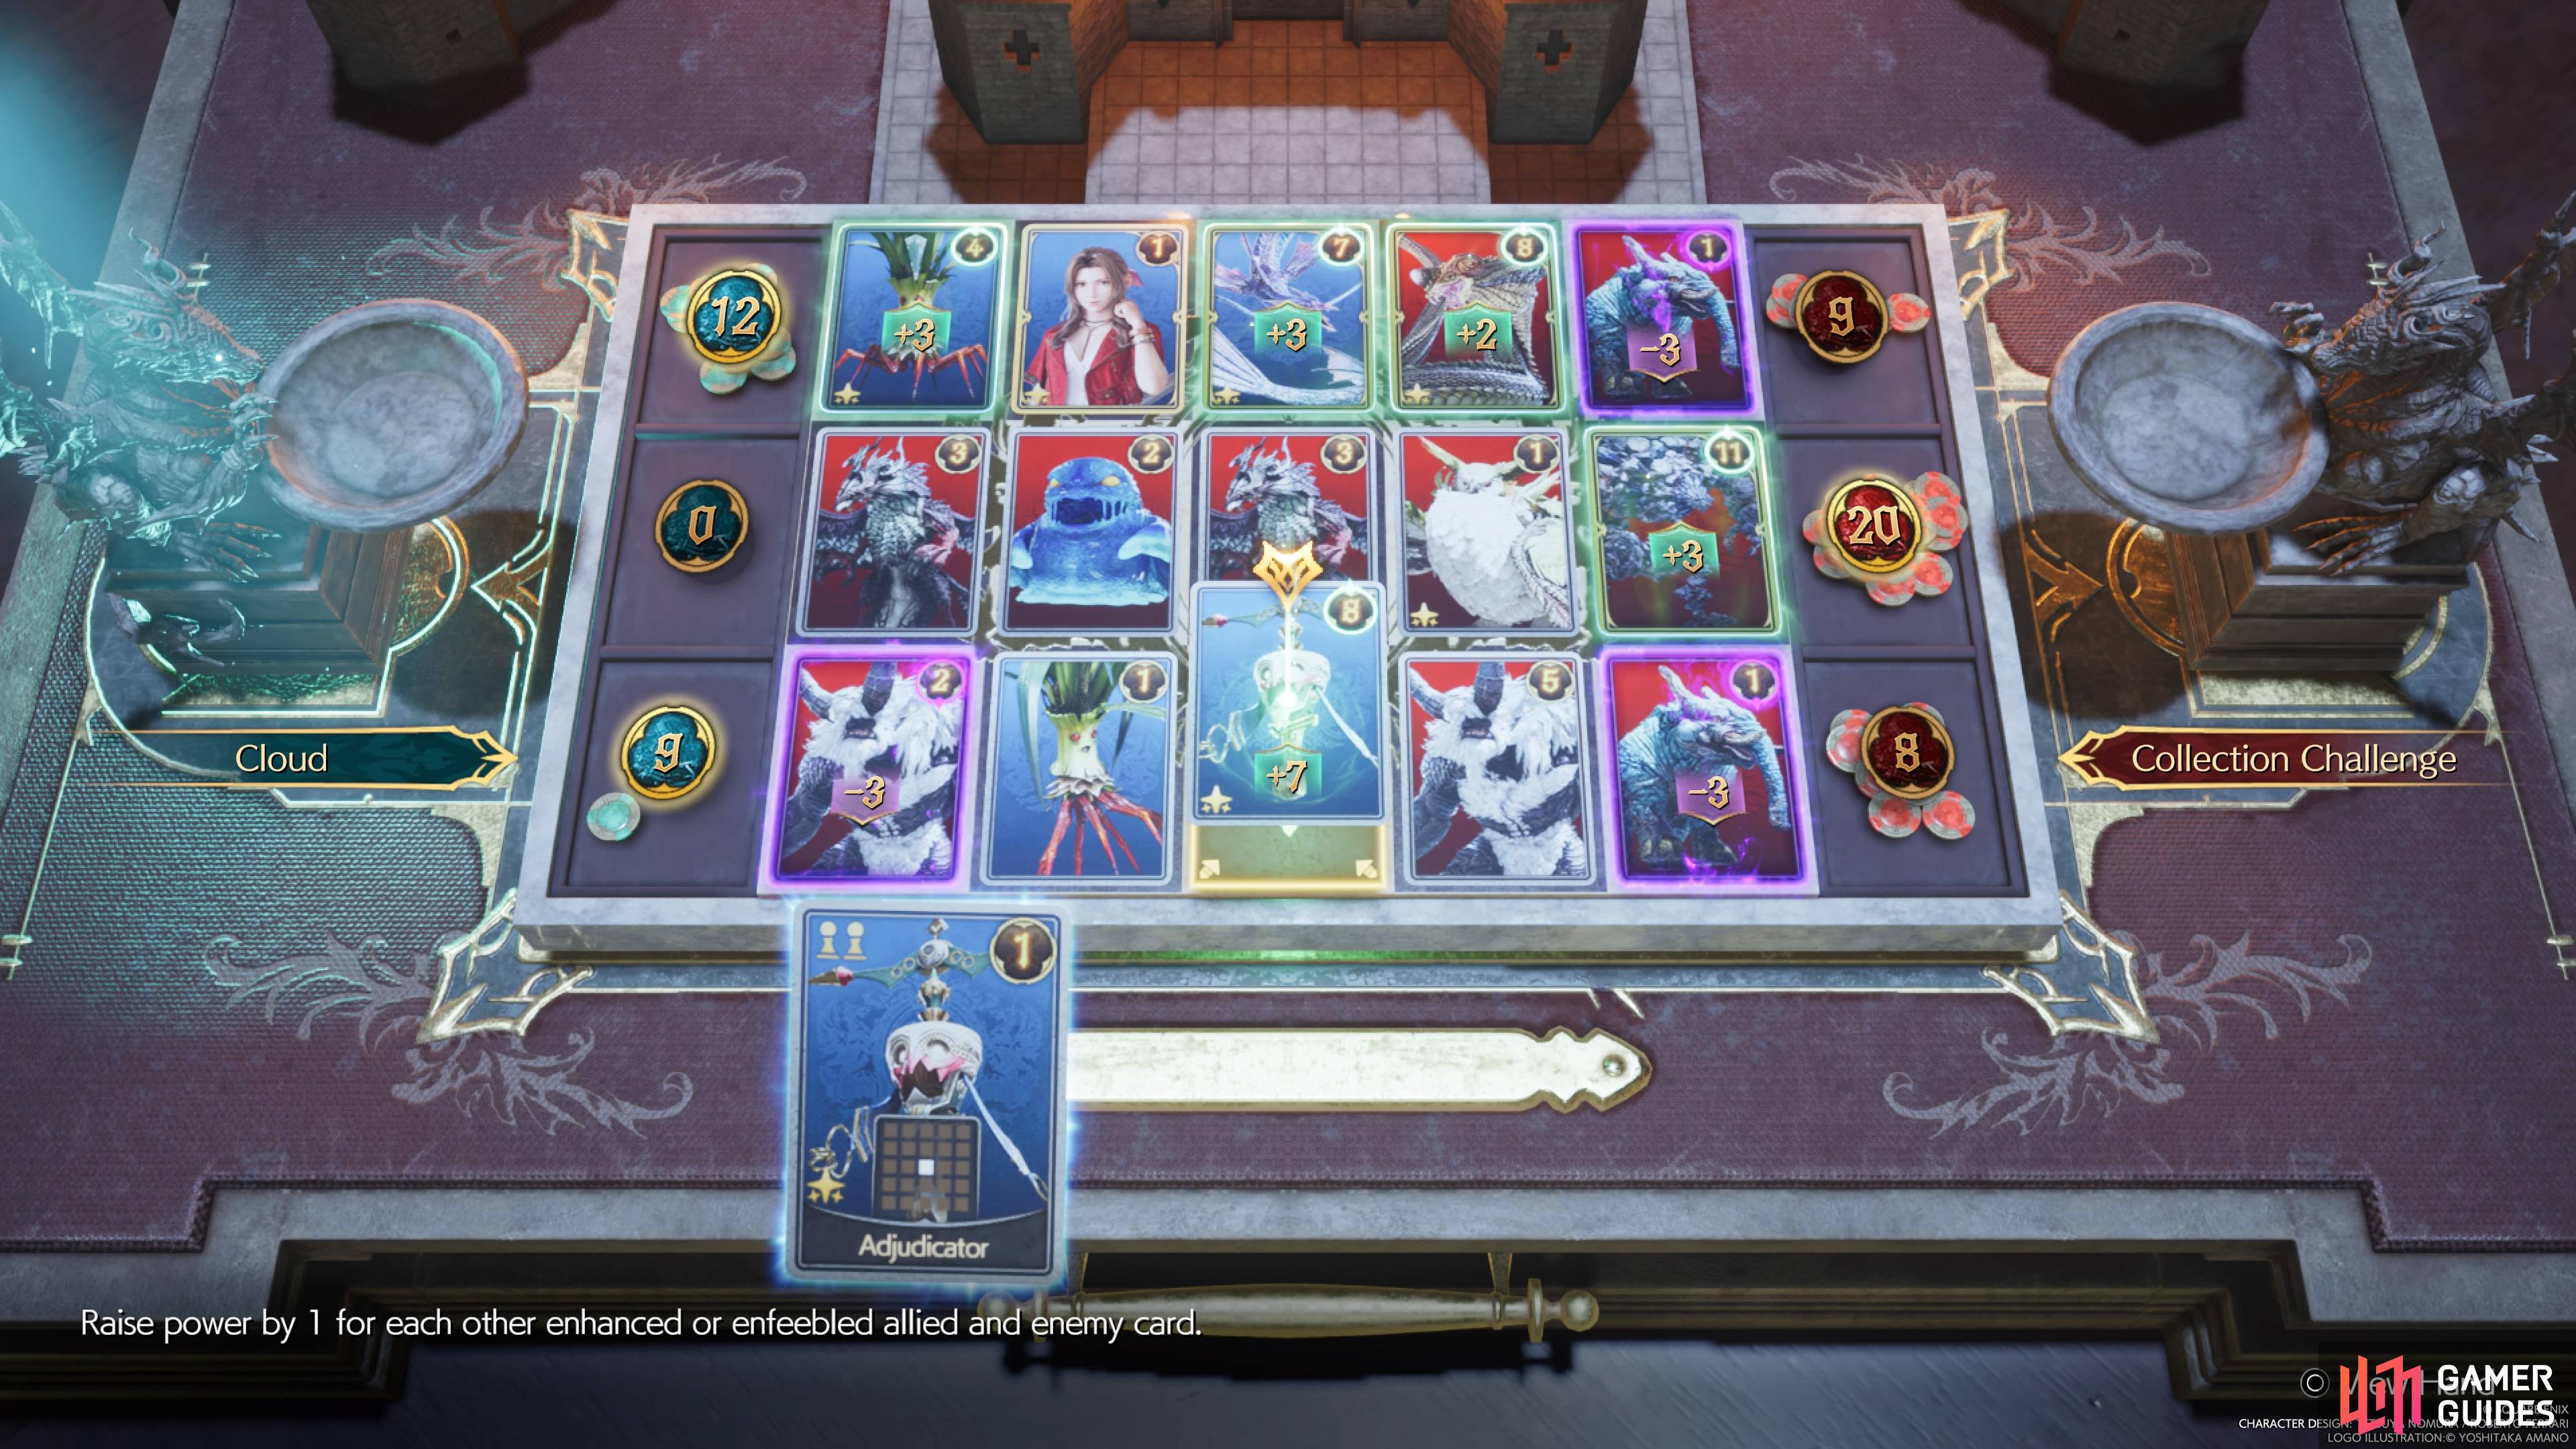
Put the Aerith card first, then place Leviathan to the right of it. (left), The rest of the cards will go as shown in the screenshot. (right)
There are only two more cards in your hand, and two open spots left on the board. Put the Mandragora Minion in the left of the two slots in the bottom row, then the Adjudicator in the final one. This card receives a bonus power for each enfeebled/enhanced card on the board, no matter if it’s an allied or enemy card. Since there should be seven cards that fall under that, it gets a big boost. This will get you enough points to just eek out a win.
Collector’s Card: Red XIII
This is a bit of a complicated puzzle, although it’s not too bad once you realize what you’re doing. You have five cards in your hand, which are a Sandhog Pie, two ![]() Stone Golems,
Stone Golems, ![]() Red XIII, and a Gi Specter. Start off by placing the Sandhog Pie in the middle row, which will open up a spot to the right of it, as well as above it. This is where you will put the two
Red XIII, and a Gi Specter. Start off by placing the Sandhog Pie in the middle row, which will open up a spot to the right of it, as well as above it. This is where you will put the two ![]() Stone Golems, so do that now.
Stone Golems, so do that now.
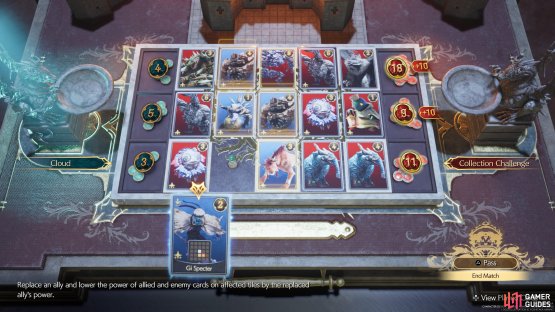
(1 of 2) Lay out all of the cards as shown, except for the Gi Specter.


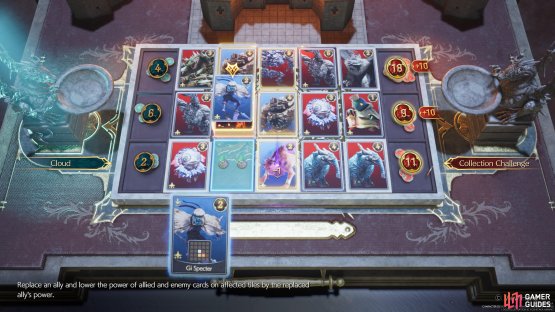
Lay out all of the cards as shown, except for the Gi Specter. (left), The Gi Specter will replace the Sandhog Pie one. (right)
With that out of the way, you can place Red XIII underneath Stone Golem in the middle row. That’s all of the pieces set up now, so it’s time to set off a chain reaction. Replace the Sandhog Pie with the Gi Specter, which will trigger both Red XIII’s ability, as well as the Sandhog Pie’s ability. The latter will then buff the Stone Golems, as well as trigger their abilities. After all is said and done, you will now have more points and the win.
Collector’s Card: Yuffie
There are a few ways to win this battle, although the deviations aren’t all too different. Start by placing the two ![]() Skeeskee cards on the leftmost column. It actually doesn’t matter which tiles you put them on, as any of them will actually work. Once you do that, you can then start placing cards in the middle column. The Spearhawk goes at the top, the Crystalline Crab on the bottom, and the Bomb in the middle.
Skeeskee cards on the leftmost column. It actually doesn’t matter which tiles you put them on, as any of them will actually work. Once you do that, you can then start placing cards in the middle column. The Spearhawk goes at the top, the Crystalline Crab on the bottom, and the Bomb in the middle.


(1 of 2) All of the cards can be put in the spots as shown, with the Yuffie card being saved for last.
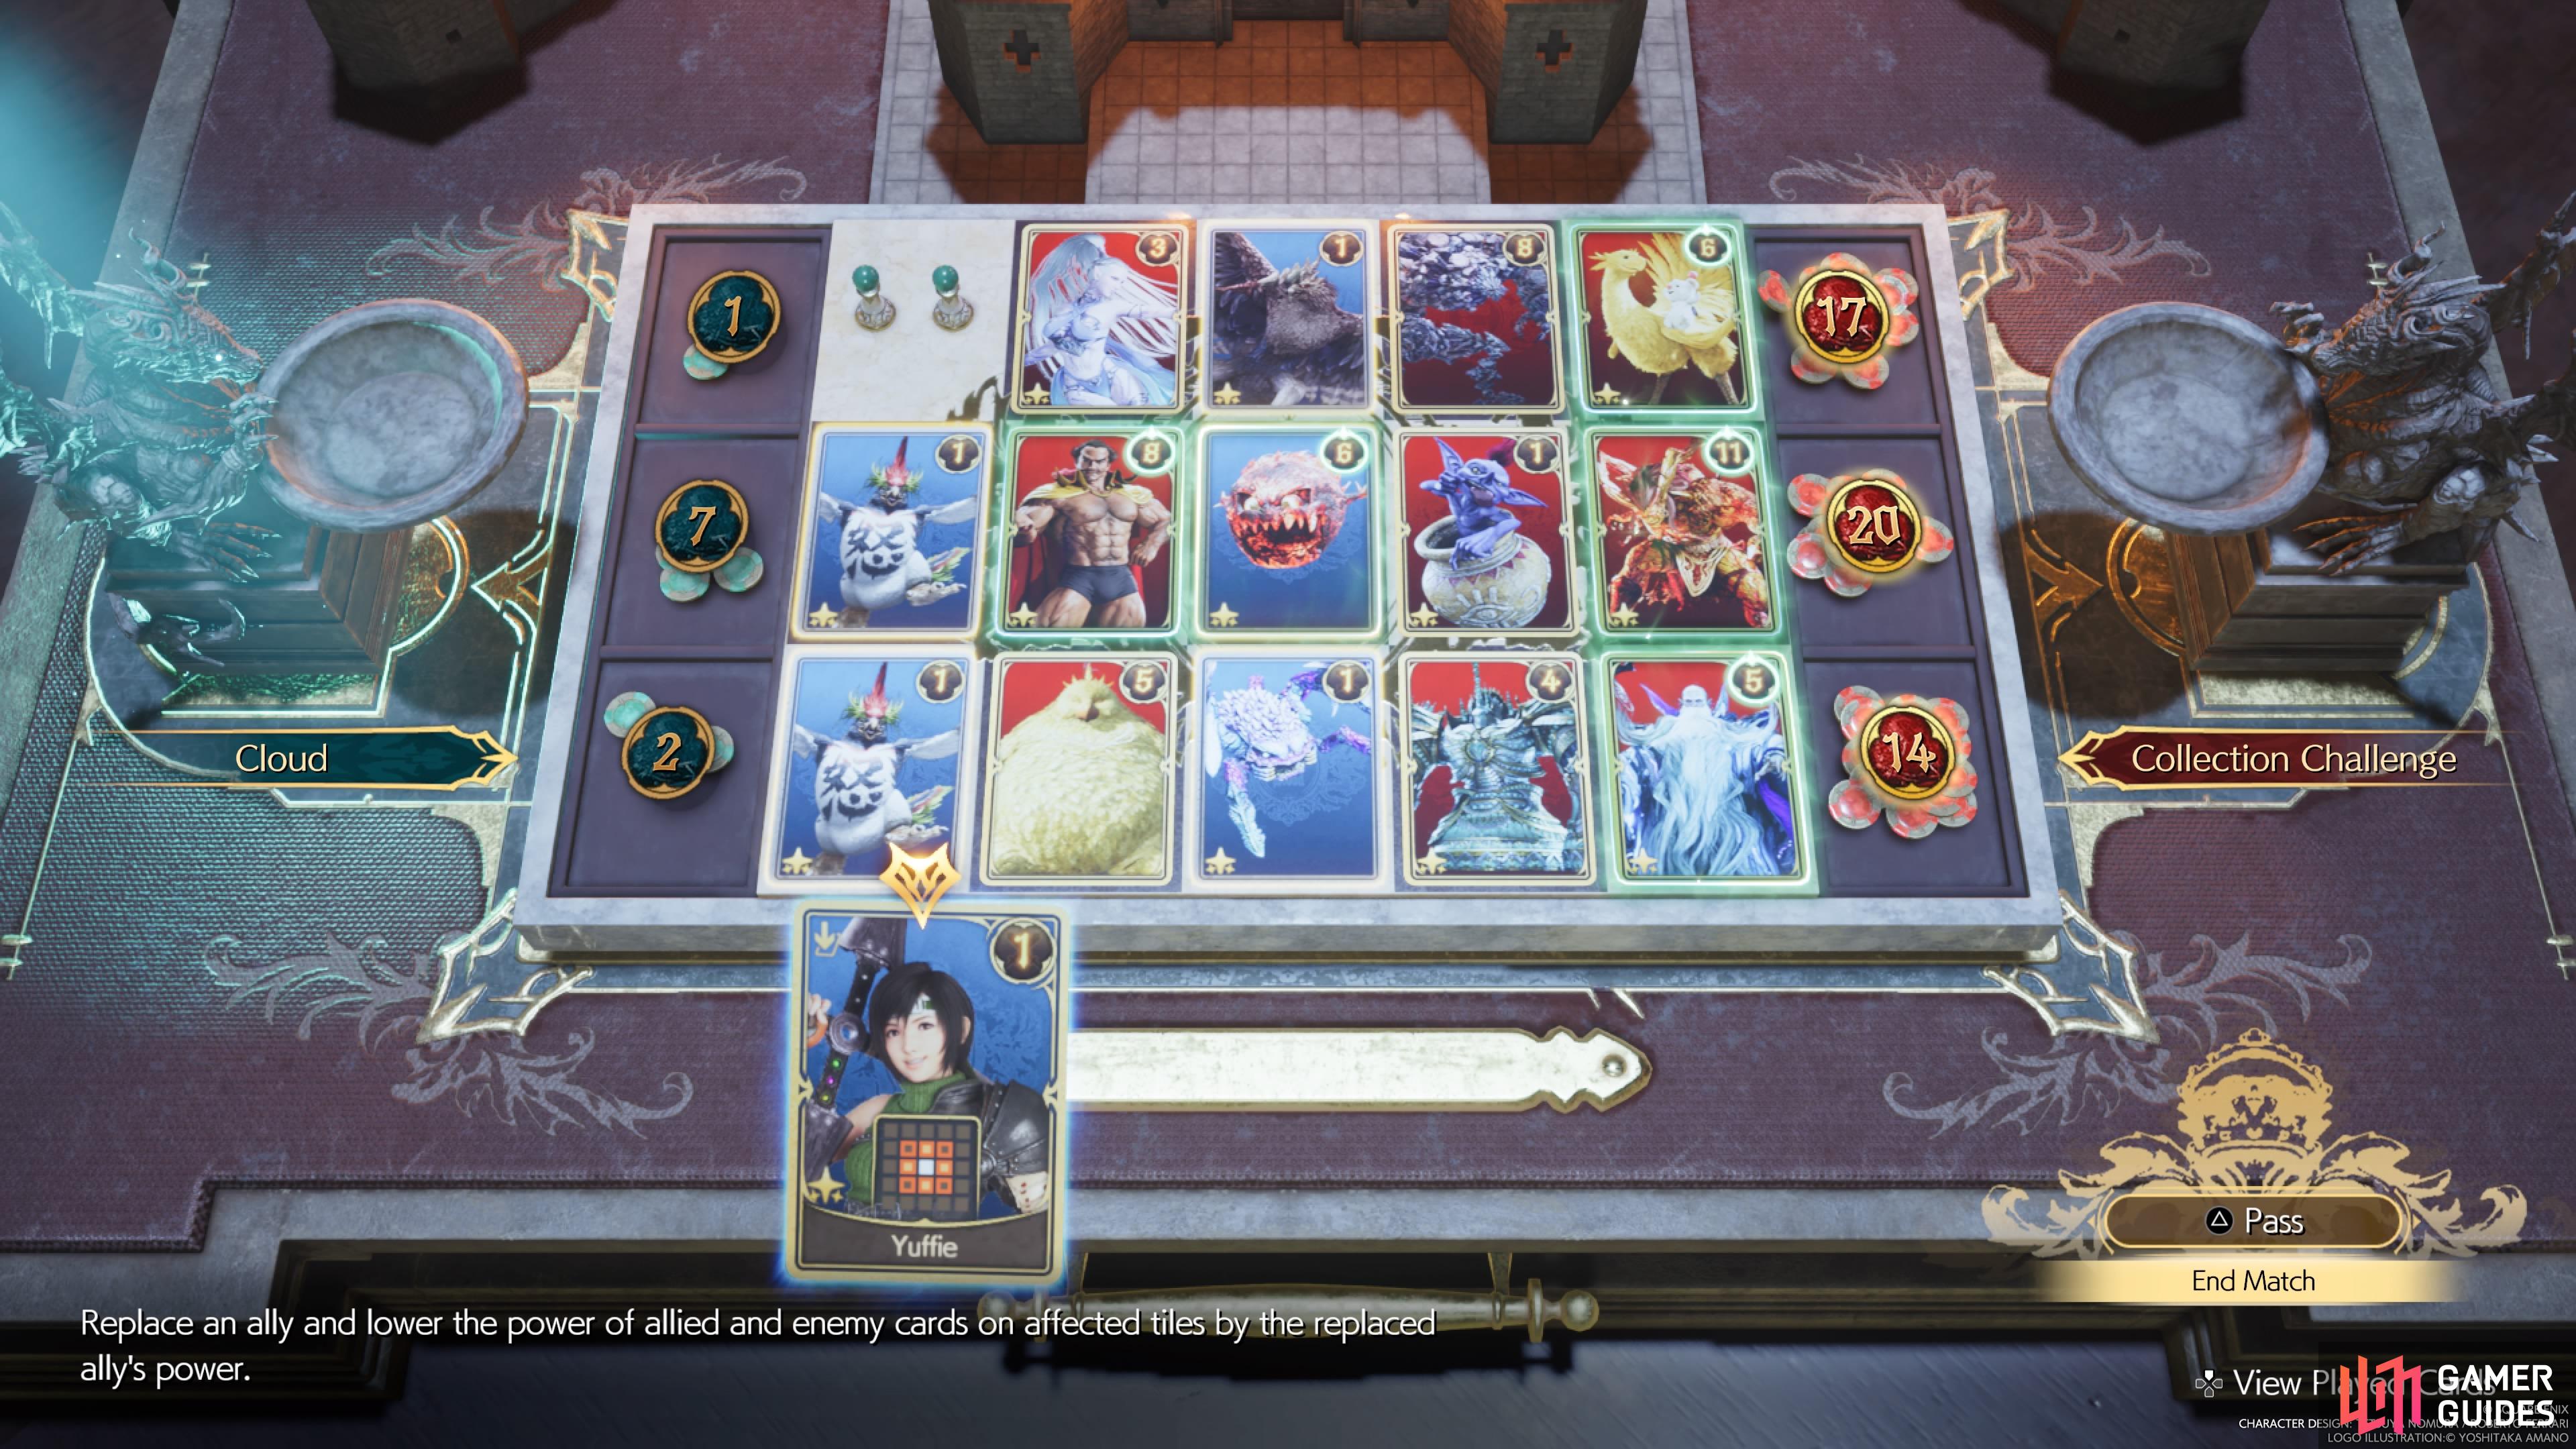

All of the cards can be put in the spots as shown, with the Yuffie card being saved for last. (left), Replace the Bomb card with Yuffie to set off a chain reaction and win the challenge. (right)
Upon setting up all of the cards, replace the Bomb with Yuffie to cause a massive chain reaction. All of the cards surrounding Yuffie will be destroyed, either by the Bomb’s ability or Yuffie’s ability. As mentioned above, the number of points you win by is determined where you place the Skeeskee cards, but you will always win with this solution.
Collector’s Card: Cait Sith
There is a lot of enhancing going on in this puzzle, so things are fairly straightforward. Start by placing the Space Ranger in the bottom left corner, then put ![]() Cait Sith in the upper left. The latter card will give you the Moogle card in your hand, so you can now put that below Cait Sith. This will power Cait Sith by three power, giving him a little more strength.
Cait Sith in the upper left. The latter card will give you the Moogle card in your hand, so you can now put that below Cait Sith. This will power Cait Sith by three power, giving him a little more strength.
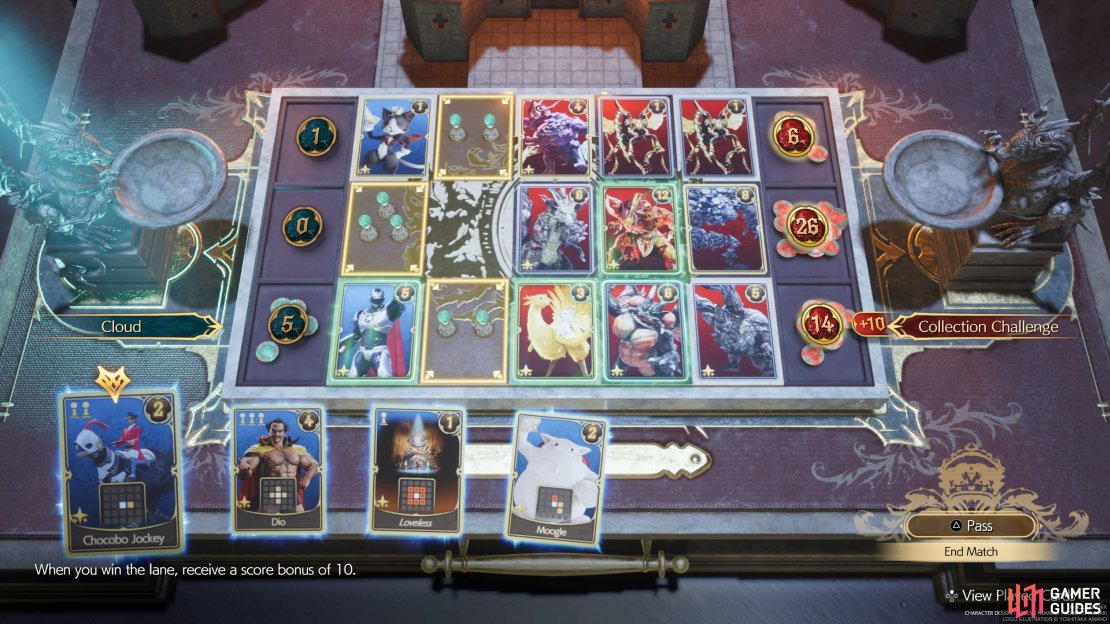
(1 of 3) The Space Ranger will go in the bottom left, and Cait Sith in the top left.
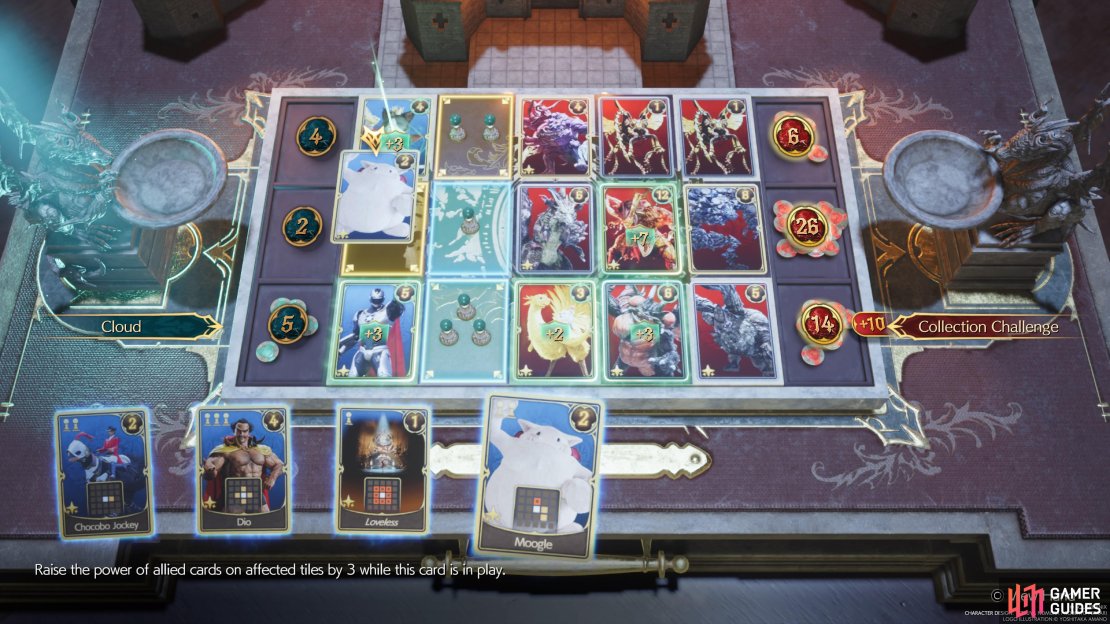
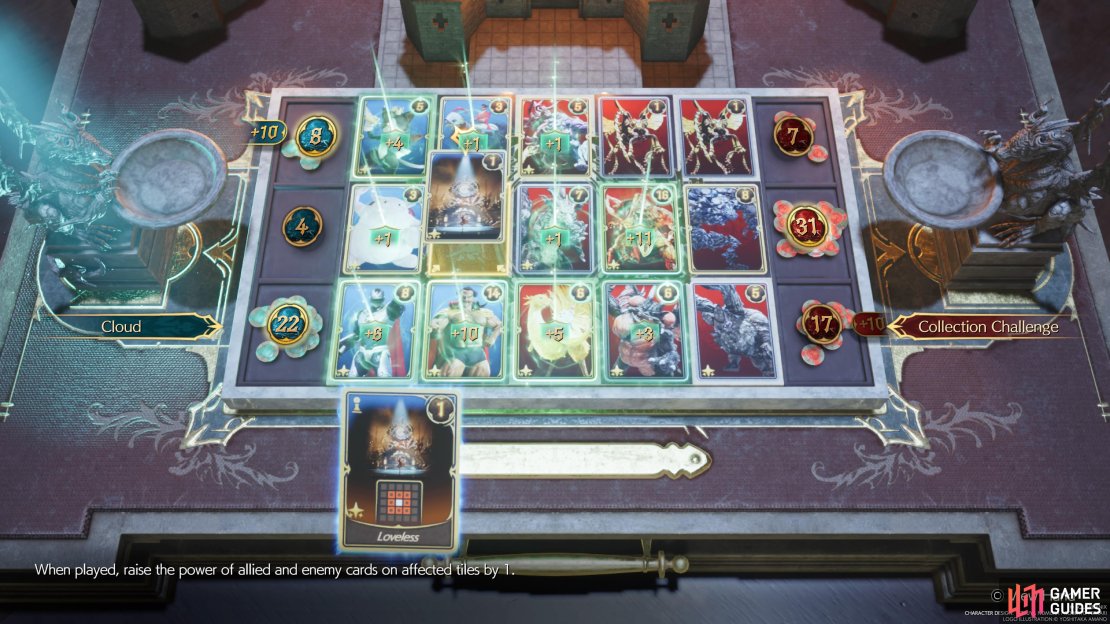
For the second round of card placement, put Dio in the bottom row and the Chocobo Jockey in the top row. Doing this will tie up those lanes, but you still have one more card to play. This is the Loveless card, so put it in the only spot left. Doing this will power up all of the cards around it, including enemy cards. But your cards will be winning the puzzle in the end.
Collector’s Card: Cid
The point of this puzzle is to use the Cid card to help set up the Bomb/Chimera combo. Start by placing Cid for the first card, in the bottom left corner. Doing this will spawn The Tiny Bronco card in your hand, so place that in the upper left corner of the board. You can now put the Skywheel card to the right of the Cid one, allowing you to take over the one spot on the right side of the board.
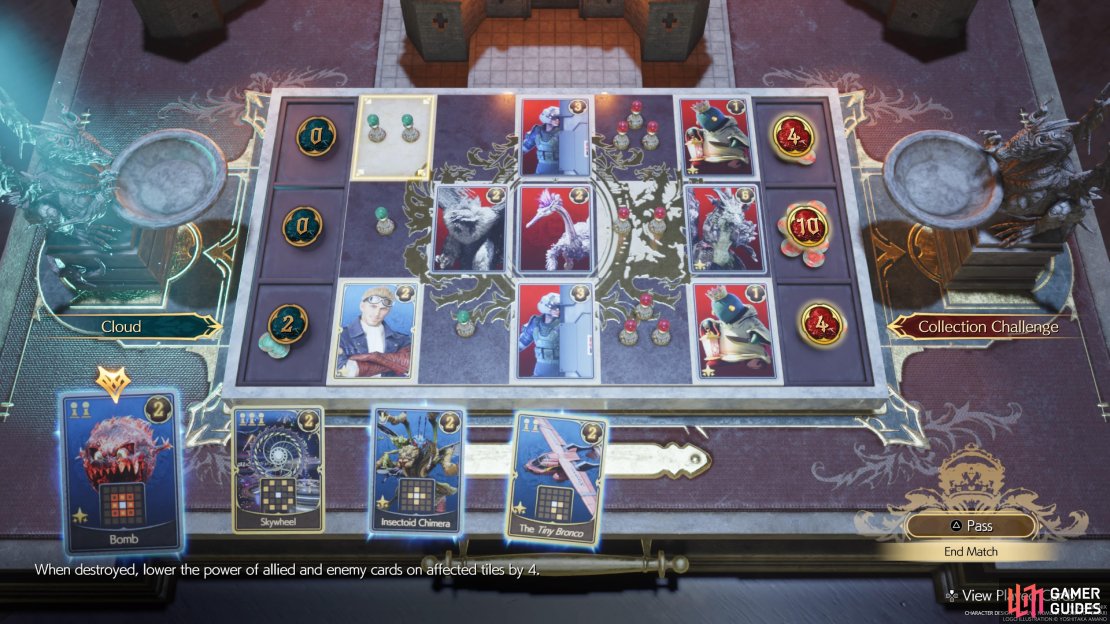

(1 of 3) Place the Cid card in the bottom left and you’ll get The Tiny Bronco from doing that.
With this play, you will be able to place your Bomb card there. Once you do, take the Insectoid Chimera and replace the Bomb with it. This sets off the Bomb’s ability, destroying most of the cards around it and netting you enough points to win.
Collector’s Card: Vincent
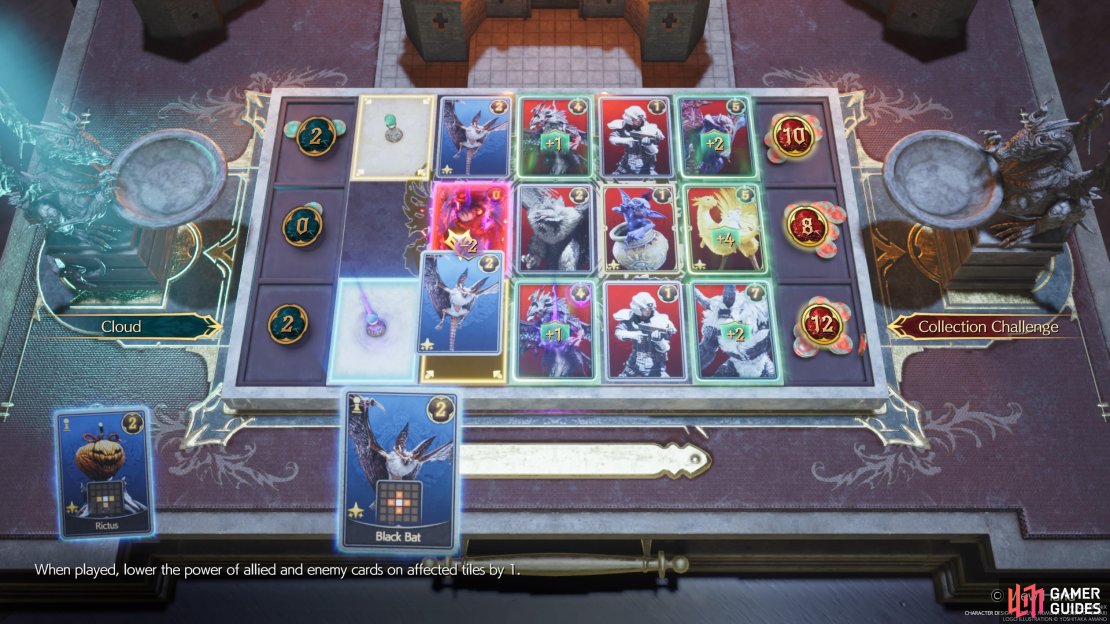
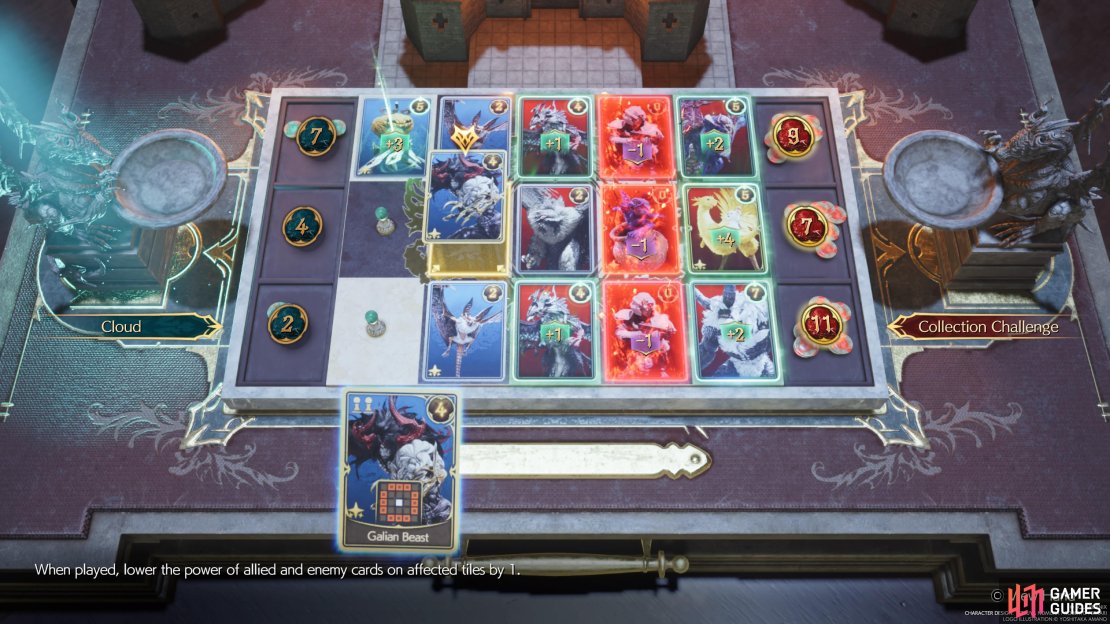
The Vincent card is kind of similar to the Cid one, where it will summon another card into your hand, but you must destroy this one first. Start the puzzle by placing Vincent in the middle row, then put the Black Bats above and below him. This will destroy him and give you the Galian Beast card in your hand. There are two cards left now, the Rictus and the Galian Beast.
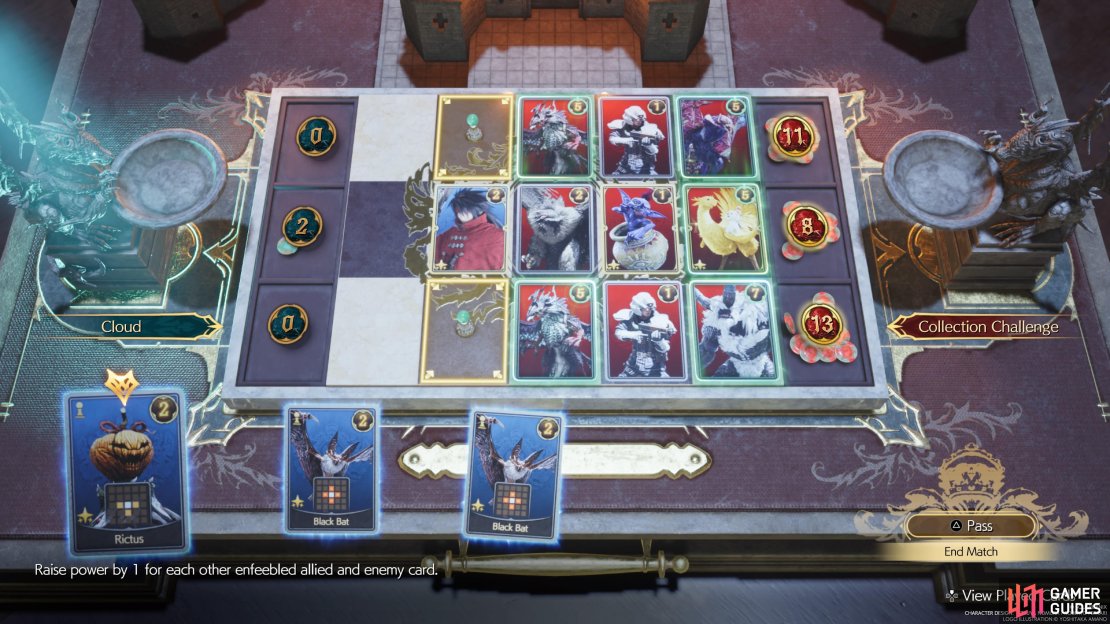
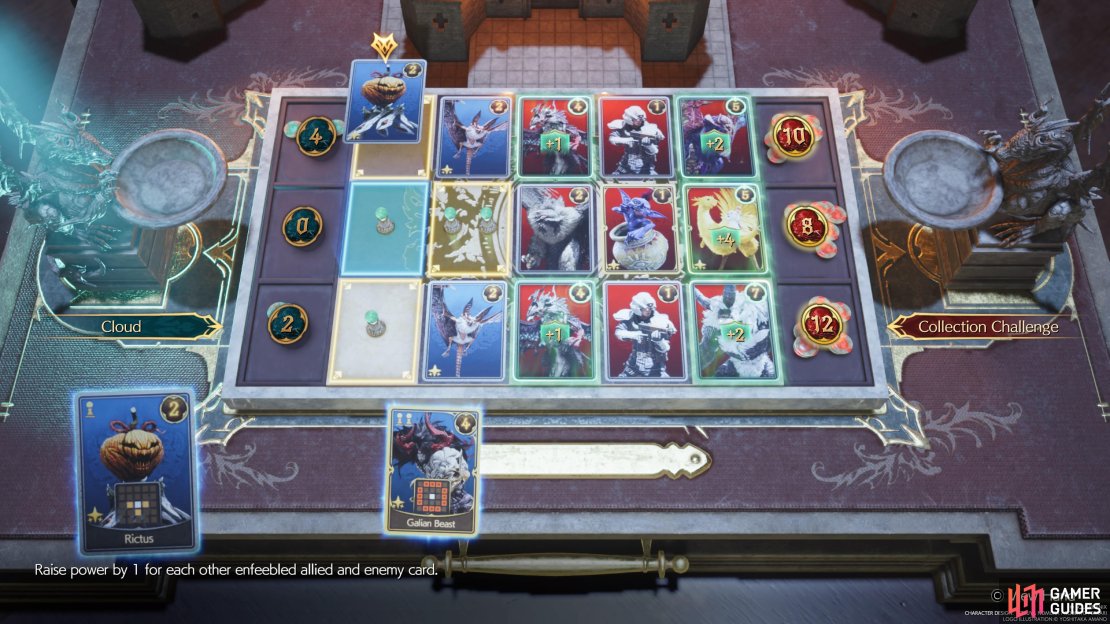
(1 of 4) The Vincent card will go in the middle row at the start.
Place the Rictus in the top left corner, next to the top Black Bat card. The only tile you can put the Galian Beast card is where the Vincent one was, so do that. This will destroy the three cards in the enemy’s middle column, essentially messing up a few interactions on that side and giving you the points needed to win.
No Comments