
Death March is the hardest difficulty in The Witcher 3, and it imposes numerous gameplay changes that makes Geralt’s adventures much more dangerous. We’ve spent hours testing what we think is the best build for Death March Difficulty, including what abilities you should purchase and gear you should find, craft and equip.
Alchemy Build - Our Build for Death March
How Abilities Work
Every time you level up or meditate at a Place of Power you’ll gain an Ability Point, which you can use to purchase an ability from one of four trees: Combat, Signs, Alchemy and General. Most abilities outside of the General tree have multiple ranks, and each rank costs an Ability Point to unlock.
Each Ability Tree consists of twenty abilities - five columns of four related upgrades (save for the General tree, which is just a random assortment of abilities). Abilities further down require investment elsewhere in the tree before you can purchase them - 6 points for the second row, 12 points of the third row and 18 points for the fourth row. You do not have to purchase abilities from the same row sequentially, as long as you have enough points to unlock lower rows, you can purchase abilities on said lower rows without spending ability points on the ability above it (for example, you do not need to spend ability points on “Poisoned Blades” to purchase “Protective Coating” or “Fixative”.
Once an ability is purchased, it must be equipped in one of the slots to the right. More slots unlock as you level up, and unequipped abilities will not provide their bonuses. You have four columns of three abilities you can equip, and it’s best to stick abilities from the same tree into a column, as each column of three abilities shares a mutagen slot, where you can equip a mutagen. If the equipped mutagen matches the color of the abilities in the connected slot, you’ll gain a bonus depending on the quality of the mutagen and the number of matching colored abilities equipped:
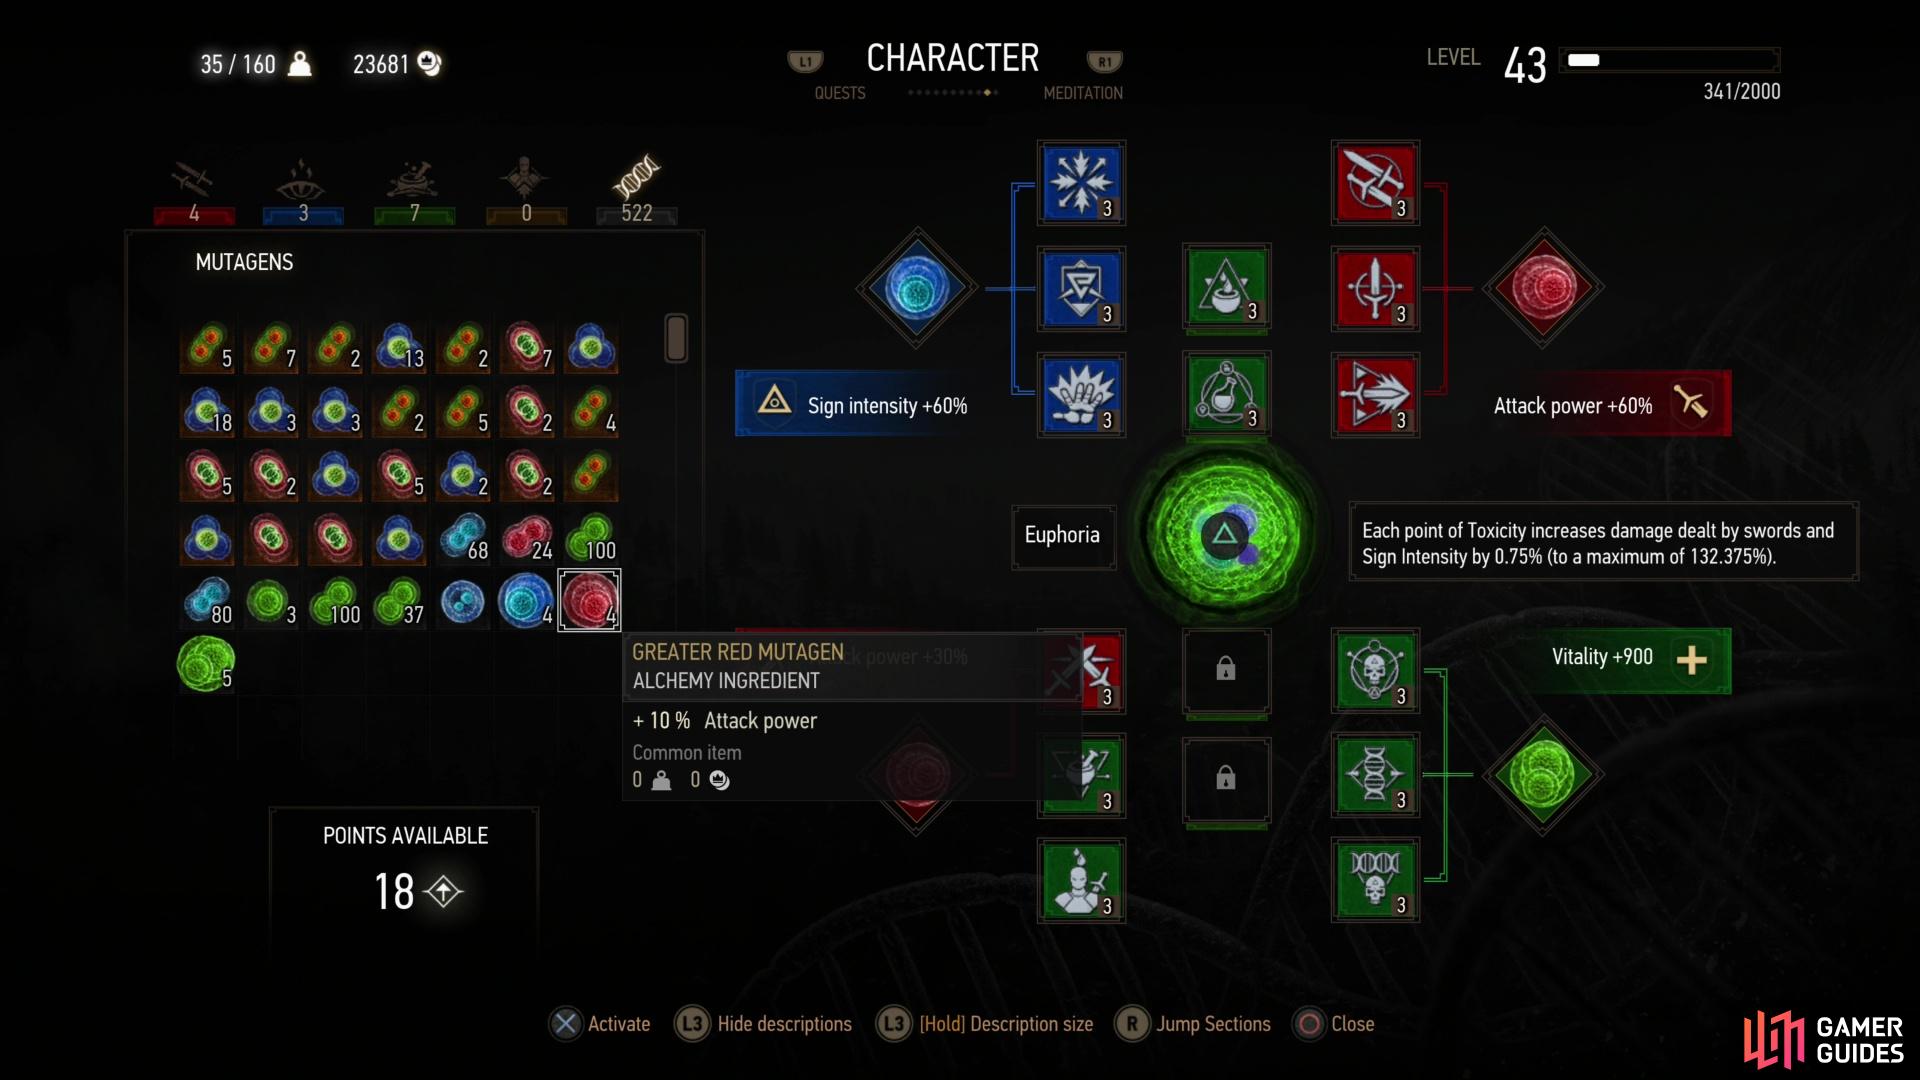
Mutagens can be used to provide significant boosts to Attack Power, Sign Intensity and Vitality.
| Mutagen Type | Bonus |
|---|---|
| Lesser Red Mutagen | +5% Attack Power |
| Red Mutagen | +7% Attack Power |
| Greater Red Mutagen | +10% Attack Power |
| Lesser Green Mutagen | +50 Vitality |
| Green Mutagen | +100 Vitality |
| Greater Green Mutagen | +150 Vitality |
| Lesser Blue Mutagen | +5% Sign Intensity |
| Blue Mutagen | +7% Sign Intensity |
| Greater Blue Mutagen | +10% Sign Intensity |
With all that covered, let’s get to the trees.
Best Alchemy Abilities
| Suggested Abilities | Ability Points |
|---|---|
| Heightened Tolerance | 3 |
| Acquired Tolerance | 3 |
| Protective Coating | 3 |
| Tissue Transmutation | 3 |
| Fixative | 3 |
| Synergy | 3 |
We call this an “Alchemy Build” because the Alchemy tree is where most of our ability points go. Oils are just super useful, plus you need to spend a lot of points to unlock “Synergy”, which boosts the effects of all your equipped mutagens by 50%… which is, needless to say, a massive boost to Attack, Sign Intensity and Vitality. In Blood and Wine you’ll want to invest in Euphoria to further boost Attack and Sign Intensity, but to do this optimally you’ll need “Acquired Tolerance” and “Heightened Tolerance”.
Blood and Wine is a bit outside of what is strictly necessary to beat the game on Death March, difficulty, so oils and “Synergy” will be our primary focuses for the main campaign (although the aforementioned “Acquired Tolerance” and “Heightened Tolerance” will allow you to chug more potions at a time, making them very useful for this game’s more challenging encounters).
“Poisoned Blades” isn’t all that great, but “Protective Coating” increases your damage reduction by up to 15% against monsters if the correct oil is applied to your blade, and “Fixative” makes oils permanent and allows you to have three oils applied to a blade at once, which significantly reduces the tedium of having to jump in and out of your inventory to drizzle death juice on your swords. Since superior-grade oils increase damage by a whopping 50%, it’s worth the effort to keep your blades coated at all times.
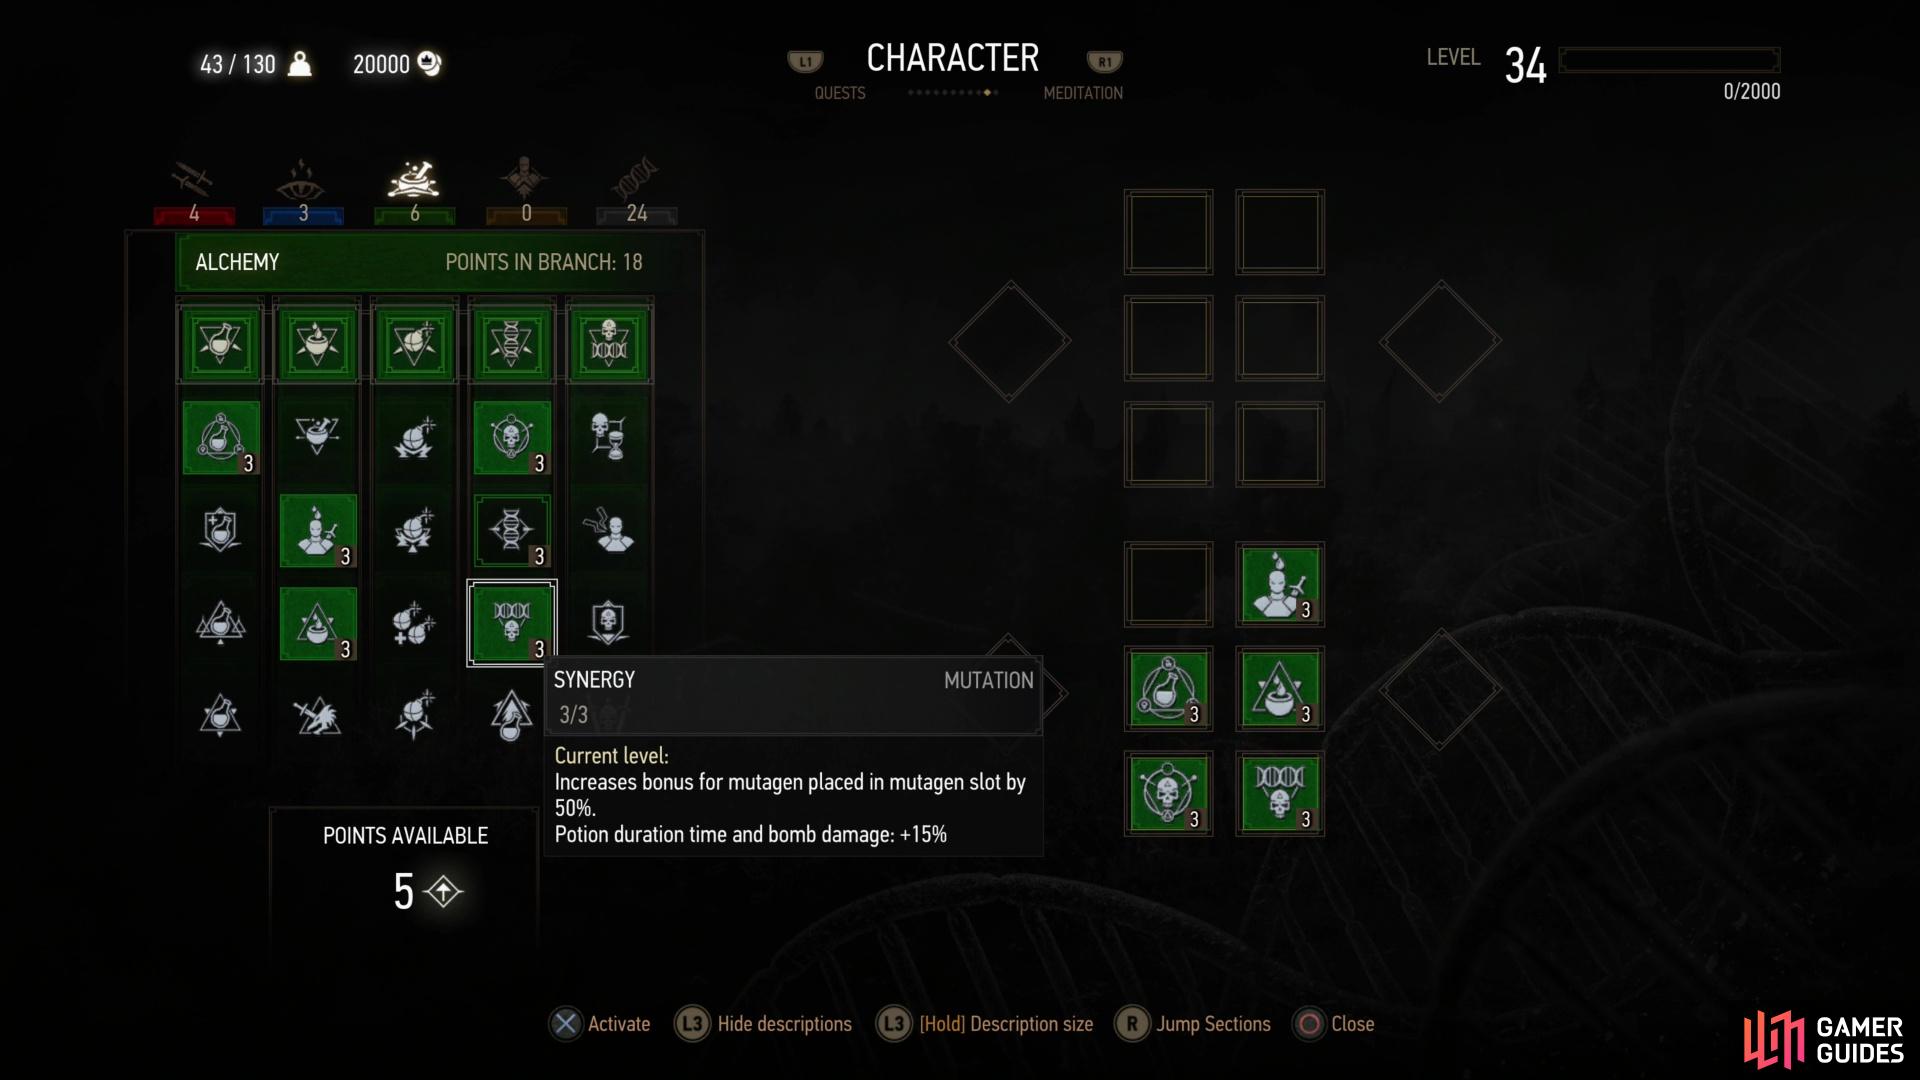
Alchemy is where it’s at - you’ll use it to boost your damage, defense, vitality… pretty much everything is better with alchemy.
Suggested Combat Abilities
| Suggested Abilities | Ability Points |
|---|---|
| Muscle Memory | 3 |
| Strength Training | 3 |
| Resolve | 3 |
| Precise Blows | 3 |
| Crushing Blows | 3 |
Most of the more broken combos have been patched into oblivion, and outside of the “Fast Attack” and “Strong Attack” columns there’s little of interest in this tree. The “Defense”, “Marksmanship” and Battle Trance” columns are usually edge-cases when they’re not outright useless… shout out to “Fleet-Footed”, which makes you invulnerable to damage while dodging. Sounds great! Except dodging basically gives you a silly amount of iframes, functionally making you damn near invulnerable while dodging, anyways.
That said, you’ll be hitting a lot of things with swords in this game, and buffing your Fast Attack and Strong Attack damage is a pretty worthwhile way to spend some Ability Points. In addition to whatever boosts you get from the abilities themselves will be further enhanced by tossing a Greater Red Mutagen constitutes a significant increase in damage output. Also, since we recommend Ursine Armor, which boosts Adrenaline generation, investing in “Resolve” will prevent you from losing Adrenaline, which will make it easier to earn Attack bonuses via Adrenaline.
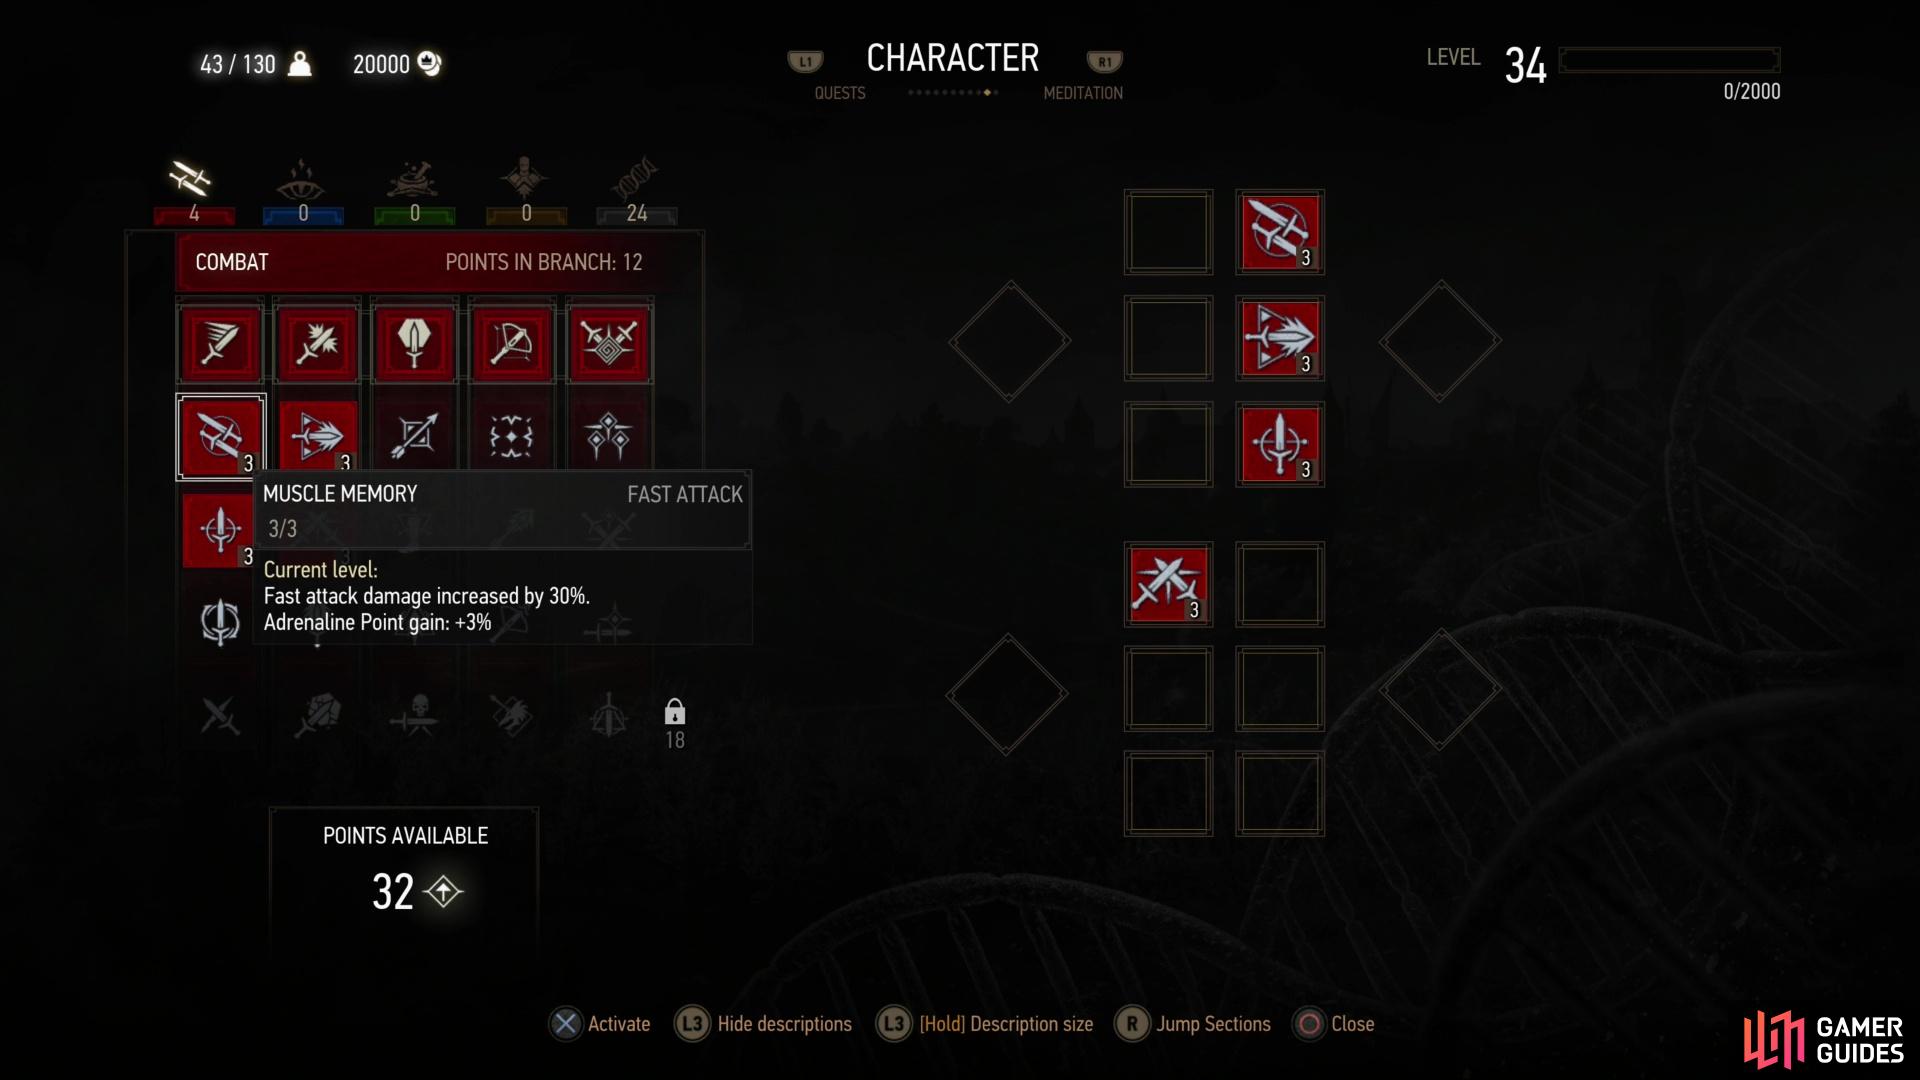
You’ll want to grab several abilities from the Combat tree to boost your damage output.
Signs Tree Abilities
| Suggested Abilities | Ability Points |
|---|---|
| Exploding Shield | 3 |
| Delusion | 3 |
| Active Shield | 3 |
We go into a lot more detail about the Best Signs on Death March Difficulty on a page of the same name, which covers each sign in some detail. While we use signs an awful lot, most signs aren’t actually worth spending any points in. Sign Intensity usually determines a sign’s intensity, and you’ll get this from gear and mutagens, not by spending precious ability points and using ability slots. In addition, many sign abilities just… are incredibly circumstantial when they’re not of entirely dubious value.
That said, Quen’s “Exploding Shield” and “Active Shield” are probably the most key abilities in the game, and Axii’s “Delusion” will unlock dialog options as well as get you to the required six points you need in invest in the signs tree to reach “Active Shield”.
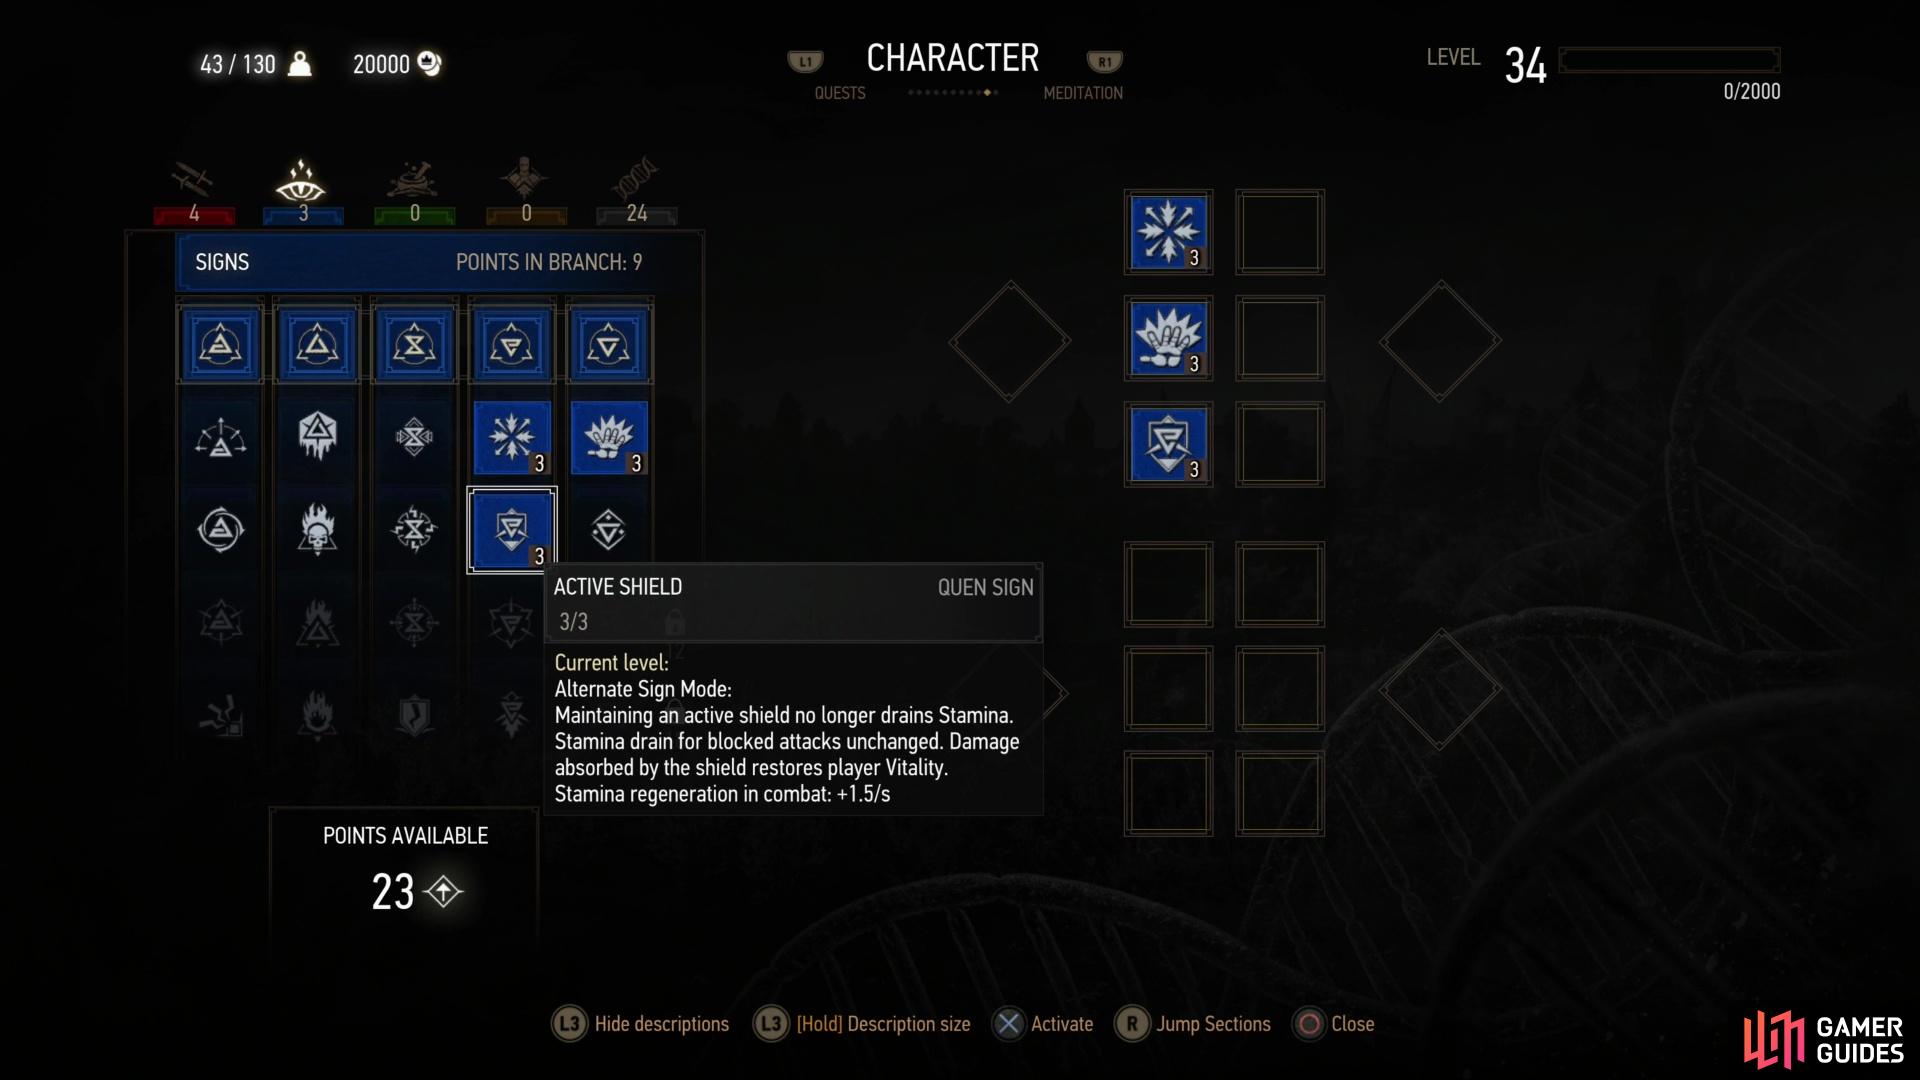
While sign usage will be heavy throughout the game, you really don’t need to purchase many abilities to make it all work.
General Abilities
| Suggested Abilities | Ability Points |
|---|---|
| Metabolic Control | 1 |
General abilities are tricky. Some of them are pretty decent, especially the armor-based ones, but whatever benefits they impart have to be weighed with the fact that they don’t count towards mutagen bonuses as well as against the abilities you could otherwise equip. Still, if the only bonuses they’re displacing are Vitality buffs, it may be worth the sacrifice.
General abilities have to overcome the hurdle of not contributing to mutagen bonuses, but a few are useful for rounding out builds… albeit during Blood and Wine.
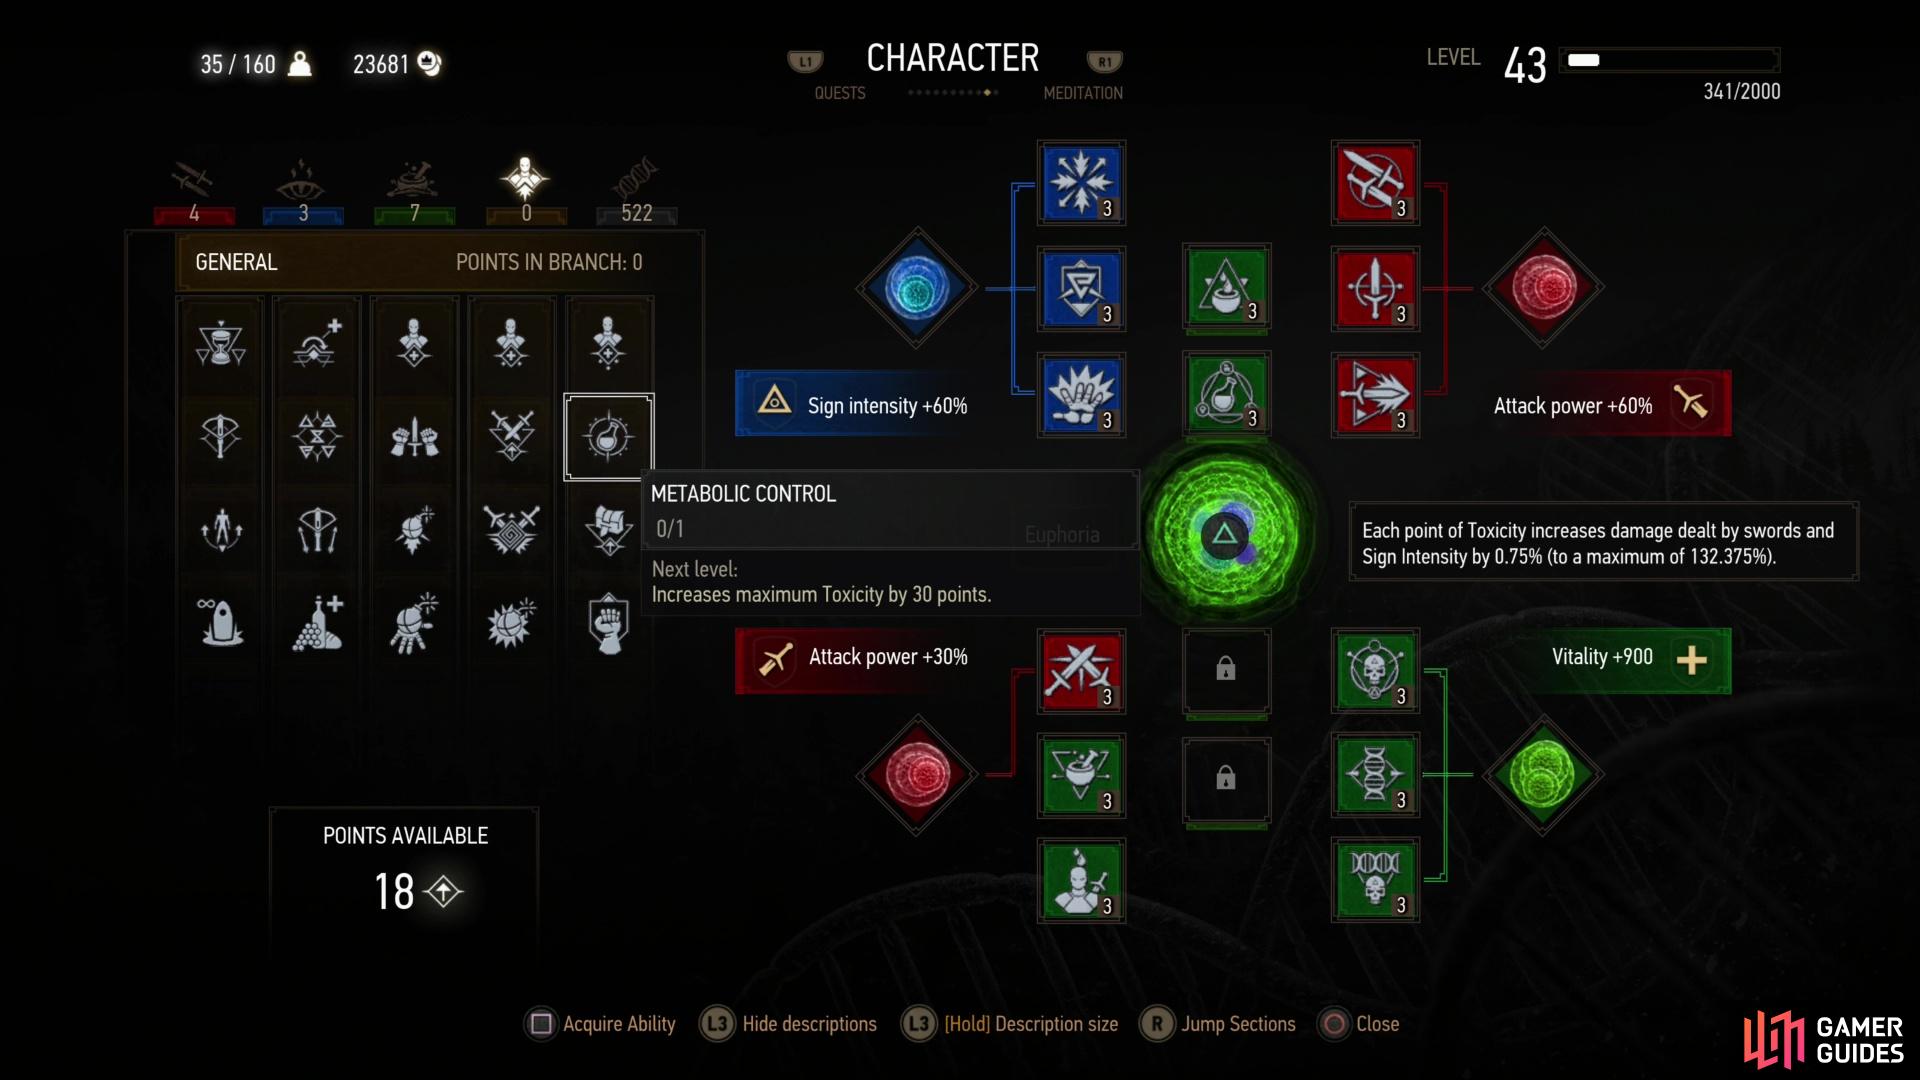
Since we plan to grab Euphoria in Blood and Wine, we recommend getting the “Metabolic Control” ability, but this is a late-game consideration, which you can ignore for quite a long time.
A review of what your ability tree will look like at the end of the game.
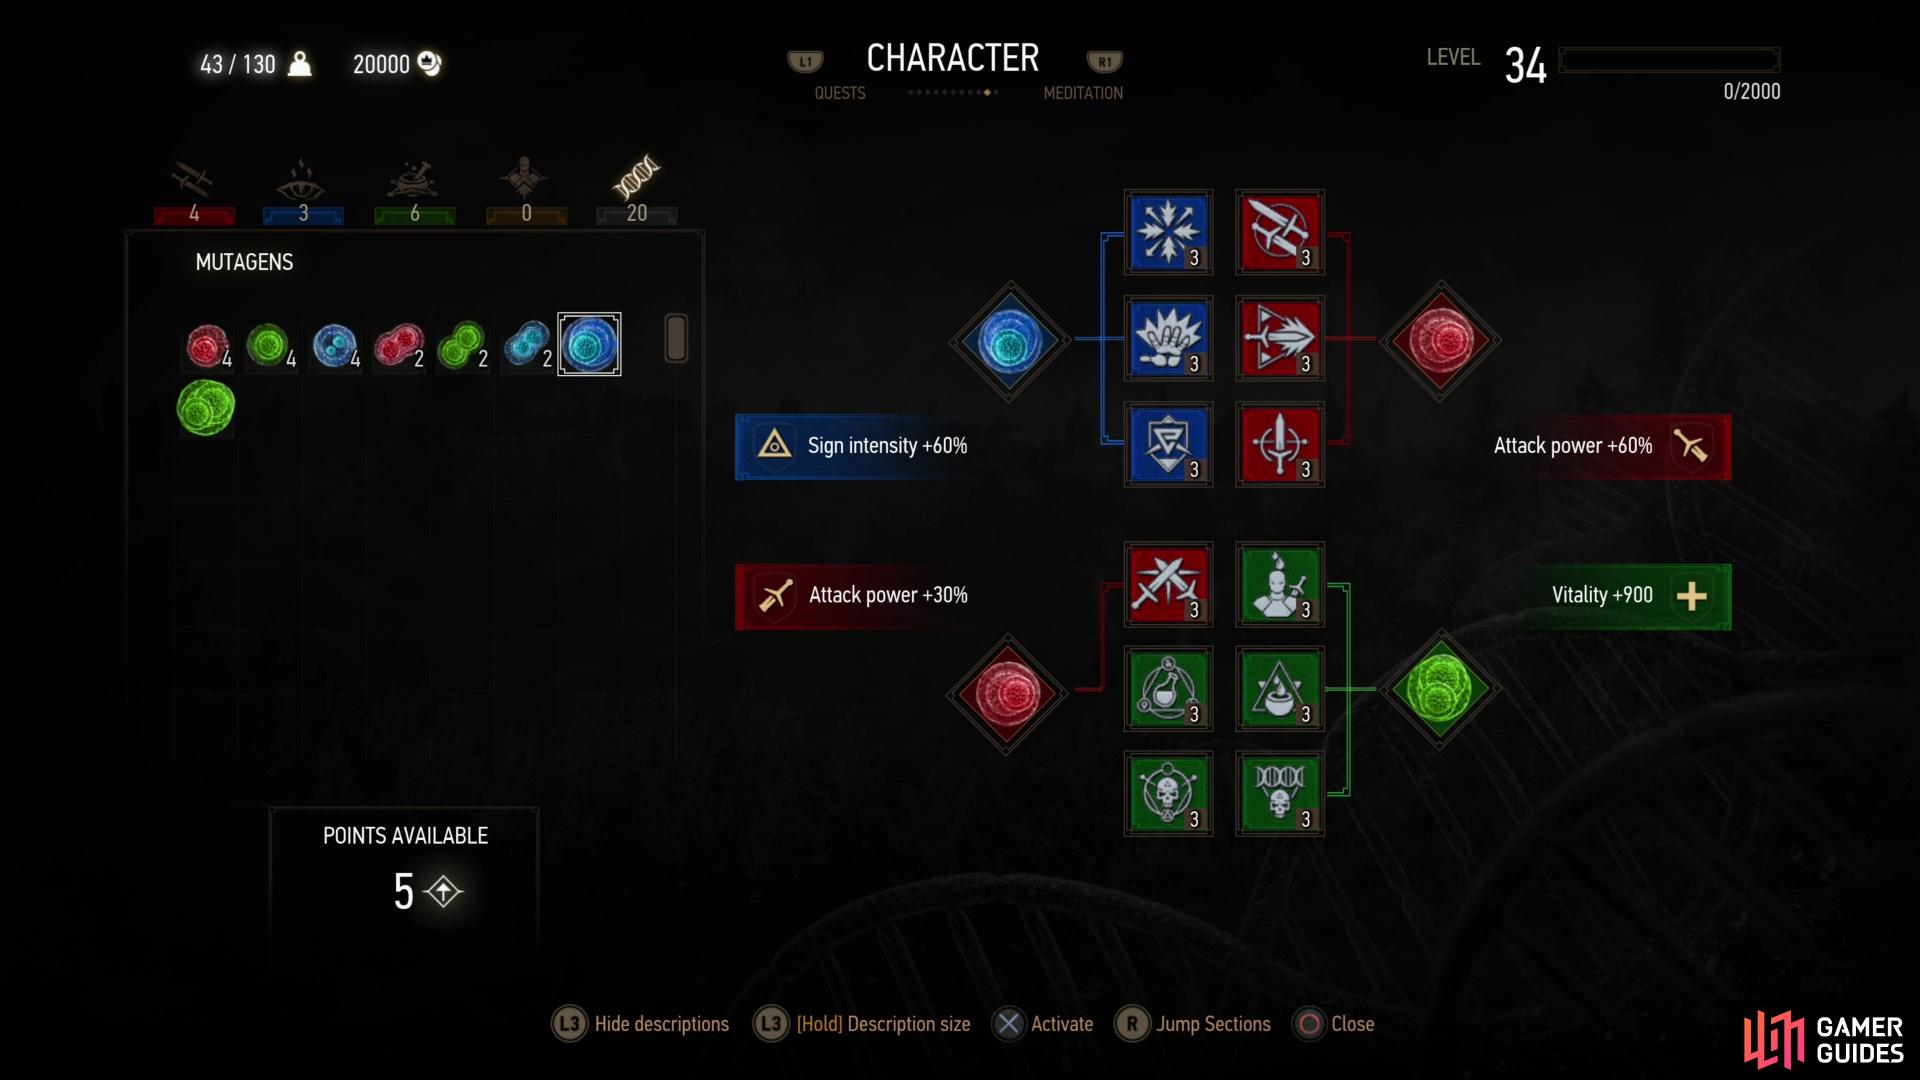
Full Alchemy Build - Equipped Abilities
With all that out of the way, here are the abilities we equip:
| Equipped Abilities 1 |
|---|
| Exploding Shield |
| Active Shield |
| Delusion |
| Greater Blue Mutagen (+60% Sign Intensity) |
| Equipped Abilities 2 |
|---|
| Muscle Memory |
| Strength Training |
| Precise Blows |
| Greater Red Mutagen (+60% Attack Power) |
| Equipped Abilities 3 |
|---|
| Crushing Blows |
| Heightened Tolerance (or Resolve) |
| Acquired Tolerance (or Resolve) |
| Greater Red Mutagen (+30% Attack Power (+45% with Resolve)) |
| Equipped Abilities 4 |
|---|
| Protective Coating |
| Fixative |
| Synergy |
| Greater Green Mutagen (+900 Vitality) |
We purchase Tissue Transmutation, but we won’t keep it equipped until we reach Blood and Wine and unlock bonus mutation ability slots. Also, since “Metabolic Control” requires Euphoria to really be useful, we don’t bother with that ability until later, equipping it when we can move some of our alchemy abilities to the extra mutation ability slots. “Resolve” suffers a similar fate, but you can equip it as soon as you start collecting Ursine Armor, although you’ll have to choose between the fickle Attack bonus from adrenaline Resolve provides and the maximum Toxicity boosts provided by Heightened Tolerance or Acquired Tolerance, both of which aren’t really essential until Blood and Wine.
Best Swords
Compared to abilities, your choice of swords is pretty simple… at least on your first playthrough, and if all you care about is beating the game on Death March difficulty, you don’t need to worry about the complications added in New Game+.
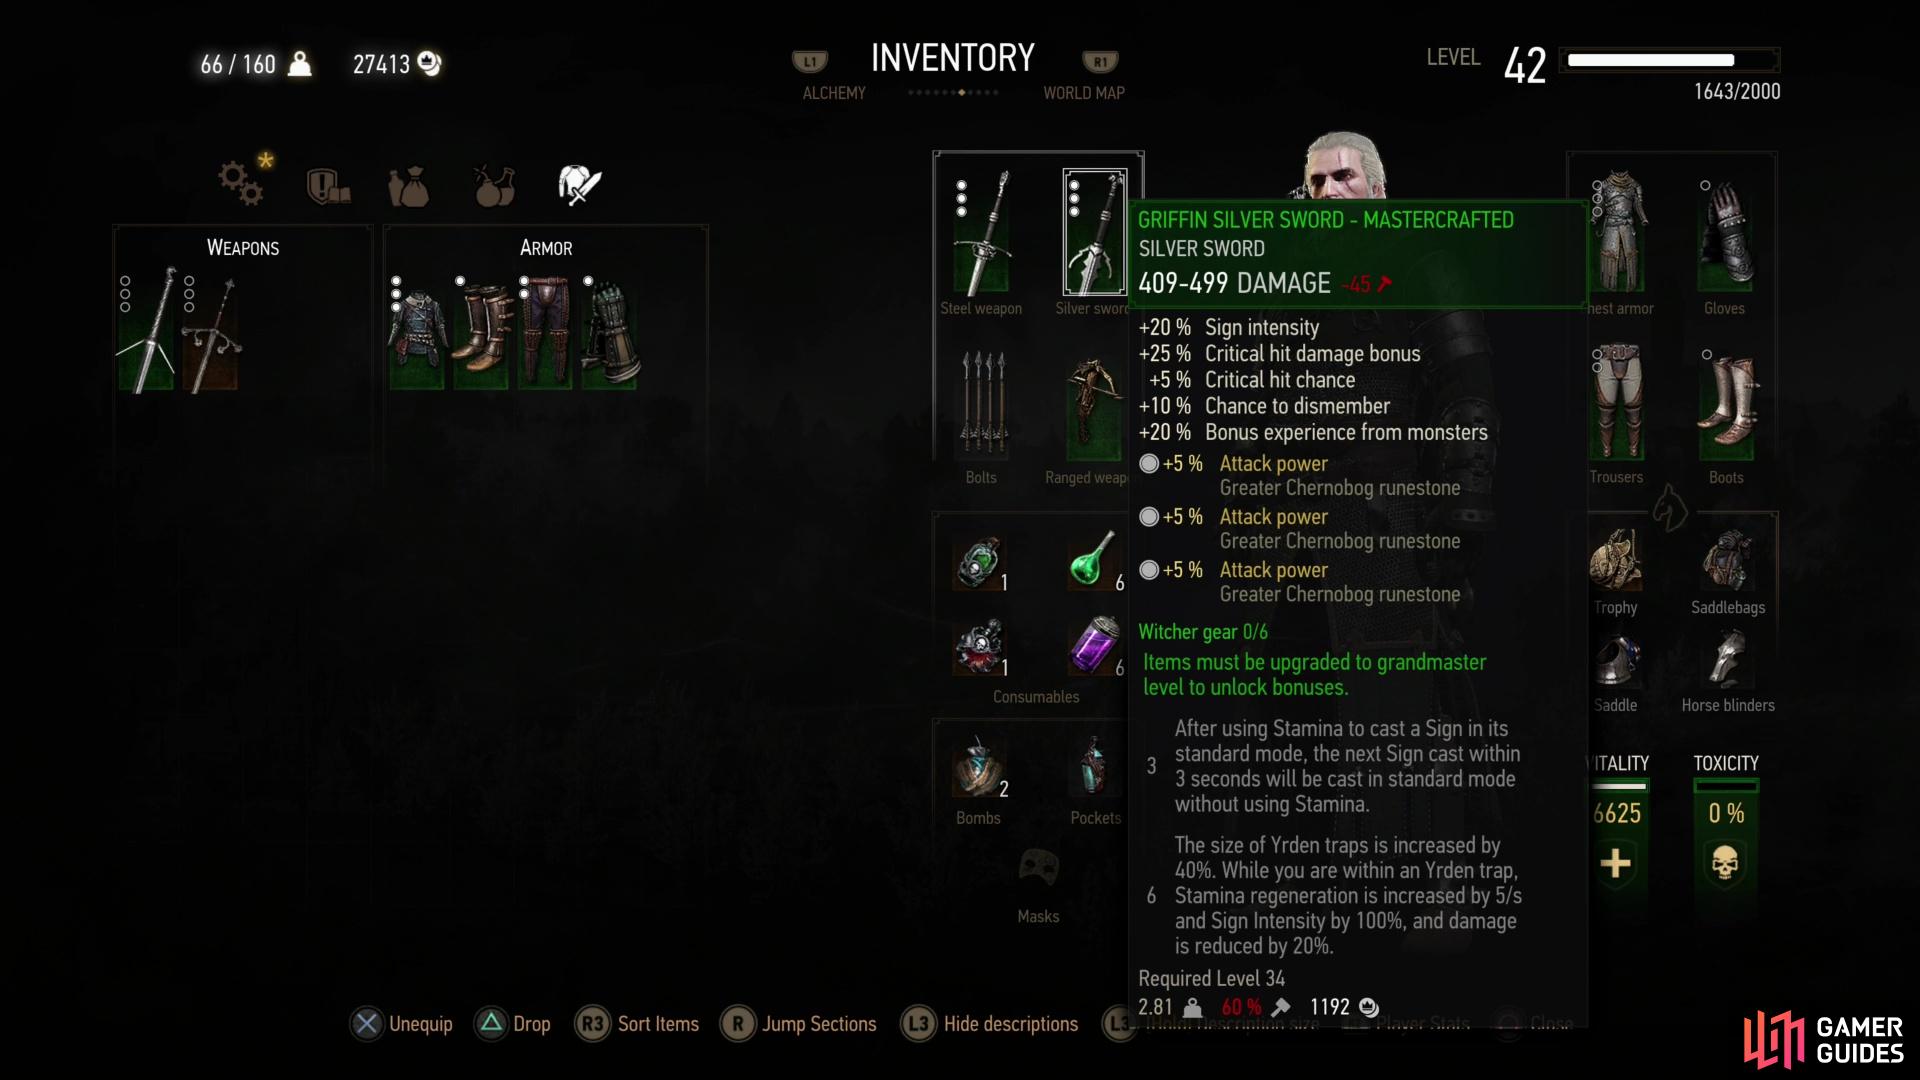
During the normal campaign, Griffin Swords make a compelling argument to remain on your back due to the Sign Intensity boost they give.
The best swords for the majority of the game will be Witcher set swords, and your level will initially determine which one you should be using. You can craft the Griffin set swords at level eleven, and at that point in the game, they’re probably going to outcompete anything else you can find. As your level increases and your library of schematics grows, you can haggle over the different mods on the various sets - Feline swords have higher crit chance and Aard Sign Intensity, Griffin swords have high overall Sign Intensity, Ursine swords have improved Adrenaline Point gain and critical hit damage, while Wolven swords are kind of a middle ground, possessing moderate Sign Intensity, Adrenaline Point gain and critical hit chance. Once the swords hit mastercrafted tier, their level requirements (34) and damage (409-499) are even. We’re somewhat keen on the Griffin swords for their Sign Intensity, with Wolven Swords being a secondary choice as great all-rounders.
Best Armor for Death March
Like swords, your best armor options for most of your first playthrough are Witcher sets, starting with the Griffin armor at level eleven. As your level and collection of schematics improves, you can start fussing over the modifiers between sets, and like the Witcher swords, each armor set has different strengths. Feline boosts Attack power, Griffin increases Sign Intensity, Ursine increases Adrenaline Point gain and Wolven increases a mix of the three, with different pieces granting various bonuses.
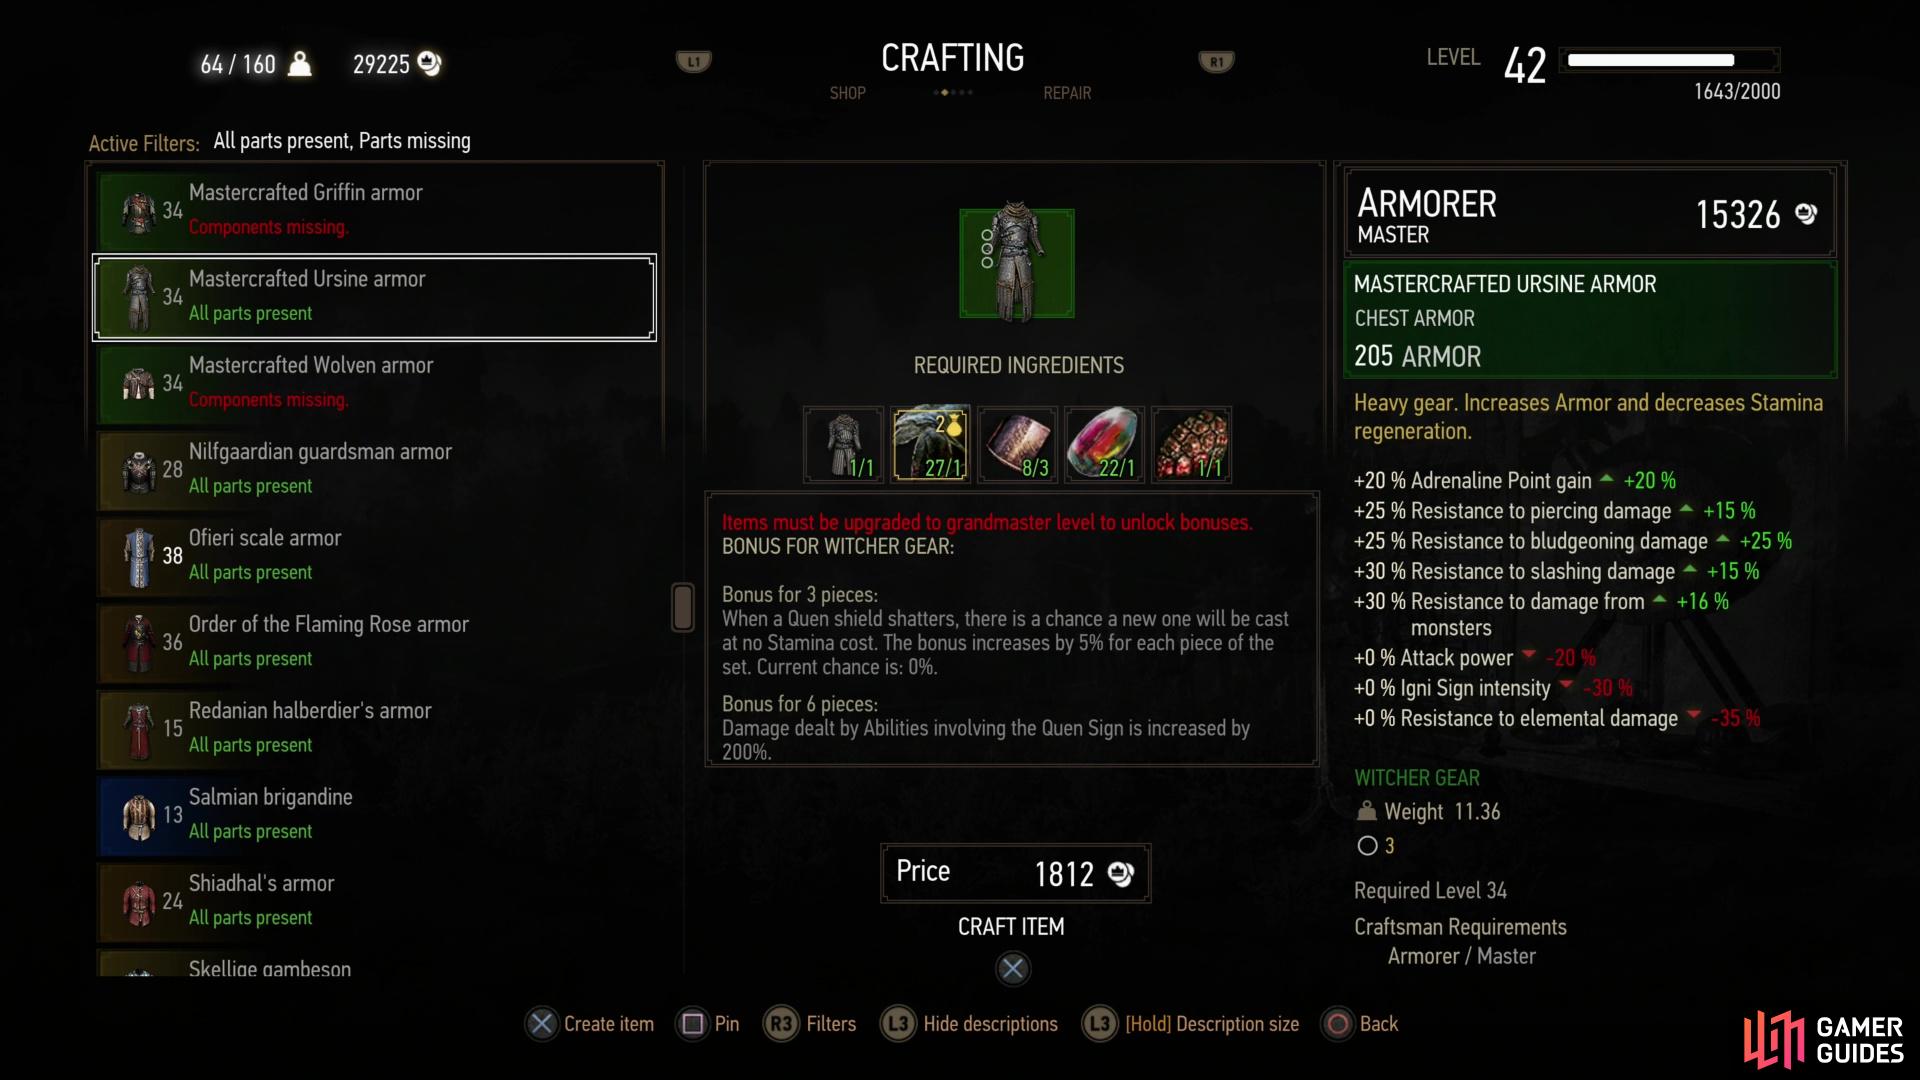
Ursine Armor isn’t just the most stylish set, the damage reduction it grants is unrivaled.
Unlike swords, however, there’s a much clearer winner when it comes to armor. As much as we love the Attack power bonuses given by Feline armor and the Sign Intensity buff Griffin armor imparts, the Ursine armor set wins on the sheer strength of its resistances. With a full set of mastercrafted Ursine armor you’ll enjoy the following bonuses:
- Slashing Resistance +50%
- Piercing Resistance +40%
- Bludgeoning Resistance +30%
- Monster Resistance +45%
- Elemental Resistance +25%
If you have the “Protective Coating” ability purchased and equipped (and the right oil applied) these bonuses increase by +15%, and if you keep your inventory weight low and chug an Arachas Decoction, this will further improve by around +10%, giving roughly another +25% resistance to damage (note that these bonuses won’t be listed in your player stats). This will significantly reduce the damage you receive, and with a decent Vitality score and high Sign Intensity, your Quen will make you even more survivable.
It doesn’t hurt that Ursine armor is also the snazziest looking armor set in the game.
For more generalized tips about Death March difficulty, check out the Surviving Death March Difficulty page, and for an in-depth look at the Best Signs for Death March Difficulty, check out that page.
No Comments