How to complete Treacherous Thermadon
To begin this quest, go to the Quest menu, then go to the Story sub-menu and then go to the second page. This is where you will find all the Hangout Events in the future. Click on Bennett and confirm, a popup will now appear and ask if you want to spend two story keys to unlock “Fantastic Voyage”, confirm that, and you’ll get the first quest. To earn Story Keys, you need to complete eight daily commissions.
What are daily commissions?
Daily commissions are the purple quest icon in-game. You get four every day, and they reward you with 250 Adventure EXP for each quest as well as a small amount of Primogems, after eight of these commissions are completed, you’ll receive a story key. The quests themselves are normally short, defeat enemy type quests.
The Traveler comforting a sick Bennett, whilst being rescued by Royce.
Timeline
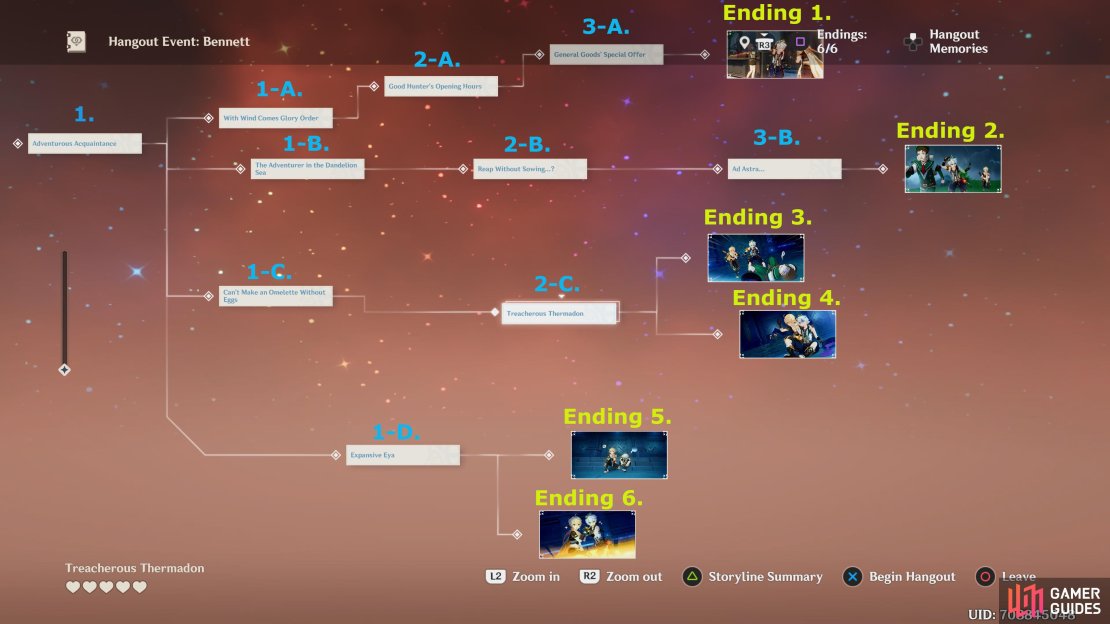
Use the Timeline to plan the path you want to take.
Use the Timeline to help you navigate what branch to take.
Enter the ruins
Bennett knows of a new ruin discovered and suggest you head there with him. Teleport to the Temple of the Wolf Domain and interact with the ruin. You’ll see Deserted Ruins of Thermadon sitting on top, your party setup doesn’t matter here as there are no battles, click on it when you’re ready, and enter.
Talk to Bennett
Bennett will be standing straight in front of you, talk to him for a scene. He’ll notice that the door in front is closed and assumes that the device behind him is used for opening it, he’ll activate the mechanism which’ll open the door in front, but lock the door behind you. He’ll try to fix the device, and then you’ll hear some shouting, it sounded like it came from the other room in front.
Accompany Bennett and proceed onward
Follow Bennett through the doorway, and up the stairs, as you reach the top, you’ll notice a large room, with four devices in the middle, and a man at the back of it. Head towards the man and then talk to Bennett for a scene.
As Bennett introduces himself to the adventurer, he’ll realize it’s Royce, who doesn’t appear to be too please to see him, Royce will go on to say that whenever Bennett is around, nothing will go smoothly, you’ll get a choice, but nothing that really matters. There’ll be a bit more dialogue and then Royce will panic because he’s used up his supplies, Bennett will say…Ah, but of course, I’ll have to check with my partner first. So, what do you think? Which’ll give you two important choices:
“You cooked it, you can do whatever you want with it.”
If you choose this option, go to Path 1
“No way. You don’t owe him anything.”
If you choose this option, go to Path 2
Path 1
Bennett will give Royce the Ominous Dish he cooked earlier, and he’ll scoff it down. As he eats it, he’ll feel some discomfort in his stomach, and then collapses to the ground. This’ll end the quest, rewarding you with Ending 3 - Taste Tester Royce.
Path 2
You’ll convince Bennett to stop trying to accommodating others, and think more of himself, and he’ll choose to keep his supplies and look for another way out.
Investigate the vicinity and find a way out
Activate all the mechanisms, and it seems that it’s broken, Bennett will tell you he’s checked every nook and cranny, and there’s no way out. Bennett will start feeling sorry for himself, and starts becoming pessimistic, you’ll try to reassure him. He’ll pull the dish he prepared earlier, and mentions that if he eats this, it may make him unconscious, which would take the bad luck with it, you’ll try to talk him out of it, but he seems determined to do it anyway. He’ll eat the dish, and pass out, which’ll end the quest, rewarding you with Ending 4 - Ready to Make Sacrifices.


No Comments