Beauty Withers Hither While Truth Dithers Thither - Difficulty 5
Objective
No more than 25 escaped monsters.
Introduction
This stage is a little tougher because in the later waves, the enemies will start coming from three portals in two different directions. By bolstering up in front of your portal (Blue) first, makes it easier to hit them where both lanes converge, creating a chokepoint.
Recommended Characters
Premium Party
| Characters |
What they offer |
 |
She can use her Elemental Skill to pick up the smaller enemies and throw them off ledges. |
 |
Her bow attacks can target and stun Ruin Guards, and her charged attack can put Cryo on in enemies in an AoE. |
 |
His Geo pillar from his Elemental Skill can stop enemies from moving forward if it’s placed in their path. |
 |
She can get around the arena quickly by using her Elemental Skill and she can also deal the Electro status on enemies in an AoE. |
 |
Has a Claymore which can break a lot of the enemies physical shields, he also has quick cooldowns and that can put Pyro elements on enemies quickly. |
Free to Play Party
| Characters |
What they offer |
 |
They can place their Geo construct in the way of the enemies to stop them moving, similar to Zhongli. |
 |
They can push enemies of the side, similar to Jean but not as easily. |
 |
Similar to Ganyu, she can target the enemies weakpoints and stun them briefly. |
 |
Has a Claymore to break enemies physical shields, can also lay down a Cryo field to put on the enemies if needed. |
 |
Can put Pyro on enemies and because of his low cooldowns, he can do it often. |
Recommended Mechanici
| Mechanici |
Level |
Name |
Effect |
 |
8 |
Veneficus Mechanicus: Inferno |
Attacks opponents with Blazing Sparks that explode, dealing Pyro DMG in a medium AoE and leaving behind Burning Flames that deal Pyro DMG to opponents passing through. |
 |
8 |
Veneficus Mechanicus: Furious Discharge |
Attacks 3 opponents at a time with Thunder Strikes that deal Electro DMG. Additionally, Veneficus Mechanicus: Furious Discharge periodically strikes one nearby opponent with a Lightning strike that deals Electro DMG. |
 |
2 |
Mysticus Mechanici: Fulfilment |
Continually buffs the Veneficus Mechanici within a large AoE around it, increasing their DMG (by 75% of their base ATK). This buff does not stack with the effects of other Mysticus Mechanici: Fulfilment and Mysticus Mechanici: Desire. |
 |
8 |
Veneficus Mechanicus: Ordnance |
Intermittently releases a Shattering Bolt that homes in on an opponent, dealing Physical DMG on impact. Shattering Bolts are especially effective against Geo. |
 |
6 |
Recovery Mechanicus: Mark III |
Generates a great deal of bonus Veneficus Points for each opponent defeated in a large AoE around it. |
Recommended Mystic Arts
| Mystic Art Type |
Effect |
| Other |
Pyro Mechanici perform 2 consecutive attacks against a single opponent |
| Other |
Max constructible Mechanici +1 |
| Other |
Cryo Mechanici fire at +1 target(s) per shot and deal +150% DMG against Frozen opponents |
| Other |
Electro Mechanici get a 50% DMG Bonus with each attack. Lasts for 30s. Max 5 stacks. |
| Other |
Pyro Mechanici ATK +50% |
| Other |
Electro Mechanici ATK +50% |
| Other |
Cryo Mechanici ATK +75% |
Enemies
| Wave |
Enemies |
| 1 |
24 |
| 2 |
24 |
| 3 |
36 |
| 4 |
36 |
| 5 |
20 |
Strategy
Wave 1
Monster Types
| Icon |
Name |
 |
Hilichurl |
 |
Hydro Samachurl |
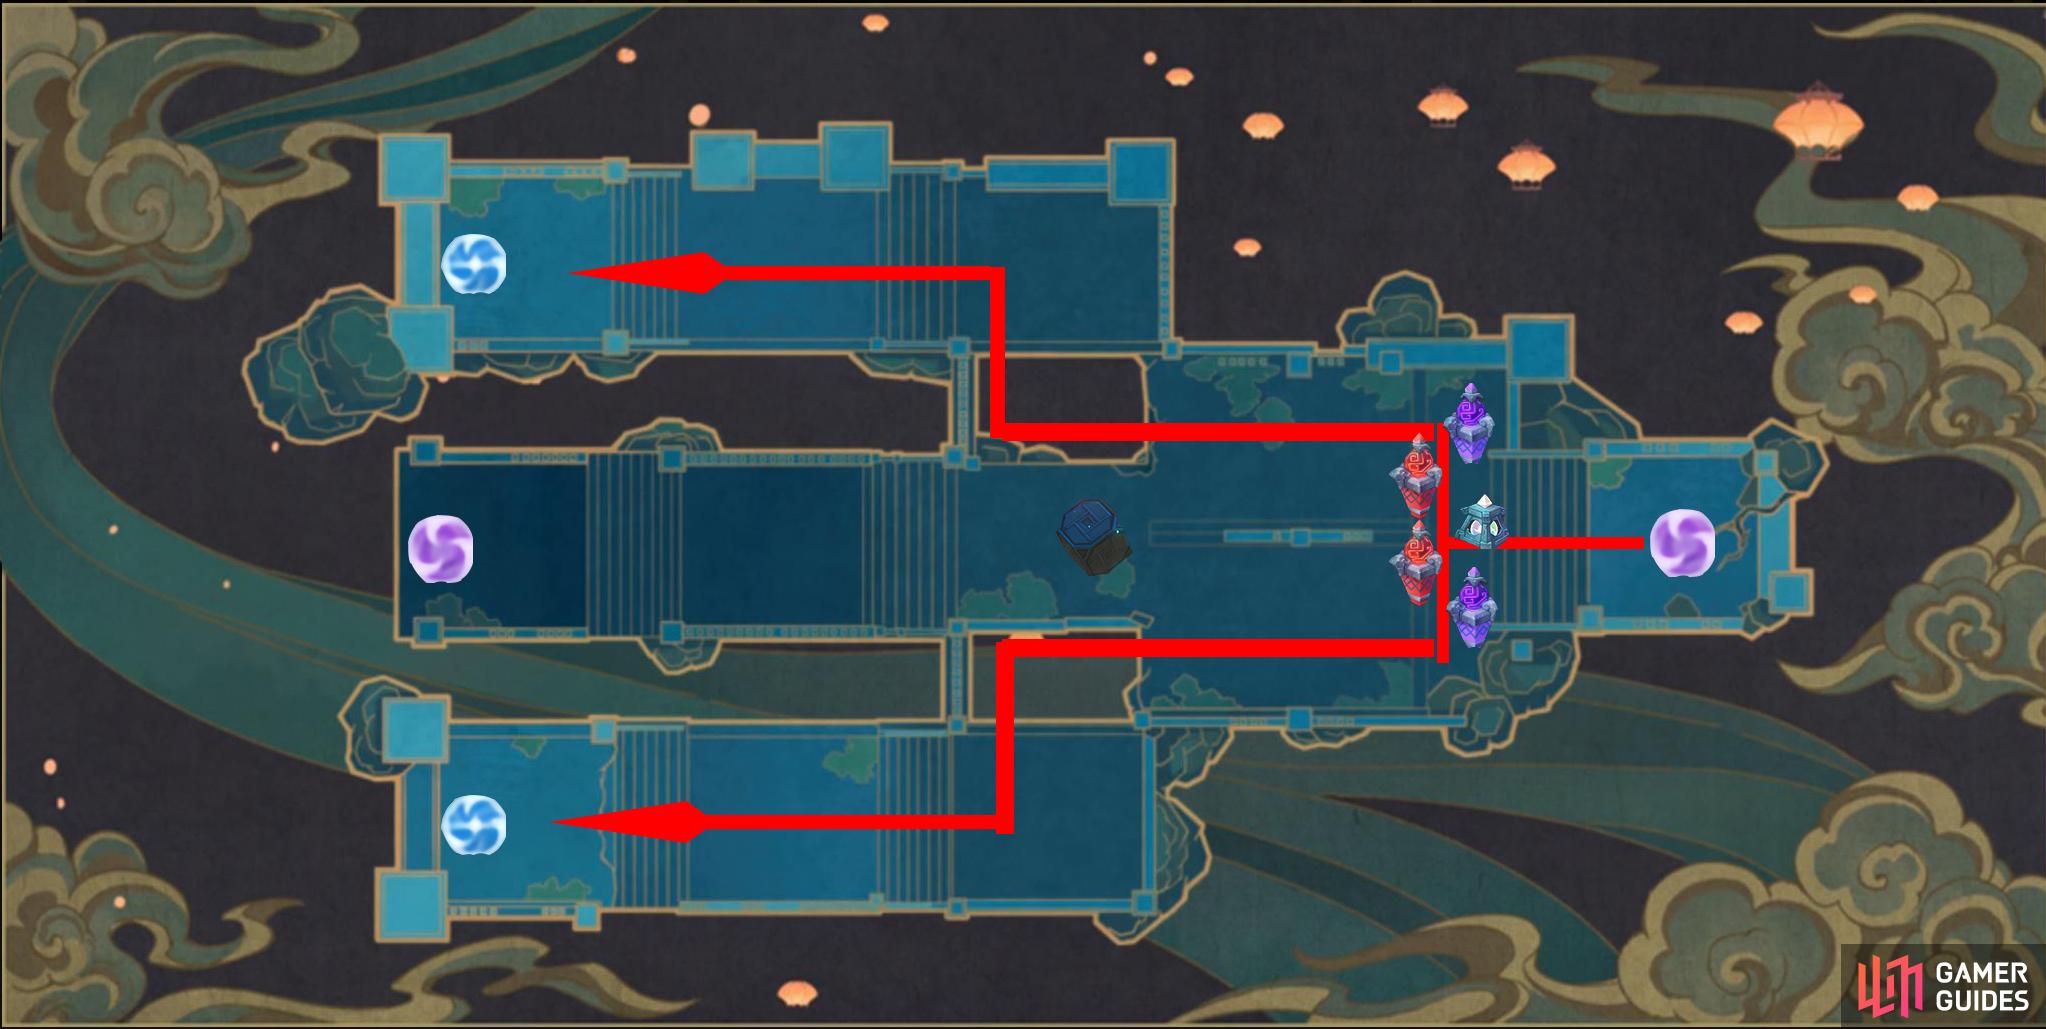
You start this wave off with the enemies coming from the top portal, moving straight down the middle until they split off to both your portals, by placing two Electro and two Pyro Mechanici nearest to the portal they come from, you can defeat them before they split, lastly having a Recovery Mechanici in the middle of them yields you more Veneficus Sigils. Like always, attack the Samachurls to slow them down as they like to sprint through.
Wave 2
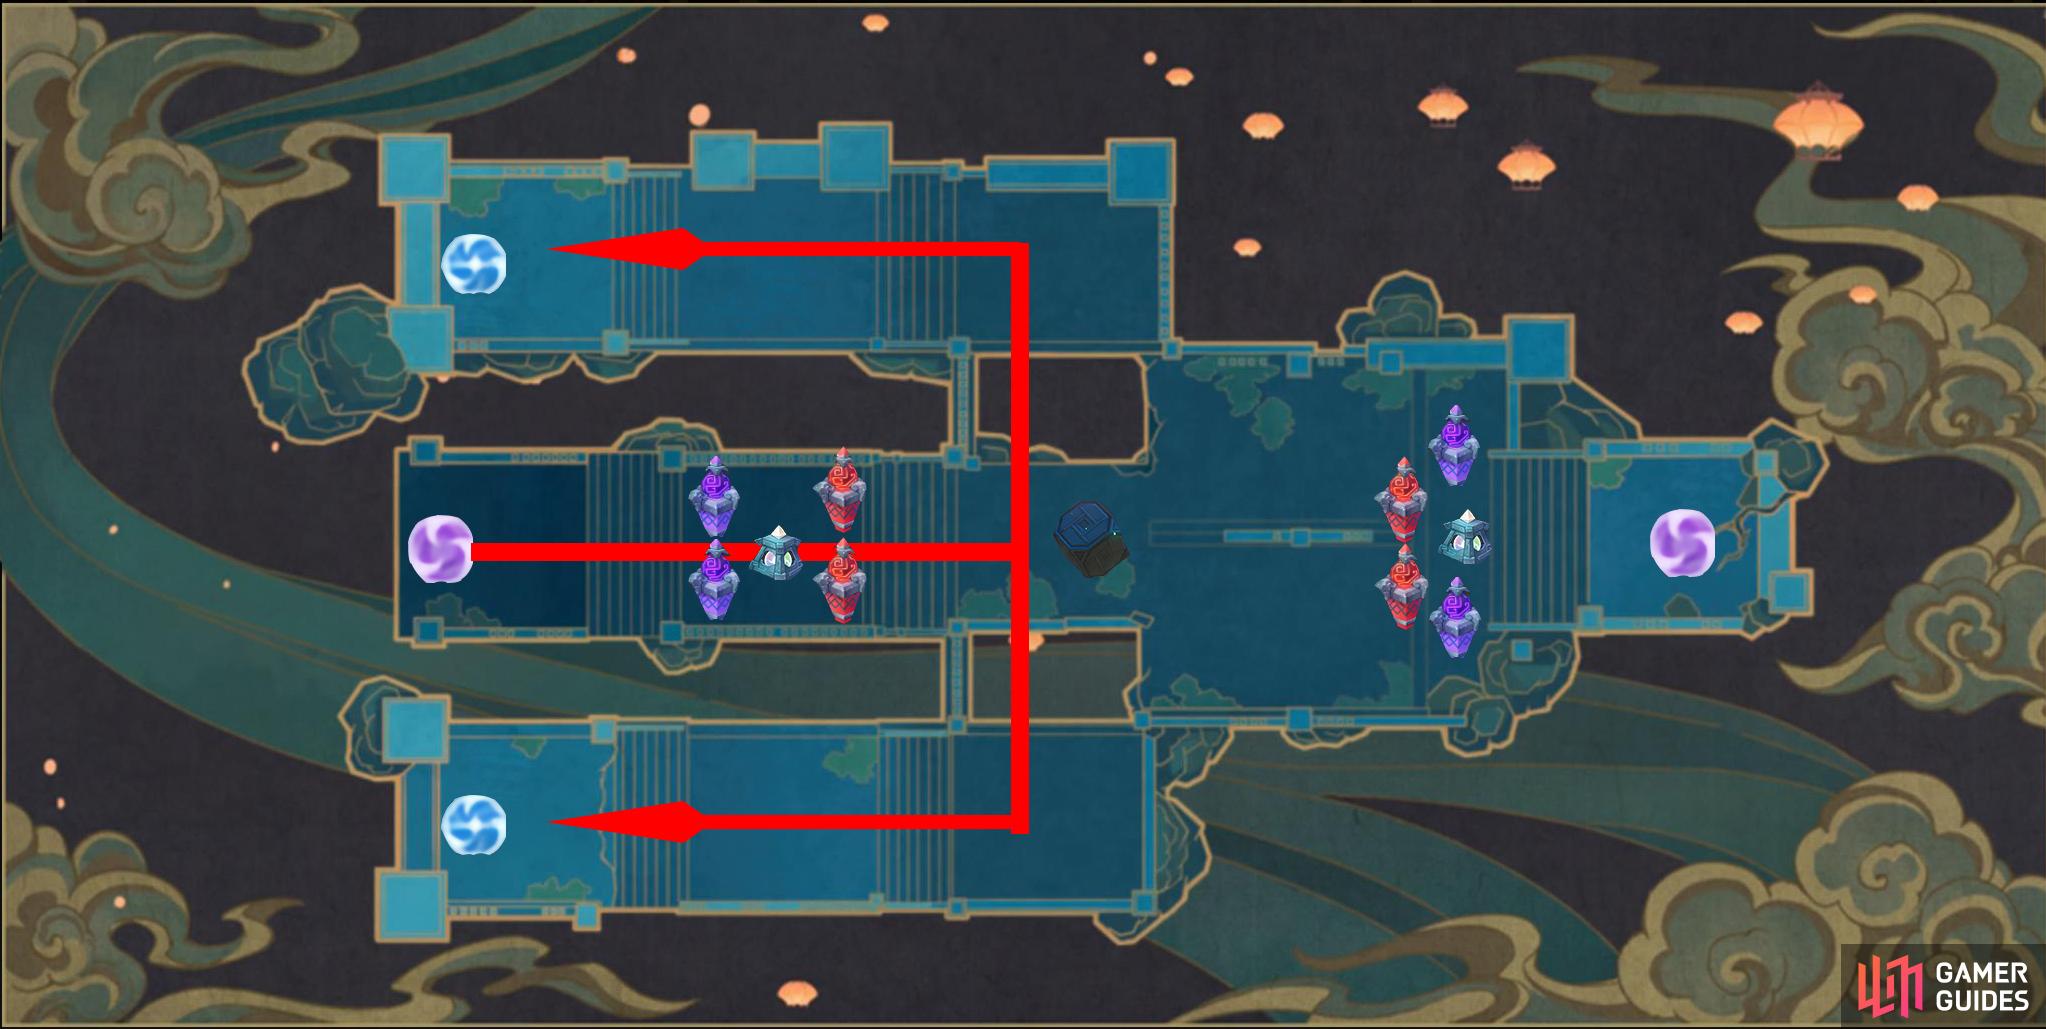
On this wave, the enemies will just come from the bottom portal and then split in the middle and then head to both of your portals. Place two Electro and two Pyro Mechanici on the panels nearest to the portal that the enemies will come from with the Electro being the ones in front and the Pyro behind them, once again, place another Recovery Mechanici in the middle for more Veneficus Sigils. Attack the enemies with your party members to slow them down, use Claymore attacks for the shield enemies and elemental attacks preferably Cryo on the other groups.
Monster Types
| Icon |
Name |
|
Hilichurl |
 |
Ice Shield Hilichurl Guard |
 |
Ice Shieldwall Mitachurl |
 |
Cryo Samachurl |
Wave 3
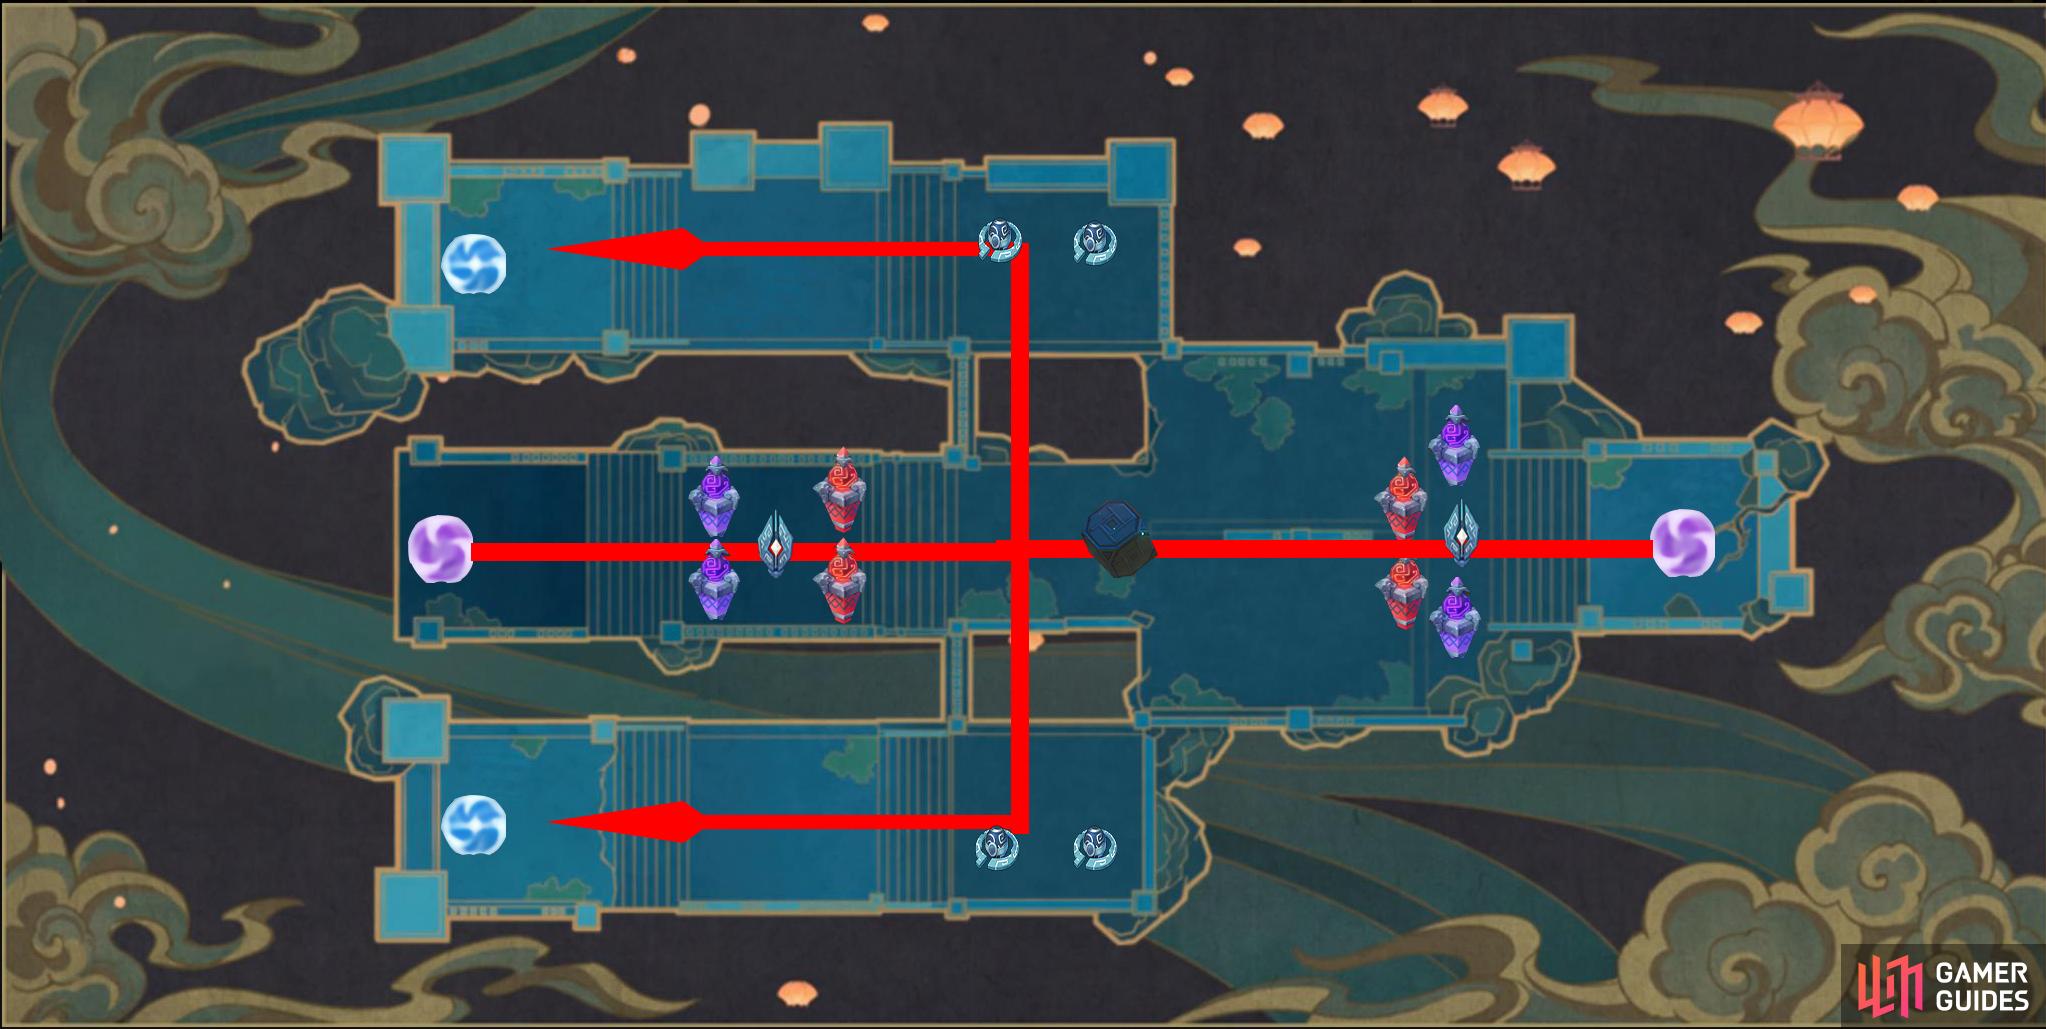
On this wave, the enemies come from both portals and split in the middle and head to both of your portals, Replace both of the Recovery Mechanicis for the Mysticus Mechanici: Fulfilment, this will buff the damage of your other Mechanici by 75%, finally we add four Physical Attack Mechanici and place them in pairs in front of each of your portals, aiming towards the middle of the arena. Once again the Shieldwall enemies should be attacked by a Claymore user to help break their shields and be wary of the Samachurls and Hilichurl Berserkers as they like to sprint through, attack them to slow them down.
Monster Types
| Icon |
Name |
|
Hilichurl |
 |
Hilichurl Berserker |
 |
Rock Shieldwall Mitachurl |
|
Ice Shieldwall Mitachurl |
 |
Geo Samachurl |
 |
Cryo Samachurl |
Wave 4
This wave can be difficult if you’re not prepared, the Slimes will come from the bottom portal and the Berserkers will come from the top, you can keep the Mechanici the same or you could change one of the Pyro Mechanici near the bottom portal to a Cryo but you shouldn’t need to, the tough part is that the Berserker will keep sprinting from the top portal and can be tough to slow down, attack them with Cryo and Claymores to keep them at bay and don’t be afraid to use the device in the middle to collapse the bridges to slow them down further, the Slimes shouldn’t get through but if they do, the Physical attack Mechanici should finish them off.
Monster Types
| Icon |
Name |
 |
Large Anemo Slime |
 |
Large Pyro Slime |
|
Hilichurl Berserker |
Wave 5
For the last wave, keep the Mechanici as is and focus on using a Cryo Archer character (Ganyu is great here) to stun the Ruin Guards briefly by shooting them at their core, which is on their face, switch to a Cryo character (or use Diona or Ganyu to cover both) and attack the Mages to bring their Shields down. Once again, use the bridges to drop/slow down some Ruin Guards if they break through your defenses.
Monster Types
| Icon |
Name |
 |
Pyro Abyss Mage |
 |
Ruin Guard |


No Comments