
This is a walkthrough for the Archon Quest, Danger All Around which is the third quest of the Interlude Chapter: Act 2 - Perilous Trail.

Yanfei and The Traveler walking through the dark tunnels of the space.
| Adventure EXP | Mora | Other Rewards | Previous Quest | Next Quests |
|---|---|---|---|---|
 1,124 1,124 |
 5 5  9 9 |
Chasmic Maze | End of the Line |
Description
In order to escape from the underground, the party keeps searching for a way out after getting some rest. But as you discuss the situation, everyone notices more and more anomalies. Can this new path really lead to the outside world?
Steps
- Return to camp
- Wait till the next day / Talk to everyone
- Confirm the situation inside the Domain
- Jump into the breach / Examine the mysterious door in front of you
- Enter the door / Escape from here
- Talk to everyone (0/3)
- Head to the place Yanfei mentioned
- Try to make contact with Xiao / Talk to Xiao
- Talk to Yelan
- Talk to everyone (0/4)
Return to camp
This step only appears if you’re not in The Chasm’s Bed when you start the quest. If you’re already there, you can ignore this step.
Wait till the next day / Talk to everyone
Once you’re in camp, go to the clock menu, and wait until the next day for a scene. The trapped group will conversate with each other about their current situation. Most of them are either tired, bored, or frustrated about being stuck underground. Paimon will mention that it feels like they have been down here at least 20 days, although it’s only been a day or two. Kuki, and Yanfei agree that something feels off as they aren’t hungry or showing any signs of fatigue which they should be showing by now.
You’ll tell the group that you were unable to summon Xiao, and Arataki deduces that he must be in trouble. As the group are talking about whether a situation like this should be any trouble for an adeptus, Yelan will come over, and tell you she’s found something. She’ll tell you that appearances can be deceiving down here, and that she found a passageway hidden behind an odd looking wall which she assumes was some type of illusory magic. Yelan shatters the illusion, and shows the passageway to the group which appears to be another Domain.
Confirm the situation inside the Domain
Head over and interact with the portal to access the next domain. This Domain is called “City of Hidden Runes”. It only recommends bringing along a Geo character, but you should bring along a Hydro, and Cryo character as well just to make the battles easier.
City of Hidden Runes
As soon as you enter, you’ll be greeted by a tutorial telling you the rules of this Domain. You’ll have four runes in the center of the room, each displaying a different rune, and color. What you need to do is step on the correct rune to light it up and activate it. If you step on the wrong rune, you’ll take damage. Another thing you’ll have on this platform is four portals one on each side, and these teleport you to another platform.
Blue Rune
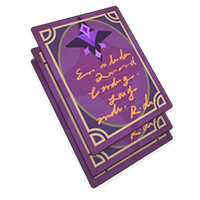
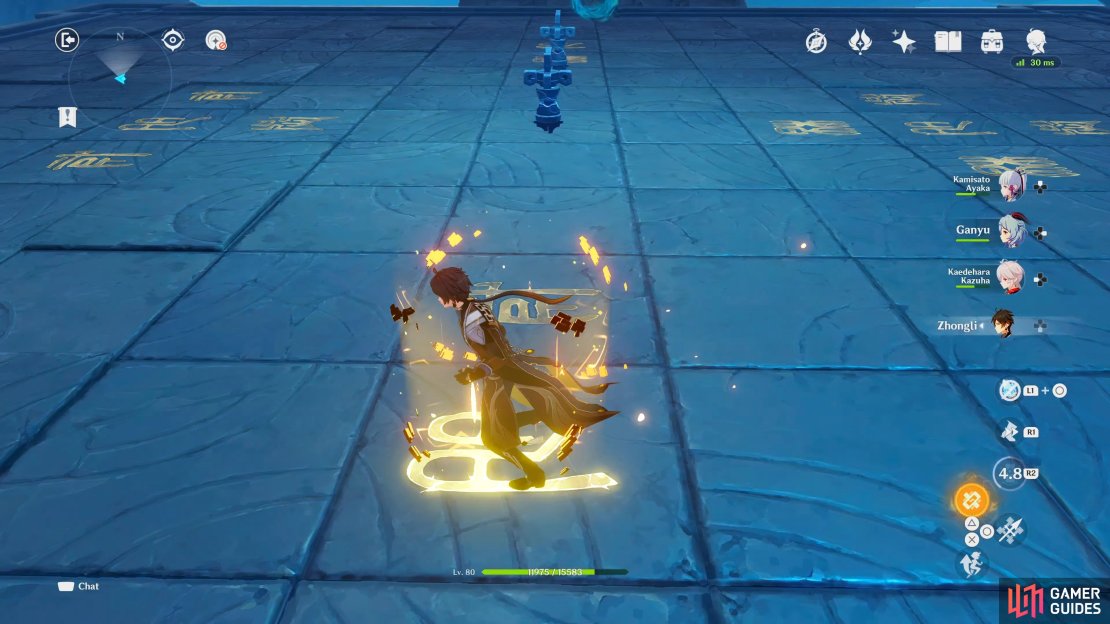
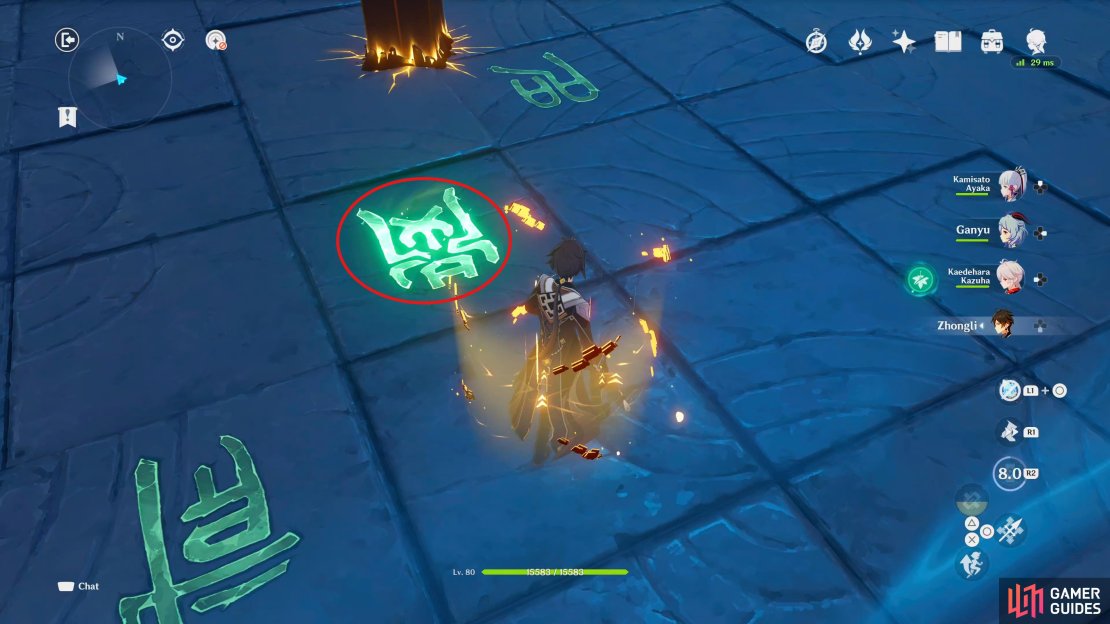
Take the western portal in the main room, you’ll hear some indiscriminate chatter which sounds like Xiao. On this platform, you’ll have two beacon-like objects, and four groups of runes in each corner. Head over to the nearest group of runes to your north, and stand on the rune in the center to activate it. The rest of them will deal damage to you.

(1 of 3) Stand on the correct rune to light them up
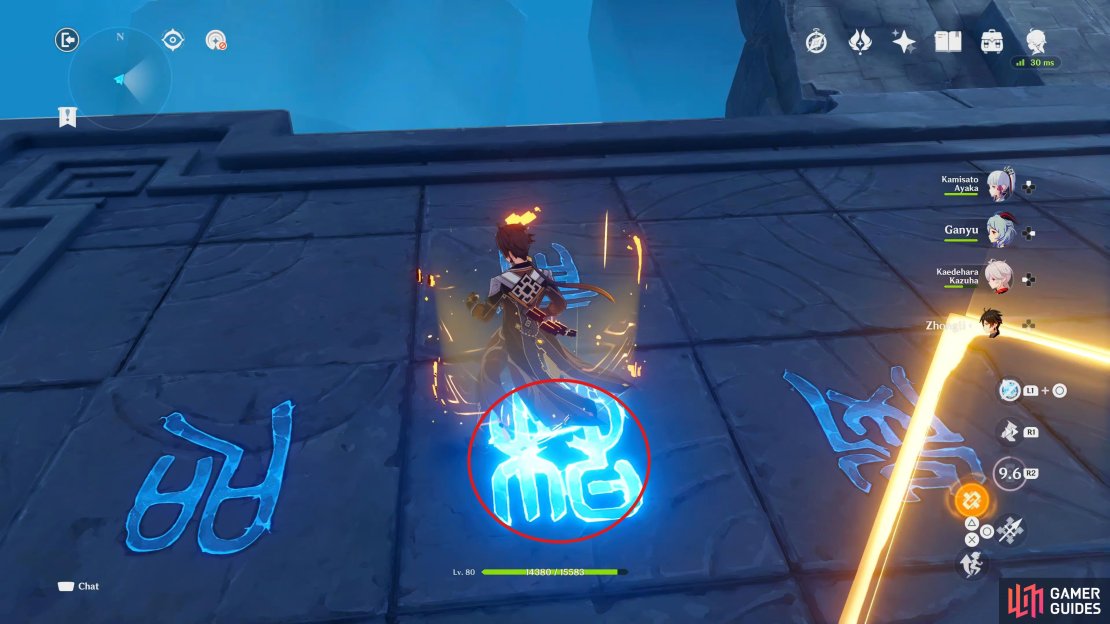
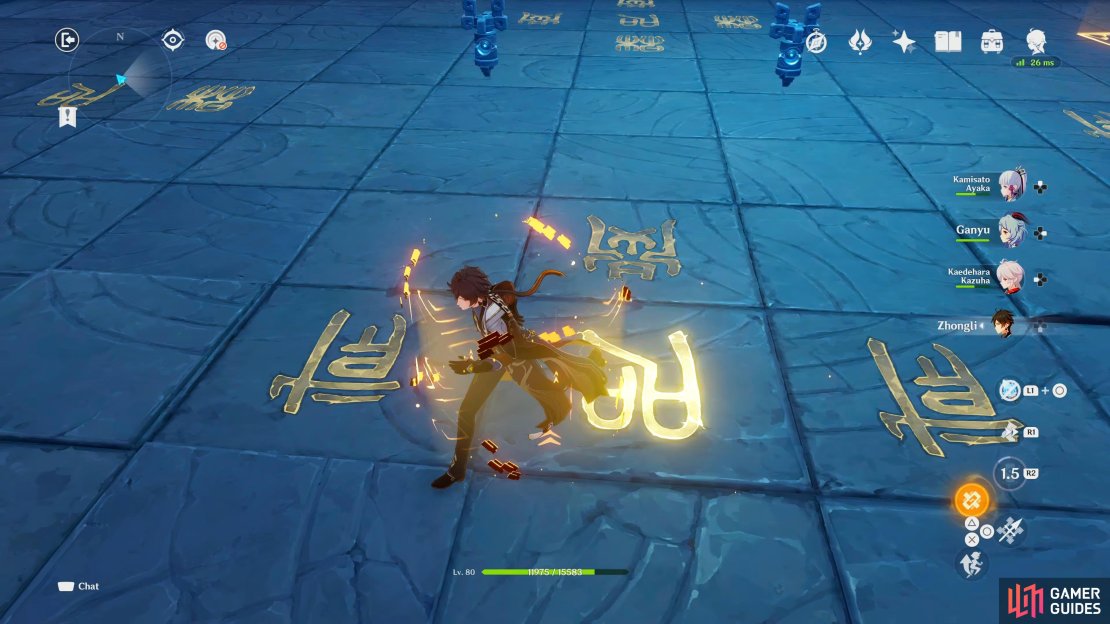
Now head west, where you’ll see two lines of three runes if your camera is facing to the west. You’ll want to stand on the bottom middle rune, and all but the middle rune on the top line. Once you activate them all, you’ll have to battle three Geovishaps Hatchlings.
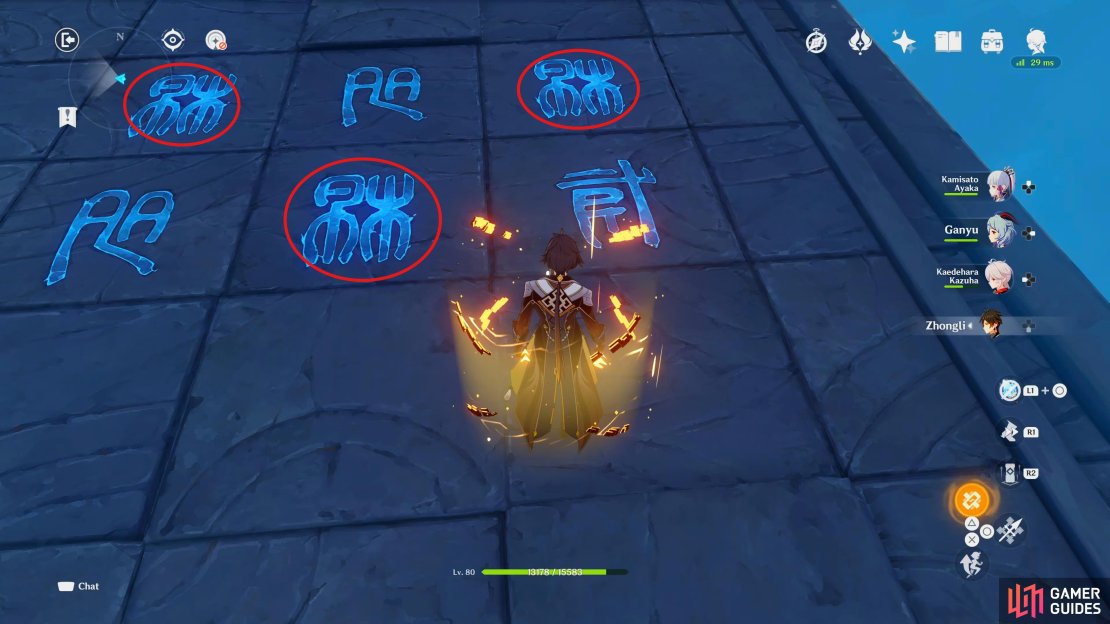
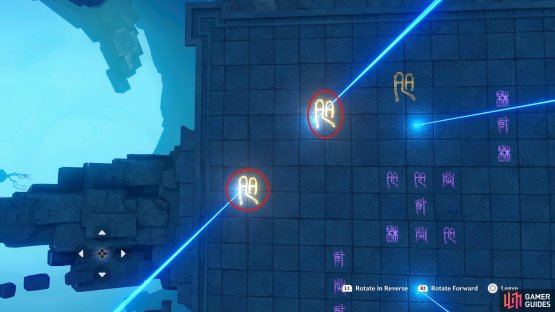
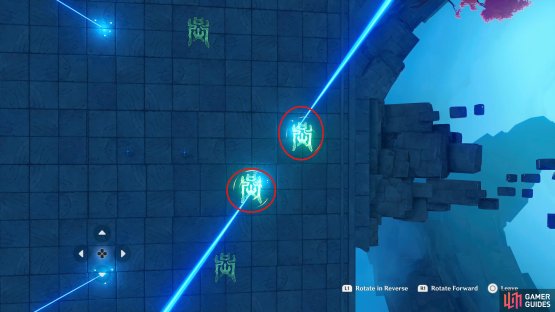
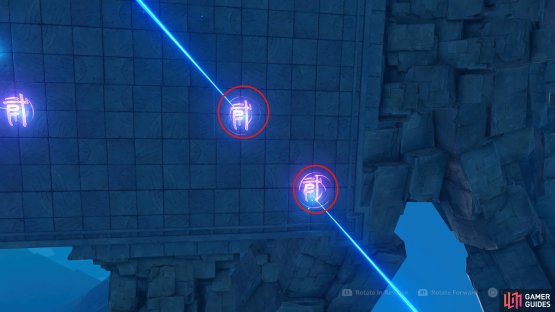
Once the battle is concluded, you’ll get another tutorial, this will explain that the beacon-like objects in the center of the room are in fact called Lightshapers. These majestic devices can shine beams onto the opposite platform. You can then direct the beams on to the opposite platforms’ large runes, and activate them.
Activate the one which is further to the south, and move the beams to match up with the two large blue runes in the northwest corner, then exit the Lightshaper. Now activate the other Lightshaper and position it on the two large blue runes in the southwest. This will light up the blue rune in the main platform leaving you with three more to do.


(1 of 2) The Lightshaper with the smallest gap between the beams needs to activate the runes in the nortwest corner.
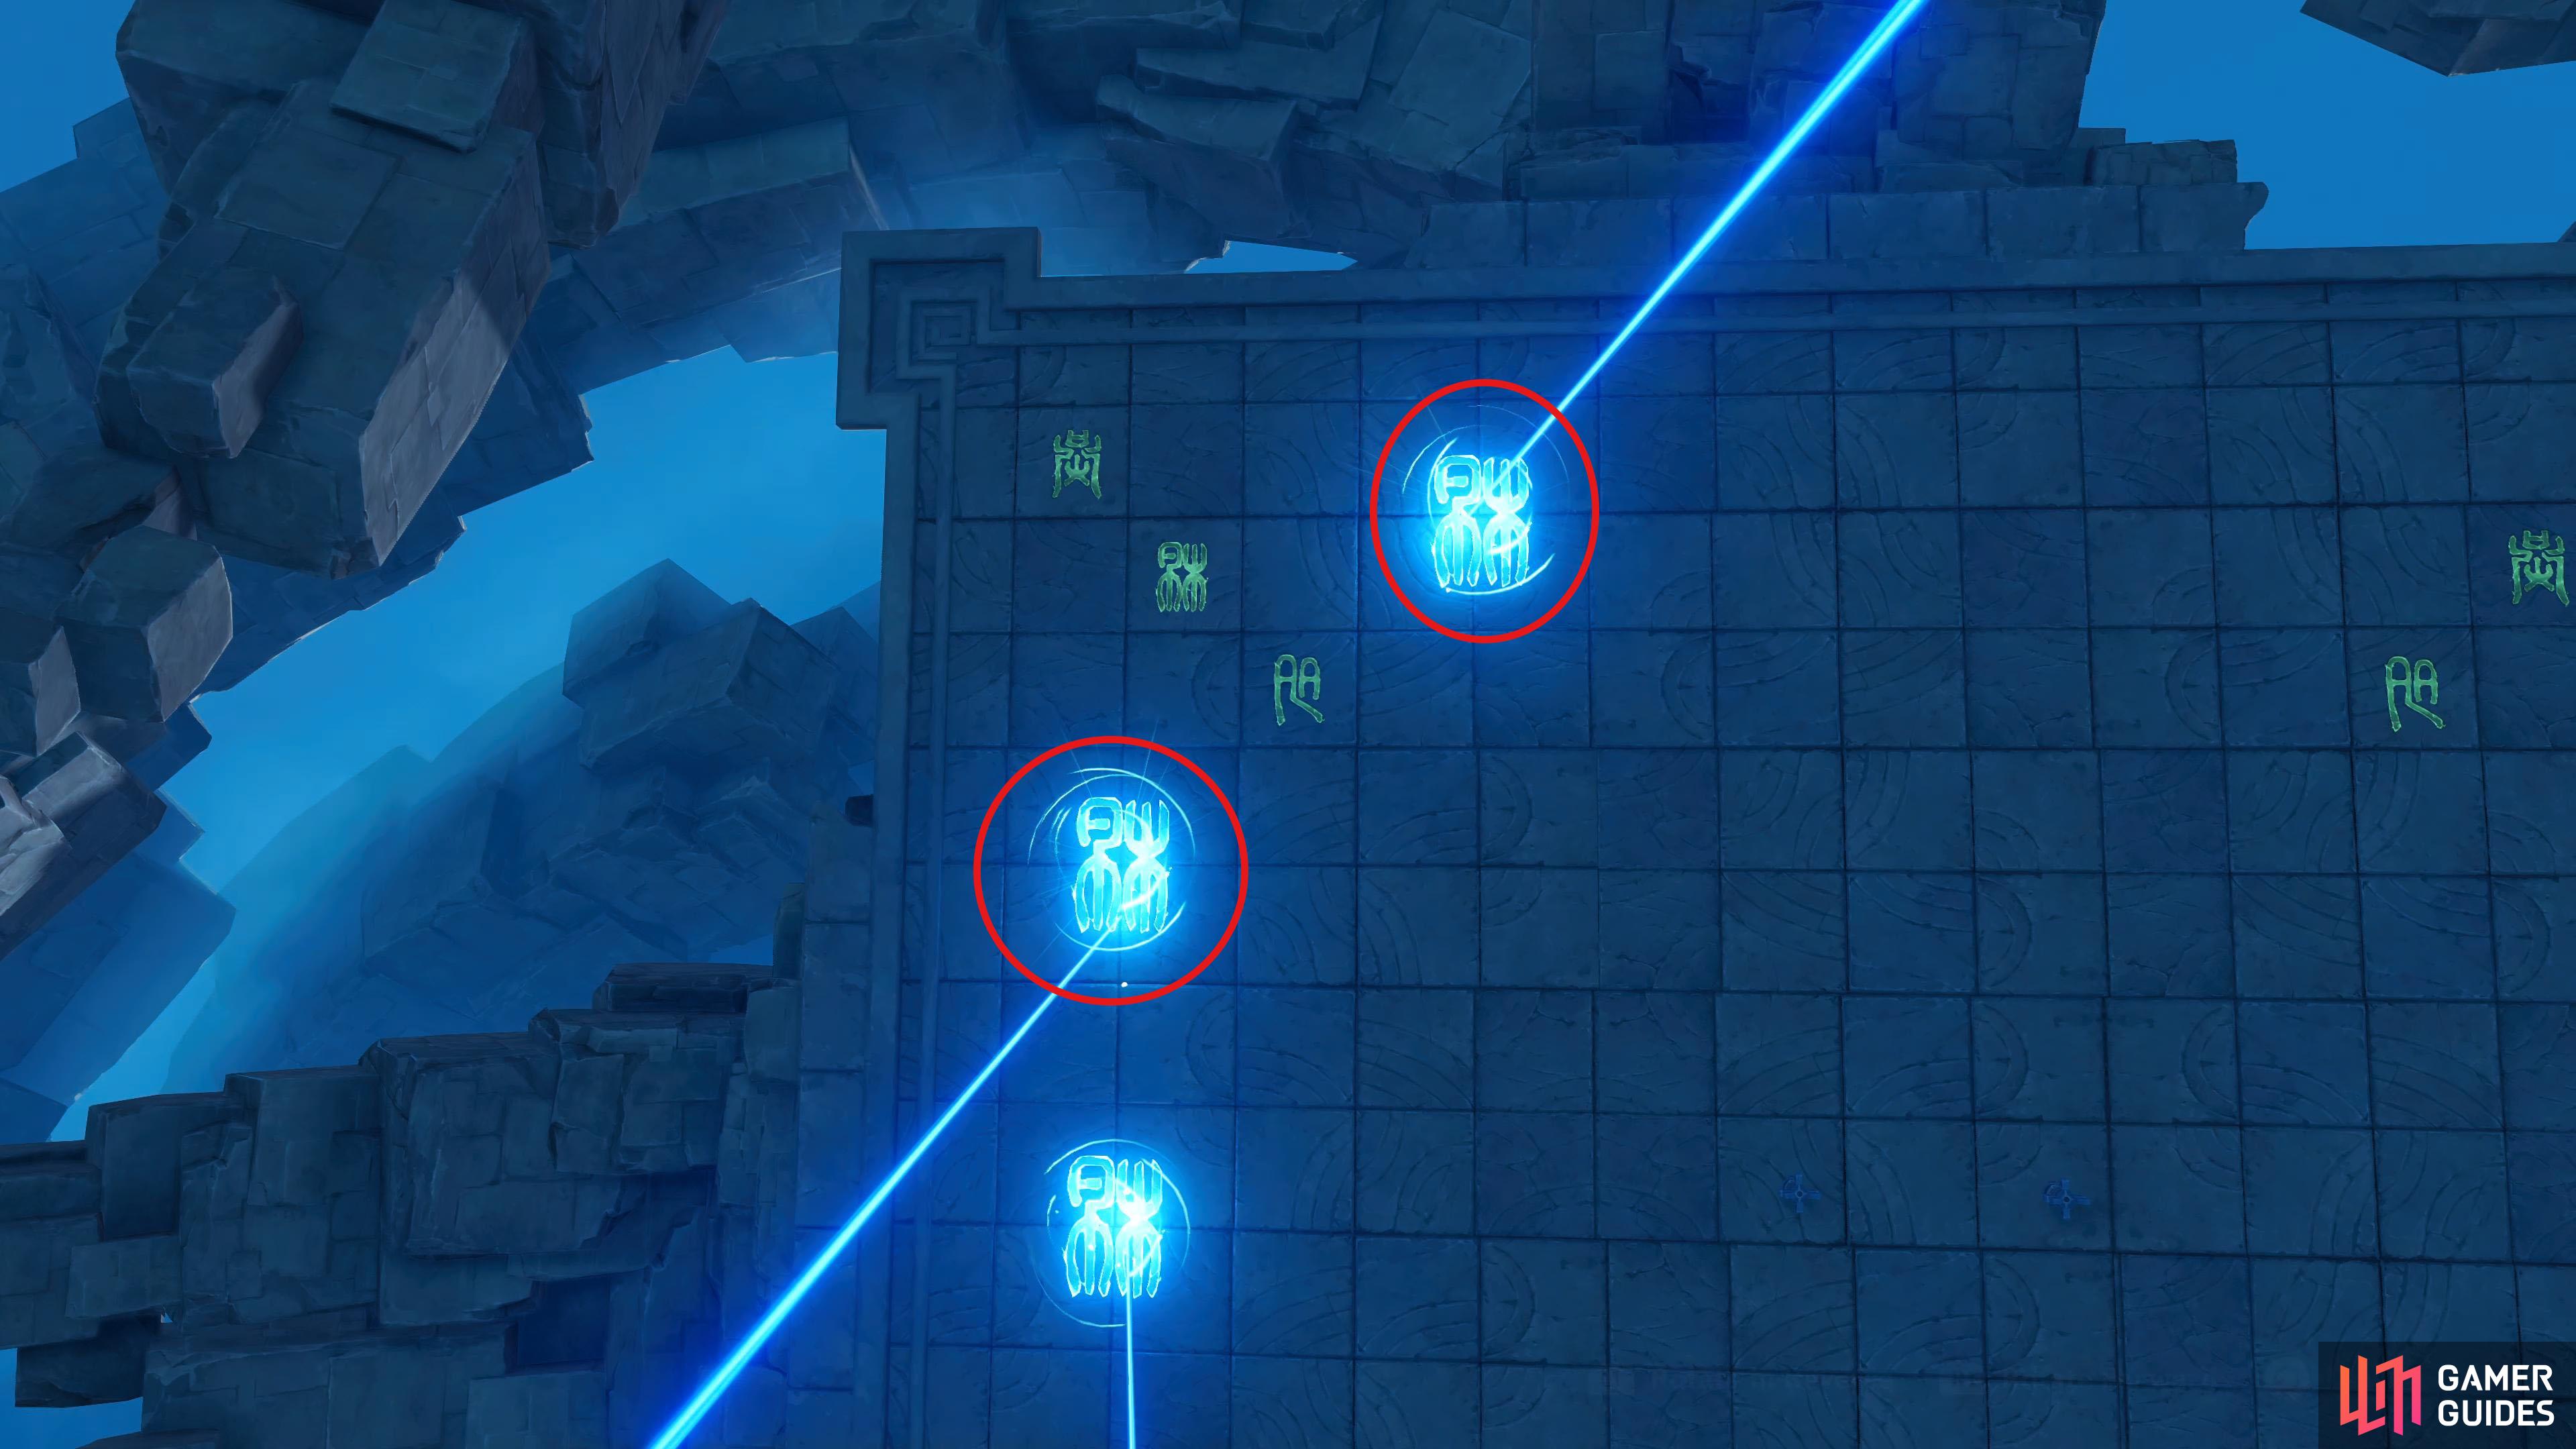

The Lightshaper with the smallest gap between the beams needs to activate the runes in the nortwest corner. (left), The larger beams will need to activate the west, and south runes. (right)
Yellow Rune
The next rune you should do is the Yellow rune, take the northern portal, and this platform will have four groups of runes around two Lightshapers in the middle. Walk over the first rune from the southern group, the center rune from the western group, the furthest north rune from the northern group, and finally, the center rune from the eastern group.
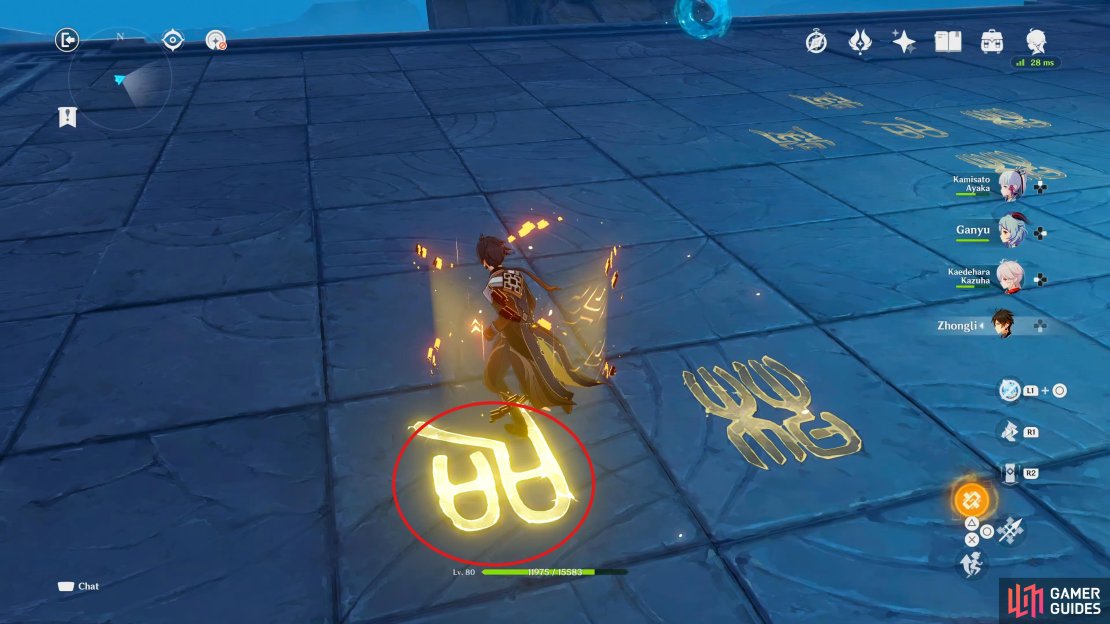
(1 of 4) Activate the first rune from the southern group
Once they’re all done, you’ll have to battle three Rock Shieldwall Mitachurls. When they’ve been defeated, interact with the Lightshapers. The one with the narrower gap between the beams needs to go to the two large yellow runes to the northwest, and the one with the larger gap needs to go to the large yellow runes to the northeast.
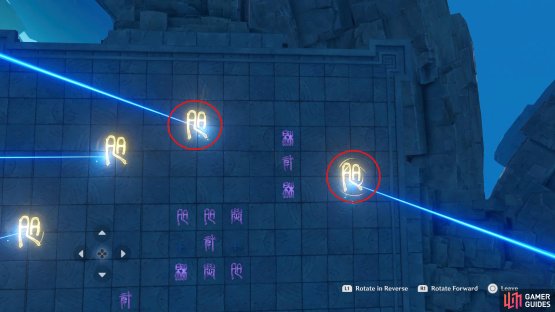
(1 of 2) The Lightshape with the smaller game between the beams needs to activate the runes in the northwest corner


The Lightshape with the smaller game between the beams needs to activate the runes in the northwest corner (left), and the larger gap between the beams needs to activate the runes in the northeast. (right)
Green Rune
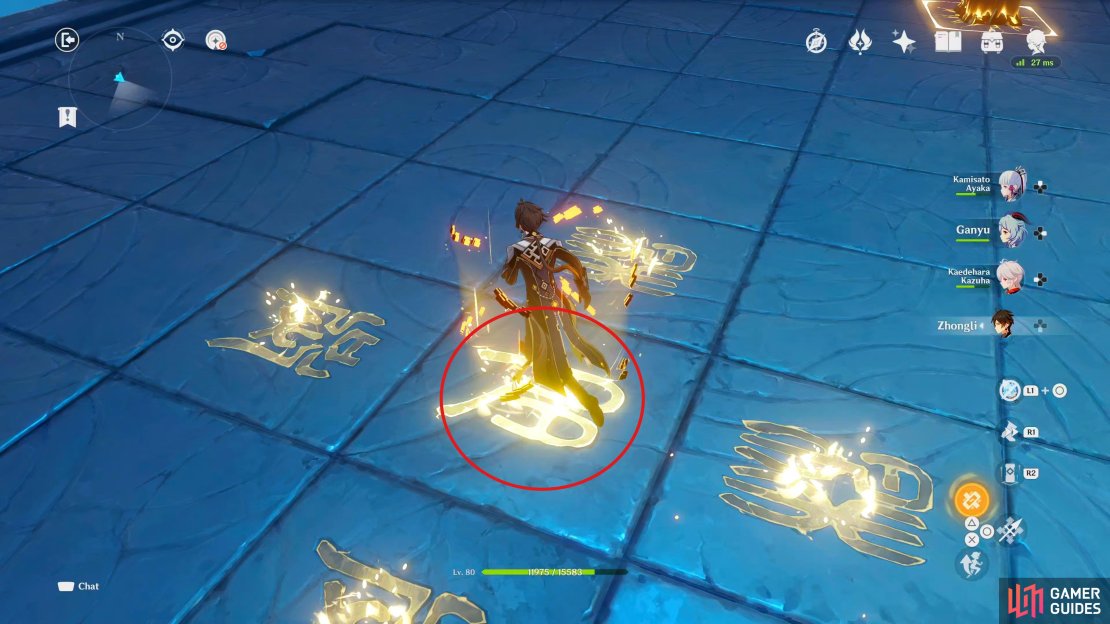
With the yellow rune lit up, make your way through the northern portal. Once again, there’ll be four groups of small green runes in each corner of the platform. Head over to the southeastern group and activate the central rune. Now activate the far northeastern rune in the northeastern corner. For the northwestern group, activate the rune nearest to the center of the room. Finally, activate the rune nearest to the center of the room from the southwestern group.

(1 of 4) First, activate the central rune from the southeastern group
Once again, you’ll have another battle. This time you’ll be fighting two Geovishaps. Once they’re defeated, activate the Lightshapers. The beam with the narrow gap needs to light up the two large green runes to the east, and the larger gap beam needs to light up the north, and south large green runes.
(1 of 2) The Lightshaper with the smaller gap between the beams needs to activate the runes on the east


The Lightshaper with the smaller gap between the beams needs to activate the runes on the east (left), and the Lightshaper with the larger gap needs to activate the runes at the top and bottom. (right)
Purple Rune
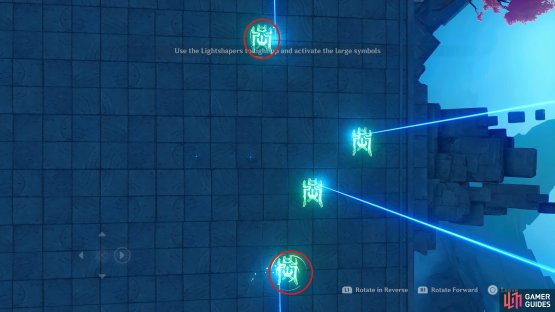
Three down, and one to go. Head back to the main room, and take the northern portal. Here, you’ll have three groups of small purple runes, one large group in the center, and two smaller groups at the southeast, and northwest of the central group. Walk over the central rune from the southeast group, the central rune in-between the Lightshapers from the larger group, and all but the central rune from the northwest group. When they’re all lit up, you’ll have to battle a Stonehide Lawachurl.


(1 of 3) First, activate the center rune from the southeast group
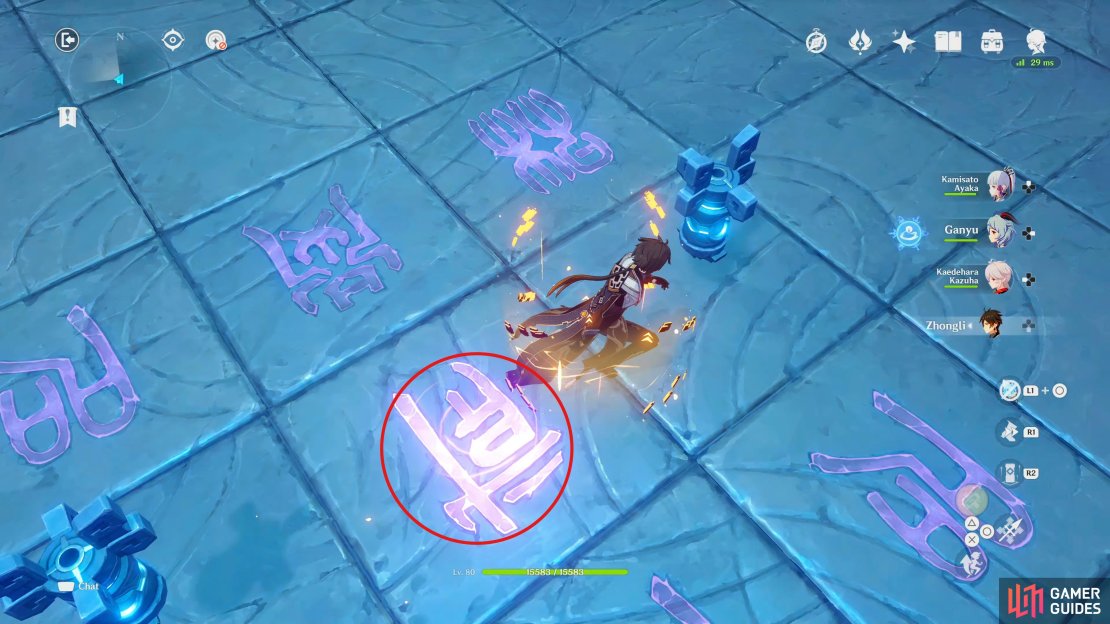
Once it’s defeated, activate the Lightshapers. The beam with the narrow gap needs to light up the large purple runes to the southwest whilst the larger beam needs to light up the large purple rune to the south/southeast.

(1 of 2) The Lightshaper with the smaller gap between the beams needs to activate the runes of the west


The Lightshaper with the smaller gap between the beams needs to activate the runes of the west (left), and the Lightshape with the larger gap needs to activate the runes in the southeast. (right)
Conclusion
Once all the runes are activated, you’ll get a scene, and a path will appear in the center of the opposite platform from the main room. When you regain control, take the northern portal to the now-opened path for another scene. Yelan will notice something’s not right, and a small fissure will appear of what looks like Xiao. The group will call out to him, and you’ll converse for a brief moment before Xiao tells you something isn’t right with the Domain, and you should leave now. Before he can tell you anything else, he disappears. Arataki will act hastily like normal, and head into the new path you opened first, which leaves him hurting his rear end. At least you now know how deep the drop is!

Is this Xiao or is it an illusion?
Jump into the breach / Examine the mysterious door in front of you
When the scene ends, you’ll find yourself falling down, and you’ll thankfully hit the pool of water at the bottom. Swim over to Arataki who is just to your east, and talk to him. Paimon will ask him how his rear is whilst she laughs, and Kuki joins in teasing him, until Yanfei tells them not to laugh whilst holding in a laugh herself. Yelan will notice that Xiao isn’t here either, but there is a mysterious door down here.
The whole group isn’t too keen to open the door except for…Arataki, and after trying some brute force on the door, he notices the device to open it sitting right next to it. When he goes into the room, he sees what appears to be a room in Inazuma. A man in there starts shouting at Arataki “Evil Oni, begone” and tells him that all he does is goof around all day which is a bad influence on their child. Also, Yelan notices that the room had a bowl of beans sitting on the table, and the family started to throw them at Arataki.
The group comments on how bizarre this is, and you’ll suggest he opens the door again to see if anything changes. He’ll tell you that he’s not going in there again, and he proposes Paimon does it instead. Paimon is obviously too scared to go in there, so Kuki takes her place. This time, a woman with green hair can be found there instead. She tells her to take her nose out of the books as she already found her a job as a Shrine Maiden. This is obviously Kuki’s mother, but what is she doing in the room?
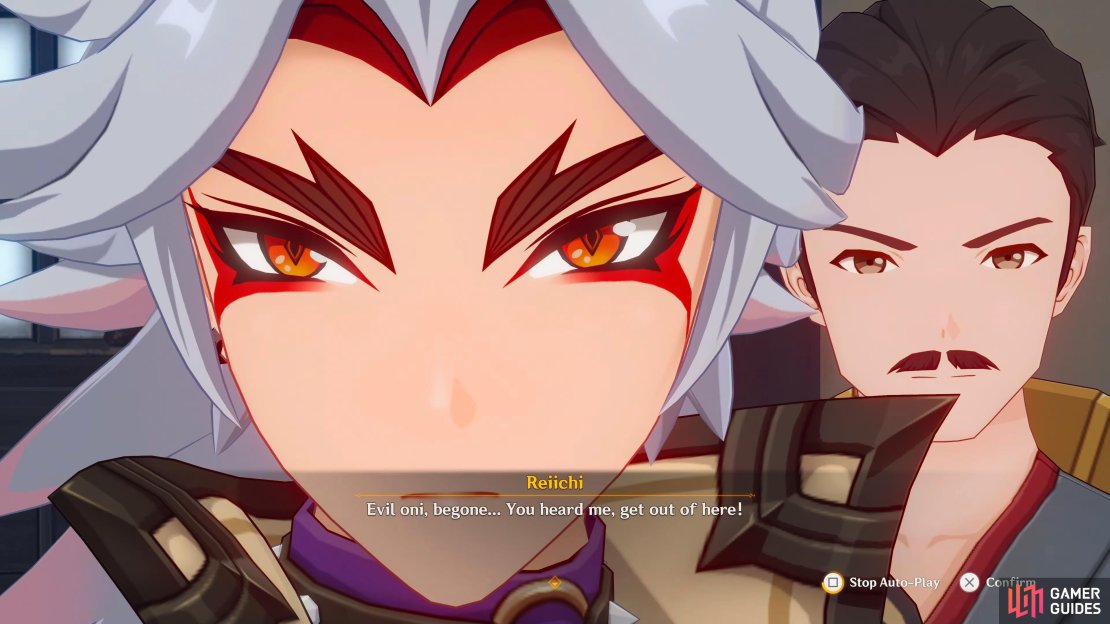

(1 of 3) The mysterious door seems to reveal your worst fears, and Arataki’s worst fear appears to be not being liked because he’s an oni.
Kuki quickly closes the door, and she explains to the group that it was indeed her mother, and that she wanted Kuki to become a Shrine Maiden. To Kuki, this is the opposite thing she wanted to do as she prefers a more chaotic and exciting type of life. Arataki deduces that whatever is behind the door can change, and the change is something they don’t want anybody to see. Kuki will ask if anyone else wants to go in, and Yelan will tell her that she isn’t going in there.
Next up is Yanfei, as far as she knows, she doesn’t have any fears…until she witnesses a civil dispute. She’ll explain her reasons why she doesn’t like them, and she’ll ask anyone else if they want to give it a try. Once again, Yelan tells you she isn’t going in there, but this time she explains why. Apparently she works for Ningguang, and that the scope of her work includes some of Liyue’s biggest secrets. If she went through that door, there would likely be no witnesses left alive. This makes the group stop asking her to go in, and that leaves only you.
Enter the door / Escape from here
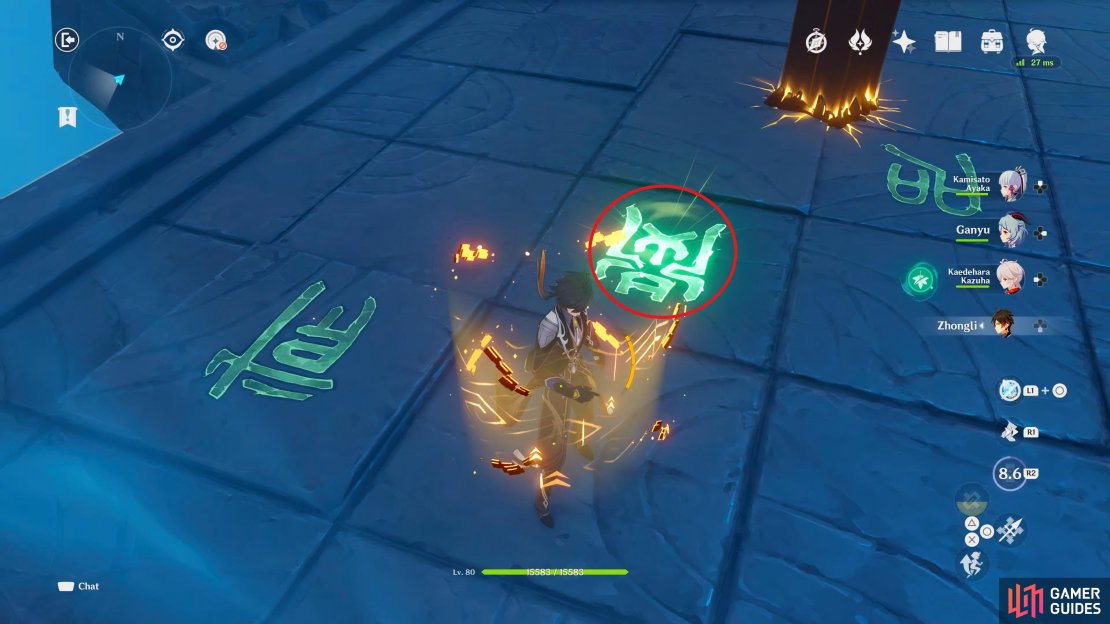
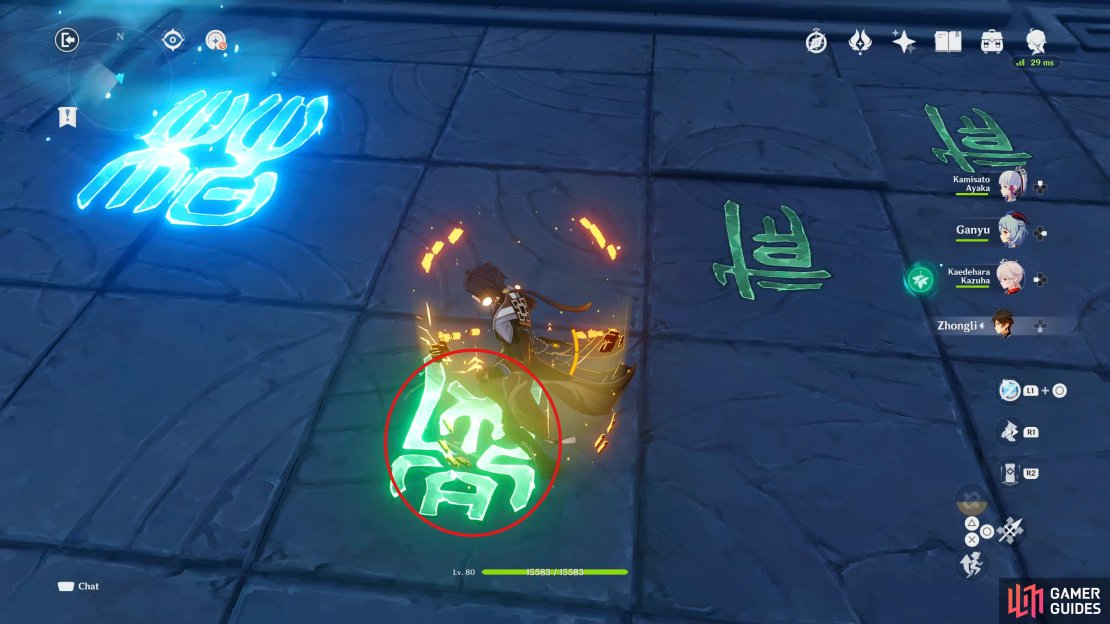
As you go through the door, you appear to be in an abyss. As you look around, the exit disappears, and it looks like it’s trying to trap you there. You’ll regain control, and you’ll need to find a way out. Head northeast to find the glowing triangle on the floor, and investigate it. This will teleport you to the back of the cave, where you dropped from earlier. Head back to the group, and they’ll ask if you found anything, Yelan will point out that by the look on your face, it was something unpleasant.

The Traveler’s greatest fear is the abyss that took away their twin.
You can hear the frustration in Yelan’s voice when she says not only did you not find Xiao, but you all witnessed something you didn’t want to see. And that it feels like the changes are targeted at the group. Kuki agrees with her, and Yanfei backs up her claim by saying that the space you’re in defies all common logic. Also, it appears that some effects of fatigue have come back, and Kuki will mention she’s tired, and Paimon will straight up fall asleep. Trying to make sense out of it, Yanfei deduces from the current evidence that you’ve experienced so far. It seems your physical condition was suspended in this space before which is why you didn’t feel the effects of hunger or fatigue.
Talk to everyone (0/3)
When the scene ends, you’ll be back at the entrance, so the group can rest. You’ll need to talk to Kuki, Arataki, and Yanfei in any order. Yanfei, and Yelan can be found at the back of a cave through the northern tunnel. Head over, and talk to them. Yanfei will ask Yelan is OK as she’s noticed that she hasn’t had any rest yet since you fell down here. She assures her that she’s fine, as staying focused under pressure is her specialty. They’ll tell each other that they both have some ideas, but they need to think them through more before they share them.
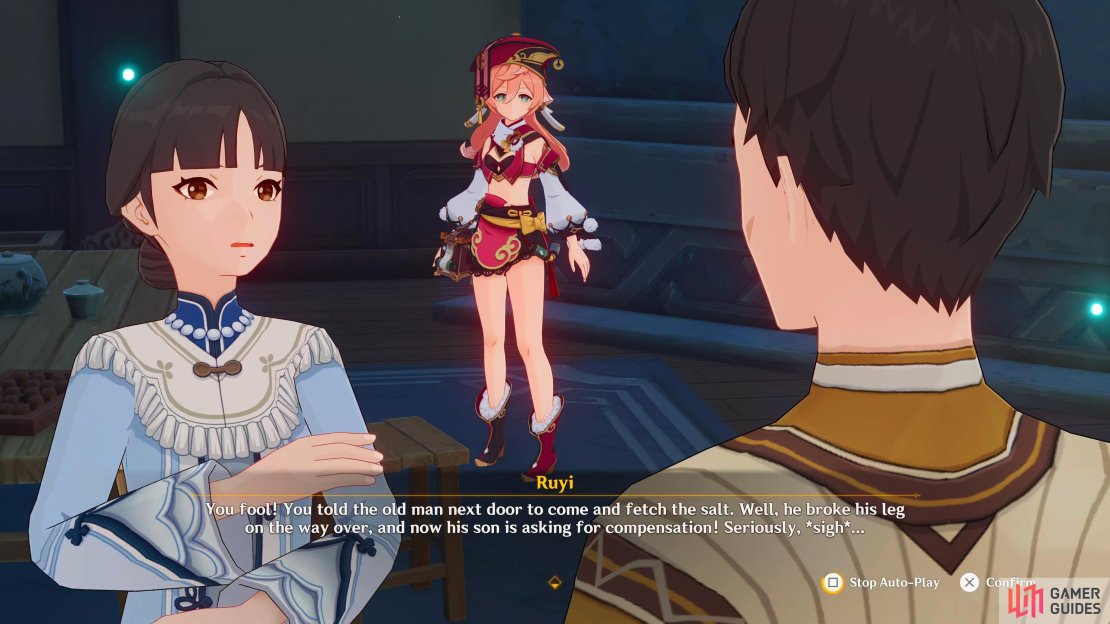
After speaking to the two of them, you can find Kuki, and Arataki in the room to the east. Kuki will explain in more detail about her biggest fear that you saw, and Arataki will be having a chat with Beefc…Ushi whilst looking after Paimon. When you’re done speaking to them all head back to the entrance for a scene.
Head to the place Yanfei mentioned
Now that she’s had some time to think, Yanfei asks you if you think it’s a coincidence that Xiao showed up after you spoke about him. That it felt like something was trying to convince you that he was there. Furthermore, Xiao’s reactions to the whole ordeal seemed like he was someplace else. This makes her think that you’re trapped in a chaotic space. When you ask her what she means by that, she explains how you’ve all been seeing things that are not there or how you weren’t feeling fatigue or hunger. It almost feels like time has stopped for you all, and you’ve entered a place where normal logic doesn’t apply.

Yanfei opens up a new path by destroying a wall which just happened to be an illusion.
Another deduction she made, was that when you were speaking to Xiao, it felt like his voice was being transmitted by some kind of mind-bending spatial alteration. Like the space wanted you to think Xiao was here, but when you were in the Domain, and saw him there, it felt like the space didn’t want that to happen. When this happened, the chaotic spaces must’ve crossed each other’s paths that allowed this to happen. So if the chaotic spaces are intersecting, it means anything is possible.
Yanfei further explains that if that is indeed the case, all you need to do is keep imagining, and the space should try to deceive you which you can use against it. She’ll tell you to stay calm, and listen. She asks if you can feel that, and before you know it Yanfei breaks one of the illusions, a technique she picked up from Yelan. With the illusion broken, another path has opened up.
Try to make contact with Xiao / Talk to Xiao
Go through the new area, following the tunnel northeast until you reach an intersection. Take the northern tunnel again, and you’ll get a scene. Yanfei calls out to Xiao, and he responds almost instantly. She’ll ask if he’s OK, and he’ll tell you that he’s fine, and Yanfei will explain the situation that is going on. When you ask him to find a way to get to you, he tells you that he can’t because the darkness that sullies his soul is harmful to mortals.
Yanfei will try to convince him, telling him that right now, there are more dangerous things going on, like the space luring you into traps by trying to find him. When he recognizes that you are in danger, he agrees to try to find you. Once again, Yanfei will explain how he can do that, and eventually Xiao will find his way to you. When you see him in the flesh, you notice that he’s been wounded. Once you’ve returned to camp, Yelan will notice that you found Xiao, and she’ll tell him to rest as he’s been injured.

It looks like Xiao managed to find his way back, thanks to you and Yanfei.
Talk to Yelan
Follow the tunnel west, then south, and talk to Yelan who is having a conversation with Yanfei. With the events that have just transpired, they confirm their suspicions about this place. Furthermore, Yelan noticed a catalyst that her clan used when they practiced magic in the Domain, but it disappeared when she got close to it. She can’t be sure if it was real or just another illusion due to the nature of this place. She also deduces that as she is the only person who knows what they look like, this space really is reading their minds.
It almost feels like it is showing things that you want to see just so you’ll lower your guards and wear you down. Yanfei thinks that if that is the case it means that the goal of the space is to trap you here until you die. She asks Yelan what was her reason for being here in the first place, and she’ll tell you that she was looking into the truth regarding the monster invasion of Khaenri’ah. Apparently, a wave of dark beasts attacked Khaenri’ah 500 years ago, Rex Lapis and the Millelith fought at the frontline near The Chasm.
Just when it looked like things were taking a turn for the worst, something distracted the beasts, and the tide turned. She also had ancestors who fought in the war with one of them coming back insane. When The Chasm got unsealed, she requested to get transferred to it, so she could find the truth of what really happened.
Talk to everyone (0/4)
When the scene ends, head around the camp, and talk to Arataki, Yelan and Yanfei, Kuki, and Xiao. Once you’ve talked to them all, the quest will end.
No Comments