
| Important Items in This Area |
|---|
| Taboo Tattoos |
| U.S. Covert Operations Manual |
| U.S. Covert Operations Manual |
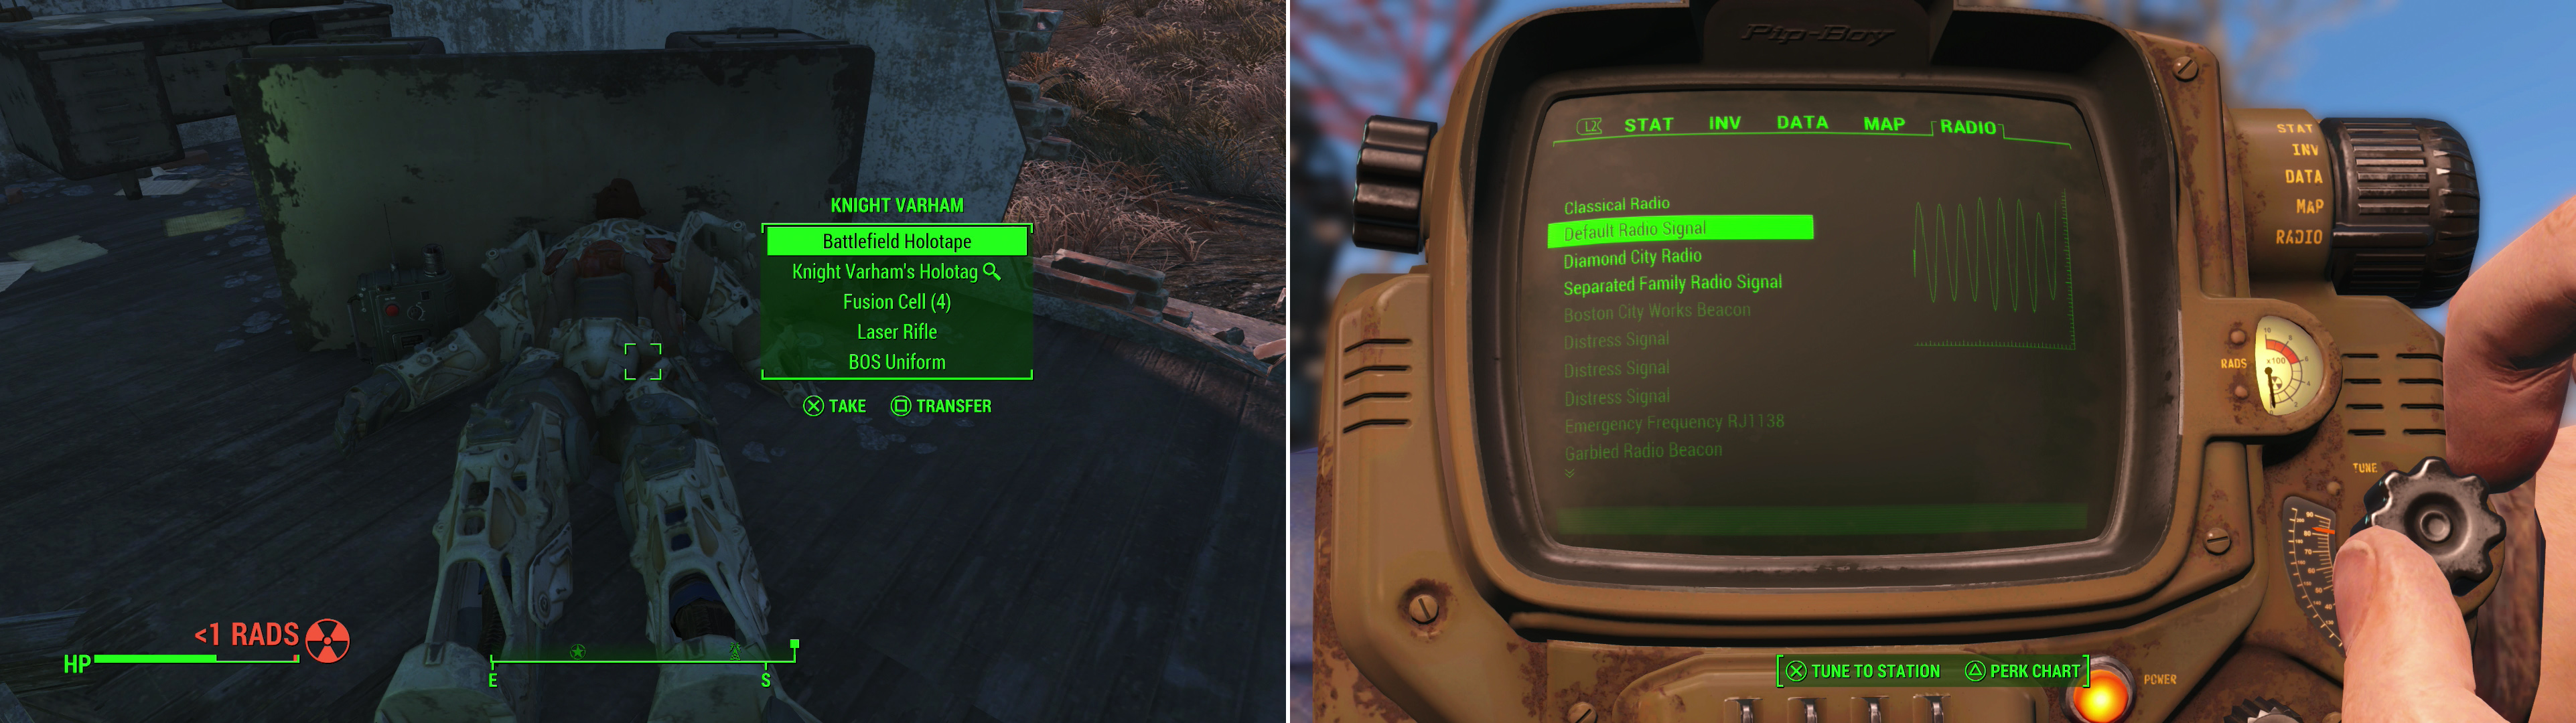
Whether you finished MacCready’s questline or not, it’s time to continue on. From the ![]() Med-Tek Research building you’re going to want to go south, but before you go, bring up your Pip-Boy, go your “Radio” tab and tune into a “Distress Signal”. Time to go signal hunting! Follow a road in front of the Med-Tek Research building south-east until you see a ruined house to the south. Investigate this house to find the shattered remains of a Brotherhood of Steel patrol, most notably the body of Knight Varham. Loot his body for the “Battlefield
Med-Tek Research building you’re going to want to go south, but before you go, bring up your Pip-Boy, go your “Radio” tab and tune into a “Distress Signal”. Time to go signal hunting! Follow a road in front of the Med-Tek Research building south-east until you see a ruined house to the south. Investigate this house to find the shattered remains of a Brotherhood of Steel patrol, most notably the body of Knight Varham. Loot his body for the “Battlefield ![]() Holotape”, his dogtag, then take the nearby Distress Pulser. This must be the remains of a Brotherhood patrol that preceded Danse and his group, and he’d certainly love to know what happened to them. Listen to the Battlefield Holotape, which will direct you to the Nation Guard Training Yard. What luck! All this starts the quest “
Holotape”, his dogtag, then take the nearby Distress Pulser. This must be the remains of a Brotherhood patrol that preceded Danse and his group, and he’d certainly love to know what happened to them. Listen to the Battlefield Holotape, which will direct you to the Nation Guard Training Yard. What luck! All this starts the quest “![]() The Lost Patrol” . Pick the locked safe [Advanced] nearby, then continue south find
The Lost Patrol” . Pick the locked safe [Advanced] nearby, then continue south find ![]() Relay Tower OMC-810.
Relay Tower OMC-810.
Locate the body of Knight Varham to start the quest “The Lost Patrol” (left). Extend the satellites at Relay Tower 0MC-810 to pick up some new radio signals (right).
Relay Tower 0MC-810
Like the last relay tower you messed with, this one has a Relay Tower Terminal you can use to “[Extend Satellites]”. This will get you two new radio signals; the “Default Radio Signal” and the “Separated Family Radio Signal”. Time for more signal searching!
From the relay tower head east, tuning into the “Default Radio Signal” and following it. You should reach a road shortly, which you should then follow north until you reach a four-way intersection with a tree in the middle. From here follow the eastern-most road and keep your eyes to the south until you spot a ruined house. Explore this house to find a trapdoor leading to a Basement, whence the source of the signal emanates. Down in the relatively intact basement you’ll find the radio on a table, near which is a Safe [Advanced].
West Everett Estates
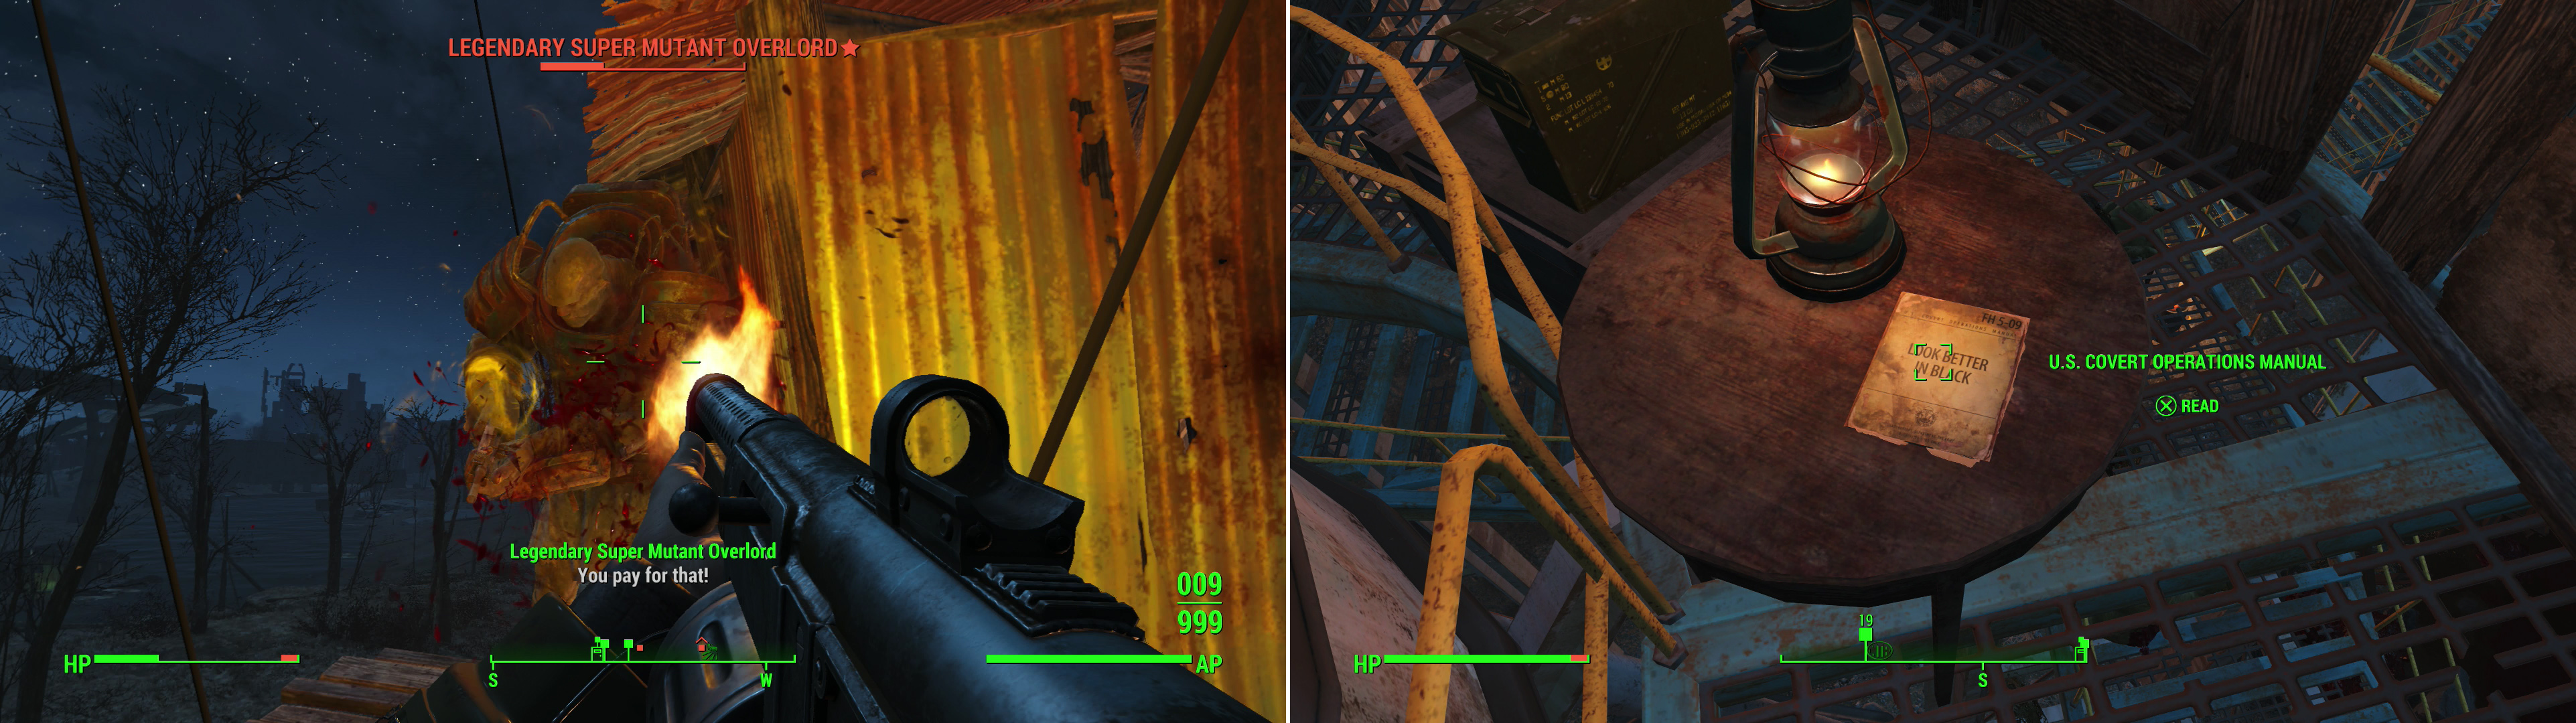
Well, that wasn’t terribly rewarding, maybe following the “Separated Family Radio Signal” will be more lucrative? Follow the signal west to find the ![]() West Everett Estates area, once a lovely little town, now a formidable Super Mutant camp. There are leveled Super Mutants, Mutant Hounds and Turrets, all of which are led by a unique mutie named Hammer, who will try to make your life miserable with the help of a
West Everett Estates area, once a lovely little town, now a formidable Super Mutant camp. There are leveled Super Mutants, Mutant Hounds and Turrets, all of which are led by a unique mutie named Hammer, who will try to make your life miserable with the help of a ![]() Missile Launcher. Kill them all, then find the water tower on the south-western edge of town. In a small shack in front (east) of the water tower you’ll find a trap door leading down to the
Missile Launcher. Kill them all, then find the water tower on the south-western edge of town. In a small shack in front (east) of the water tower you’ll find a trap door leading down to the ![]() Backyard Bunker, the source of this signal. Inside you can find a
Backyard Bunker, the source of this signal. Inside you can find a ![]() Hazmat Suit on a some metal shelves, along with a Toolbox [Novice] and a bunch of potentially useful pre-war junk. Grab a Nuka Cola Quantum out of a wooden box on the table,then continue south-west to find a “Wayne’s Terminal”, which discusses some of Wayne’s trials. Eject “David’s Holotape” from the device, then use the terminal to bypass the lock on the nearby wall Safe [Expert] before looting a Steamer Trunk and leaving the bunker.
Hazmat Suit on a some metal shelves, along with a Toolbox [Novice] and a bunch of potentially useful pre-war junk. Grab a Nuka Cola Quantum out of a wooden box on the table,then continue south-west to find a “Wayne’s Terminal”, which discusses some of Wayne’s trials. Eject “David’s Holotape” from the device, then use the terminal to bypass the lock on the nearby wall Safe [Expert] before looting a Steamer Trunk and leaving the bunker.
Once back outside, it’s worth looting the remaining houses here. In the yellow house south-east of the entrance to the bunker you can find “Hammer’s Holotape” on a counter, where you can listen to Hammer scheme and cooperate with another Super Mutant named Fist… the same Fist you killed at ![]() Trinity Tower. In the blue house across the street you can find a Safe [Master] and a Duffle Bag. Make your way east from this house to find another blue house. Search the eastern room to find a Dresser, in which you’ll find the “
Trinity Tower. In the blue house across the street you can find a Safe [Master] and a Duffle Bag. Make your way east from this house to find another blue house. Search the eastern room to find a Dresser, in which you’ll find the “![]() Boston Mayoral Shelter Bathroom Key”. From this house head north to find another yellow house and loot an Ammo Box and a Chem Box on a patio table, then head into a red truck to find a Super Mutant Helmet, a First Aid Box and a Steamer Trunk [Expert]. Finally head up a road to the north-west and when you reach some barricades, turn east to find a blue house. Be wary when you explore, though, as there are two Bathrooms Scale rigged to a Grenade Bouquets, as well as some Frag Mines lying around. Once those have been disarmed, hack “Lance’s Terminal” [Advanced] to get another perspective of what happened here after the bombs fell. Use the terminal to unlock a nearby safe [Expert] then find another Safe [Advanced] in a back room.
Boston Mayoral Shelter Bathroom Key”. From this house head north to find another yellow house and loot an Ammo Box and a Chem Box on a patio table, then head into a red truck to find a Super Mutant Helmet, a First Aid Box and a Steamer Trunk [Expert]. Finally head up a road to the north-west and when you reach some barricades, turn east to find a blue house. Be wary when you explore, though, as there are two Bathrooms Scale rigged to a Grenade Bouquets, as well as some Frag Mines lying around. Once those have been disarmed, hack “Lance’s Terminal” [Advanced] to get another perspective of what happened here after the bombs fell. Use the terminal to unlock a nearby safe [Expert] then find another Safe [Advanced] in a back room.
Time to head back to Relay Tower OMC-810. If you follow the road north a bit from the last house you looted, be sure to disarm a Tripwire between a ruined car and some bushes, as it’ll drop a triple Grenade Bouquet down on your head. You may also find another straggler Super Mutant in a bare-bones building further north, who has thoroughly trapped his house and the area outside with Frag Mines. Anyways, from the relay tower head east to finally arrive at the ![]() National Guard Training Yard. Big area. Can’t miss it.
National Guard Training Yard. Big area. Can’t miss it.
National Guard Training Yard
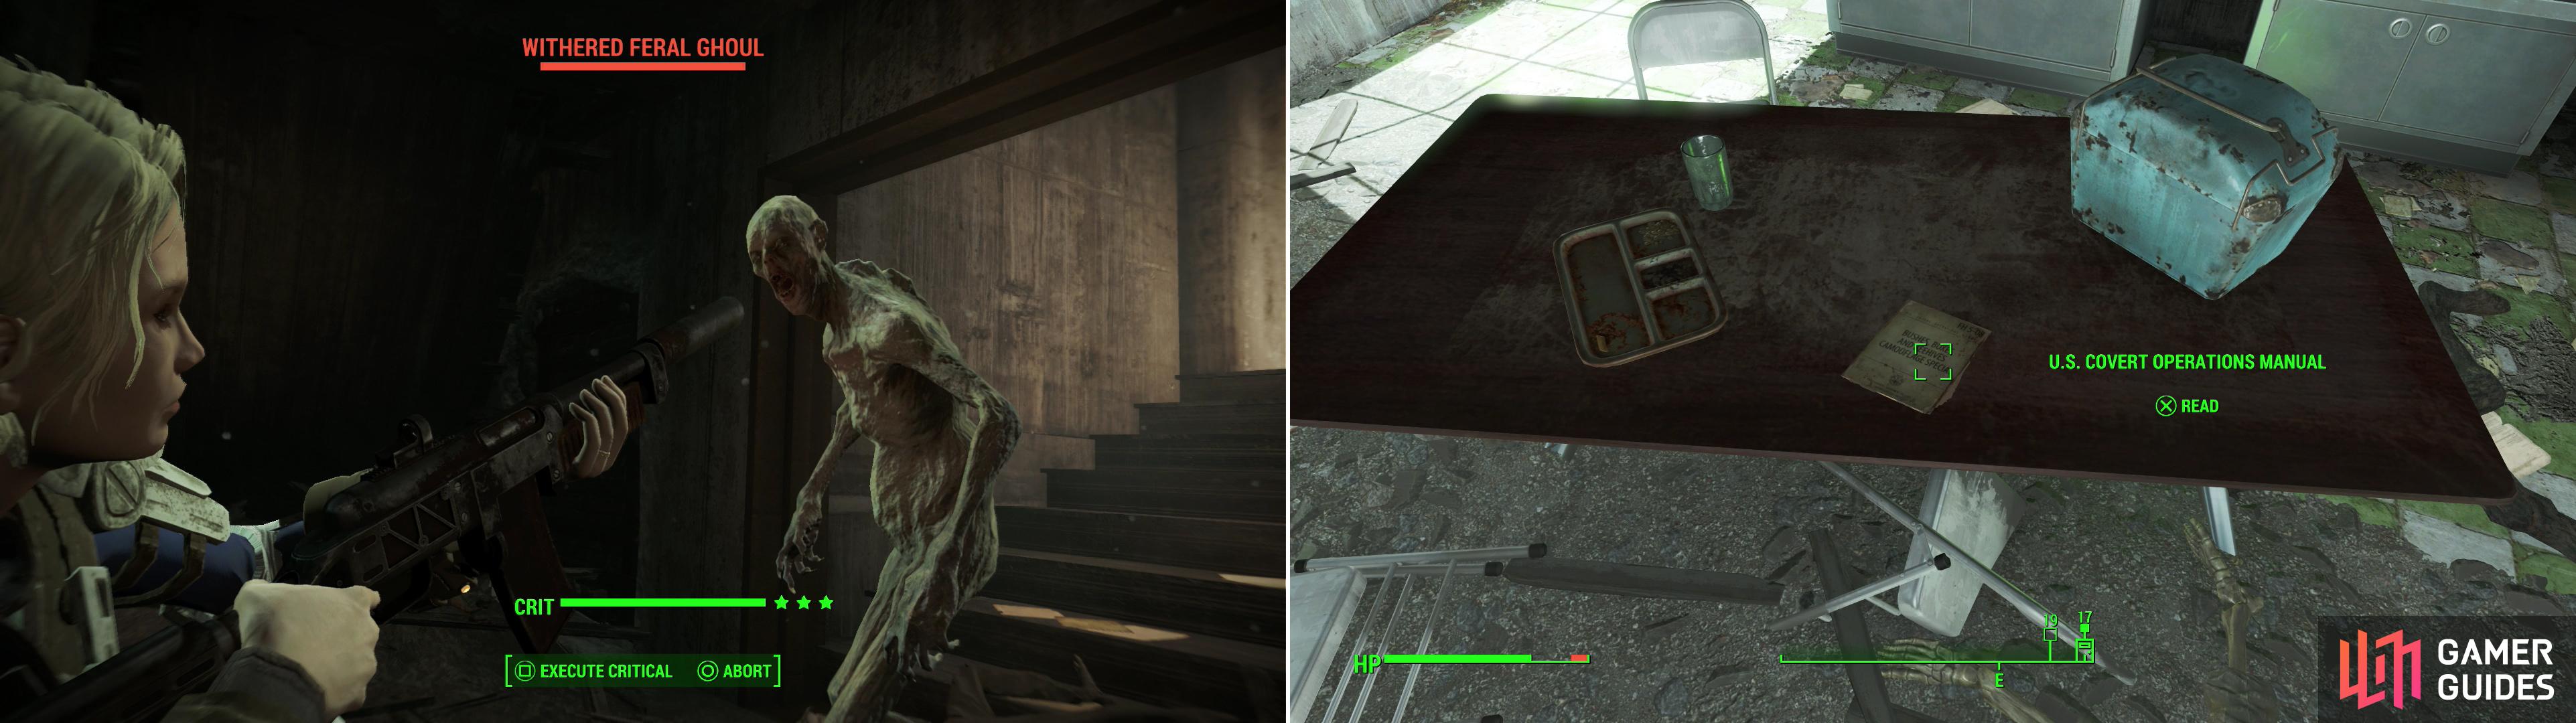
When you reach the yard you’ll find several threats waiting for you: Feral Ghouls, Frag Mines and turrets. Sweep the grounds thoroughly, clearing out any threats, then loot two small concrete structures to the north-east and south-west of the large central buildings. For the sake of argument, ignore the red door to the National Guard Armory [Master] too. There’s bound to be another, longer, more tedious way to get inside that building, and to apply to the lowest common denominator, that’s the route which will be taken. Also note that you’ll pick up another “Distress Signal” when you reach the grounds. Don’t worry, there’s no need to rush off anywhere, this one will be found as you explore.
Knight Astlin never made it out of the National Guard Training Yard, but her holotape will help you locate her missing squard (left). Grab the National Guard Officer’s Password to get easy access to the barracks (right).
National Guard Recruitment Office
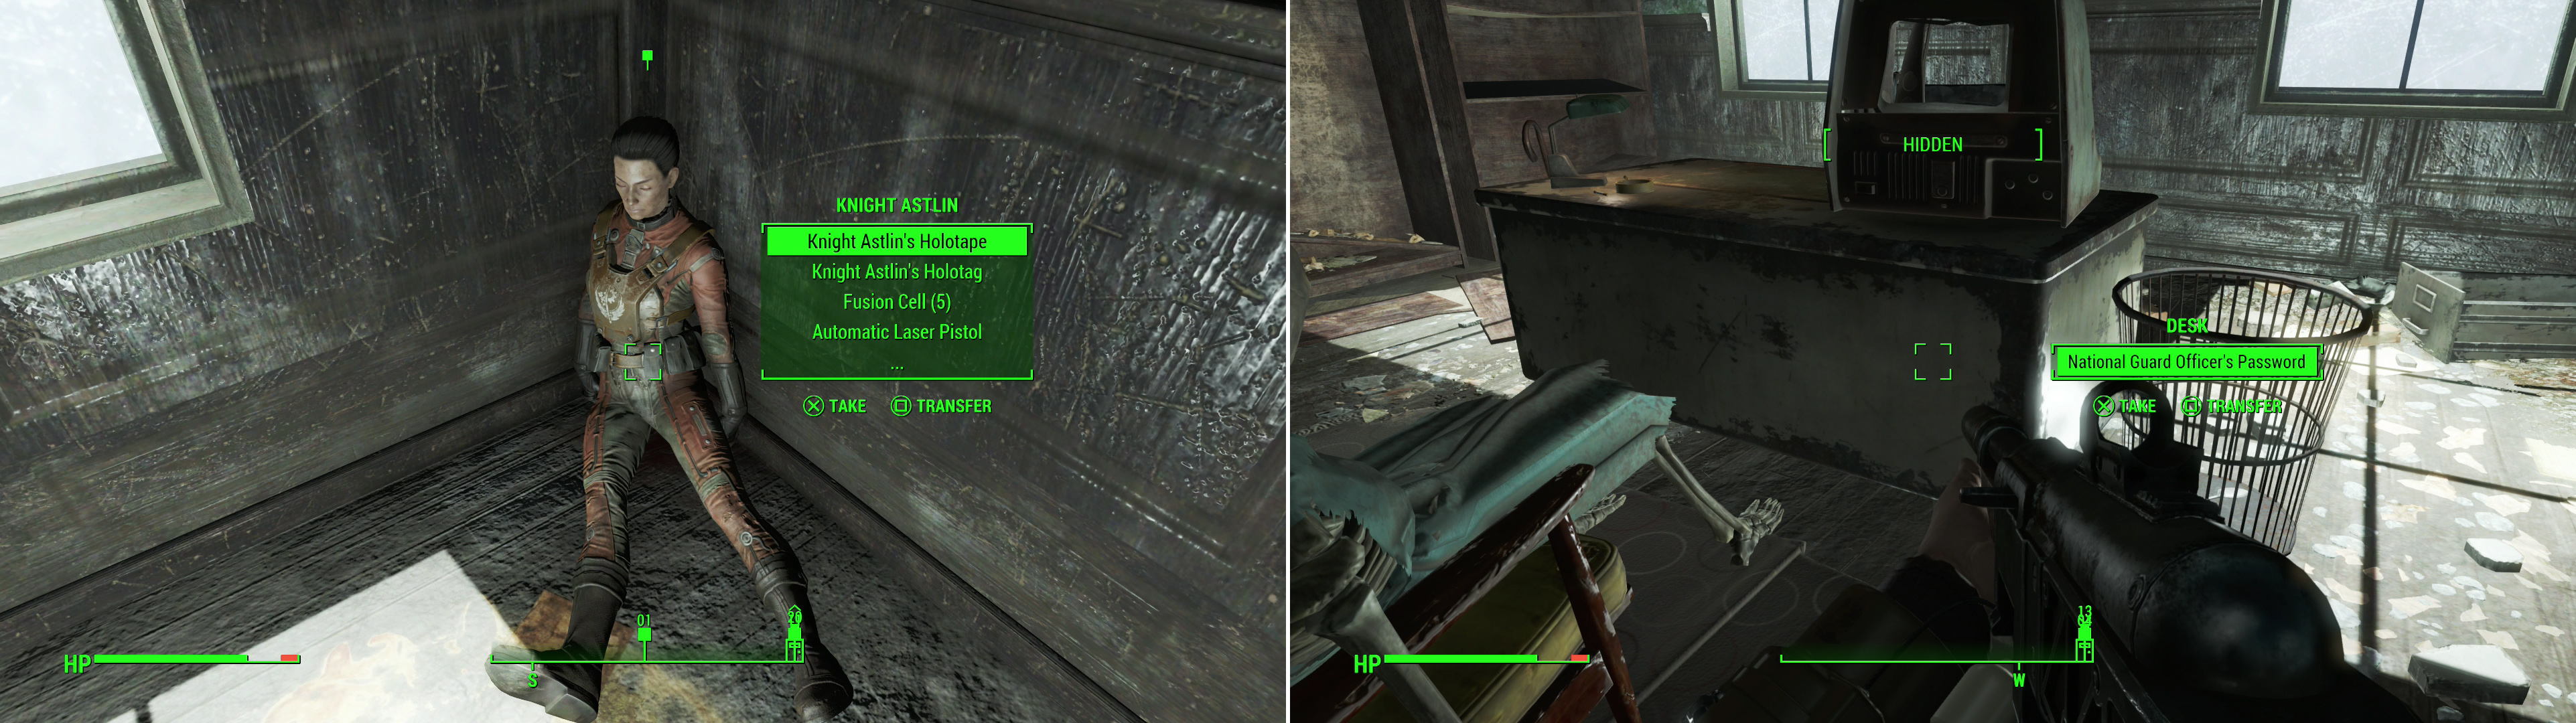
First stop here is the National Guard Recruitment Office. From the first room make your way south into another room, where you’ll need to put down some Ghouls. Once done, turn west past a Cooking Station to find a gun on some metal crates and a Footlocker nearby. On a caged-off area to the west you’ll find a “Barracks Access Terminal” [Expert] but ignore it for now. You’ll get to the barracks soon enough. Continue south, then west through a doorway into a small room where you’ll find the body of Knight Astlin, who can be looted for “Knight Astlin’s Holotape” and her holotag. Take her stuff and grab the Distress Pulser nearby, then listen to her holotape.
Don’t worry about reporting to the Brotherhood of Steel yet and instead return to the room to the east and continue up some stairs to the east. Once on the upper level, turn south into a room with a nearly completely ruined floor, circling around the remnants to find a wall Safe [Advanced]. Return north and maneuver around some ruined floor into an office to the west, where you can find the “National Guard Officer’s Password” in a desk which bypasses the terminal leading to the barracks. Next make your way back to the previous room and continue north, through a broken wall, where you’ll find the room in which Shelly Tiller lurks. Kill her and the quest will update, pointing you in the direction of a dead drop. All in good time.
Sweep the area and clear out the Feral Ghouls prowling around (left) then grab the U.S. Covert Operations Manual left carelessly out in the open (right).
National Guard Barracks
Time to hit the barracks. Head back downstairs and use the “Barracks Access Terminal” to open the cage door, beyond which you’ll find a door back to the yard. Clear some Feral Ghouls lurking around in between the two buildings, then enter the barracks. From the entrance continue west, then head north up some stairs, killing whatever Ghouls rise against you. There’s a lot of them up here, so don’t be afraid to use the stairs as a bottleneck. Once the dust has settled head east to find a small office room to the north, wherein you can find an “Armory Management Terminal” [Master]. This will also open the armory, bu it’s a tough pill either way: a [Master] lock or a [Master] hack. Do what you will with the terminal then make your way south down a hallway across from the stairs and pillage a room to the east to find a ![]() Stealth Boy on a metal shelf.
Stealth Boy on a metal shelf.
Head across the hall to the west to reach a large room with several holes in the floor. Kill the lurking Ghouls playing possum in here, then drop down a hole (after looting some Footlockers, perhaps). Kill the rest of the Ghouls in this place, including a rare Glowing One, then head north into a Cafeteria to find a U.S. Covert Operations Manual on a table near a blue Cooler. Return to the larger room to the south and go through a hole in the wall to the east to find some double doors leading back out into the yard. Once outside, use a nearby Terminal to open up the cage-off area you’re in to allow direct access to the barracks. Huzzah!
National Guard Armory
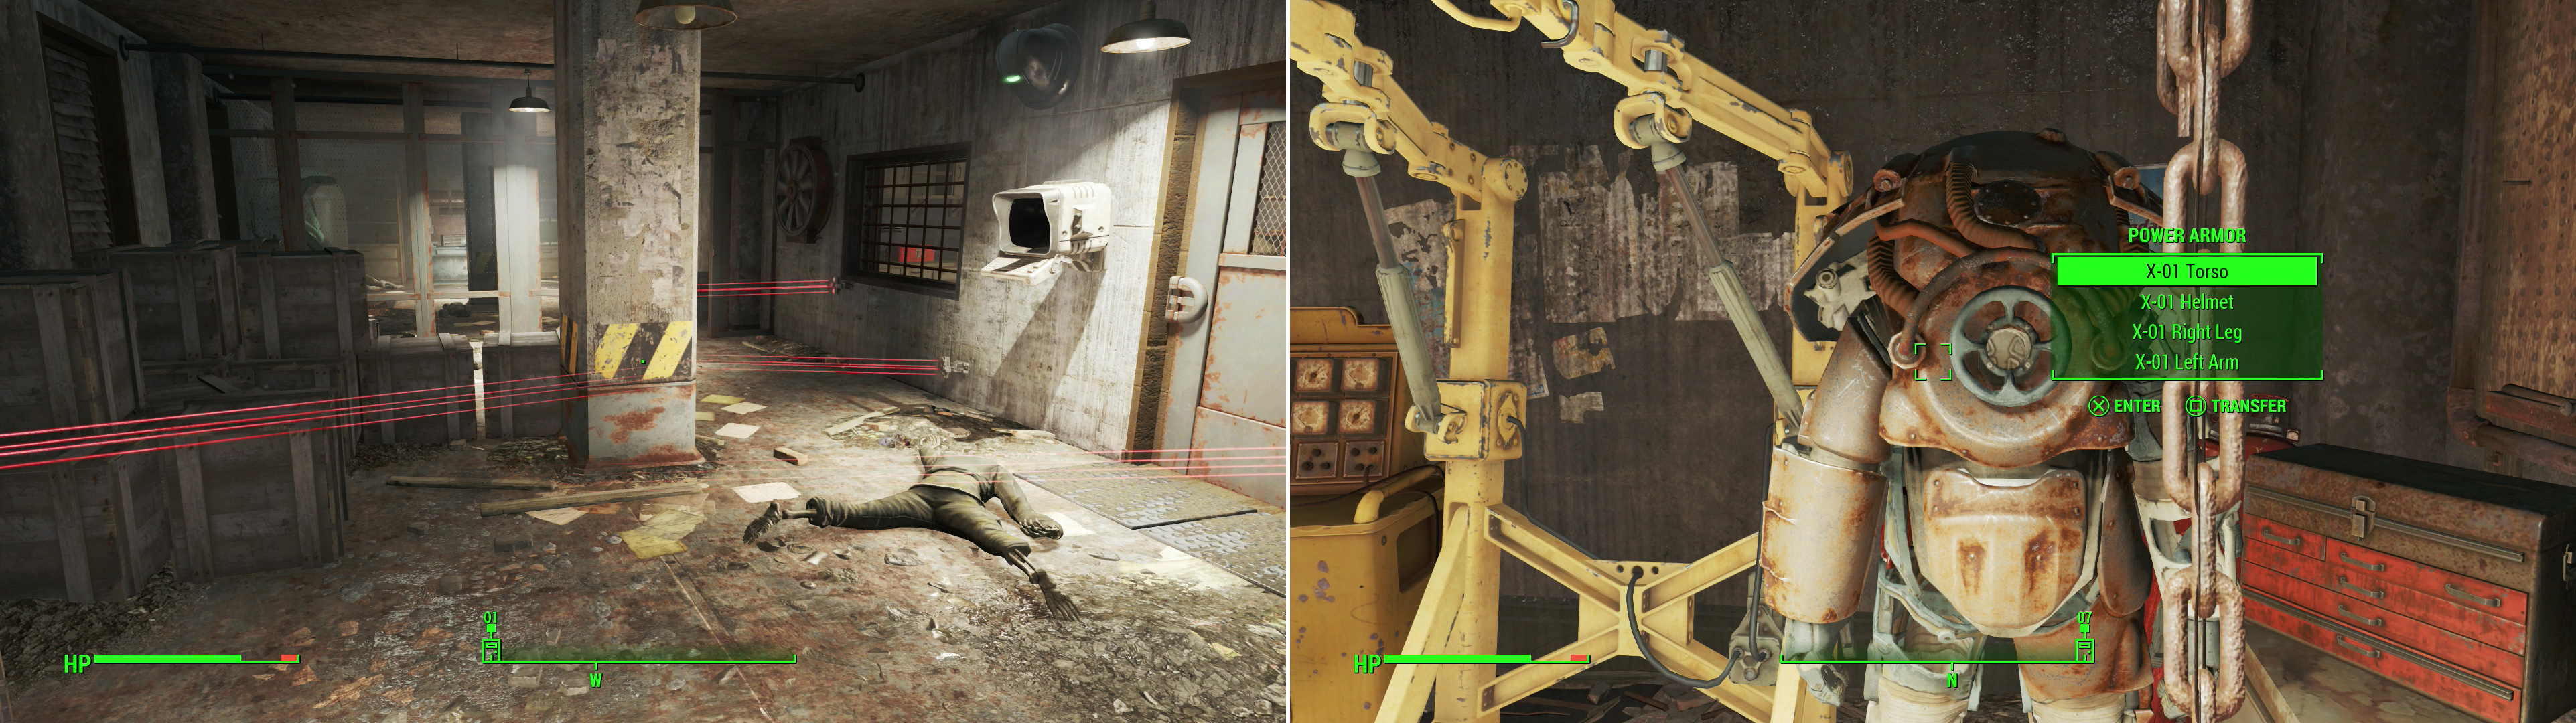
Now it’s time to deal with that pesky door to the National Guard Armory, if you haven’t already. There’s only two ways to get in: pick the lock [Master] or hack the terminal in the barracks [Master], and for once, it’s pretty lucrative to be able to mess with [Master] locks and hacks. Get inside the armory however you. The door is the least of your troubles, however, as once you’re inside you’ll find the place liberally littered with Laser Tripwires. Cautiously disarm them like the pro you are, then continue west to find a chamber with a Trunk, a sleeping Protectron and a Tool Case [Novice].
Plenty of pre-war security still remains intact in the armory (left), but your prize for bypassing it all is a partial suit of leveled Power Armor (right).
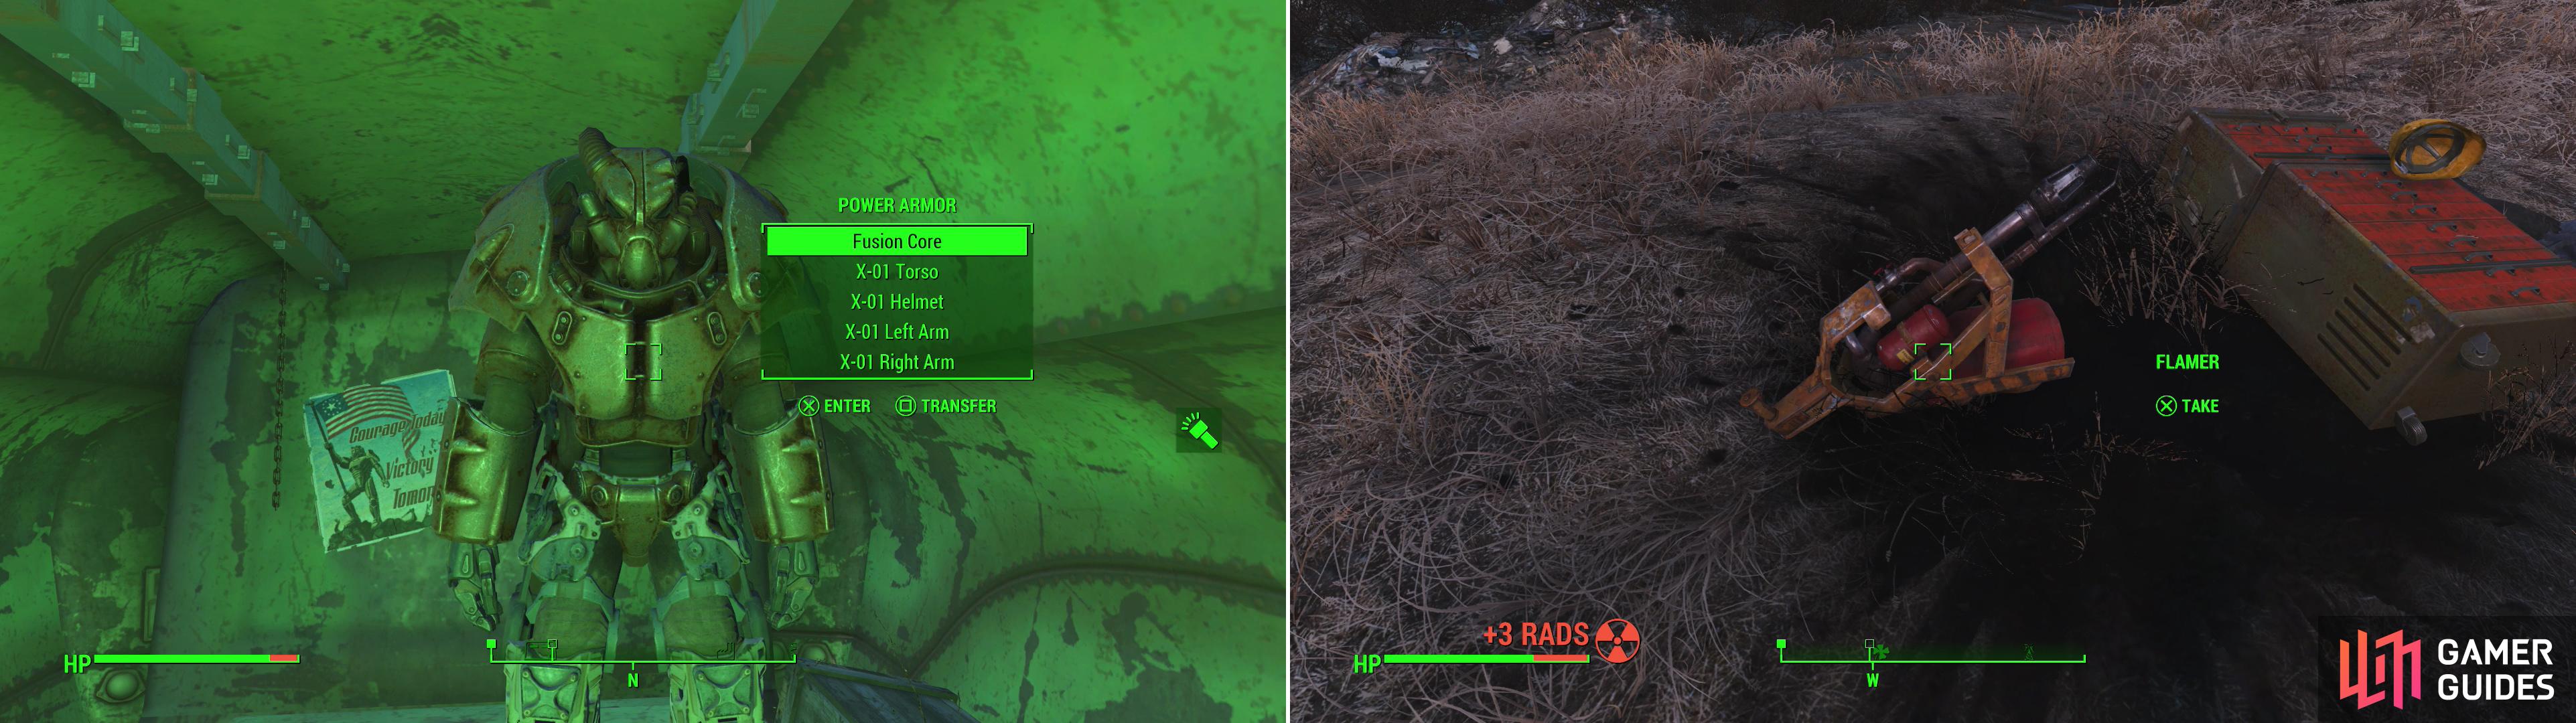
Once done, return to the east and hack a “Power Armor Storage Terminal”. Oh yeah, you know something with a name like that has to be hiding serious goodies. Hack the terminal and kill the leveled Ghoul in the room beyond, then claim your new, leveled suit of Power Armor. Again, at this point in the game, it’s very likely you’ll find yourself in possession of a swanky new suit of X-01 Power Armor. In fact… it might be a good idea to hop on in that Power Armor, as there’s a special surprise waiting for you outside. Return outside and you’ll find that you’ve awakened a leveled Sentry Bot uphill to the north-west, and it’s not happy you took that Power Armor. Even at level fifty this foe can have a threat skull next to its name, so be prepared for a rough fight. That Power Armor you scavenged will help even the odds, as will a few critical hits. After you’re victorious head north-west from the armory to find the structure that housed the Sentry Bot. From here turn west, south-west to find some shipping crates. Two stacked teal ones, in particular. Enter the bottom crate and you’ll find a locked door [Expert] beyond which is yes another suit of leveled Power Armor, which may very well be your third suit of X-01 Power Armor. Very win. Take these two suits of Power Armor where you keep such prizes, then return to the National Guard Training Yard.

After looting the armory, you’ll be attacked by an awakened Sentry Bot (left). Good thing you just found that Power Armor! Speaking of which, another suit of Power Armor can be found hiding in a shipping crate (right).
Revere Satellite Array
Since you took care of Shelly Tiller, the excuse that’s been used to lure you out here, you can go back to ![]() Goodneighbor and get on with
Goodneighbor and get on with ![]() The Silver Shroud questline, right? Sure… but there’s the matter of “The Lost Patrol” to deal with, and since you’re already out here… You know how this goes. Head east to find
The Silver Shroud questline, right? Sure… but there’s the matter of “The Lost Patrol” to deal with, and since you’re already out here… You know how this goes. Head east to find ![]() Revere Satellite Array, but approach sneakily. The entire place is crawling with Super Mutants, who lurk in equal numbers on the ground and along the walkways and fortifications. Many of them are leveled, and can be quite powerful, so it’s worth taking out a sniper rifle (suppressed if possible) and picking off as many as you can from a distance. Stay far away, locate them with VATS, fire, and retreat if necessary. Thin them out as much as possible before you make your way onto the grounds, then, when all is clear, look around to spot five towers you can climb: one in the middle of the array, and one in every prime direction.
Revere Satellite Array, but approach sneakily. The entire place is crawling with Super Mutants, who lurk in equal numbers on the ground and along the walkways and fortifications. Many of them are leveled, and can be quite powerful, so it’s worth taking out a sniper rifle (suppressed if possible) and picking off as many as you can from a distance. Stay far away, locate them with VATS, fire, and retreat if necessary. Thin them out as much as possible before you make your way onto the grounds, then, when all is clear, look around to spot five towers you can climb: one in the middle of the array, and one in every prime direction.
Battle your way through the powerful Super Mutats at the Revere Satellite Array (left) and claim the U.S. Covert Operations Training Manual they guard (right).
Head up the central tower until you reach a dead-end, at which point you’ll find a table near an Ammo Box [Novice]. Loot the Ammo Box, then grab the U.S Covert Operations Manual off the table. The tower to the west goes nowhere, as the walkway is broken, but if you head up the tower to the north you’ll find the Super Mutants have built some precarious-looking walkways leading to the dish. In this satellite dish you’ll find a might haul: a Power Armor Frame (it just needs some love!), a ![]() Fat Man, and a Steamer Trunk. The southern tower leads to a shack with an Ammo Box and some Super Mutant Chains armor. Finally, ascend the eastern tower to find a shack, inside of which is the body of Scribe Faris. You know the drill, loot him for “Scribe Faris’ Holotape”, his holotag and other goodies, then pick up the Distress Pulser nearby. Give the holotape a listen and you’ll get intel on a bunker up north, along with the password that goes to it.
Fat Man, and a Steamer Trunk. The southern tower leads to a shack with an Ammo Box and some Super Mutant Chains armor. Finally, ascend the eastern tower to find a shack, inside of which is the body of Scribe Faris. You know the drill, loot him for “Scribe Faris’ Holotape”, his holotag and other goodies, then pick up the Distress Pulser nearby. Give the holotape a listen and you’ll get intel on a bunker up north, along with the password that goes to it.
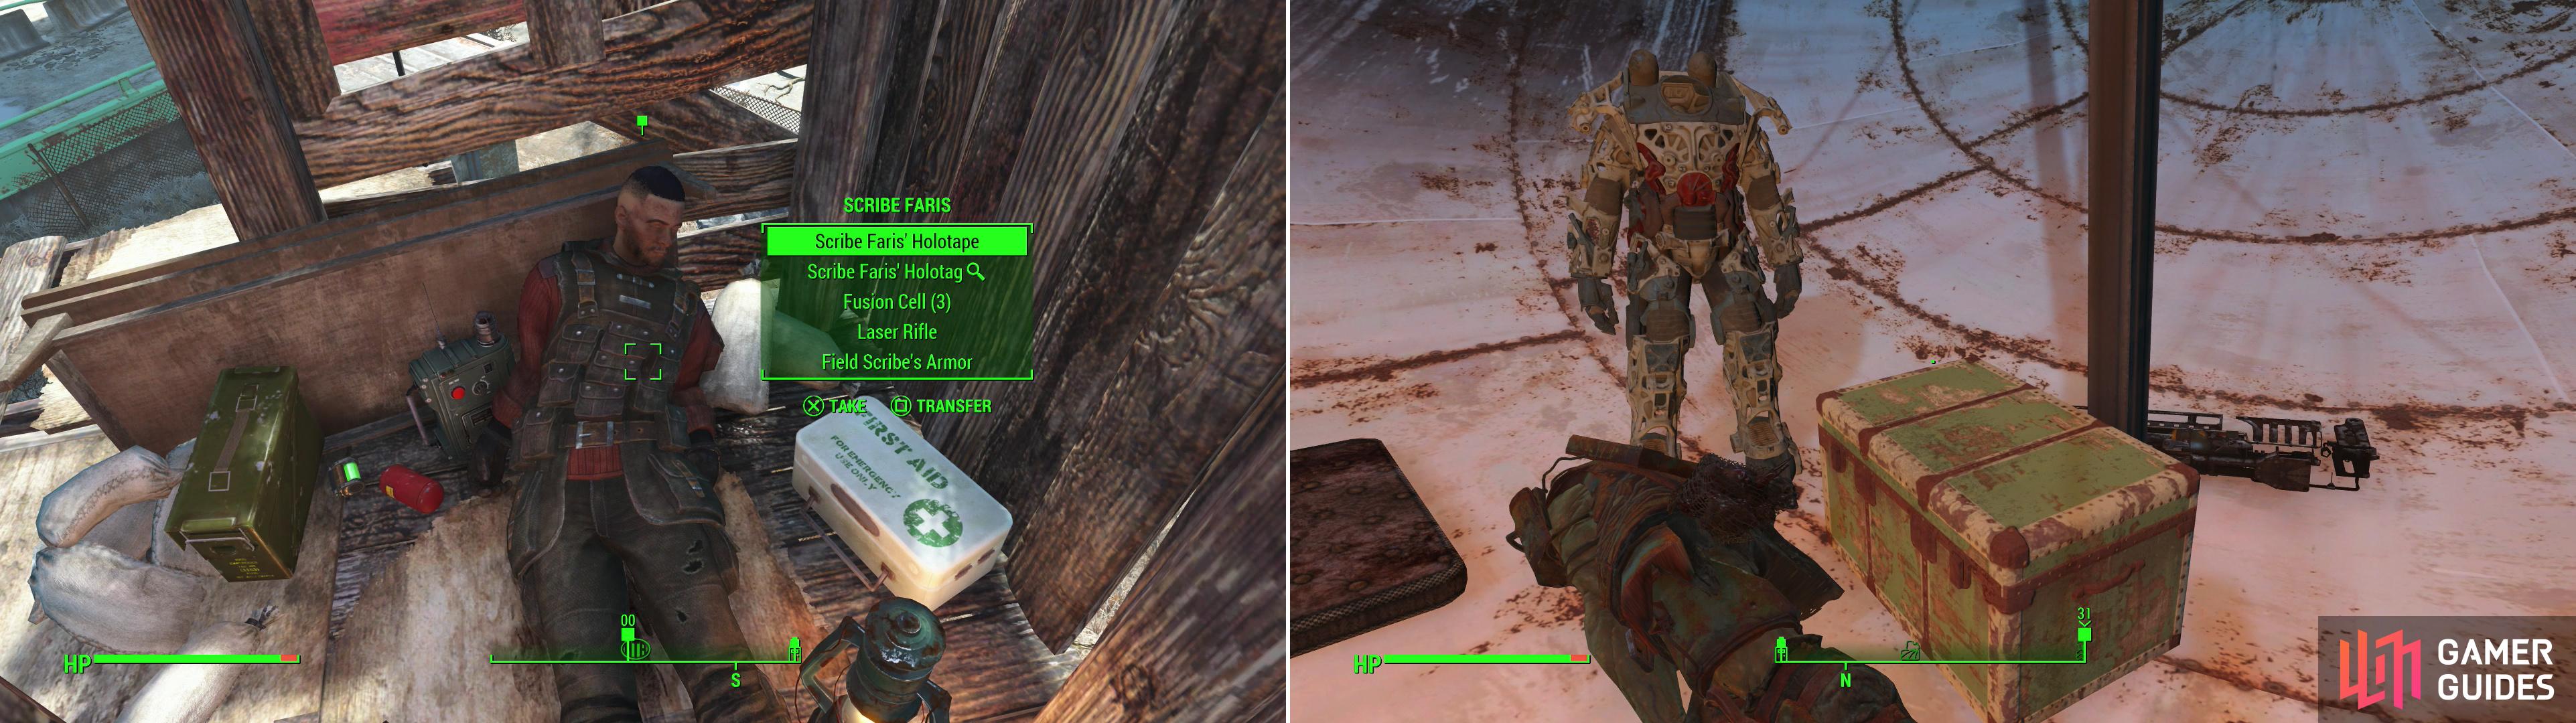
In one of the Super Mutant shacks you’ll find the body of Scribe Faris, who has the last bit of information you need to locate the lost patrol (left). On top of a satellite dish you can also find a Power Armor Frame, a Fat Man and a Steamer Trunk (right). Nice haul!
Before you head off anywhere, however, loot some trailers to the west, south-west to find a Duffle Bag, an Ammo Box and a dead Raider. After that, follow the road south-west from the Revere Satellite Array until you reach an intersection, at which point turn west, north-west until you’re just outside of the Nation Guard Training Yard again. At another intersection turn north-east until you find a series of APCs along the road, which are guarded by a deranged Mr. Gusty. Kill it, then continue into the back of the APC to find another suit of Power Armor, again, quite possibly a suit of X-01 Power Armor. It’ll likely be incomplete, but free is free.
Not enough Power Armor for you? You’re in luck, as another suit can be found in the back of an APC (left). There’s little reason to visit the facility south of County Crossing, unless you fancy a free Flamer (right).
County Crossing
It seems like it’s time to head up to find this bunker, but first, there are some areas to the south that should be cleared out. They’re out of the way, but there’s no other excuse to explore them. Fast-travel to the National Guard Training Yard and head south to find the settlement of ![]() County Crossing, where, when you talk to a Settler, you’ll get a radiant quest. Again, if you’re lucky, it’s something you’ve already done (clearing out Sunshine Tidings, for example), if not, it may be a lame kidnapping quest in
County Crossing, where, when you talk to a Settler, you’ll get a radiant quest. Again, if you’re lucky, it’s something you’ve already done (clearing out Sunshine Tidings, for example), if not, it may be a lame kidnapping quest in ![]() Monsignor Plaza. If that’s the case, you may want to just avoid the place until the guide takes you to Monsignor Plaza (it’ll be a ways off, and kidnapping quests are timed). Or you can just pay the ransom. Once you’re done dealing with County Crossing head south-west to find some ruins dominated by two containment spheres. Aside from Bloodbugs and a
Monsignor Plaza. If that’s the case, you may want to just avoid the place until the guide takes you to Monsignor Plaza (it’ll be a ways off, and kidnapping quests are timed). Or you can just pay the ransom. Once you’re done dealing with County Crossing head south-west to find some ruins dominated by two containment spheres. Aside from Bloodbugs and a ![]() Flamer, however, there’s little of interest here.
Flamer, however, there’s little of interest here.
Irish Pride Industries Shipyard
Follow the southern coast to the west (you may find a random encounter near some ruined houses along the way) until you find the ![]() Irish Pride Industries Shipyard. Make your way to the western side of the building (you can find a back door on the eastern side, but it’s locked [Master]) and kill any Bloodbugs you find. These critters infest the grounds around the shipyard, and the two smaller metal structures along the western end of the building. Once the bugs are cleared and you’ve obtained what paltry loot you can find in the aforementioned structures, head inside the western entrance.
Irish Pride Industries Shipyard. Make your way to the western side of the building (you can find a back door on the eastern side, but it’s locked [Master]) and kill any Bloodbugs you find. These critters infest the grounds around the shipyard, and the two smaller metal structures along the western end of the building. Once the bugs are cleared and you’ve obtained what paltry loot you can find in the aforementioned structures, head inside the western entrance.
From the entrance head south down a hallway to find a blue locked door [Novice] to the east, beyond which you’ll find a cafeteria with a Nuka Cola Quantum on the desk. Kill a trio of ![]() Mirelurk Hatchlings (this should tip you off to what you’ll be fighting soon). Head through a door to the south to reach the drydock, where you’ll find two fully grown
Mirelurk Hatchlings (this should tip you off to what you’ll be fighting soon). Head through a door to the south to reach the drydock, where you’ll find two fully grown ![]() Mirelurks and a half dozen Hatchlings, many of which are initially lurking underground. After they’re destroyed, you can loot two shelters, one to the south-west and one to the north-east, both of which contain an Ammo Box. Head inside the ship and search the cabin to find a copy of Taboo Tattoos on a table near a lantern. Finally, in the captain’s quarters you can find “Rory’s Terminal”, which details the notes of some imbecile who tried to raise Mirelurks. Once done, get off the boat and head into the sludge beneath it. Kill the Mirelurks down here and search the south-eastern corner of the drydock to find the body of Rory Rigwell and a Steamer Trunk. Seems her “positive messages” weren’t enough to overcome nature. On her body you’ll find the “Irish Pride Key”, which opens the back door to the shipyard, for what that’s worth.
Mirelurks and a half dozen Hatchlings, many of which are initially lurking underground. After they’re destroyed, you can loot two shelters, one to the south-west and one to the north-east, both of which contain an Ammo Box. Head inside the ship and search the cabin to find a copy of Taboo Tattoos on a table near a lantern. Finally, in the captain’s quarters you can find “Rory’s Terminal”, which details the notes of some imbecile who tried to raise Mirelurks. Once done, get off the boat and head into the sludge beneath it. Kill the Mirelurks down here and search the south-eastern corner of the drydock to find the body of Rory Rigwell and a Steamer Trunk. Seems her “positive messages” weren’t enough to overcome nature. On her body you’ll find the “Irish Pride Key”, which opens the back door to the shipyard, for what that’s worth.
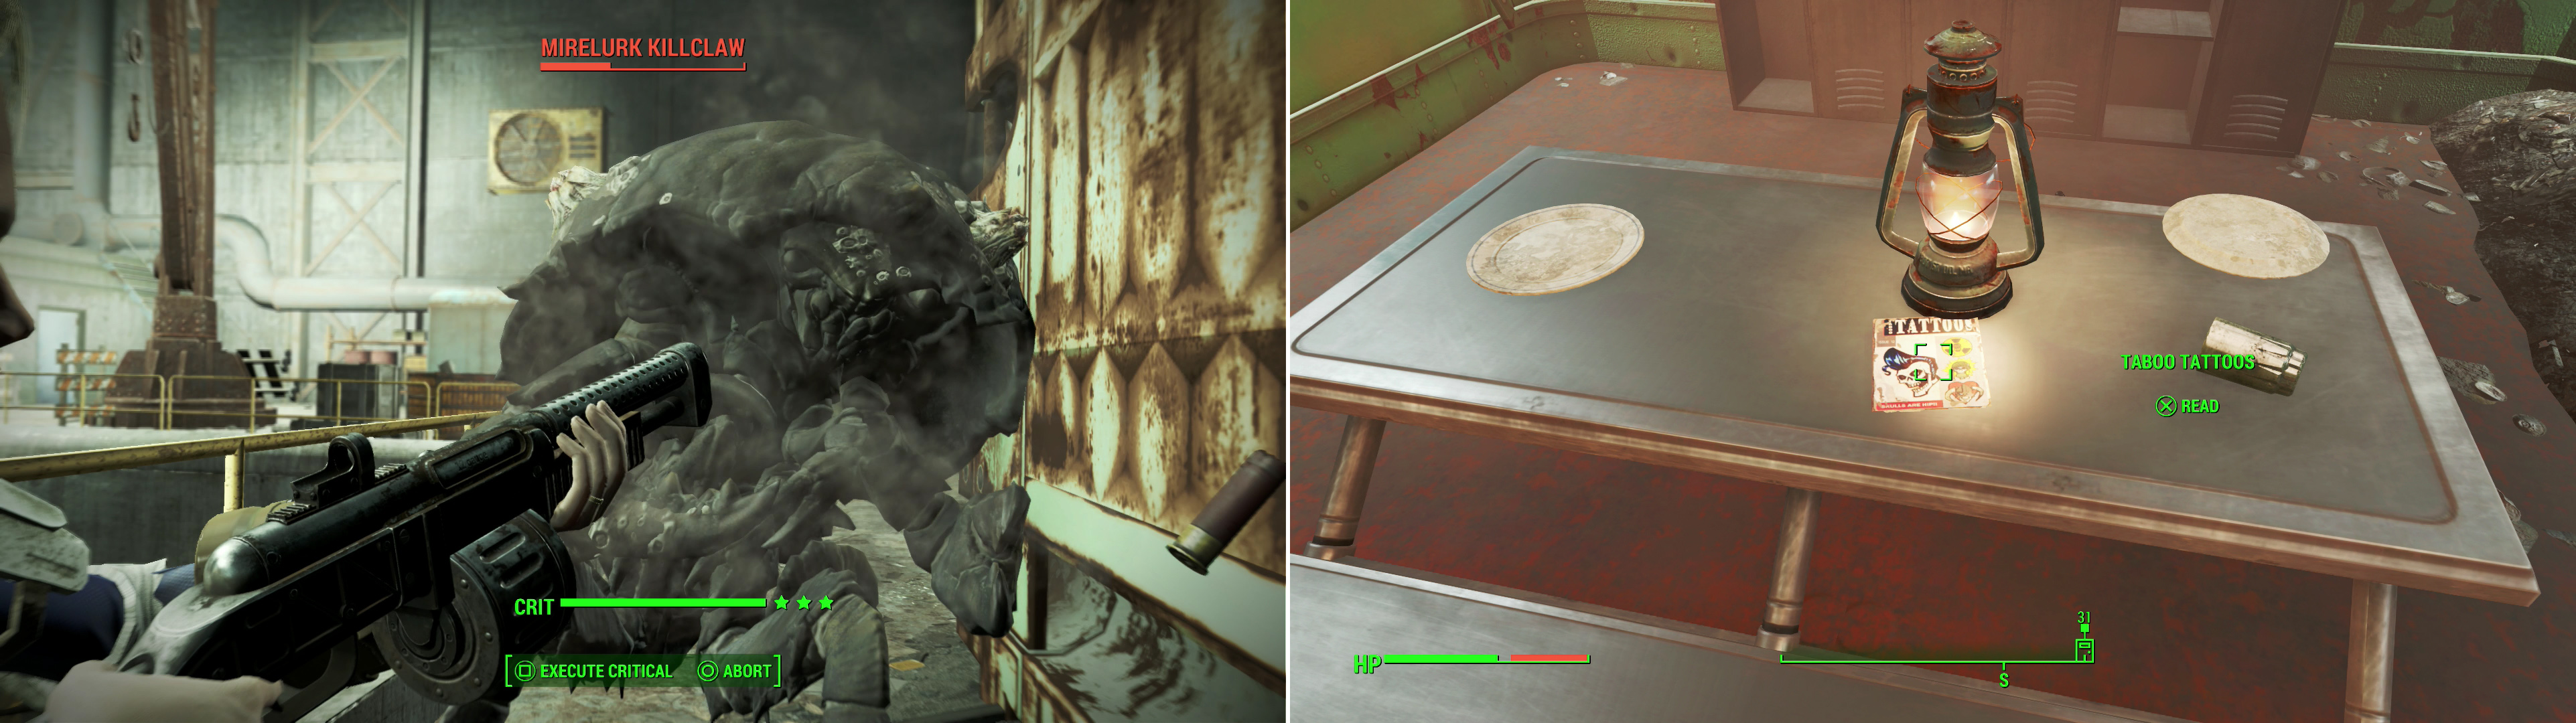
Exterminate the Mirelurks in the Irish Pride Industries Shipyard (left) then search a docked boat to find a copy of Taboo Tattoos (right).
Recon Bunker Theta
Now it’s time to go check out that bunker. Fast-travel to ![]() Lake Quannapowitt and head north-east from here to find
Lake Quannapowitt and head north-east from here to find ![]() Recon Bunker Theta. It may be tempting to go to the nearby radio tower (
Recon Bunker Theta. It may be tempting to go to the nearby radio tower (![]() Radio Tower 3SM-U81), but this is best left for the first leg of later exploration. You’ll shortly leave the lake behind and end up following smaller streams, perhaps exploring a drainage pipe filled with
Radio Tower 3SM-U81), but this is best left for the first leg of later exploration. You’ll shortly leave the lake behind and end up following smaller streams, perhaps exploring a drainage pipe filled with ![]() Mirelurk Eggs (which will hatch and impose the company of some Mirelurk Hatchling upon you). Keep following the streams north-east until you find a hill you can scale to the east. Be wary of Frag Mines and eventually you should reach the bunker, which you can access by using the “Bunker Access Terminal”, now that you’ve found the codes.
Mirelurk Eggs (which will hatch and impose the company of some Mirelurk Hatchling upon you). Keep following the streams north-east until you find a hill you can scale to the east. Be wary of Frag Mines and eventually you should reach the bunker, which you can access by using the “Bunker Access Terminal”, now that you’ve found the codes.
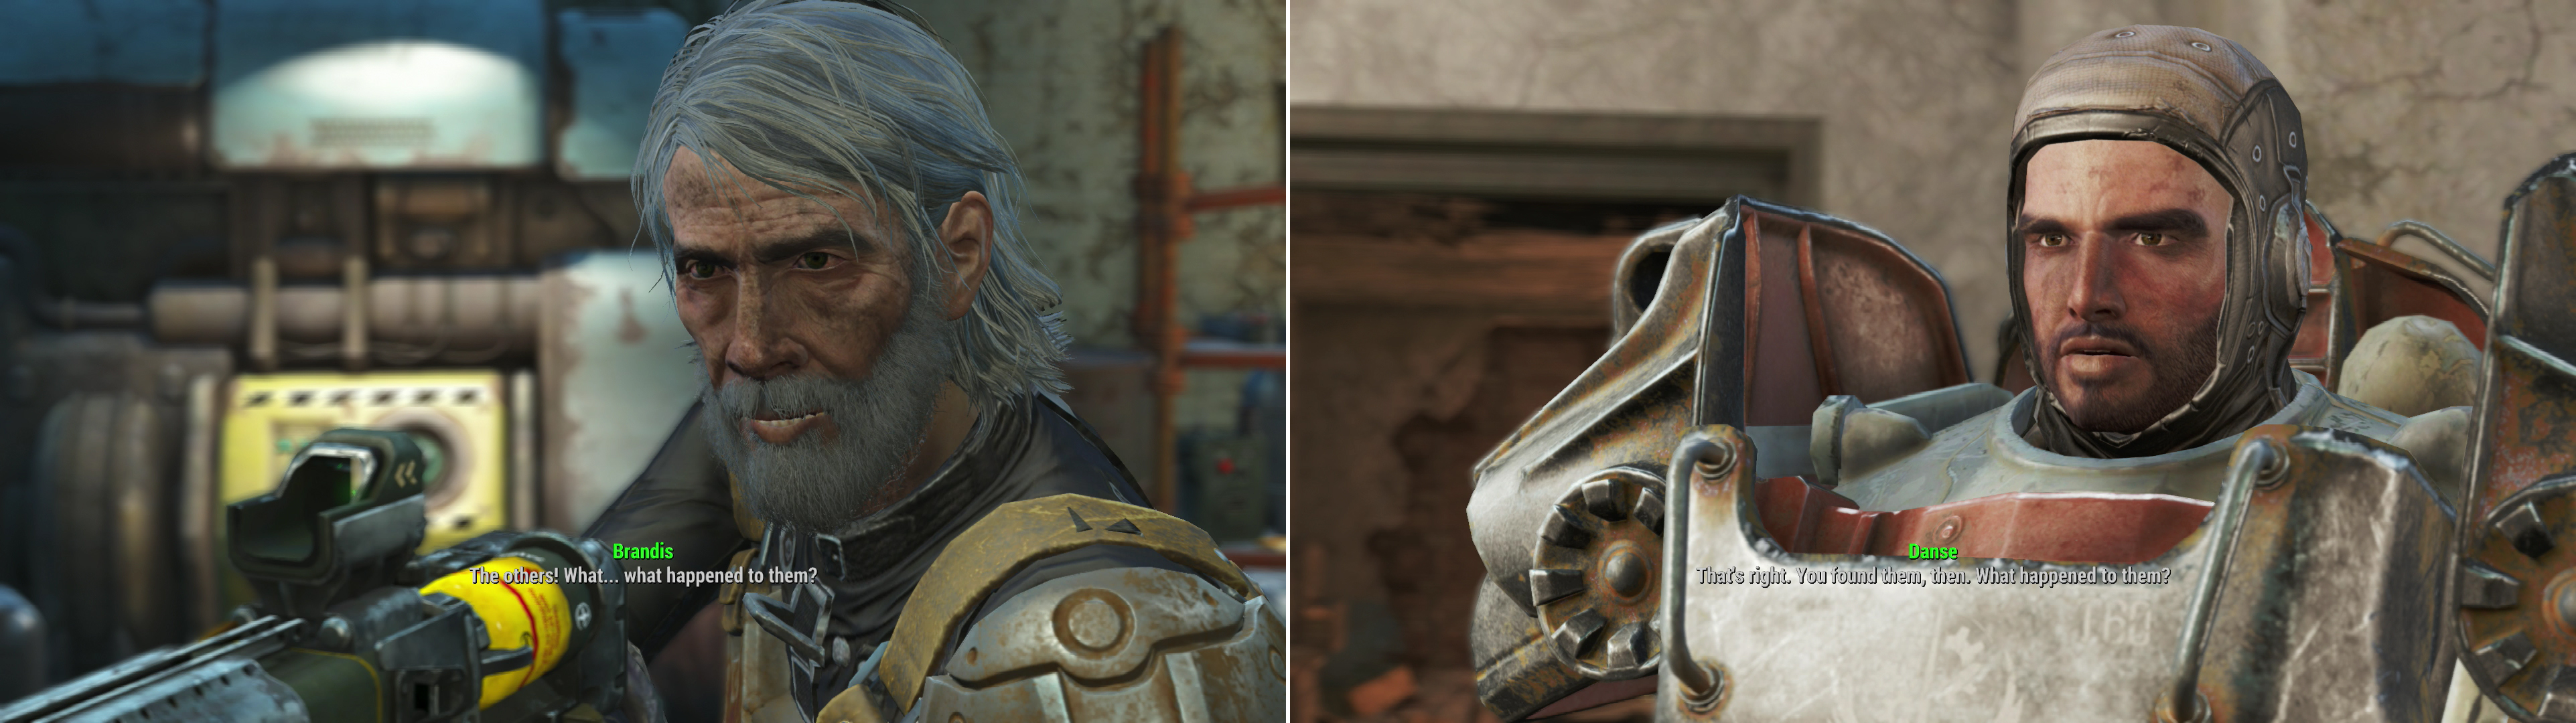
Open the door, put on your ![]() Charisma gear, then enter the bunker to find Paladin Brandis, who has clearly suffered mentally from his ordeal. Either play nice by saying “Brandis?” then tell him about his team and either tell him they’re dead or pass on their holotags, or attempt one or two moderate or one hard speech checks… although the speech checks are pretty superfluous. After this you’ll get the chance to pass an easy speech check to try to get him to rejoin the Brotherhood. Follow this with a moderate and a difficult speech check and he’ll finally relent. Afterwards, loot his bunker to find an Ammo Box, a First Aid Kit, a Steamer Trunk, a Stealth Boy, an Inactive Distress Pulser, “Paladin Brandis’ Holotape” and a
Charisma gear, then enter the bunker to find Paladin Brandis, who has clearly suffered mentally from his ordeal. Either play nice by saying “Brandis?” then tell him about his team and either tell him they’re dead or pass on their holotags, or attempt one or two moderate or one hard speech checks… although the speech checks are pretty superfluous. After this you’ll get the chance to pass an easy speech check to try to get him to rejoin the Brotherhood. Follow this with a moderate and a difficult speech check and he’ll finally relent. Afterwards, loot his bunker to find an Ammo Box, a First Aid Kit, a Steamer Trunk, a Stealth Boy, an Inactive Distress Pulser, “Paladin Brandis’ Holotape” and a ![]() Fusion Core.
Fusion Core.
You’ll find the sole survivor of the squad the preceeded Danse and company in Recon Bunker Theta (left). After dealing with Brandis, talk to Danse and make your report (right).
Only one more stop to make now. Return to the ![]() Cambridge Police Station and talk to
Cambridge Police Station and talk to ![]() Paladin Danse. Ask him about the other recon teams and he’ll fill you on the missing patrol from three years prior. Give Danse the details, tell him about Brandis and hand over the Holotapes and/or holotags, if you still have them to complete the quest. While you’re here, feel free to talk to Knight Rhys and Scribe Haylen and turn in their radiant quests ( “
Paladin Danse. Ask him about the other recon teams and he’ll fill you on the missing patrol from three years prior. Give Danse the details, tell him about Brandis and hand over the Holotapes and/or holotags, if you still have them to complete the quest. While you’re here, feel free to talk to Knight Rhys and Scribe Haylen and turn in their radiant quests ( “![]() Cleansing the Commonwealth” and “
Cleansing the Commonwealth” and “![]() Quartermastery” , respectively), which will also complete the quest “
Quartermastery” , respectively), which will also complete the quest “![]() Semper Invicta” and open up another quest with Paladin Danse. Despite this, however, you can’t actually advance the Brotherhood of Steel questline further at this time.
Semper Invicta” and open up another quest with Paladin Danse. Despite this, however, you can’t actually advance the Brotherhood of Steel questline further at this time.
| Objective | Reward |
|---|---|
| For discovering what happened to the lost patrol | 455 XP 200 Caps |
| For clearing out a location for Knight Rhy | 260 XP 106 Caps |
| For recovering an artifact for Scribe Haylen | 260 XP 103 Caps |
| For supporting the Brotherhood Recon Team | 390 XP |
No Comments