
| Important Items in This Area |
|---|
| Eddie Winter |
| Grognak the Barbarian |
| Massachusetts Surgical Journal |
| Massachusetts Surgical Journal |
| Overdue Book |
| Tumblers Today |
Two new settlements isn’t a terrible prize for those who have the resources and the will to better the Commonwealth, but the next leg of the journey promises rewards with a more… well, awesome flavor. That is, if you find the figurative taste of Skill Books, Bobbleheads and Power Armor tasty. Literally, probably not so much. Anywho, from the ![]() Taffington Boathouse head north along the road, then turn east at an intersection, stopping to loot the trailer of a trunk [Advanced] on a hill north of the road.
Taffington Boathouse head north along the road, then turn east at an intersection, stopping to loot the trailer of a trunk [Advanced] on a hill north of the road.
Medford Memorial Hospital
Continue east to find Malden Memorial Hospital, outside of which you’ll find several Super Mutants, including a Suicider and a mutt of some kind. Exterminate them, then head through some double doors to reach the interior of the hospital. The interior, like the exterior, is crawling with Super Mutants, and if you make a commotion you’ll end up fighting a mess of them at once. They lurk on three floors, all of which can shoot into the lobby, and more dwell deeper in the complex, as well. Again, be especially careful of another Suicider lurking around, who will make your life miserable if you let him.
Once the lobby is more or less clear, head down a hallway to the west. Explore the room to the north to find an Ammo Box [Novice] and a Duffle Bag, then explore an office to the south to find a Terminal [Advanced] which unlocks a floor Safe [Advanced]. Continue west until you find a stairwell, then head up to the third floor. While on the third floor, head east, stopping to clear some rooms to the north, then continue on into a small waiting room with a Terminal [Novice] which activates a nearby Protectron.
Continue east onto a balcony overlooking the lobby, then make your way north to find the “Operating Theater Door” [Master]. If you can’t get past this door yet, never fear - there’s a key further on - but assuming you can get past the door, it’ll be covered now. Beyond this door you’ll find an “Operating Theater Terminal” which you can use to fiddle with the lights, door and music here. You can make your way through a door [Advanced] to reach the operating room, or you can go up the stairs to the east to reach the rear of the same location. Here you’ll find a leveled Super Mutant, a weaker Super Mutant, and two Mutant Hounds. Once they’re dead, grab some Heavy Super Mutant Armor along the western wall, then head up some stairs to the north and into a small preparation room, where you’ll find a Syringer Rifle and a Steamer Trunk. Make your way down a tunnel to the south and pick a door [Expert], beyond which is a dead Raider lying against a bench, upon which is a Super Mutant Helmet.
Leave the operating room and return to the balcony over the lobby. From here turn east and make your way - carefully - across the remains of a floor and through a doorway. Head north down a hallway, then turn east to find a doorway to the south, beyond which is a Terminal [Expert] which opens a nearby door to a caged-off area, beyond which you’ll find some chems and other medical supplies to loot. Once they’re yours, continue through two doorways to the east to find two laboratories (now made into one room, thanks to a wall collapse) where you’ll find random junk that may be worth looting, as well as a Tool Case [Novice].
Loot and return to the room with the caged-off area, then leave here and make your way north. Continue past an elevator shaft, then follow some winding hallways and down some stairs to reach another waiting room. Make your way south through it to find a desk, upon which you’ll find an Instrument Case, within which you’ll find the “Medford Operating Theater Key”, which bypasses the [Master] door upstairs. Keep going south down a hallway, looting the rooms to the east and west for minor junk. When you reach the southern hallway turn west, go through a doorway, then continue past another desk and back into the lobby.
Make your way west, staying upon the second floor as you do so to find two more ways to proceed west; a door [Advanced] and a hallway. Pick the lock to the door and search the desk near the window to find a Massachusetts Surgical Journal . Score! After reading your new magazine, continue down a hallway to the west to find a room to the north with some minor loot you can score. The room to the south at the end of the hallway will yield a ![]() Fusion Core, which you can daintily pluck from a machine. What a generous little area!
Fusion Core, which you can daintily pluck from a machine. What a generous little area!
![Pick up the Medford Operating Theater Key, as it’‘ll save you the bother of picking a [Master] lock later (left). Being a hospital, it shouldn’t be too surprising to find a Massachusetts Surgical Journal inside (right).](/assets/guides/107/124404-1450396800.jpg)
Pick up the Medford Operating Theater Key, as it’‘ll save you the bother of picking a [Master] lock later (left). Being a hospital, it shouldn’t be too surprising to find a Massachusetts Surgical Journal inside (right).
Malden Police Department
Well, that was almost worth the trouble. Leave the hospital and continue east to find a police station. Enter the Police Station and head upstairs, the make your way into the south-eastern corner of the level to find a “Malden Police Evidence Terminal”, near which you’ll find the “Eddie Winter ![]() Holotape 2” and a box containing some
Holotape 2” and a box containing some ![]() Jet. The terminal itself may also give you a map marker.
Jet. The terminal itself may also give you a map marker.

Grab the Eddie Winter Holotape 2 off a desk in the police station (left). In the Malden Center Station you’ll find a squad of Synths fighting the Raiders dwelling here (right).
Malden Center
From the Malden PD building head north to find the ![]() Malden Center Station (marked on your map merely as Malden Center). Enter the subway tunnel and pass some turnstiles to find two Synths lurking around. Deactivate them with some violence, then search to the north to find some dead Raiders, near which is also a First Aid Box and an Ammo Box. If you look to the south you’ll find a chained door… which should let you know that this area will loop around back to the beginning.
Malden Center Station (marked on your map merely as Malden Center). Enter the subway tunnel and pass some turnstiles to find two Synths lurking around. Deactivate them with some violence, then search to the north to find some dead Raiders, near which is also a First Aid Box and an Ammo Box. If you look to the south you’ll find a chained door… which should let you know that this area will loop around back to the beginning.
Continue east down two staircases to reach the metro tunnel, where another half dozen or so Synths lurk in the immediate vicinity. To the east there are two subway lines, both of which are occupied by trains, which now serve as tunnels up and down the tracks. At the southern end of the western-most track you’ll find two dead Raiders in a shelter, an on the eastern-most track’s southern end you’ll find another shelter, in which you can find a ![]() Fat Man and a Suitcase [Novice]. If you enter the western train and follow it north you can find a Suitcase [Novice] in the train, along with some chems. Once you get off the train, be wary of a rigged gun and a proximity trap on a monkey toy. To the north is one more Raider Shelter with an Ammo Box inside of it. The other (eastern-most) train also contains a Suitcase [Novice].
Fat Man and a Suitcase [Novice]. If you enter the western train and follow it north you can find a Suitcase [Novice] in the train, along with some chems. Once you get off the train, be wary of a rigged gun and a proximity trap on a monkey toy. To the north is one more Raider Shelter with an Ammo Box inside of it. The other (eastern-most) train also contains a Suitcase [Novice].
Along the northern end of the tracks you’ll find some doorways leading east. Head inside the tunnel here and follow it south, killing more Synths and perhaps a Turret, then make your way through a door [Advanced]. In the room beyond the locked door you can find another Synth, an Ammo Box, and a Frag Mine in a refrigerator. Sneaky. If you continue south you’ll find a gift shop, behind the counter of which is a Tripwire rigged to a Makeshift Explosive and further south is a Terminal [Novice] which can activate a Protectron, if it’s still functional.
Where you really want to go, however, is down an elevator east of the fridge with the Frag Mine inside of it. Take the elevator down and exit into a room where you’ll find more Synths. Smite them, then continue to the southern end of the chamber and grab a Fusion Core out of a machine to the east before turning west to find a Large Toolbox [Novice]. Loot an Ammo Box hiding under a wheeled table, continue through a hole in the wall to the west, then pick your way south, then west over the corpses of some dead Raiders. Eventually you’ll hear the sound of some fighting coming from a tunnel to the north.
Make your way through a hole in the wall to find several Synths fighting some Raiders, their Turret, and their leader, Helter-Skelter. Wait for one side to lose, or join the fray. The Synths are closer to you, so they’re the ones you’ll likely pick off first. When all is quiet, loot the bodies - at least one of the Synths should have been leveled, and Helter-Skelter, of course. Once done, head into a yellow boxcar to the north and search a metal shelf to find a copy of Tumblers Today . East of here, on a table near a bed, you can also find an Overdue Book . The rest of the Raider camp isn’t as generous, but you can still find the some junk and the odd chem lying around. When you’re done looting, head to the south-western corner of the chamber to find a door to the south which will ultimately lead to a room with some ammo and chems in a metal locker, and another elevator. Take the elevator and you’ll surface just behind a chained door, which of course opens up near the entrance.
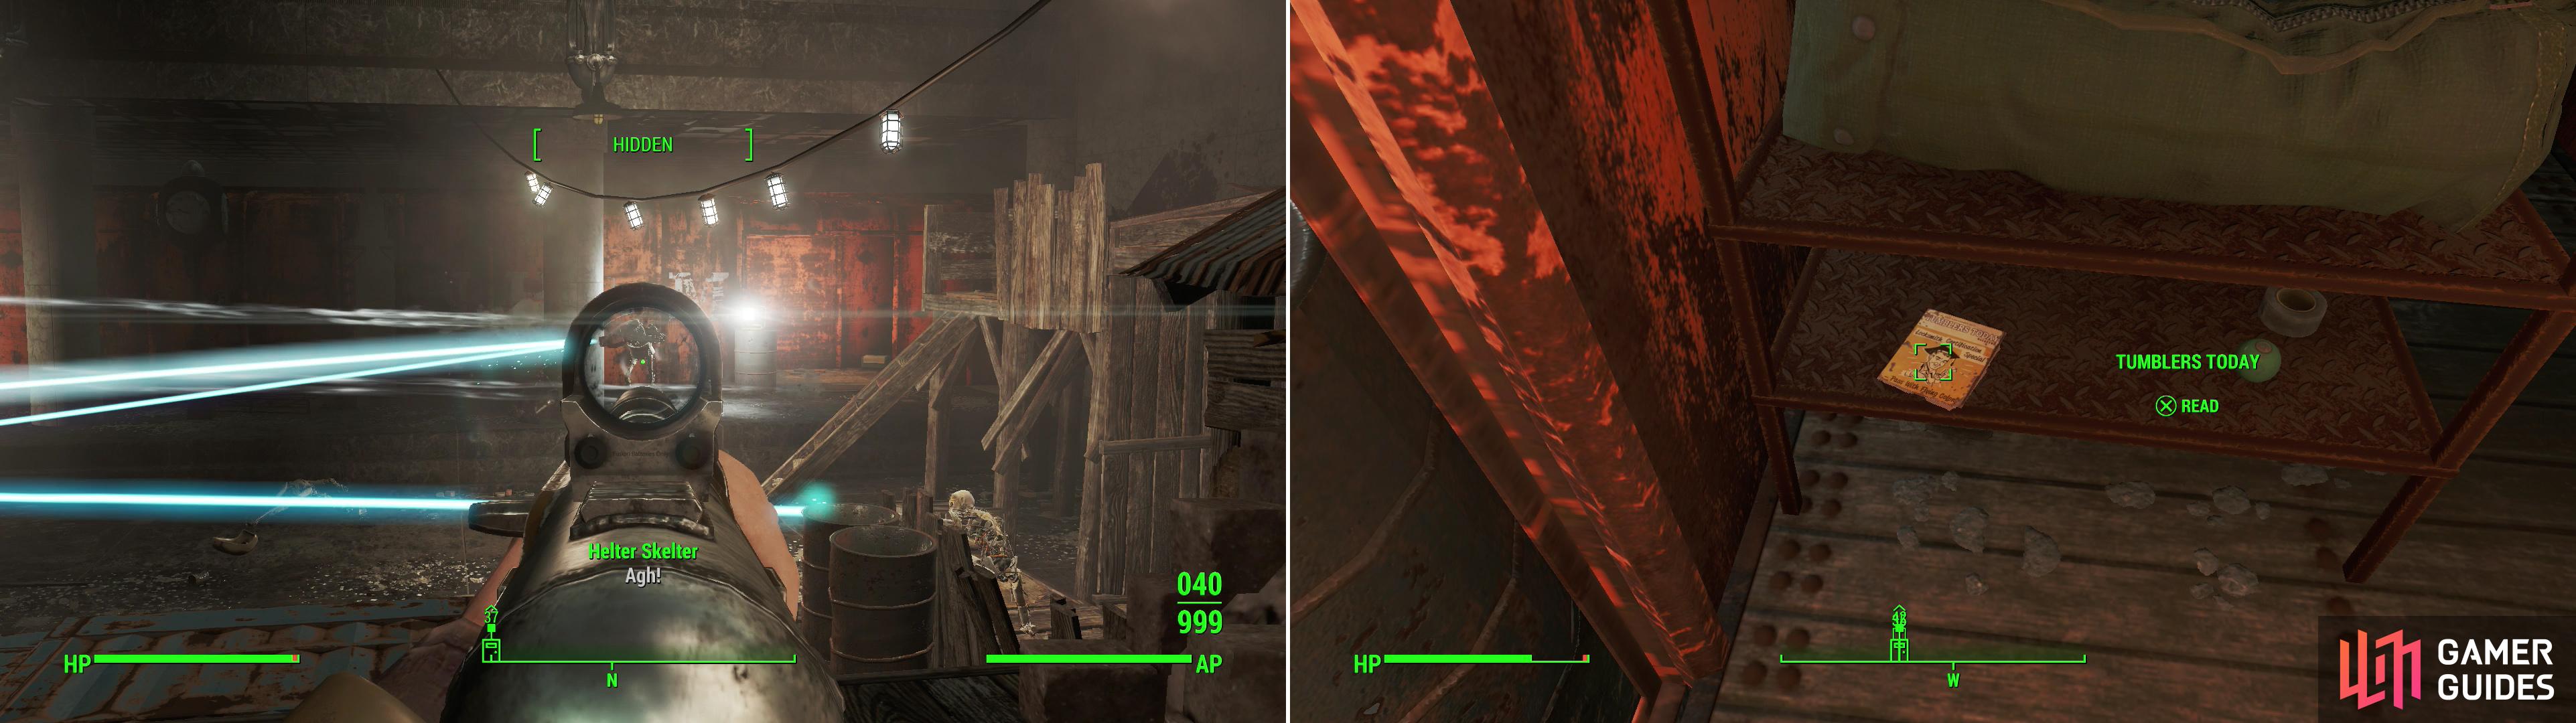
At the bottom of Malden Center Station the strongest Synths square off with the leader of the Raiders (left). After the fighting is over, search a boxcar to find an issue of Tumblers Today (right).
Malden Middle School
Exit the metro and follow the road in front of it to the north-east, then east past a bookstore to find ![]() Malden Middle School, the next stop on this exploration run. Continue south-east along the front of the school and keep your eyes out for Frag Mines, which some jerk has kindly placed around. Disarm them, then enter the building via the ruined eastern corner. Proceed north through the ruined school and open a cage door, then turn north-west and head down some stairs to find some double doors leading to the basement.
Malden Middle School, the next stop on this exploration run. Continue south-east along the front of the school and keep your eyes out for Frag Mines, which some jerk has kindly placed around. Disarm them, then enter the building via the ruined eastern corner. Proceed north through the ruined school and open a cage door, then turn north-west and head down some stairs to find some double doors leading to the basement.
Malden Middle School Basement
From the entrance to the basement head south, then west up some stairs to discover a vault, of all things. The entrance here is guarded by several Gunners and a turret, and they’ll put up quite a ferocious fight. Kill them, then search a small office to the west, which contains an “Admissions Terminal”. Seems ol’ Vault-Tec was trying to get kids into ![]() Vault 75. Once done, head down a nearby elevator to reach Vault 75, which will start the quest “Vault 75”.
Vault 75. Once done, head down a nearby elevator to reach Vault 75, which will start the quest “Vault 75”.
Vault 75
Continue south and waste two more Gunners, and note the generally trashed appearance of this vault. Not nearly as pretty as ![]() Vault 81 was, or even
Vault 81 was, or even ![]() Vault 114. If you continue south you’ll reach a small room, which has nothing in it, but west of this room is a door with a panel missing. Near the door is a Lab Access Card Reader, which of course you don’t have the card for. Investigate it to get a new objective, then continue south, then west to reach a cafeteria which is swarming with Gunners, both on the ground floor and on the balcony above. Clear the area, then head south to find a playground cavern where some more Gunners lurk, although there’s little else of interest to note. From the cafeteria you can head through a doorway to the west, then go up some stairs to reach the balcony, where a few rooms wait to be looted. In the barracks to the west you can score some Footlockers, while in a classroom to the east you can find a Toolbox [Novice] and other assorted loot. The room to the south, however, is less interesting.
Vault 114. If you continue south you’ll reach a small room, which has nothing in it, but west of this room is a door with a panel missing. Near the door is a Lab Access Card Reader, which of course you don’t have the card for. Investigate it to get a new objective, then continue south, then west to reach a cafeteria which is swarming with Gunners, both on the ground floor and on the balcony above. Clear the area, then head south to find a playground cavern where some more Gunners lurk, although there’s little else of interest to note. From the cafeteria you can head through a doorway to the west, then go up some stairs to reach the balcony, where a few rooms wait to be looted. In the barracks to the west you can score some Footlockers, while in a classroom to the east you can find a Toolbox [Novice] and other assorted loot. The room to the south, however, is less interesting.
Return to the ground floor of the cafeteria and head north-west through a locker room, then turn east to find another sealed door that requires a Lab Access Card. Instead turn north and go down some stairs to reach a laboratory part of the lab. Kill the Gunners milling about down here then head west through a locker room and an armory (in which you can find some guns on a metal shelf) to reach the mock-up of a city. Here you’ll find a Gunner Commander lurking on the roof of the diner. If you’re patient, you can snipe him from stealth without having to deal with him in a fair fight. Afterward, interact with a “Combat Simulation Terminal” if you want to run through the simulation course. Aside from just being a way to waste ammo, you can set a new high score on the terminal and teach “ToppedYaAll!!” a lesson. Be sure to loot the Gunner Commander to obtain the Vault 75 Lab Access Card. If you want a bit of extra loot, circle around behind the diner to find a Wooden Crate [Novice].
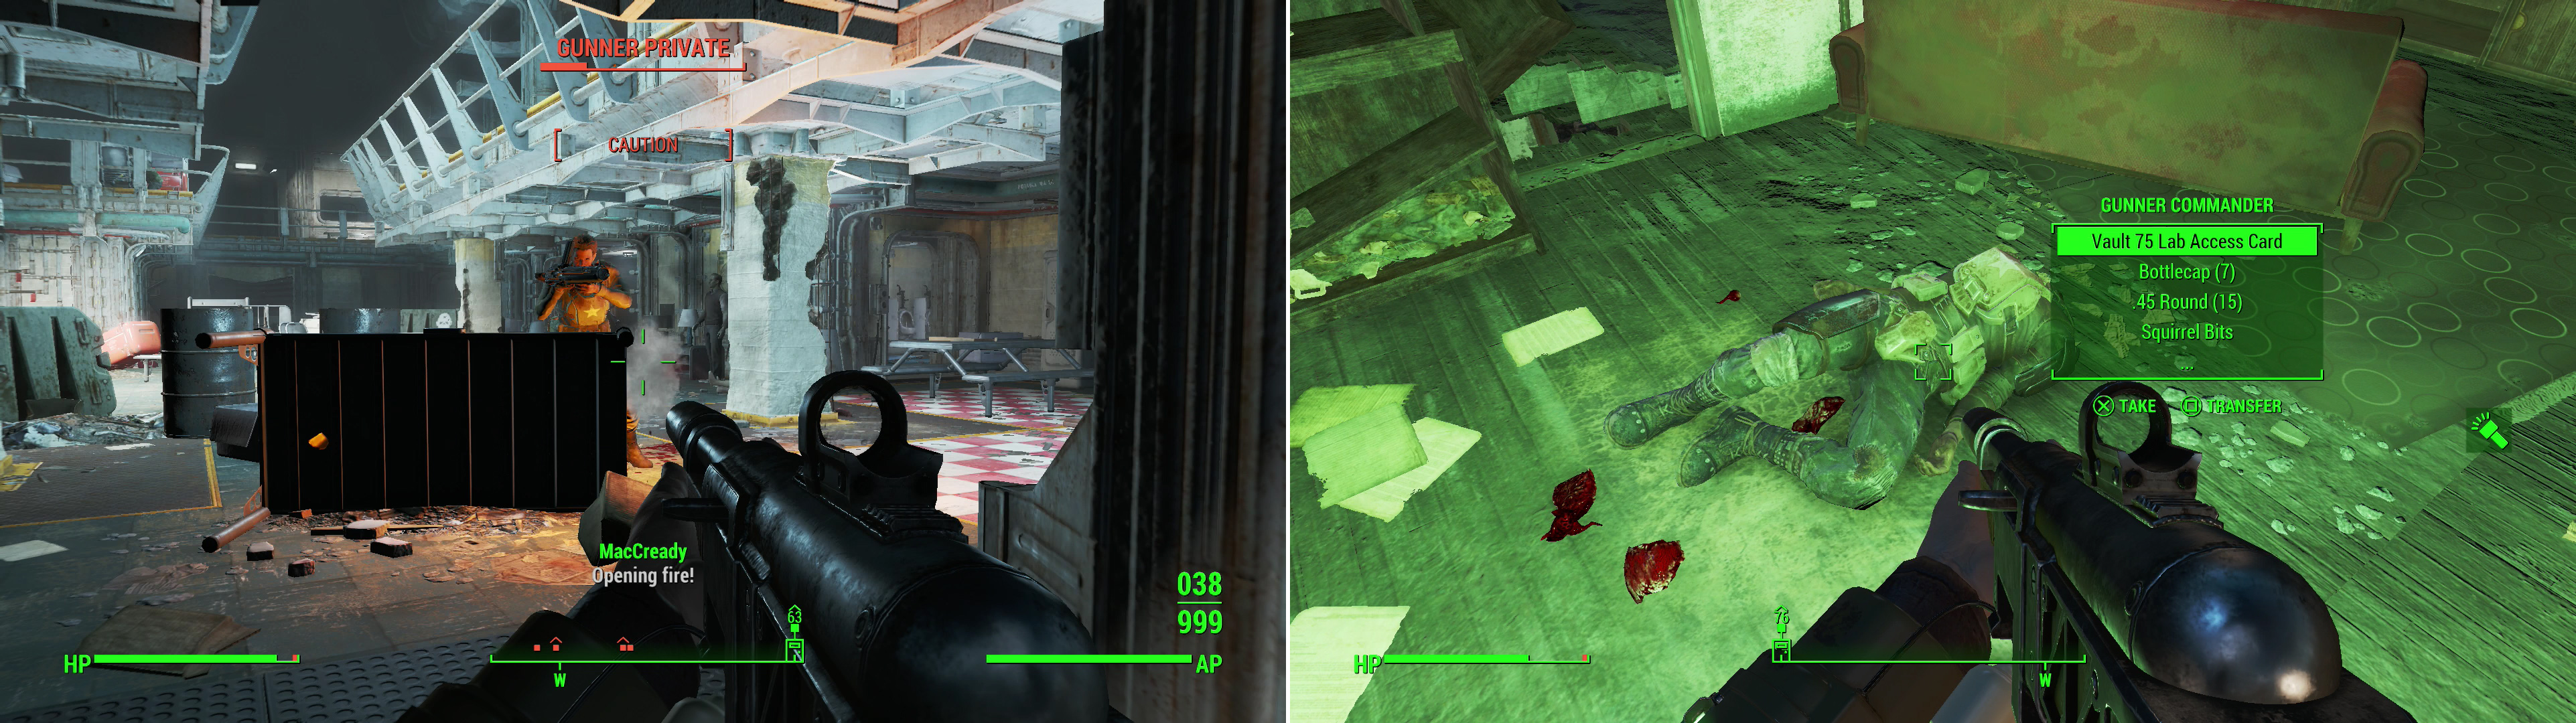
You’ll have to fight your way through a host of Gunners, who have made Vault 95 their stronghold (left). Kill the Gunner Commander in the training yard to obtain his Vault 75 Lab Access Card (right)
Backtrack back into the vault proper and back up the stairs leading to the lab. From here turn east and use your newfound Lab Access Card Reader to open the sealed door. Another sealed door to the east will take you back near the entrance, while the door to the south requires an Admin Access Card. Oh boy. Go through an unsealed door to the north, up some stairs, through a doorway to the north and finally turn west to spot more Gunners in the distance. Once they’ve been eliminated, you can do down some stairs and loot some more untidy barracks. You can also find an observation room overlooking the combat training area, and opposite the doorway leading to it you’ll find a “Research Terminal”, which details some research goals and random musings from of of the scientists. Return back upstairs and continue west to reach another room overlooking the combat training ground. Kill whatever Gunners still lurk in this area, then loot one of them for the Vault 75 Admin Access Card. This will open the last door back east, but before you go, grab the ![]() Science Bobblehead off a desk near the windows overlooking the training ground. With this thing in your possession, hacking terminals will be somewhat less tedious.
Science Bobblehead off a desk near the windows overlooking the training ground. With this thing in your possession, hacking terminals will be somewhat less tedious.
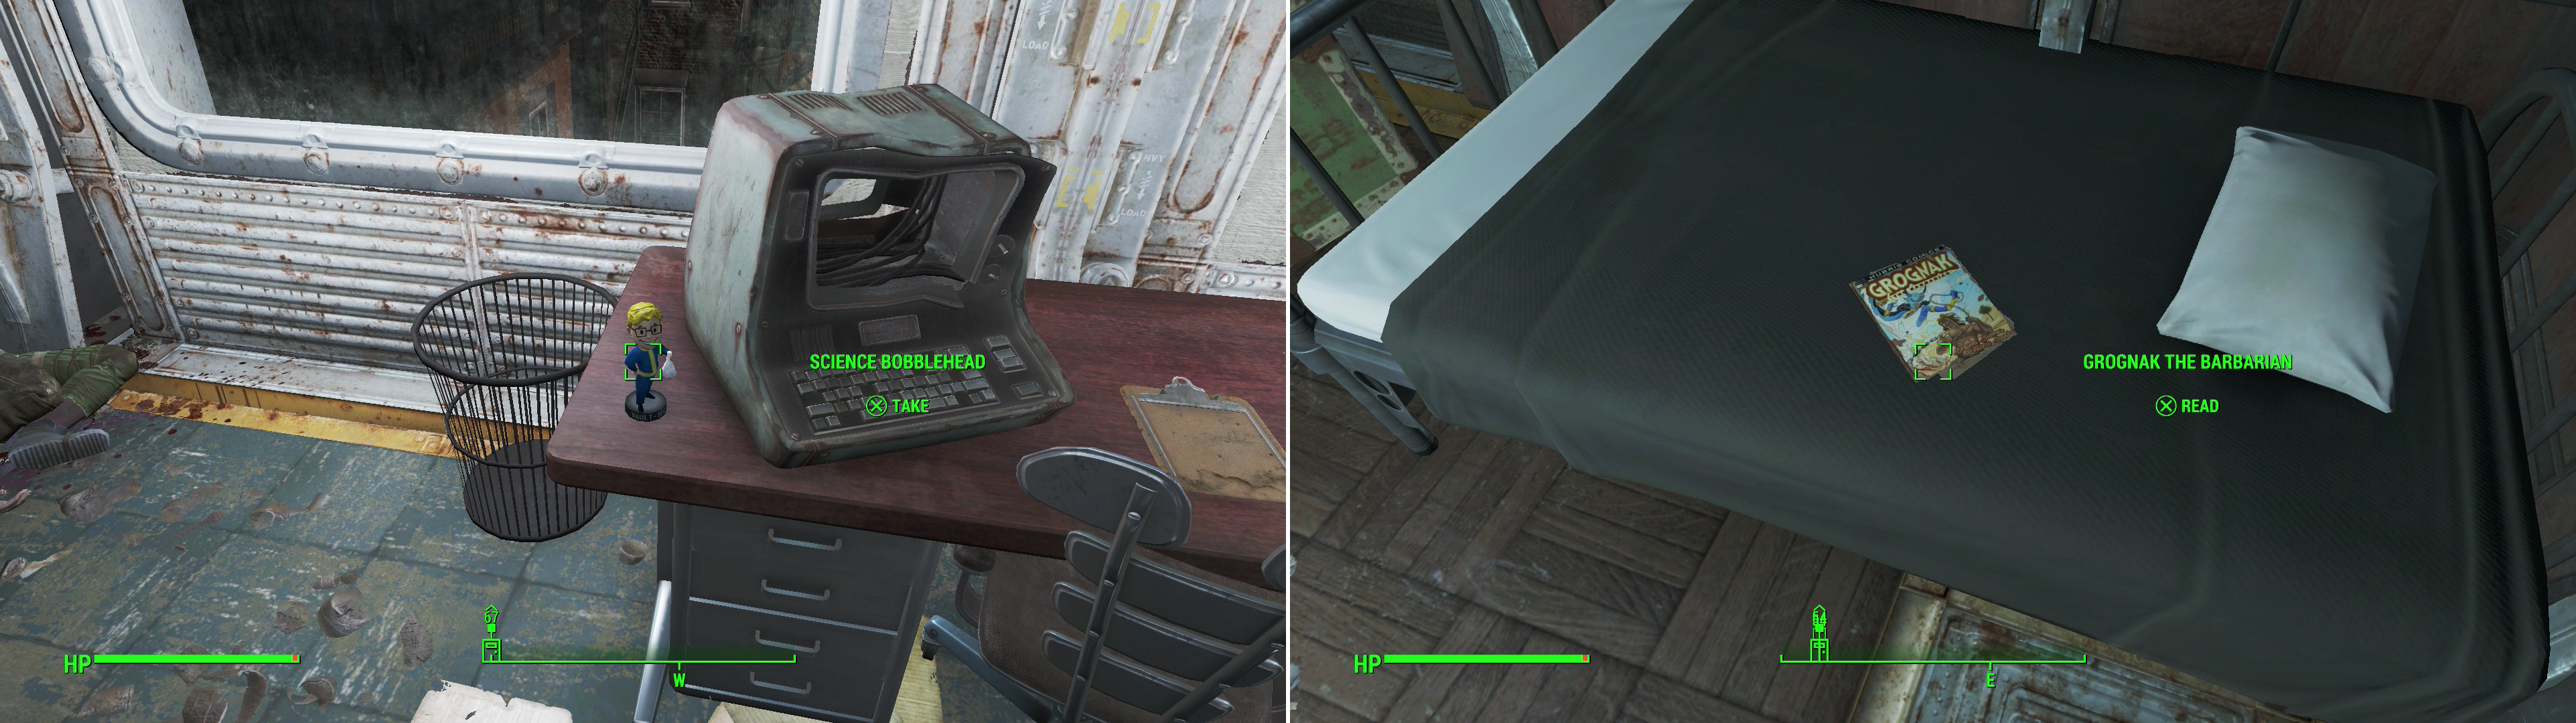
In an office overlooking the training yard you’ll find the Science Bobblehead (left). The Overseer was apparently a fan of Grognak the Barbarian (right).
Make your way back to the sealed Admin door and open it, then head up some stairs beyond to reach the Chief Scientist’s office, where another Gunner dwells. Kill him, then use the “Chief Scientist’s Terminal” to learn about the purpose of this particular vault, which for once actually seems to be human survival. Okay, so it’s making super-soldiers, but in post-apocalyptia, that might just be the same thing. Go through a door [Advanced] to the west to find a small sleeping quarters room for the staff which has some minor loot inside, then continue through a door to the south and up another flight of stairs to reach the Overseer’s Office, where the final few Gunners lurk. Kill the Gunner Commander and his lackey, then use the “Overseer’s Terminal” to get more information about the vault, as well as to open the door [Expert] to the north and the Safe [Master] built into the desk. Merely interacting with this terminal will complete the quest “Vault 75”. Loot the safe, then enter the Overseer’s room to find a copy of Grognak the Barbarian on the bed, a floor Safe [Master] under the bed, a Steamer Trunk and a First Aid Box. Not bad… now all you need to do is head through a doorway to the south, go down some stairs, and use that Admin Access Card to return to the cafeteria, from which you should easily be able to make your way out of the vault.
| Objective | Reward |
|---|---|
| For exploring |
260 XP |
Slocums Joe Corporate HQ
Once you’re back outside, head south-west across the street - around a bus - to find the ![]() Slocum’s Joe Corporate HQ. Like the Malden Middle School area (which is no longer on your map, having been replaced by Vault 75), it’s just a marked exterior area, the building having been compromised. In other words, no loading screens. At least, not yet. Head upstairs and exterminate any Raiders you encounter. Make your way to the third floor, where you can find a Steamer Trunk along the southern end of the building, then return to the second floor, exit the stairwell, then head south past a Cooking Station to find the door leading to the Slocum’s Joe Offices. Inside you’ll find more Raiders trying their raidery best to break into a Safe. Kill them, then snipe (pun intended) their prize: a Safe [Advanced], inside of which you’ll find the “
Slocum’s Joe Corporate HQ. Like the Malden Middle School area (which is no longer on your map, having been replaced by Vault 75), it’s just a marked exterior area, the building having been compromised. In other words, no loading screens. At least, not yet. Head upstairs and exterminate any Raiders you encounter. Make your way to the third floor, where you can find a Steamer Trunk along the southern end of the building, then return to the second floor, exit the stairwell, then head south past a Cooking Station to find the door leading to the Slocum’s Joe Offices. Inside you’ll find more Raiders trying their raidery best to break into a Safe. Kill them, then snipe (pun intended) their prize: a Safe [Advanced], inside of which you’ll find the “![]() Slocum’s BuzzBites Recipe”. Uh… neat? There’s also a Duffle Bag nearby, just in case you’re not carrying around enough loot already.
Slocum’s BuzzBites Recipe”. Uh… neat? There’s also a Duffle Bag nearby, just in case you’re not carrying around enough loot already.
The ![]() National Guard Training Yard - where Shelly Tiller is located - is still a bit to the south-east. Yeah, little progress has been made, and most of this exploration has been kind-of-along-the-way, but mostly for loot. To the south-east from Malden is the
National Guard Training Yard - where Shelly Tiller is located - is still a bit to the south-east. Yeah, little progress has been made, and most of this exploration has been kind-of-along-the-way, but mostly for loot. To the south-east from Malden is the ![]() Med-Tek Research building, which is where MacCready will eventually want you to explore. If you haven’t advanced his companion quest “Long Road Ahead” enough to get him to mention the place, it’s not worth exploring yet, as your progress will be impeded without MacCready. Assuming you have MacCready, however, and advanced his quest to this point, the Med-Tek Research building will be covered shortly. If that’s not the case, again, you can skip it for now and come back later when “Long Road Ahead” leads you back here.
Med-Tek Research building, which is where MacCready will eventually want you to explore. If you haven’t advanced his companion quest “Long Road Ahead” enough to get him to mention the place, it’s not worth exploring yet, as your progress will be impeded without MacCready. Assuming you have MacCready, however, and advanced his quest to this point, the Med-Tek Research building will be covered shortly. If that’s not the case, again, you can skip it for now and come back later when “Long Road Ahead” leads you back here.
Greentop Nursery
First, however, there’s another place to knock off the map. Head north-east from Malden to find the ![]() Greentop Nursery settlement, which Preston may or may not have told you about. Radiant quests, what are you going to do, right? It doesn’t matter if he sent you here or not, though, talk to one of the Settlers and she’ll give you a radiant quest, one of which may be “Ghoul Problem at Greentop Nursery”, which will lead you to the National Guard Training Yard. If you’re lucky, you’ll get “Clearing the Way for Greentop Nursery” which just requires you to kill the Bloodbugs at the Taffington Boathouse, which you should have already done. Or, in another lucky break, you may get a random kidnapping mission which may lead you back to
Greentop Nursery settlement, which Preston may or may not have told you about. Radiant quests, what are you going to do, right? It doesn’t matter if he sent you here or not, though, talk to one of the Settlers and she’ll give you a radiant quest, one of which may be “Ghoul Problem at Greentop Nursery”, which will lead you to the National Guard Training Yard. If you’re lucky, you’ll get “Clearing the Way for Greentop Nursery” which just requires you to kill the Bloodbugs at the Taffington Boathouse, which you should have already done. Or, in another lucky break, you may get a random kidnapping mission which may lead you back to ![]() Back Street Apparel, which should be done immediately, as kidnapping quests have a time limit. If you’re less fortunate you may get “Raider Troubles at Greentop Nursery”, which will require you to go to the
Back Street Apparel, which should be done immediately, as kidnapping quests have a time limit. If you’re less fortunate you may get “Raider Troubles at Greentop Nursery”, which will require you to go to the ![]() Dunwich Borers area or the quest “Super Mutant Trouble at Greentop Nursery” which sends you to
Dunwich Borers area or the quest “Super Mutant Trouble at Greentop Nursery” which sends you to ![]() Breakheart Banks. Both of these latter locations won’t be covered just yet, and it’s not a big deal if you delay before claiming Greentop Nursery (unless you got a kidnapping quest, of course). You’re here just in case you get another excuse to travel to the Nation Guard Training Yard. Birds. Stones. All that fun stuff.
Breakheart Banks. Both of these latter locations won’t be covered just yet, and it’s not a big deal if you delay before claiming Greentop Nursery (unless you got a kidnapping quest, of course). You’re here just in case you get another excuse to travel to the Nation Guard Training Yard. Birds. Stones. All that fun stuff.
Med-Tek Research
Return to Malden and head south-east to find the Med-Tek Research building, outside of which you’ll have to deal with a horde of Feral Ghouls. That’s promising. Kill them all and, assuming you’ve advanced “Long Road Ahead” to the point where MacCready asked to go here, head inside. Otherwise, skip ahead to the “National Guard Training Yard and Surround Areas” section.
Enter the Med-Tek Research building and head east through a door [Novice] to find a small office with a “Security Terminal” inside, along with some ammo and an Ammo Box. Believe it or not, that’s actually a fair bit of the loot you’ll find on this exceptionally boring floor. At least, in the part you can access now. Return to the lobby and head north, past an elevator, then west to find the “Airlock Terminal”, which controls access to the part of the facility MacCready wants to get into. But first, you’ll have find the Executive Terminal.
From the room with the “Airlock Terminal” head east down a hallway, dust a Feral Ghoul that drops from the ceiling, then continue east up some stairs to reach a room with red carpeting and numerous terminals. There are also Ghouls here. Lots of Ghouls. Most of them are on the balcony overlooking this floor, but they won’t be shy about coming down to greet you. Fight your way up a ramp to the balcony then continue south, turning west at a Nuka Cola Vending Machine to find a doorway. Go through the doorway and proceed west to find the Executive’s office, where another trio of Feral Ghouls lurk. Kill them and approach the “Executive Terminal”, which can only be accessed with a password. MacCready will furnish you with “Jacob’s Password”, which you should use to access the “[Alert Override]” entry.
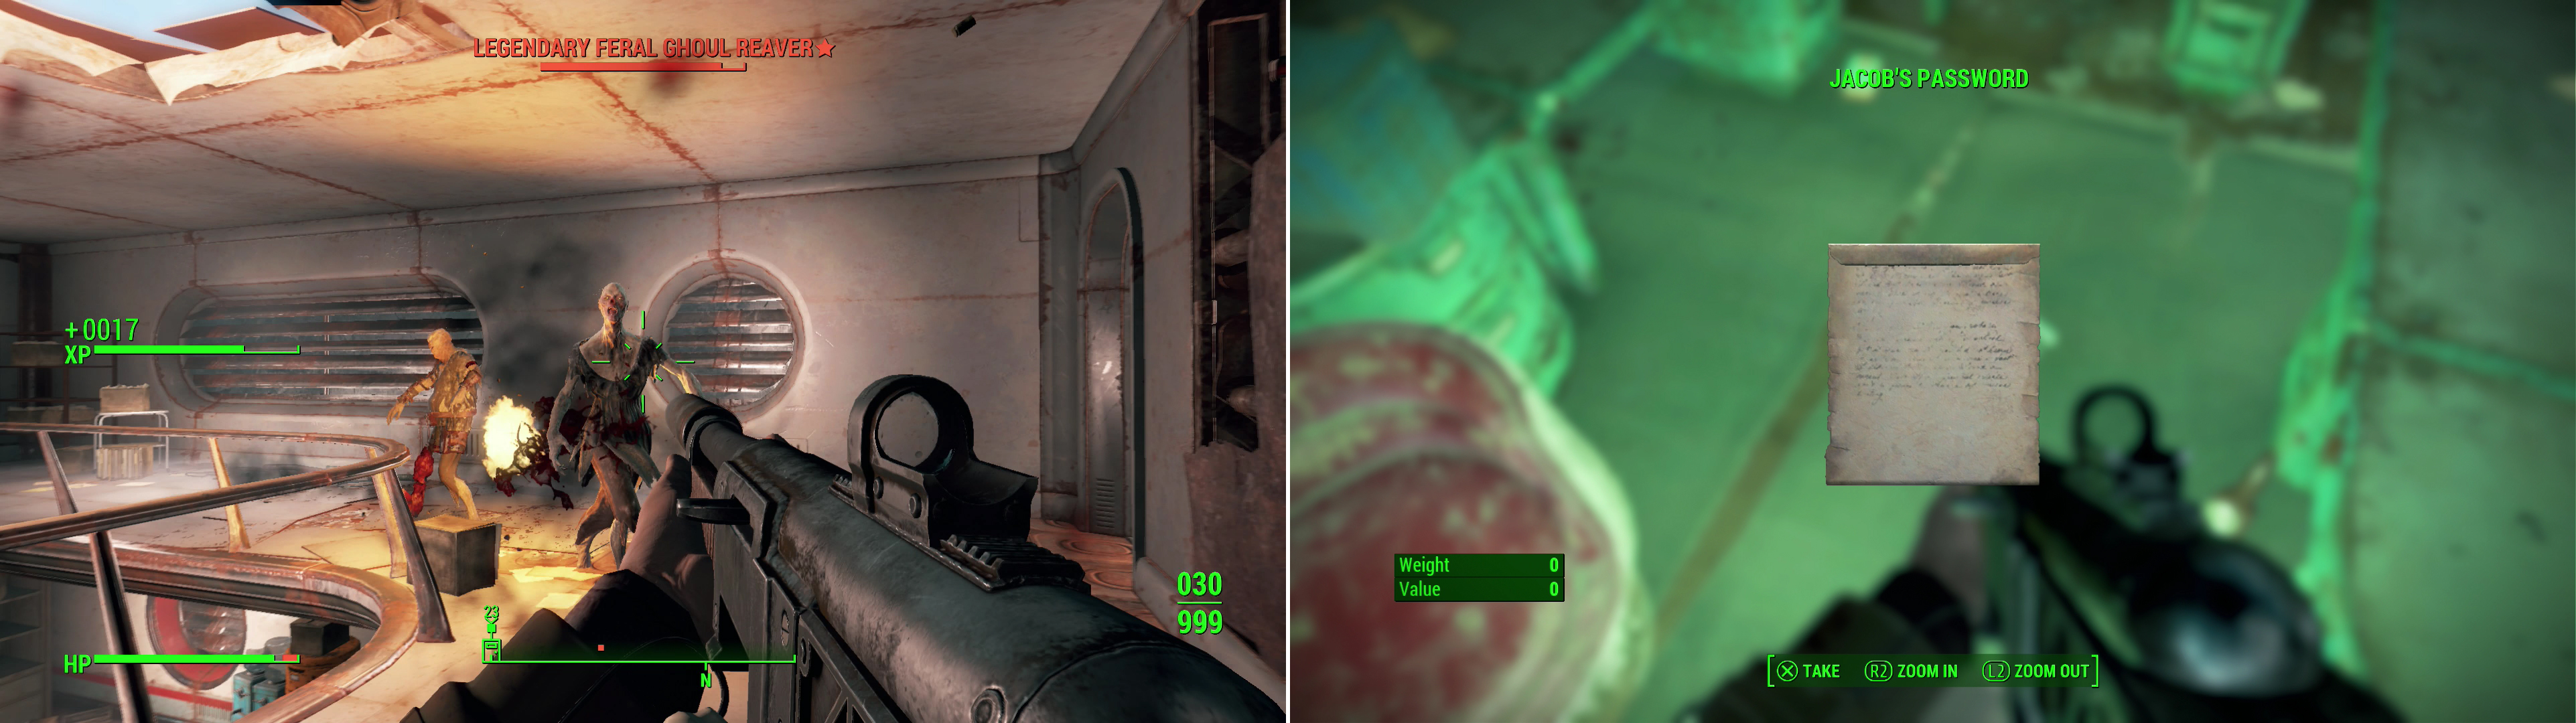
Feral Ghouls prowl the interior of Med-Tek Research (left). When you reach the executive office, MacCready - if he’s with you - will furnish you with a password to the terminal (right).
Once you’re done messing with the terminal, drop down a hole in the floors below and continue east then north to return to the room with the “Airlock Terminal”, which can now be used to “[Open Airlock Doors]”. Beyond the sealed airlock doors you’ll find an office, which is guarded by two turrets. After entering the room you can immediately turn south to find a “Security Terminal” which can be used to shut down the turrets and open the sealed doors on the western end of the room. Opening these doors will unleash a flood of Feral Ghouls upon you, so be prepared. Once they’re gone, loot the northern and southern rooms to obtain some junk and the odd chem, then continue into the room to the west when you’re ready to move one.
Turn south then head through a door to the east to find a small room with some stairs and a ramp you can go up. They both go to the same place, to pick whichever irrelevant choice you wish, then in the room above kill some Ghouls and loot a metal shelf to find some chems an a Large Toolbox [Novice]. Continue on to a room to the north, then turn west to find a room with four cells, all of which can be opened with “Cell Terminals”, three of which are locked [Novice]. Open the doors, put the Ghouls in some of them out of their misery, then ride an elevator.
Med-Tek Sub-Levels
From the room the elevators opens into, head down a hallway to the south (the northern path leads to a dead-end) and turn east to find a large room protected by a pair of turrets. Note the sealed doors and either dispatch the turrets or sneak past them to the east to find a small control room with a “Med-Tek Cell Block Terminal” inside of it. Activate the terminal to get the option to turn on a Protectron on the lower level, open the sealed doors, and manipulate the turrets. If you’ve been playing video games for any length or time - or if you’re just paying attention to this area - you should be ready for a Ghoul rush when you open the door. The more machines you can get on your side before you open the doors, the easier your life will be. Survive the Feral Ghouls you unleash, then unlock a Security Gate [Advanced] in the control room (beyond which you’ll find some guns, medical supplies and Ammo Boxes) before ultimately heading downstairs.
Enter the middle room on the lower level to the south, then go down a ramp and follow a highway to reach another large, multi-storied room. Grab a Fusion Core out of a machine then continue up some stairs to reach a small room with a Safe [Novice]. Loot it, then you can use the stairs to jump across some pipes to reach the western end of the room, where you’ll find a First Aid Box and a Toolbox near a skeleton. Continue east into a hallway and travel north into - and through - a small room, then turn east down another hallway and enter yet another chamber. Kill a Feral Ghoul, go down some stairs, and make your way south by initially taking either hallway to the east or west. On the southern end of the wrap-around hallways you’ll find a “Med-Tek Lab Terminal”, which opens the doors to the room surrounded by the hallways to the north and the door to the south.
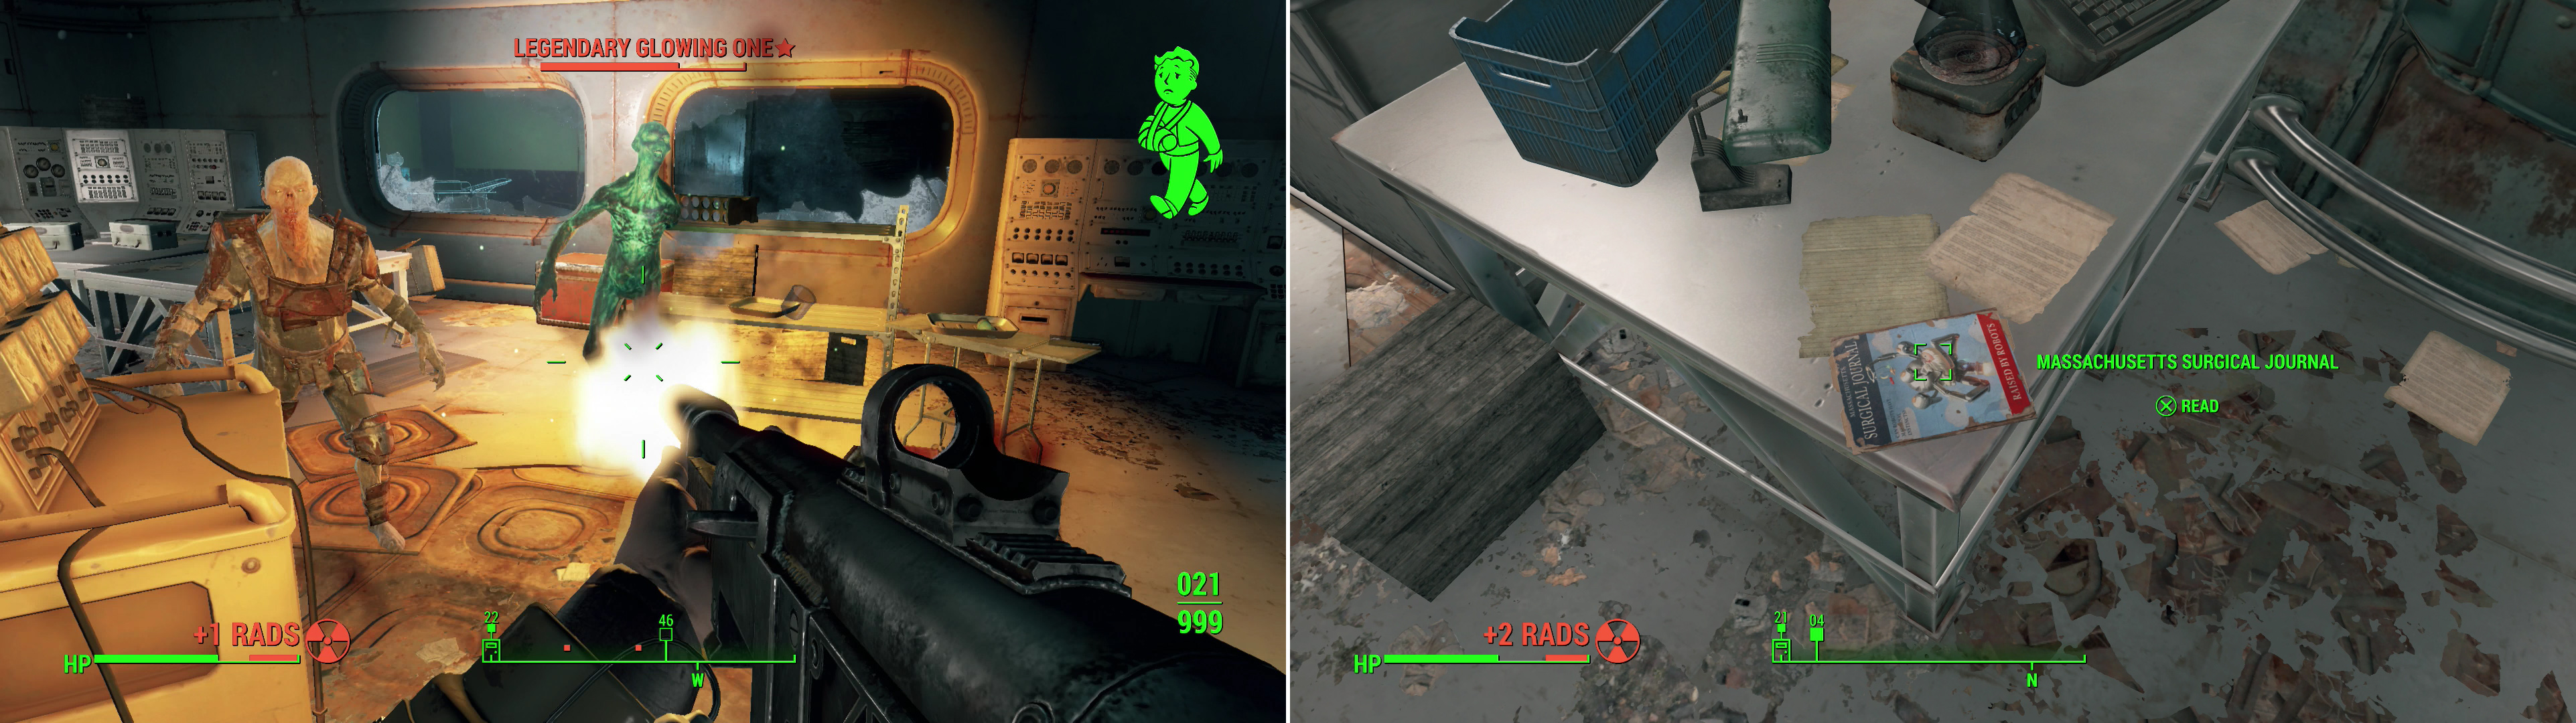
Kill the Feral Ghouls in the Sub-Levels, including a rare Glowing One (left). The lab occupied by the Glowing One also houses a copy of the Massachusetts Surgical Journal (right).
In the room to the north you’ll encounter a few more Ghouls, led by a Glowing One. Kill these foes, then get to looting the room, as it contains two First Aid Boxes, a Steamer Trunk and some chems. As for the more interesting loot, you can find a Massachusetts Surgical Journal on the corner of a metal table and, on the northern side of the large table with skeletons on it, you’ll find a dose of PREVENT, the medicine MacCready is searching for. Talk to MacCready and hand the cure over and, after he’s done thanking you, he’ll ask you to take the cure to Daisy in ![]() Goodneighbor, who can get the medicine to his son in a timely manner.
Goodneighbor, who can get the medicine to his son in a timely manner.
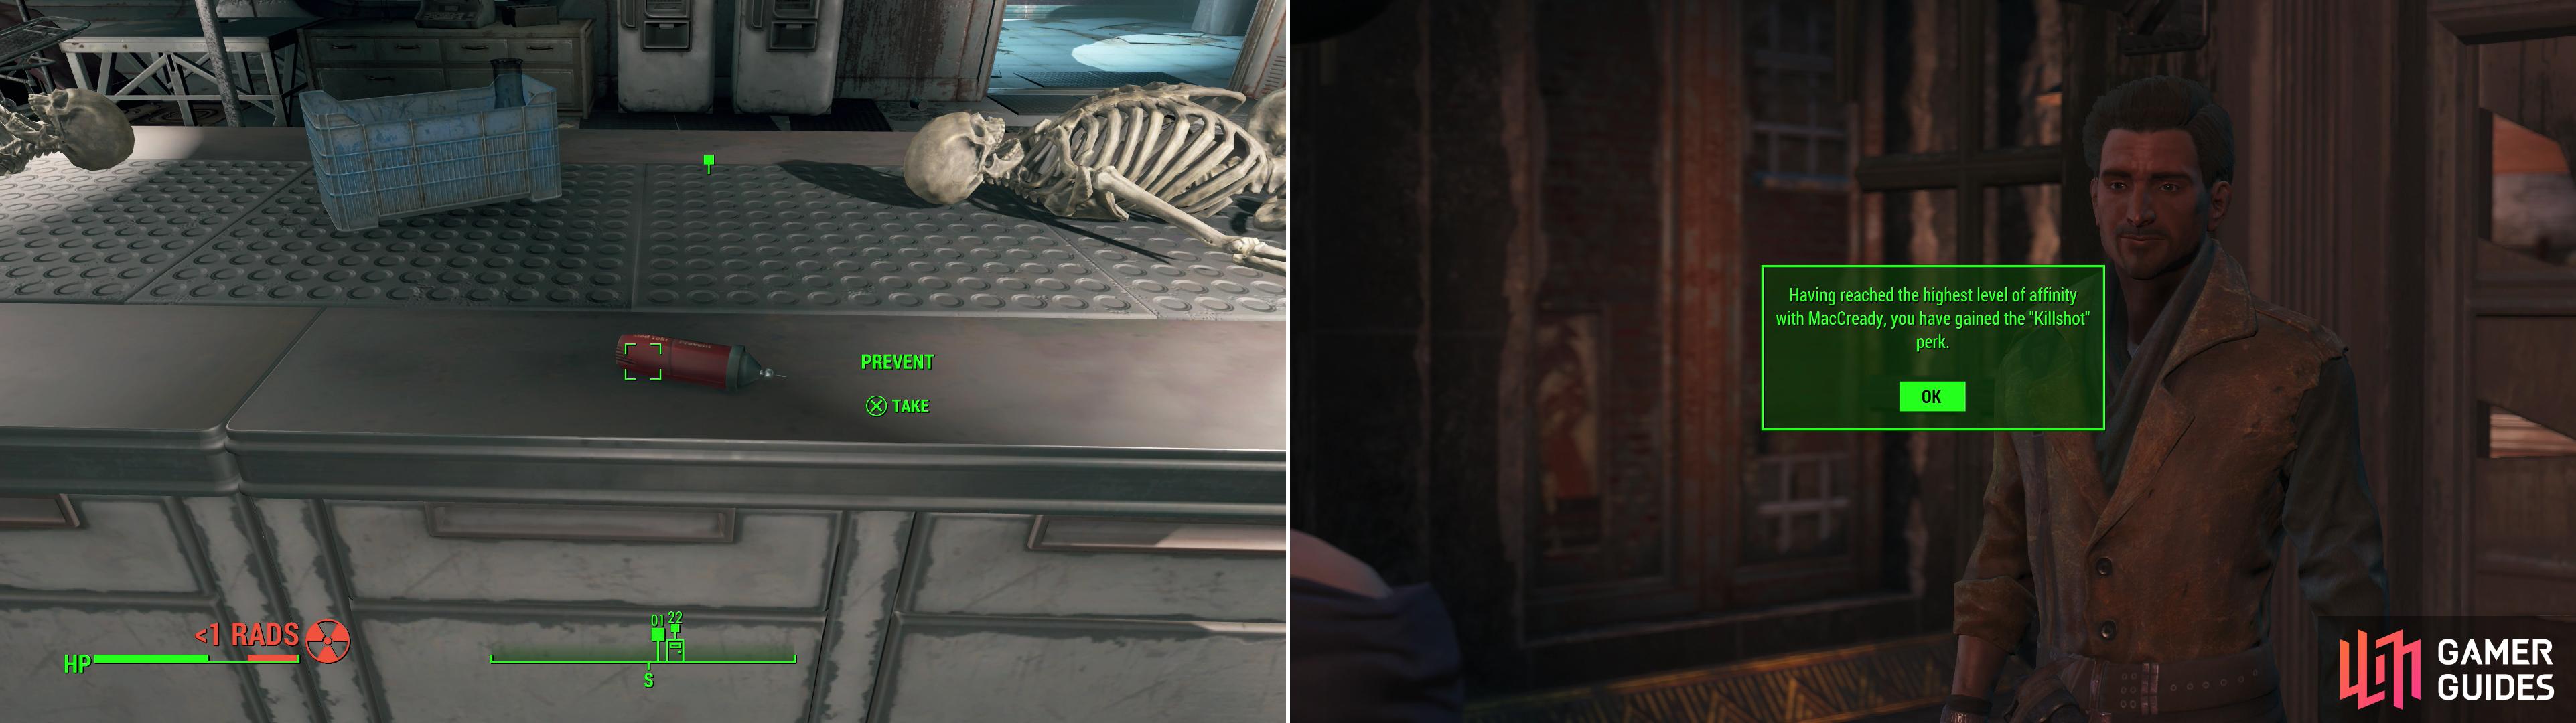
The Medicine MacCready needs to save his son can be found in the depths of Med-Tek Research (left). Earn MacCready’s loyalty and you’ll forever more benefit from the Killshot perk (right).
If you want to get this done with quickly, there’s no harm in it. Exit the room and continue through the now-open door to the south to reach an elevator, which will take you to the lobby. From here head back outside and fast-travel back to Goodneighbor and talk to Daisy in her stall. She’ll agree to send the medicine down with no fuss, after which this quest should end. If MacCready’s disposition to you is now high enough, he should initiate dialogue after a bit and give you a Wooden Soldier Toy, and if you pass a speech check, you may also be able to start a romantic relationship with him. And why not? You both have children in peril, and somewhat recently-deceased spouses. Bask in your shared misery. Best of all, however, is the Killshot perk, which is just all kinds of awesome, giving a +20% chance to hit in VATS.
| Objective | Reward |
|---|---|
| For recovering the cure for MacCready’s son | 325 XP |
No Comments