
Walkthrough for the quest ![]() When Freedom Calls in Fallout 4. This quest should begin at the end of Out of Time, after you defeat the Raiders outside of the
When Freedom Calls in Fallout 4. This quest should begin at the end of Out of Time, after you defeat the Raiders outside of the ![]() Museum of Freedom in
Museum of Freedom in ![]() Concord.
Concord.
| Important Items in This Area |
|---|
| RobCo Fun |
Be sure to loot the corpses of the Raiders and equip any new/better arms and armor they may have dropped. Note that apparel in Fallout 4 is highly variable; you can equip individual pieces of armor on each arm, each leg, the head and torso. Some clothing is light enough to be worn under armor (like Vault Jumpsuits) and other clothing is cumbersome enough to preclude the use of some or all armor. A ![]() Drifter Outfit will preclude any other armor save headwear, an Athletic Outfit uses up both leg armor slots (but allows arm, torso and head armor), and a Pink Dress cannot be worn with torso or leg armor (but allows arm and head armor), just to provide a few examples. Each piece of apparel you wear can increase your Damage Resist (reducing incoming physical, energy or radiation damage, or a combination thereof), provide a temporary boost to SPECIAL stats, or grant other bonuses. Mixing and matching various bits of apparel to obtain the best overall bonuses comes highly recommended, although it can be admittedly difficult to do so and avoid ending up rather… garish. Priorities.
Drifter Outfit will preclude any other armor save headwear, an Athletic Outfit uses up both leg armor slots (but allows arm, torso and head armor), and a Pink Dress cannot be worn with torso or leg armor (but allows arm and head armor), just to provide a few examples. Each piece of apparel you wear can increase your Damage Resist (reducing incoming physical, energy or radiation damage, or a combination thereof), provide a temporary boost to SPECIAL stats, or grant other bonuses. Mixing and matching various bits of apparel to obtain the best overall bonuses comes highly recommended, although it can be admittedly difficult to do so and avoid ending up rather… garish. Priorities.
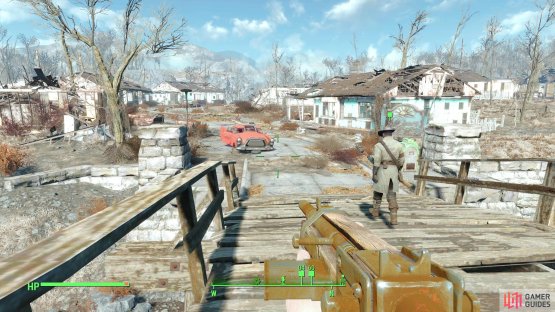
Anyways, when you’re done preparing (don’t be shy about finding a bed to sleep in if you need to recover lost HP!), enter the Museum of Freedom.
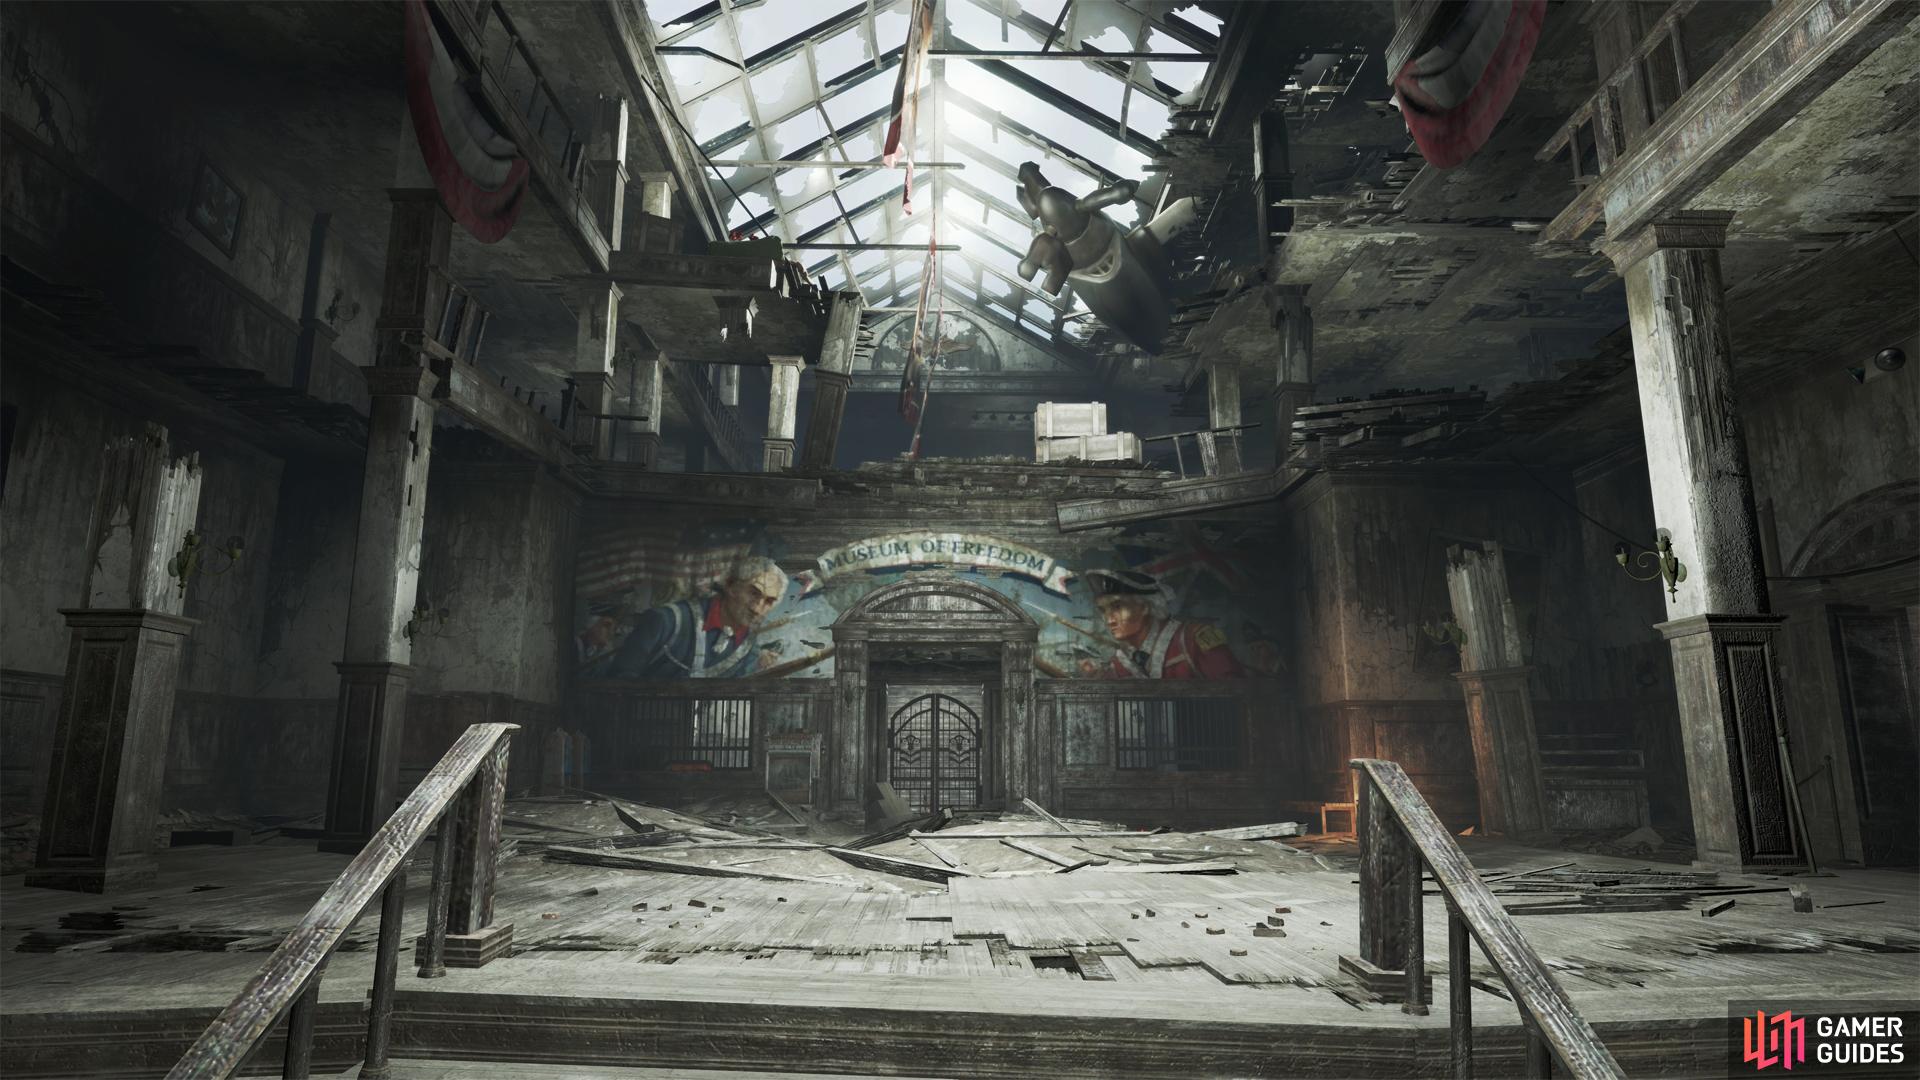
A firefight in Concord will lead you to the Museum of Freedom.
Museum of Freedom
You are here to save some settlers from the Raiders trying to take them out inside; right away you’ll be able to target some Raiders above you. There is one two levels above you on the left and a second above you straight ahead. Kill the higher enemy here (use VATS to see where they are) and that will trigger the other enemy. They will try to hide behind the boxes on the bridge pathway, but you can head right to get them at an angle fairly easily.
Once they are dead you may or may not get a third enemy (at ground level) to attack you. It is probably best to hide a bit and de-aggro him unless you can shoot him through the bars. The gate here can be unlocked if you’ve invested into lockpicking as it is an [Advanced] lock. There are also some Bobby Pins near the gate you should pick up regardless. Even if you unlock the gate, it’s still worthwhile to go through the side rooms. Follow this path (sneak through it) as you are given a history lesson about the American Revolution. In the second presentation room is a Raider, so get in a sneak attack if you can for a crazy kill. Keep following the path and you’ll end up behind the main gate.
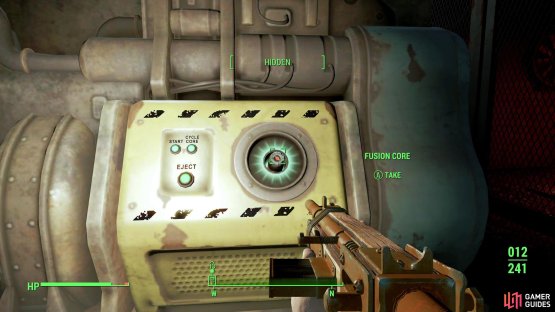
From here the floor drops down to the basement. Go down with the floor to see a locked security door [Novice] and a computer terminal [Novice]. Both of these unlock the door, so pass one of them (or, for more XP, do the computer and then exit out of it and do the door separately). You’ll need the item that is behind here: a ![]() Fusion Core , to complete the mission, so be sure to grab it now.
Fusion Core , to complete the mission, so be sure to grab it now.
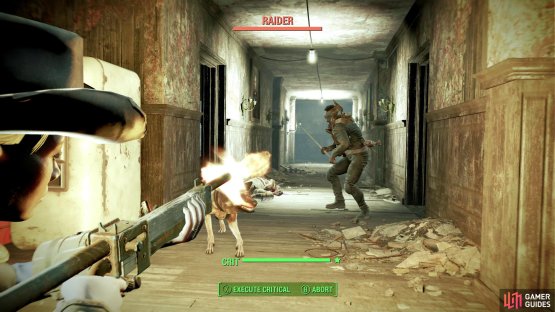
(1 of 2) There are numerous Raiders in the Museum of Freedom, but fortunately you’ll rarely fight more than two at a time.


There are numerous Raiders in the Museum of Freedom, but fortunately you’ll rarely fight more than two at a time. (left), Break into a cage-off area in the basement to find a Fusion Core. (right)
Head up the stairs now and hang a left. Skip the door here for right now and head to the bridge where you killed the Raider (you can loot them now). There is also a Cap Stash in the far corner, where the red light is. Grab it and head back to the door you skipped. This door leads to a room with a hallway on the left. In the far room though are two Raiders who are debating leaving, so try to get in a sneak attack if you can and take them down. Head past the hole in the wall past them and go up the stairs (the door in the hallway leads to the entrance). Up on this third level you will hear some Raiders trying to reach the settlers. They’ll give up in a bit and start to patrol the place. If you prefer, you can hide by the vending machines and wait for them to patrol for a sneak attack opportunity or just take them out (they aren’t too tough). Once you take them out, the man who shouted for your help will open up the door for you.
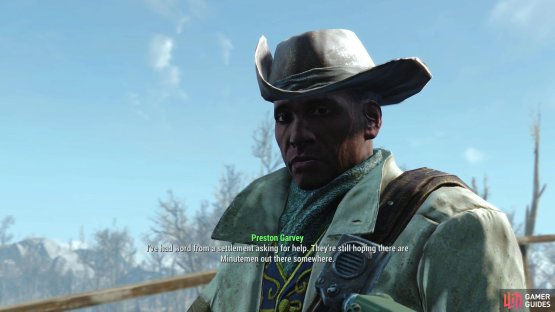
Enter to meet the “Last Minuteman”, ![]() Preston Garvey. Preston and his Mechanic, Sturges, will tell you how his group has done since coming to Concord (hint: not well) and tells you of his current plan: get a Fusion Core and use the Power Armor on the roof to drive away the rest of the hostile forces. With that you will be tasked to retrieve the Fusion Core, which you will already have if you are following this guide (excellent!).
Preston Garvey. Preston and his Mechanic, Sturges, will tell you how his group has done since coming to Concord (hint: not well) and tells you of his current plan: get a Fusion Core and use the Power Armor on the roof to drive away the rest of the hostile forces. With that you will be tasked to retrieve the Fusion Core, which you will already have if you are following this guide (excellent!).
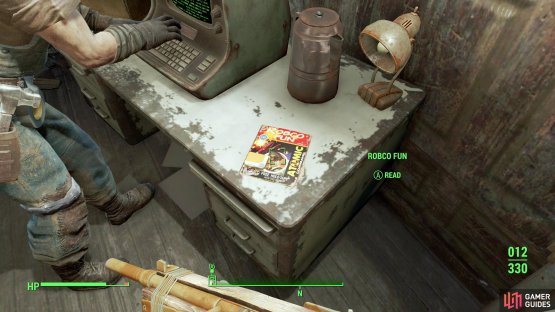
(1 of 2) On the upper floor you’ll find the RobCo Fun magazine,


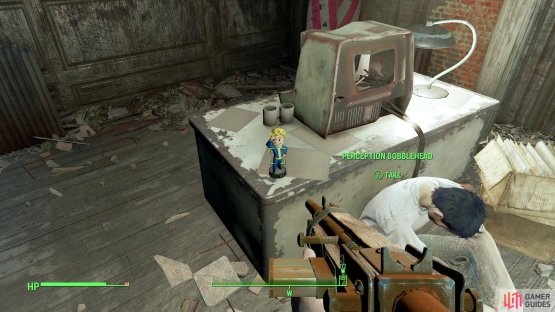
On the upper floor you’ll find the RobCo Fun magazine, (left), and the Perception Bobblehead. (right)
Now, there are several cool things in this room. First and foremost, to the left on a desk is the all-important ![]() Perception Bobblehead . Nabbing this thing will increase your
Perception Bobblehead . Nabbing this thing will increase your ![]() Perception skill by +1 permanently. Very nice. You can also find a Robco Fun magazine near Sturges which comes with the “
Perception skill by +1 permanently. Very nice. You can also find a Robco Fun magazine near Sturges which comes with the “ ![]() Atomic Command
Atomic Command ![]() Holotape “, which is similar to the old Atari game “
Holotape “, which is similar to the old Atari game “![]() Missile Command”. Try it out when you wish. Also note that you can kick Sturges off the terminal here and hack it yourself, as it is a [Novice] Terminal. Nothing of any real note however, aside from some museum memos.
Missile Command”. Try it out when you wish. Also note that you can kick Sturges off the terminal here and hack it yourself, as it is a [Novice] Terminal. Nothing of any real note however, aside from some museum memos.
Go ahead and save now and then get ready for a Speech Check. Sitting on the couch is Mama Murphy, who has a speech check if you ask her about her “Sight”, which, if you can pass, gives you a good chunk of XP and warns you of an upcoming danger more clearly. If you happen to have low ![]() Charisma, you can equip any Charisma-boosting items you may have found and drink some booze to help improve your charm.
Charisma, you can equip any Charisma-boosting items you may have found and drink some booze to help improve your charm.
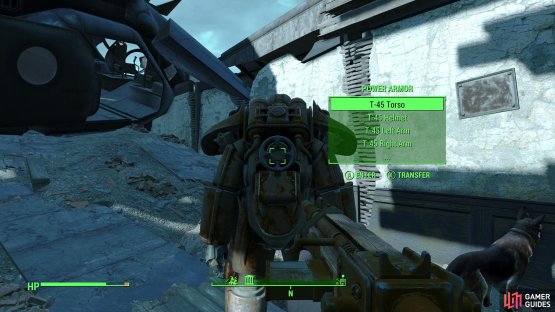
(1 of 2) Enter the abandoned T-45 Power Armor on the roof,


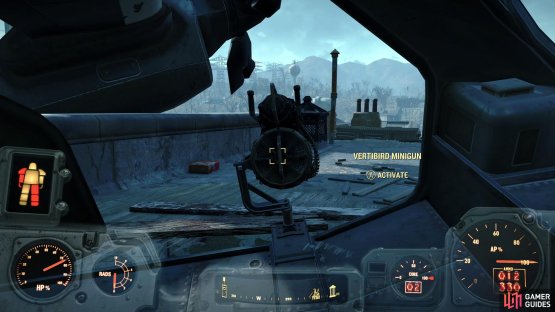
Enter the abandoned T-45 Power Armor on the roof, (left), then rip the Minigun off the Vertibird. (right)
The Battle of Concord
Once you are done with that, head outside to find the Power Armor Preston was telling you about. Here you should pick up the ![]() Log - SSG Michael Daly Holotape nearby and any other goodies you wish, then put the Fusion Core into the Power Armor (interact with it). Interact with it again to enter the Power Armor, then head into the Vertibird and rip the
Log - SSG Michael Daly Holotape nearby and any other goodies you wish, then put the Fusion Core into the Power Armor (interact with it). Interact with it again to enter the Power Armor, then head into the Vertibird and rip the ![]() Minigun off.
Minigun off.
You now have an awesome objective; wipe out all hostiles in the area. Jump on down (you take no fall damage in Power Armor) and give the Minigun a go! This thing will just tear the Raiders to shreds. Don’t worry about looting any of them until you are done. Head forward wiping out the Raiders and, as you press towards the beginning of the town, a monster will tear up the ground and emerge… it is a ![]() Deathclaw! This can rightfully be considered the first “boss” of the game even with your awesome Power Armor.
Deathclaw! This can rightfully be considered the first “boss” of the game even with your awesome Power Armor.
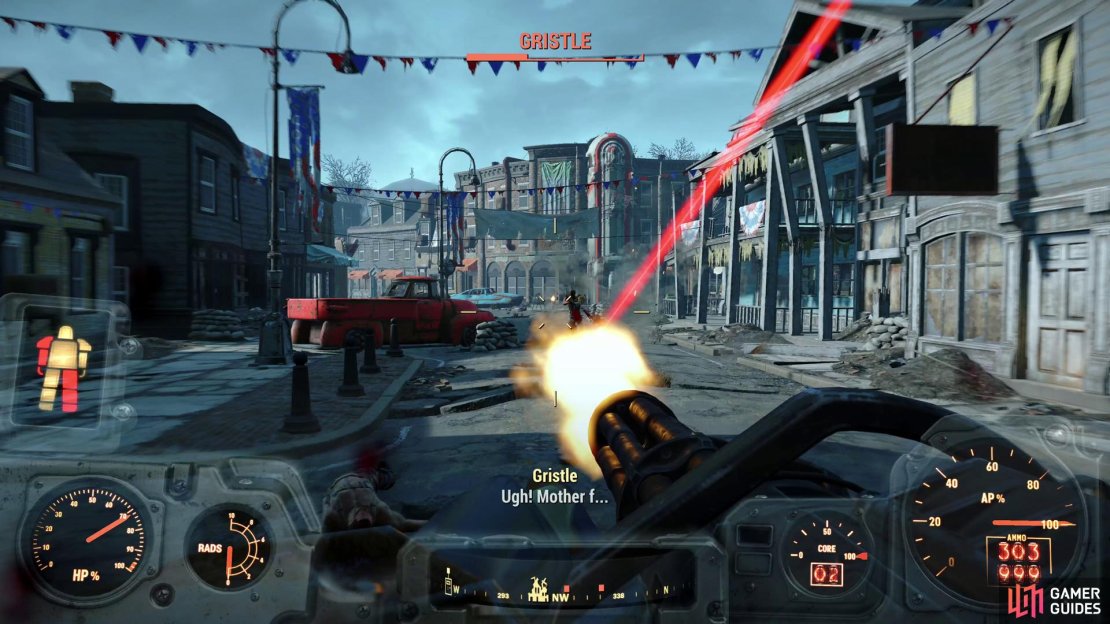
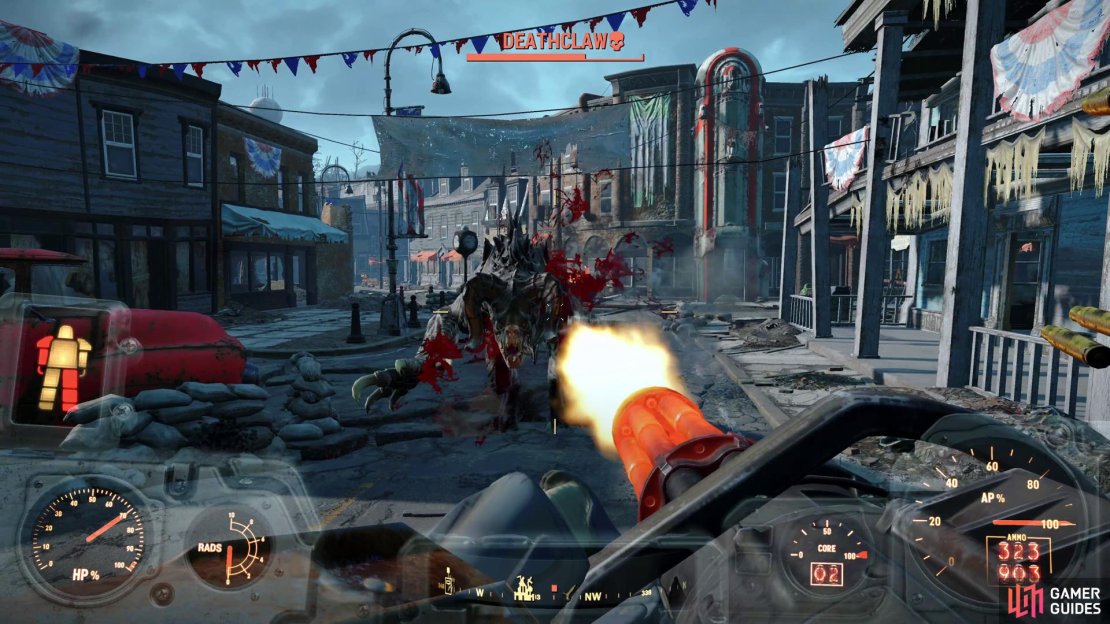

(1 of 3) With your new arms and armor, eradicate the Raiders - led by Gristle - in Concord,
Go ahead and focus on the Deathclaw here. You’ll want to lay into him with short bursts of controlled, focused fire as when he chases after you he tries to dodge back and forth. If you can, try to get him near a car and blow the car up to do major damage to him. You may also get a bit lucky if ![]() Dogmeat gets in its way. Otherwise, if it gets close, dash away a bit and lay into him again. The Deathclaw for its part will always try to close in with you and melee attack you. You can actually back-step slightly to avoid most of his attacks, but he can also rush in and grab you, doing damage and throwing you aside. If you get low on health, don’t be afraid to use a
Dogmeat gets in its way. Otherwise, if it gets close, dash away a bit and lay into him again. The Deathclaw for its part will always try to close in with you and melee attack you. You can actually back-step slightly to avoid most of his attacks, but he can also rush in and grab you, doing damage and throwing you aside. If you get low on health, don’t be afraid to use a ![]() Stimpak or two from the Pip-Boy menu and keep laying into the Deathclaw outside of the museum (so Preston can assist you with his
Stimpak or two from the Pip-Boy menu and keep laying into the Deathclaw outside of the museum (so Preston can assist you with his ![]() Laser Rifle).
Laser Rifle).
Once you defeat the Deathclaw, be sure to loot him and all of the enemies in the area. In particular, one of the Raiders named Gristle has the Corvega Storage Key , so be sure you find and loot him. You are now tasked with meeting back up with Preston, and there’s no good reason to postpone your rendezvous, as you’re a short and (hopefully) uneventful stroll away from finishing this quest. No need to wait on that XP.
A New Home
Go ahead and head back to the Museum of Freedom now (bring your Power Armor along and leave it for now at the entrance to the museum). Go talk to Preston now and he will reward you for your help: 100 Bottle Caps and 50 ![]() Fusion Cells. Talk to him to see what his plans are and soon you’ll be talking to Mama, who actually has some useful info for you. Talking to her starts the Jewel of the Commonwealth quest, but this quest is still not quite done!
Fusion Cells. Talk to him to see what his plans are and soon you’ll be talking to Mama, who actually has some useful info for you. Talking to her starts the Jewel of the Commonwealth quest, but this quest is still not quite done!
| Objective | Reward |
|---|---|
| For rescuing the survivors at |
100~ Caps, |
(1 of 2) Escort the survivors back to Sanctuary,


Escort the survivors back to Sanctuary, (left), and when you arrive, Preston will suggest you help out a nearby settlement. (right)
Your current objective for this quest is to “Join Preston Garvey in ![]() Sanctuary”. Go ahead and exit the museum and follow Preston and his crew back to your old city. Yes, you’ll have to walk with them all the way there, but there shouldn’t be any hostiles left to worry about.
Sanctuary”. Go ahead and exit the museum and follow Preston and his crew back to your old city. Yes, you’ll have to walk with them all the way there, but there shouldn’t be any hostiles left to worry about.
Once you arrive, be sure to talk to Preston and agree to help him with the Minutemen quest he offers to start the quest The First Step, which will likely task you with helping the settlers at Tenpines Bluff and getting them to ally with you. You will also get a Miscellaneous Quest to Talk to Sturges, which will kick off the quest Sanctuary.
There are lots of things on your plate right now. If you want to continue with the story, skip ahead to the section Jewel of the Commonwealth, but keep in mind you may be somewhat underleveled for it. ![]() Diamond City is a long way off, after all, and the further away from Sanctuary you get, the stronger you can expect foes to become. Video game logic. We highly recommend helding Sturges out and completing the quest Sanctuary, which serves a settlement building tutorial - basically free, easy XP. After that, explore around Sanctuary and complete quests like Returning the Favor and The First Step. Once those are done, you’ll be more fit to deal with the foes en route to Diamond City. Also be sure to talk to
Diamond City is a long way off, after all, and the further away from Sanctuary you get, the stronger you can expect foes to become. Video game logic. We highly recommend helding Sturges out and completing the quest Sanctuary, which serves a settlement building tutorial - basically free, easy XP. After that, explore around Sanctuary and complete quests like Returning the Favor and The First Step. Once those are done, you’ll be more fit to deal with the foes en route to Diamond City. Also be sure to talk to ![]() Codsworth, who can now be recruited as a companion. If you’d rather have a humble Mr. Handy robot at your side than Dogmeat, anyway.
Codsworth, who can now be recruited as a companion. If you’d rather have a humble Mr. Handy robot at your side than Dogmeat, anyway.


No Comments