
| Important Items in This Area |
|---|
| Guns and Bullets |
| Live & Love |
| Overdue Book x6 |
| Tesla Science |
College Square
Back near ![]() Graygarden you picked up the “Military Frequency AF95” signal, which started the quest “
Graygarden you picked up the “Military Frequency AF95” signal, which started the quest “![]() Fire Support” . Since that’s fairly close to previously explored areas, and since it gives you an excuse to explore further west, let’s head over to Cambridge and see what’s going on. Fast-travel to Graygarden and from there head east, following a road into Cambridge. Be on the lookout for Frag Mines on the road, and as you enter town, your progress will be complicated by some Feral Ghouls. Kill all the zombies roaming about and you should discover the
Fire Support” . Since that’s fairly close to previously explored areas, and since it gives you an excuse to explore further west, let’s head over to Cambridge and see what’s going on. Fast-travel to Graygarden and from there head east, following a road into Cambridge. Be on the lookout for Frag Mines on the road, and as you enter town, your progress will be complicated by some Feral Ghouls. Kill all the zombies roaming about and you should discover the ![]() College Square area. The quest suggests you head south-east to reach those who gave the signal, but for now, let’s take a brief detour.
College Square area. The quest suggests you head south-east to reach those who gave the signal, but for now, let’s take a brief detour.
Start out by following a road at a three-way intersection to the north-east. There are plenty of Ghouls that need to be gunned down, including some in buildings to the north-west and east. There’s even a Feral Ghoul Reaver hiding in a Pulowski Preservation Shelter [Novice] near a diner on the eastern end of this plaza, if you want to inflict such misery upon yourself. Continue north-east along the road, destroying Ghouls as you go until you reach a barricade that’s now patrolled by Ghouls. In the back of a red and gray truck bed you can find an Explosives Box, which in turn is guarded by a lurking Feral Ghoul Roamer. If you enter a building west of the barricade (disarm the Tripwire in the doorway!) you can plunder the place for some junk. More importantly, head upstairs to mount the barricade and climb a ramp to the east to reach a roof and you can find a Steamer Trunk in a rooftop shack. From here head across some planks to the south-east to reach the roof of another building, which you can descend and loot.
From the ground floor of this building (outside of which is the aforementioned Pulowski Preservation Shelter with the Feral Ghoul Reaver inside) head south-west to find the ![]() College Square Station. Oh boy. a metro. Before you subject yourself to the miseries of exploring a metro, however, head south into a building with a blue shade over the front of it and make your way to the second floor, where you can find a Duffle Bag to loot. Cross a ramp to the north and score two Ammo Boxes, then return south to the previous roof and ascend some ramps to the third floor, where you can loot the body of a woman named Ricca. Go down two flights of stairs to the east, then enter a room to the north where you’ll find a Tripwire rigged to an explosive device near a counter, behind which is a wall Safe [Advanced]. Make your way back out to the front (north) of the building, looting as you go, then head down into the College Square Station.
College Square Station. Oh boy. a metro. Before you subject yourself to the miseries of exploring a metro, however, head south into a building with a blue shade over the front of it and make your way to the second floor, where you can find a Duffle Bag to loot. Cross a ramp to the north and score two Ammo Boxes, then return south to the previous roof and ascend some ramps to the third floor, where you can loot the body of a woman named Ricca. Go down two flights of stairs to the east, then enter a room to the north where you’ll find a Tripwire rigged to an explosive device near a counter, behind which is a wall Safe [Advanced]. Make your way back out to the front (north) of the building, looting as you go, then head down into the College Square Station.
College Square Station
From the entrance head east to find the body of a Raider lying against a Trash Can. Poor fellow. Turn north and disarm a Tripwire between another Trash Can and a pillar, loot another Raider, then head down some stairs to the north. When you reach the lower level, you’ll spot a Protectron waiting patiently behind a counter, as well as some Ghouls hanging out further north. Before you bother them, though, explore some bathrooms beyond some blue doors to the east and west. In the western bathroom you’ll find yet another dead Raider, and in the eastern one lurks a Ghoul and a Suitcase [Novice]. Wonder if one has has anything to do with the other? Leave the bathrooms, then search two small stores to the east and west, with the eastern one being the more interesting, this time, as it likely houses Feral Ghouls and some chems. Continue north and pick a locked door [Expert] to get behind the counter where the Protectron rests. Loot a First Aid Box, plunder a safe for some Pre-War Money and a ![]() Stimpak, then grab the copy of Live & Love from atop the safe before hacking the Security Terminal [Novice] - if you want to set the Protectron loose, anyway. Whatever you do, be sure to grab the Nuka Cola Quantum from out of the nearby Nuka Cola Vending Machine.
Stimpak, then grab the copy of Live & Love from atop the safe before hacking the Security Terminal [Novice] - if you want to set the Protectron loose, anyway. Whatever you do, be sure to grab the Nuka Cola Quantum from out of the nearby Nuka Cola Vending Machine.
With the upper floor done, it’s time to turn your attention to the turnstiles to the east and west, both of which lead to the lower subway platform. The eastern path leads down to a subway tunnel where a few Raiders made a last stand against some Feral Ghouls, a couple of which still lurk about. Open a locked door [Novice] to the south to find a First Aid Box, then follow some rails to the north, then enter a subway car to the west, where you’ll find a Suitcase [Novice].
In the western path you’ll find more Feral Ghouls (what else?) immediately off the stairs. Through a doorway to the south you’ll find another Security Terminal [Novice], which awakens another dormant Protectron. From here follow the tracks to the north and enter a subway car, where you can find a Duffle Bag and a Suitcase [Novice]. Next, leave the subway car and make your way down a tunnel to the west and enter a room to the north, where you can find a lurking Feral Ghoul, the College Square Station Key, a Steamer Trunk and plenty of junk. Once this place is looted, continue through a door [Advanced] to the east, which is also opened by the College Square Station Key. This returns you to the large subway landing room, from which you should now head north down a tunnel to find some dead Raiders, one of whom possess the note “Journal Scrap”, which spells out the obvious about Raider/Feral Ghoul relations in College Square. Loot a Duffle Bag and grab a ![]() Bottlecap Mine, then leave College Square.
Bottlecap Mine, then leave College Square.
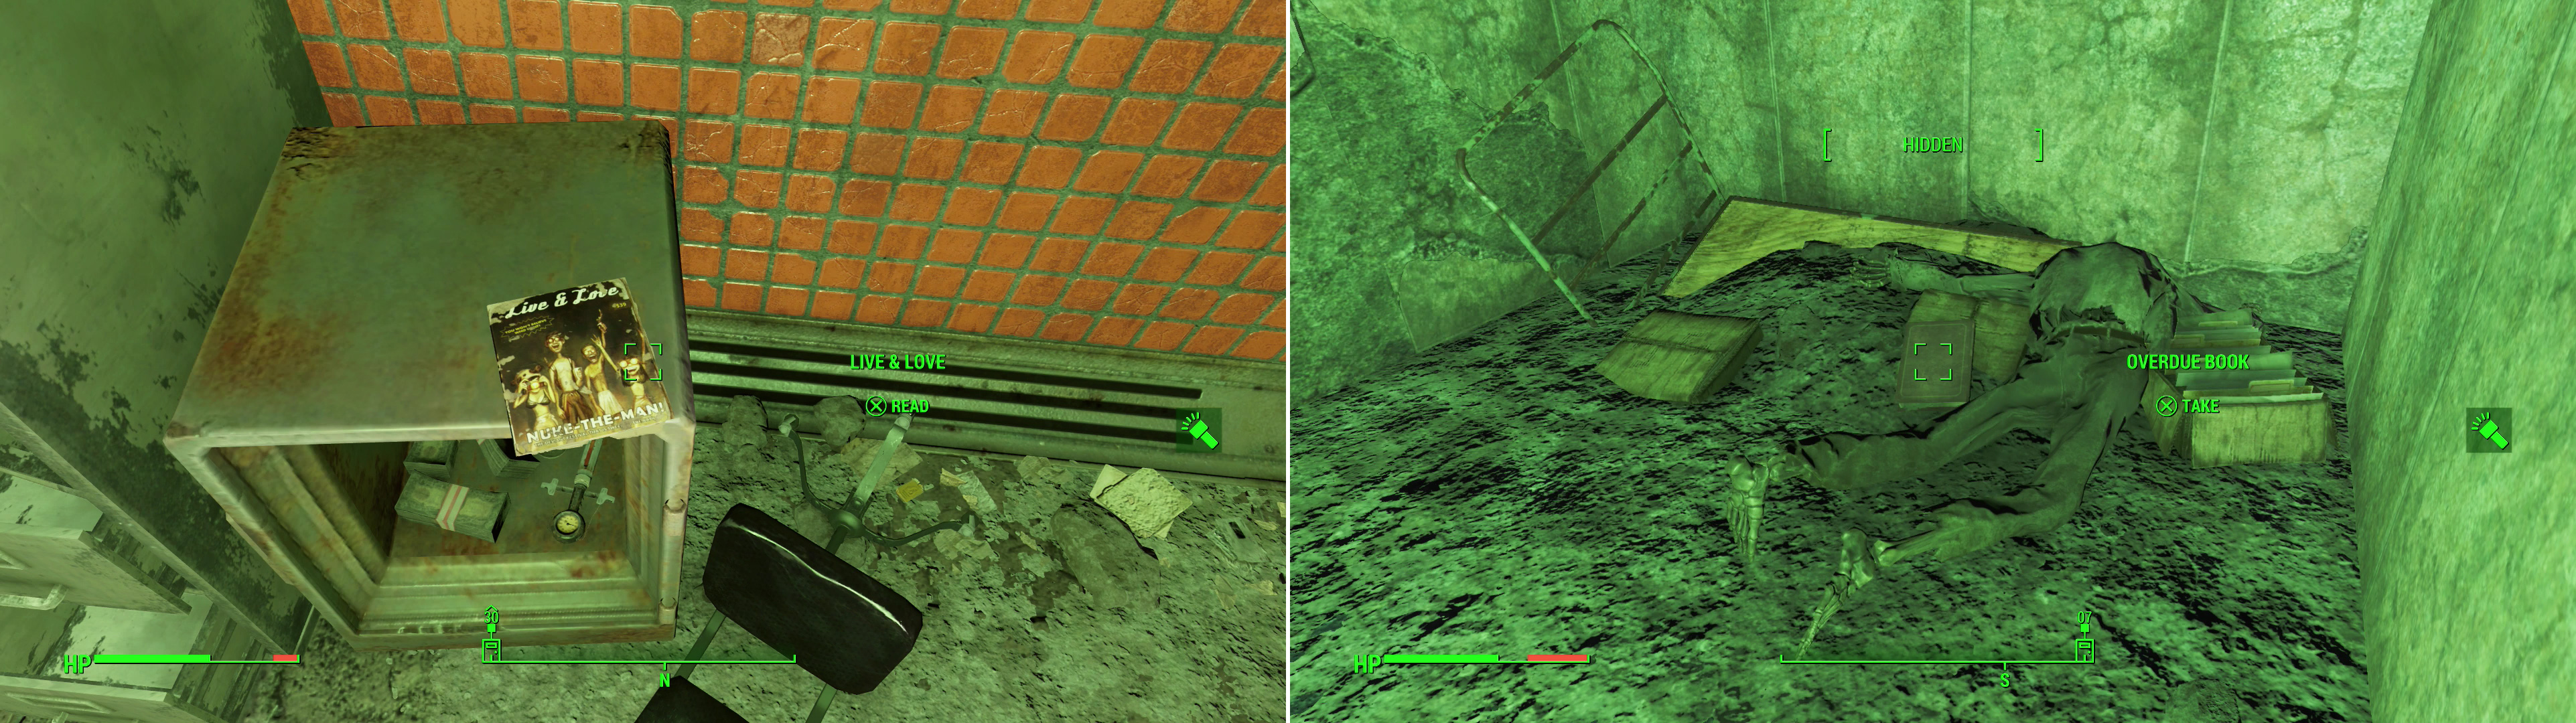
Grab the Live & Love magazine off an already-opened safe in the College Square Station (left). In the Collegiate Administration Building you can find a few Overdue Books (right).
Collegiate Administration Building
Pass the barricade to the north-east, disarm another Frag Mine in the road, then continue up another road to the east. When you find a Red Rocket gas station to the south, explore it, then continue south to find the ![]() Collegiate Administration Building. Once inside, search the counter to find two Overdue Books and a Safe [Advanced]. Next go through a doorway to the east then search behind some stairs to the south to find another Overdue Book . On the second level, follow the balcony west until it terminates to score a Tool Case [Novice]. On the third level you can find two doors, both of which lead to the roof. The only even remotely worthwhile thing up here, though, is through the northern-most door. From the roof, drop down onto a ledge to the north (you’ll have to navigate around a desk that’s falling through the wall) to find a skeleton lying next to a Duffle Bag.
Collegiate Administration Building. Once inside, search the counter to find two Overdue Books and a Safe [Advanced]. Next go through a doorway to the east then search behind some stairs to the south to find another Overdue Book . On the second level, follow the balcony west until it terminates to score a Tool Case [Novice]. On the third level you can find two doors, both of which lead to the roof. The only even remotely worthwhile thing up here, though, is through the northern-most door. From the roof, drop down onto a ledge to the north (you’ll have to navigate around a desk that’s falling through the wall) to find a skeleton lying next to a Duffle Bag.
Drop off the roof to the west and loot the nearby houses for trivial loot, then proceed south until you find a road, which you should follow west. Keep your eyes to the south to spot a building you can explore, inside of which are two broken elevators. Go through a doorway to the east to find a cafeteria, inside of which you’ll find a table with several lunchboxes in it; two of them are benign, but one is a Bottlecap Mine, so disarm it quickly. Once that ordeal is over with, loot a First Aid Box and return to the street, which you should follow west a short distance, then head downhill to the south to discover the ![]() Cambridge Police Station, and the source of the beacon.
Cambridge Police Station, and the source of the beacon.
Cambridge Police Station
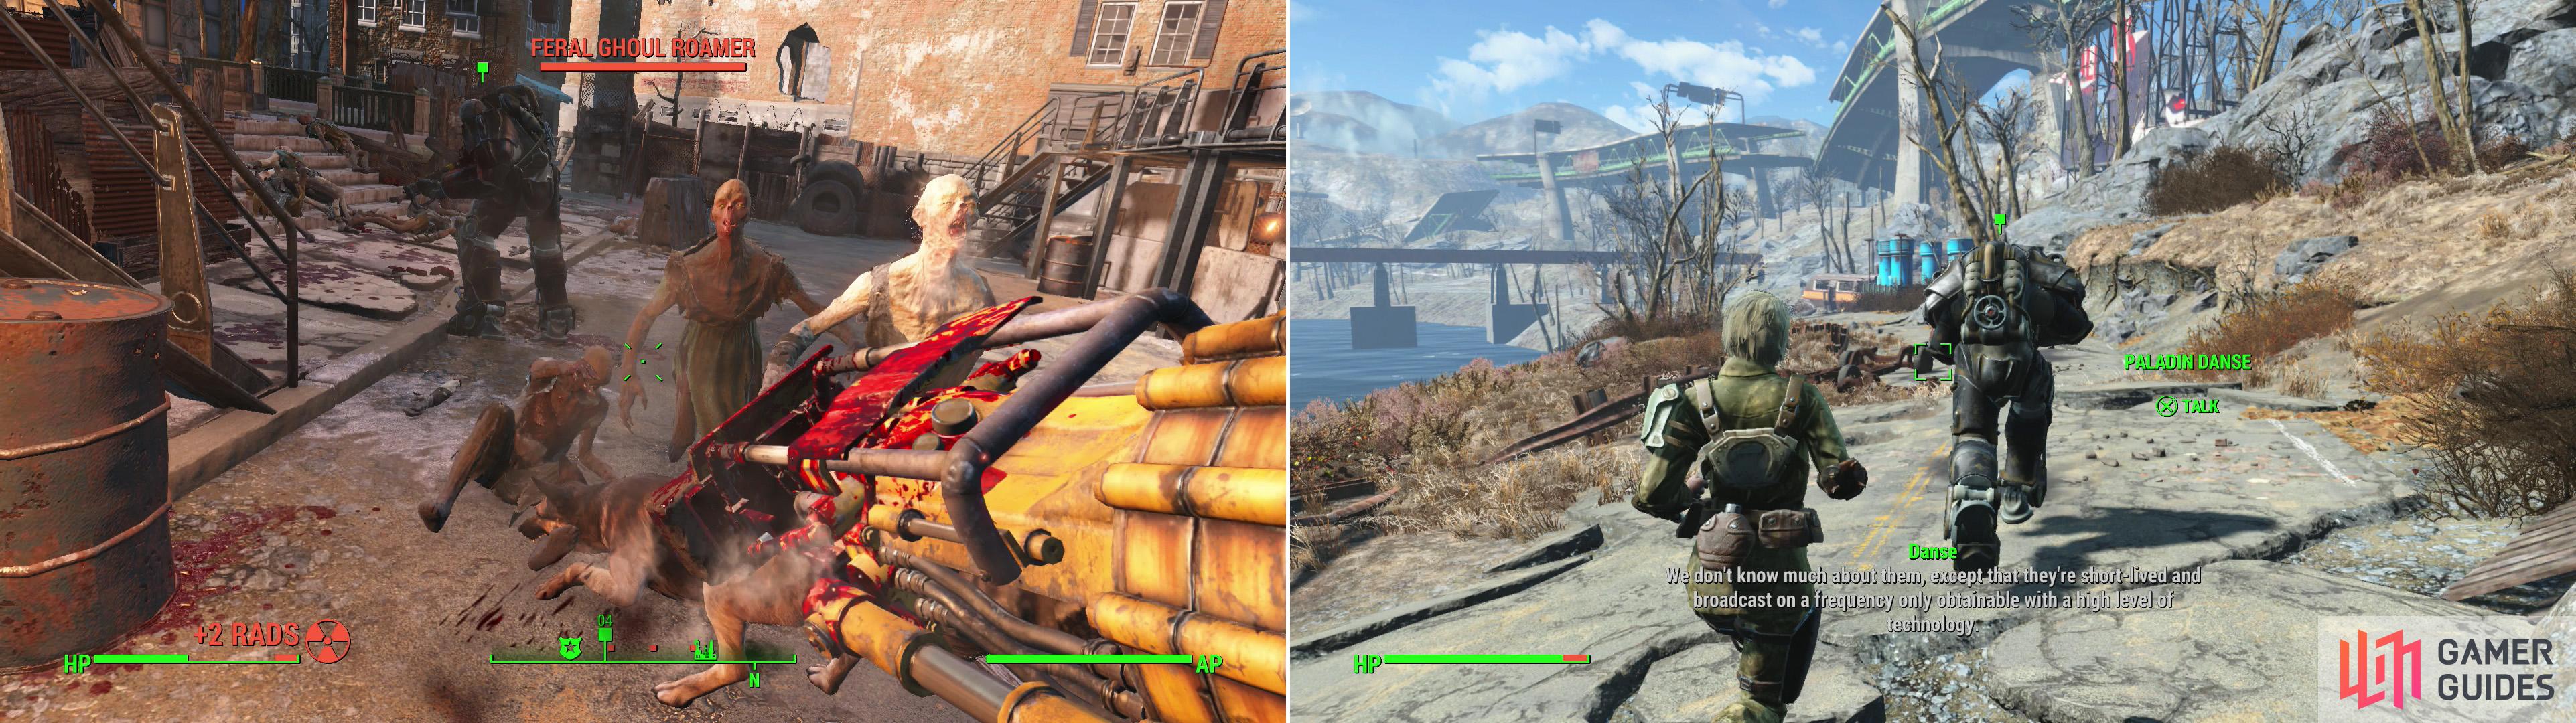
Here you’ll find a trio of humans desperately fighting off a horde of Feral Ghouls Roamers. Kill them all (their numbers may necessitate the use of more powerful weapons than usual) then talk to the man in Power Armor - ![]() Paladin Danse. He’s not the friendliest of guys, so answer his questions, passing speech checks when possible. Eventually he’ll reveal their identities: they’re members of the Brotherhood of Steel, and they need your help to recover a “Deep Range Transmitter” from the Arcjet Systems building to the west. Agree to help out to complete the quest “Fire Support” and start “
Paladin Danse. He’s not the friendliest of guys, so answer his questions, passing speech checks when possible. Eventually he’ll reveal their identities: they’re members of the Brotherhood of Steel, and they need your help to recover a “Deep Range Transmitter” from the Arcjet Systems building to the west. Agree to help out to complete the quest “Fire Support” and start “![]() Call to Arms” . Your new Brotherhood of Steel buddies will head into the police station, and you should follow - after looting the grounds outside, where you can find some First Aid Boxes and Ammo Boxes.
Call to Arms” . Your new Brotherhood of Steel buddies will head into the police station, and you should follow - after looting the grounds outside, where you can find some First Aid Boxes and Ammo Boxes.
| Objective | Reward |
|---|---|
| For helping the Brotherhood of Steel fight off Feral Ghouls | 345 XP |
Head into the police station and approach Scribe Haylen, who is a bit nicer than Paladin Danse. Pass a speech check to get her to tell you about how she joined the Brotherhood herself recently. On a table in the room to the north you can find Scribe Halen’s ![]() Personal Log, which discusses some of the Brotherhood’s more… unsavory aspects. Before you bother Paladin Danse again, give this place a thorough looting, as there’s plenty of goodies to be had. Namely, there’s ammo and chems on the counter in the front room and the “Gladius Personnel Terminal” to the east, where you can learn more about the Brotherhood’s mission here, which seems to be going poorly, to say the least. Next head through a doorway to the south-east and search an office to the east to find a Safe [Expert], then explore the evidence room to the south-west, which contains a Wooden Crate, a Duffle Bag and an Ammo Box all worth looting. In the prison room to the north-west you can find a First Aid Box, and finally, down some stairs to the south-east you can find the Cambridge Police Station Motor Pool, wherein you can find two Ammo Boxes and a bunch of other junk.
Personal Log, which discusses some of the Brotherhood’s more… unsavory aspects. Before you bother Paladin Danse again, give this place a thorough looting, as there’s plenty of goodies to be had. Namely, there’s ammo and chems on the counter in the front room and the “Gladius Personnel Terminal” to the east, where you can learn more about the Brotherhood’s mission here, which seems to be going poorly, to say the least. Next head through a doorway to the south-east and search an office to the east to find a Safe [Expert], then explore the evidence room to the south-west, which contains a Wooden Crate, a Duffle Bag and an Ammo Box all worth looting. In the prison room to the north-west you can find a First Aid Box, and finally, down some stairs to the south-east you can find the Cambridge Police Station Motor Pool, wherein you can find two Ammo Boxes and a bunch of other junk.
Once that’s all explored, return to Paladin Danse (perhaps after storing all the loot you picked up) and he’ll ask if you’re ready to move out. Give him an answer in the affirmative, then follow his slow, plodding ass all the way to ![]() ArcJet Systems, east of Graygarden. He’ll chatter as you walk, and at an underpass near Graygarden, you’ll be attacked by some Raiders, whom Paladin Danse can handle fairly easily, if you want to keep your hands clean. Shortly afterwards you’ll be attacked by some Mongrel Dogs, who Danse can also make short work of.
ArcJet Systems, east of Graygarden. He’ll chatter as you walk, and at an underpass near Graygarden, you’ll be attacked by some Raiders, whom Paladin Danse can handle fairly easily, if you want to keep your hands clean. Shortly afterwards you’ll be attacked by some Mongrel Dogs, who Danse can also make short work of.
Help fight off the Feral Ghouls outside of Cambridge Police Station (left) then go with Paladin Danse to the ArcJet Systems building (right).
ArcJet Systems
Follow Danse to - and into - the ArcJet Systems building, then shadow him as he walks into a hallway to the east, lecturing you about the evil of corporatism. In a small room he’ll comment on the scrapped security bots, and point the finger at the Institute and their synths. After he’s done talking, follow him east, then south through a room and into another room to the west, where he’ll tell you to open a door while he “reconnoiters” - which must be Brotherhood code for “stand around and be useless”. Search the north-eastern corner of the room to find a Lab Analyst’s Terminal and select the entry “Automated Password Change”, which will allow you to bypass the security on the Lab Control Terminal [Advanced] to the west. You can also find an “Discarded ArcJet Worklog”, which contains no useful information.
Anyway, hack the terminal and select the option “Security Door Control” to get the door to the south open, beyond which lurk several Synths armed with ![]() Institute Pistols and Shock Batons. Deactivate the machines with some violence, then go into the room to the south and follow Danse through a hole in the wall to the west to reach a larger, two-story room to the south, where more Synths lurk. Destroy them (there’s no shame in letting Danse do the heavy lifting) then Danse will head off up a ramp and into an upstairs room to the east. You can shorten your trip by hacking a door [Novice] to the east on the ground floor, and in any event, it’s worth ignoring Danse for a moment to loot this area.
Institute Pistols and Shock Batons. Deactivate the machines with some violence, then go into the room to the south and follow Danse through a hole in the wall to the west to reach a larger, two-story room to the south, where more Synths lurk. Destroy them (there’s no shame in letting Danse do the heavy lifting) then Danse will head off up a ramp and into an upstairs room to the east. You can shorten your trip by hacking a door [Novice] to the east on the ground floor, and in any event, it’s worth ignoring Danse for a moment to loot this area.
Head up the ramp and turn west to find a pair of rooms. In the one you enter into, disarm a Laser Tripwire attached to a Tesla Arc. In the room to the north you’ll find a Lab Terminal [Expert] which can open a Safe [Expert]. There’s also a locked Large Toolbox [Novice]. Once that’s yours, make your way through the locked door [Novice] on the ground floor and head south into the room behind the ramp, where you can find an Ammo Box and a ![]() Stealth Boy.
Stealth Boy.
Now head north to regroup with Danse. Go up some stairs to the north, then turn west to find the CEO’s Terminal, near which is a copy of Tesla Science . Loot a Wall Safe [Advanced] on the western wall, then go through a door to the north. Head east and go down a ramp to the south to find a Safe [Novice], then return up the ramp and go down a hallway to the north. Search the second room to the east to find an Overdue Book on a desk, then search another room across the hall to the west to find an Ammo Box and a 10mm Pistol.
Head down some stairs to the north and, when you reach a small room, go through a doorway to the south to reach the receptionist’s office in the entry chamber. Hack the Receptionist’s Terminal [Novice], which can unlock a floor Safe [Advanced]. When you’ve looted all that, head down some stairs to the east and enter the door leading to the ArcJet Engine Core.
ArcJet Engine Core
Proceed east down a hallway and descend some stairs to reach a room with a remarkably intact rocket in it. Descend some more stairs to get under the rocket, and Danse will lay out a plan: you do all the work and turn a generator on, and he’ll stand there and do nothing. It’s how the Brotherhood of Steel has pretty much always operated. Best to get started, then. Head through a doorway to the west and follow the hallway beyond into a small room lit by a red light. Grab the ![]() Junk Jet weapon off a table in this room, then pick up the “Technician’s Personal Log” nearby, which is a note left by the creator of the Junk
Junk Jet weapon off a table in this room, then pick up the “Technician’s Personal Log” nearby, which is a note left by the creator of the Junk ![]() Jet.
Jet.
Continue south until you find the Facilities Terminal [Novice], which must be hacked so you can turn the auxiliary generators on. Quickly turn east and grab the ![]() Fusion Core out of the nearby machine, then rush north back to Paladin Danse, who is being assaulted by a horde of Synths. Hit the “Engine Start Button” to wipe out everything in the room (back up to keep yourself out of trouble after hitting the button) then head inside the room and investigate the carnage to find out that Paladin Danse is alive and… well, he’s alive. Turn south and call the elevator, which is now operational, thanks to the power being restored.
Fusion Core out of the nearby machine, then rush north back to Paladin Danse, who is being assaulted by a horde of Synths. Hit the “Engine Start Button” to wipe out everything in the room (back up to keep yourself out of trouble after hitting the button) then head inside the room and investigate the carnage to find out that Paladin Danse is alive and… well, he’s alive. Turn south and call the elevator, which is now operational, thanks to the power being restored.
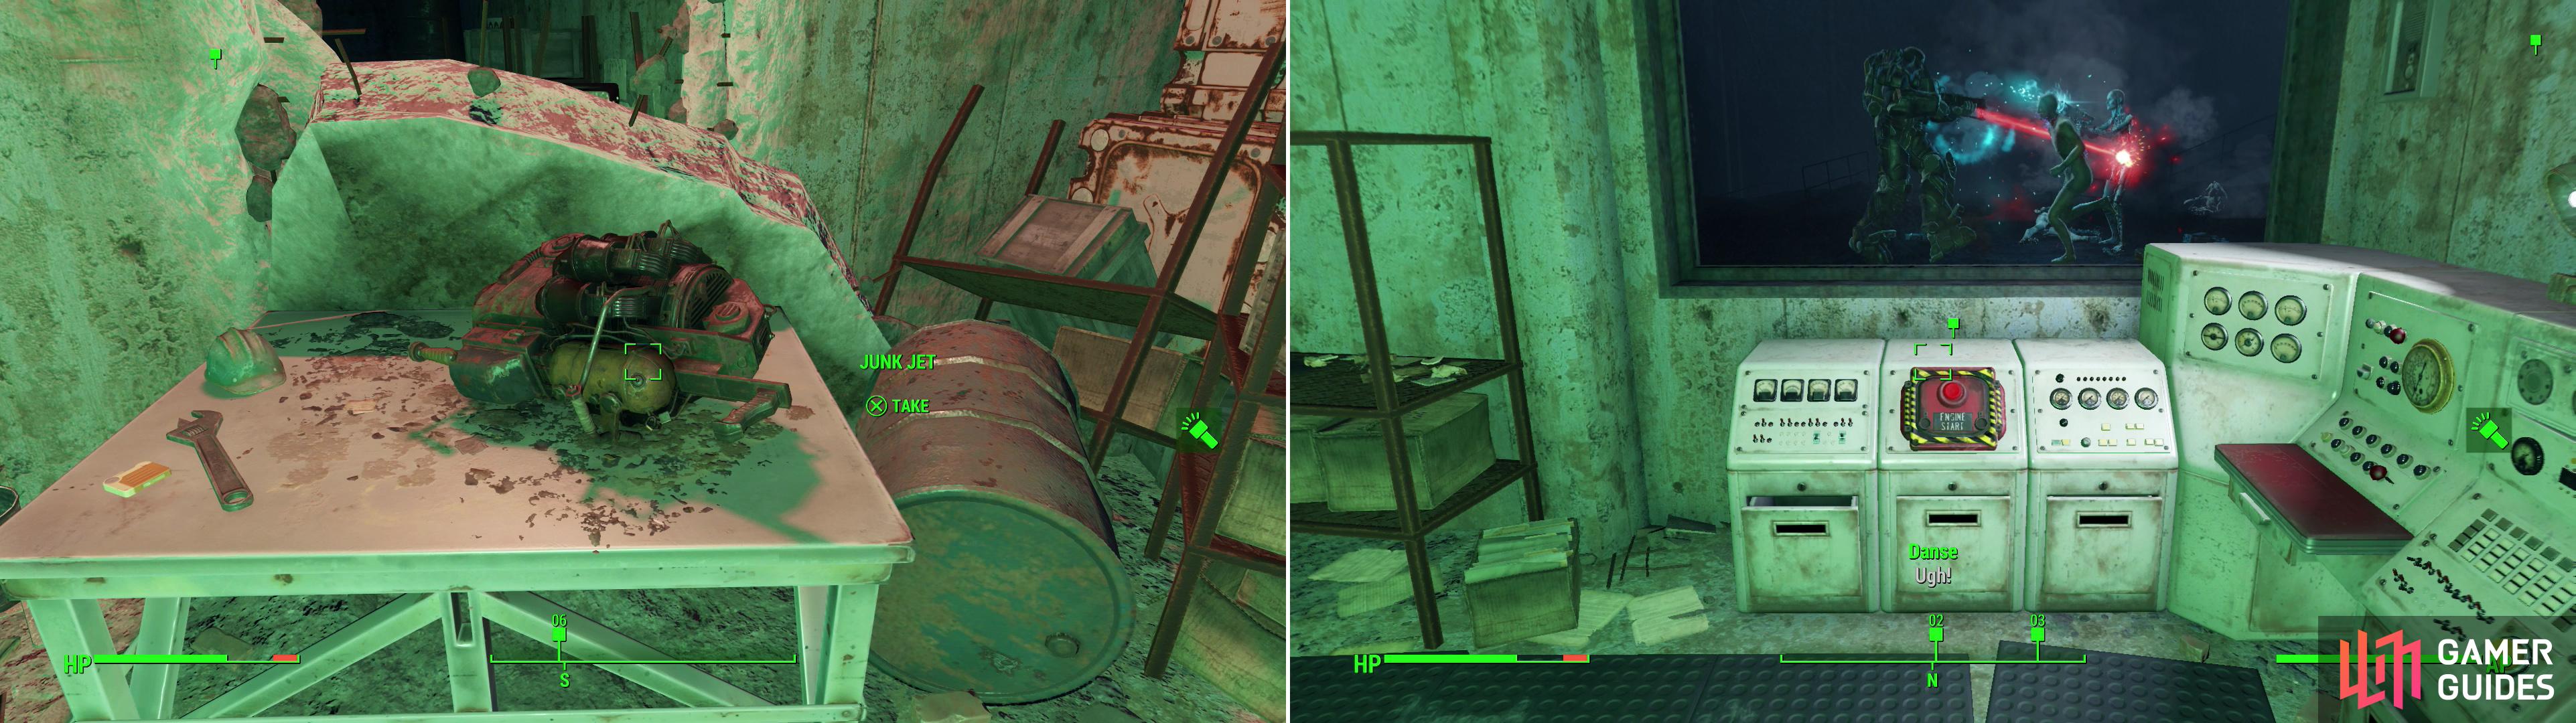
In the ArcJet Engine Core area you’ll find the odd Junk Jet weapon (left). As Danse struggles against a host of Synths, provide some dubious aid to him by firing up the dormant rocket (right).
Take the elevator up and make your way north to find one last room full of Synths. Put them down and loot one to find the Deep Range Transmitter you’re looking for. Once it’s yours, loot the room to find a Steamer Chest worth plundering, then head into an elevator to the east. Follow Danse and, once you’re outside, talk to him and you’ll get the option to pass a moderate speech check. Afterwards he’ll trade you his power and unique ![]() Laser Rifle,
Laser Rifle, ![]() Righteous Authority , for the Deep Range Transmitter, throwing 50
Righteous Authority , for the Deep Range Transmitter, throwing 50 ![]() Fusion Cells and 250 Caps on top, then he’ll invite you to join the Brotherhood of Steel. It’s paid well enough so far, and there’s probably more quests to do with them if you join so you would do well to agree. This ends the quest “Call to Arms” and starts “
Fusion Cells and 250 Caps on top, then he’ll invite you to join the Brotherhood of Steel. It’s paid well enough so far, and there’s probably more quests to do with them if you join so you would do well to agree. This ends the quest “Call to Arms” and starts “![]() Semper Invicta” .
Semper Invicta” .
| Objective | Reward |
|---|---|
| For recovering the Deep Range Transmitter | 403 XP, 250 Caps |

Kill the leader of the Synths to obtain the Deep Range Transmitter (left). After your efforts, Danse will reward you well for your services with the unique Laser Rifle, Righteous Authority (right).
Return to the Cambridge Police Station, where Danse will announce your enlistment to the rest of the Brotherhood of Steel unit; all two members of it. Rhys is a jerk and Danse will lay down the law on both of you, after which you’ll be assigned to do some odd jobs for Haylen and Rhys. Talk to Haylen and talk about Rhys, succeeding at a moderate speech challenge to learn a bit about their history. After that, accept her job and she’ll task you with recovering of an artifact. The order in which you’ll recover these artifacts is static, but their location is not. Your first goal in this quest, “Quatermastery” is to recover a Haptic Drive. Once you have this quest, talk to Rhys, who will interrogate you before giving you your first quest. Rhys’s missions involve clearing out areas of baddies, and like Halyen’s quest, the location is random. Starting this begins the quest “![]() Cleansing the Commonwealth” .
Cleansing the Commonwealth” .
Once you have these missions, it’s time to put the Brotherhood of Steel quests on the back-burner for now. A trip to ![]() Diamond City is long overdue, and it’s time to start working on quests that will give you an excuse to explore further south. But first, let’s finish exploring some areas on and near the former Cambridge campus. There’s little enough excuse to come back to them later.
Diamond City is long overdue, and it’s time to start working on quests that will give you an excuse to explore further south. But first, let’s finish exploring some areas on and near the former Cambridge campus. There’s little enough excuse to come back to them later.
Fraternal Post 115
Head south from the Cambridge Police Station to find ![]() Fraternal Post 115. There are two entrances to the place: the front door, on the eastern side of the building, and the back door, on the western side of the building. In this case, it’s more tactically advantageous to enter through the back (blue) door. Once inside you can pick a fight with the Super Mutants lurking here, especially if you sneak through a locked doorway [Novice] to the east, where a Super Mutant named Dead Eye lurks. Normally he’d be all too eager to activate a Circuit Breaker on the wall behind him to summon support (including two Super Mutants who will spawn in the room you entered into, to the west). Kill Dead Eye before he can trigger the alarm, or, if you’re extra badass, flip the alarm for him and kill the extra Super Mutants summoned. Aside from the ‘muties’ that can spawn behind you and Dead Eye, there are more sci-fi Orcs that’ll fire at you from a balcony to the east and Frag Mines on the ground around the podium upon which Dead Eye stands. However you manage it, once the ‘muties’ are dead, loot the podium near Dead Eye to obtain a copy of Guns and Bullets . Very nice.
Fraternal Post 115. There are two entrances to the place: the front door, on the eastern side of the building, and the back door, on the western side of the building. In this case, it’s more tactically advantageous to enter through the back (blue) door. Once inside you can pick a fight with the Super Mutants lurking here, especially if you sneak through a locked doorway [Novice] to the east, where a Super Mutant named Dead Eye lurks. Normally he’d be all too eager to activate a Circuit Breaker on the wall behind him to summon support (including two Super Mutants who will spawn in the room you entered into, to the west). Kill Dead Eye before he can trigger the alarm, or, if you’re extra badass, flip the alarm for him and kill the extra Super Mutants summoned. Aside from the ‘muties’ that can spawn behind you and Dead Eye, there are more sci-fi Orcs that’ll fire at you from a balcony to the east and Frag Mines on the ground around the podium upon which Dead Eye stands. However you manage it, once the ‘muties’ are dead, loot the podium near Dead Eye to obtain a copy of Guns and Bullets . Very nice.
The rest of the building is less interesting, but still worth exploring. In an office on the upper floor in the north-eastern corner of the building you’ll find an Executive Terminal [Novice] which you can use to open a nearby floor Safe [Novice], gain control of the place’s turrets, and, if you select the entry “[Speech Memo]” you’ll be treated to a mention of your spouse. Other than that, there’s a bit of junk to be scavenged as you make your way to the eastern end of the building.

Kill the Super Mutants occupying Fraternal Post 115, including their leader, Dead Eye (left) and grab the copy of Guns and Bullets from off the podium near which he stood (right).
Cambridge Campus Diner
Exit out the eastern (front) door of Fraternal Post 115 and cross the street to the north-east to find a building with a clock above the doorway. Head north-east through the building to find the more humble ![]() Cambridge Campus Diner building, which - like Fraternal Post 115 - has two entrances. The big, red inviting front door to the north-east and the less conspicuous back door to the south-west. In this case, however, it doesn’t matter in the slightest which route you take; there’s little of interest in the diner. You can find a Toolbox [Novice] behind the counter and a First Aid Box in the kitchen. The fact that this place has a map marker at all is more interesting than the location itself.
Cambridge Campus Diner building, which - like Fraternal Post 115 - has two entrances. The big, red inviting front door to the north-east and the less conspicuous back door to the south-west. In this case, however, it doesn’t matter in the slightest which route you take; there’s little of interest in the diner. You can find a Toolbox [Novice] behind the counter and a First Aid Box in the kitchen. The fact that this place has a map marker at all is more interesting than the location itself.
Campus Law Offices
From the back door of the diner, head south-east into - and through - a building with a “![]() Hubris Comics Toys” sign on top. In this building are two Raiders, who should be more of a nuisance by now than anything else. The entrance you need to take will require you to scramble above - and over - some rubble. This nondescript building is the
Hubris Comics Toys” sign on top. In this building are two Raiders, who should be more of a nuisance by now than anything else. The entrance you need to take will require you to scramble above - and over - some rubble. This nondescript building is the ![]() Campus Law Offices, as marked on your map.
Campus Law Offices, as marked on your map.
No Comments