
| Important Items in This Area |
|---|
| Overdue Book x4 |
| Tales of a Junktown Jerky Vendor |
| Unstoppables |
You’ve explored everything in a line north-east from ![]() Diamond City now, with the conspicuous neglection of Goodneighor. But before you tackle another city’s quests, you should finish up Diamond City’s side-quests. If you’re wondering, it’ll be a while before the guide takes you back to Nick and the main quest… there’s lots of exploration to be done (very lucrative exploration in many cases) before you need to bother advancing the main story any more. With that in mind, return to Diamond City and enter the Colonial Taphouse in Diamond City, up where the big-wigs of the town live (facing the town entrance, take the catwalk on the left upward).
Diamond City now, with the conspicuous neglection of Goodneighor. But before you tackle another city’s quests, you should finish up Diamond City’s side-quests. If you’re wondering, it’ll be a while before the guide takes you back to Nick and the main quest… there’s lots of exploration to be done (very lucrative exploration in many cases) before you need to bother advancing the main story any more. With that in mind, return to Diamond City and enter the Colonial Taphouse in Diamond City, up where the big-wigs of the town live (facing the town entrance, take the catwalk on the left upward).
Colonial Taphouse
Once you enter you will see a man named Paul trying to get his wife to leave with him, but she is having none of it. He will eventually get in a fight with the barkeep, who he suspects is fooling around with his wife, but he will end up losing the fight (just watch it for now). After witnessing the fight, go talk to Henry and ask what that was about. Darcy and Henry will both comment but nothing really pops up. What you need to do here is go find Paul outside wandering around town and he will ask you for a favor.
Once you find him, save your game and equip your ![]() Charisma gear. Paul will ask you to help him out and come with him to get Henry to leave Darcy alone. Well then… you have a speech check check here if you want to get paid (an easy speech check) as well as a second speech check for you to go along (a moderate speech check). It’s recommended that you manage to pass both, although if you don’t Paul will just go with us. Still, pass the speech checks for the XP. You will officially get the quest “
Charisma gear. Paul will ask you to help him out and come with him to get Henry to leave Darcy alone. Well then… you have a speech check check here if you want to get paid (an easy speech check) as well as a second speech check for you to go along (a moderate speech check). It’s recommended that you manage to pass both, although if you don’t Paul will just go with us. Still, pass the speech checks for the XP. You will officially get the quest “![]() Diamond City Blues” at this time.
Diamond City Blues” at this time.
Now head up to the Taphouse and keep your Charisma gear on. Talk to Henry now (Darcy will be gone, you will likely see her on the way up) and tell him you have a problem. Tell him it is about Darcy and then you can use a “Threaten” moderate speech check to intimidate him, or pick from two easy speech checks. You would think that would be the end of the quest, but this quest stretches out amazingly long. Henry will apologize and pledge Darcy will never set foot into the bar again. Ask for something “more concrete” and Henry will then tell you about a drug deal he is doing with the Latimer kid that he is offering to you (which is a bit weird, but go with it). You can ask questions about it but in the end, agree to go with Henry. At this point, you should wait for Henry to leave the bar after which you can loot whatever you wish here without worry. This includes the “Gwinett Ale Brewing Subroutines” behind the counter, the ammo box behind the counter, and an [Advanced] locked safe. Very nice.
At this point the quest diverges wildly depending on what you tell Paul. You can essentially do one of two things here: tell him about Henry’s deal or leave him out of it. There are honestly good and bad points to each choice. If you leave him out of it, you will gain much more loot later on… Like, a ridiculous amount. If you tell him about it, you will gain a helping hand (which doesn’t count for much, honestly) and you will have the option for two speech checks during the quest. You will get less loot though… well, to be fair, you’ll get less loot if you are not a complete murderous psychopath and choose to kill for his share. Since Paul’s help is dubious, at best, and extra loot it not, it’s suggested that you keep Paul in the dark.
Put Henry on ice and go find Paul (he is often in the Dugout Inn, but follow the marker). Once you talk to him you can either tell him about the deal or say “Good ![]() Luck” and he will drop it. Talk to him again to assure him that Henry won’t be a problem with Darcy anymore as well, and he will give you the caps he promised earlier. If you happen to bring him along on the drug deal, he will head out at this point.
Luck” and he will drop it. Talk to him again to assure him that Henry won’t be a problem with Darcy anymore as well, and he will give you the caps he promised earlier. If you happen to bring him along on the drug deal, he will head out at this point.
The Drug Deal
Now, the drug deal is going on at a place just to the north of the city: Back Street Apparel. Outside of Back Street Apparel, to be specific. You can walk there with Henry if you wish, as it isn’t a long walk. Along the way he’ll give you some flavor text and, when you reach your destination, he’ll also furnish you with a plan of attack. You can either send him in first or not. Up to you. Approach the drug deal and you’ll spot Nelson Latimer waiting on Henry. The drug dealers are men of a man named Marowski, a drug runner living in ![]() Goodneighbor and they are joined by three Triggermen here and Trish, the boss.
Goodneighbor and they are joined by three Triggermen here and Trish, the boss.
While you can go up and talk with them, there is little point in doing so, as you are going to get into a fight no matter what you do. The smart thing to do here is to go walk behind the last Triggerman facing the farthest away and take him out with a powerful close-range weapon (melee, shotgun, etc). Then immediately enter VATS and take out the other Triggerman and Nelson, but leave Trish alone.
Once you have done that, save the game and put on your best Charisma gear, as you are now free to talk to Trish (she may take a few pot-shots at you, but she’ll stop being hostile shortly). Talk to her immediately as if you take too long to talk to her, Henry will take her out. Trish will beg for her life and swear that she won’t tell anyone what happened here. Ask her how you can trust her and she will offer to give up Marowski’s lab, claiming that there are a ton more drugs there and this deal is small fries! Tell her to go on (in spite of Henry’s complaints) and she will want your word. This is the first speech check here, go with the “Tell me first” option. If you fail it, Trish will attack but if you succeed she will start to describe where the Drug Lab is: at the “![]() Four Leaf Fishpacking Plant”. From here ask her about “Secure” to learn it is crawling with Feral Ghouls, then pick “More to it” to learn the door is only opened by tripping the correct laser wires in order. Finally, ask her the “How do I get in?” question and she will give you the password for the terminal to the place, “Applejack”, which gives you the key item “Four Leaf Security Password”. This is the reason you needed to talk to her: getting this item is much easier than worrying about which laser mines to trip!
Four Leaf Fishpacking Plant”. From here ask her about “Secure” to learn it is crawling with Feral Ghouls, then pick “More to it” to learn the door is only opened by tripping the correct laser wires in order. Finally, ask her the “How do I get in?” question and she will give you the password for the terminal to the place, “Applejack”, which gives you the key item “Four Leaf Security Password”. This is the reason you needed to talk to her: getting this item is much easier than worrying about which laser mines to trip!
This is all followed by your assurance that you aren’t killing her, which is another easy speech check (based on whichever speech check you choose). However, if you have Henry with you, he will not let Trish go, gunning her down (Paul will help if he is here as well). You can also help if you want. So much for promises! Note that her corpse has the “Trish’s Note” item on it, which tells you which Laser Tripwires to trip and in what order to get into the Drug Lab. This is in case you never got a chance to talk with her (so the quest can continue no matter what).
At this point, you need to go loot everyone, including Nelson Latimer who has a whopping 862 Caps and the “Latimer Residence Key”. Henry (if he is here/still alive) explains that he is going to leave Diamond City and go on the run, which he has been planning to do for a long time. He won’t tell you where he is going though. After his explanation and your one dialog chance, Henry will be off. If Paul did not come with you, all the drugs and the Caps are yours. Each box has 10 each of ![]() Jet,
Jet, ![]() Mentats,
Mentats, ![]() Psycho, and
Psycho, and ![]() Buffout, with six boxes (five in the front, one behind the first five), for a grand total of 60 Jet, 60 Mentats, 60 Psycho and 60 Buffout. Ridiculous. If you did bring Paul, you will have to split the loot. Paul of course suggests a 50-50 split. You have several options here. The first is that you can kill Paul and take everything (you monster,you!). You can also go along with the 50-50 split, which ends with Paul taking all of the drugs and you keeping the money. While the drugs seem to be worth more, Paul writes this off as giving the mayor his cut and the hassle of transporting and selling them. A third option is a moderate speech check of a 70-30 split. If you pass this, Paul will be content with 500 Caps while you get everything else. The final option is to threaten Paul by saying you are taking everything. This leads to a hard “Threaten” speech check, but if you want to go that route, go for it. Paul will go away empty-handed.
Buffout, with six boxes (five in the front, one behind the first five), for a grand total of 60 Jet, 60 Mentats, 60 Psycho and 60 Buffout. Ridiculous. If you did bring Paul, you will have to split the loot. Paul of course suggests a 50-50 split. You have several options here. The first is that you can kill Paul and take everything (you monster,you!). You can also go along with the 50-50 split, which ends with Paul taking all of the drugs and you keeping the money. While the drugs seem to be worth more, Paul writes this off as giving the mayor his cut and the hassle of transporting and selling them. A third option is a moderate speech check of a 70-30 split. If you pass this, Paul will be content with 500 Caps while you get everything else. The final option is to threaten Paul by saying you are taking everything. This leads to a hard “Threaten” speech check, but if you want to go that route, go for it. Paul will go away empty-handed.
Now that the drug deal has been busted, the only thing left to do on this quest is to follow up the Drug Lab tip and: “Gain access to Marowski’s chem lab”. Note that “Four Leaf Fishpacking Plant” is a ways south-east of the city… which just gives you an excuse to head down in that direction and explore everything along the way. Huzzah! You’ve already made some progress in this direction, so you first stop should be the ![]() Wilson Atomatoys Corporate HQ, which is just east
Wilson Atomatoys Corporate HQ, which is just east ![]() Layton Towers, although it may be safer to fast-travel to
Layton Towers, although it may be safer to fast-travel to ![]() Hubris Comics and head south.
Hubris Comics and head south.
Wilson Atomatoys Corporate HQ
When you arrive, scout the exterior of the building to find a few Super Mutants and a Mutant Hound. This should leave little doubt as to what awaits you inside. Once the outside is clear, enter via a door on the southern end of the building. After entering you’ll immediately be confronted with locked doors. To the right is a [Master] locked door (that surprisingly doesn’t ever need to be opened) and in front of you is a door that needs an ID Card Reader. Well… yeah… coming back for those.
Head through an open door to the left but be sure to disarm the chimes first. Kill the Super Mutant in here and open the door in the back after grabbing the ![]() Fusion Core in the northern corner of the room. Head left from here (you can climb the elevator to the west, but let’s take a thoughtful approach - but be sure to grab a loose Fusion Core from the elevator!) and kill the two Super Mutants you see in this “prison room”. There is a [Novice] door lock here you can open if you wish and some poor humans you can loot. There is also a Caps Stash past a broken concrete wall as you continue to the east.
Fusion Core in the northern corner of the room. Head left from here (you can climb the elevator to the west, but let’s take a thoughtful approach - but be sure to grab a loose Fusion Core from the elevator!) and kill the two Super Mutants you see in this “prison room”. There is a [Novice] door lock here you can open if you wish and some poor humans you can loot. There is also a Caps Stash past a broken concrete wall as you continue to the east.
Enter a room full of Giddyup Buttercup toys (which are treasure troves of crafting components, well worth picking up) disarm the Bathroom Scale rigged to a Makeshift Explosive, then head up a ramp. Kill a Super Mutant in the room above, then head south into a hallway, where more Super Mutants lurk. The left path leads to a dead end where you can score a Duffle Bag, after which you’ll want to head into the bathroom. Head through the bathroom and open the door you find, following this broken area to another door.
Go through a pair of doors, then pass north through a room with a hole in the floor and into another room. Kill the Super Mutant you may find here then search the room for some Super Mutant Cowl Armor, which is for your companion ![]() Strong. Go through an unlocked door to the west to reach a small office. The desk in the corner here has the note “Buttercup Sales” and the “Wilson Atomatoys ID Card” laying on the desk, which is a key item. You have two terminals you can check in this room as well. Read both of them (every entry) and you will get the location “Wilson Automatoys Factory” put on the map, which is located far to the south. Like, really down there. You’ll also find the “Marc’s Warning” holotape on another desk.
Strong. Go through an unlocked door to the west to reach a small office. The desk in the corner here has the note “Buttercup Sales” and the “Wilson Atomatoys ID Card” laying on the desk, which is a key item. You have two terminals you can check in this room as well. Read both of them (every entry) and you will get the location “Wilson Automatoys Factory” put on the map, which is located far to the south. Like, really down there. You’ll also find the “Marc’s Warning” holotape on another desk.
Head back to the larger room to the east and hack a door [Novice] to the west, beyond which is a First Aid Box on a shelf. Once that’s yours, head down the slope in this room, passing quickly past some nasty radiation barrels and into a computer-filled room to the east. Hack the “Mainframe Access Terminal” [Expert] to open a door to the north, beyond which you can find some loot including some chems in an already-opened safe, some ammo near and within an Ammo Box and a Tool Case.
Head into a room to the east and turn south to find the door near the beginning of the building which can be opened with your newfound ID Card. Do so, if you wish, then head up some stairs to the south and through a door to the west. Be ready to kill some more Super Mutants, as they may dwell in the room beyond and/or on the upper level. Search the receptionist desk in this room to find a “Reception Terminal”, next to which is an “Office Note” which will allow you to bypass the need to hack a terminal later. Next head into some offices to the east to find the Wilson Atomatoys HQ Key on a desk (this opens the [Master] door you passed twice now) then hack the nearby “Security Terminal” [Advanced], which will also allow you to bypass the same terminal the “Office Note” did. Once done head into the office to the north and ascend a ramp.
In the room you reach above the ramp, make your way west through a doorway, then turn south and walk along a sliver of remaining floor, then enter a small room to the east, where another Super Mutant may lurk. Kill it, then loot the conference room to obtain a Nuka Cola, a Nuka Cola Quantum and another Wilson Atomatoys HQ Key. Leave the room and continue south to find a door [Expert] which can be opened with the aforementioned key. Beyond is Arlen Glass’s office, the deposed mind behind the beloved Giddyup Buttercup toys. Using his “Development Office Terminal” is yet another way to get the password found on the “Office Note”. Speaking of which, turn east to find the “Development Lab Terminal” [Master], which can be opened by the password you could have obtained so many different ways by now. Beyond this door you’ll find another Development Lab Terminal, in which you can find “Marlene’s ![]() Holotape”. Also be sure to unlock the Safe [Master] in this room, either with skill or with the terminal.
Holotape”. Also be sure to unlock the Safe [Master] in this room, either with skill or with the terminal.
Leave this room and head west, then enter the first room you find to the south, where a leveled Super Mutant lurks, and another, even more powerful one can be found in the room to the east. This first room is a boring office room, south of which is a storage closet with some junk. The room to the east, however, is the President’s Office, which contains the “President’s Terminal”, which describes just what the SCYTHE program is. In a trash can nearby you’ll find the “Arlen’s Manifesto” holotape, which reveals the nature of the conflict between Arlen and the president. Loot a nearby Steamer Trunk then a wall Safe [Advanced], then, if you wish, you can loot the president’s desk for yet another Wilson Atomatoys HQ Key, as well as a Resignation Letter. Finally, along the southern end of the room you can find a Duffle Bag and some Super Mutant Shoulder Rags.
Leave the President’s office by heading north to reach a small room. If you turn east you’ll find an elevator, in which you’ll find a gun near a skeleton. If you go north through a door you’ll reach the roof, where a few more Super Mutants may lurk, if you didn’t kill them from below earlier. Your reward for diligently searching this roof is an Ammo Box nestled into an over-turned desk and yet another Fusion Core nearby.
D.B. Technical High School
From the entrance to Wilson Atomatoys Corporate HQ head north back to the street and continue east. It won’t take long before some Raiders (hiding in a yellow school bus) attack or notice you. Head south and wipe them all out. You will also discover “![]() D.B. Technical High School” here, which has an entrance on the west side in the building (double doors, can’t miss it). Might as well explore this place as well. Unlike the last building you places you’ve plundered, you’ll actually get some note-able loot here! This includes a
D.B. Technical High School” here, which has an entrance on the west side in the building (double doors, can’t miss it). Might as well explore this place as well. Unlike the last building you places you’ve plundered, you’ll actually get some note-able loot here! This includes a ![]() Fat Man (if you don’t have one yet), a
Fat Man (if you don’t have one yet), a ![]() Minigun, the Unstoppables magazine and a unique piece of armor. Not bad… There’s also an Overdue Book in a Pulowski Preservation Shelter along the northern end of the building, which you should grab real quick.
Minigun, the Unstoppables magazine and a unique piece of armor. Not bad… There’s also an Overdue Book in a Pulowski Preservation Shelter along the northern end of the building, which you should grab real quick.
This school is full of Raiders, and they ain’t here to do no book-learnin’, so be ready. It is very likely that at some point this entire area is going to turn into a giant fire-fight. Head on in with that in mind (good time to save) and the double doors on the right are chained, so you’ll be forced to go left. Here, behind the table, is a hidden ![]() Bottlecap Mine, so be careful. Note that you can go up here, but continue past the ramp for now. In the next room there’s a Tripwire you’ll want to disarm, unless you fancy the thought of being shot in the face by a rigged gun. Continue on to a sleeping area (with some lovely heads on display) and kill any Raiders you find. Once done, loot some shelves by a dead body to obtain a
Bottlecap Mine, so be careful. Note that you can go up here, but continue past the ramp for now. In the next room there’s a Tripwire you’ll want to disarm, unless you fancy the thought of being shot in the face by a rigged gun. Continue on to a sleeping area (with some lovely heads on display) and kill any Raiders you find. Once done, loot some shelves by a dead body to obtain a ![]() Mini Nuke and a Caps Stash, then search the desks with some broken terminals on top of them to find an Overdue Book . Next, turn your attention to a Book Return Machine along the northern wall, which only contains junk, but junk that will be pointed out nonetheless.
Mini Nuke and a Caps Stash, then search the desks with some broken terminals on top of them to find an Overdue Book . Next, turn your attention to a Book Return Machine along the northern wall, which only contains junk, but junk that will be pointed out nonetheless.
| Item | Cost | Number |
|---|---|---|
| Undamaged Camera | 36 Tokens | 4 |
| 10 Tokens | 5 | |
| Toothbrush | 2 Tokens | 1 |
| Toy Rocketship | 14 Tokens | 1 |
| Teddy Bear | 6 Tokens | 4 |
| Toy Car | 10 Tokens | 5 |
Return back south to the room with the ramp and ascend it to reach a small room with a Terminal [Novice], which you can use to turn off the spotlights in this place, which will make sneaking about somewhat easier. Continue north into a room, grab an Overdue Book from atop a wooden desk, then head east through a doorway (not the hole in the wall). Be wary of Raiders around here; they patrol this upper level and the eastern half the building, and it might not be a bad idea to run around and exterminate them all on this floor before continuing on. In any event, proceed east through another doorway to reach a room above an cafeteria, below.
From the room above the cafeteria head south, past some stairs to the east, and into a room with a bonfire burning. There is a Terminal [Novice] over here that discusses the Raider boss and the monster that torments them. From this room head through a wall to the west through a small office and into a wide, locker-lined hallway. Turn north to spot a turret, then continue west into a room with a Terminal [Advanced], which controls said turret. Do what you will with it, grab an Overdue Book on a table, then go through a hole through the wall to the north, turn east and pick your way across a broken floor, then turn north and continue down the locker-lined hallway. Keep your eyes to the west to spot a door [Advanced], beyond which is a small storage closet full of junk. Once you’ve looted it, return to the room with the turret control terminal and drop down the hole in the floor north of said terminal to reach a room beyond the chained door near the entrance to the building. Unlocked a latched door, then open a chained door before looting a Safe [Advanced] and an Ammo Box [Novice]. From here head east to find the stairs you bypassed earlier, which has two doors along the stairwell; one [Expert] which leads to the eastern end of the exterior of the building, and a higher door which leads to the roof, where you’ll likely find some Raiders milling about.
Return to the cafeteria on the main level of the school - not above it this time, but actually entering the cafeteria - and search around for a Bottlecap Mine Bottlecap Mine in the kitchen area. Now make your way to the south-eastern corner of the cafeteria and descend a ramp to reach the basement, where all the real goodies can be found. Go north past the ramp and open some double doors [Advanced] to reach a room with a Power Armor Station inside of it then continue into another room to the west. To the right is the “Generator Room” which is another small dungeon, but note the hole in the wall up ahead.
Up ahead is a room with a small lake in it and, on the right, a Raider named “Bosco” sitting on his “throne”. Bosco really isn’t a proper boss as he is just a level 24 Raider and can be killed in one sneak attack, so sneak up to the hole in the wall and see if you can’t take him out with whatever long-ranged weapon you have handy. In the room are a couple of other Raiders and in the corner there is a turret. Let the Raiders come to you and take them out, taking care of the turret last.
Time to get your loot now! Bosco actually has a rare “Mascot Head” helmet on him. Also be sure to check out the north-western corner of this room to find an Unstoppables book, a Fat Man and a Steamer Trunk to loot. On top of all this is “Boscoe’s Terminal”, which is some more great flavor text on what happened to Boscoe exactly. Who is the real monster!? You’re now done with this area, so feel free to look around and lot if you wish. Remember the nearby “Generator Room”? Might as well explore that next, since you’re down here and all.
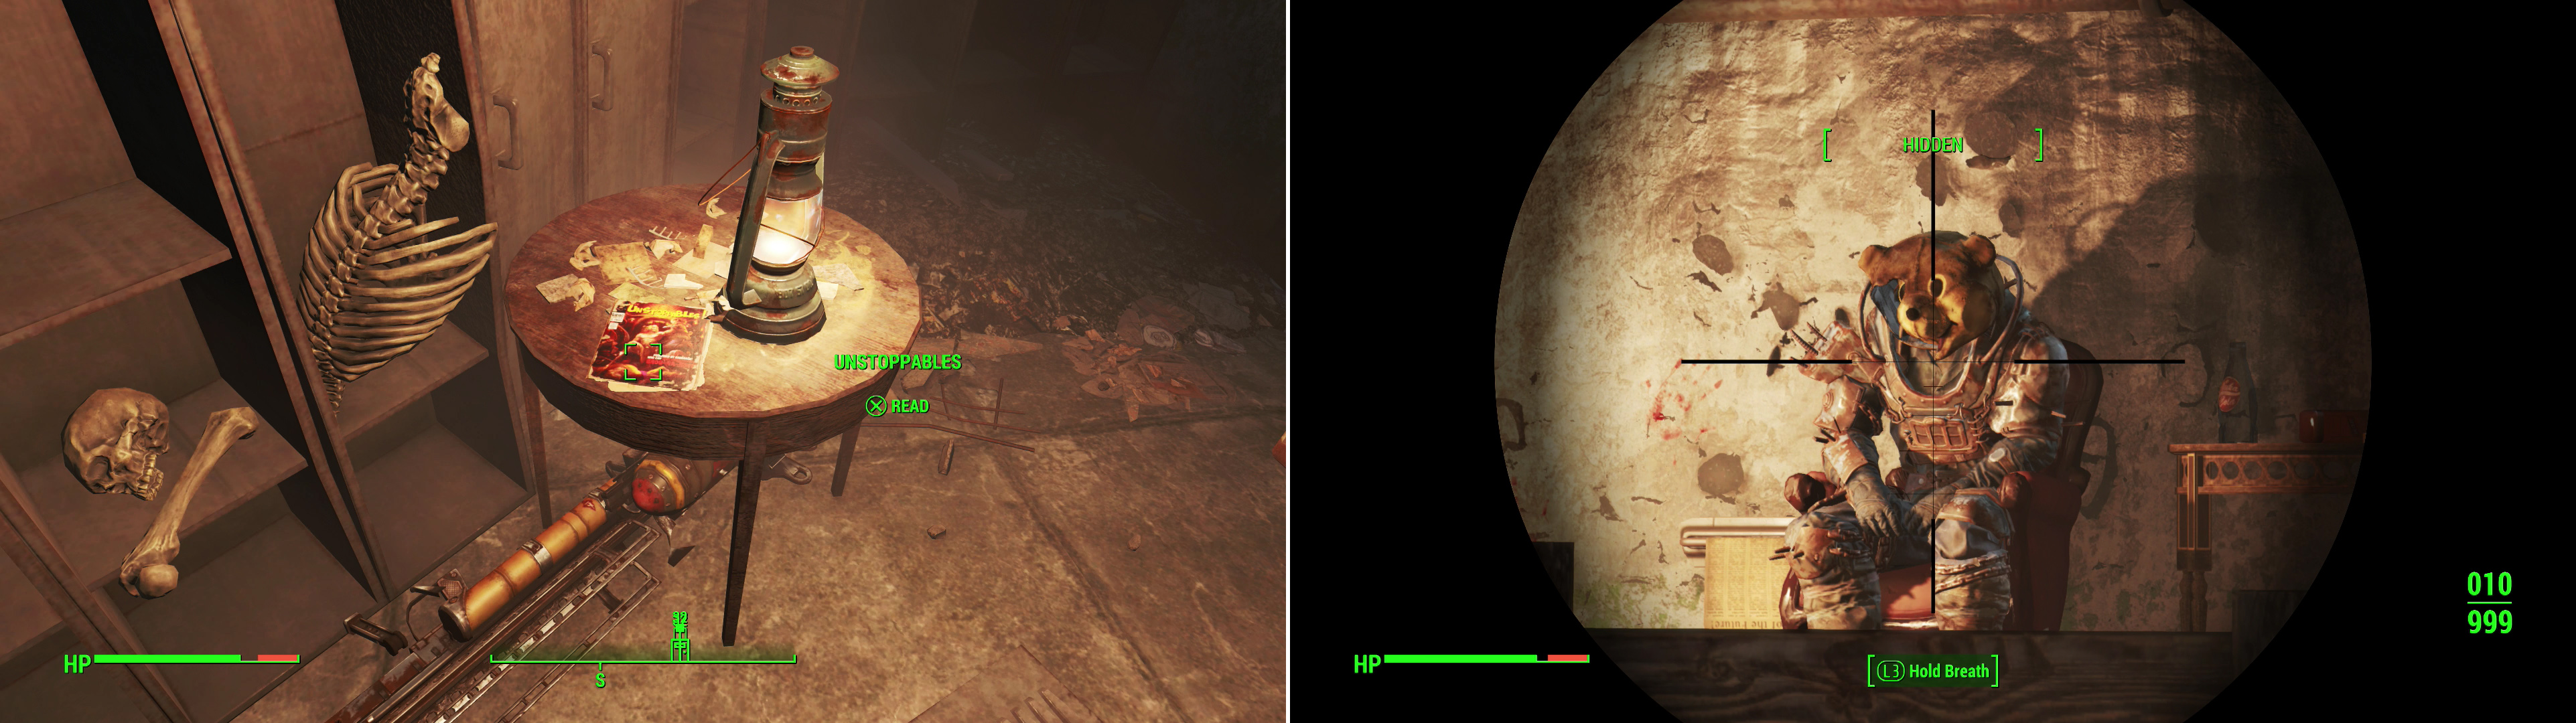
The Raiders at D.B. Technical High School guard a number of treasures, including an issue of Unstoppables and a Fat Man (left). Kill their leader, Bosco and take his odd piece of headwear (left).
Generator Room
The first thing to do here is head to the back and in the corner you can get a Fusion Core. Pull it out and get ready to kill a ton of Raiders down below. Of note there is a Raider with a Minigun below that will tear you up if you aren’t careful, so be ready for them and get a sneak attack on the Minigun Raider if at all possible. Clear out the tunnel from there.
One thing of note in this first area (besides how awesome it is that this tunnel connects into the school nearby, that is just fantastic) is that there is a [Novice] door lock on the left. Before you pick it, head forward and take out the turret in the corner, then go pick it (the turret is looking away from you, so that should be easy). Pick the door and inside the room you open up is an [Advanced] safe in a corner. Across from the door you came in is another [Advanced] locked door. You can use the terminal nearby if you don’t want to pick it. Be sure to loot the cash registers here as well (lots of pre-war money).
The path where you took out the turret loops around to the other side of the subway tunnel (on the way is a can trap you can disarm). Over here there are several Bloodbugs that you should take out (they are resting against the far wall and ceiling). There are also some bathrooms over here. Of note is the woman’s bathroom: there is a pressure plate trap on the top that you can disarm for some XP. It drops a grenade if you don’t find it and open the door. By the stairs over here are some Nuka Cola machines (two Quantums!) and a door to the left. Inside the door to the left is a [Novice] locked toolbox that you can pick. Head up the stairs now to the station proper.
Sneak up near the top as there is a Raider in the office area. You can take her out easily with a sneak attack. There’s a number of things to note up here, like the [Expert] Terminal that controls the Protectron (really not worth it for one Raider) and the back of the office area that has an [Expert] safe in it. You can also check behind the counters here for a Caps Stash as well. Be careful as you leave this area heading out the subway tunnel as there are some Bottlecap Mines on the way out. You will be able to leave this area now for the “Theater District” which, once you load out on the map outside, will automatically give you the “![]() Medical Center Metro” landmark.
Medical Center Metro” landmark.
Now, from here you want to head east but on the way you will very likely discover the “![]() Mass Bay Medical Center” landmark. There are Gunner enemies to the north up here, so sneak up there and take them out, then take the nearby doors into this medial center.
Mass Bay Medical Center” landmark. There are Gunner enemies to the north up here, so sneak up there and take them out, then take the nearby doors into this medial center.
Mass Bay Medical Center
There aren’t a lot of enemies in this area, so this should be pretty fast. Explore this first floor and kill the Gunner you find. There’s a lot of junk here, if you fancy such fare. There is also an exit to the west on the first floor as well (if you go outside, there is another Gunner, but you don’t need to). Near the west exit is an [Expert] terminal that controls the Protectron, but there’s not very many enemies here, so don’t worry about him. Head up the stairs to the second level now. Note that these stairs do not go up to the third level, so you’ll have to explore some more.
Kill any Gunner’s you may find up here and check out the south-east corner for a [Novice] cell you can unlock (for loot). Make your way to the south area on the second floor to the proper “Emergency Room” area. Now, nearby is a staircase that actually goes down to the first floor. You can explore that really quick as there is a turret down there (in the elevator, be ready for it) and an exit to the north, but nothing noteworthy is down here. Instead, head back upstairs and enter the “Emergency Area” and check the room on the left for a [Novice] lock. There are a quite a few rooms in here with quite a few medical supplies, so be sure to stock up. There is also a Chemistry Station in here, as well as a [Novice] terminal that control the nearby Protectron again (which again you don’t need). The far door back here also has an [Expert] lock. If you can pick this, you will be treated to quite a scene, as well as a room with a ![]() Flamer and some
Flamer and some ![]() Flamer Fuel.
Flamer Fuel.
Head to the north-east corner now and notice the slope going up to the third level. You may be able to kill a Gunner here from below if you want. There is an office nearby the slope here (just to the left) that has a [Novice] safe and a [Novice] terminal (which can unlock the safe… not that you need it). Loot the area and then check out the rooms to the east. There are all sorts of things to find, including a “Short Syringer Rifle” which - if you haven’t seen one of these before - uses “Syringer Ammo” to do all sorts of funky stuff to enemies. You can even craft this special Syringer Ammo at the Chem. Stations so be sure to check it out.
Ascend the ramp to reach the third floor, where you’ll find an Assaultron. Once you destroy him head to the door on the west to reach some stairs and head up to a fourth floor. This leads to a small area with an exit that leads to “Medical Center Station North”. Before you head outside, though, turn south and take an elevator up to reach the “Mass Bay Medical Radiology” floor. On a balcony to the east you’ll find a Gunner Commander, who can be reached by going up a ramp made out of debris and a wing. If you can take him out sneakily, you can prevent him from entering the nearby Power Armor, which you can then claim as your own. Score. He’ll be joined by another, weaker Gunner who lurks on the floors above. Once they’re dead, leave the Power Armor alone for now and make your way up some stairs to the next floor, then head through a doorway on the eastern end of the level to find the MRI machine. To the north are two small rooms, in the western one you can find a wall Safe [Novice] and in the eastern one you’ll find “Bonnie’s Holotape”. Loot the MRI machine for some High-Powered Magnets, then return to the west and head up a ramp to find another elevator, which will take you up to the roof. Up here you can find a First Aid Box, some Chems, and some Frag Mines. From here you can take an elevator down to a roof that leads to the “Ticker Tape Lounge” inside of which wait two more Gunners, two Ammo Boxes and an Explosives Box.
Return to the Mass Bay Medical Radiology level and take descend back to the elevator to return to the fourth floor of the Mass Bay Medical Building, then go through the doors leading to the “Medical Center Station North”. Outside you’ll find two more one of which is likely above you on a higher level, so kill the lower-level one and then take the higher-level one out. Head up above the exit now and search behind the counter for an [Advanced] safe. Head back down stairs now and head east into the subway car. Take this destroyed subway car south and out onto a roof. Now, from here drop down to the street level and take a left. If you haven’t discovered it yet, this will unlock the “![]() Hester’s Consumer Robotics” location, which you are now right in front of. How convenient.
Hester’s Consumer Robotics” location, which you are now right in front of. How convenient.
Hesters Consumer Robotics
This first room is all about the Mr. Handy’s (one can only imagine the genocide that ![]() Codsworth would feel!). The shop up front has a lot of displays here, each with a Mr. Handy but they are all hostile to us, but they won’t attack you if you don’t do anything. They’re still worth taking down for the loot and XP, however. Sometimes a nearby Mr. Handy will wake up if it sees its brother being killed, so you may have to kill two at once here and there, but overall just kill them one at a time and loot this front room. Note that you can find a
Codsworth would feel!). The shop up front has a lot of displays here, each with a Mr. Handy but they are all hostile to us, but they won’t attack you if you don’t do anything. They’re still worth taking down for the loot and XP, however. Sometimes a nearby Mr. Handy will wake up if it sees its brother being killed, so you may have to kill two at once here and there, but overall just kill them one at a time and loot this front room. Note that you can find a ![]() Stealth Boy in a toolbox by the door (it is on a shelf facing away from the door) and there is a ton of Pre-War Cash to be found in the cash registers nearby (and laying around), which is excellent. There is some first-aid in the bathroom nearby as well, but do not open the door here yet.
Stealth Boy in a toolbox by the door (it is on a shelf facing away from the door) and there is a ton of Pre-War Cash to be found in the cash registers nearby (and laying around), which is excellent. There is some first-aid in the bathroom nearby as well, but do not open the door here yet.
Let’s be thoughtful about this: head to the door behind the counter and go through the office. In the back room you can find an ammo crate and the door on the right leads back to the main floor, but it is the door in front of you that is interesting. Sneak, save, and open the door. To the left out in this garage area is a Sentry Bot, a big mean robot. Up on the catwalk is also an Assaultron (which you’ve likely fought before a bit earlier). Now, you can get in a sneak attack on the Sentry Bot, so do so and take him out. From there the Asssaultron will wake up and dash at you, after which you’ll need to take out two more Protectron units.
As for looting the area, first note that out in the garage you can use the armor and weapon crafting stations if you wish. There is a [Novice] lock in the area as well leading to some junk and the door leading to the bathroom from earlier. You can also go up the stairs to the catwalk and take a left to find a dead Raider and Trader behind the boxes up here (the trader’s always have decent caps). Once you are done, head to the south-west exit and leave.
Four Leaf Fishpacking Plant (Exterior)
The south-west you can find a Ghoul trader named Slim, who will let you use his crafting stations. More interestingly, head east from Hester’s Consumer Robotics to find some docks, on which you’ll encounter a few Gunners (one of which is leveled, and might be quite powerful). From here your objective is just to the east, across a small body of water. You’ll catch some RADS crossing, but not too many. On the far shore you’ll find your destination a short distance further east; the Four Leaf Clover Fishpacking Plant. Be wary as you approach the grounds as there are lots of leveled Feral Ghouls around here. Expect Reavers and Stalkers. There are also a ton of trip-mines. This is the reason you got the terminal password from Trish: so you don’t have to deal with this “puzzle”. If you didn’t get the password, however, you can just reference the note that Trish dropped to see the correct order of laser beams and trip them. If you do this, it is best done while having your companion wait somewhere so they don’t mess with you.
Make your way to the terminal though (if you aren’t tripping wires on purpose don’t mind any of them). From the east side head up the stairs and you will make your way to the roof, where you’ll find more Feral Ghouls. It is best just to get their attention (unless you can silently snipe them) and funnel them through the nearby pipes or perhaps the stairs so you can take them on one at a time easily (making a killzone). This roof has a couple of rooms up here that you can find some goodies in: an Explosive Box in one room and a Fusion Core and a Caps Stash in the other). There are also stairs to the south winding up to an [Expert] Safe. Once you are done looting, head down the only other stairs here (past the stairs winding up) to a terminal.
This is the terminal you need to input the password in. Go ahead and interact with it and if you got the password from Trish you will automatically use it and some doors will quite literally magically appear. They really hid this place well! Too bad it is about to be raided! To get inside without the code from Trish you’ll just have to trip the Modified Tripwires in the correct order. The first one is along the south-western side of the building, between the front of a ruined semi truck and a fence. Walk through it and it should vanish. Neat. From here, head to the northern side of the truck, climb some stairs to reach the bed, then jump onto the cab to bypass the tripwire east of the first one. Trip the Tripwire near the stairs and continue north-east and work your way around the entire building until you’re back near the truck. The third Tripwire is in front of the red double doors that lead into the building. After that’s been triggered, walk through the second Tripwire near the front of the truck you took such pains to avoid earlier. The fifth and final Tripwire is up on the roof of the building, near the terminal that can unlock the way forward if you got the password.
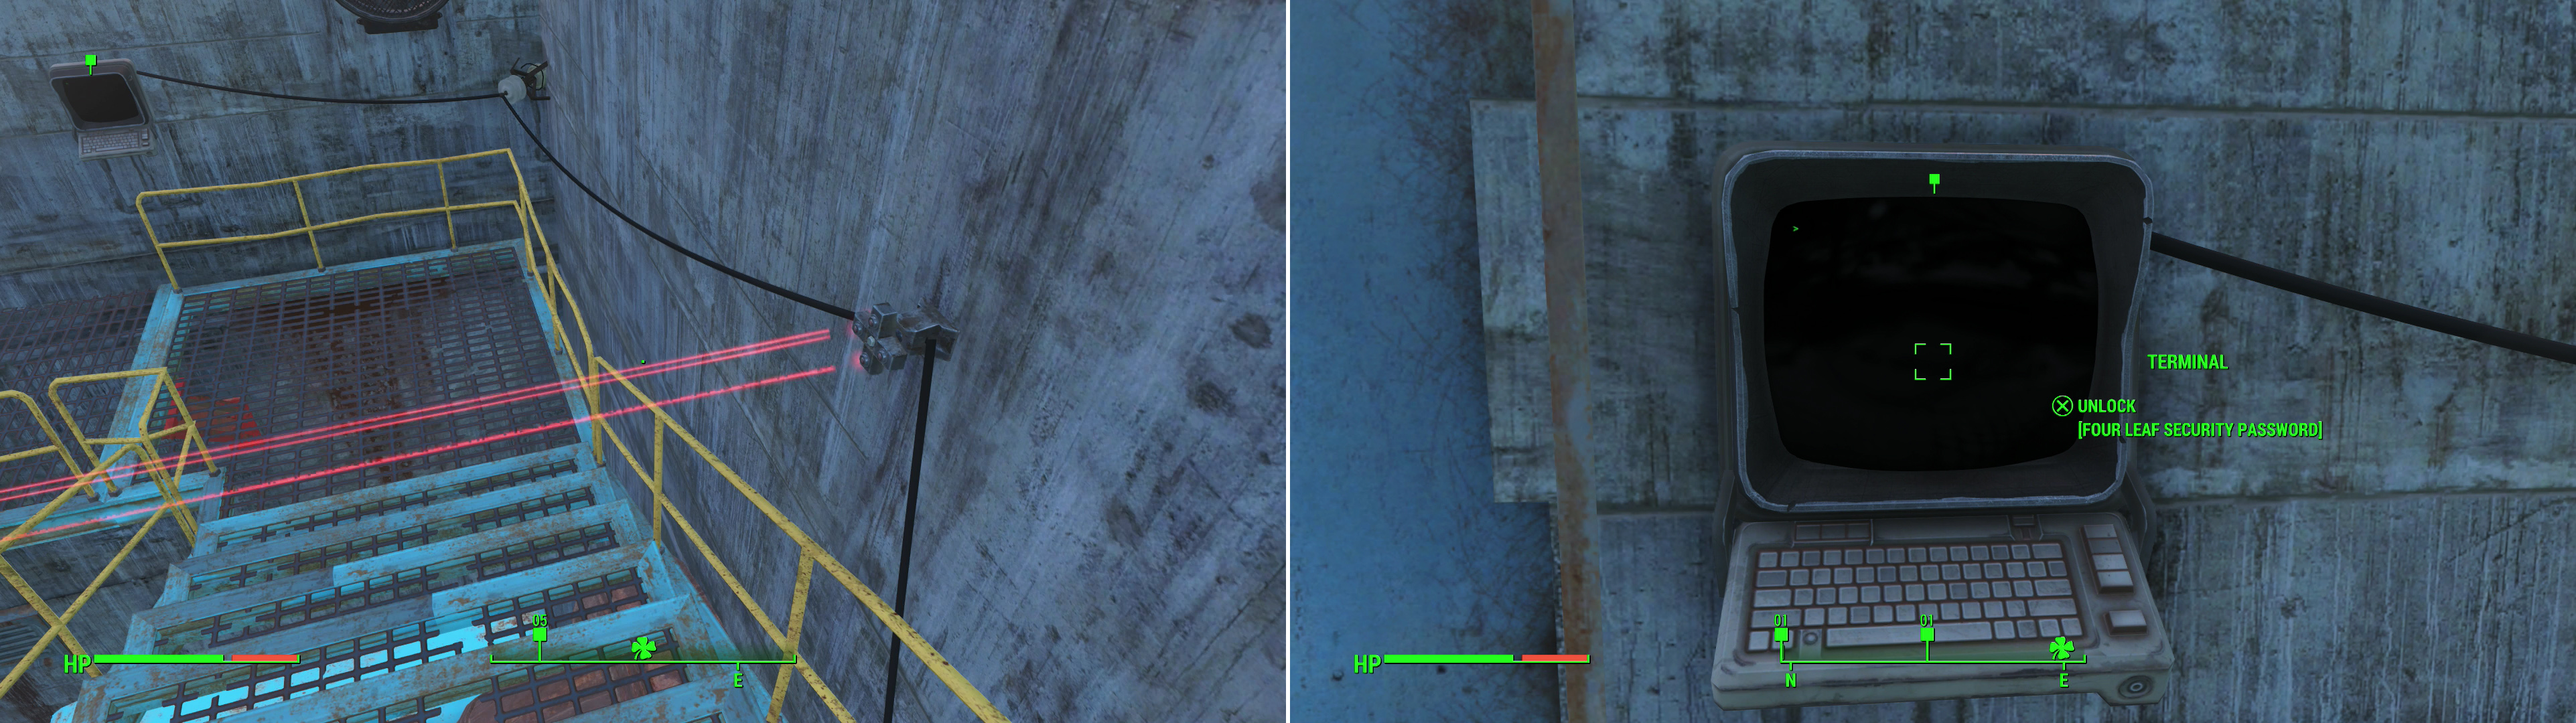
Trip the Laser Tripwires in the correct order to find Marowski’s Chem Lab (left) or use the password you got from Trish (right).
Marowskis Chem Lab
Inside of the drug lab are four weak-as-tissue Chem Lab Workers. Go ahead and take them out, then loot them for their ![]() Hazmat Suits, which may come in handy later on in the main questline. Now, look around for drugs and loot, nabbing whatever you wish. There is undoubtedly quite a few drugs and chems here, but nothing like what Trish was promising, nothing at all. It doesn’t even compare. And so you learned a valuable lesson: don’t trust Trish. Not that it matters, since she is (very likely, if you followed this guide) rotting in the streets… As soon as you entered this room, the Side Quest “Diamond City Blues” was officially over with, but while you are here you might as well explore the Fishpacking Plant. Craft at the Chem Station if you wish and once you are done use the terminal here to enter the Four Leaf Fishpacking Plant.
Hazmat Suits, which may come in handy later on in the main questline. Now, look around for drugs and loot, nabbing whatever you wish. There is undoubtedly quite a few drugs and chems here, but nothing like what Trish was promising, nothing at all. It doesn’t even compare. And so you learned a valuable lesson: don’t trust Trish. Not that it matters, since she is (very likely, if you followed this guide) rotting in the streets… As soon as you entered this room, the Side Quest “Diamond City Blues” was officially over with, but while you are here you might as well explore the Fishpacking Plant. Craft at the Chem Station if you wish and once you are done use the terminal here to enter the Four Leaf Fishpacking Plant.
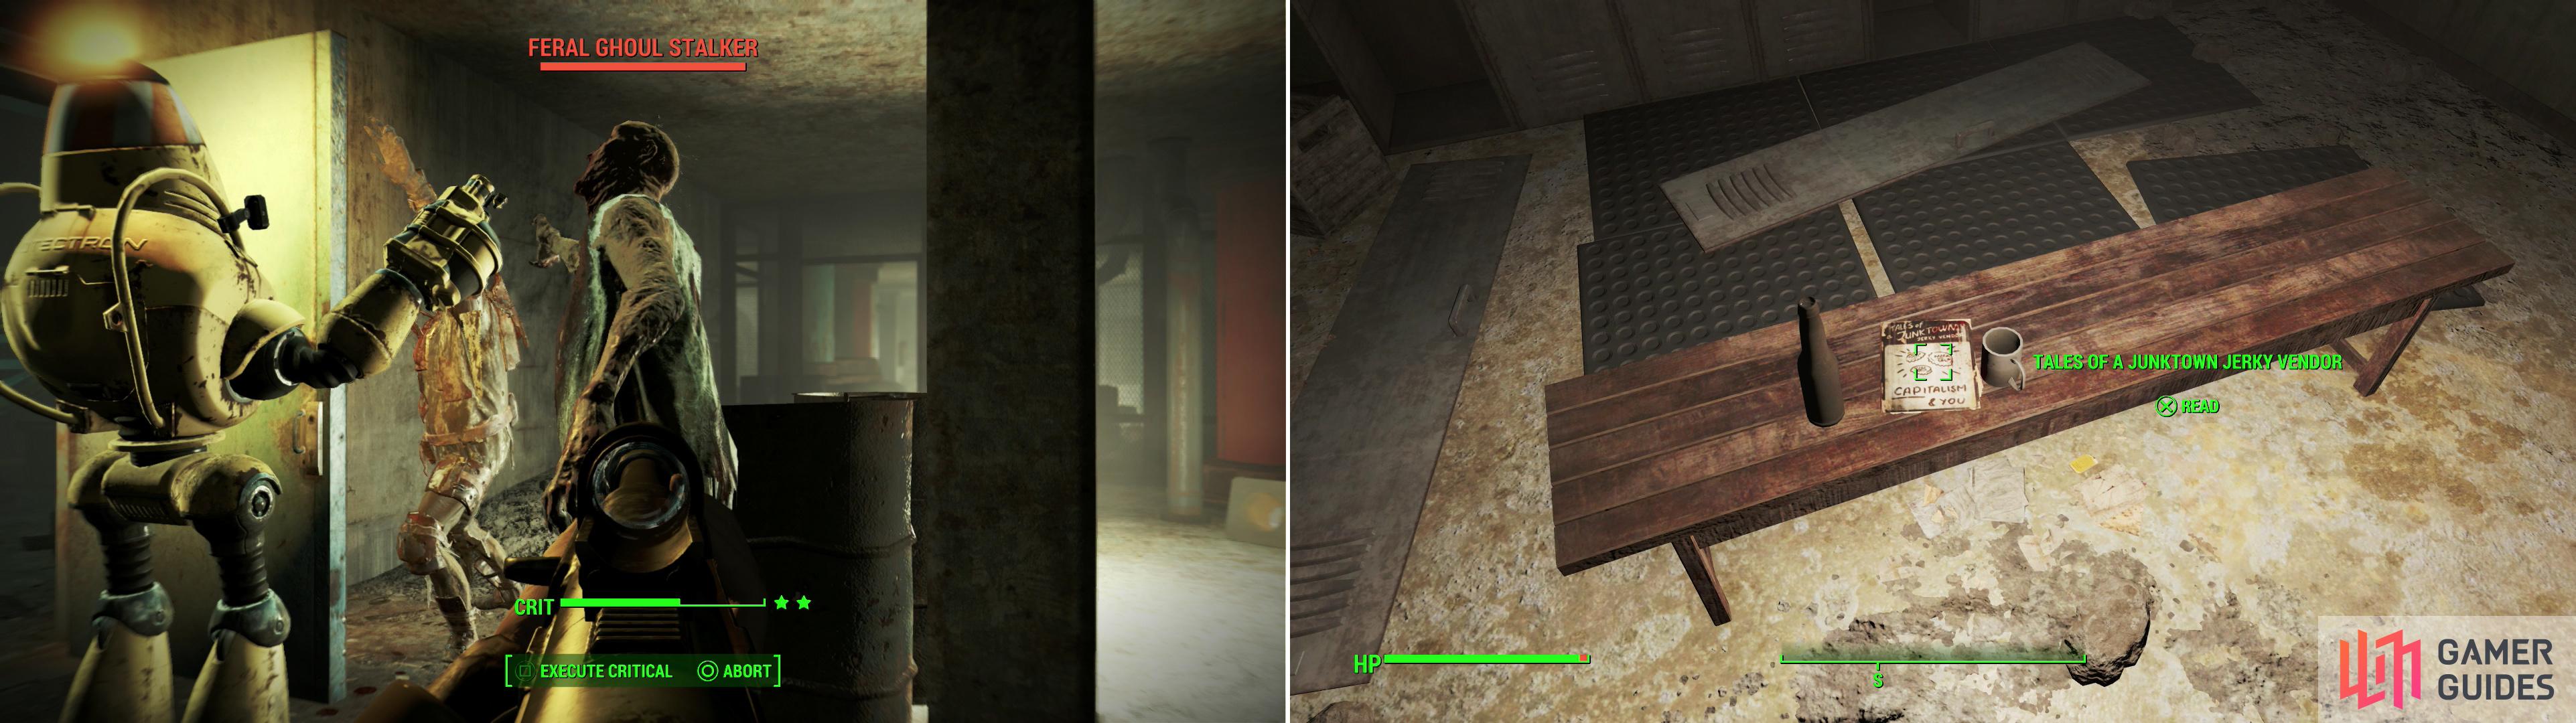
Unleash a dormant Protectron to lure some lurking Feral Ghouls out into the open (left). When the ghoulies are dead, grab a copy of Tales of a Junktown Jerky Vendor off a bench (right).
Four Leaf Fishpacking Plant (Interior)
Drop down to the catwalk and sweep the catwalks, clearing out the Feral Ghoul that may be up here. Once done make your way north and cross a wooden walkway connecting two sections of the metal catwalk (or leap the gap, as the boards may prove unwilling to support your weight). Over here you can find a Tool Case [Novice]. Open it up and head down the steps after that to the ground floor. Head through a doorway to the west and kill the Feral Ghoul lying in front of the magnetically-locked door. Once he is dead, use the [Novice] terminal (so nice of them!) and open the door. You should also really activate the Protectron here, then quickly explore his room where you will find a First Aid Box on the wall and a Fusion Core on the shelf.
From here, go ahead and follow Protectron as he heads downstairs (he may kill a random Ghoul on the way). As you head downstairs and through the door, kill the Ghoul hiding in the corner behind the barrels and note the locked door here, but keep following Protectron as he continues. The next room has some very powerful, leveled Feral Ghouls, whom the Protectron may make easier to deal with by drawing their attention. Even a relatively high-level character (low 40s) will probably encounter foes with skulls near their names, so take them seriously. After you’re victorious go back to that door you skipped and open the [Advanced] lock for some good junk. Head into the room where the high level Ghouls were to find a First Aid Box on the left (back in the back room) then head west to find a room with a Steamer Trunk in it, and, on a bench further west you’ll find an issue of Tales of a Junktown Jerky Vendor .
Once you are done down here, head back up to the first floor (where the Protectron is likely patrolling up here now) and head to the north-east corner. Here, slightly up the stairs, is another Fusion Core you can take as well as an [Expert] safe. You can also head up to the top of the catwalks and use the catwalks and pipes in the area to jump to the top of the forklift for an Explosives Box, but it is honestly more trouble than it is worth. Still, it is very do-able if you try. With that you have completed the quest and explored every area you came across. As tempting as it might be to explore down around here, there’s some unfinished business to the north, and until the north-east is clear, why bother moving on? Particularly, the town of Goodneighbor, which will be the next place covered.
Diamond City Revenge
After this quest, when you return to Diamond City you may encounter Malcom Latimer near the Colonial Taphouse, who will accuse you of killing his son, Nelson. You can admit to the deed, then pass a moderate speech check to apologize or be somewhat more rude, in which case Latimer will swear revenge and will send Triggermen to bother you once in a while. Alternatively, pass a hard speech check to shift the blame (you can finger Paul or Marowski) at which point Latimer will offer to pay you to get rid of said target. He’ll pay 200 Caps for Paul, or 400 Caps for Marowski (plus another 200 Caps if you pass a moderate speech check). Obviously the best way to deal with things is to blame Marowski and get offered 600 Caps for killing him. You’ll find Marowski in Goodneighbor, which will be covered shortly. If you want to kill Paul for Latimer, just blame him, haggle for more Caps, go to his house and kill him without getting detected, then return for your reward.
| Objective | Reward |
|---|---|
| For killing Paul for Latimer | 177 XP 200 - 300 Caps |
Also, if something happened to Henry Colette (or if Paul thinks something did) you’ll be confronted by his daughter (Henry’s) Colette. Pass an easy speech check to call Paul a liar or say you don’t know who killed him and Colette will rant, then walk off. Alternatively you can pass a moderate speech check to blame Paul for the deed to get the same response. If you fail any of these checks, she’ll blame you and attack, forcing you to put her down.
No Comments