
| Important Items in This Area |
|---|
| Grognak the Barbarian |
| Overseer’s Guardian |
| Taboo Tattoos |
Along the way to rescue Vadim you passed ![]() Vault 81… it’s now the only area near and north-west of
Vault 81… it’s now the only area near and north-west of ![]() Diamond City that’s not done. Let’s do something about that, shall we? Don’t worry, it might be pretty involved, but there’s a lot of good loot to be had. Just make sure you have
Diamond City that’s not done. Let’s do something about that, shall we? Don’t worry, it might be pretty involved, but there’s a lot of good loot to be had. Just make sure you have ![]() Charisma gear handy; there are plenty of speech checks ahead.
Charisma gear handy; there are plenty of speech checks ahead.
Entering Vault 81
Make your way to the fenced-off trash heap that graces the exterior of Vault 81 and head into a cave on the cliff face to the west, north-west. Beyond you’ll find the rarest of the rare; a functional vault whose population only became slightly xenophobic. Activate the Vault Control Terminal and use your magical Pip-Boy to coax the door open… or at least, try to. A security guard from Vault 81 will question you over an intercom, asking about how you got a working Pip-Boy and what your business is. Shortly he’ll be interrupted by the Overseer, who will cut to the chase; you help them by forking over three ![]() Fusion Cores (you can find four at a time in Ammo Boxes, so they’re not all that treasured), or you can keep your loot and succeed at a hard speech check. Your call.
Fusion Cores (you can find four at a time in Ammo Boxes, so they’re not all that treasured), or you can keep your loot and succeed at a hard speech check. Your call.
Once the vault opens, head on in to meet the Overseer, who is having a discussion with another dweller named Calvin. After Calvin leaves, the Overseer will ask about ![]() Vault 111, then mention that, despite their goal of self-sufficiency, they do need some things from the outside world. End the conversation however you want, and when you’re done, you’ll have free reign of Vault 81… or freedom to roam, anyways.
Vault 111, then mention that, despite their goal of self-sufficiency, they do need some things from the outside world. End the conversation however you want, and when you’re done, you’ll have free reign of Vault 81… or freedom to roam, anyways.
| Objective | Reward |
|---|---|
| For gaining entry into |
91 XP |
First up, talk to Neil, who dreams of going outside, but due to the long hours he’s working… that doesn’t seem likely. Another dweller named Miranda, however, has the opposite attitude towards the outside - and outsiders. Succeed at a moderate speech check by asking “Something happen?” and she’ll tell you about some youthful indiscretion that backfired on her.
Vault 81 Atrium
Head west through some radiation scanners, then a doorway, finally making your way down an elevator to reach the lower, more populated levels of the vault. When you reach the lower level head north to find a shop, where you might find Holt and Alexis Combes, the former of which isn’t very friendly. The latter, however, will run the store and complain about her husband. Succeed at the moderate speech check by saying “Tell me” and she’ll… well, reveal that the spark in their relationship has faded. Once you’re done prying, you can peruse her wares, which includes a lot of junk and the unique Combat Rifle, Overseer’s Guardian .
Go north down a tunnel in the north-western corner of this area and follow it as it winds, goes upstairs, past a security checkpoint and ultimately lands you in the Overseer’s office. The Overseer has little new to say, but you can hack the Overseer’s Terminal [Advanced] to learn more about the problems faced by the vault. Once done backtrack to the large, multi-level chamber and continue exploring the rest of the vault by heading downstairs. In the south-western corner of the lower level you’ll find the cafeteria, where Maria and Mark Summerset work. Talk to them both to learn that they’re more welcoming of outsiders, and that despite the attitude of some vault dwellers, outside help is needed in Vault 81 these days. Seems Vault 81 is on its last legs, and it’s a constant battle to keep it operational. You can also buy food and alcohol from Maria, if you’re so inclined.
Vault 81 Residential
Make your way north down a long tunnel to reach residential part of the vault… which is another large, multi-leveled room. You can scour the various living quarters where you’ll find a paltry bit of loot to grab, but none of it is worth mentioning, much less going through the trouble to steal. Instead, down a tunnel to the north to reach the reactor room. Make your way down some stairs to the west to find a beat-up Mr. Handy named Old Rusty, who seems to be the only thing keeping the reactor functioning. For the slacker human component here, find Bobby and Tina De Luca, the ![]() Jet-addict and his dealer. Talk to them both to learn about their situation(s), Tina wants you to not sell her brother Jet, while Bobby offers 75 Caps for each dose. Don’t sell him any Jet and later you’ll get a chance to help deal with his addiction in a more permanent fashion. While you’re down here, if you Hacking perk is up to snuff, you can hack the Old Overseer’s Terminal [Master], which is located in a small structure to the east. On this terminal you’ll find all kinds of dirty secrets about Vault 81, including its prime directive… it’s never just about saving humanity from nuclear apocalypse with Vault-Tec. But, despite the goals of Vault 81, it looks like nothing bad happened to the dwellers so far thanks to the frankly heroic actions of its first Overseer.
Jet-addict and his dealer. Talk to them both to learn about their situation(s), Tina wants you to not sell her brother Jet, while Bobby offers 75 Caps for each dose. Don’t sell him any Jet and later you’ll get a chance to help deal with his addiction in a more permanent fashion. While you’re down here, if you Hacking perk is up to snuff, you can hack the Old Overseer’s Terminal [Master], which is located in a small structure to the east. On this terminal you’ll find all kinds of dirty secrets about Vault 81, including its prime directive… it’s never just about saving humanity from nuclear apocalypse with Vault-Tec. But, despite the goals of Vault 81, it looks like nothing bad happened to the dwellers so far thanks to the frankly heroic actions of its first Overseer.
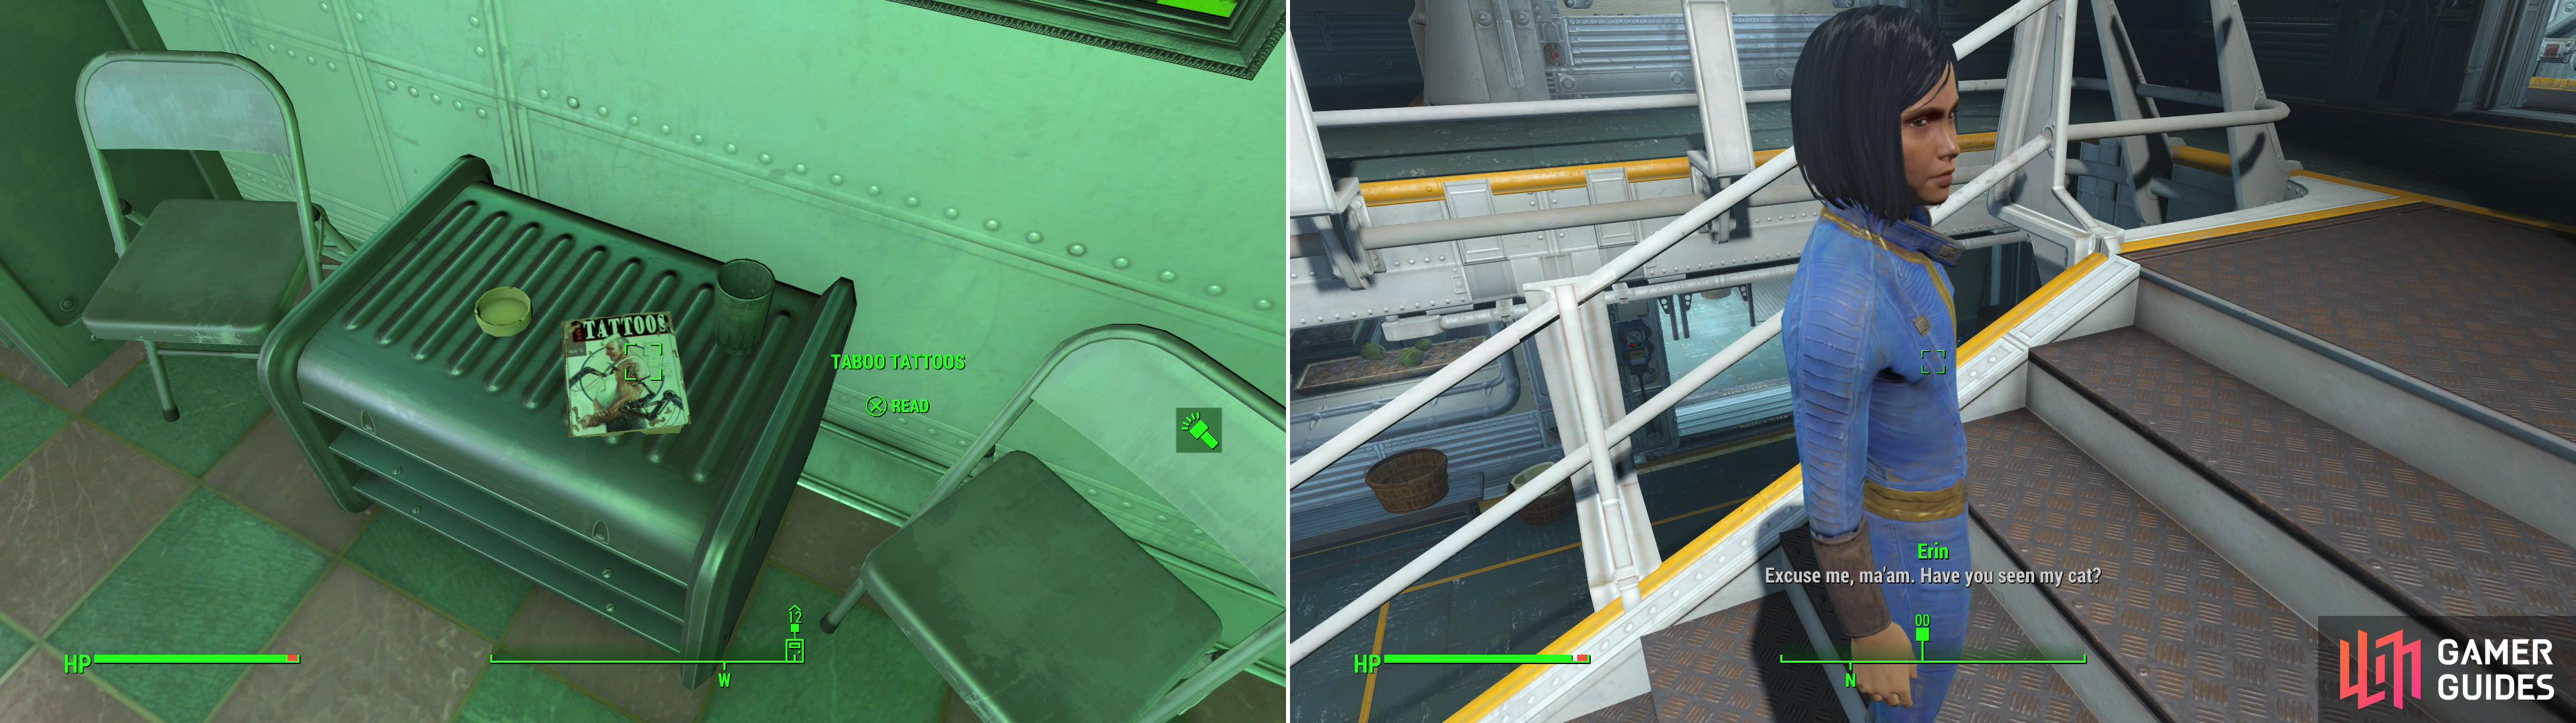
In Horatio’s barber shop you’ll find an issue of Taboo Tattoos (left). Talk to Erin and she’ll request that you find her missing cat, Ashes (right).
In the south-eastern corner of this area to find Horatio and his barber shop, where - for 15 Caps - you can get your hair cut, styled and/or colored. Not a bad bargain, if you want a little change in scenery. Also be sure to ask him some rumors to learn about an unfaithful husband, a Jet-addict, a runaway cat, the last bit of info starts the quest “![]() Here Kitty, Kitty” . Be sure to grab an issue of Taboo Tattoos from a table along the western wall, then leave the barber shop. Find Erin Combes wandering around and ask her about her cat and… well, time for more speech-based haggling. Pass an easy check to get offered a Teddy Bear, extort her more and she’ll offer you her Kickball, then finally you can shake her down for a Silver Locket. Get the kid to offer up her prized possessions… or do the job pro-bono, but accept to start it to move the chains.
Here Kitty, Kitty” . Be sure to grab an issue of Taboo Tattoos from a table along the western wall, then leave the barber shop. Find Erin Combes wandering around and ask her about her cat and… well, time for more speech-based haggling. Pass an easy check to get offered a Teddy Bear, extort her more and she’ll offer you her Kickball, then finally you can shake her down for a Silver Locket. Get the kid to offer up her prized possessions… or do the job pro-bono, but accept to start it to move the chains.
Next head into a laboratory to the north-east to find Doctor Penske, who wants to use you as a guinea pig to test some fruit she’s been growing. Her Alzheimer’s can’t make you optimistic, but if you agree, she’ll give you some perfectly safe ![]() Fresh Mutfruit to eat. Consume it, then talk to her again and tell her it was good, after which she’ll ask you to supply her with fertilizer so she can work with other crops who are more… picky about soil conditions. Accept her offer of 25 Caps per, then read her Research Terminal to find out more about her work.
Fresh Mutfruit to eat. Consume it, then talk to her again and tell her it was good, after which she’ll ask you to supply her with fertilizer so she can work with other crops who are more… picky about soil conditions. Accept her offer of 25 Caps per, then read her Research Terminal to find out more about her work.
Short Stories
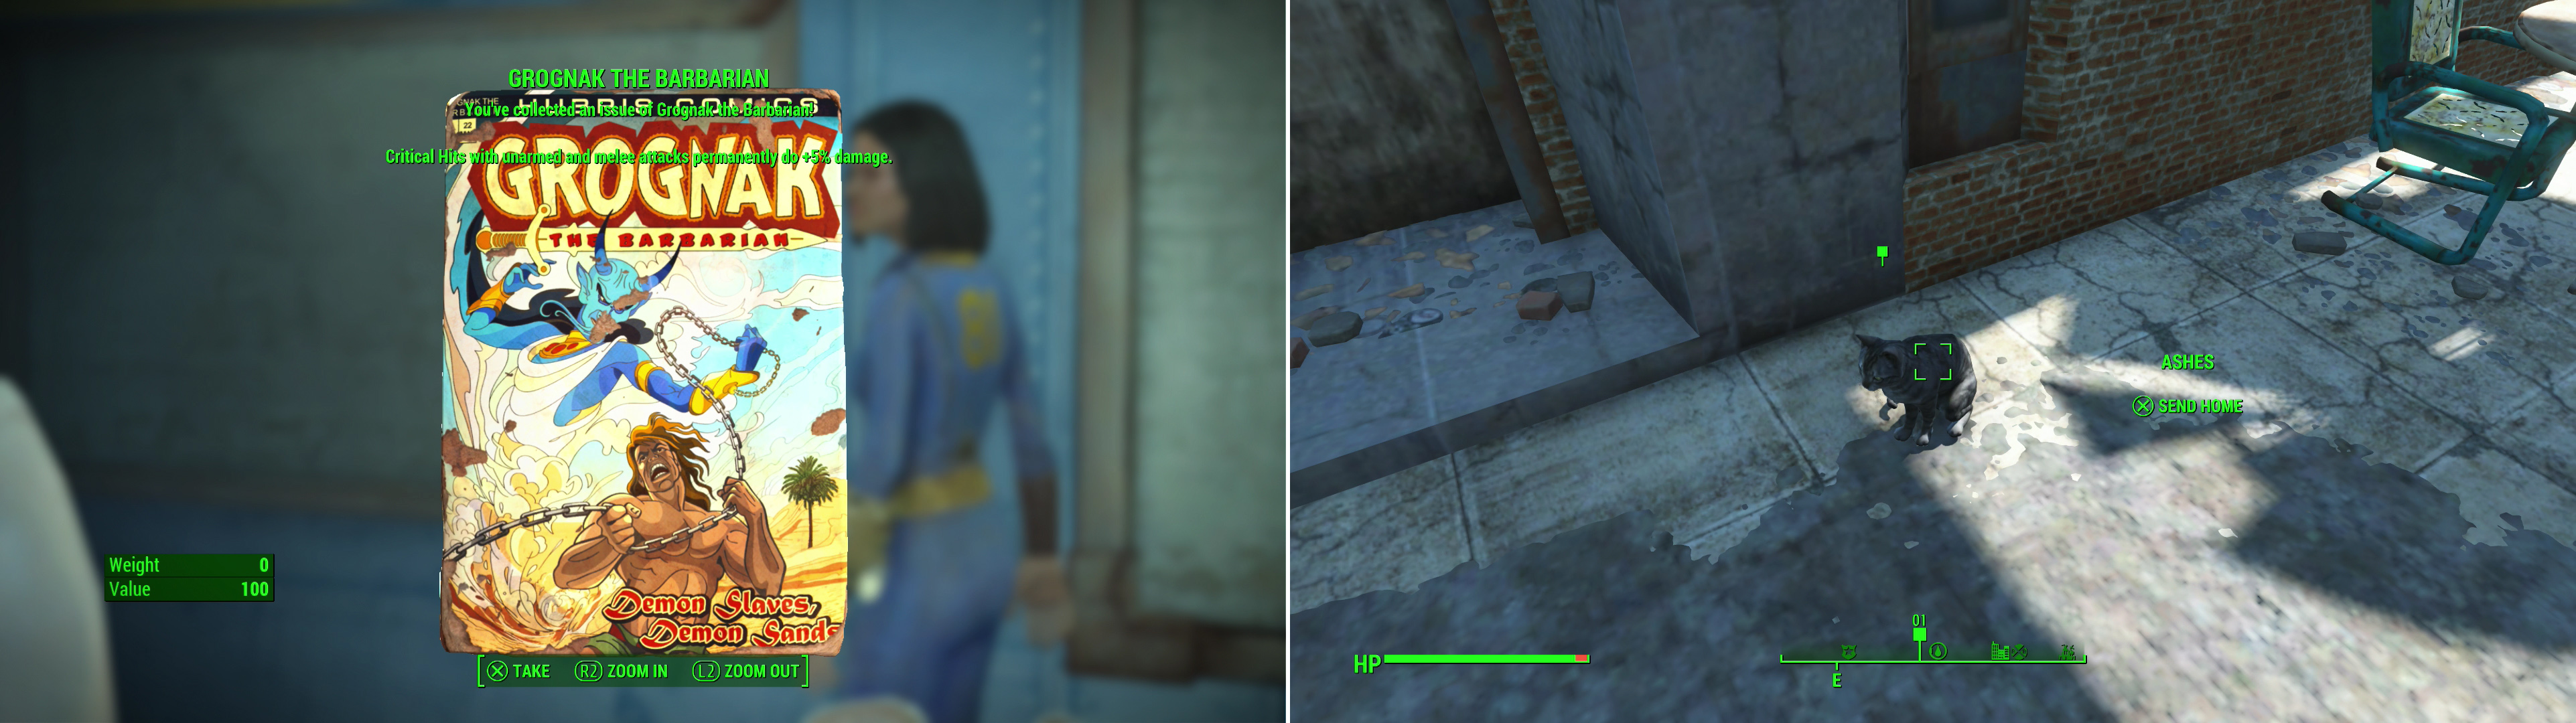
Leave the Reactor area and head into the Class Room, where you’ll find Katy. Talk to her and she’ll ask you to tell the kids a story about the outside world, starting the quest “![]() Short Stories” . Agree and talk to Katy again and start telling a story… which is really more of a Q&A, as a ginger devil named Austin will immediately ask if you’ve ever fought a
Short Stories” . Agree and talk to Katy again and start telling a story… which is really more of a Q&A, as a ginger devil named Austin will immediately ask if you’ve ever fought a ![]() Deathclaw. Tell the kids the story however you wish - you really can’t botch the story - and afterwards you’ll be rewarded with a Grognak the Barbarian comic. Uh… do they need any more stories?
Deathclaw. Tell the kids the story however you wish - you really can’t botch the story - and afterwards you’ll be rewarded with a Grognak the Barbarian comic. Uh… do they need any more stories?
| Objective | Reward |
|---|---|
| For telling the brats a story | 91 XP Grognak the Barbarian |
Head down the stairs to the east (ignore the Reactor room for now - it will be worth visiting later) and head north into a Clinic to the north, where the vampiric Dr. Forsythe will ask you to donate blood… so he can see how inbred Vault 81’s population has become. Do the old three-speech haggle to get him to pay you between 50 and 150 Caps, then sit down and let the ghoul suck your blood. When that’s done, you can see Rachel for medical supplies and healing services (healing, RAD removal, addiction removal)… all that good stuff.
Tell the kids a story at the behest of their teacher, Katy, and you’ll get a Grognak the Barbarian comic as a reward (left). Head outside Vault 81 to find the missing kitty, Ashes (right).
Hole in the Wall
With that, you’re temporarily done with Vault 81. Might as well go check on this kid’s cat, Ashes. Leave Vault 81 and head east of the ![]() Chestnut Hillock Reservoir to find Ashes, chilling out like only cats can. Interact with the little beastie to send it back to Vault 81, where you should return, as well. Inside, if you run into the Overseer she’ll tell you that one of the vault’s children fell sick, and that you should seek out the clinic, where you’ll find Dr. Penske and Dr. Forsythe arguing. Apparently Austin was bitten by a Molerat… some kind of diseased Molerat. Fortunately Bobby De Luca is here to tell them about some sub-vault, which is the only lead they really have right now. Talk to Dr. Penske and agree to help out… because you’re such a good-hearted person. Or because there’s some awesome loot down there. This starts the quest “
Chestnut Hillock Reservoir to find Ashes, chilling out like only cats can. Interact with the little beastie to send it back to Vault 81, where you should return, as well. Inside, if you run into the Overseer she’ll tell you that one of the vault’s children fell sick, and that you should seek out the clinic, where you’ll find Dr. Penske and Dr. Forsythe arguing. Apparently Austin was bitten by a Molerat… some kind of diseased Molerat. Fortunately Bobby De Luca is here to tell them about some sub-vault, which is the only lead they really have right now. Talk to Dr. Penske and agree to help out… because you’re such a good-hearted person. Or because there’s some awesome loot down there. This starts the quest “![]() Hole in the Wall” .
Hole in the Wall” .
Follow Bobby to the Reactor room where he’ll kick a door into existence. Not bad for a junkie. Save your game and head inside… things beyond the door are a little more complicated than a normal rodent extermination mission. You will be exterminating Mole Rats, but the rub is that if they hit you, you’ll get the same disease that Austin has. Since you’re a big girl (or boy) however, its effects will be somewhat less deleterious; you’ll only permanently lose ten Hit Points if you’re infected with the disease. This only happens if you get hit, however, so if you’re careful, you can avoid the disease (and the moral conundrum at the end of the quest) entirely. Mole Rats can only surface in dirt, so keep that in mind as you explore. Being able to sneak, having a fast weapon, using VATS to spot out foes will all help you immensely with this goal.
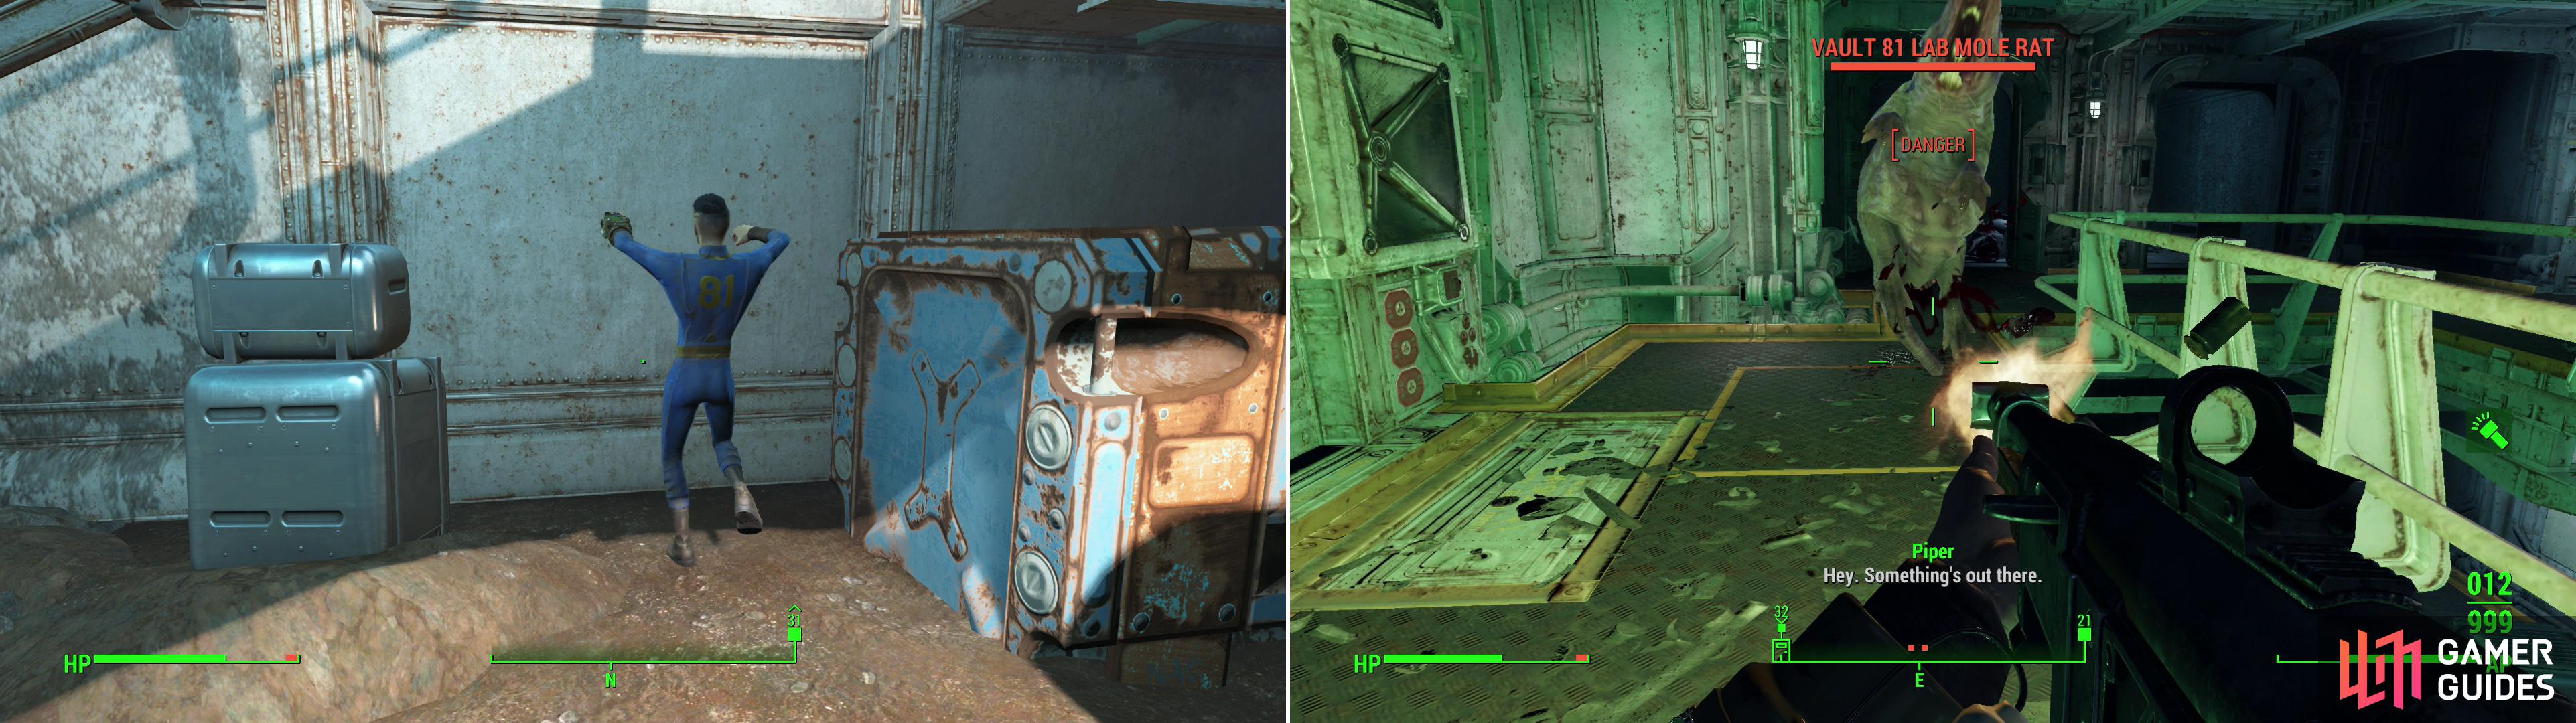
Bobby will perform a magic dance and summon a door to the seal parts of Vault 81 (left). If these diseased Mole Rats bite you, you’ll become infected, suffering a permanent damage to your maximum health (right).
From the entrance to the secret portion of the vault head west up some stairs to find your first Vault 81 Lab Mole Rats. Kill them without getting hit if possible, and note that they can only ambush you from places with dirt on the floor. Once they’re dealt with, continue east along a walkway, stopping to loot two First Aid Boxes as you go. Head through a wrecked section of wall to the north to reach a small room, where you can access a Terminal, which talks about some of the vault’s less interesting programs.
Continue north through a doorway and turn west, where you’ll have to dispatch a pair of turrets and a Protectron Watcher. Once they’re no longer a threat, loot a Toolbox [Novice], then proceed west down the hallway, south through a pair of rooms, then continue west down the other half of the hallway. Loot a Wooden Crate [Novice] on a metal shelf near some stairs, then head down said stairs. Scrap another turret down a hallway to the south, then explore to the east to find a Terminal [Novice], which you can hack to activate a nearby Protectron… which is actually worth hacking, since it’ll meander its way south and provide support in a fight with some Mole Rats there. Loot a Dufflebag to the east, then follow the Protectron south until you reach a dirt-filled room. Your goal is to make your way to the south-east to find some stairs, near which you’ll be ambushed by several Mole Rats. It may be hard to pick them all off without getting hit (a fast weapons in VATS will help), but if you have a companion, the Protectron, and you keep your back to the south-eastern corner you may just be quick - and protected - enough to manage.
Ascend the first stair case and search behind some crates to the north-west to find some chems hiding from you. Once they’re yours make your way up another flight of stairs, passing the Hydroponics Observation Terminal along the way, from which you’ll overhear a conversation. Seems the isolated scientists here could hear everything happening in the vault. Creepy. Climb some stairs to the south, head east through a Security Door, then continue past a Depot Observation Terminal where you’ll overhear more chatter. Head past some pillars and turn south to find a cubby with a Jangles the Moon Monkey doll, a Toy Truck and three bottles of Nuka Cherry. This little cubby is a fine defensive spot, and there are plenty of Mole Rats in the level below. Fire off a shot from an unsilenced weapon to get their attention, then kill off any Mole Rats that show up, hopefully without getting diseased. There are tons of burrows all over from which they can spring, so stay frosty and check to make sure you don’t have the disease before you save. Once you’ve killed about half a dozen of them (and no more respond to gunfire) continue past the Overseer Observation Terminal, then head down another flight of stairs to the dirty level below. Here you’ll probably have to face another few Mole Rats, and for them… either retreat to the relative safety of the stairs or… well, fire quickly.
Continue through a door to the south, then head west down a generous hallway. Be wary of the rooms to the north and south, however, as more Mole Rats await. If they lose track of you, they’re not above burrowing into the previous room and coming at you from the otherwise safe hallway, so be on the lookout for rodent duplicity. Once you’re fairly certain your safe (for now) head into the room to the north and try your luck with a Wall Safe [Master] on the eastern wall, if you can. Make your way to the western end of the hall, then head north down a hallway and up some stairs. Here you’ll find the Vault 81 Secure Access Terminal [Expert], which opens the nearby door. If you can hack this terminal, you need not face any more Mole Rats, but in case you can’t, continue east along a walkway. At the eastern end of this area are two open doors, where a Mole Rat Brood Mother lurks… and of course, the cells you passed to the north will serve as spawning points for more rodents, who will attempt to flank you. Kill them and search the room at the eastern end of the chamber to find a ![]() Mini Nuke in an over-turned locker and a Steamer Trunk on a bed. In a room to the south you’ll find the Vault 81 Tech Password on a table near the Research Comm Terminal, which has much of the same information as the Overseers Terminal in the Reactor room, sans the need to hack a [Master] password. There’s also a
Mini Nuke in an over-turned locker and a Steamer Trunk on a bed. In a room to the south you’ll find the Vault 81 Tech Password on a table near the Research Comm Terminal, which has much of the same information as the Overseers Terminal in the Reactor room, sans the need to hack a [Master] password. There’s also a ![]() Stealth Boy and a First Aid Box in the room, making these areas well worth looting, despite the risk.
Stealth Boy and a First Aid Box in the room, making these areas well worth looting, despite the risk.
Once you have the password (or if you have the skills to hack the terminal without it) use it to open the door and proceed beyond it, then up some stairs. In the room atop the stairs you’ll find three lockers, which serve as the coffins for the three scientists stranded in this part of the vault by the ethical overseer. Rob their locker/coffins and take their Lab Coats, if you wish, then talk to a Mr. Handy (Mrs?) named ![]() Curie behind some glass to the south. She’ll tell you all about the projects going on here, the fates of the scientists, and will pester you about being Vault-Tec Security… or anybody from Vault-Tec. Or just anybody, so she can finally leave her post. It doesn’t matter what you say, if you deny having the authority she’ll “mishear” you and open the door anyways. Head inside and she’ll give you the
Curie behind some glass to the south. She’ll tell you all about the projects going on here, the fates of the scientists, and will pester you about being Vault-Tec Security… or anybody from Vault-Tec. Or just anybody, so she can finally leave her post. It doesn’t matter what you say, if you deny having the authority she’ll “mishear” you and open the door anyways. Head inside and she’ll give you the ![]() Vault 81 Cure, which will cure Austin… or it could cure you. And there’s the rub. Do you be a moral person and save Austin’s life, or do you treat your own disease and remove that nasty -10 Hit Point penalty? Or… if you were super skilled and made it through the vault unscathed, you can enjoy the best of both worlds; you can be a hero and not have permanent debuffs on your character! Whatever you choose to do, grab the
Vault 81 Cure, which will cure Austin… or it could cure you. And there’s the rub. Do you be a moral person and save Austin’s life, or do you treat your own disease and remove that nasty -10 Hit Point penalty? Or… if you were super skilled and made it through the vault unscathed, you can enjoy the best of both worlds; you can be a hero and not have permanent debuffs on your character! Whatever you choose to do, grab the ![]() Medicine Bobblehead from atop a desk in this room and enjoy +10%
Medicine Bobblehead from atop a desk in this room and enjoy +10% ![]() Stimpak healing for the rest of the game. To the west, in a small, caged-off area, you’ll find Curie’s Terminal to learn a bit about the robot and how she became… rather unique.
Stimpak healing for the rest of the game. To the west, in a small, caged-off area, you’ll find Curie’s Terminal to learn a bit about the robot and how she became… rather unique.
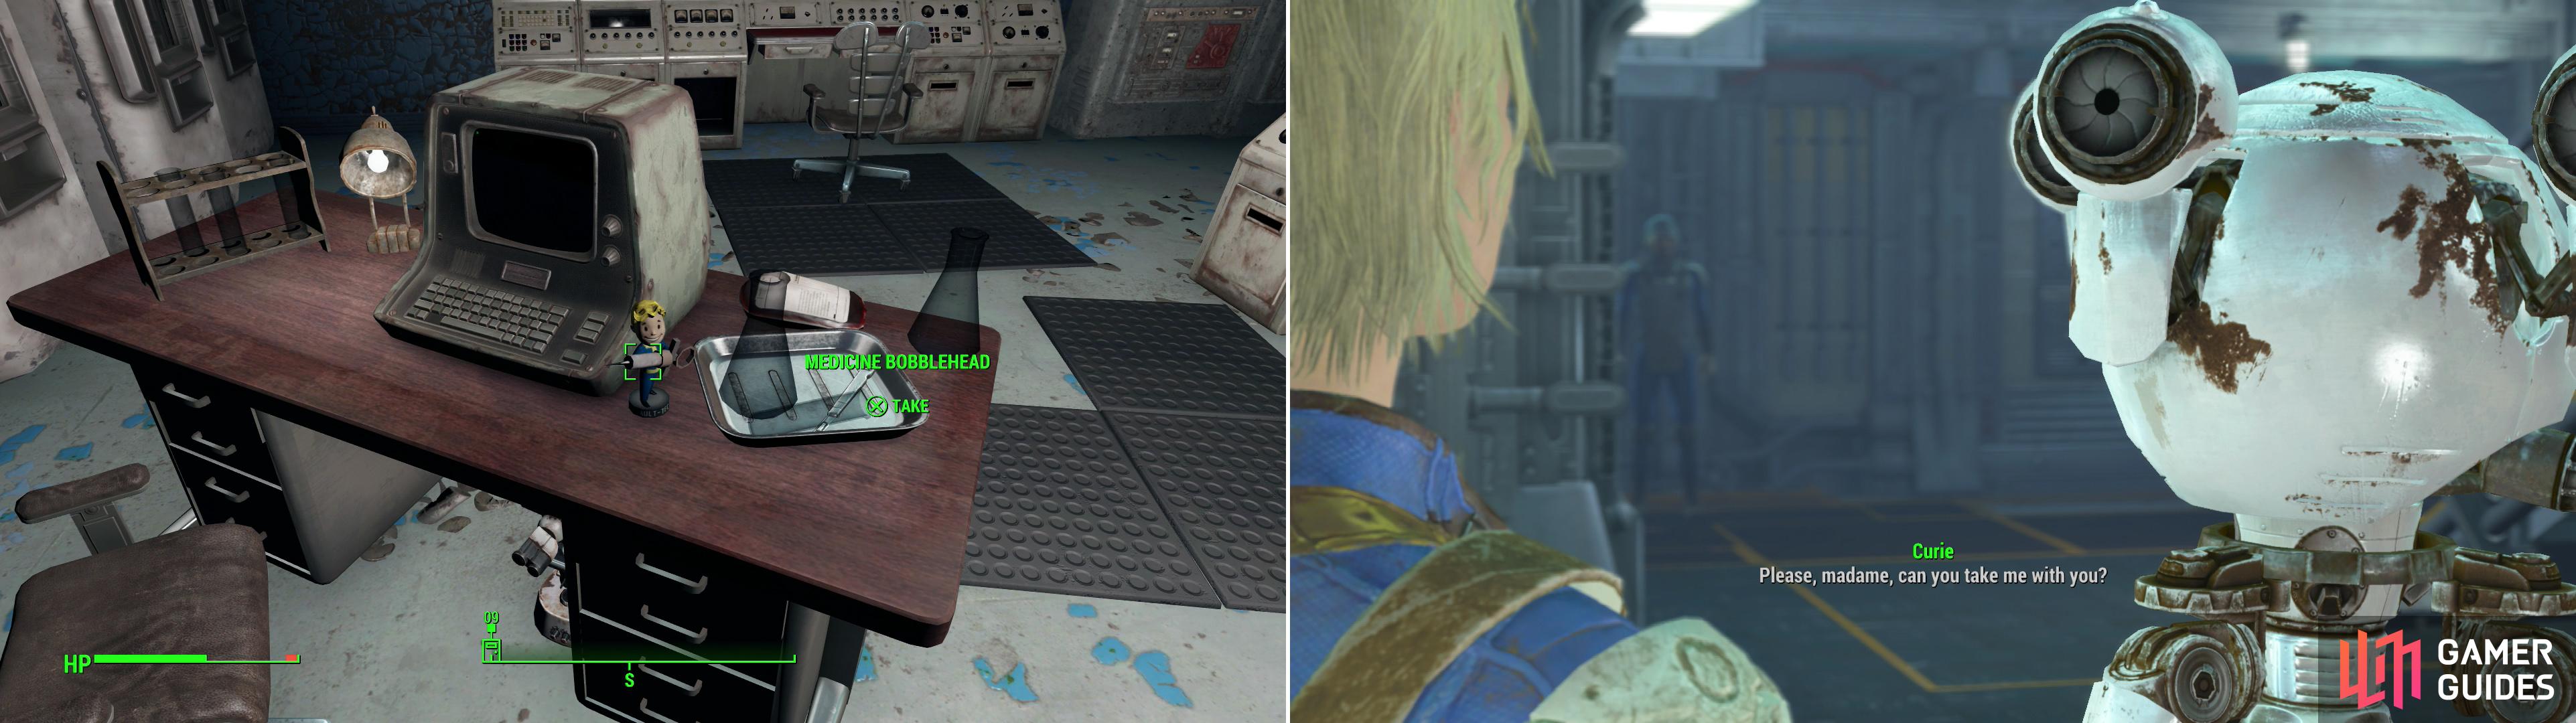
Claim the Medicine Bobblehead from the lab in which Curie was confined (left) then, after delivering the cure (or the bad news) Curie will ask to travel with you (right).
Leave the room and head through a doorway to the east, then take an elevator to reach the inhabited part of the vault. Once off the elevator, head east and use a Terminal to open a previously sealed doorway near the vault entrance. From here, you shouldn’t have much trouble getting to the Clinic. Talk to Dr. Forsythe, who will administer the cure to Austin if you give it to him. If you used it on yourself, or refuse to hand it over, the quest ends with an XP reward, and an angry vault. If you cured Austin, the doctor will give you a Syringer Rifle, the Overseer will give you a room in the Vault, and nothing in the vault will be considered stealing anymore. Obviously the best choice is to get through the secret part of the vault without getting diseased and then give the cure to Austin.
| Objective | Reward |
|---|---|
| For keeping the cure | 302 XP |
| For giving the cure to Austin | 302 XP Syringer Rifle |
If you thought you were done with Vault 81… well, not quite yet. As you leave the clinic you’ll be pestered by Curie, who will ask to accompany you around from now on. Take her along if you want, then find Erin, who will thank you for finding Ashes, and give you a paltry XP reward.
| Objective | Reward |
|---|---|
| For rescuing Ashes | 91 XP |
Dependency
Next, go find Tina De Luca, who is finally ready to do something about her brother, Bobby, whose Jet addiction has moved from a nuisance to life-threatening. Agree to help her (this starts the quest “![]() Dependency” ), then head back out to the Residences part of the vault. Bobby’s room is on the upper level, the eastern-most room along the southern wall. Inside you’ll find him… doing what a Jet-junkie does best. Put on your Charisma gear and confront him, then pass one of various moderate speech checks to get him to agree to get help. Once done, return to Tina and tell her the news and she’ll resolve to leave the vault. If you succeed at the hard speech check “Work for me” she’ll act as if she’ll go to one of your settlements, but… well, this quest is kind of glitchy. When you’re done with the conversation (one way or another) talk to Rachel and tell her that Bobby is coming to see her (even if he’s already there). This will end the quest “Dependency” , and Tina… well, she just hangs around Vault 81, whatever you said to her.
Dependency” ), then head back out to the Residences part of the vault. Bobby’s room is on the upper level, the eastern-most room along the southern wall. Inside you’ll find him… doing what a Jet-junkie does best. Put on your Charisma gear and confront him, then pass one of various moderate speech checks to get him to agree to get help. Once done, return to Tina and tell her the news and she’ll resolve to leave the vault. If you succeed at the hard speech check “Work for me” she’ll act as if she’ll go to one of your settlements, but… well, this quest is kind of glitchy. When you’re done with the conversation (one way or another) talk to Rachel and tell her that Bobby is coming to see her (even if he’s already there). This will end the quest “Dependency” , and Tina… well, she just hangs around Vault 81, whatever you said to her.
| Objective | Reward |
|---|---|
| For helping Bobby kick his addiction | 91 XP |
With that, Vault 81 is done. Ideally, you’ve left the place much better off than it was before you entered. You told some brats some stories, rescued one of said brats (and a cat), found two magazines and a Bobblehead, cured Bobby’s downward spiral and finished off the north-western corner of the island upon which Diamond City rests. Now it’s time to turn your attention back to the main story and finding ![]() Nick Valentine. This will take you east of Diamond City, and from there… well, it can’t hurt to explore the eastern side of the island along the way, right?
Nick Valentine. This will take you east of Diamond City, and from there… well, it can’t hurt to explore the eastern side of the island along the way, right?
No Comments