
| Important Items in This Area |
|---|
| Grognak the Barbarian |
| Picket Fences |
| RobCo Fun |
| Taboo Tattoos |
From ![]() Back Street Apparel it’s a fairly short run south and somewhat west to reach
Back Street Apparel it’s a fairly short run south and somewhat west to reach ![]() Diamond City, but there’s another way to get there which - while longer - is worth the detour. Plus, some of these areas, there’s little excuse to explore them otherwise, so let’s make use of this forced, tenuous excuse to clear them. Backtrack to
Diamond City, but there’s another way to get there which - while longer - is worth the detour. Plus, some of these areas, there’s little excuse to explore them otherwise, so let’s make use of this forced, tenuous excuse to clear them. Backtrack to ![]() Relay Tower 1DL-109 and return back west across the bridge. Continue west to find a swamped town to the south, which is the subject of the
Relay Tower 1DL-109 and return back west across the bridge. Continue west to find a swamped town to the south, which is the subject of the ![]() Forest Grove Marsh map marker.
Forest Grove Marsh map marker.
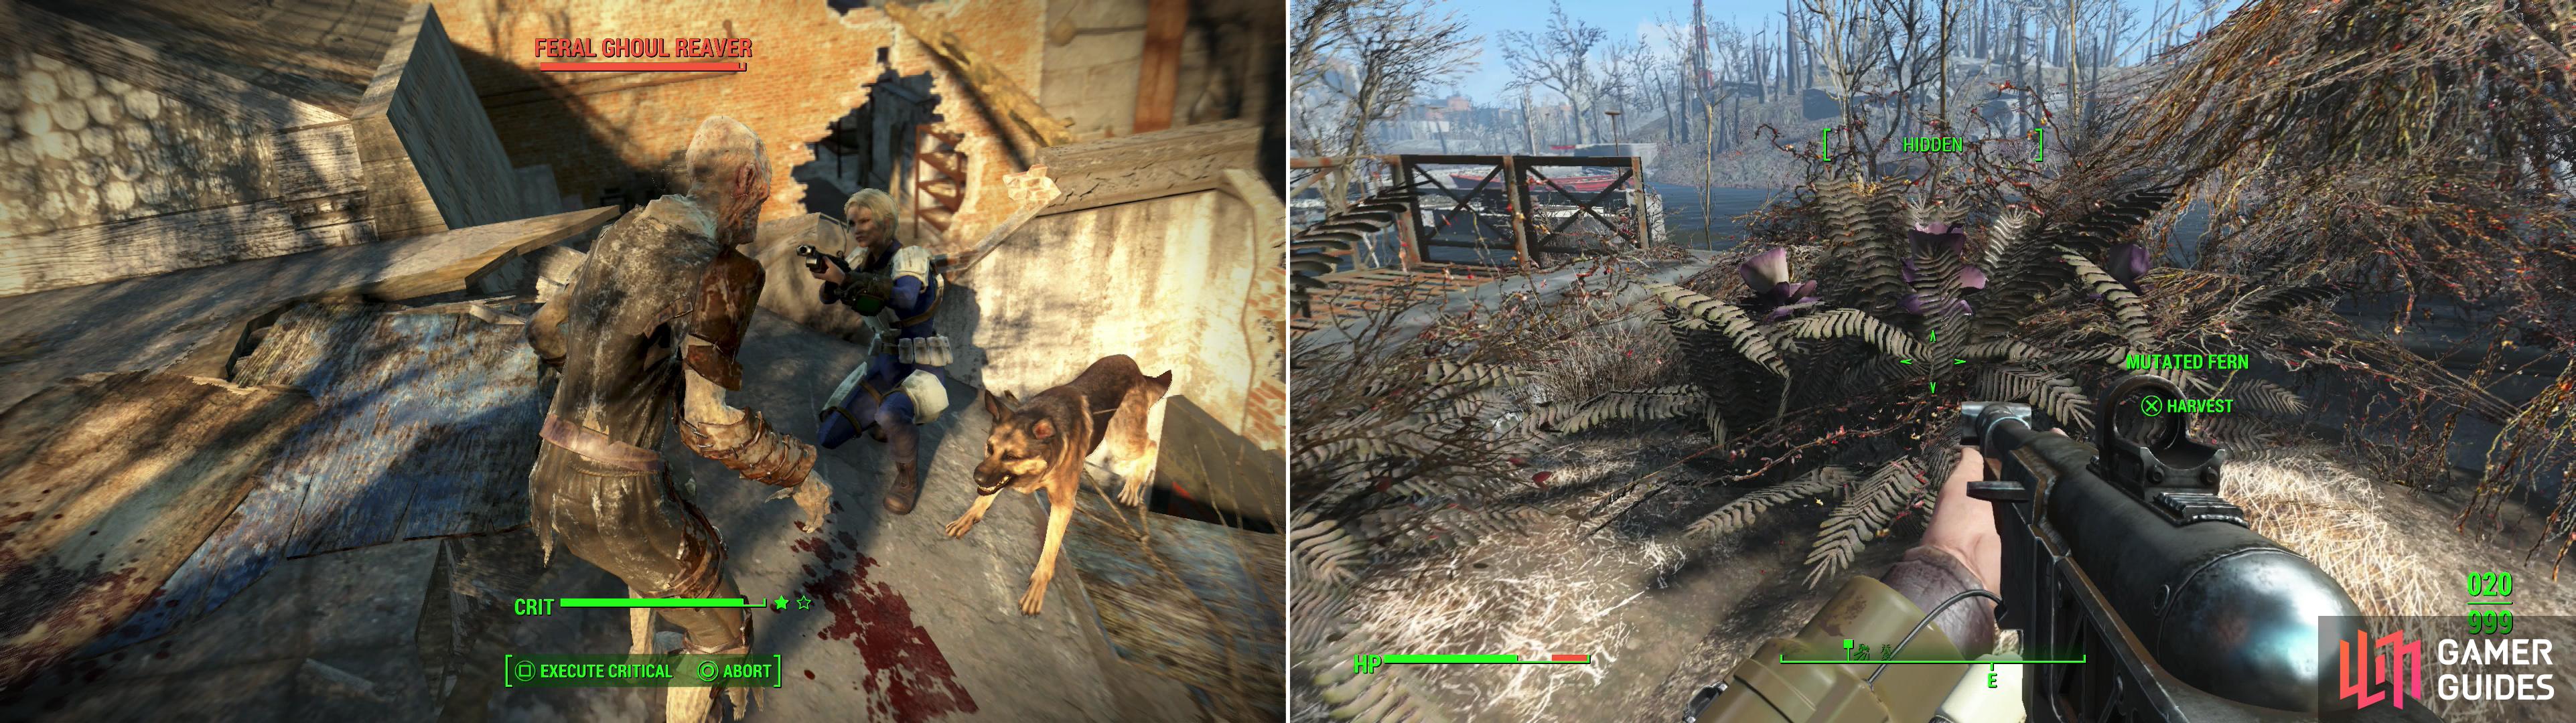
In the swampy ruins of Forest Grove Marsh, many Feral Ghouls prowl, waiting to feast on unwary intruders (left). Be sure to pick a Mutated Fern while you’re here, as it’ll come in handy later (right).
Forest Grove Marsh
Not only is this place filled with radioactive water, but that water itself is filled with Feral Ghouls - possibly rather strong ones. Your best bet is to reach the rooftops and stay on high ground, preferably with as few accesses as possible to hold off the horde of ghouls that will arise as you pick your way through the swamp. Find a yellow piece of construction machinery along the northern end of town, then follow some makeshift ramps onto the nearby roof to the south. Drop down a ledge onto a lower roof to the south, then cross a fallen tree from this roof to the the building to the west. From here, head south through the ruined second floor of this building and cross another debris ramp to the east to reach a roof then immediately turn west and ascend a ramp to a higher flat roof. On this roof you can find some Sleeping Bags, a Steamer Trunk and, on a wooden crate near a lantern, Sheila’s ![]() Holotape . On the ground floor of this building you can find some ammo and a floor Safe [Advanced] behind a counter. There are also plenty of roofs you can clamber upon, more Ghouls to slay and a half submerged red truck [Advanced] along the south-eastern edge of town, which you can open to find a First Aid Box and a Large Tool Box to loot. Other than that, there’s not much to see here. Be sure, however, to harvest
Holotape . On the ground floor of this building you can find some ammo and a floor Safe [Advanced] behind a counter. There are also plenty of roofs you can clamber upon, more Ghouls to slay and a half submerged red truck [Advanced] along the south-eastern edge of town, which you can open to find a First Aid Box and a Large Tool Box to loot. Other than that, there’s not much to see here. Be sure, however, to harvest ![]() Mutated Fern Flowers found growing throughout town; they’ll be useful in a quest later on.
Mutated Fern Flowers found growing throughout town; they’ll be useful in a quest later on.
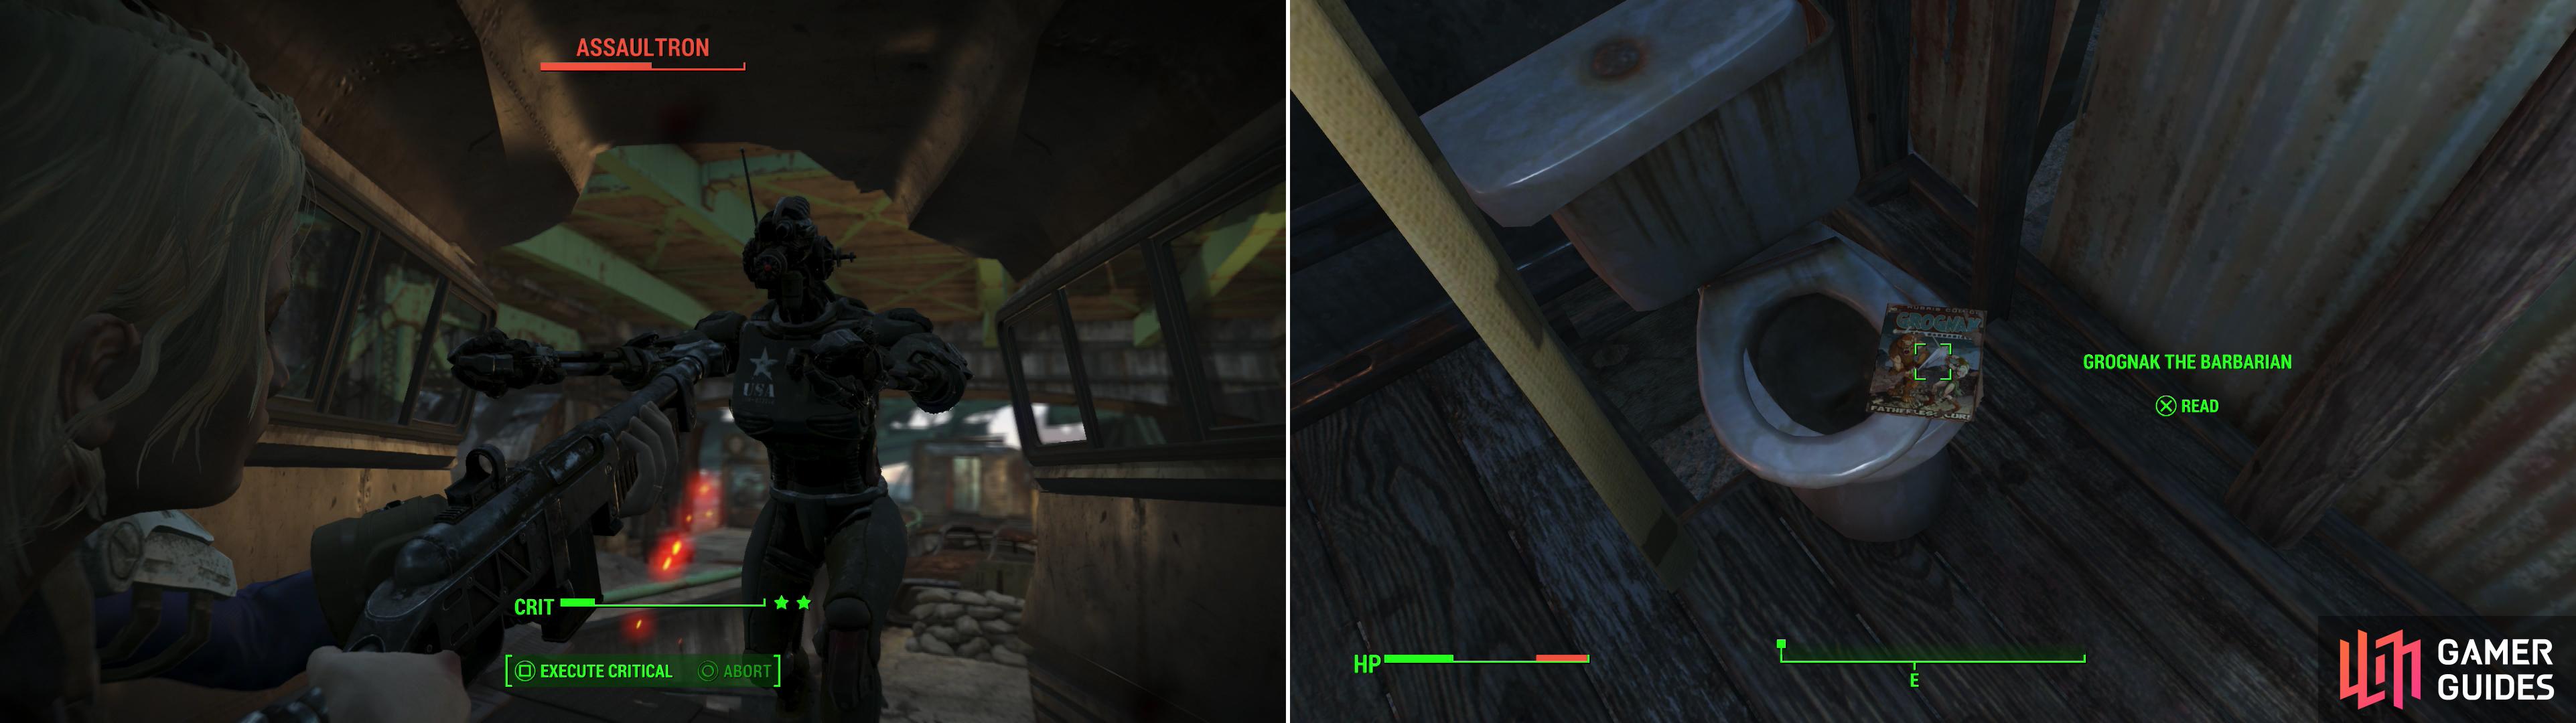
Be wary on the elevated highway, as the Gunners here have an Assaultron (left). Once the Gunners have been defeated, grab a poorly placed issue of Grognak the Barbarian (right).
Mass Pike Interchange
Leave the flooded town by heading west to find a road running north/south along the side of town. More interesting still is the large, elevated highway further west. Get under this highway and follow it south until it is bisected by another elevated highway running east/west. Where these roads cross some Gunners have set up camp, both on the ground and atop the highway. Kill the opposition you can reach, then head west and ascend a collapsed highway segment (it can be done, but it might take some jumping) to reach the elevated highway above. To reach the highest highway, however, you’ll need to search the camp under the highways to find a metal shack. Climb some stairs to reach the top of this shack to find a button, which will summon an elevator, which you can then ride up to a highway. Be cautious, however, as this place is guarded by an Assaultron, a Gunner Commander and a Machinegun Turret MK III. Once they’re dead, make your way to the south-east to find a shack, outside of which you’ll find a Power Armor Station and inside of which is a toilet, upon which is a copy of Grognak the Barbarian . There’s also a Trunk inside, and in another shack to the north you can find two ![]() Bottlecap Mines, a Caps Stash, an Ammo Box and two Wooden Crates.
Bottlecap Mines, a Caps Stash, an Ammo Box and two Wooden Crates.
Make your way back to the ground and follow the highway east to the river. You’ll have to cross the river here, which will give you some horrible RADS, but it is a short swim to the other side. As soon as you cross, look up and notice the broken overpass - there are Raiders up here that will spot you if you aren’t careful. If you can snipe at them with your Sniper Rifle, do so. You may kill off one of them and make their dog come down to you (which hopefully it will, as you can kill it off easily). You likely won’t kill all the Raiders from below, so continue east and you can soon head up the broken overpass yourself and wipe out the remaining Raiders.
Once the Raiders are dead, continue east, avoiding the road heading down into a tunnel for now, and instead running on the high ground south of the road. This will lead you to a Raider camp full of dead Ghouls that you can loot, and perhaps the Raiders that killed them. Loot, then head into a shack to the north and grab two Nuka Cola Quantums on a metal table, then head down into the tunnel to find the “![]() Mass Pike Tunnel West” location. There are two ways from here to get to Diamond City, and both will be covered. First, you can enter the tunnels and go through Mass Pike Tunnel West to reach
Mass Pike Tunnel West” location. There are two ways from here to get to Diamond City, and both will be covered. First, you can enter the tunnels and go through Mass Pike Tunnel West to reach ![]() Mass Pike Tunnel East (covered in the following paragraphs) or you can go the overland route (covered under the heading “
Mass Pike Tunnel East (covered in the following paragraphs) or you can go the overland route (covered under the heading “![]() Hardware Town”, below) or you can do both. Both are worth exploring, given the loot inside.
Hardware Town”, below) or you can do both. Both are worth exploring, given the loot inside.
Mass Pike Tunnel West
Once you’re down in the tunnel, head east down the northern tunnel, where one of the Feral Ghouls lying on the ground will rise up and attack. This will foreshadow what awaits you in the tunnel beyond. You now have a choice to make: you can bee-line for Diamond City (not a bad idea) which is the much easier path or you can stick around and explore this Tunnel while you are here. If you’ve been following along this far, however, going through another side area before reaching Diamond City shouldn’t be too much, so, head on into the tunnels.
Start out by entering a bus. Be sure to check out the right of this bus (the front) for some goodies and to see what the Teddy Bears are up to (so wrong!). Out the back of the bus, several Ghouls are walking around. Sneak attack them if you can and hold the bus. After they are dead, slowly move down each tunnel (left and right) and clear out the Ghouls in the tunnels. Remember that they like to lie down, so enter VATS (or try to) as you go and clear the tunnels. You might not be able to pick out the living ones from the dead, but VATS sure can!
Now… the left side is the most dangerous side, but let’s go over what you’ll find. The left tunnel has a side hallway on the left that has some notable enemies. Head down into the left tunnel to the east until you find watery ground where, as mentioned earlier, Feral Ghouls may lurk. Kill whatever you find, then head into a side chamber to the north to reach a room that has a major obstacle in it: four Ghouls including a Glowing One. The Glowing One is one of the most powerful types of Ghouls, dealing more damage (physical and radiation) than other Ghouls. He hits hard and has a radiation attack that can actually revive Ghouls that you’ve already killed. Once it’s dead, loot a Steamer Trunk [Novice] in the north-western corner of the room, then search a pipe to the north to find a dead Raider near a Chem Cooler.
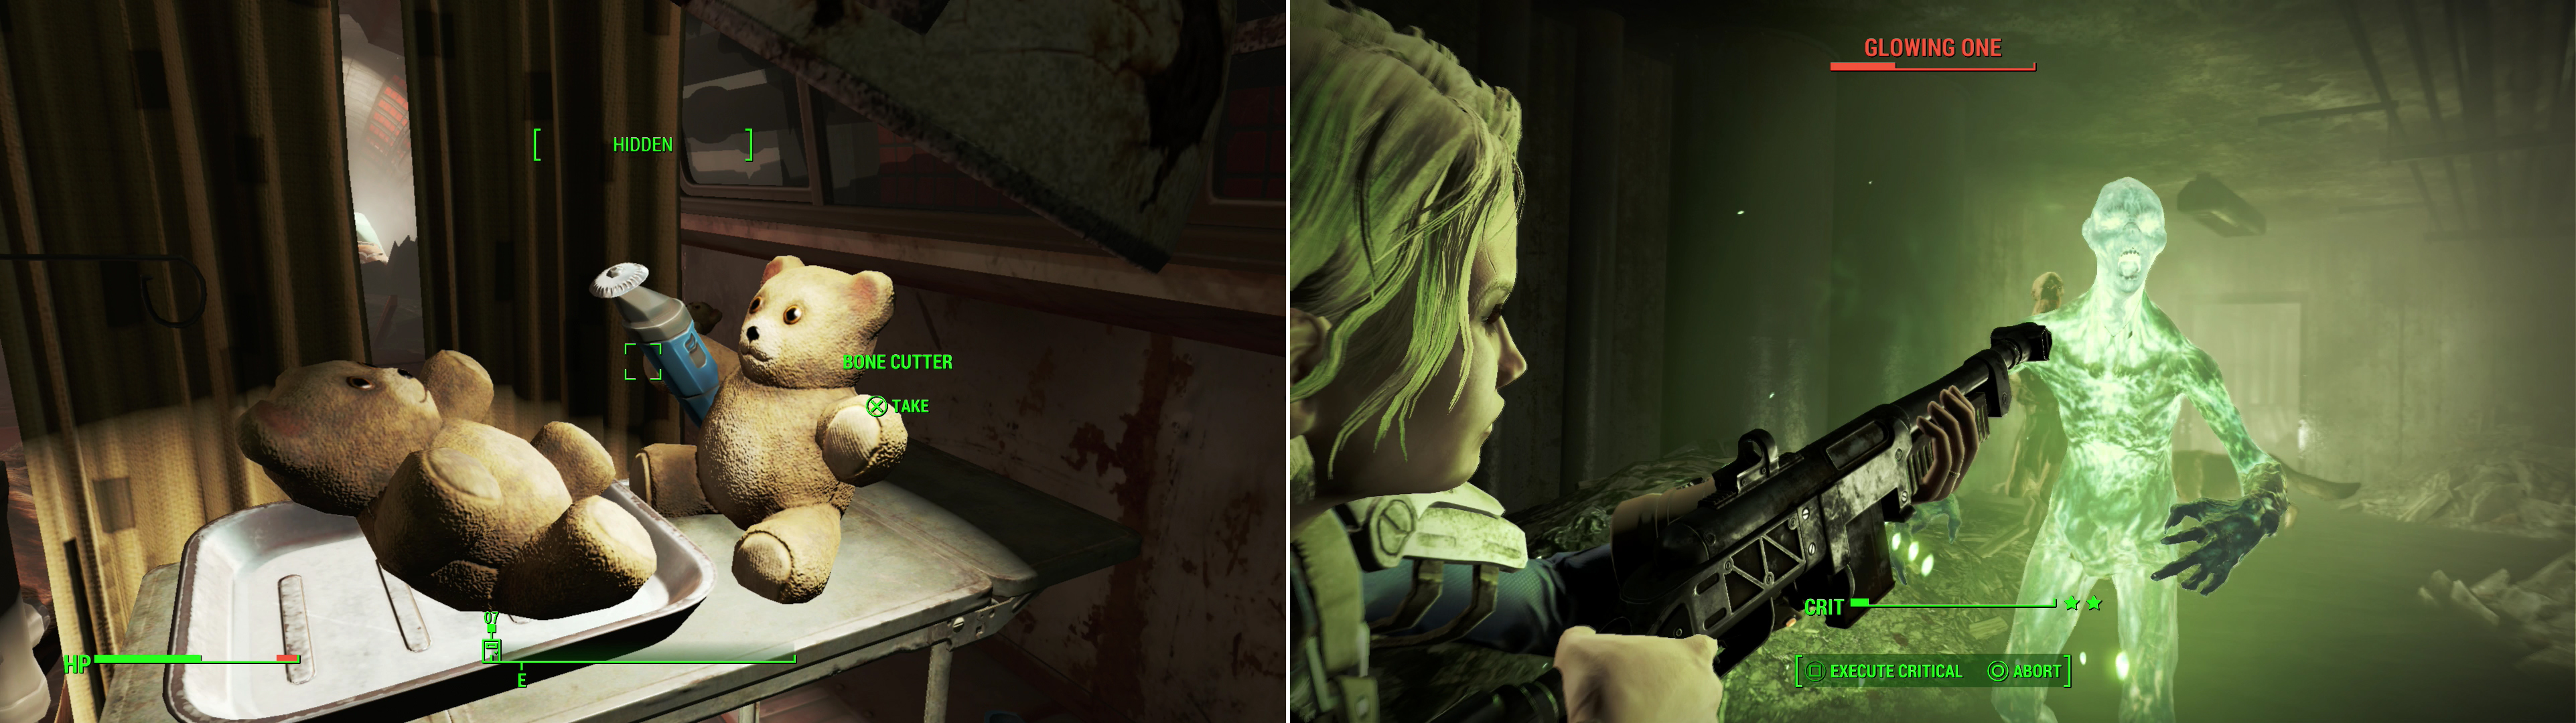
Something tells me this Teddy Bear isn’t a real doctor (left). There are plenty of Feral Ghouls in the tunnels, but the most dangerous of them is a Glowing One: radiation personified (right).
The initial tunnels in this area re-convene at the bottom, so the right side should be mentioned really quick. Honestly, it is the way to go to avoid the harder fights to the left; it just has various Ghouls spread out but nothing as bad as a Glowing One. As you explore the right hallway you’ll find some stairs leading up to a locked door with an [Advanced] terminal. If you’ve been investing into Hacking, it will pay off here. You can hack the terminal and enter the room here to find some note-able items.
By the corpse here is the “Mass Pike Tunnel Password” Holotape (which opens a terminal coming up) and the “Det. Perry’s Holotape” which you can listen to. There is also a copy of Taboo Tattoos to the right of the corpse as well, near the wealth of vodka. Someone was obviously smuggling! There are more various goods in this room, so be sure to explore a bit.
You can find a Chem Station in the corner, near a terminal that you can open with the password you picked up. It is interesting to note that you do not need to use this terminal: taking the path through the broken wall in the room leads to the oil-filled tunnel you need to go down. Note that you will likely fight a Molerat when you go past the door, but it is easily killed. Further up is a room with a Glowing Radroach in it (easy to kill) but more importantly a ![]() Fusion Core! You can keep going down this path to reach a door leading out to the “Commonwealth”. Go ahead and open it up to discover (and enter) the “
Fusion Core! You can keep going down this path to reach a door leading out to the “Commonwealth”. Go ahead and open it up to discover (and enter) the “![]() Boston Police Rationing Site”.
Boston Police Rationing Site”.
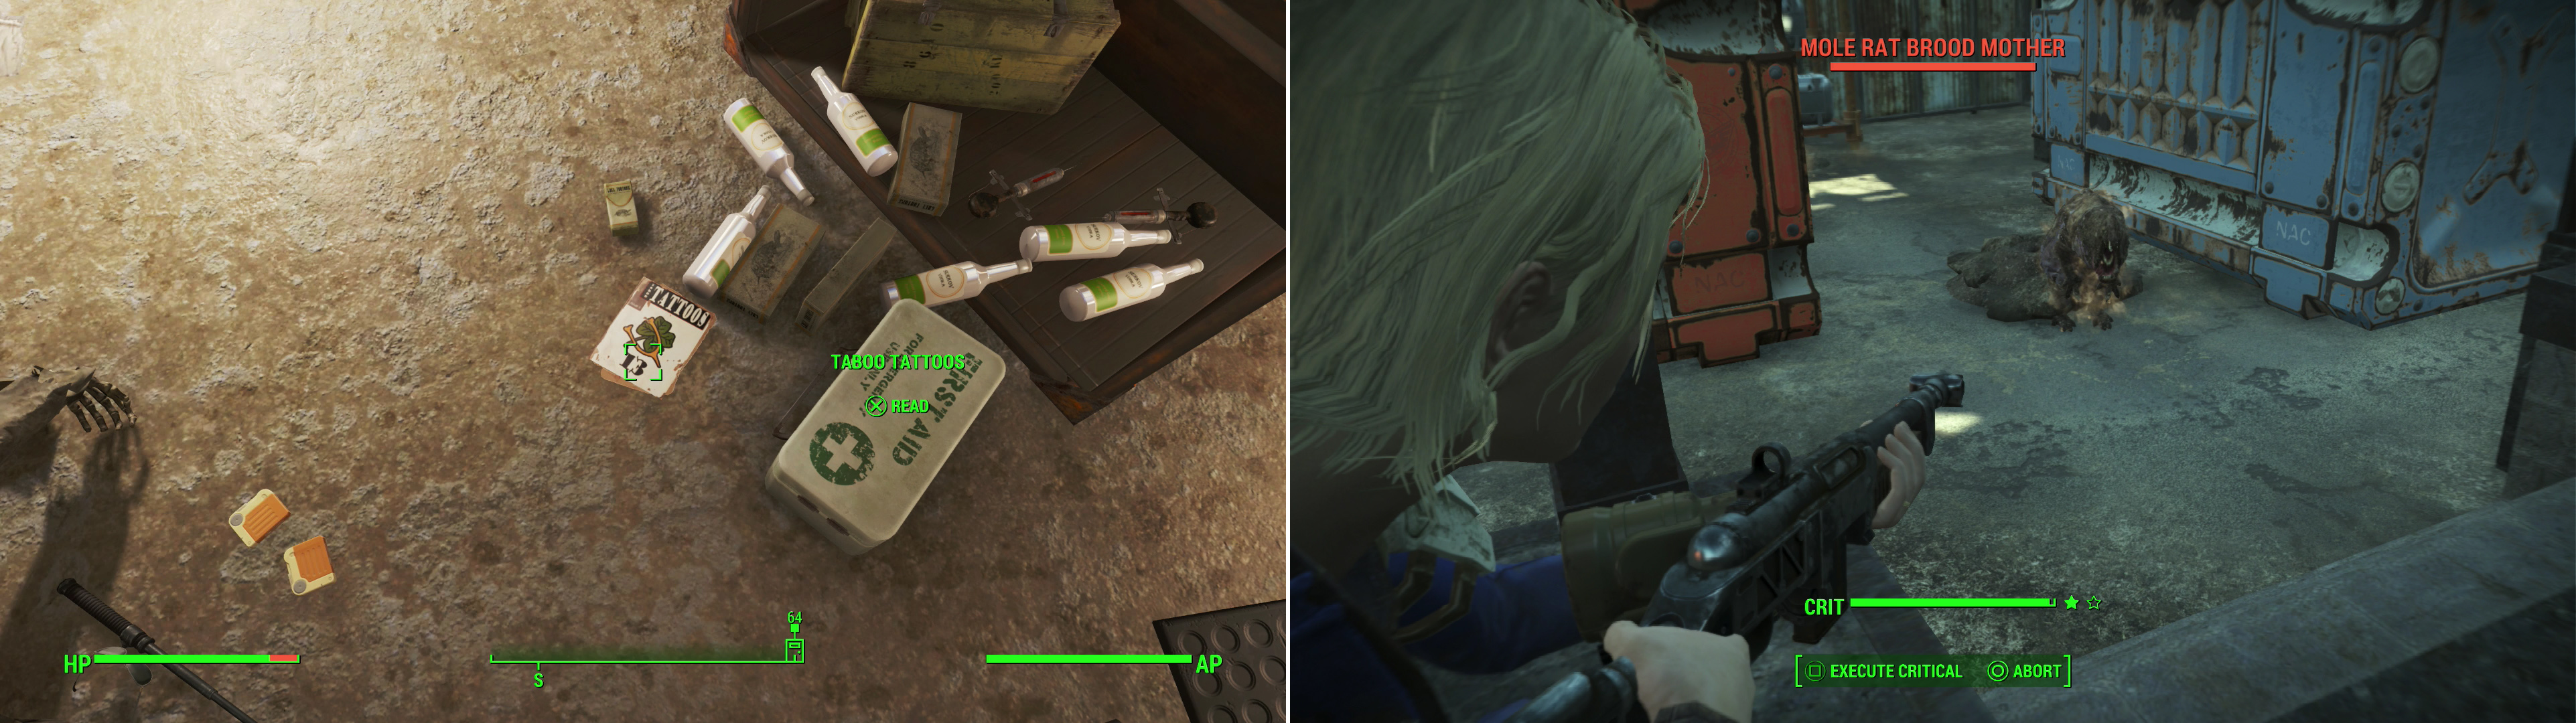
In the tunnels you can find a copy of Taboo Tattoos (left). Surface at the Boston Police Rationing Site and take care of the Mole Rat infestation here (right).
Boston Police Rationing Site
Inside are three Molerats, but if you can you can sneak to the Army Terminal to the east (which is unlocked) and activate the Protectron unit inside, you can get some extra help fighting the pests. Raid the rest of this warehouse and unlatch the door nearby. There is a button on the ground floor that opens up the warehouse as well, which you may as well push for easy access. Inside the warehouse note that you can go up to the upper floor to find a locked trunk, but it has an [Expert] lock, so you may very well need to come back to this one. If you want to explore the grounds outside… well, they’re not terribly interesting. If you head west from the building where you surfaced you can find a metal shack past a yellow construction vehicle. Inside is a Police Terminal from which you can recover “Det. McDonnell’s Holotape” . There’s also a First Aid Box on the wall nearby and some Frag Grenades in a wooden crate under one of the desks. Anywho, for once in this guide, let’s try to stay somewhat on track and return to the Mass Pike Tunnel. Plenty of time to explore the areas around Diamond City after you reach Diamond City.
Mass Pike Tunnel West (cont.)
Head back to where the tunnels meet up and continue east. Both tunnels will eventually start sloping back up, and when they do you really want to take the right side. Beware of ![]() Fragmentation Mines laying around so sneak up on them and disarm them. The left side of this tunnel leads to a small Raider group, but they have a Machine Gun nest which is dangerous. Be sure you disarm all the mines before you engage them (use VATS to make sure). If you can, Sneak Attack one of the Raiders from range, taking him out. A well-placed grenade is helpful as well. If all else fails, you can always stay on the right side and wait for your AP to fill, then pop over to the left, use VATS on the machine gun turret, and go back to the right side (safe, but cheap). Clean up the Raiders once the machine gun nest is down. They have a lot of goodies in their small camp as well, so be sure to look around.
Fragmentation Mines laying around so sneak up on them and disarm them. The left side of this tunnel leads to a small Raider group, but they have a Machine Gun nest which is dangerous. Be sure you disarm all the mines before you engage them (use VATS to make sure). If you can, Sneak Attack one of the Raiders from range, taking him out. A well-placed grenade is helpful as well. If all else fails, you can always stay on the right side and wait for your AP to fill, then pop over to the left, use VATS on the machine gun turret, and go back to the right side (safe, but cheap). Clean up the Raiders once the machine gun nest is down. They have a lot of goodies in their small camp as well, so be sure to look around.
Mass Pike Tunnel East
This path will lead you back outside but it drops you off in a Raider Camp (they are defending the tunnels from the east). There are 4+ Raiders here, but they are spread out. Ideally, you can kill the first two nearby the camp fire silently. Unarmed or Melee characters will have a good time here as they can wipe these Raiders out and still sneak up on the other ones. Once you kill the first two Raiders, you can head forward and get behind the outposts they have set up to the left and right and clear out the Raiders there, too.
From this point, Diamond City is relatively nearby. Climb the ladders the Raiders have constructed on the northern side of the tunnel they occupied, then, once out of the tunnel head west through some rubble between two buildings to find a road. To the north-west you’ll find a junkyard where you can kill some Mongrels and Radroaches, but they’re just a diversion. Continue west and you’ll find the gates to Diamond City.
Hardware Town
Skipping the tunnels? Or perhaps you did them and want to do this as well, since it is on the way? Either way, let’s cover this location on the way to Diamond City. North-east of the Mass Pike Tunnel West area is Diamond City, but before you get there you will likely discover Hardware Town, which is east of the Mass Pike Tunnel West map marker. When you get near this location, you will hear a woman crying out for help. Well, you are a good samaritan, right? Go ahead and enter the blue door to the left of the Power Armor Station.
Once you are inside, immediately sneak and creep forward. Once you get to the hole in the floor, stop and listen to the Raiders in the back - this is obviously a trap; just look at the hole to see all the bodies. What a shame! They will be avenged! The Wooden Crate by the hole had all of their stuff, so pick what you want. You can actually wait before continuing and the Raiders will off one of their own for worrying too much. Hilarious! After they thin their numbers for you, go ahead and head down the hole.
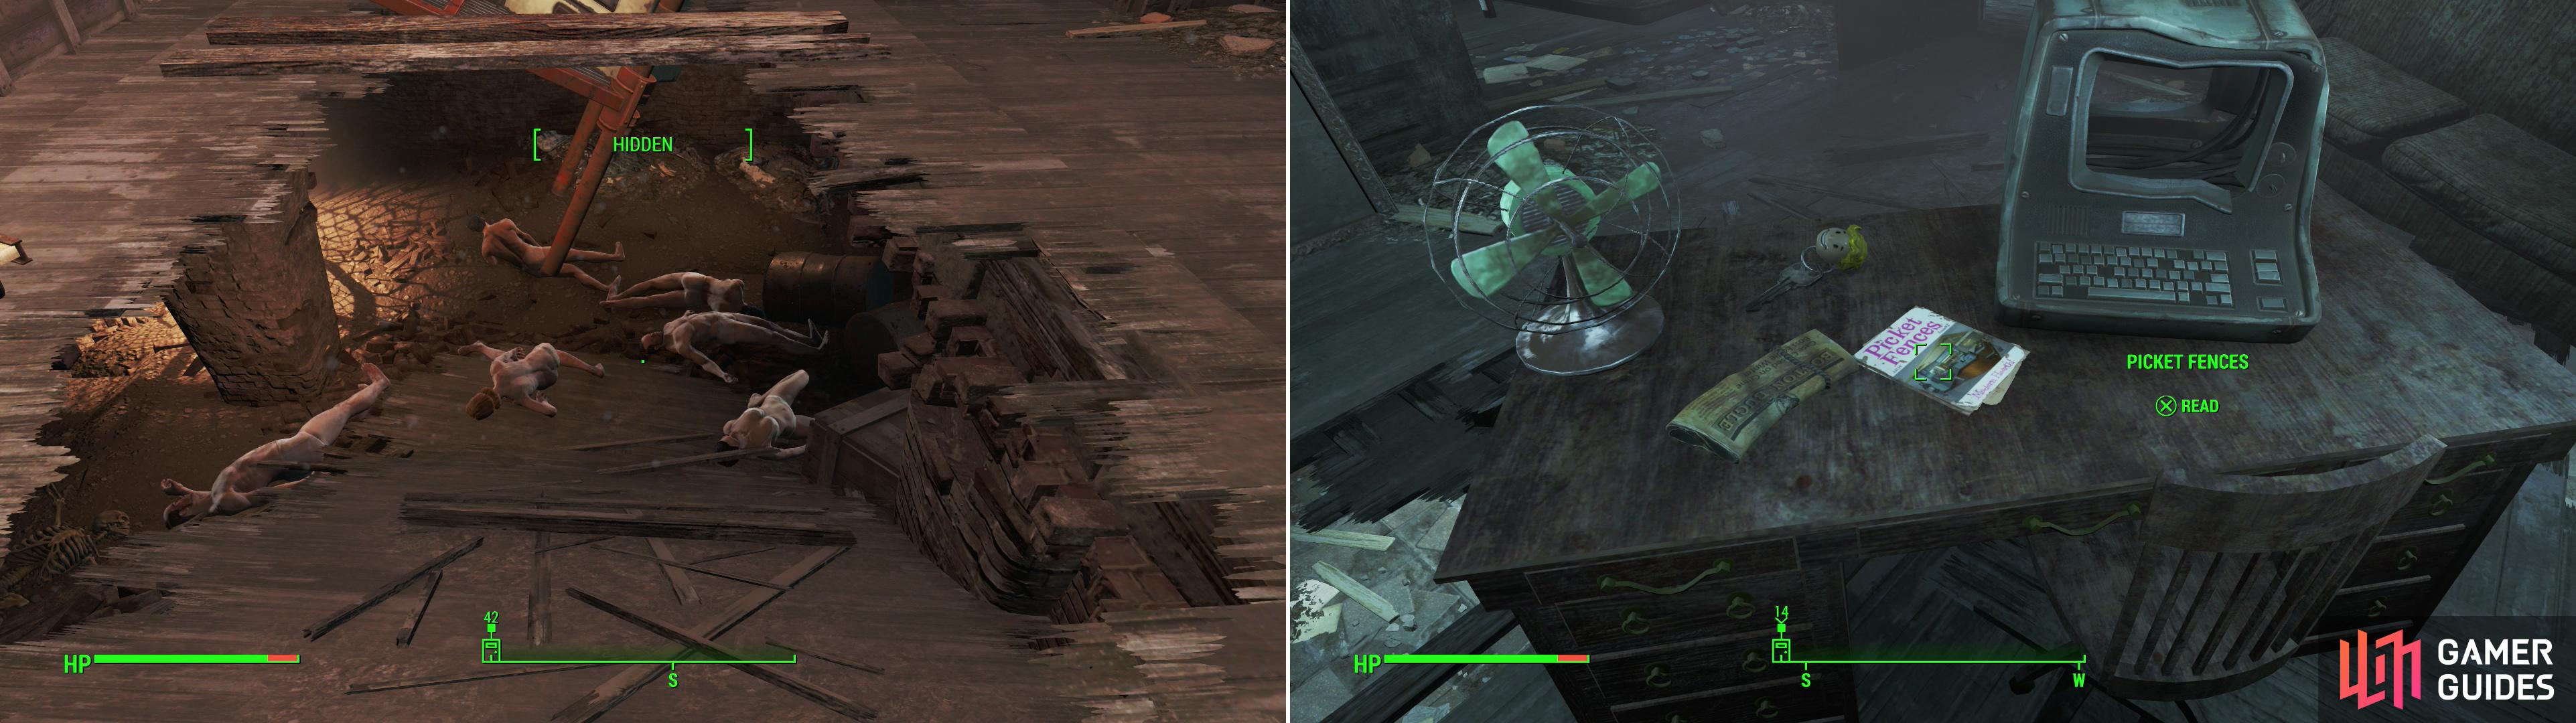
All those dead bodies… this place is probably legit, right? (left) Fight your way through the Raiders to find a copy of Picket Fences (right).
This hole leads down through the basement where you’ll come out through a destroyed wall. Once you’re through the wall, turn south and you’ll find a Toolbox [Novice] behind some stairs. Take these stairs up as well and work your way around past the crafting stations you find and you’ll be behind the Raiders who are waiting to ambush you. There are three Raiders here: two normal Raiders and a Raider named Demo. He is slightly higher level, so sneak attack him first if you can and mop up the other Raiders afterward.
Once they are dead, loot the area (lots of ammo and items - in particular get the Bobby Pin Stash from the bathroom) and head up the stairs. You’ll note there’s a path to the right here going into the shelving that you can use to find chems and a Caps Stash. Head upstairs next and examine all of the rooms up here. You’ll find their sleeping quarters with various goodies (namely alcohol) and the middle room which has the Picket Fences magazine, which lets you build a “high-tech light” at your settlements. There is also a “Hardware Town Storage Key” here you should pick up. This unlocks the storage room nearby [Advanced] that you can loot for several goodies. There is a [Master] safe here as well, which you likely can’t open so you’ll have to come back for that!
The rest of this place is cleared, so check it out to your heart’s content and use the crafting facilities if you wish. Once you are ready, exit to “The Fens” and continue on to Diamond City, which is still to the north-east. There shouldn’t be any problem getting there; just follow the signs, guards and friendly turrets.
Diamond City
Here at last!
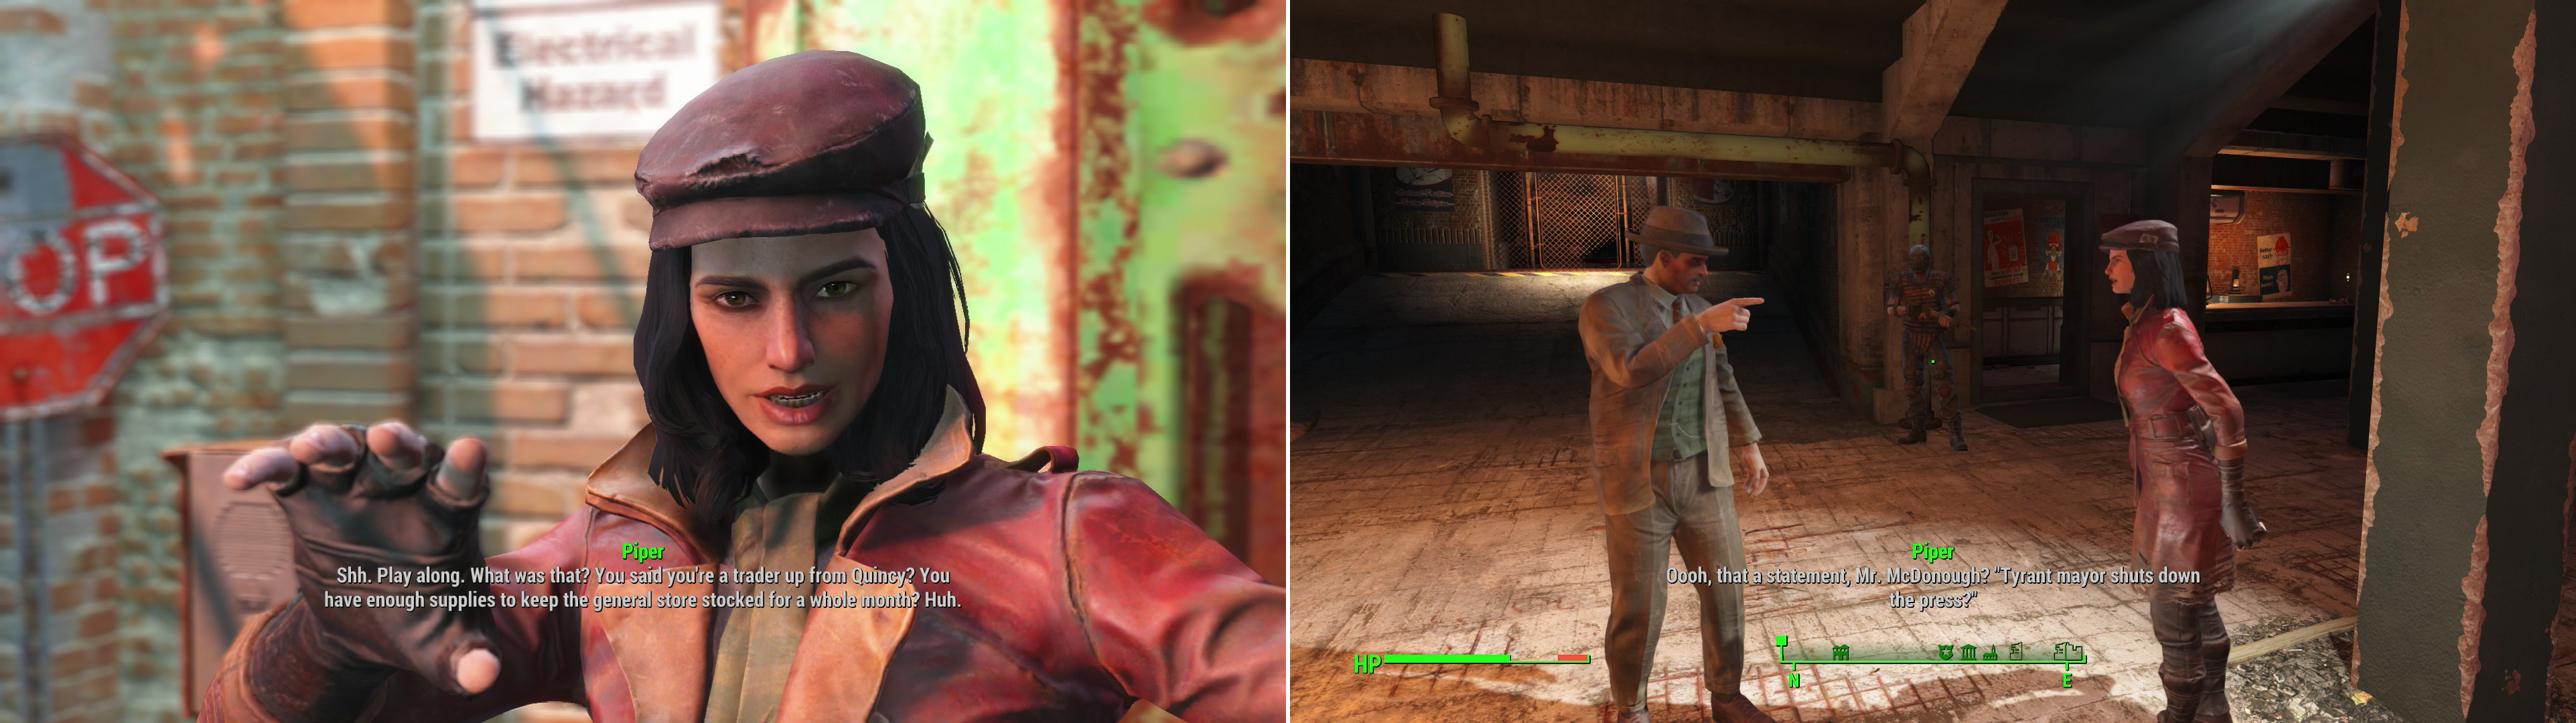
You are greeted with an argument right at the gate: a woman named Piper is trying to convince the guard to let her in which he isn’t doing. It seems she has pissed off the mayor. On your approach however, she will rope you into the argument, claiming you are a trader and the gate needs opening. Play along and Danny will end up opening the gate. Be sure to save at this point and equip your ![]() Charisma gear as there are some speech checks coming up!
Charisma gear as there are some speech checks coming up!
Outside of Diamond City you’ll find Piper, a colorful character who opportunistcally uses you to get back home (left). Shortly thereafter you’ll witness her and the mayor express… a difference in opinion on free speech (right).
Well then, go ahead and head past the gate. The mayor will be here to greet Piper and they’ll end up arguing. Reply however you wish and ask about your son as the mayor at least comes off as cordial. The mayor can’t seem to spare anyone to help and brushes off your problem by saying “someone” can help. He does have a speech check here though, so pick “Who can help?” once it is available. It is moderately hard to pass, but passable (you can try reloading and stacking more Charisma if you fail).
If you do happen to pass the speech check, you’ll learn of “![]() Nick Valentine” and will be directed to go get his help. Either way, you are free to enter the city after the talk is done. Piper will comment on how you should come check her out, giving you the quest “
Nick Valentine” and will be directed to go get his help. Either way, you are free to enter the city after the talk is done. Piper will comment on how you should come check her out, giving you the quest “![]() Story of the Century” . Before you go though, talk to the head guard, Danny Sullivan, for another speech check. You can pick either option for some good XP, and then feel free to head inside to Diamond City proper.
Story of the Century” . Before you go though, talk to the head guard, Danny Sullivan, for another speech check. You can pick either option for some good XP, and then feel free to head inside to Diamond City proper.
Ellie will tell you that the good detective - whose services you may need to find Shaun - has himself gone missing (left). Before you leave the detective’s office, be sure to grab the issue of RobCo Fun off the desk (right).
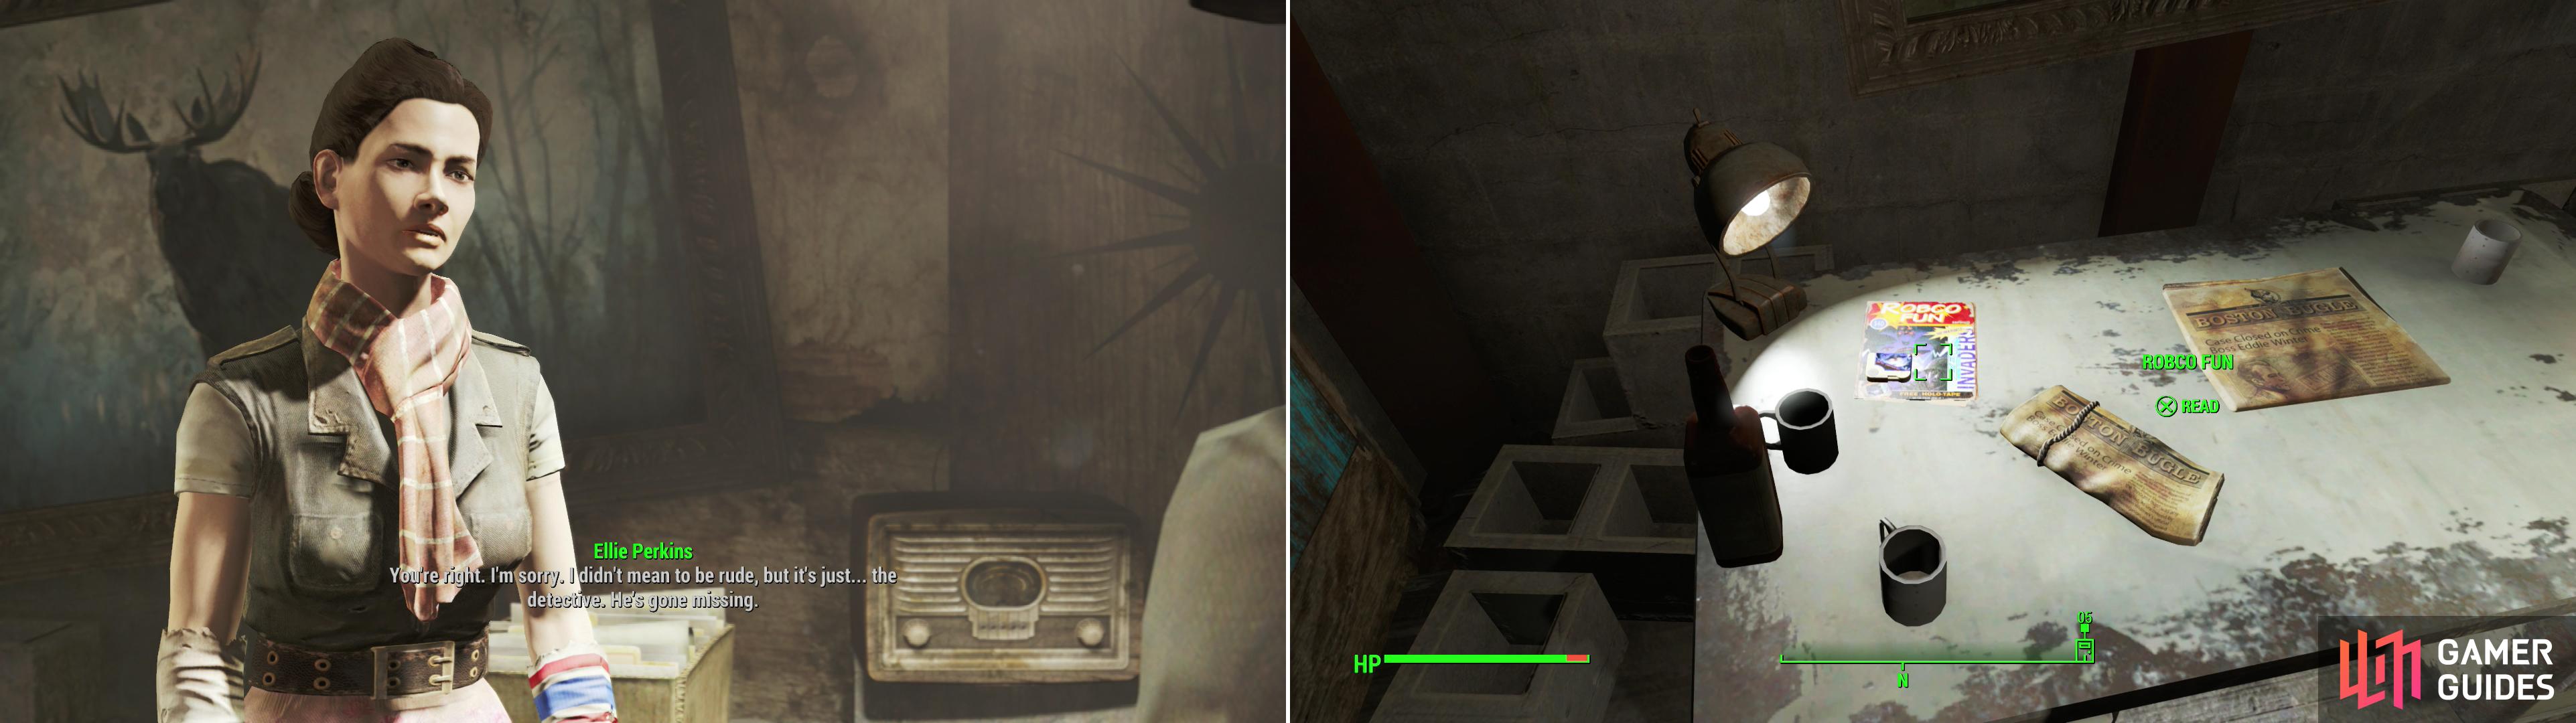
There is a ton of stuff to do here as you may imagine, but let’s focus on finishing up the quest “![]() Jewel of the Commonwealth” for now. Nick’s office is located in the middle of the city; just follow the pointer and you can’t miss it. Inside is a woman named Ellie Perkins who is talking to herself. Save and interact with her as there are several speech checks here. Start off by telling her “It’s Important” to pass that speech check (again, keep your Charisma gear on!) and then follow up to learn Nick is… missing. You can actually ask for money afterwards, believe it or not, to get paid for finding Nick. Ask for as much as you can for a slight incentive, and keep asking until you are told no. Promise to find Nick afterward and you’ll officially be done with this quest! Before you leave the detective agency, however, search a desk in the north-western corner of the office to find a copy of RobCo Fun lying in plain sight. Whew, that was a long one… mostly due to the trek to Diamond City. But now you have your next official story-line quest: “
Jewel of the Commonwealth” for now. Nick’s office is located in the middle of the city; just follow the pointer and you can’t miss it. Inside is a woman named Ellie Perkins who is talking to herself. Save and interact with her as there are several speech checks here. Start off by telling her “It’s Important” to pass that speech check (again, keep your Charisma gear on!) and then follow up to learn Nick is… missing. You can actually ask for money afterwards, believe it or not, to get paid for finding Nick. Ask for as much as you can for a slight incentive, and keep asking until you are told no. Promise to find Nick afterward and you’ll officially be done with this quest! Before you leave the detective agency, however, search a desk in the north-western corner of the office to find a copy of RobCo Fun lying in plain sight. Whew, that was a long one… mostly due to the trek to Diamond City. But now you have your next official story-line quest: “![]() Unlikely Valentine” .
Unlikely Valentine” .
| Objective | Reward |
|---|---|
| For searching for help in |
173 XP |
No Comments