
Wayne Delancy
Time to appease old man Ken by playing the super hero. It might be a welcome change of pace. Tune your Pip-Boy radio to the “Silver Shroud Radio” station and you’ll get your first target, a no-good murderer named Wayne Delancy. Wearing the clothing and using the ![]() Silver Submachine Gun are optional, but why not play the part? Head into the alley between the Memory Den and
Silver Submachine Gun are optional, but why not play the part? Head into the alley between the Memory Den and ![]() Hotel Rexford to find your prey. Like a typical murderer, Wayne Delancy views you as another mark. Take him down then leave your calling card on the body (go to loot the corpse, then hit the button prompt to leave the card).
Hotel Rexford to find your prey. Like a typical murderer, Wayne Delancy views you as another mark. Take him down then leave your calling card on the body (go to loot the corpse, then hit the button prompt to leave the card).

Kent is stuck in the past, being particularly enarmored of the Silver Shroud character (left). Help him bring the Silver Shroud back to life, then fill the role of the super hero, stalking the streets for ne’er-do-wells (right).
AJ
Once done, listen to another broadcast to get your next target; a chem-dealer named AJ, who lurks in the alley leading to Bobbi’s lair. He’ll offer you 50 Caps to just go away, and you can talk up his price… but the Silver Shroud will not be bribed! Continue to play the part and AJ and his goons will attack. AJ might not be well armed, but his goons may be, so be careful, especially if you’re wearing the sub-par ![]() Silver Shroud Armor. Loot them when they’re dead, drop the calling card, then get your next target.
Silver Shroud Armor. Loot them when they’re dead, drop the calling card, then get your next target.
Kendra
Head into ![]() The Third Rail, where you’ll need to locate an assassin named Kendra. Like any good bartender, Whitechapel Charlie has the scoop, but you’ll need to pass an easy speech check, bribe him with 60 Caps, or keep up the Silver Shroud act. After you get the location, leave
The Third Rail, where you’ll need to locate an assassin named Kendra. Like any good bartender, Whitechapel Charlie has the scoop, but you’ll need to pass an easy speech check, bribe him with 60 Caps, or keep up the Silver Shroud act. After you get the location, leave ![]() Goodneighbor and head south to return to the Water Street Apartments, previously abandoned apartments that now house Kendra and her Raider pals. You can enter from the nearby street or the highway (in the latter case you’ll need to cross a makeshift bridge to an upper story and ride and elevator down. Kill the Raiders on the bottom floor and head west through a blue door and up some stairs to find a turret. Take it out, then head into a room where Kendra lurks. Be wary, however, she’s quite dangerous, being leveled above what you are (unless you’re an exceptionally high-level; she had a skull when encountered by a level 46 character). Talk to her and she’ll insinuate that you might not be the hunter this time around, but the hunted. Kill her and loot her body for the note “Contract: Shelly Tiller”, then grab the chems in the room. Be sure to loot a cardboard box for a variety of mines before leaving.
Goodneighbor and head south to return to the Water Street Apartments, previously abandoned apartments that now house Kendra and her Raider pals. You can enter from the nearby street or the highway (in the latter case you’ll need to cross a makeshift bridge to an upper story and ride and elevator down. Kill the Raiders on the bottom floor and head west through a blue door and up some stairs to find a turret. Take it out, then head into a room where Kendra lurks. Be wary, however, she’s quite dangerous, being leveled above what you are (unless you’re an exceptionally high-level; she had a skull when encountered by a level 46 character). Talk to her and she’ll insinuate that you might not be the hunter this time around, but the hunted. Kill her and loot her body for the note “Contract: Shelly Tiller”, then grab the chems in the room. Be sure to loot a cardboard box for a variety of mines before leaving.
Now, you can ignore this Shelly Tiller character, but… well, you did kill her assassin, and it would be a shame if she went unmurdered. Somebody is counting on her demise, after all! This involves heading into the previously unexplored north-east, however, but like with most areas, you only needed a decent excuse to make your way there. There are a few quests to pick up along the way, new areas to explore, perhaps a settlement to secure. In particular, the objective also possibly ties into quests at the ![]() Greentop Nursery settlement, and
Greentop Nursery settlement, and ![]() Quartermastery, so for various reasons it’s worth going through with this exploration now. If you’ve been advancing MacCready’s companion questline, the
Quartermastery, so for various reasons it’s worth going through with this exploration now. If you’ve been advancing MacCready’s companion questline, the ![]() Med-Tek Research building is up here, too. Lots of birds being taken down on this diversion.
Med-Tek Research building is up here, too. Lots of birds being taken down on this diversion.
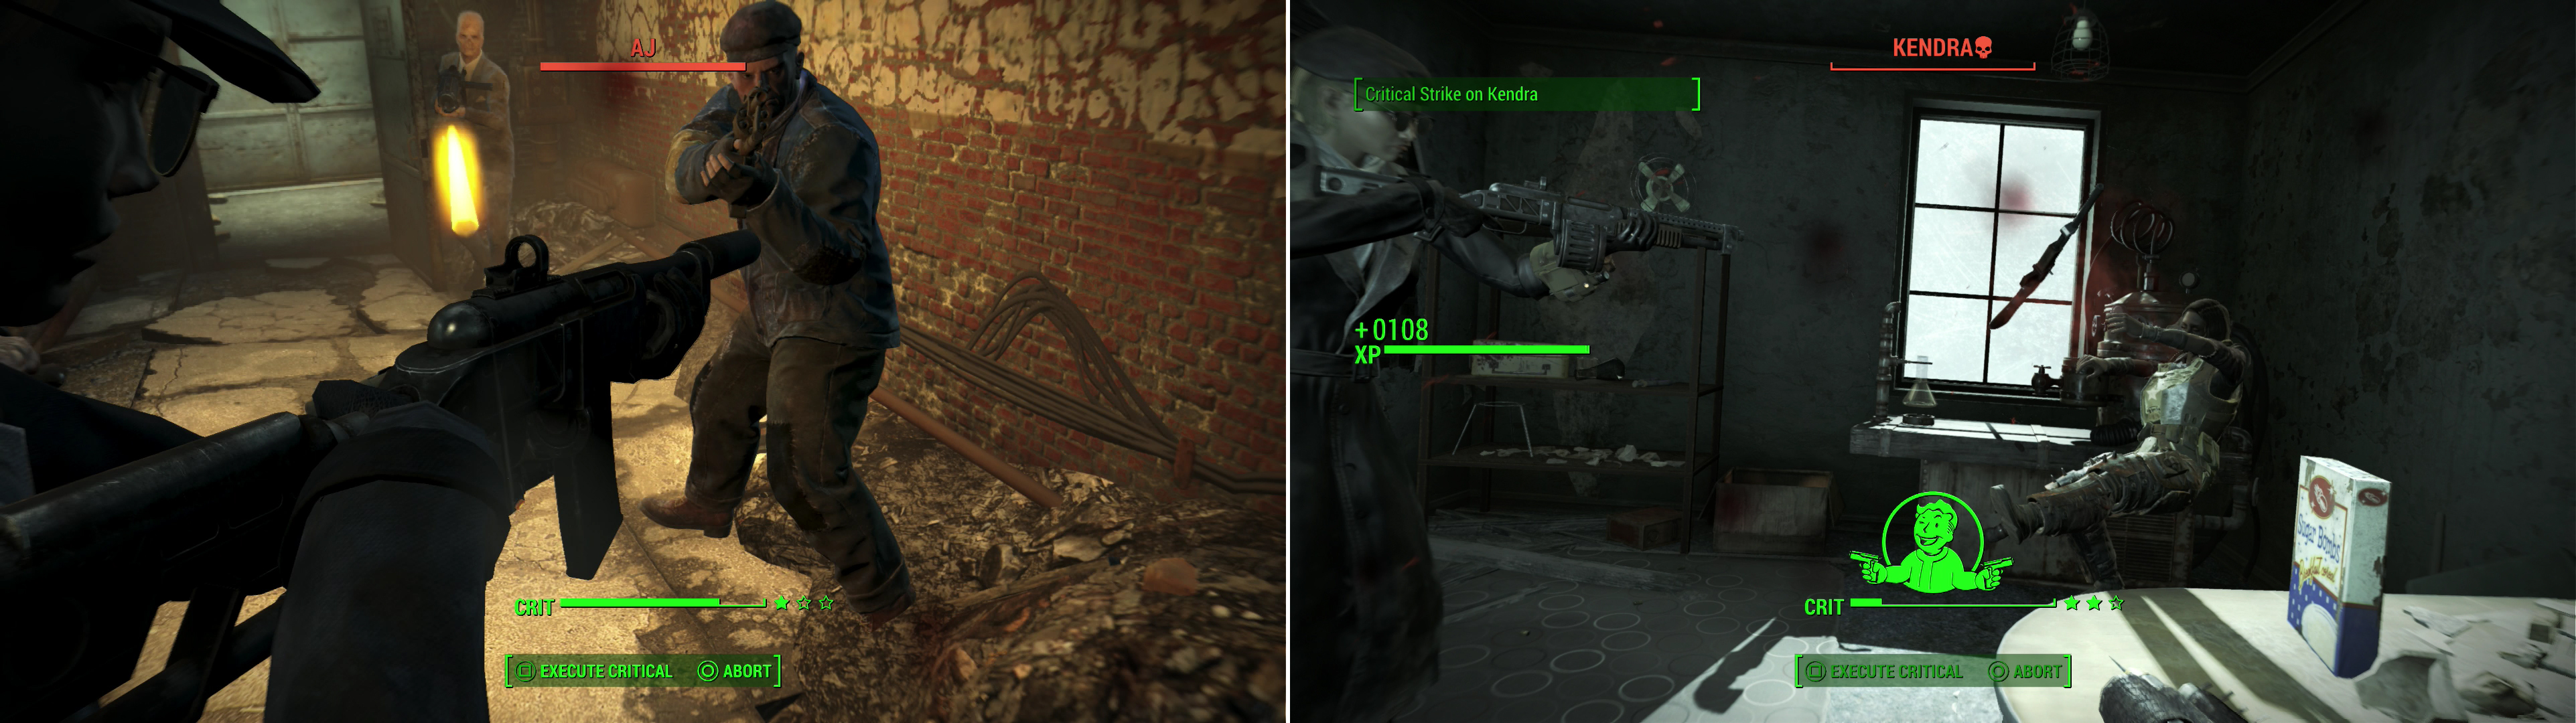
Your next two targets as the Silver Shroud are the dealer AJ (left) and the assassing Kendra (right).
Covenant
To start things out, fast-travel back to a familiar old map marker everybody should have by now; the ![]() Mystic Pines building, which is near the river on the eastern end of
Mystic Pines building, which is near the river on the eastern end of ![]() Lexington. From here follow a road north past an old military checkpoint (and an APC on the side of the road). Make your way east past the
Lexington. From here follow a road north past an old military checkpoint (and an APC on the side of the road). Make your way east past the ![]() Rotten Landfill and continue following the road as it turns south-east, moving around a lake. Eventually you should reach a three-way intersection, at which point turn south to reach the settlement of
Rotten Landfill and continue following the road as it turns south-east, moving around a lake. Eventually you should reach a three-way intersection, at which point turn south to reach the settlement of ![]() Covenant.
Covenant.
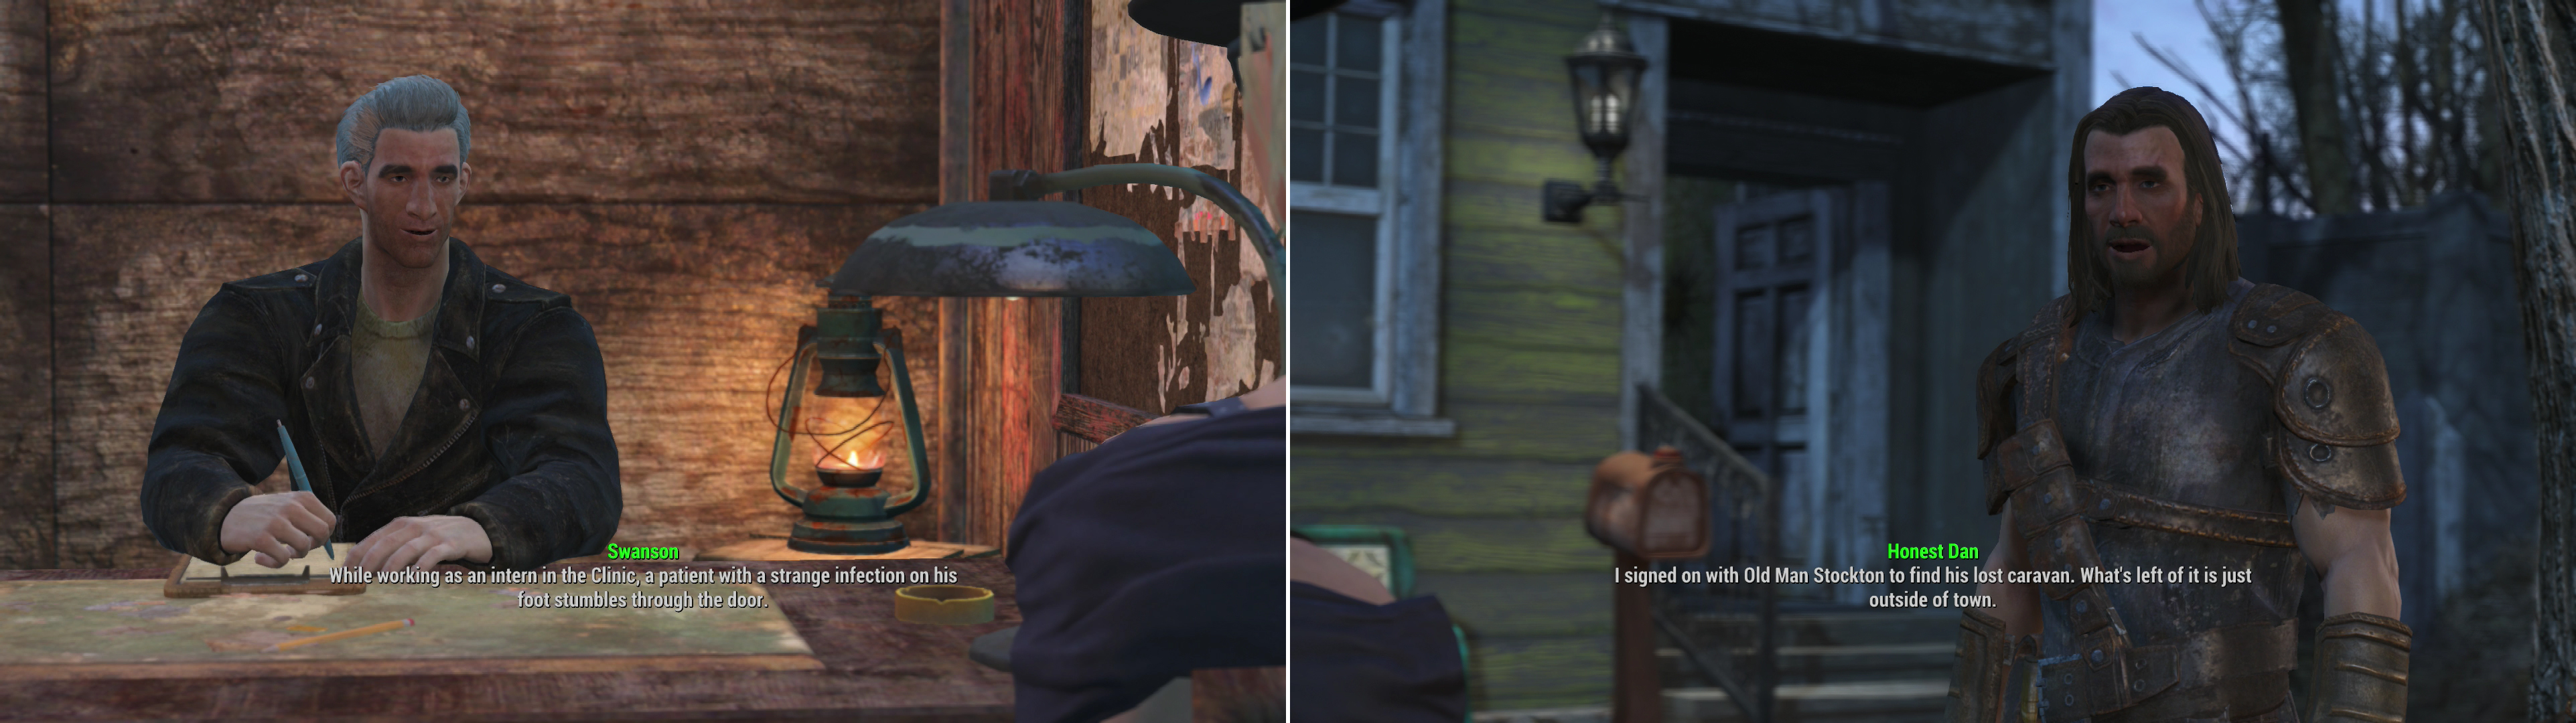
Talk to Swanson outside the city, who will tell you about the town’s attractions before revealing that you need to take a SAFE test before you can come in. Pass a pair of moderate speech checks and he’ll reveal who - or what - the SAFE test is meant to keep out of Covenant; Synths. Agree to take the test, sit down, and take a test that should seem oddly familiar… Answer however you wish you’ll be allowed inside.
Enter the surprisingly well-maintained settlement and meet up with the locals. Most of them don’t have much of interest to say, but Doctor Patricia will provide typical medical services, Penny Fitzgerald supposedly sells you stuff, a Mr. Handy named Deezer will give you ![]() Deezer’s Lemonade.
Deezer’s Lemonade.
Take the SAFE test to gain entry to Covenant (left). Inside you’ll find Honest Dan, who is looking for clues as to what happened to Old Man Stockton’s caravan (right).
Human Error
Enough of this silly niceness. Find an obvious outsider named Honest Dan, who is looking for a missing caravan that passed through here. He’ll make you an offer; help him find the caravan and he’ll split the reward. Pass a speech check to get him to throw in 50 Caps up front, then agree to help him look. You know nothing that seems friendly and peaceful in the Commonwealth, and this deal starts the quest “![]() Human Error”.
Human Error”.
Go to leave the town and head north-east from Covenant to find the sacked Caravan. Search a Chem Cooler to find some of Deezer’s Lemonade, which of course means the caravan was, in fact, in Covenant. Return to the town and head into Penny’s shop, where you can search the trash can to find a “Covenant Reminder” letter. On a table nearby you can also score some Covenant House Keys. Next, talk to Penny Fitzgerald and gossip about Honest Dan. Passing a speech check will get her to slip up and give you the information you need.
If speech isn’t your strong suit, head into the white house near the doors to town [Advanced], to the north, inside of which you can find a the note “Jacob’s Password” on a table near the bed. Grab it and head into another white house along the eastern part of town, which may be locked [Master]. Never fear, however, as this door can by opened with the Covenant House Keys. Inside you can search a Radio, which you can “fiddle with” and, with a ![]() Luck score of nine or higher you can get the location of the
Luck score of nine or higher you can get the location of the ![]() Compound you’re looking for. Alternatively, search an Office Terminal [Master], which can be bypassed with Jacob’s Password. On this terminal you’ll find the entry “[> Fishermen report (Draft)]”, which will point out the Compound.
Compound you’re looking for. Alternatively, search an Office Terminal [Master], which can be bypassed with Jacob’s Password. On this terminal you’ll find the entry “[> Fishermen report (Draft)]”, which will point out the Compound.
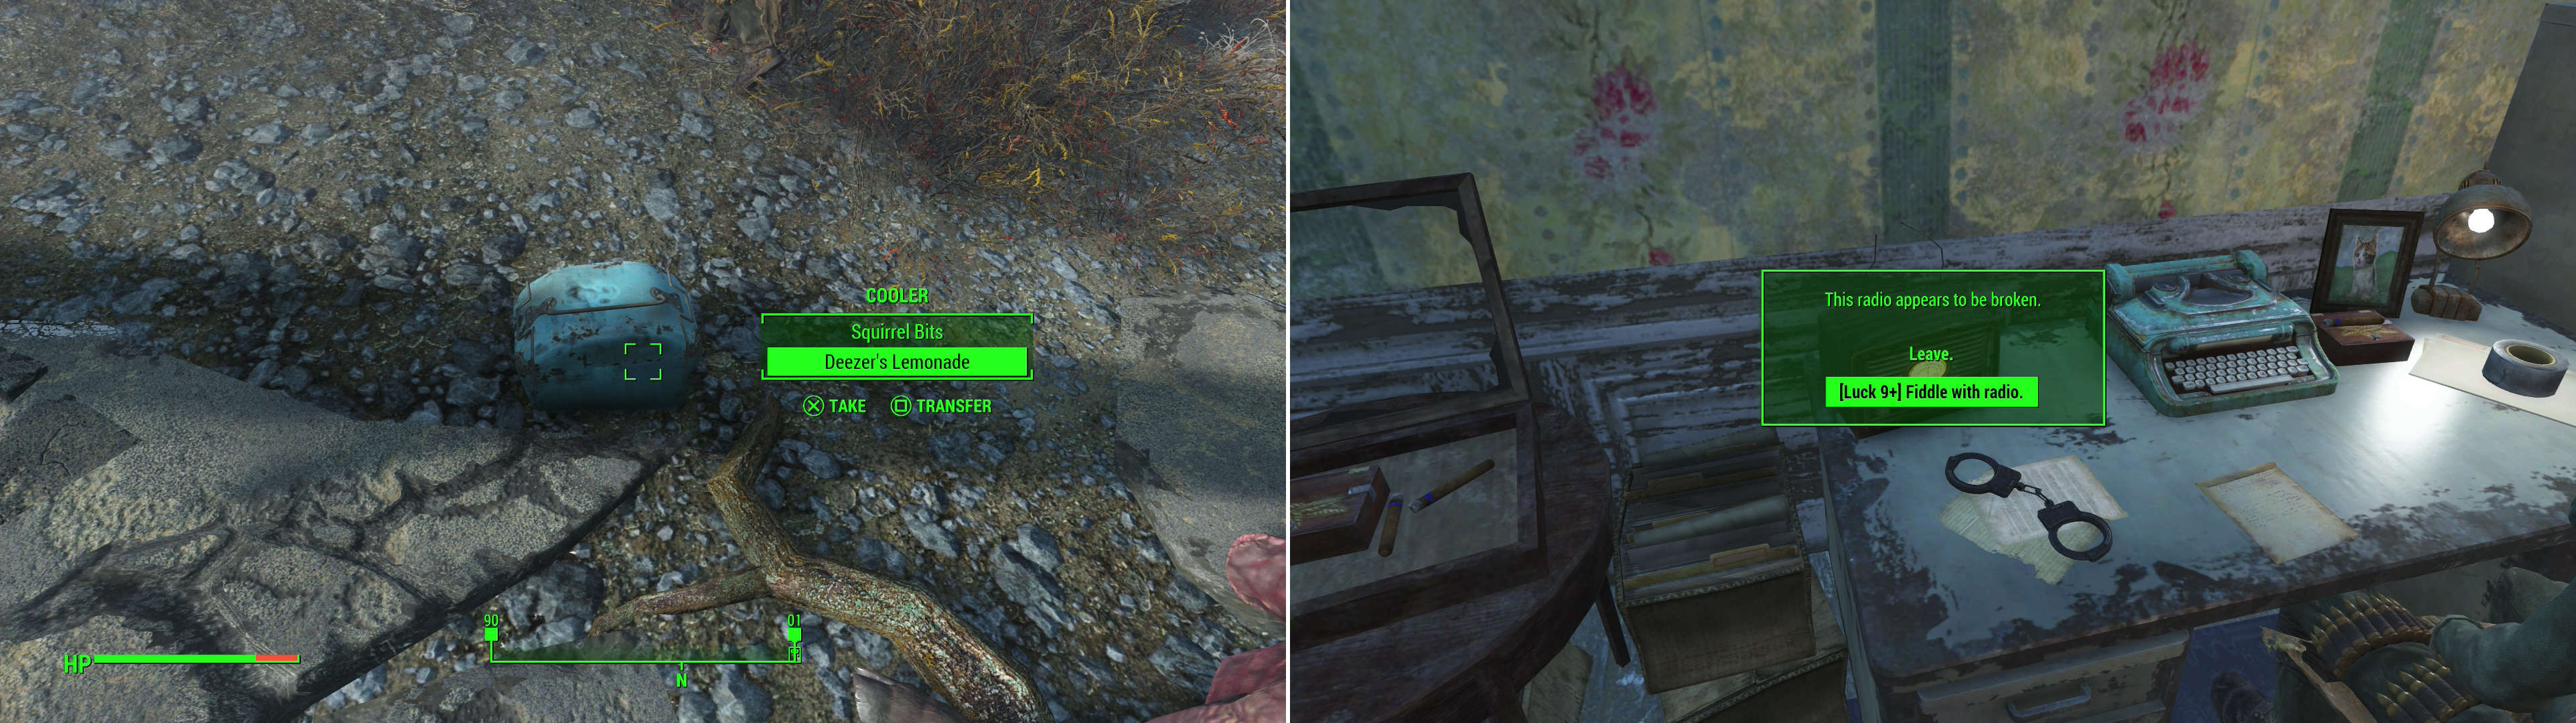
Search the remains of the caravan to find Deezer’s Lemonade, something which decisively proves the caravan stopped off at Covenant (left). You can find plenty of clues in Covenant which will point you towards The Compound (right).
However you learn the location of the Compound, you now have two choices; tell Honest Dan, or head their on your own. If you do the former, Dan will elect to meet you there. Go to leave Covenant and, as you do, a rotund older man named Jacob Orden will talk to you, accuse you of snooping, and lightly threaten you if you don’t keep your nose clean. After this he’ll play an incriminating hypothetical with you before offering 100 Caps for you to drop the investigation. Pass a moderate speech check “Look for compromise” and he’ll tell you where the “Compound” is.
The Compound
Fast-travel to Mystic Pines, then head east to the lake to find some drainage tunnels. Take a swim and head up the middle pipe to find a Sewer. You’ll catch some RADS, but it’s inevitable at this point. Once in the sewer, make your way through the pipes to reach a chamber, where you’ll be confronted by a guard named Manny. If you got Jacob Orden to recommend you, you’ll be able to choose between three speech options (one of each difficulty). If not, you’ll have to pass a hard speech check to avoid violence… assuming you care to avoid a fight, anyways.
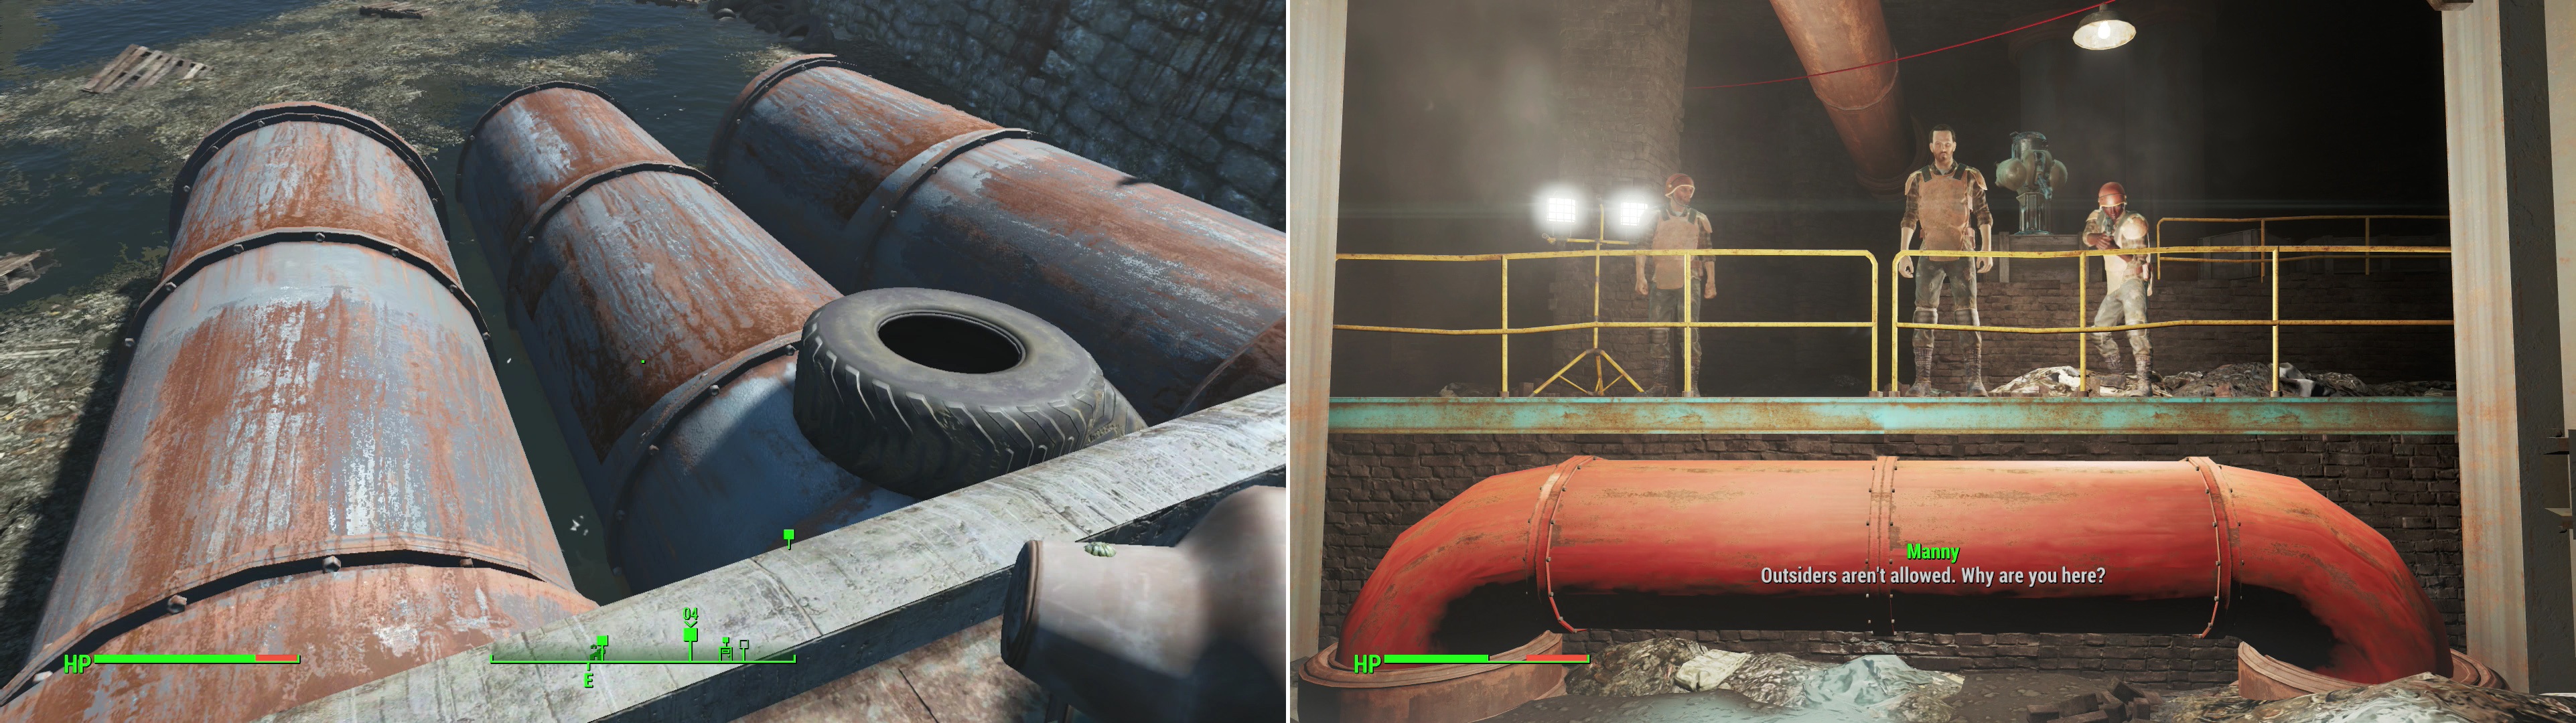
Find several pipes in the river near Mystic Pines, the middle one of which will lead to The Compound (left). Inside, you’ll be stopped by Manny, whom you’ll need to persuade to avoid violence (right).
If you opt to avoid a fight through diplomacy Manny will lead you through the area, taking his sweet ass time, but you’ll get where you need to go with no fuss. On the other hand, if you have to fight, gun down the guards here (and their turret!) then loot Manny for a Compound Key, which will allow you to bypass the locked door to the west. Follow the ramp down until you can turn north through another locked door to the north which can be opened with the Compound Key. Kill the guard inside and the scientist named Blythe, then grab the “Subject 12 Baseline” holotape off the desk. Whatever experiments are going on here aren’t friendly. Loot a Duffle Bag and an Ammo Box, then leave the room and continue down the ramp outside, turn north down another ramp, then head up some stairs to reach a larger chamber full of metal walkways.
Your goal here is to get to the western side of this room, which, if you’re getting an escort from Manny is achieved when he calls another guard to extend a bridge. For those who are fighting their way through the Compound, however, you’ll have to kill everybody in sight. Loot a ![]() Fusion Core out of a machine just west of the stairs leading up to these metal walkways, then continue up some stairs to the north, first some metal ones, then stone. Go through a red door [Expert], then through a blue door, beyond which lies another holding cell… or rather, torture chamber. Loot what you want out of here, but be sure to grab the “Subject 12 Testing” holotape.
Fusion Core out of a machine just west of the stairs leading up to these metal walkways, then continue up some stairs to the north, first some metal ones, then stone. Go through a red door [Expert], then through a blue door, beyond which lies another holding cell… or rather, torture chamber. Loot what you want out of here, but be sure to grab the “Subject 12 Testing” holotape.
Leave the room and continue down a hallway to the west until you reach a small chamber with another guard and a turret. Dust them, then continue west into another room with a locked Toolbox [Novice], the “Subject 12 Debrief” ![]() Holotape and an “Office Terminal”, which just contains some chatter about refining test results. Return to the previous chamber and unlatch a door to the south, beyond which you’ll find yourself on the western side of the bridge room. Extend the bridge to shorten your trip back, then continue south until you reach a dead-end, near which you’ll find a gate door, beyond which are some stairs. Take them down and continue south-west to find the chamber where the mastermind of this operation lurks… and where Amelia Stockton is being held captive.
Holotape and an “Office Terminal”, which just contains some chatter about refining test results. Return to the previous chamber and unlatch a door to the south, beyond which you’ll find yourself on the western side of the bridge room. Extend the bridge to shorten your trip back, then continue south until you reach a dead-end, near which you’ll find a gate door, beyond which are some stairs. Take them down and continue south-west to find the chamber where the mastermind of this operation lurks… and where Amelia Stockton is being held captive.
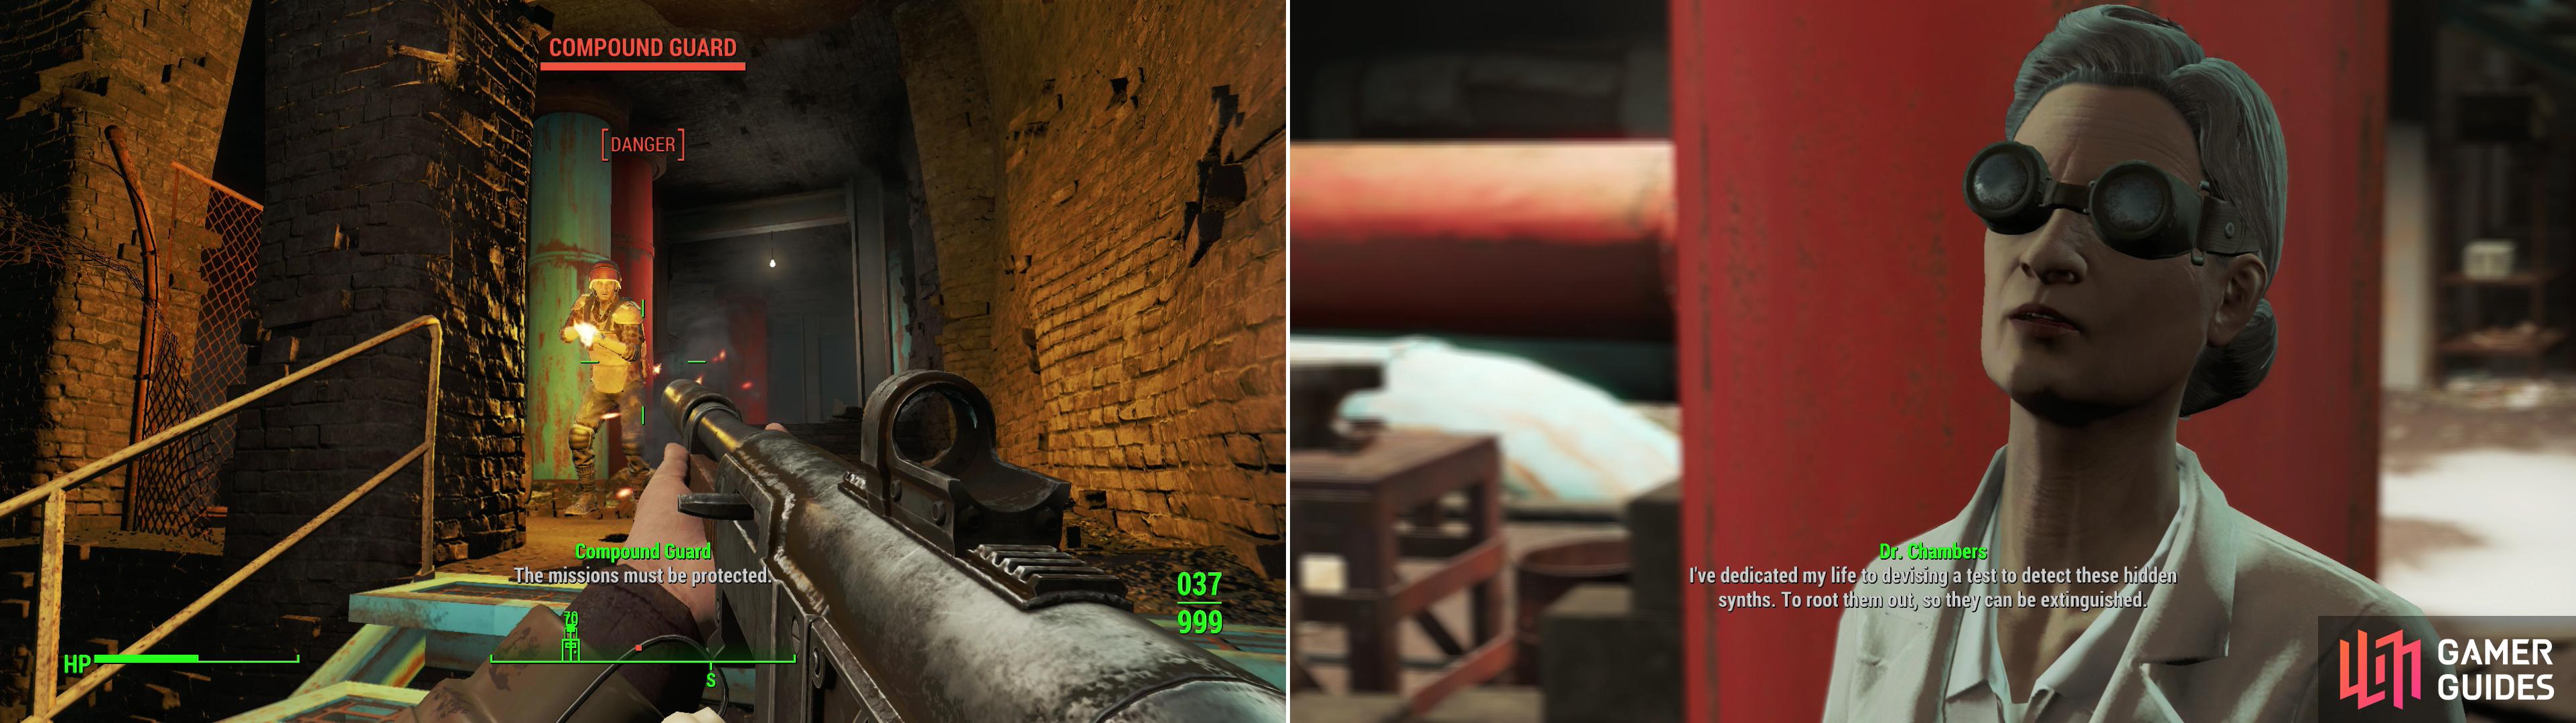
Fight your way through the Compound Guards (left)… or not. Either way, make your way through The Compound to find Dr. Chambers, who will tell you the purpose of Covenant (right).
If you were escorted by Manny, this is where he’ll stop, and either way - whether through violence or peace - you’ll get your meeting with Dr. Roslyn Chambers. Talk to her and she’ll explain herself and the actions of her Covenant; they want to eradicate Synths - all Synths - and are developing the SAFE test to root them out. As of now they have a whopping 20% chance to detect a Synth, but with further work, they hope to get their false flag rate down even lower. That’s an awful lot of corpses of innocent people left behind, at the best, not to mention the Synths who are being exterminated. You have two choices: side with her and let her see if Amelia Stockton is a Synth (there’s a 70% chance she is, according to Dr. Chambers!) or stand up to her. If you have Honest Dan with you, he obviously won’t approve of the former option, and will attack if you choose it. If you refuse and didn’t bring Honest Dan with you, you’ll have to fight Manny, Dr. Chambers, and eventually the rest of the Compound. If you did bring Honest Dan and refuse, Dr. Chambers will protest, but won’t stop you from recovering Amelia (open her cell [Master] by hacking a Terminal and selecting the option “[Unlock Cell 1]”. Let Dr. Chambers kill Amelia, then talk to her for your reward, or rescue Amelia and talk to Honest Dan. Either way, the reward is the same, but you can haggle more Caps out of Honest Dan. If you didn’t bring Honest Dan, you will need to head to ![]() Bunker Hill and talk to Amelia’s father to get your reward, which will be covered once you’re done in Goodneighbor. It’s worth pointing out that if you search Amelia body after Dr. Chambers kill her, you can confirm that she is, in fact, a Synth.
Bunker Hill and talk to Amelia’s father to get your reward, which will be covered once you’re done in Goodneighbor. It’s worth pointing out that if you search Amelia body after Dr. Chambers kill her, you can confirm that she is, in fact, a Synth.
| Objective | Reward |
|---|---|
| For resolving the Stockton abduction | 501 XP 300 - 540 Caps |
More interesting is the fate of Covenant. If you sided with Dr. Chambers, talk to Jacob Orden and he’ll decide to join with the Minutemen to help make the Commonwealth safer, giving you access to the Workshop at Covenant, which is now a brand spanking new - and fully functional - settlement. If you freed Amelia and hence aren’t on good terms with Covenant anymore, everybody will be hostile. Clear them out (save trusty old Deezer, of course) then activate the Workshop to make this settlement yours.
Taffington Boathouse
You just picked up one settlement… why not get another? Don’t worry, this one is nowhere near as involved. It’s pretty much a “go there and clear the critters out”. It may also serve as a quest location for another settlement, so you may just be killing two birds with one stone here. From Covenant head east to find the ![]() Taffington Boathouse, which is populated by Bloodbugs, both normal adult specimens and Hatchlings, about a half-dozen in all. They reside both in and around the house, but if you clear them out you’ll be able to activate the Workshop along the northern end of the house. First, however, be sure to disarm the Tension Trigger (and linked gun) atop the fridge. Once done head upstairs and loot the Steamer Trunk [Novice] and the Safe [Advanced] before searching the body of Mary Sutton, near a tub. On her you’ll find the “Margaret’s Note”. In a boat shed just north of the house [Novice] you’ll find two Laser Tripwires rigged to guns and loot a Duffle Bag. Lastly, head into a drainage ditch north of the house to find around a half-dozen more Bloodbugs, who guards the corpse of Margaret Sutton, who possesses “Russell’s Note”. The drainage pipe further north, which is mentioned in the letter, leads to
Taffington Boathouse, which is populated by Bloodbugs, both normal adult specimens and Hatchlings, about a half-dozen in all. They reside both in and around the house, but if you clear them out you’ll be able to activate the Workshop along the northern end of the house. First, however, be sure to disarm the Tension Trigger (and linked gun) atop the fridge. Once done head upstairs and loot the Steamer Trunk [Novice] and the Safe [Advanced] before searching the body of Mary Sutton, near a tub. On her you’ll find the “Margaret’s Note”. In a boat shed just north of the house [Novice] you’ll find two Laser Tripwires rigged to guns and loot a Duffle Bag. Lastly, head into a drainage ditch north of the house to find around a half-dozen more Bloodbugs, who guards the corpse of Margaret Sutton, who possesses “Russell’s Note”. The drainage pipe further north, which is mentioned in the letter, leads to ![]() Malden Drainage, but before you go bothering with that, you might as well build up a settlement here.
Malden Drainage, but before you go bothering with that, you might as well build up a settlement here.
Malden Drainage
This is short, simple, and lucrative little area. Kill the Bloodbugs lurking around in the main chamber, then examine the western wall (be wary of a Frag Mine!) to find a Terminal [Average] which will unlock a nearby door to a caged-off area, where you’ll find a Steamer Trunk. Once that’s looted make your way to the north-western corner of the chamber and follow some pipes to the east to reach a small, elevated chamber. In here you’ll find the body of Russell Sutton, who possesses the “Pledge Initiation Instructions”, which details the initiation rite of some chem-cult. Okay. Grab some chems off a metal shelf, disarm another Frag Mine, plunder a Trunk then loot a machine to obtain a Fusion Core. Not a bad little diversion.
No Comments