
Final Phase and The Altar
At the Final Phase, boldly make your way to the far north-east, where the Adventurer and the final teleporter are. Who knows how the Adventurer got here before you, but nevermind that. Do what must be done, then take a breath and jump into the teleporter.
You’ll arrive at The Altar. Head north to see what happens…
Boss: Lord Providence

| Level | HP | Weakness |
|---|---|---|
| 70 | 100,000 | Wind, Aerial |
In terms of attacks, Lord Providence can use Star of Destruction to deal non-elemental damage to the party or Seven Stars to rain 7 light-based hits on the party. Both attacks are magic-based so high magic defence is recommended and the Lustrous Shield for your healer.
The battle starts to get a little tricky when Providence uses Pawn of Fate to inflict Doom on your party. Doom is one of those annoying ailments that cannot be cured. However, if you completed the Yokai sidequest, you can use Status Barrier (Astral Magic) to prevent Doom.
Otherwise, cast Reraise (Time Magic) n conjunction with the Blast Spellcraft or the Black Mage’s Group-Cast All to give your entire party Reraise. That way, they will automatically revive after a KO once. Similarly, you could use the Enopu Mushroom with the Patissier’s Items For All for the same effect.
Just be wary if you’re using Reraise that Providence is pretty quick and can KO your resurrected–but weakened–party the turn after they’re back on their feet. To avoid this situation, give your healer all the speed boosts you can, such as Falcon Knives in both hands and the Hermes Shoes.
Finally, Providence’s trump card is Mandate of Heaven. As soon as Providence uses this move, pay extreme attention to the message that follows. You will be instructed to make a specified character “strike down” another specified character. By that, you simply need to inflict damage.
Fail to do so and as soon as Providence reaches 0 BP, it will use Divine Punishment to inflict a whopping 99,999 damage to your party. That’s ten times the amount of HP your party currently has so you generally want to avoid this scenario by obeying the mandate.
Although, if you’re feeling unruly, you can simply cast Calm (Holy Magic) on the turn Providence has -1 BP. Calm negates all damage to everyone–and this includes damage from Divine Punishment. Or you could cast Reraise like you did against Pawn of Fate to automatically revive after the KO.
For your own attacks, Providence has lower physical defence than magic defence, so stick to physical attacks. It’s also weak to wind-based attacks and pistols, so Hawkeyes will have a field day. In general, you shouldn’t have much trouble dealing amazing damage.
Like many stubborn bosses, Providence will recover all HP after you reduce its HP by a half. After this happens, plot magic occurs, which will prevent Providence from recovering HP again. If you can knock off half its HP, you can surely knock off two more halves!
One final thing: When Providence reaches critical HP, it will use Mandate of Heaven, except this time you’ll be instructed to defeat Providence within 2 turns (basically before it reaches 0 BP). If you’ve gotten to this stage, you ought to be able to fulfil that mandate with ease.
Boss: False God Providence
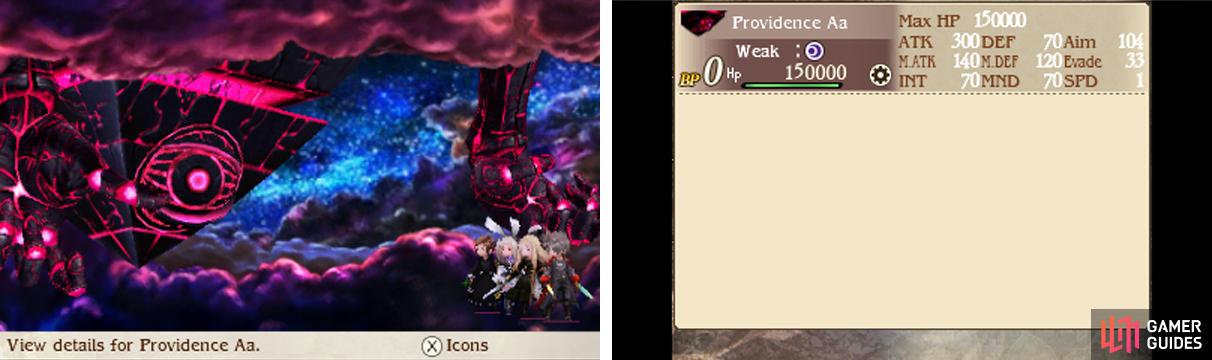
| Boss | Level | HP | Weakness |
|---|---|---|---|
| Providence Aa | 70 | 150,000 | Dark, Inorganic |
| Providence B | 70 | 9999 | Dark, Inorganic |
| Providence Ab | 70 | 9999 | Dark, Inorganic |
Of course, you can’t have a final boss without multiple forms. This is Providence’s final–and predictably grotesque–form, although not necessarily the final battle. You see, as soon as the 9th turn begins or if you KO Providence Aa (the pyramid), the battle will end abruptly.
As such, feel free to wing the battle or obliterate Providence–whichever is faster. But obviously try not to die! Providence B (the right hand–from our pespective) uses Ruin, which deals magical damage to your party, although the damage it does is likely very pitiful.
Providence Ab (the left hand) meanwhile uses Salvation to deal physical damage to your party–and this time the damage is definitely noticeable. After the hands attack, they will become immobile for 3 turns, which is oddly generous. However, there’s a catch, which we’ll discuss in a moment.
Finally, Providence Aa routinely casts Dispel to remove your party’s buffs; it’s also super slow so expect it to move last always. For this battle, don’t bother buffing your party, except with the Fencer’s Bloody Wolf if you have that or right before you unleash an onslaught of attacks.
Occasionally, after some time has passed, Providence Aa may stop time with Bravely Second and blast your party with New World Order, which deals decent magical damage. This move isn’t too dangerous, but can catch you off guard, so try to keep your party’s HP high at all times.
Now for the catch: Every five turns, Providence Aa will use Ruin or Salvation? to vastly increase the damage done by the two hands. So much that you’re looking at a nigh guaranteed KO. Well, aren’t you glad that the hands can only attack every four turns?
…But thankfully time is on your side because the battle will end right before any of the powered up hands get to attack.
Alright, this is it! No more tricks! Just four heroes against one false god! In fact, the second part of this battle is exactly the same as the first part, except you can now progress beyond the 8th turn. This also means the hands can now benefit from Ruin or Salvation?
The most obvious way to avoid getting violently slapped across the face is to destroy the hands. Fortunately, each has relatively low HP, so a few hits will quickly break them, especially if you’re using dark-based attacks or are equipped with knuckles to target their monster family.
Trouble is, after a few turns, each hand will come back with full health and use Big Bang to deal physical damage to your party. On the plus side, the damage is far less than an attack buffed by Ruins or Salvation? so if you can keep the pace, you should be OK.
To keep things simple, we instead recommend focusing all your attacks on Providence Aa. After Providence uses Ruin and Salvation? and on the turn the hands have returned to 0 BP, immediately cast Calm (Holy Magic) to negate all the damage done by the hands. Then rinse and repeat. Easy!
You only need to destroy Providence Aa to win the battle, so this way you waste less time attacking its expendable hands. All parts of Providence share the same weakness, so keep on pummeling the pyramid with dark-based attacks or your strongest knuckles for a quick win.

 Sign up
No Comments