Phase I
We’re finally here! This dungeon is all that stands between you and the final boss, so don’t hold anything back! Like the Dark Aurora dungeon from Bravely Default, you’ll be using teleporters to get around, but you’re unlikely to get lost so long as you follow a somewhat logical path.
From the teleporter where you came from, head west a few paces to reach a branch in the path. First, go along the upper path to find an Enopu Mushroom at the end. Next, follow the lower path. At the second junction, take the lower path for a chest with a Gold Hourglass inside.
Afterwards, follow the upper path. As you turn the corner, go up the steps above and head east over the overpass to reach a chest containing a pair of robust Genji Gloves . Finally, go back down the steps and continue east under the overpass to discover a teleporter that you can use.
You’ll rematerialise close by, towards the central part of the area. Immediately head west to pick up a majestic Lordly Robes from a semi-obscured chest. From there, attempt to head east from the teleporter to trigger a brief cutscene. Once that’s over, carry on east towards an obscured junction.
Going along the upper path will lead you to a chest containing a Megalixir . Amazing for emergency healing. Meanwhile, following the lower path will take you to the next teleporter. Before hopping in, head west along the remaining path for a chest with a powerful Ama-no-Murakumo .
Phase II
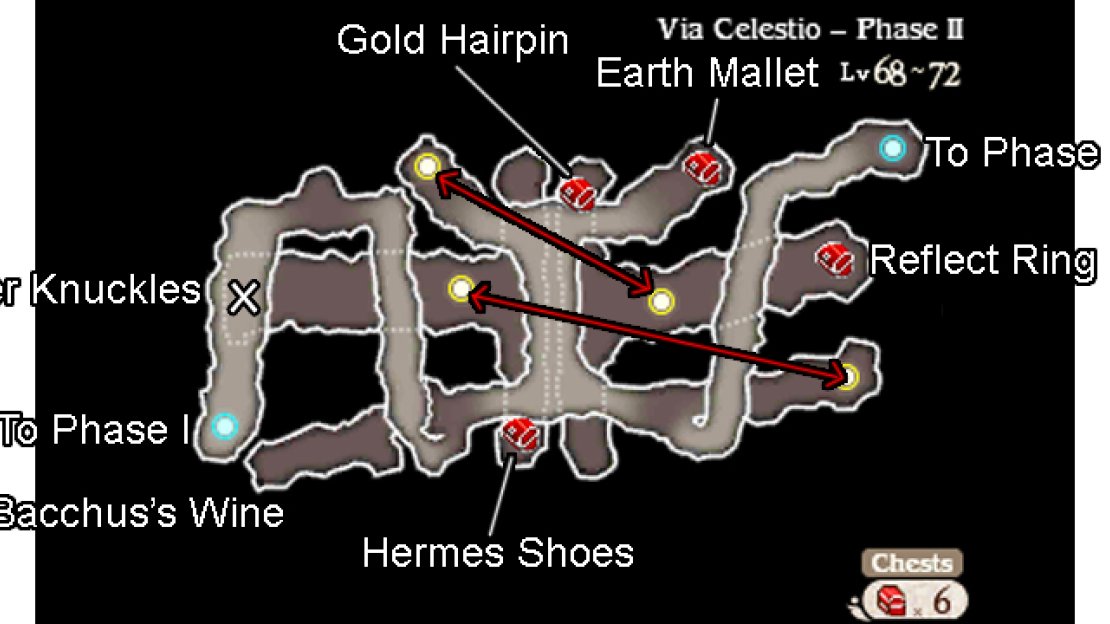
When you materialise, follow the path ahead north, then around to the south. After going down the steps, navigate behind the steps and, from there, head west to recover some Bacchus’s Wine . Next, make your way east towards the central part of the area. Here, the path branches to the north and the east.
If you want to grab all the items, start by going north. At the end of the road, descend the steps on the right to discover a chest with an Earth Mallet inside. Return up the steps and go down the steps on the left, then use the yellow teleporter at the end.
You’ll reappear down below towards the east. Make your way east, going under the overpass, to pick up a Reflect Ring from the chest. After that, head north-west from the teleporter to come across a chest containing a Gold Hairpin . Give this to a character to reduce their MP usage.
Backtrack to the south part of this area, before you headed north along the central path. From here, carry on east until you’re right before some steps going up. Go behind the steps and continue east to a second yellow teleporter in the south-east corner.
On the other side, you’ll be on the down below on the west side. Similar to before, go west to find a chest partially obscured by the west-most overpass–inside are a pair of Kaiser Knuckles . Next, head south-east from the teleporter for a chest with a pair of Hermes Shoes .
These shoes can give you a huge advantage in battle, by increasing the chance of your character going first. Give it to somebody who might benefit, like a healer. Finally, return to the south-eastern steps and go up them. Continue ahead to reach the teleporter to the next area.


No Comments