
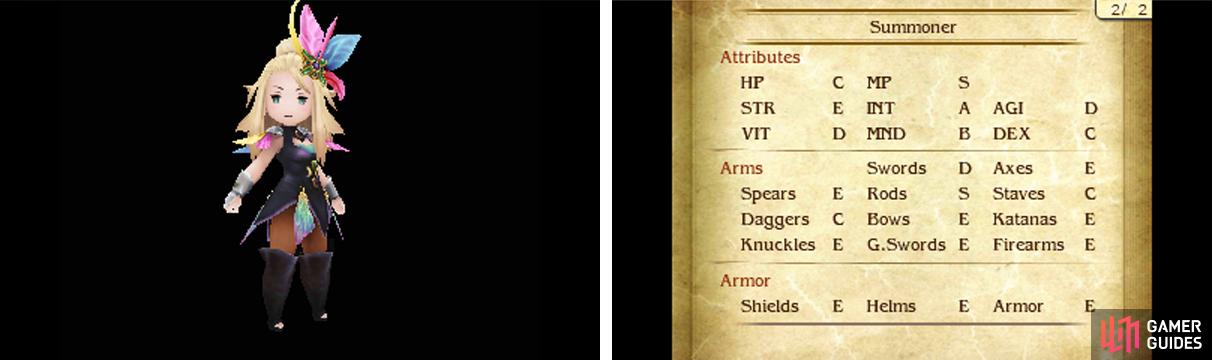
Summoner is the second purely offensive spell-caster job you can acquire and a behemoth at that. When comparing raw stats, Wizard beats Summoner is nearly every area, but the Summoner’s Summon Magic wipes the floor damage-wise.
Unlike other types of magic, Summon Magic is more elusive and can only be learned by seeking the anchorites scattered around Luxendarc and surviving their ordeal. Although Summon Magic is indubitably strong, it’s expensive to cast.
Specialty: Convert MP
Each time the user takes damage, they gain MP equal to 5% of the damage. Does not trigger for poison or freeze damage.
Seeing as Summoner is a MP-intensive job at the start, having a way to passively acquire MP is a welcome bonus. For example, if your Summoner sustains 100 damage, they will gain 5 MP. Which isn’t a lot, but adds up over time.
Level 1: Summoning Level 1
| Type | Cost |
|---|---|
| Command | 40 MP |
Enables the use of the following Summon Magic: Hresvelgr and Deux Ex. However you must obtain the right to summon the summon beast before you can summon it.
Hresvelgr deals heavy wind damage to all enemies, which cannot be reflected, while Deux Ex does the same thing, but is lightning-based. Great for wiping out enemy mobs, but a massive drain on your MP. Not really recommended early on when Ethers are expensive.
Level 2: Summoning Level 2
| Type | Cost |
|---|---|
| Command | 40 MP |
Enables the use of the following Summon Magic: Ziusudra’s Sin and Promethean Fire. However you must obtain the right to summon the summon beast before you can summon it.
These are the water and fire versions of the previous spells, so expect pretty much the same comment as before. By this stage, you can probably afford to carry more Ethers, but the high MP cost is still off-putting.
Level 3: Summon Substitute
| Type | Cost |
|---|---|
| Support | 1 slot |
When the user is KO’d, a random Summon Magic is triggered without consuming MP. Does not trigger when KO’d by poison or freeze.
If you’re going down, this is one way to give the enemy the middle finger. Useful early on when you have few support abilities, but outclassed later on unless you’re using a build that relies on getting KO’d.
Level 4: MP 20% Up
| Type | Cost |
|---|---|
| Support | 1 slot |
Increases the user’s Maximum MP by 20%.
Needless to say, this helps with offsetting the high cost of Summon Magic. Also useful for other spell-casters or healers.
Level 5: Summoning Level 3
| Type | Cost |
|---|---|
| Command | Girtablulu: 40 MP Charybdis: 60 MP |
Enables the use of the following Summon Magic: Girtablulu and Charybdis. However you must obtain the right to summon the summon beast before you can summon it.
Girtablulu is the earth version of previous Summon Magic. By the way, although Summon Magic is best used against mobs, you can combine with various Spellcraft, such as Dart and Mist to punish bosses. That said, Summon Magic eats up a lot of MP already, nevermind with Spellcraft.
Charybdis is a new summon that drops all enemies’ Physical Attack and Magical Attack by 50% (down to a minimum of 75%) for 4 turns. Like other summons, it cannot be reflected. It’s expensive as heck, but a neat way of enfeebling enemies before you get a Patissier.
Level 6: Convert MP
| Type | Cost |
|---|---|
| Support | 1 slot |
Each time the user takes damage, they gain MP equal to 5% of the damage. Does not trigger for poison or freeze damage.
Convert MP is only really good because it’s free for Summoners; otherwise, it’s kind of pricey for other jobs. If you need more MP, you’re better off using the Thief’s Steal Mind or Red Mage’s Aspir. Or wait till you get an Exorcist.
Level 7: Summon in Pinch
| Type | Cost |
|---|---|
| Support | 1 slot |
When the user’s HP falls to critical levels (below 20%), a random Summon Magic will trigger without consuming MP. Does not trigger for poison/freeze damage.
Slightly better than Summon Substitute as you don’t have to get KO’d to trigger it, but it’s too unreliable to use normally.
Level 8: Summoning Amp
| Type | Cost |
|---|---|
| Support | 2 slots |
Increases the damage and MP cost of Summon Magic by 1.25 times.
This is an expensive ability is all essences of the word. Summon Magic is already MP-intensive and this ability makes them more expensive and costs 2 ability slots. Vaguely useful if you’re purposely aiming for bigger numbers, but there are better 2-slot abilities that you can wait for.
Level 9: Summoning Level 4
| Type | Cost |
|---|---|
| Command | 60 MP |
Enables the use of the following Summon Magic: Susano-o and Amaterasu. However you must obtain the right to summon the summon beast before you can summon it.
Susano-o is the dark version of previous offensive Summon Magic, with a higher damage output. It was non-elemental in Bravely Default, so having an element means you can amplify its power with Elemental Boon etc, but it also means some enemies can resist it.
Amaterasu restores a gargantuan amount of HP to all party members (or the equivalent damage towards undead). It’s also only marginably more expensive than Curaga, the next best healing spell, but it’s usually overkill and made redundant by Benediction.
Level 10: Summoning Surge
| Type | Cost |
|---|---|
| Support | 2 slots |
Each time the user uses Summon Magic, the damage dealt by all subsequent Summon Magic is increased by 1.1 times (up to 2 times) for the duration of the battle.
Summoners are expensive to manage up to around mid-game. However everything changes once you can make them Ghosts and give them MP Free in a Pinch so they can cast spells without expending MP. From here, it’s easy to take advantage of Summoning Surge.
Level 11: Summoning Level 5
| Type | Cost |
|---|---|
| Command | 68 MP |
The user can invoke the summoned beasts to maximise one of their stats for 10 turns.
Now this is more like it! With this, Summoners effectively double up as Conjurers from Bravely Default. Can be–and should be used–in conjunction with the Astrologian’s Limit Break to immediately reach insane power levels.
No Comments