In Search of Yoko
To reach Geyser Grotto, head due west from Yunohana, then inch slightly towards the south when the greenlands end and the wasteland starts. Sitting tightly between the mountains to the west is a conspicuous cave–the entrance to the grotto.
Entrance
This dungeon can be really fun if you want it to be. Each area of the dungeon will induce its own set of special effects during battle–these affect both your characters and the enemy. You can read the signposts by the entrance to determine the effects and we’ll also mention them in our guide.
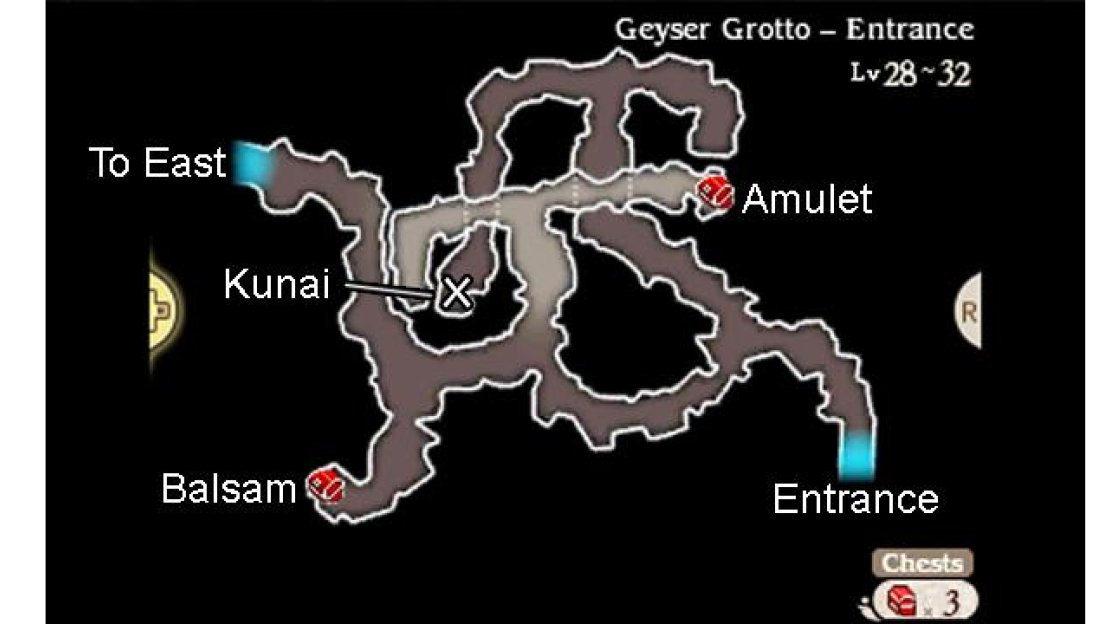
Anyway, start by heading in a north-westerly direction from the initial signpost, ignoring the path leading west for now. After walking through the shallow water and going under the overpass, you’ll emerge at a junction. Follow the path to the left to find a Kunai on the floor at the end.
Return to the initial signpost and head due west. At the next junction, go north up the steps, then follow the overpass to the east for a chest with an Amulet –hand this to a magic user. Next, go back to the previous junction and continue west.
When the path splits again, go south first to discover a chest containing a Balsam . Finally, head north along the shallow water and approach the enemy at the end to trigger a battle wih 5 Rafflesia. For an easy victory, unleash two lots of Heat Needle–heck, even one might be enough.
East
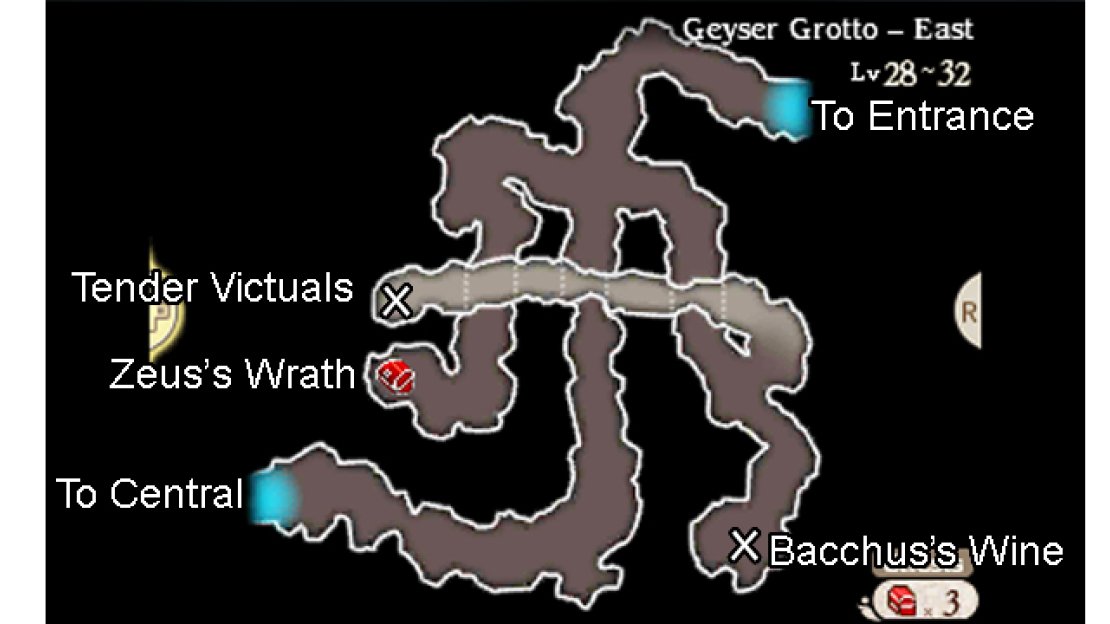
It seems nobody can control their rage in this area. Start by heading west from the initial signpost. After turning a corner, there will be a crossroad. First, head west and follow the path underneath the overpass to find a chest containing Zeus’s Wrath –even the gods are angry!
Back at the crossroad, go east and follow the path south. Ignore the steps on the right for now and carry on towards the south-east corner to find a bottle of Bacchus’s Wine on the ground–you don’t need to use this right now since the enemies are already angry.
Next, go up the steps you passed by and follow the overpass to the far west to find some Tender Victuals lying on the floor. Finally, backtrack to the initial crossroad and take the path south, under the overpass. After turning the corner, a pair of Valtoras will block the way.
Have someone equip the Orichal Dagger, then let your characters do all the hard work for you. Once you’ve sent the beasts packing, continue west to exit the area. At last, your characters and the enemies will regain some measure of sanity again…
Central
You’re halfway there! This section is perhaps the most fun part of the dungeon, but it’s also incredibly dangerous. Since every attack is a critical hit, neither your party or the enemy will last very long. As such, you’ll want to end the battle quick with your strongest moves.
By now, your party may be running low on MP–if this is the case, don’t hesitate to turn off encounters and return to Yunohana to rest up. In addition, if you skipped any equipment or spells, you can use the pg you recently earned to fill in the gaps.
As soon as you’re ready to advance, take the path going west from the signpost to identify a blue locked chest . Back at the signpost, follow the left-side path to find an Adamantite Shell blocking the road. This tough nut casts Reflection Angle to reflect magic.
In addition, it Defaults often–up to a maximum of 3 BP–and is fond of using Spin Attack twice to inflict major pain. Your best bet is to rain Frost Dart on the first turn. In case it Defaults, you can have the fourth party member throw Antarctic Winds with Attack Item Amp.
After vanquishing that formidable foe, continue south to find a chest containing a Black Belt , which boosts your critical rate–a great souvenir to remember your time here! Next, follow the right-side path from the signpost. Once again, there’s something evil-looking on the road.
Compared to the Adamantite Shell, the Lilith trio isn’t nearly as dangerous. The demonic gals are fond of using Tail Whip to attack one character and potentially inflict charm. Shut them down in record time with powerful sword attacks.
Having cleared the way, carry on south, then go up the rocky steps around the corner to get on the overpass. After crossing over the path to the Black Belt chest, the path will split. Head for the south-west corner first for a chest with a Hi-Potion inside.
Finally, follow the remaining path towards the north as it loops around back to lower ground. Then exit to the far west.


No Comments