
Floor 1F

The real fight begins here. From the entrance, head east until you reach three platform lifts along the centre of the south path. First, get on the westward lift and ride it up to higher ground. Next, make your way north, down the steps and under the floor to pick up an Earth Mallet at the end.
Return to before the steps and use the lift on the left to return to the start. Back at the three lifts, allow the northward lift to take you up. Follow the northward path to the end, turning left to recover some Bacchus’s Wine on the floor. Then use the lift on the right to go back around.
Third time’s the charm! Back at the three platform lifts again, use the remaining eastward lift. Up on higher ground, follow the path north, then west down the steps and under the higher path you walked across earlier. On the other side, exit via the stairs in the north-west corner.
Floor 2F
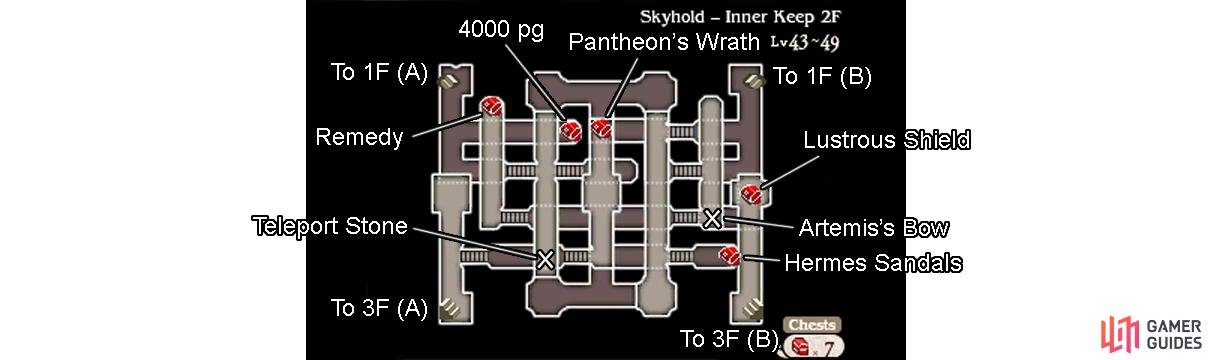
This floor is a lot more complicated than previous ones. From the north-west corner, head a few paces south, then go east under two overpasses for a chest containing 4000 pg . After that, continue south from the stairs and follow the bottom path east under one overpass and up the steps.
On higher ground, hurry to the south to pick up a shiny Teleport Stone from the floor. That’ll come in handy. Next, make your way north and use the lift at the end to drop back down to lower ground. Here, follow the path to the east as it zigzags under the central overpasses.
Eventually you’ll be back on higher ground near the east side. The route here starts to become tricky so listen carefully. Start by going down the steps to the south back to lower ground. Head west past the first overpass and stop directly under the second (central-most) overpass.
From here, head all the way south, following the overpass to begin with. At the end, pull the lever to the right to bring the eastward lift down. Then stand on the lift and pull the lever from the lift side to ride it up. On higher ground, go down the nearby steps ahead on the right.
The chest here contains a pair of Hermes Sandals , which you should give to your healer or another character who benefits from speed. Next, head all the way to the northern end of the overpass, where there’s a lift and steps going down on the right.
Head down the steps and continue east under the overpass. On the east-most side, go all the way south, under the east-most overpass, then head west when you reach the end. Prise open the elusive chest here for a mighty Artemis’s Bow .
To mop up, head back and go down the stairs in the north-east corner. Back on Floor 1F, open the chest beyond for a Gladius . Now you need to carefully retrace your steps. Go back upstairs and head west back to the northern lift that you ignored previously.
Ride the lift down to lower ground and go through the zigzaggy south-east path back to the top of the overpass near the east side. Go down the steps to the south and, this time, head all the way west, under all three overpasses and up the steps at the end.
To the far north is a chest with a Remedy inside. From here, go back down the previous steps so you’re directly under the third (left-most) overpass that you went under. Here, head south, following the overpass, then go east and up the nearby steps.
Atop the central overpass, head all the way north to retrive a Pantheon’s Wrath from the chest at the end. Finally, go back down the steps and head west, up another set of steps. You’ll be by the south-west corner. Go up the nearby stairs to progress to the next floor.
Floor 3F - Entrance
This floor starts with a boss battle, so prepare your party for serious combat. Don’t forget if you have Auto-Save enabled, the game will save when you change between different floors. Once you’re ready, proceed up the steps ahead and begin heading east.
Halfway along the path, an old friend who miraculously survived certain death has returned to push his luck.
Boss: Janne Balestra
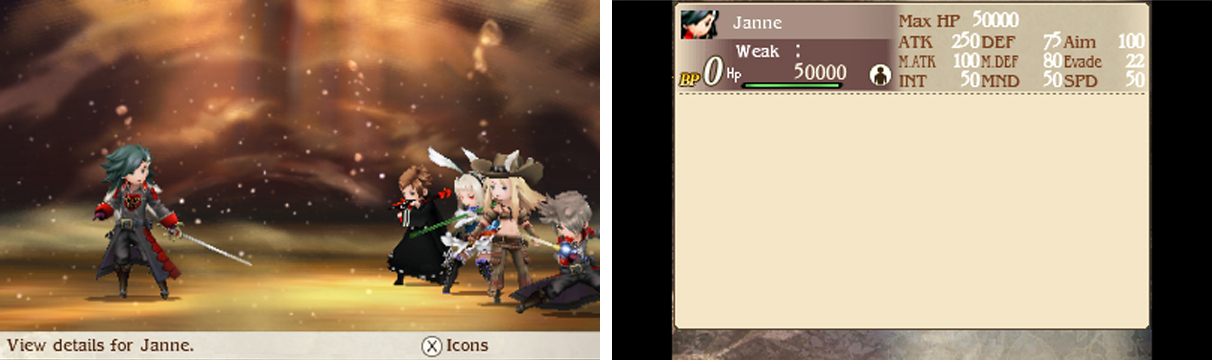
| Level | HP | Weakness |
|---|---|---|
| 50 | 50000 | Nothing |
By now, you ought to be familiar with the Fencer job, having used it for so long, so there should be zero surprises in this battle.
Janne opens with Blazing Wolf to enter Wolf Stance. Next, he will use Wolf Fang to damage a character and switch to Aurochs Stance. Finally he will use Goring Aurochs to damage one and switch to Wolf Stance. From there, he will cycle between Wolf Fang and Goring Aurochs.
On occasions, Janne may Brave and unleash two Fencer techniques in one turn. Of course, this will leave him open to attacks for one turn. However, remember that in Aurochs Stance, physical hits will incur a counter-attack due to Stampede.
Additionally, Janne has Muscle Memory, so he will retain the offensive buffs from Wolf Stance and the defensive buffs from Aurochs Stance for several turns. Also, he’s fast, so expect him to act before your characters do unless they’re in speedy jobs and have significant speed boosts.
The key to success is to take advantage of Janne’s predictability and the fact that all his attacks are physical-based. For one, you should start off by buffing your party’s physical defence with your Astrologian or Performer. That way his physical hits will hurt much less.
Meanwhile, you can have your own Fencers enter Aurochs Stance to give Janne a taste of his own medicine. Or if you have a Swordmaster, you can go one better with Nothing Ventured. Better still, Ninjas can avoid one of his attacks completely with Utsusemi and counter with Transcience.
If your characters can’t keep up, don’t worry and simply factor it into your strategy. For instance, if Janne is in Wolf Stance, by the time your characters attack him, he’ll have switched to Aurochs Stance and your physical attackers will all be eating his Stampede.
So instead attack when he’s in Aurochs Stance. However avoid piling multiple attacks in case he Braves while in Aurochs Stance, in which case he will return to Aurochs Stance after attacking. If you’re afraid of taking damage, wait till after he Braves while in Wolf Stance.
Floor 3F - Continued

Moving on, you’ve got a bit more ground to cover before you reach the climax. Carry on east and ride the lift at the end. Unlike the previous floors, the lift will move sideways, taking you to the south. When the lift stops, head down the steps on the left and go around to the back of the steps.
Next, go down the stairs in the south-east corner to return to Floor 2F. Beyond, grab the Lustrous Shield from the chest at the far end. This precious shield negates light-based attacks and should be equipped by your healer. Back on Floor 3F, follow the path north from the steps.
At the junction between two overpasses, head east for a chest for a Remedy inside. Return to the steps to the south again and this time head all the way west. At the end, recover the Lilith’s Kiss shining on the ground to the north. Afterwards, follow the northward path to the right.
Just before going up the steps to the north, head west under the overpass and follow it north, then west at the end to reach a chest containing a Luminous Robe . Next, go up the steps and follow the path to the left, across the lift, to retrieve 6000 pg from the chest in the far corner.
Finally, ride the lift to the right of the steps to reach your destination. Somehow, the plucky Adventurer has managed to get past the imperial soldiers before you did. Which is a good thing as you’re probably dying to rest up and save your game. When you’re ready, exit via the door to the far north.
No Comments