
Floor 5F

Man, this castle seems to go on forever and a half. Hopefully you’re still hanging in there! If you’re finding yourself running low on MP, consider swapping to the Kaiser job or equipping the Exorcist’s Steady MP Recover ability.
Anyway, go right from the entrance stairs and head south along the right-side corridor. Shimmering at the end of the purple path is a Lilith’s Kiss . Double back to the stairs and follow the outer corridor. Soon after passing the south-west corner, detour north to retrieve an Elixir from a chest.
From there, continue along the outer corridor, past the south-east corner. After a few paces north, you’ll arrive at a crossroads of sorts. Go north first to relieve a chest of its Remedy , then carry on west. As usual, there’s a painting hanging along the north-most wall that you’re free to inspect.
Once you’ve listened to another insightful history lesson or otherwise, head east and ascend the stairs in the corner.
Floor 6F

Are we there yet? Don’t worry, there are only two more floors including this one! Briefly head south, stopping to explore the right-most corridor; you’ll be rewarded with a chest containing a Turbo Ether . Next, carry on along the main corridor.
When you reach the south-west corner, you may notice a corridor to the left that’s seemingly inaccessible. Approach the pair of wodden coffins along the wall above the corner and walk between them to reach the other side. Beyond, flip open the chest for a Blood Blade .
This powerful blade can also be used as an item to trigger Drain, absorbing HP from a single foe (assuming they’re not undead). It runs off the Magic stat so it’s not quite as efficient as the actual Drain spell used by a magic-caster, but it’s main benefit is that it doesn’t cost MP.
In any case, after that novel discovery, return to the main corridor and follow the eastward path ahead. This will take you to the far north, where the fifth painting awaits. By now, it’s probably no surprise that heading west from here will lead to the next set of stairs.
Floor 7F

At last, we come to the final floor–and that means a destined battle draws near. In the meantime, hurry south towards the bottom corridor. As soon as you enter the doorway, a cutscene will trigger and the meaning of the seventh painting will be revealed.
From there, carry onwards to the east wing. Sitting cozily in the north-east corner is this floor’s only chest, which contains a Safety Ring . Take this as a not-so-subtle clue to equip everybody with a Safety Ring–hopefully you bought plenty from Caldisla.
Meanwhile, the Adventurer and fox are waiting patiently to the west, along the entrance to the central area. Once all preparations are complete, approach Yoko by the central throne to begin the battle.
Boss: Yoko
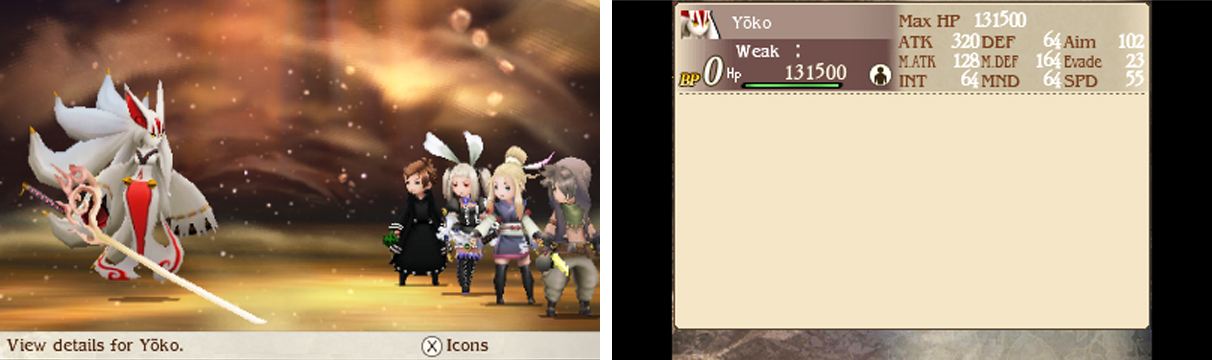
| Level | HP | Weakness |
|---|---|---|
| 64 | 131,500 | Nothing |
Yoko is powerful; comparable to Turtle Dove, but much less headache-inducing. For attacks, she can use the ultimate lightning and wind spells, Thundaja and Aeroja, to pummel your party. These are fairly damaging, but can simply be nullified by Elemental Barrier.
Beware that Yoko can use Sloth to remove your buffs and make you weak to all elements. As such, it’s a good idea to have Elemental Barrier under your belt–preferably combined with Prescience so you always act before her and not after her, when it’s too late.
At this stage, you could consider using the Black Mage’s Group-cast All ability to cast Elemental Barrier on your party, instead of wasting an additional BP to cast Blast. Alternatively, Mist works well too, although it can be awkward when it runs out before Sloth.
Yoko can also use Consume Life to physically assault your party, with a high chance of inflicting instant death. This is where those Safety Rings come in real handy! Without them, your party’s going to be hitting the floor faster than you can pronounce “Yokai”.
With adequate preparation, this battle is actually fairly straightforward. For offence, focus on physical attacks since Yoko’s Magical Defence is sky high. To really drive home the pain, you can target her Humanoid family with the Doujiri-Yasutsuna and Ripper weapons.
Near the beginning, Ringabel will pop in during even-numbered turns to perform a Special Move. Strangely, his Special Moves don’t provide any buffs to your party. However they still trigger Special Move music, so if you have any Special Move buffs, it’s easy to retain them.
Furthermore, Sloth doesn’t affect Special Move buffs, so this is one battle where Special Moves really shine! Just be sure to use them early on before Ringabel runs out of juice. Either way, keep it up and you’ll send the Yokai scurrying home in next to no time!
Awakened Power
Triumph and the eight–and final–painting will be yours to ogle at. …And that marks the end of this “little” diversion, but not the end of your ordeals. For now, use a Teleport Stone to exit the castle. Outside, you can speak to the Adventurer’s fox to purchase Level 7 magic scrolls.
No Comments