
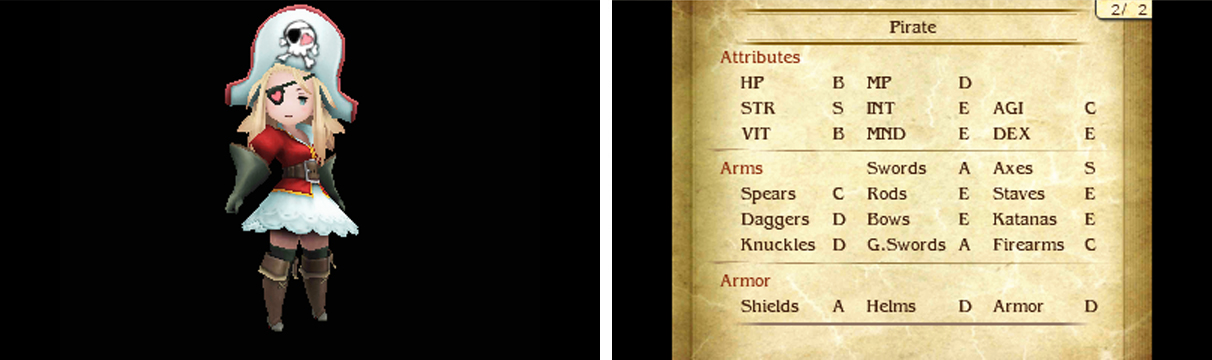
The Pirate is an offensive juggernaut that can weaken foes too. It has staggering Strength and decent bulk, making it a fearsome fighter. However its terrible Dexterity combined with the naturally low Aim of its favourite axes means its normal attacks will unimpress.
Of all the physical jobs, the Pirate has the highest raw attack power, and factoring in its versatile damage-boosting and enemy-crippling attacks, makes it a fantastic job to use during end-game. Because of its low accuracy, avoid using normal attacks and stick to offensive abilities instead.
Specialty: Adrenaline Rush
When the user’s HP falls below 20%, Physical Attack and Physical Defence each increase by 50% for five turns (up to 150%).
Not the safest or most reliable of abilities, but a cheap and effective way of upping your Pirate’s best stats in an emergency.
Level 1: Double Damage
| Type | Cost |
|---|---|
| Command | 50 MP |
Deals 2 times damage to one enemy.
The cost is high, but you get exactly what it says on the tin. Generally too pricey when you first acquire the Pirate, but becomes a little easier to stomach as the adventure goes on.
Level 2: Provoke
| Type | Cost |
|---|---|
| Command | None |
Increases the user’s chance of being targeted by enemies to the highest level.
This works like a reverse version of the Patissier’s Decoration (or rather the opposite, since Provoke came first). Pirates aren’t the sturdiest things ever, but this could be useful when used in a tanky job.
Level 3: Shell Split
| Type | Cost |
|---|---|
| Command | 9 MP |
Damages one enemy and drops their Physical Defence by 25% for four turns (down to a minimum of 75%).
Pirates already hit hard and dealing more damage is always beneficial.
Level 4: Scale Strip
| Type | Cost |
|---|---|
| Command | 9 MP |
Damages one enemy and drops their Magical Defence by 25% for four turns (down to a minimum of 75%).
Useless for your Pirate, but good for boosting your magic users’ damage.
Level 5: Shin Smash
| Type | Cost |
|---|---|
| Command | 9 MP |
Damages one enemy and drops their Speed by 25% for four turns (down to a minimum of 75%).
A good way to slow down fast opponents, so you can act before them (or more consistently). Best used after dropping the foe’s defence(s).
Level 6: Adrenaline Rush
| Type | Cost |
|---|---|
| Support | 1 slot |
When the user’s HP falls below 20%, Physical Attack and Physical Defence each increase by 50% for five turns (up to 150%).
There are worse abilities that cost the same, but you should look into investing in more reliable abilities.
Level 7: Defang
| Type | Cost |
|---|---|
| Command | 9 MP |
Damages one enemy and drops their Physical Attack by 25% for four turns (down to a minimum of 75%).
Fantastic for stopping powerful foes from mauling your party. Can often be combined with Physical Defence buffs to shrug off physical attacks like they’re nothing.
Level 8: Skull Bash
| Type | Cost |
|---|---|
| Command | 9 MP |
Damages one enemy and drops their Magical Attack by 25% for four turns (down to a minimum of 75%).
Magical bosses are less common, especially those that use non-elemental magic, meaning you can’t negate their damage with Elemental Barrier. However it’s a stellar move when you do face one.
Level 9: Axe Lore
| Type | Cost |
|---|---|
| Support | 1 slot |
Increases the user’s axe proficiency to S.
Axes are incredibly hit-and-miss weapons, in a literal sense. So unless you’re an axe-lover, there’s not much reason to equip one when you’re not a Pirate.
Level 10: Amped Strike
| Type | Cost |
|---|---|
| Command | 150 MP |
Deals 4 times damage to one enemy.
One of the strongest physical attacks around, but one that costs an unholy amount of MP, which Pirates are not exactly swimming in. Best used with the Swordmaster’s Free Lunch, like in Bravely Default.
Level 11: Bully
| Type | Cost |
|---|---|
| Support | 1 slot |
For each ailment the enemy suffers from, damage increases by 10%.
An interesting ability, but it’s largely devoid of practical applications. Most bosses are immune to or resist ailments and even if you can inflict them, you need to inflict multiple for decent damage and most ailments eventually wear off.
No Comments