
The Journey Continues!
No longer just a roadblock!
So you’ve beaten the game, but there’s a lot more you can do! Namely, there are three postgame dungeons for you to explore, plus the neverending Ba’als invading Fort-Lune. For the former, they will be automatically unlocked as soon as you load your completed save file or start a New Game Plus.
Meanwhile the latter are of course available at any time (after unlocking Fort-Lune). However, now that peace has returned to Luxendarc, you can afford to divert more time and resources towards repelling the Ba’al menace. Plus by now, you should have more than enough tools at your disposal.
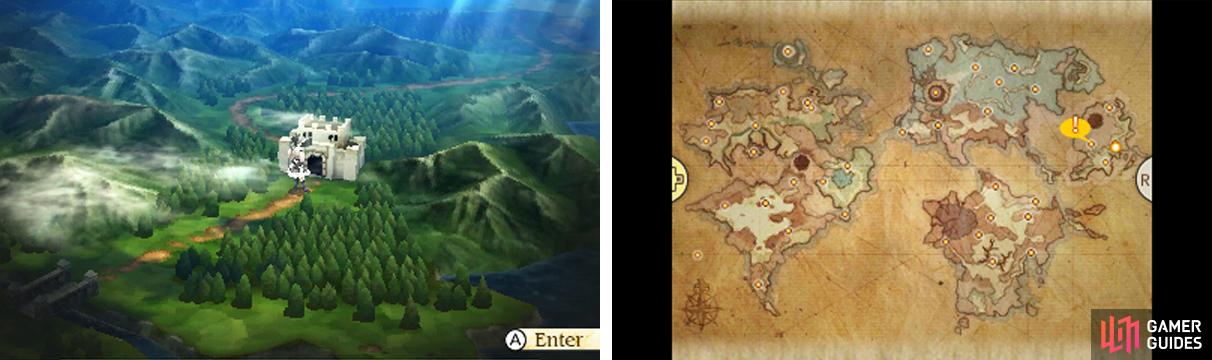
In any case, we’ll start with the Dimension’s Keep dungeon, which is the fortress between Caldisla city and Lontano Villa that you may have passed by at the beginning of Chapter 6. Originally known as the Ruins of Centro Keep, mysterious forces have warped the interior of the keep.
Floor 1F

As the first proper dungeon of Bravely Default, you’d generally expect to have a simple time here, but you’d be surprised. From the entrance, go east to reach your first conundrum. Up ahead, there’s a locked door, which appears to be the only way to proceed, but the switch is out of reach.
Head towards the dead end to the south and hug the wall below to discover a secret passageway, which leads to the isolated room on the right. Inside, inspect the switch on the wall to open the door from before. Afterwards, go back around and pass through the open door and up the stairs.
Floor 2F

Near the stairs, the path will branch in two directions. First, continue west to discover a chest containing a pair of nifty Dwarven Gloves . Next, follow the southward path to the right to reach the south-east corner. Here, flip the switch on the wall to open the door to the left of the initial stairs.
Before leaving, hug the corner below the switch to find a secret passageway, which takes you to the secluded chest to the left. Inside is a Laevateinn , a powerful staff that deals additional damage to aerial foes–not that you’ll be using it as an actual weapon much.
Afterwards, return to the branch in the path and head north throughly the newly opened door and up the next flight of stairs.
Floor 3F

Up on the third floor, head directly east to find a chest with a Barrier Shroud inside. Don’t go back just yet and carry on towards the bottom-right corner. Here, you’ll find a secret passageway leading south towards an isolated room with a switch.
Give the switch a good poke to open a door near the centre. Return to the stairs and, start going south from the stairs. Before turning the corner, briefly head west. The door that you opened is just ahead, while a chest containing an Elixir lies to the south.
Before passing through the door, carry on along the path you were going. When you reach the south-east corner, go right up to the corner to discover yet another secret passageway going south. As soon as the path seems to stop, head west to bump into an unseen chest.
Boss: Jabberwock
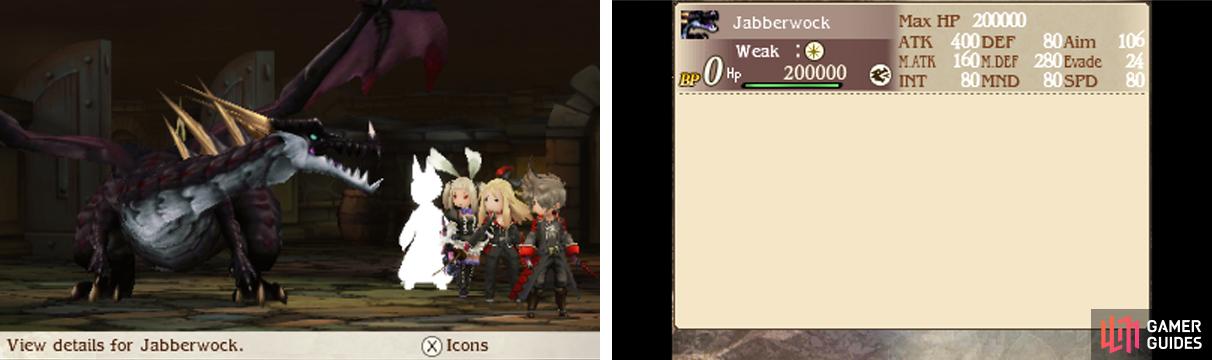
| Level | HP | Weakness |
|---|---|---|
| 80 | 200,000 | Light, Dragon |
Hey, that’s unfair! How exactly does a dragon fit inside a treasure chest, anyway? Nevermind, let’s focus on the battle at hand. If you did the Vampire sidequest in Bravely Default, you may have fond memories of Jabberwock the dark dragon.
The fight here is essentially the same as before. Jabberwock uses Bite to attack one and Fearsome Breath to inflict dark damage to the party and potentially cause Dread. Every now and then it will use Evil Eye to make everyone weak to dark attacks.
To trivialise the battle, give everyone a Courage Ring (extras can be purchased from Hartschild) and group-cast Elemental Barrier in conjuction with Prescience to override Evil Eye. Don’t use Dark Mirror despite the temptation as Jabberwock absorbs dark damage.
The dire dragon has exceptional magical defence, so smite it with physical attacks–preferably light-based or from a greatsword (the Excalibur is perfect as it fulfils both). Or if you can afford the hefty cost, use the Black Mage’s Pierce Magic Defence ability.
Floor 3F (Continued)
After slaying the dragon, go back towards the centre of the floor and pass through the door that you opened earlier. On the other side, follow the corridor towards the south-most dead end. Similar to the first floor, there’s a secret passageway below that leads to the isolated room to the left.
Here, pull the switch to open the locked door north-west from the centre. Finally, make your way back along the previous corridor and descend the stairs in the north-west corner.
Floor 1F and 2F (Again)
Back downstairs on Floor 2F, head directly south from the stairs where you came. Just before the dead end, turn to the west for a chest with a Black Belt inside. Next, continue to the dead end and poke around the bottom-right corner to stumble upon a secret passageway.
Follow the unseen path west to arrive at the south-west corner. Hug the bottom-right corner here to discover another hidden path, which leads to the switch in the isolated room on the right. As expected, touching the switch opens the door in the north-west corner, allowing you access to the stairs.
Finally, you’ll arrive in the north-west corner of Floor 1F, moments before your battle with Ominas in Bravely Default. Except this time there’s just a lonely chest–open it to find an elusive Ribbon , a wonderful headgear that negates every common status ailment.
Rather frustratingly, there’s no switch on this side to open the door on the right. You’ll just have to use a Teleport Stone to leave or walk all the way back.
No Comments