The Never-ending Tower
With the Grand Marshal’s Shield in your possession and plenty of experience from the Central Command prison, you’re in prime form to tackle Everlast Tower and claim the Grand Marshal’s Sword. However, expect the road to be much longer, especially if you want to be thorough.
The easiest way to reach Everlast Tower is by air, so jump aboard the Rubadub. Next, Auto-Pilot or manually fly to Gravemark Village towards the east side of the Eternian continent. From there, fly a short distance north west and you should spot a cave to the east of Everlast Tower itself.
Everlast Tower - 1F
As one of the final dungeons from Bravely Default, this tower is incredibly complex and time-consuming to explore if you want to get everything. If you’re only looking for the Grand Marshal’s Sword though, then it’s pretty simple.
To get to the sword, follow this path:
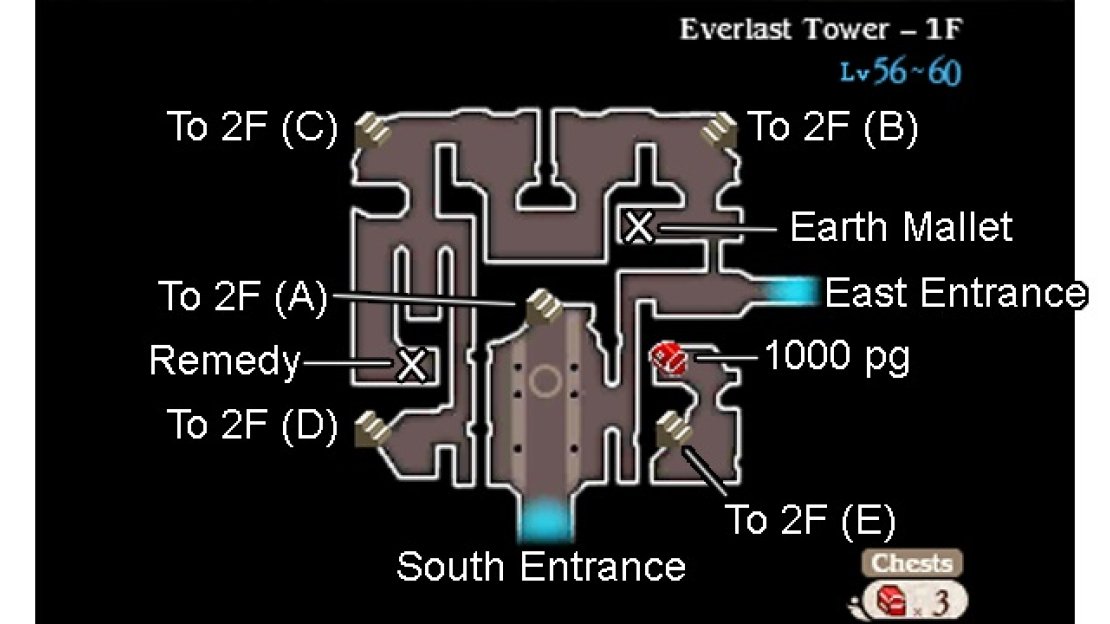
- Floor 1F: Head anti-clockwise towards the south-west corner and go up the stairs.
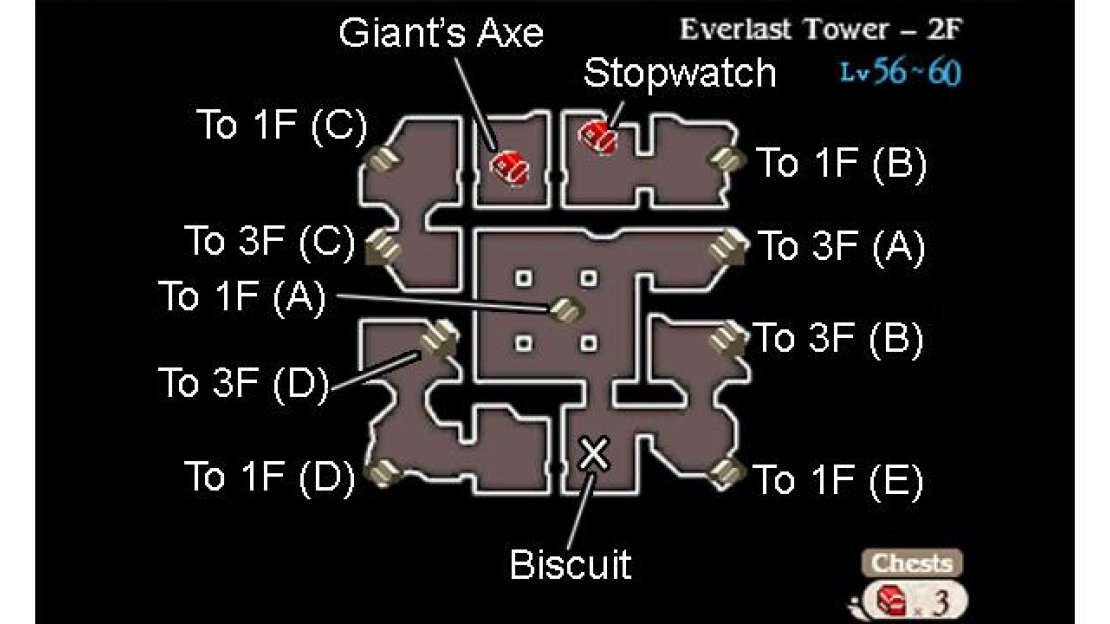
- Floor 2F: Go north and up the nearby stairs.
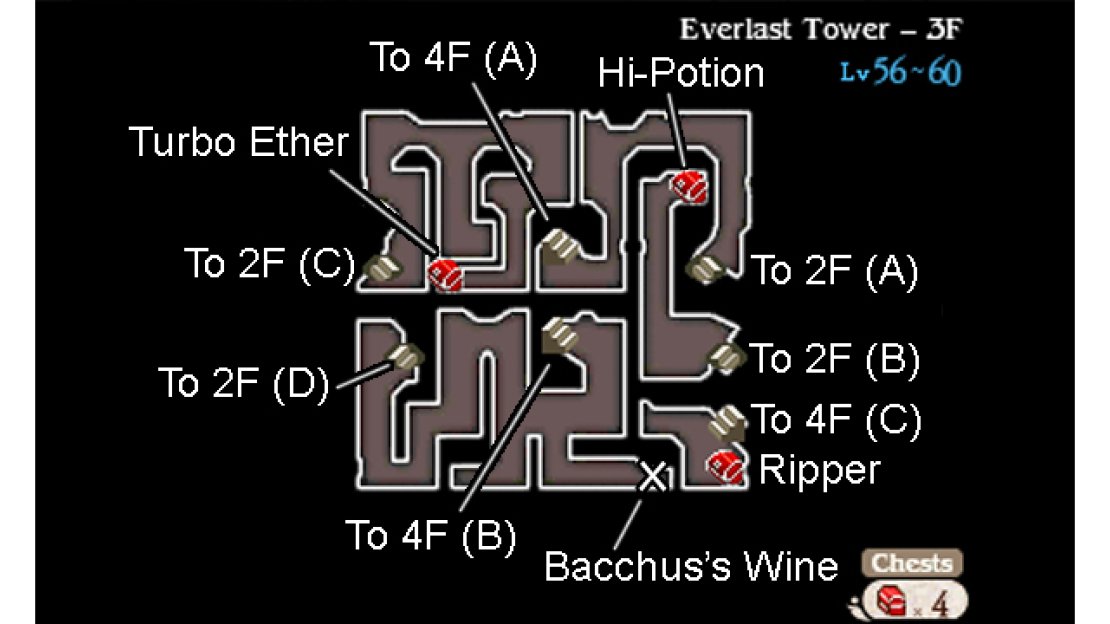
- Floor 3F: Make your way east and go up the central stairs.
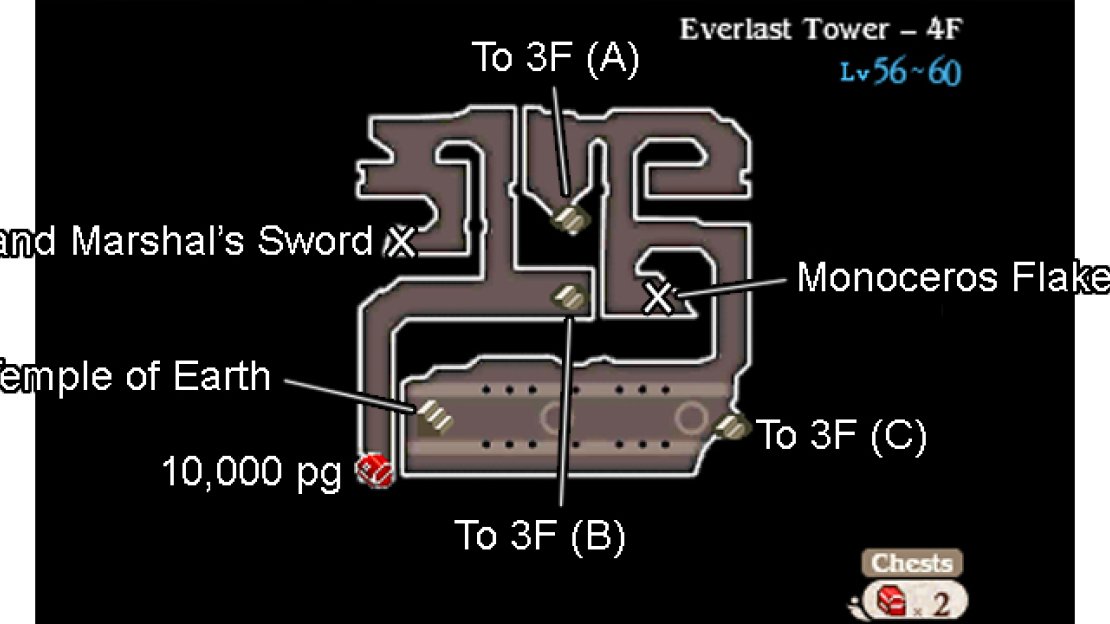
- Floor 4F: Head for the north-west corner.
For the rest of you who want to leave no rock unturned, begin by going west from the eastern entrance, ignoring the northward path for now. When you reach the corner, head south, then west towards the southern entrance.
If you want, you can exit the tower via the south. Outside, follow the narrow mountain trail west to reach the back door of Eternian Central Command. Inside, inspect the door to the south to open it, creating a nifty–but slightly useless–shortcut to the front door.
After that, head west and check out the shiny object on the floor to discover it’s a… Potion !? Well, that certainly wasn’t worth the effort, but at least your curiosity has been sated. From here, return to Everlast Tower and head up the central stairs opposite the southern entrance.
Floor 2F
Assuming you came from the central stairs, you’ll arrive in a large room at the centre. First, head south to the square room below and check the bottom-left corner for a sparkling Biscuit . Next, go west into the room with the toppled pillars and descend the stairs in the corner.
Back in Floor 1F, flip open the chest ahead and add the 1000 pg to your bulging war chest. Upstairs on Floor 2F again, head up the stairs to the north. Up on Floor 3F, briefly follow the northward path to reach a chest containing a Hi-Potion .
Finally, return to Floor 2F and retrace your steps to the large central room. From here, head east and ascend the stairs at the far end. Upstairs on Floor 3F, follow the path directly ahead as it leads you towards the upper central stairs.
Floor 4F
Your eyes aren’t deceiving you. We’ve skipped straight to Floor 4F, if only because you spent barely a minute traversing Floor 3F each time. Right now, you should be along the north side. If you have the Summoner asterisk, make for the north-east corner where an anchorite awaits.
Appropriate for what is essentially the Temple of Earth, you can acquire the Girtablulu earth summon if you can survive a hit. Easy if you have Earth Charms equipped or high Magic Defence. Once you’ve earned the summon or otherwise, follow the southward path to the right of the stairs.
At the first junction, carry on south to retrieve some Monoceros Flakes from the floor, before doubling back to head east. Soon you’ll reach the southern half of the floor. Here, descend the stairs in the corner to return to Floor 3F.
With the Chest Key firmly in hand, open the blue chest to discover a deadly Ripper . This dagger isn’t the most powerful weapon, but it deals 1.5 times mor damage to humanoid foes. Great for fighting asterisk holders and the like, if you haven’t beaten them all already!
That’s pretty much the end of the road, but if you want, return to Floor 4F and head west from the stairs. At the end are stairs leading up to the Temple of Earth. Inside, there’s nothing much, except the Adventurer if you want to save etc. and the Altar of Earth if you want to gawk.
Floor 1F and 2F (Again)
Using a Teleport Stone or otherwise, return to Floor 1F. From the eastern entrance, head north through the doorway, then immediately turn left to recover an Earth Mallet . Afterwards, go up the stairs in the north-east corner. Upstairs, there’s a chest to the west containing a Stopwatch .
Back on Floor 1F, make your way west. At the north-west corner, ascend the stairs. Up on Floor 2F, head straight into the stained-glass window ahead to discover a clever secret passage. Follow the dark path east to reach the room on the right, where there’s a chest with a Giant Axe inside.
After that enlightening moment, return to the north-west corner and ascend the nearby stairs to the south.
Floor 3F
From the upper western stairs, follow the path directly ahead. As you travel east, go down the southward path to bump into the Adventurer’s fox by his (or her) lonesome. Even if you don’t need to rest, you may as well set up camp to see what Yew’s gang gets up to.
Afterwards, carry on around the outer corridor to reach the chest to the south, which houses a potent Turbo Ether . From here, backtrack to the north-west corner of Floor 1F; basically, just keep going downstairs. Once there, go south, while keeping to the west when the path splits.
At the end of the fork is a shiny Remedy on the floor. Next, return to the path split and follow the right-most path, which leads to the south-west stairs. Back up on Floor 2F, briefly head north and go up the stairs ahead.
You’ll be back up on Floor 3F, near the lower western part of the floor. Follow the path below as it snakes towards the east. As you reach the midway point, head south-west to find a hard-to-see Bacchus’s Wine on the floor. Finally, carry on north towards the lower central stairs.
Floor 4F
That’s a lot of walking around thus far, but you’ve made it to the end! From the central stairs, head west and carry on towards the south-west corner. At the end of this path is a chest containing a whopping 10,000 pg . But for your real prize, follow the northward path to the left of the stairs.
Shining among the crates below the crumbling wall towards the west is none other than the Grand Marshal’s Sword !


No Comments