
The Final Trial
By now you should have both the Grand Marshal’s Sword and the Grand Marshal’s Shield. However your task isn’t quite done yet, as you need to bring the relics to the Grand Marshal, who’s waiting at the depths of Vestment Cave. Let’s not keep him waiting too long then.
Outside on the world map, hop aboard the Rubadub and Auto-Pilot to Miasma Woods in the Harena region. If you somehow haven’t been there yet, quick travel to Ancheim instead. From there, head east towards the western edge of the nearby Yulyana region.
At the west-most edge, roughly halfway down the region is a cave surrounded by forest–this is Vestment Cave, the location of Edea’s final trial. Don’t forget you can’t land on top of trees, so position the Rubadub above the clearing to the south of the cave to land.
Floor 1F

Cave of Vestments, Vestment Cave, same thing. What’s different is that the enemies are slightly stronger here, but the layout is more straightforward, since it’s a dungeon from Chapter 1 of Bravely Default. Yup, they’re determined to recycle every last dungeon from that game!
Anyway, from the entrance stairs, head north-east to reach an early junction. Follow the eastward path, across the stepping stones, to reach a Cannelle lying in the south-east corner. Next, head along the westward path; very soon, you’ll be confronted by another junction.
Carry on west first to reach the south-west corner, where a piece of Dried Remora is glittering on the floor. Afterwards, make your way north, where a third junction awaits. For now, continue north and follow the cavern eastward after turning the corner.
As you travel east, there’ll be another junction, but this one converges, so it doesn’t matter which path you go through. At the end of this path is a chest with an X-Potion inside. Finally, return to the third junction and head west to discover the stairs.
Floor B1

Downstairs, travel directly south, ignoring the eastward passage for a moment. Pick up the Enopu Mushroom shimmering on the ground, then double back and head east. After a few paces, there will be a junction intent on dividing your attention.
Carry on east, where you’ll be rewarded with a chest containing a Light Curtain . Next, head south from the junction. Soon, you’ll reach stairs going down, but ignore it and continue further south. Along the way, flip open the chest on the left for an Earth Mallet .
Afterwards, make your way east to find a second set of stairs, which you should descend. On the other side, you’ll be in an isolated part of Floor B2. Go west to find a lonesome chest containing a Failnaught . Despite its hilariously depressing-sounding name, this is a fairly powerful bow.
Finally, go back upstairs and return to the first set of stairs towards the centre, then eagerly go down them.
Floor B2

This cave sure runs deep, but you don’t have far to go. Start by heading east to reach a dead end with a Spider’s Web for your curiousity. Next, make your way west, then south at the next junction. Scoop up the Magnifying Glass from the floor and carry on north.
Towards the north, the path will split in three directions–and all of them lead to treasure. Heading south-east will lead to some Monoceros Flakes , while heading north-east will take you to a chest containing a more impressive Holy Lance .
After finding space for your loot, continue by following the path to the north-west. As you travel west, take a moment to explore the southward path for a chest with an Elixir inside. Finally, descend the stairs in the north-west corner to reach your destination.
Downstairs, on Floor B3, the Adventurer is once again here for all your pre-battle preparations. Be sure to rest up, restock on items, save your game, etc. so you’re in top form to greet the Grand Marshal. Once you’re ready, proceed north to give the man your answer.
Boss: Braev the Templar
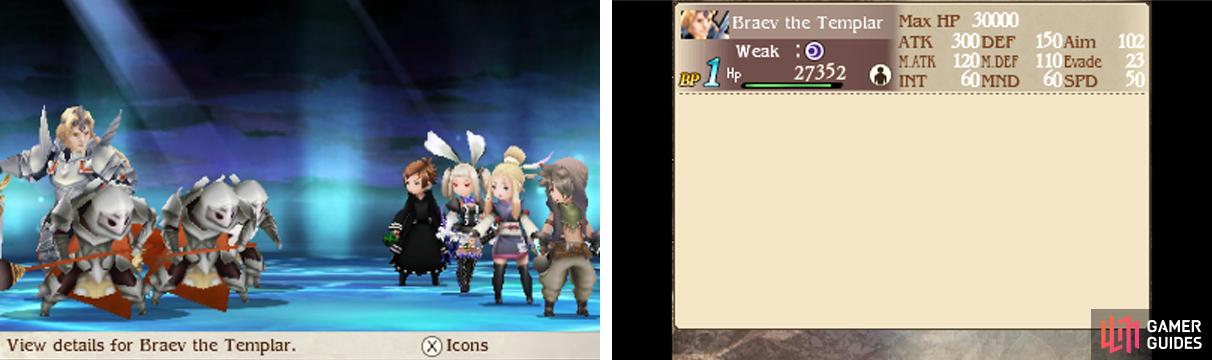
| Boss | Level | HP | Weakness |
|---|---|---|---|
| Braev the Templar | 60 | 30000 | Dark |
| Duchy Guardsman | 60 | 7200 | Lightning |
| Duchy Pike Guard | 60 | 7200 | Lightning |
| Duchy Mage Guad | 60 | 6000 | Lightning |
…And of course your answer results in a test of might. Braev likes to Default to build up BP and reduce the damage he sustains. In addition, because of Fortitude, he will gain BP with each attack received. So expect him to have more BP than he can get rid of.
For offence, he can use Radiant Blast to inflict light-based damage to one or Giant Slayer to damage one, dealing more damage the higher the character’s HP. He also likes to Brave to unleash two attacks–usually Giant Slayer followed by Radiant Blast.
Braev’s attacks pack a punch, but they’re all physical-based, so consider buffing your party’s physical defence or using the Ninja’s Utsusemi or the Exorcist’s Undo Action to avoid one attack. To stop his BP recovery, you can use the Kaiser’s Winter Storm, but it’s usually not a problem.
As for his minions, the Guardsman uses Carotid Slash to damage one and drop their magical defence, while Mr. Pike Guard uses Execution to damage one or First Spear to attack first. Finally, the Mage Guard casts Blizzaga to hurt one and Sleep to try and send someone to dreamland.
Leaving Braev’s minions for too long will hamper your odds of winning, so focus on quickly removing them off the field. They’re all weak to lightning and–despite appearances–have lower physical defence than magical. Plus they’re susceptible to the Ripper and Doujiri-Yasutsuna.
Once you’ve singled out Braev, hit him hard with dark-based spells or the aforementioned humanoid-slaying weapons. You should also use the Hawkeye’s Condor or equip the Valkyrie’s Pierce Default ability to get around Braev’s constant Defaulting.
Be wary when Braev’s HP goes under half as he’ll start to Brave twice, to unleash two lots of Giant Slayer followed by Radiant Blast. On the plus side, he may go into negative BP, allowing you to easily mount a comeback. If you’re still standing that is!
Succeed in reducing Braev’s HP to 0 and he’ll recover all HP for another bout. Of course, if you fought him in Bravely Default, you should have expected that. He’ll even do this a second time, so keep this in mind. But strike him down a third time and he’ll throw in the towel.
Afterwards
As proof of Edea passing his test, Braev will at last hand her the Grand Marshal’s Staff . Like the sword and shield before it, it’s an excellent piece of equipment, so don’t hesitate to equip it. Later, you’ll be automatically brought to Yulyana Needleworks.
Now that you’ve got some downtime, feel free to explore the area for the usual hidden goodies. If you need to rest, speak to the Adventurer’s fox below the house or make a beeline for the bedroom to the east. Otherwise, check the desk behind Braev to find a Star Corslet .
Next, go down the steps and head west. Carefully comb the corner below the window to discover a stray Cat Feather . Finally, hurry to the south-east corner, past the bridge. Some thorough inspection here will yield a Spider’s Web for your growing pile of combat items.
As soon as you think you’ve overstayed your welcome, you can leave via the wooden bridge to the south. Onwards to more adventures!
No Comments