
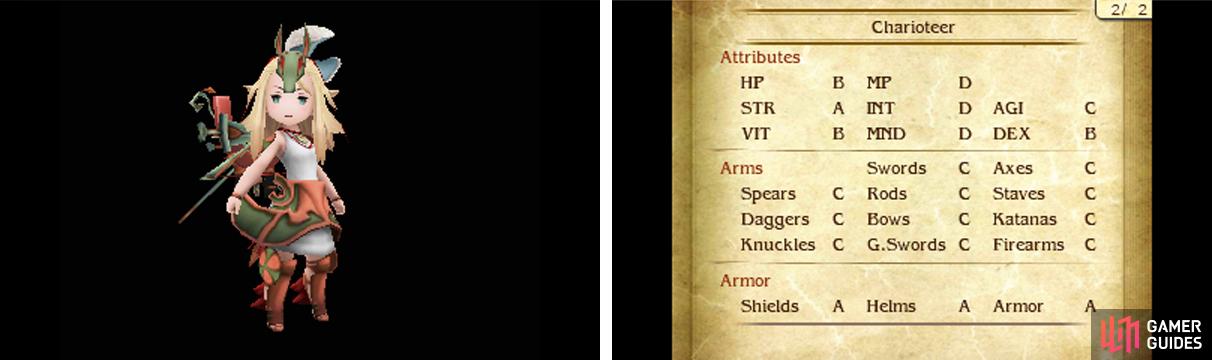
The Charioteer is the first physical-focused job you acquire and a frankly odd one at that. Its physical stats are impressive and it has good equipment proficiencies, making it a fairly reliable tank early on. Born Warrior lets it temporarily master any and all weapons after a few swings.
Its main claim to fame is Triple Wield and Quad Wield, which allows an additional weapon to be equipped in place of headgear and body armour. Of course, this sacrifices a lot of defence. Either way, physical attackers will want to swap to it to learn Physical Attack 20% Up.
Specialty: Born Warrior
Each time the user performs a conventional attack (via the Attack command), their proficiency with their equipped weapons increases one stage for the duration of the battle (up to S).
After three conventional attacks, the Charioteer will reach S proficiency in any weapon, boosting their damage. It’s a bit fiddlesome for short battles where you may not have a chance to utilise your increased proficiency, but otherwise great as you can use any weapon well eventually.
Level 1: Trample
| Type | Cost |
|---|---|
| Command | None |
Deal 0.75 to 1.5 times damage to an enemy. The closer your HP is to maximum, the more damage dealt.
When your HP is maximum, you’re guaranteed to deal 1.5 times damage. As long as you can keep your HP high, this ability is fantastic for dealing damage for no additional cost.
Level 2: Physical Attack 20% Up
| Type | Cost |
|---|---|
| Support | 1 slot |
Increases the user’s Physical Attack stat by 20%.
As mentioned previously, stat-enhancing abilities are better in this game, but far and few between. This one in particularly is strongly recommended for physical attackers, at least early on–and at this low level you’ll definitely be able to acquire it early on!
Level 3: Triple Wield
| Type | Cost |
|---|---|
| Support | 1 slot |
The user can equip weapons to the head slot, allowing for a maximum of three equipped weapons and thus three conventional attacks. Physical Attack is halved for weapons equipped in the head slot unless Dual Wield is also equipped.
This ability lets you gain 50% more attack at the cost of your headgear slot. Since headgear doesn’t really boost your defences that much, it’s not a bad compromise at all. Sadly, in case you were wondering, your character doesn’t actually wear a weapon on their head.
Level 4: Weapon Toss
| Type | Cost |
|---|---|
| Command | None |
Throw a chosen weapon at a foe, dealing 7 times damage and ignoring Physical Defence. The better the weapon’s attack, the higher the damage. Only swords, greatswords, axes, spears, daggers and katanas can be thrown. Weapons thrown can be recovered after battle or by using Retrieve Weapon.
This is a novel way to deal damage independent of your character’s stats. For example, even a weak Wizard could use this to inflict the same damage. As an extra bonus, it bypasses the enemy’s physical defence, which is great for bulky foes. Only issue is that it’s a bit cumbersome to use.
Level 5: Born Warrior
| Type | Cost |
|---|---|
| Support | 2 slots |
Each time the user performs a conventional attack (via the Attack command), their proficiency with their equipped weapons increases one stage for the duration of the battle (up to S).
With this ability, any job will eventually reach S proficiency with any weapon during battle. But unless you’re wielding multiple weapon types, one Lore ability will generally suffice.
Level 6: Retrieve Weapon
| Type | Cost |
|---|---|
| Command | 8 MP |
Recover all weapons thrown during battle.
If you want to use Weapon Toss or Wild Toss multiple times, here’s your ticket.
Level 7: Wild Toss
| Type | Cost |
|---|---|
| Command | None |
Throw a chosen weapon at all foes, dealing 4 times damage and ignoring Physical Defence. The better the weapon’s attack, the higher the damage. Only swords, greatswords, axes, spears, daggers and katanas can be thrown. Weapons thrown can be recovered after battle or by using Retrieve Weapon.
What the game doesn’t quite make clear is that you need one weapon for each foe, so if there’s a mob of 6, you need 6 of the same weapon. It’s OK for dealing with bulky mobs, but you’re unlikely to have many spare powerful weapons lying around.
Level 8: Master-at-Arms
| Type | Cost |
|---|---|
| Command | 8 MP |
Increase the weapon proficiency for all of the user’s equipped weapons by three stages for the duration of the battle (up to S).
This is a fast alternative to using Born Warrior, especially if you’re not in the Charioteer job and need to quickly boost a weapon proficiency from, say, E up to S. Why you’d need to do that is another question though.
Level 9: Wanton Destruction
| Type | Cost |
|---|---|
| Command | 1 BP |
Deal 6 to 16 hits targeting random foes, each hit inflicting 25% damage. The higher the user’s proficiency with the weapon in their right hand, the more hits.
With a weapon proficiency of S, you’ll achieve 16 hits, effectively dealing 2 times damage per turn. Which isn’t bad at all and a potential massacre with Triple Wield or Quad Wield. However it’s not recommended against single foes since the damage remains capped at 9999.
Level 10: Quad Wield
| Type | Cost |
|---|---|
| Support | 2 slots |
The user can equip weapons to the head and body slots, allowing for a maximum of four equipped weapons and thus four conventional attacks. Physical Attack is halved for weapons in the head and body slots unless Dual Wield is equipped.
This ability takes the sacrificing defence for attack approach to the extreme. Fantastic for enemy mobs, but suicidal against bosses. That said, depending on the situation, you can use Utsusemi, Undo Action or Soul Mirror to get around your non-existent defence.
Level 11: Achilles Heel
| Type | Cost |
|---|---|
| Support | 2 slots |
All attacks targeting a monster’s family type will hit for critical damage always.
Since every enemy belongs to a particular family and there’s at least one weapon that targets every monster family, as long as you have the right weapon for the job, Achilles’ Heel is a very easy–albeit slightly costly–way of boosting your physical damage.
No Comments