
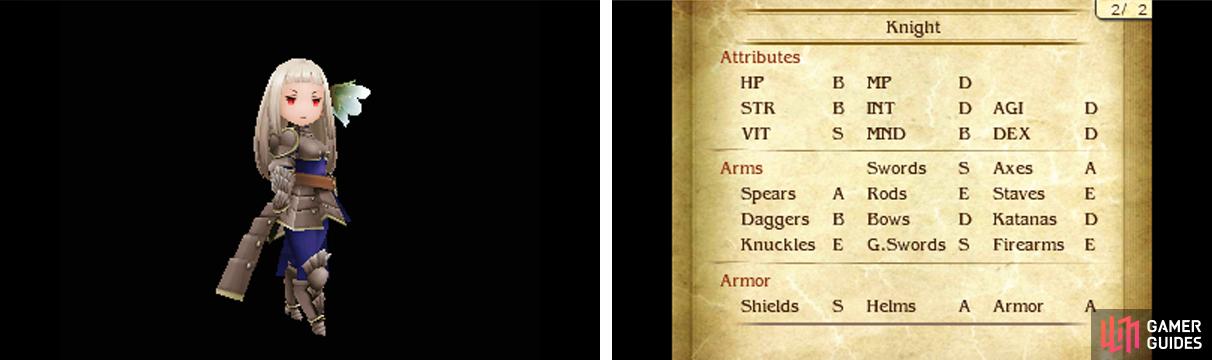
Knight is a sturdy physical-based job that’s great at tanking hits. It has exceptional Vitality and high armour aptitudes, especially in shields, allowing it to serve its purpose well. With decent Strength, it’s capable of dealing decent damage back too.
Like White Mage and Black Mage, the Knight is another of those “earlygame jobs that joins late”. However unlike those two jobs, the Knight doesn’t have any comparable rivals until later on. Also, while it’s not the best job, it has some amazing abilities too.
Specialty: Protect Ally
If an ally with less than 20% HP receives a single-target physical attack, the user takes the damage for the ally.
This ability can be used to protect fragile allies like healers or spell-casters. If you acquired the Merchant job, this is effectively a reverse White Knight. Can also be abused against foes that only use single-target attacks, by purposely making your other party members go below 20% HP.
Level 1: Stomp
| Type | Cost |
|---|---|
| Command | None |
Deal 1.25 times damage to an enemy, but decreases the user’s Physical Defence and Magic Defence by 25% (down to a minimum of 75%).
As an offensive ability that costs nothing, it’s pretty decent. The defence drop hurts, but Knights are naturally tanky, so it’s not too noticeable most of the time.
Level 2: Two-Handed
| Type | Cost |
|---|---|
| Support | 1 slot |
Axes, spears, staves, katanas, greatswords can be equipped in both hands to double the weapon’s Physical Attack.
At the time you acquire Knight, enemies are become increasingly more resilient and Two-Handed is one of the best ways to deal with them (the other being the Ninja’s Dual Wield). You’ll need to sacrifice a shield, but the attack boost is usually worth it.
This ability also works well with other physical jobs like Fencer and Swordmaster. Just bear in mind that Dual Wield slightly outperforms Two-Handed, but early on, you may not see much of a difference.
Level 3: Ironclad
| Type | Cost |
|---|---|
| Command | 5 MP |
Increases the user’s Physical Defence to its maximum level (usually 150%) for one turn at the start of the turn.
This is an effective alternative to Defaulting, although you can’t save up BP. Best used in conjunction with Protect Ally so you can tank hits even more effectively.
Level 4: Protect Ally
| Type | Cost |
|---|---|
| Support | 1 slot |
If an ally with less than 20% HP receives a single-target physical attack, the user takes the damage for the ally.
Nothing’s really changed despite this now being a support ability rather than a Specialty. If you prefer, you can now use this in the (better) tanky jobs that follow after the Knight.
Level 5: Shield Lore
| Type | Cost |
|---|---|
| Support | 1 slot |
Increases the user’s shield proficiency to S.
This ability is nice for healers if they have a shield.
Level 6: Shield Strike
| Type | Cost |
|---|---|
| Command | 8 MP |
Attack one enemy and increase the user’s Physical Defence by 25% (up to 150%) for two turns. Only available when a shield is equipped.
This is pretty much the opposite of Stomp and fantastic if you’re focusing on defence. Obviously, you can’t use this together with Two-Handed, so you’ll have to choose one (more power) or the other (more protection).
Level 7: Full Cover
| Type | Cost |
|---|---|
| Command | None |
Choose an ally. For one turn, from the start of the turn, the user takes single-target physical damage in place of the ally, but only suffers half damage.
A better version of Protect Ally that only protects one ally. Hopefully you only have a single wounded ally at a time then!
Level 8: Dual Shield
| Type | Cost |
|---|---|
| Support | 1 slot |
Enables a shield to be equipped in the right hand, in addition to the left hand.
If defence is all that matters, this is one of the best abilities to have. With two shields, full armour and the Freelancer’s Physical Defence 20% Up, you’ve got yourself one heck of a wall. Trouble is, you can’t use normal attacks and your damage output drops to the floor…
Level 9: Chivalrous Spirit
| Type | Cost |
|---|---|
| Support | 1 slot |
Each time the user uses Protect Ally, Full Cover, White Knight or Iron Wall, their Physical Defence increases by 25% (up to 150%) for five turns.
If protecting allies is your M.O., this ability is a perfect fit.
Level 10: Super Charge
| Type | Cost |
|---|---|
| Command | 1 BP |
Attack an enemy, converting double the user’s Physical Defence into attack power.
This ability was born to be used with Dual Shields. With the massive Physical Defence from all your shields and armour, Super Charge hits like a Knight-shaped truck. Who says you can’t have offence and defence?
Level 11: Iron Wall
| Type | Cost |
|---|---|
| Command | None |
For one turn, from the start of the turn, the user takes single-target physical damage in place of any ally, but only suffers half damage.
This ability is the perfect fusion of Protect Ally and Full Cover–in other words, the ultimate protecting move. Combine it with Dual Shields to stop foes that rely on single-target attacks straight in their tracks. It’s incredible, but watch out for foes that use group attacks.
No Comments