Grave-digging
Wonderful! Now it’s the kaiser who’s in another castle. Well, it’s nice when the enemies are clever, we suppose. That said, you can’t afford to let him get away for a fourth time, lest you hang your head in shame. So hurry and use a Teleport Stone to leave the Skyhold.
Back on the world map, fly a short distance east and land at Gathelatio. This is where it all began and it looks like this is where it’s going to end. Inside, head for the east-most part of the city, past the Geneologia Manor. At the end, there’s a conspicuous door that demands attention.
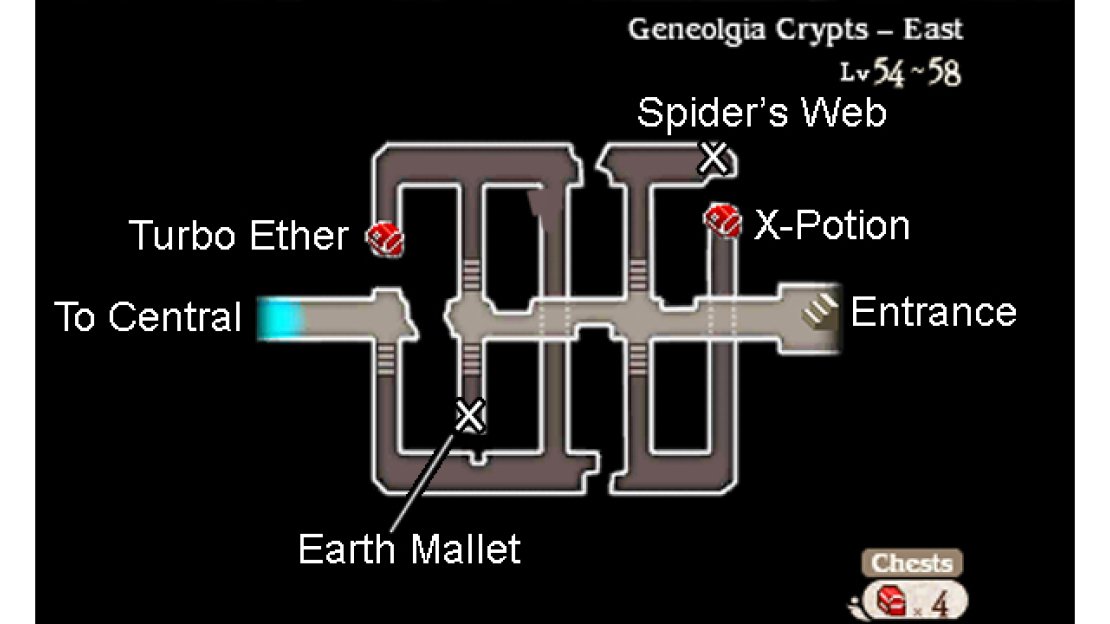
Geneolgia Crypts - East
The crypts of the esteemed House Geneolgia are a veritable labyrinth. Fortunately there’s such a thing as a “map”. In any case, start by heading west along the central path. When you reach steps leading north and south, go down the steps to the north to pick up a Spider’s Web .
Next, go down the southward steps to reach a chest containing an X-Potion through the tunnel. Back on the central path, continue west to reach the broken end of the path. Here, head directly south, down the steps, to find an Earth Mallet lying on the ground.
Afterwards, go down the northward steps and turn left at the junction to arrive at a chest with a Turbo Ether inside. Finally, head right from the junction and follow the path as it goes through the tunnel and around to the west side of the chamber.
Just before the exit to the next area, the fox companion is waiting in case you want to set up camp. You may as well accept the invitation with grace.
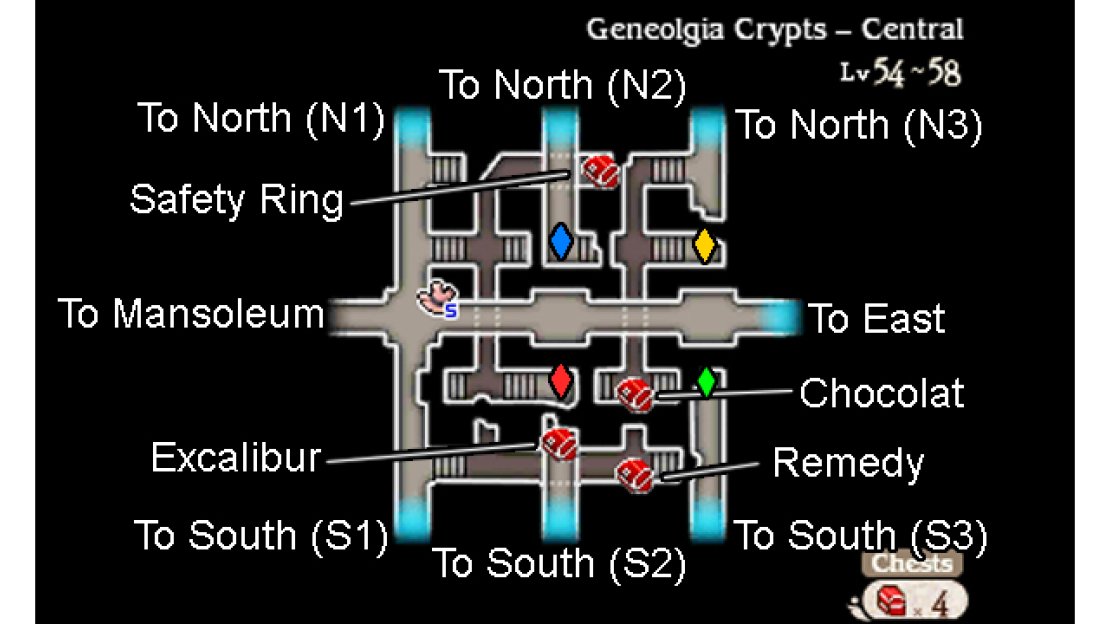
Central
In the next area, things get more interesting. First, make your way west along the central path. Take note of the crystal switches along your party–two on each side. At the far end, you’ll find the Adventurer already, but the way ahead on the left is currently shut tight.
You can probably guess what you need to do next–trigger the four crystal switches to open the way. You can do the switches in any order, but we’ll try to get to them in a somewhat logical order. First, head a few paces north from the Adventurer.
Go down the steps on the right and follow the northward path, under the overpass, for a chest containing a Safety Ring . Give this to a character to prevent the instant death status that the White Queens and Vorpal Bunnies love to inflict. Sadly, it’s just one, but it’s better than nothing.
Next, follow the same path in the opposite (south) direction, through the central overpass. On the other side, head up the steps on the right to locate the red crystal switch. Give it a careful examination to illuminate the first crystal in front of the westward door.
Three more switches to go. Retrace your steps so you’re back on the west-most path, north of the Adventurer. From here, head all the way north into the next area.
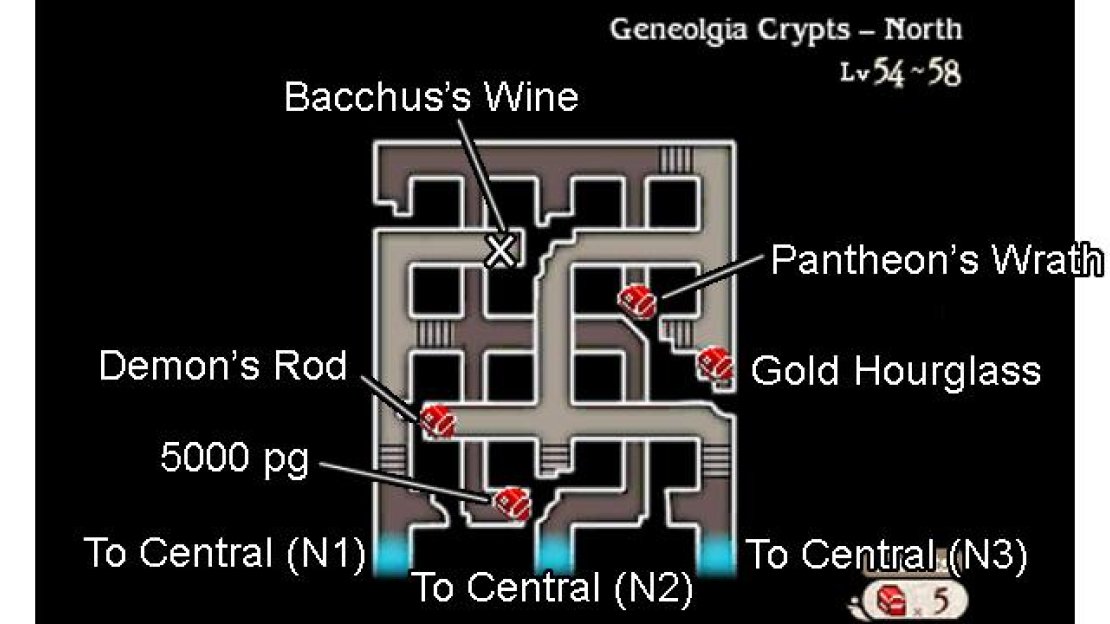
North
This area is quite confusing. To begin with, make your way north, ignoring the steps to the right for the time being. At the end of the path is a glittering bottle of Bacchus’s Wine , perhaps somebody’s offering? Next, go down the steps you skipped by. You’ll arrive at a crossroad.
First, head south and under the overpass to discover a chest hiding 5000 pg . Afterwards, follow the path east from the crossroad. Eventually, after going under two overpasses, you’ll reach an exit back to the Central area of the crypts. Beyond, inspect the blue crystal switch.
Two more switches remain. Return to the North section and, finally, go north from the crossroad. After going through the tunnel, you’ll be at a junction. If you have the Summoner asterisk, turn left to reach an Anchorite who you can challenge to receive the Susano-o summon.
Unlike Bravely Default, Susano-o deals dark magic, rather than non-elemental. As such, Dark Charms from Sagitta Village or Chompshire will help to reduce the damage. Once you’ve earned the summon or otherwise, continue east from the junction.
Before the next set of steps, go south through the tunnel to reach a chest containing a Pantheon’s Wrath . After that, go up the steps and head all the way south, ignoring the westward path for a moment. At the end of this route is a chest with a Gold Hourglass inside.
Next, follow the inviting path that you just went past. Towards the south, there’s one last junction. To finish your duty as a tomb raider, head west to locate a chest with a Demon’s Rod inside. This powerful rod also boosts the damage of dark spells, so keep it somewhere handy–like in your hands.
Finally, head east to reach another exit. Beyond, you’ll be in a different part of the Central crypt. Go down the nearby steps and follow the path a few paces south. Soon on your right there’ll be steps going back up–follow them to reach the yellow switch.
Just one more switch to go! Before you forget, go back down the steps and carry on south through the tunnel. On the other side is a chest containing some Chocolat . Yup, that’s some treasure, alright. From here, backtrack all the way back to the Adventurer. Use a Teleport Stone if you’re lazy.


No Comments