Skyhold - Exterior
This is it! The moment you’ve been waiting for since the very beginning of the game. Back then, you had absolutely no chance in hell of surviving an assault, but 40 or so hours later, the odds are starting to look more in your favour.
You’ll start along the east side of the Skyhold exterior. No enemies will obstruct your path, so relax and head clock-wise around the perimeter path. Go straight through the cannon house to the south-east and enter the building to the south-west.
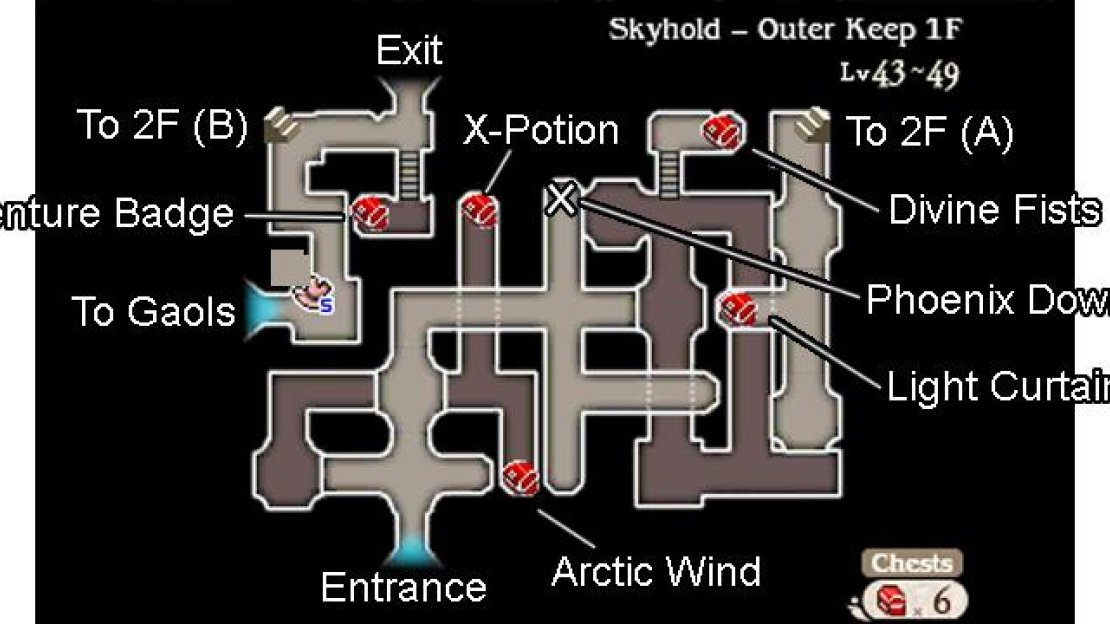
Outer Keep - 1F
The main gimmick of this dungeon are platform lifts that you can lower and raise by inspecting the lever next to the lift. Keep in mind that if you want to ride the lift, you need to be standing on the lift before pulling the lever. Near the entrance, there’s a lift to the left that you can try.
First, step on the left side of the lever, on top of the lift, and give the lever a good pull. Voila! You’ll be brought down to lower ground along with the lift. However, since the lever isn’t attached to the lift, you can’t go back up from your current position.
Follow the path ahead and there’ll be another lift. If you want to return to the entrance, use the same logic as before. Stay on the right side of the lever, on top of the lift, and pull the lever from there. But we don’t need to do that just yet, so carry on to the east.
Next, head south-east to snag an Arctic Wind from the chest below. After that, go north under the overpass for a chest with a handy X-Potion . Now use the lift to return to the entrance, but don’t leave the dungeon. You may notice that the lift has also bridged the gap to the north.
So if you wish to proceed, follow the new path to the north. When you reach the crossroads near the centre, first head south and then east to pick up a Phoenix Down from the ground. Back at the crossroads, head east onto the platform lift and use it descend to lower ground.
Run up the stairs directly above for a chest containing a pair of Divine Fists . From there, make your way to the south-east corner of the floor via either of the southward paths. Use the platform lift there to return to higher ground.
Finally, head north along the east side. Along the way, there’s a chest on the left with a Light Curtain inside. Then go up the stairs in the north-east corner.
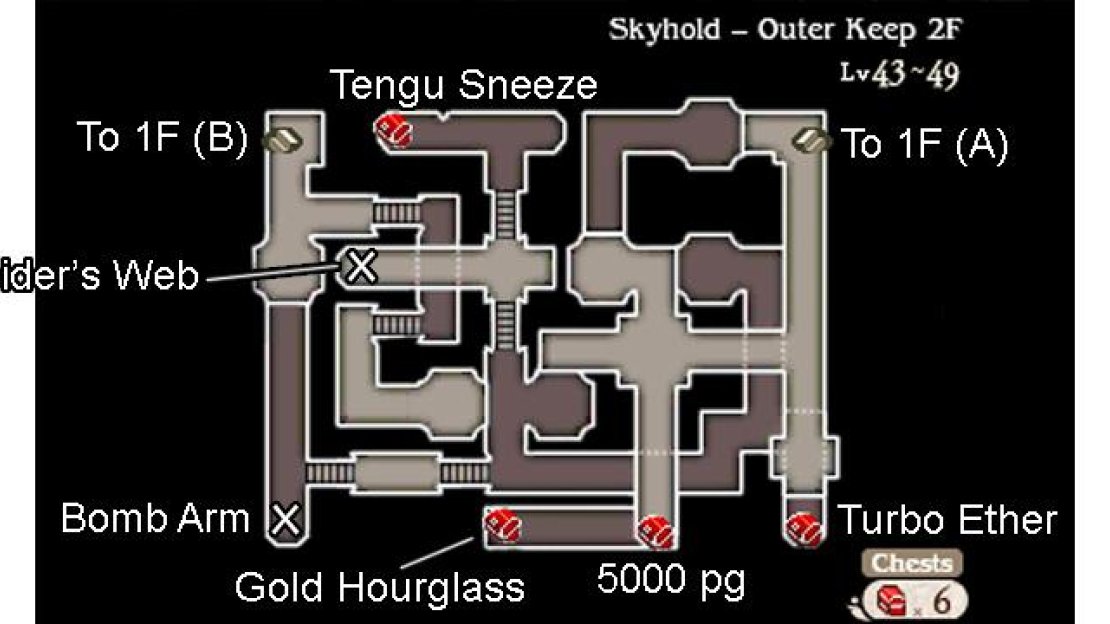
Floor 2F
This is the final floor of the Outer Keep, but not necessarily the entire Skyhold. Begin by heading south, then go west at the first junction. At the crossroads, go south first for a chest containing 5000 pg . Next, head north to find a pair of platform lifts.
The one on the left will take you back to the entrance, but hopefully you don’t need to do that. Instead, step on the lift on the right and use it to go down. Follow the path south, under the overpass, and stop near the south-east corner.
Here, go under the floor above to reach a hidden chest in the far corner with a Turbo Ether inside. Next, head west from where you left off. As you go under the southward overpass, head south yourself to reach the bottom-most path where a chest with a Gold Hourglass awaits.
Afterwards, go all the way west, past the stairway bridge. In the most south-west corner, there’s a destructive Bomb Arm for the taking. From here, go back to just before the stairway bridge and head all the way north past the pair of platform lifts.
Up on higher ground, go west to pick up a Spider’s Web from the floor, then carry on north for a chest with a Tengu Sneeze . That’s everything to be found. Go back to the previous pair of lifts and use the left-side lift to reach the stairs in the north-west corner.
Floor 1F (Again)
Back upstairs, go east, then down the nearby stairs to reach the last chest, containing a Venture Badge . With the keep thoroughly raided, return to the stairs and head south towards the exit. A tricky boss battle is coming up, so be sure to check in with the Adventurer.


No Comments