The Guardian
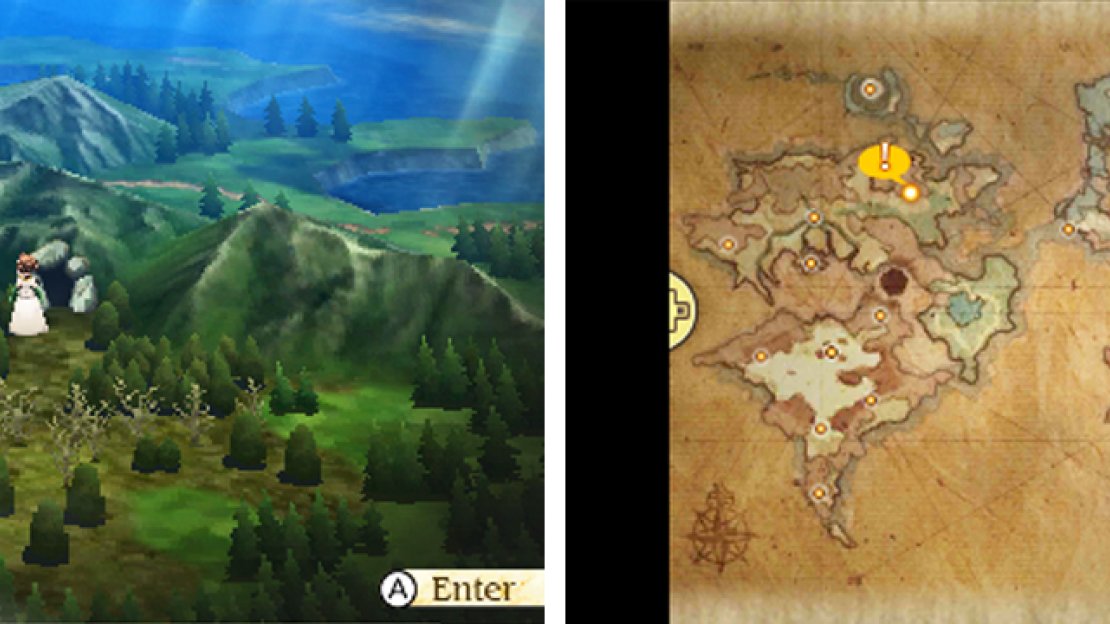
The path to the Sagitta begins to the north-east of Florem.
On the world map, travel east from Florem, across the two bridges. After crossing the second bridge, travel in a north-westerly direction along the path between the river and mountains until you reach the sea of trees. From here, follow the trees all the way east.
Eventually, after passing the bay to the north, you should notice a cave sitting cozily among the northern mountains. This is the entrance to the Guardian–the place where Artemia the Ranger was watching over in Bravely Default and your way into the realm of the Sagitta.
Inside, your guide Lotus will direct you to an unseen path to the east. Before following, search the area in front of the giant skull to the north for some Beast Flesh . Next, run towards the protruding fang left from the entrance to discover a Tengu Sneeze .
Sagitta Forest - South
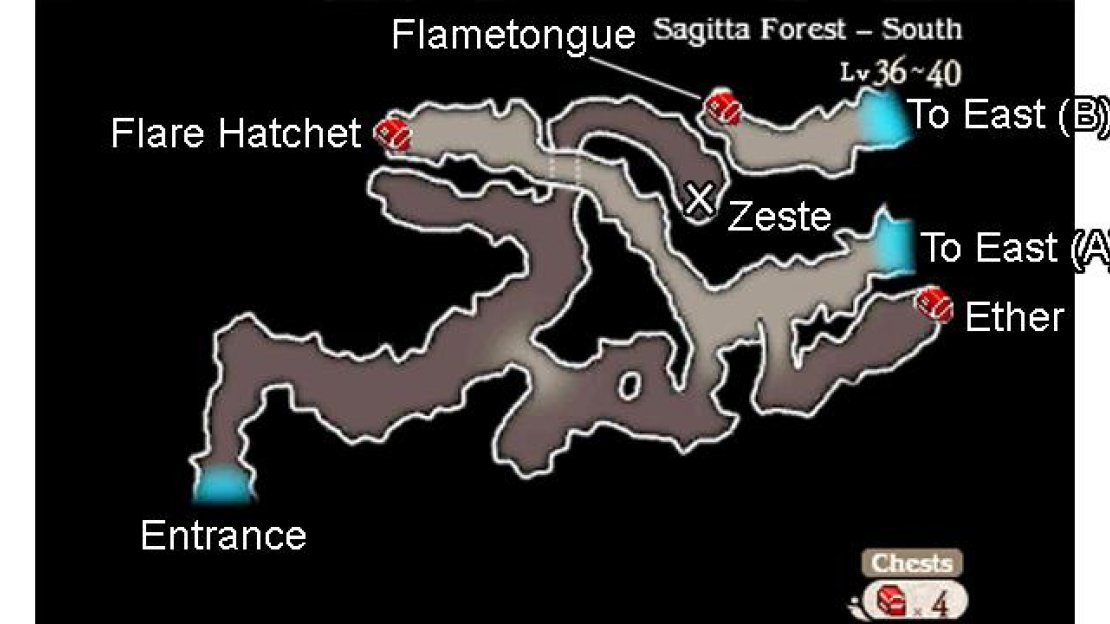
This dungeon demands little from your brain, but the monsters are getting tougher, so keep on your toes. From the start, follow the path east until you reach the log bridge near the centre. For now, continue in a north-easterly direction, under the overpass, to pick up a slice of Zeste from the floor.
Return to the log bridge and cross over it to the other side. Next, make your east, up the ramp onto higher ground. Afterwards, head north-west across the overpass for a chest with a Flare Hatchet inside. This is a nice weapon–perfect for a Catmancer–since many foes here are weak to fire and axes.
Head back to where you entered higher ground and continue east. Go down the path nearby and follow the path to the end for a chest containing an Ether . Finally, return to higher ground and keep going east towards the next area.
East
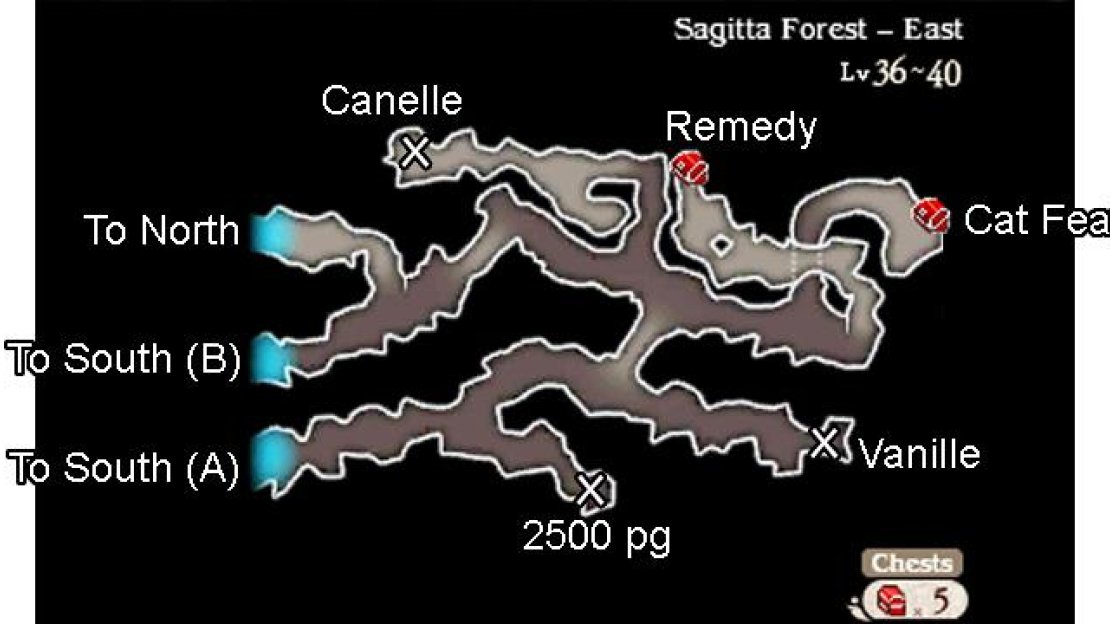
Begin by heading east along the woodland path. At the nearby junction, take the bottom path to discover 2500 pg lying on the floor, then go back and follow the top path. Before long, there will be a log bridge near the middle. Before going across, carry on east for a slice of Vanille .
After crossing the log bridge, go east. When you see a tunnel going through higher ground, follow it to find a chest containing a Cat Feather . Return to before the tunnel and keep going east, then up the hill onto higher ground. At the end is a chest with a useful Remedy tucked inside.
Next, backtrack to the area just after crossing the log bridge and head north through the gap between higher ground. Follow the path beyond to scoop up a slice of Cannele at the end. That’s everything in this area; return to just after the log bridge and travel all the way west.
Towards the far west, ignore the ramp going up for now and continue past to the middle exit. Back in the South section, flip open the chest for a Flametongue –give this fiery blade to your Fencer or sword-wielder of choice.
Finally, return to the East section and climb up the ramp that you skipped over previously. Carry on ahead to reach the exit to the next area.
North
This area will be mighty familiar to those who played the Bravely Second demo. Travel west along the river, keeping an eye out for a log bridge to the north. Cross over the bridge and pilfer the Earth Mallet from the chest, then hop over back to the main path.
Continue west, stopping when you can no longer see the river above and the path seems to abruptly stop. Head north-west through the bushes and under the overpass to reach a chest containing some Catnip . Backtrack to before the bushes and follow the path to the south-west.
Soon, there will a ramp above leading up to higher ground. For now, stay on lower ground and follow the path west, then under the tunnel going through higher ground. At the next ramp, go up and turn right to collect 3000 pg from a chest.
Back on lower ground, carry on west to find a chest in the north-west corner with an X-Potion inside. Stash the potion safely in your pouch and travel east from the opened chest. At the end of this road, you’ll discover a rare Enopu Mushroom glimmering on the forest floor.
Retrace your steps until you’re back at the first ramp near the south-west of this area–of course, now you should go up it. On higher ground, travel in a north-easterly direction, ignoring the first path branch going east. Eventually you’ll reach a ramp going west and a log bridge to the east.
If your party’s still in one piece, head down the westward ramp first and follow the path clockwise for a chest containing a pair of Force Amulets , useful for White Mages. Finally, cross over the eastward log bridge to reach the Adventurer-fox duo and the exit.
There’s no boss waiting at the end, but you should still rest with the fox and save your game with the Adventurer while you have the chance to do so.


No Comments