
Thieves Den
Normally, this would be the end of the Harena Ruins and the place where you fight the sidequest boss. However, these ruins hold one more secret–and a very big one at that. Before anything though, speak to the fox by the entrance to set up Yew’s tent.
After resting your battle wounds, approach the throne at the top of the stone steps and give it a thorough inspection. Now you can press the A button in front of the dusty chair to enter the hidden area behind it.
Forgotten Halls

Beyond, there are no more gas-spewing statues, just a lot of really long tunnels. Oh well, you’ll need all the experience you can muster for the boss battle ahead. Begin by heading east through the tunnel, taking a detour south at the first fork to loot a Balsam chest.
Continue east and ignore the next passage leading south; at the end of the eastward tunnel is 250 pg lying for the taking. Return to the previous fork and head south this time; soon, the path will divide again. Take the tunnel going south-east for a chest with a Star Pendant .
Head backwards and follow the tunnel going south-west until you reach a crossroads. From here, follow the path north-west for a chest containing an Earth Drum . Next, take the path leading south to find a Teleport Stone on the floor. Finally, travel east from the crossroad.
Eventually you’ll reach the final fork. To finish your treasure hunt, continue east and prise open the final chest for a Phoenix Down . Then return to the fork and head south. Nearby is the Adventurer and a blue exclamation mark at the very end.
Rest and save if necessary, then inspect the small blue stone south-west from the stone pedestal. The Jackal and DeRosa will arrive on the scene, both eager to claim the Wellspring Stone for their own purposes. After much debate, the two will be locked in battle by the pedestal.
At this point, you may speak to either of the two asterisk holders to challenge them to a battle. The game will helpfully inform you that you’ll receive the job asterisk of the asterisk holder you battle and defeat–but not the other. Be sure to carefully pick your side…
Boss: The Jackal
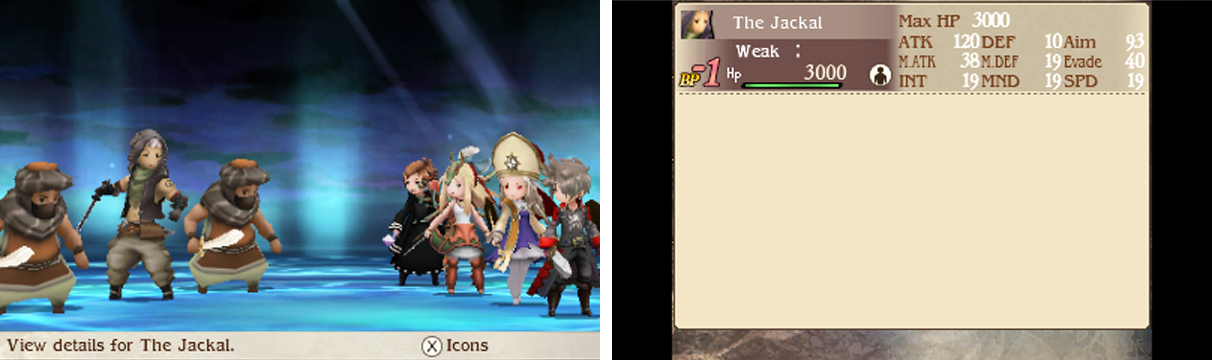
| Boss | Level | HP | Weakness |
|---|---|---|---|
| Jackal | 19 | 3000 | Nothing |
| Desert Vigilante x2 | 19 | 950 | Lightning |
Of the two boss battles, The Jackal is the easiest, but by no means a cakewalk. Try to equip everyone with optimum physical defence; if your Wizard was dual-wielding rods, give them a shield now.
The Jackal uses Steal Breath to drain HP from one. On occasions, he will use Steal to rob a Potion from you. He may also Brave to use Steal Breath and a regular attack, leaving him immobile for one turn.
Meanwhile his lackeys, the Desert Vigilantes, use Final Strike for a strong hit on one at the end of the turn. Combined, the three thugs can inflict a lot of damage fast, so you’ll want to eliminate the weakest link–the vigilantes–first.
Begin by casting two lots of Lightning Needle on the two vigilantes, while the rest of your party Defaults. With luck, the vigilantes were planning to use Final Strike, so your Wizard will go first. But if you’re unlucky, The Jackal may attack your Wizard, hence the need for a shield.
Once The Jackal is alone, he will become absolutely enraged and Brave 3 times to unleash 4 attacks, but as a result he will become immobile for 3 turns. During this stage, Default with everyone except your immobile Wizard to survive The Jackal’s fury.
With The Jackal a sitting duck, you can unleash as many attacks as you want down to -3 BP and patch up your party at the same. If your Wizard got knocked out by The Jackal, you’ve got plenty of elbow space to resurrect him or her.
For attacks, the Charioteer’s Trample is good at maximum health, while Wizards can use Mist and Dart for varying levels of pain. Finally, your Fencer can begin with Blazing Wolf, then alternate between Wolf Fang and Goring Aurochs.
Boss: Fiore DeRosa
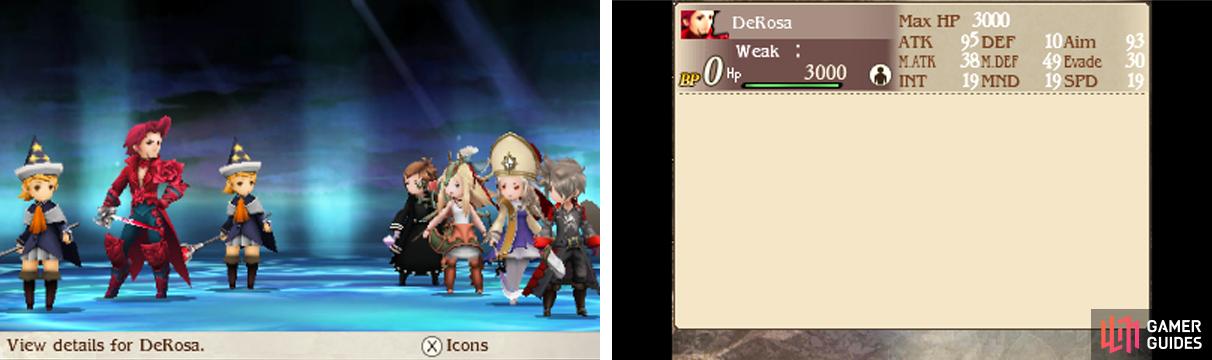
| Boss | Level | HP | Weakness |
|---|---|---|---|
| DeRosa | 19 | 3000 | Nothing |
| Mage Apprentice x2 | 19 | 950 | Nothing |
For this battle, we recommend a powerful Wizard, a Bishop (or somebody with the Holy Magic job command whose Bishop job level is 2 or higher) and a Fencer who’s job level is 4 or higher. The remaining character can be a Charioteer or another Fencer or Wizard.
DeRosa is the main force here, using Blizzara to inflict medium water damage on your party. He also uses Captivating Cologne to charm one; snap them out with a Remedy or weak attack. The killer is that any attack has a 25% chance of increasing DeRosa’s BP by 1.
Whenever DeRosa’s BP is 1 or greater, he will Brave twice and cast Cura and Blizzara, before finishing with a normal attack. If he does this with exactly 1 BP, he will end up with -1 BP, rendering him immobile for one turn. Always Default whenever DeRosa’s BP is more than 1.
Meanwhile the Mage Apprentices use Shining to inflict light damage onr your party and Love Tap to poke DeRosa, in an attempt to increase his BP. The gals do pitiful damage, but Love Tap can mess with your plans, so you’ll want to focus on them first.
Begin by Defaulting with all characters until you have 3 BP. Make sure your characters are all above half HP; if not, have your highest HP characters heal them with Potions or whatnot. If your party has taken significant damage, Group-Cast Heal twice or use Halfsies.
As soon as the coast looks clear, have your Bishop cast Holy Night on all four members of your party. Afterwards, if your Wizard has high HP, have him or her cast two lots of any Needle on the Mage Apprentices. Any other attackers with high HP should lend a hand too.
On the next turn, Default until you have 3 BP again and allow DeRosa to heal your party with his attacks. If any Mage Apprentices are still standing, finish them off. When you’re back to 3 BP, go crazy and unleash all of your strongest moves on DeRosa.
Your Wizard should use Hammer to get around DeRosa’s high magic defence, while your Charioteer can use Trample if at maximum HP. If your Fencer is Level 4, alternate between Wolf Fang and Goring Aurochs. Don’t hesitate to unleash some of your special moves.
After your onslaught, DeRosa will most likely have 3 BP, so Default to absorb his blows. Unfortunately, DeRosa may end up using Cura twice. However if your attacks were strong enough, you should have taken off more HP than he has healed. If not, reset and train your party.
Alternatively, if you dealt enough damage to DeRosa to drop him below half HP, he will forgo Cura and cast Blizzara twice instead. This is even better since he won’t heal himself and you’ll take no damage because of Holy Night.
Now repeat the onslaught when you reach 3 BP again, remembering to put up Holy Night again after it wears off. Eventually, after DeRosa’s HP drops even more, he will tire and give up Braving outright; at this point, you’ve basically won.
No Comments