
Floor B3

Wow, this dungeon seems to go on forever; fortunately the end is almost in sight… Start by heading east from the fake wall near the bottom-right corner. On the other side, go north and follow the invisible path east, then go down the stairs to lower ground.
Next, travel in a south-westerly direction until you reach the steps going east and west. Position yourself so you’re standing a few paces above the path to the eastward steps–if you look carefully, you should be standing on top of some cobwebs.
From here, run directly west to travel underneath higher ground, then go up and around to reach a Bomb Arm shining on the floor. Back on the main path, head directly south, past the steps. Below, there’s an invisible maze.
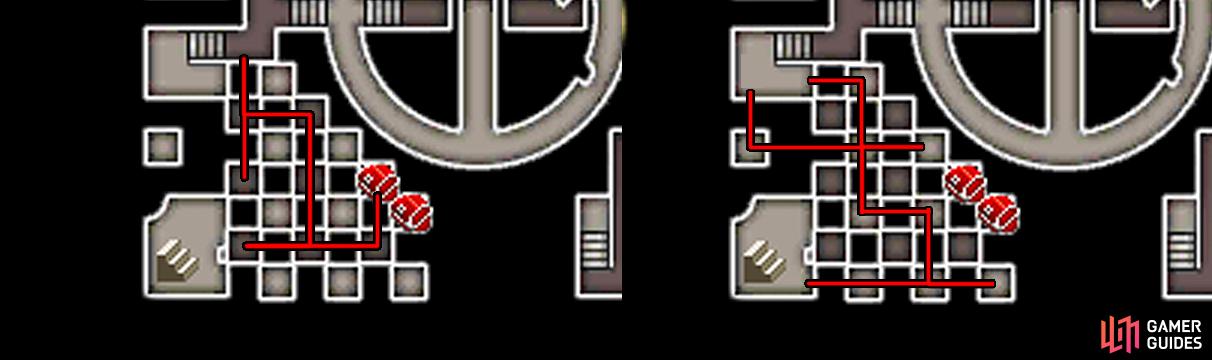
Left: Lower ground route. Right: Higher ground route.
From the main path, follow this route through the invisible paths: south, east, south, south, east, north. This will take you to a chest containing a Remedy . Return to the main path and go up the stairs to the left. Up on higher ground, follow this route: east, south, south, east, south, west, west.
This will lead to the south-west corner where there are stairs leading back up. Upstairs, open the chest ahead for a mighty Trident . That’s the west side covered. Retrace your steps until you’re near the steps leading east to the central circle, then proceed onto the circle.
The puzzle here isn’t quite as trivial as the previous one. Start by heading anti-clockwise around the circle until you reach the south-most part. Next, go up along the higher path leading to the cetnre. Ignore the green switch here for now.
Instead, continue north onto the invisible path, then turn left to reach the chest containing a Gaia Gear . Go back to the south-most part and continue in an anti-clockwise direction. Inspect the blue switch at the far end to lower the central blue platform.
After that, return to the centre and press the green switch to lower the green platform to the east. This will open the path to the red switch. Go back to the west side of the circle and descend the stairs on the right to reach lower ground.
Here, head towards the the centre, where the lowered blue platform is. Before doing anything else, go north, past the lowered red platform to reach a chest with a Light Curtain inside. Next, head east from the centre and trigger the red switch at the end to raise the red platform.
Ta-da! If you haven’t noticed, you’ve solved the puzzle! Go west back to the outer circle, then travel clockwise towards the north-most part of the circle. Having raised the red platform, you can use it to cross north to the next tablet. Phew, just the east side of this floor to explore now.
From the tablet, head east across the invisible path, then down the steps to lower ground. Follow the path in a south-easterly direction to obtain a Lilith’s Kiss from the floor at the end. Go back up the steps and follow this route: east, south, east and finally south all the way.
You should end up in the south-east part of the floor, with steps on the left going down. Accept its invitation and descend to lower ground. From here, head south and go up the nearby steps. Back on higher ground, follow the invisible path west to reach a chest containing an awesome Ancient Bow .
To finish the task, return east to the top of the steps and follow this route: east, east, south, east. Prise open the chest in the corner for your final item–a Tengu Sneeze . Afterwards, retrace your steps until you back before the steps.
From the bottom of the steps, head east through the fake wall and then hurry north-east up the steps on the other side. Finally, travel north along the invisible path and turn left when you’re parallel to the visible path. Beyond is the Adventurer and the final tablet.
Oddly (and almost too kindly), there’s no boss in this dungeon. Still, the journey has been long and tiring, so it’d be a smart idea to save and rest up. After checking in, continue north to see what the tablet has to say. …And you’re all done! Use a Teleport Stone to exit the dungeon at your leisure.
No Comments