
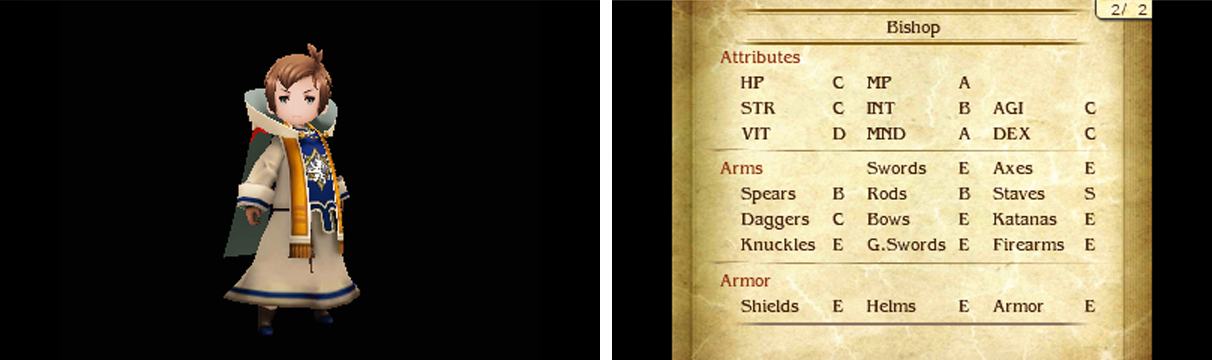
Bishop is the early-game healer job and crucial for surviving boss encounters. It has excellent stats for healing, but is fragile as you might expect. Its Holy Magic restores a fixed percentage of a character’s HP, so anyone will use it well–not just a Bishop.
Early on, Bishops are relatively underpowered unless you use their signature Good Measure to boost their healing power. However don’t be discouraged as they get better eventually, when they acquire spells that consistently restore 50% and 100% HP.
Specialty: Good Measure
When the user casts the same spell twice on the same target, it combines into a single spell with 250% power (instead of 200%).
Good Measure is slightly costly, requiring an additional 1 BP to use, but you get 50% more power. It’s particularly handy for boosting the potency of Holy Magic early on and it applies to offensive spells too (although Bishop doesn’t really have any, so you’ll need to assign a secondary job).
Level 1: Holy Magic Level 1
| Type | Cost |
|---|---|
| Command | Heal: 5 MP Antidote: 4 MP |
Enables the use of the following Holy Magic: Heal and Antidote. However you must own the corresponding magic scroll to use that magic.
Heal restores 30% of a target’s HP (or deals the equivalent amount of damage if undead). It can be group-cast, but doing so will reduce its potency. 30% isn’t a lot, but it suffices during early-game, when enemies don’t deal as much damage.
Antidote cures a single target of poison. When you’re trying to save on Antidote items, this is a cheap way to remove poison.
Level 2: Holy Magic Level 2
| Type | Cost |
|---|---|
| Command | Open Eyes: 4 MP Holy Night: 8 MP |
Enables the use of the following Holy Magic: Open Eyes and Holy Night. However you must own the corresponding magic scroll to use that magic.
Open Eyes cures a single target of blind. Useful for conserving Eye Drops.
Holy Night allows a target to restore 30% of their HP when receiving more than 0 damage while Defaulting for 10 turns. It cannot be reflected and cannot be extended by Spellcraft. This spell is amazing when playing defensively, passively triggering Heal while you Default.
Level 3: Magic Defence 20% Up
| Type | Cost |
|---|---|
| Support | 1 slot |
Increases the user’s Magic Defence by 20%.
Magical-based enemies are rarer than physical-based ones, but this ability is still nice to have in your pocket. Especially when you’re taking the brunt of an anchorite’s summon.
Level 4: Holy Magic Level 3
| Type | Cost |
|---|---|
| Command | 16 MP |
Enables the use of the following Holy Magic: Blessing and Vivify. However you must own the corresponding magic scroll to use that magic.
Blessing revives a character from KO and restores 15% HP. If used against undead, it has a 70% chance of instantly defeating them. Basically a “free” Phoenix Down. Can be combined with the Mist Spellcraft for a safety net or a hilarious way of exorcising undead.
Vivify restores 50% of a target’s HP (or deals the equivalent amount of damage if undead). It can be group-cast, but doing so will reduce its potency. By the time you get Vivify, bosses will start hurting a lot more, so the additional 20% healing is appreciated.
Level 5: Holy Magic Level 4
| Type | Cost |
|---|---|
| Command | Benevolence: 4 MP Innocence: 16 MP |
Enables the use of the following Holy Magic: Benevolence and Innocence. However you must own the corresponding magic scroll to use that magic.
Benevolence transfers 20% of the caster’s MP to a selected target (up to a maximum of 100 MP). It cannot be reflected. Under normal circumstances, there’s not much use for this unless you’ve ran out of Ethers and your Bishop somehow has a truckload of MP.
Innocence cures a single target of poison, blind, silence, sleep, paralyse, dread, berserk, confuse and charm. This functions as a “free” Remedy and is great for dealing with surprise ailments. Can be combined with the Blast or Mist Spellcraft to cure your entire party.
Level 6: Good Measure
| Type | Cost |
|---|---|
| Support | 2 slots |
When the user casts the same spell twice on the same target, it combines into a single spell with 250% power (instead of 200%).
Now you don’t need to be a Bishop to use Good Measure. As mentioned earlier, it works with offensive spells too. Not only that, but it can be combined with Spellcraft. So you could have, for example, a Heat Heat Dart.
Level 7: Staff Lore
| Type | Cost |
|---|---|
| Support | 1 slot |
Increases the user’s staff proficiency to S.
Bishop has a natural proficiency of S in staves, so this ability is meant to be given to other jobs. That said, there’s not much benefit to having a S in staves, since they’re poor weapons and the boost to Mind is usually miniscule.
Level 8: Holy Magic Level 5
| Type | Cost |
|---|---|
| Command | Benediction: 24 MP Resurrect: 32 MP |
Enables the use of the following Holy Magic: Benediction and Resurrect. However you must own the corresponding magic scroll to use that magic.
Benediction restores 100% of a target’s HP (or deals the equivalent amount of damage if undead). It can be group-cast, but doing so will reduce its potency. Now we’re talking! Use with the White Mage’s Group-Cast Master to heal your party for full HP. Also one-shots undead with less than 9999 HP.
Resurrect revives a character from KO and restores 100% HP. If used against undead, it has a 70% chance of instantly defeating them. Fantastic for keeping your party members off the floor. Works wonders with the Blast and Mist Spellcraft, although by now you should be aiming to minimise KOs.
Level 9: Holy Magic Level 6
| Type | Cost |
|---|---|
| Command | Sacrifice: 44 MP Calm: 1 BP |
Enables the use of the following Holy Magic: Sacrifice and Calm. However you must own the corresponding magic scroll to use that magic.
Sacrifice KOs the user, but inflicts a powerful light-based attack on all foes. Cannot be reflected. Handy as a last-resort or you can use it with Resurrection Mist or Re-raise to bring your Sacrifice-user back from the brink afterwards.
Calm negates all HP, MP and BP damage for all combatants for one turn and casts at the start of the turn. It cannot be reflected and can be cast while silenced, but not when in the Ghost state. This spell calls a temporary ceasefire, which can be heavily abused.
Level 10: Brevity
| Type | Cost |
|---|---|
| Support | 3 slots |
When casting a spell, there’s a 50% chance it will have the same effect as a Good Measure spell.
In other words, when you cast, say, Benediction, there’s a 50% chance you’ll cast Benediction Benediction instead, which heals 250% HP rather than 100%. Generally, the steep ability cost isn’t worth it and you’re better off sticking with innate Good Measure or Group-Cast Master.
Level 11: Holy Magic Level 7
| Type | Cost |
|---|---|
| Command | 48 MP |
Enables the use of the following Holy Magic: Fate. However you must own the corresponding magic scroll to use that magic.
Fate makes a single target fall in Love with the caster. If combined with Rain, targets can fall in Love with others beside the caster. While in love, the character will copy the actions and HP recovery/loss of their target of affection.
Love is a complicated thing in real life and in Bravely Second. One benefit of being in Love is that characters in Love can still perform actions while at negative BP. However avoid using it twice as characters will use Love Rivals to attack one another instead.
No Comments