
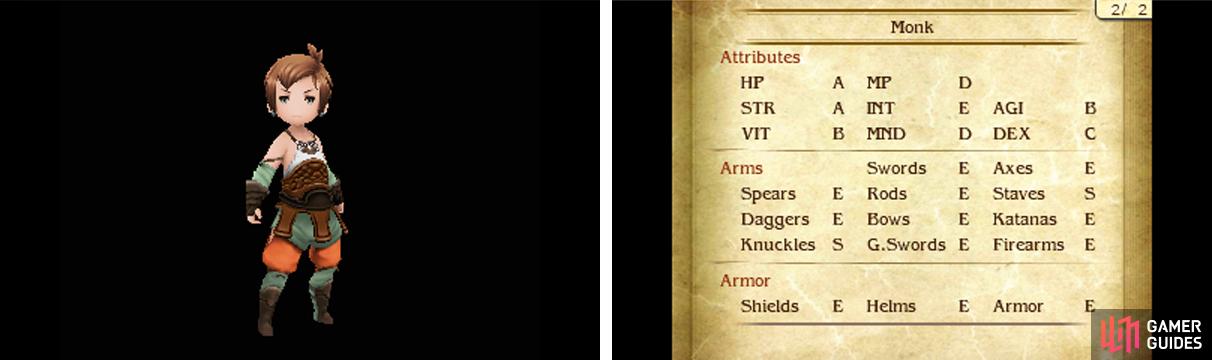
The Monk is a no-nonsense physical-based job, whose mighty punches can send enemies flying. It has great HP, Strength and Agility, making it a versatile attacker. In terms of weapons, it can fight well with knuckles or staves–or even just its bare hands!
Alongside White Mage, the Monk was one of the first jobs obtained in Bravely Default; here, the Charioteer more or less serves its role. Now that you’re nearing the end of the game, you’re probably wondering if this latecomer has any purpose: Not really, but it’s not a bad job.
Specialty: Knuckle Lore
Increases the user’s knuckle proficiency to S. Additionally, when no weapons are equipped in the left and right hand slots, the user’s Physical Attack is increased by a value equal to twice their Level.
This ability’s secondary effect is unique in that it allows your Monk to fight effectively even when no weapons are equipped. Depending on your Monk’s Level and the weapons available, having no weapons equipped can be better than equipping weapons or vice versa.
By the way, weapons equipped to the head slot and body slot (via Triple Wield and Quad Wield) are independent of this ability.
Level 1: Strong Strike
| Type | Cost |
|---|---|
| Command | None |
Deal 2 times damage to one enemy, with a 50% chance of success.
If you like to gamble, this is a nice ability. On average, you’ll be dealing normal (1 times) damage anyway, but the double damage may KO an enemy that you otherwise wouldn’t be able to. Can be improved with the Astrologian’s Lucky Day.
Level 2: Paralyse Immunity
| Type | Cost |
|---|---|
| Support | 1 slot |
The user is immune to paralyse during battles.
A convenient way of protecting your characters from the annoying paralyse ailment. As with similar abilities, you can get the same result with an accessory, but accessory slots are limited to one, while ability slots aren’t.
Level 3: Inner Alchemy
| Type | Cost |
|---|---|
| Command | 5 MP |
Cures the user of poison, blind, silence, dread and confuse.
Not as effective as a Remedy, Esuna or Innocence, but can be worth using if you don’t want to pester a healer. We have no idea how you’d use this when confused though…
Level 4: Invigorate
| Type | Cost |
|---|---|
| Command | None |
Increases the user’s Physical Attack by 25% for 2 turns (up to 150%), but has a 25% chance of failing, reducing the user’s HP by 20% instead.
Back in Bravely Default, this was a decent, but risky way of boosting your damage output during earlygame. Right now, you’re far beyond that and there are countless other less risky ways to up your damage.
Level 5: Knuckle Lore
| Type | Cost |
|---|---|
| Support | 1 slot |
Increases the user’s knuckle proficiency to S. Additionally, when no weapons are equipped in the left and right hand slots, the user’s Physical Attack is increased by a value equal to twice their Level.
Good if you want to go bare-handed in another job. Namely the Pirate because it has the highest Strength.
Level 6: Hidden Dragon
| Type | Cost |
|---|---|
| Command | None |
Deal 1.25 times damage to one enemy at the end of the turn.
Similar to the Hawkeye’s Maverick, this is a cheap and fairly powerful attack if you can afford to wait.
Level 7: Qigong Wave
| Type | Cost |
|---|---|
| Command | 12 MP |
Deal 1.25 times damage to one enemy. Damage is not reduced by Default.
This is better than Hidden Dragon if you’ve got MP to spare. Perfect for stubborn foes who like to Default to reduce damage.
Level 8: Pressure Point
| Type | Cost |
|---|---|
| Command | 1 BP |
Deal 2 times damage to one enemy. Damage is unaffected by the enemy’s Physical Defence.
This serves as a decent way of striking down foes with high or even maximum Physical Defence. However since it effectively deals normal damage per turn, you may be better off using the Hawkeye’s Harpoon so you can stack other offensive abilities.
Level 9: Phoenix Flight
| Type | Cost |
|---|---|
| Command | None |
Reduces the user’s HP to 1 and converts the sacrificed HP into damage to one enemy.
With the Monk’s naturally high HP (and perhaps combined with the Catmancer’s HP 20% Up), you can rack up some seriously impressive damage. Trouble is, you need high initial HP to use it and it puts your Monk at risk afterwards.
That said, there are various ways to protect your Monk, like Utsusemi, Undo Action or many of the Knight’s abilities or you can use Re-raise to revive your Monk if they get hit. While your Monk is at 1 HP, they can abuse the Dark Knight’s Minus Strike as well.
Level 10: Natural Talent
| Type | Cost |
|---|---|
| Support | 2 slots |
Increases Physical Attack by 100% when nothing is equipped in the right hand, left hand, head, body and accessory slots.
Your Monk’s attack power is boosted to insane levels when they’re naked (except for costumes). Just like the Charioteer’s Quad Wield, this renders your Monk virtually defenceless, so abilities that protect your Monk will come in handy.
Level 11: Crouching Tiger
| Type | Cost |
|---|---|
| Command | None |
Deals 4 times damage to all enemies, but reduces the BP of all allies by 1.
You can think of this is as the Monk borrowing strength from their other party members. Works well with Natural Talent for absolutely demolishing mobs.
No Comments