
Floor 48F

From Edea’s room, head west until you reach a passage leading south. Step beyond and enter the first passage to the east to find a blue locked chest . Like in Bravely Default, you won’t be opening these any time soon, so keep a note of their locations for later (we’ll remind you anyway).
Go back to the central passage and take the next passage leading east; at the end is an unlocked chest with yet another Round Shield inside. Backtrack to the central passage and this time continue south; at the end of this corridor is a bunch of Echo Herbs on the floor.
To continue, return to the central passage and take the first passage leading west, opposite the locked chest. Eventually, you’ll come across a flight of stairs leading down. Hey, weren’t we supposed to be going up? Nevermind, we’ll just have to take the long way.
Floor 47F

From the stairway, follow the corridor clock-wise, ignoring the passage going south-east for now. At the far end, there’s a Barrel Helm that somebody left on the floor. Backtrack to the north-west corner and take the passage you previously ignored.
In the centre of the floor is a crazy crossroad. Stand exactly in the centre of the crossroad and head directly south. When you reach the wall, don’t stop and instead hug the wall; once you find the sweet spot, you’ll walk straight through the wall and discover a hidden Mage Masher .
Return to the visible corridor and head west, where a lone Teleport Stone sparkles on the floor. Next, go back to the central crossroad and follow the corridors east and then south-east. In the south-east corner is another flight of stairs leading up to floor 48F.
Before climbing the stairs, go north from the stairs to find 500 pg lying on the floor. To complete the search, return to the stairs and follow the passage south-west for a chest concealing a pair of Mittens . When the coast is clear, ascend the stairs.
You’ll arrive at one of the two isolated parts of floor 48F; just nearby is another flight of stairs leading up, to floor 49F.
Floor 49F

This is the final floor as you can probably tell by the reappearance of the orange exclamation mark on the bottom screen. From the stairs, follow the corridors in an anti-clockwise direction, slowly edging towards the centre of the floor like a spiral.
As you approach the west side, head west through the gateway. From here, follow the outer corridor north to find stairs leading down to floor 48F and, beyond, a chest containing Lamellar Armor . Return to 49F and follow the outer corridor the other direction for an Ether chest.
Backtrack to before the gateway and continue anti-clockwise as you were going before. Not long after you reach the inner-most corridor, you’ll be close to the orange exclamation mark. Don’t stress and continue onwards; a cutscene will play and you’ll discover the Skyhold is about to depart.
Further in, the Adventurer will be waiting by the elevator. If your party’s in good condition, continue around the passageway for now, ignoring the elevator; at the end is 300 pg for the taking. After that, go to see the Adventurer to pay your tidings before the upcoming battle.
Once you’re prepared, step forth into the elevator and inspect the white lever inside. Upstairs, a fateful foe has come to stop Yew and his friends.
Boss: Janne (and Nikolai)
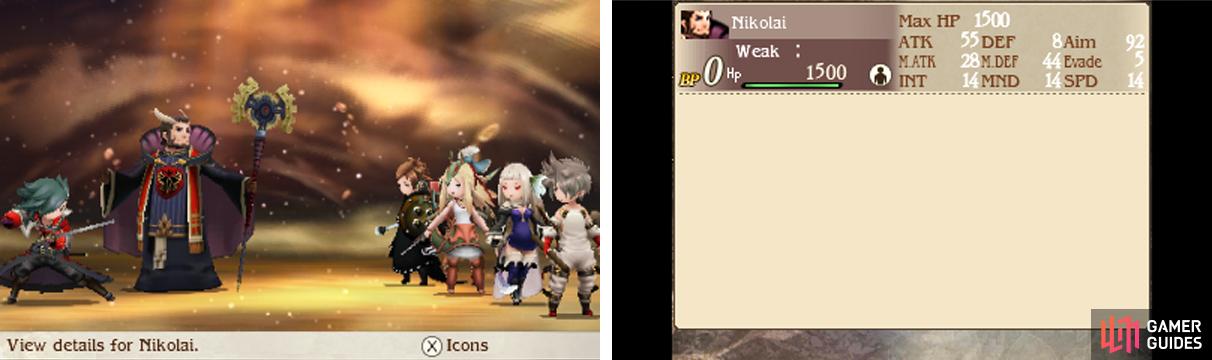
| Boss | Level | HP | Weakness |
|---|---|---|---|
| Janne | 14 | 2000 | Nothing |
| Nikolai | 14 | 1500 | Nothing |
Although you start off fighting Janne by himself, after defeating him the first time, Janne’s HP will be fully restored and Nikolai will come in to join the battle.
Janne uses Blazing Wolf to enter Wolf Stance, bolstering his offence, and Wolf Fang to inflict damage to one and simultaneously switch to Aurochs Stance, for increased defences. Later, he may Default to build up BP, then unleash two attacks on his next turn.
This battle is won with patience and prediction. Janne’s Wolf Fang hits pretty hard, but he can only use it in Wolf Stance–in other words, after he’s used Blazing Wolf. So avoid attacking him in Wolf Stance and Default instead.
Meanwhile, once Janne enters Aurochs Stance, he will generally use Blazing Wolf to return to Wolf Stance. So when he’s on the defensive, unleash your attacks and heal up if necessary. Janne should be faster than your party, so your attacks will probably land right after he switches stances.
Once Nikolai joins the fray, not a lot changes. However Nikolai can use Heal to restore HP, so you should focus your efforts on him. Unlike Janne, Nikolai has low HP and physical defence, so it won’t be too long until he falls.
Watch out when Nikolai uses Holy Night on Janne; if you hit Janne as he Defaults, he will restore a lot of HP. Instead, wait until Holy Night is gone; press Left on the Circle Pad to check. Or if everyone’s HP is high, attack him after he’s Defaulted.
When you have time to change jobs, we recommend making at least one character a Fencer and Bishop. Since Tiz slightly favours physical jobs, he’d make a fine Fencer. However the difference is very slight, so choose whatever suits you.
By the way, the Bishop’s Holy Magic always heals a fixed percentange of the target’s HP, so anyone can use them well. If you have a free secondary Job Command slot, it might be useful to set it as Holy Magic for backup healing. Of course, you won’t benefit from Good Measure.
No Comments