

This quest starts as a generic “Visitor Waits in the Castle” event, which will occur when there’s 36 days left on An Ancient Curse, Part 2. Return to your throne room at any point after this date and you’ll be met by Willas Gunderson, who, after commissioning some mercenaries to steal some relics from some accursed ruins, has the temerity to come crying to you for succor. Instead of assuming death by misadventure, he’s assuming his hirelings ran off with the treasure he was trying to plunder. In any event, to prevent Willas’s tiers from flooding your throne room you’ll need to agree to help him out. This starts the quest [The Curse of Candlemere].
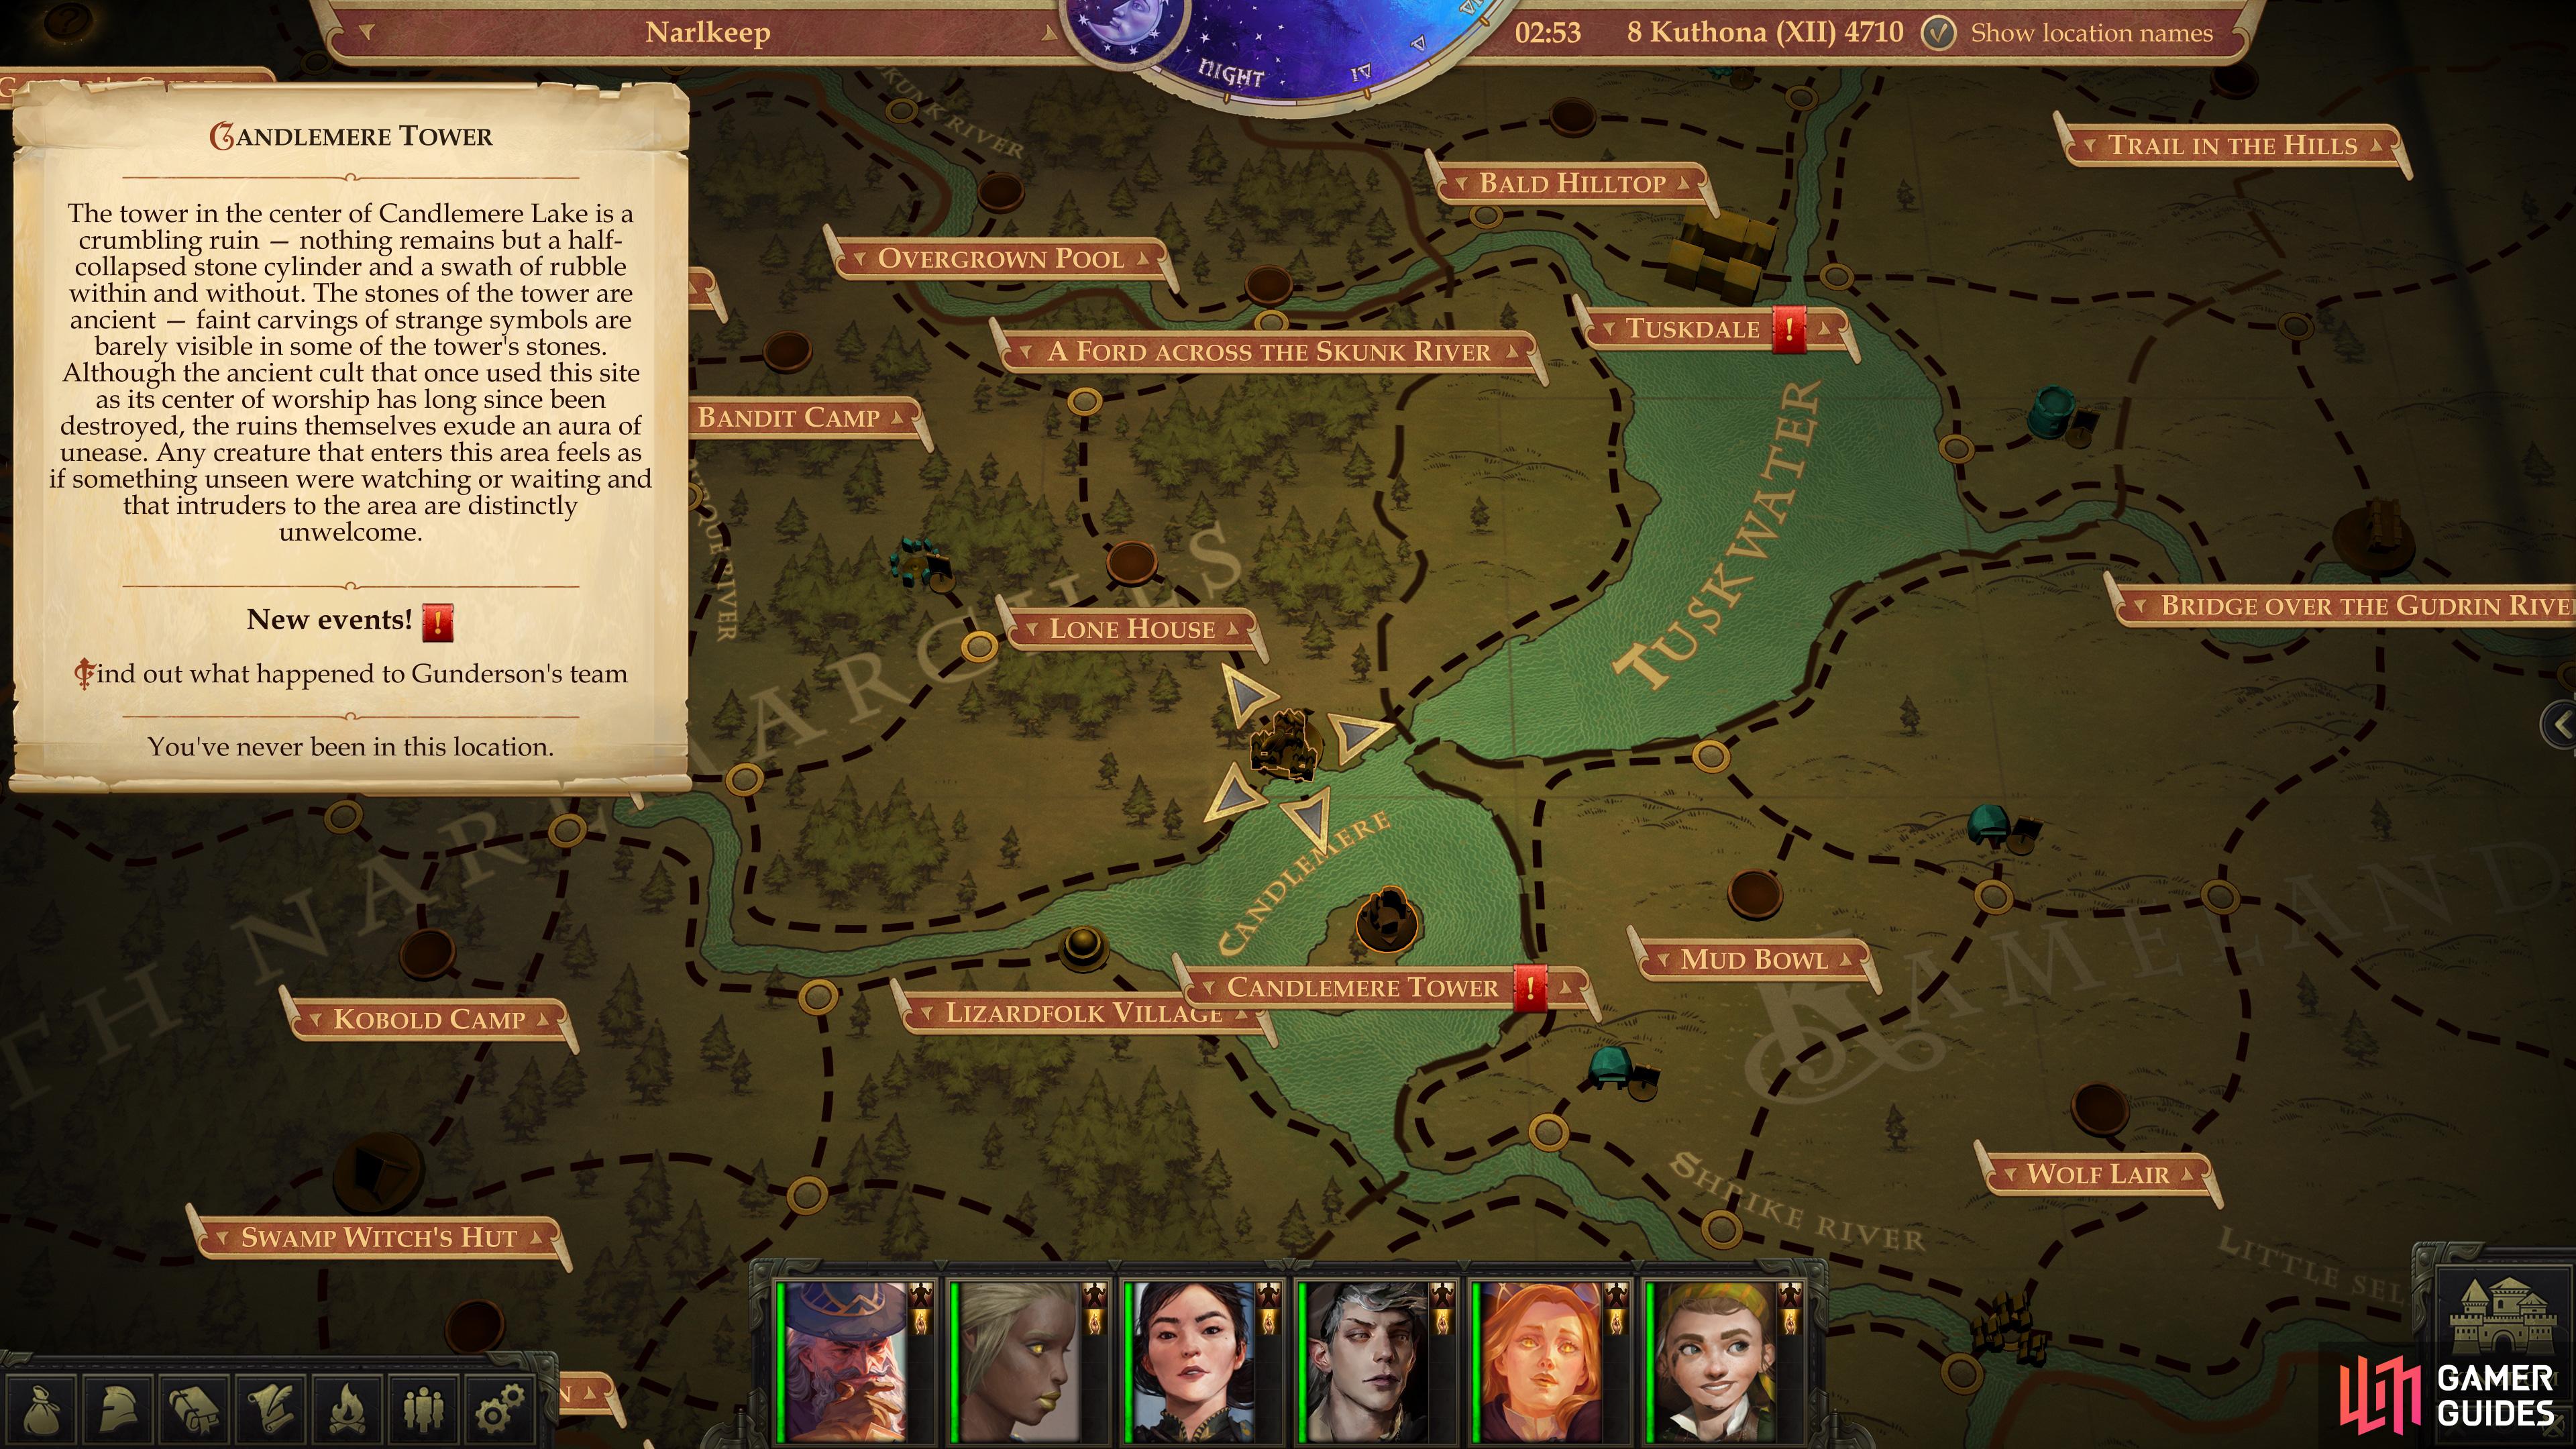
The location of Candlemere Tower.
Travel: Candlemere Island
Your destination - Candlemere Tower - isn’t terribly far from your capital, so you don’t need to make any grand preparations for a lengthy expedition. You should, however, prepare for the monsters you’ll find there, which, if you passed a [Knowledge (Arcana) 20] check while talking to Willas Gunderson, you’ll identify as will-o’-wisps. By now you’ve certainly encountered these creatures at the Swamp Witch’s Hut area, so you know what a nuisance they can be. You should also know that a few spells can render them relatively harmless. That being the case, make sure you have Resist Energy, Communal and Protection from Energy, Communal spells prepared. The former will reduce the damage you take from a chosen source by ten, while the latter will absorb ten points per caster level of damage. Together, they’ll provide long-lasting protection against the elements that should significantly help you get through Candlemere.
Once those preparations are made, leave your capital and follow these directions to reach Candlemere island:
- West
- Southwest to landmark: A Ford Across the Skunk River
- South (across Skunk River)
- East (path will veer south, then west, running along lake Tuskwater and lake Candlemere)
- Southeast (across lake Candlemere)

Fight Through the Wisps of War
Candlemere Island is gloomy, desolate and foggy - everything you’d expect of a haunted, isolated island with spirits so brazen they put on light shows for mainlanders. The time to teach whatever haunts this island some humility has long since passed. First make your way east along the coast and pass a [Perception 28] check to find a box you can loot for 231 GP, a Robe of Earth and a Potion of Bull’s Strength. You can also loot the boat you came in on and a nearby barrel for some food-stuffs and a Note Wrapped in an Oiled Leather. Grabbing this note will update the quest The Curse of Candlemere, or start it, if you aren’t following the walkthrough chronologically and happened to come here of your own volition.
Read the note and refuse to heed Morry Focrey’s advice - this island was meant to be explored, and you’re no novice adventurer anymore. Make your way north and note that the path turns east over some vines, which are convenient landmarks. At this point, be sure to buff with Resist Energy, Communal and Protection from Energy, Communal (choose electrical damage with both spells). They both have a fairly long duration, so you shouldn’t need to recast them, just be prepared to re-apply Protection from Energy, Communal, should enemies manage to do enough damage to break through it.
Once you’re protected, venture east, then southeast to find another cluster of vines swarming the road. As you approach these vines a War Wisp will appear and ambush you with its “Lightning Form” attack. With the aforementioned buffs in place, these attacks should bounce harmlessly off, and without its damage-dealing capabilities to worry you, this wisp should be easy to dispose of. Continue east past a third set of road-clogging vines, then follow the road as it turns northwest.
As you round the corner, three more War Wisps will appear, one in front of you, and two behind. Here is where you’ll learn the value of preparing ahead of time, as if you don’t have those spell protections, you’re in for some pain. Split your party up to engage each of them in melee, as this will coerce the wisps to use a less damaging attack instead of their “Lightning Forms”. You’ll still have to suffer through the initial barrage - which your spells should absorb - and if you engaged them all in melee you should emerge victorious without them zapping through your spell buffs.

After defeating the first group of War Wisps, search for a “Wand of Crushing Despair”,

and a “Torn Damp Note”.
Defeat this trio of War Wisps, then explore off the road to the east. If you pass a very difficult [Perception 30] check, you should notice an abandoned tent, inside of which is a Wand of Crushing Despair. Grab it, then return to the road and follow it to the northwest until you find a campfire off the road to the north. Just past this campfire you’ll find yet another War Wisp, so walk the extra distance and banish the wisp, then search the campfire to find a Torn Damp Page, which continues Morry Focrey’s account of his time on Candlemere Island. It seems that Gunderson’s plan was fundamentally flawed - even if the adventurers he hired were trustworthy, they all seem to have had different ideas as to what counted as “treasure”.

Pass either a Knowledge (Nature) or Athletics check to get through the foliage,

but be wary before you climb the cliff beyond, as four War Wisps wait for you above.
Ascend to the Tower
There are two ways to proceed from here, you can either follow the road to the northwest, or you can attempt a shortcut. Search northwest of the campfire to find a difficult path through the dense thicket, which you can pass through with a successful [Lore (Nature) 24] check or cut through with an [Athletics 27] check, after which you can climb a hill to ascend the rocky slope to the north. This can be somewhat rough, however, as you’ll immediately find yourself in conflict with four War Wisps when you arrive.
You can deal with these four wisps the same way you defeated the three you encountered earlier, just try to engage as many possible in melee to deter their “Lightning Form” attack, and hope your electrical resistance buffs last the duration of the fight, although given the number of enemies you may also want to use Haste to give yourself an extra edge. Once they’re defeated, you’ll be able to search around the tower… but first we might as well cover the longer route up. Not only for those who find these skill checks a bit hard to pass, but for those who just want to complete the entire area, kill as many monsters as possible, and grab whatever loot there is to be found.

Continue following the road north and west from the campfire until you hit the western edge of the area, at which turn north to find an Ancient Will-o-Wisp blocking your way. It’ll be joined by two War Wisps when combat starts, so be wary. Despite the venerable status of this will-o-wisp, the same protections and strategies that worked against the War Wisps you’ve fought should hold for it. You know the drill: weather the initial lightning attacks with the aid of your buffs, engage in melee, and cut the wisps down. After the fight, loot the remains of the Ancient Will-o-Wisp for a Token of the Dryad, then continue north to find a corpse you can search for the Chaos Shard (a Dagger +2 which can inflict confusion on hit), 129 GP and a variety of Jade and Agate gems.

Defeat more Wisps and claim the “Dirty Travel Log”,

and the “Noble Warhammer”.
From here, the road will veer south and you’ll find yourself in another encounter similar to the last one, this time facing off against three War Wisps and an Ancient Will-o-Wisp. Same strategy applies: engage in melee and hope they don’t break through your spell buffs. As usual, Haste will help if you need some offensive power but honestly, if you survive long enough to engage them, you should be in a good position to win. Heal up afterwards, then loot a corpse to find a Dirty Travel Log - the last, sad words of one of the adventurers who challenged Candlemere Island.
Continue south from here and you’ll find another Ancient Will-o-Wisp. This one is well and truly alone, so don’t be afraid to engage it. Once it’s vanquished, loot the chest it guarded [Trickery 28] to find the Noble Warhammer, which is just a Warhammer +3 with a fancy name. Backtrack to the north where you found the Dirty Travel Log and search the cliff near the corpse to find a spot you can climb. This will get you up to the tower, albeit to the north of where you’d be if you made it through the secret route.

Defeat a final group of Wisps near the tower,

and claim the “Ancestral Dwarven Shield”.
Explore Around the Tower
However you get up to the tower, kill the four War Wisps along the southern end of the tower (mentioned earlier), then head north along the western edge of the cliffs (clockwise around the tower) to find a pair of Ancient Will-o-Wisps. Not only are they well worth killing for the Experience they reward you with, but behind them you’ll find a chest with some gems and scrolls to loot, and a sack containing some Sweet Syrup.
Now make your way south past where you encountered the four War Wisps and follow the cliffs south and east until you reach the eastern end of the area. Here you’ll find a chest behind some Edible Moss, but be wary, as an Ancient Will-o-Wisp and two War Wisps dwell in the ruins to the north. Exorcise the wisps, then plunder the chest to obtain 158 GP, a Composite Shortbow and an Ancestral Dwarven Shield, a Heavy Shield +2 that gives its wielder DR 2/-. You can, ah, also grab the nearby moss, should you have the munchies.

Search some rubble near the tower for another “Token of the Dryad”,

then examine the corpse of a fallen paladin.
Next make your way north along the eastern edge of the map to reach the tower itself. Pass a [Perception 19] check to notice a slab of stone you can loot for a Token of the Dryad, then search a nearby corpse to identify Gunderson’s paladin, who apparently fell to treachery. On that dour note, venture west along the perimeter of the tower to find an entrance, but before entering the structure, search the wall to the west to find some runes. Pass a [Knowledge (Arcana) 23] check to decipher it, although its meaning is still pretty cryptic.

The Creature Beyond the Portal
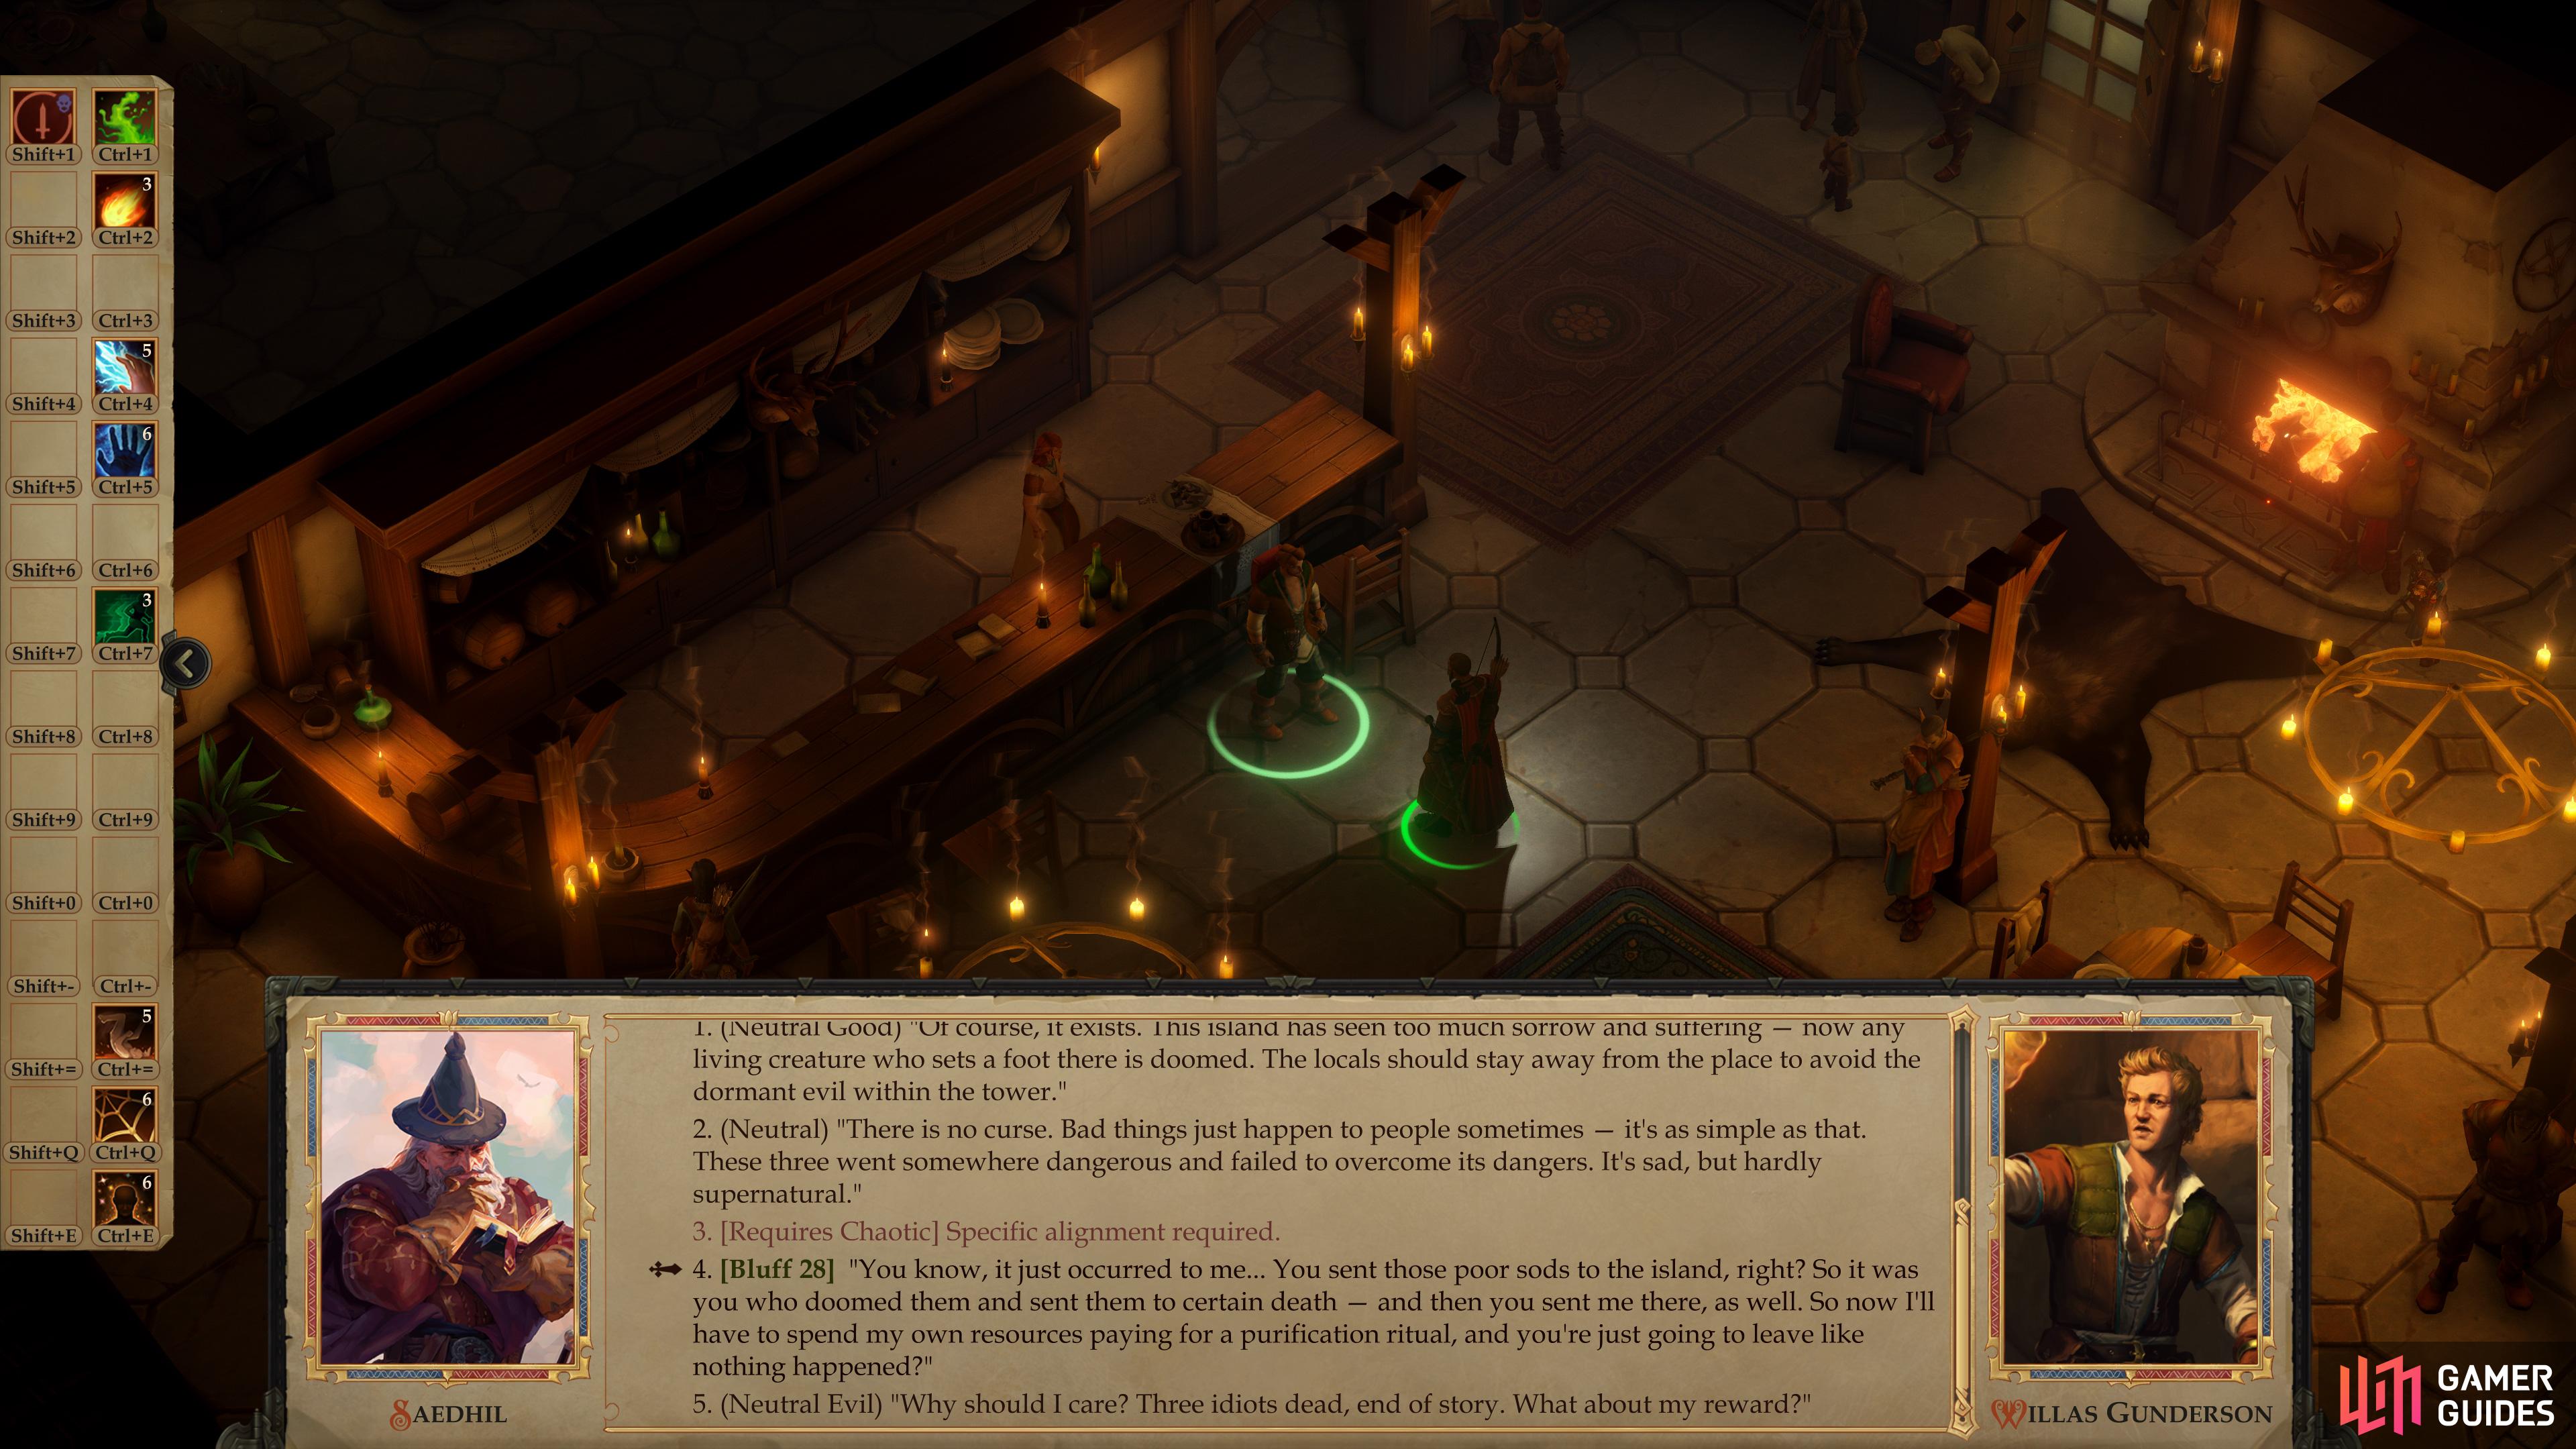
Enter the tower and you’ll find Rismel standing in front of a glowing portal. Talk to the cleric, and if you have no patience to deal with this mystery, you can just attack him. He’s not a dangerous combatant on his own, nor is Duke Dazzleflare - the unique will-o’-wisp that comes through the portal to help him. On the plus side, you can loot the wisp to find the Cypress Queen’s Flute, while Rismel himself will leave behind a Quarterstaff +1 a Breastplate, and a Cloak of Resistance +1.
This isn’t a great way to go about completing the quest, though, so engage in dialogue with the priest by asking who he is, to quickly determine that, well, he’s kind of bonkers. Exhaust his dialogue options before finally picking the option “Rismel… no matter if this island is cursed or not, you’re not in your right mind. You don’t know what you’re doing.”. This leads to an automatic [Lore (Religion) 20] check, which you must pass to advance the conversation in any meaningful way.
Assuming you pass the [Lore (Religion)] check, follow up by telling him about the corpses of his companions, which you should have found on your way up. You can also mock his claims to be the chosen of Nethys - any two of these dialogue options will suffice. After picking any two of these dialogue options, he’ll come to his senses and lament his unsavory deeds. Whatever Rismel’s failings are, they can be dealt with later, and he’ll turn his attention to whatever creature lurks beyond that portal… and presumably compelled him to commit his crimes.
| Reward: For talking sense to Rismel |
|---|
| 480 XP |
He’s willing to confront the beast beyond the portal, with your help. Should you turn on him (pick the dialogue options “I’m not sure if I’ll help you or not, but I’m not done talking with you”. then “You’re a threat to yourself - and others. I’d best kill you.”, followed by one of three moral choices) he’ll defend himself, and the beast beyond the portal (Duke Dazzleflare) will appear and attack as well. Assuming there are no shenanigans on your part, you can either choose to prepare before dealing with the creature beyond the portal, or you can fight it immediately.
Duke Dazzleflare isn’t a terribly dangerous foe, although it’ll regularly cast some high-level Magic Missile spells at you, as well as deal electrical damage with its touch (melee) attacks. Neither of these attacks should trouble you too much with the correct buffs applies… especially if your protagonist/tank is able to cast Shield on themselves. Your foe has a respectable amount of Hit Points and a high Armor Class, but if you flank it with your warriors you should have no trouble cutting it down. Vanquish this foe, then loot it to find the Cypress Queen’s Flute, after which you can talk to a more lucid Rismel. He’s somewhat more terse than before, and won’t offer up much information save his resolution to remain here, and his claim that, despite Gunderson’s ambitions, there’s no treasure to be found here. If you haven’t killed him yet, you’ve got another opportunity, although the only reason to do so at this point is for his meager loot. Speaking of loot, now that the tower has been cleared, search to the west of the entrance to find a chest containing a suit of Full Plate +2.
Whatever Rismel’s fate, leave the area and return to Tuskdale, where you’ll find Willas Gunderson in the tavern. Talk to him and tell him what you learned about Candlemere Island and he’ll seem more worried about a potential curse than by the… dozens of other things he could be more concerned about. Most responses play out more or less the same way, as far as rewards go: the [Neutral Good], [Neutral] and [Neutral Evil] responses will earn you 2,400 experience and 1,500 GP.
| Reward: For telling Gunderson about the Candlemere expedition |
|---|
| 900 XP, 1,500 GP |
If your protagonist is [Chaotic], you can pick the dialogue option to indulge in a well, a chaotic rant before ultimately asking for a reward. After being dazzled by your rant, Gunderson will reveal himself to be a kindred spirit, and give you the normal reward along with a Ring of Protection +1. Hey, sometimes crazy works.
| Reward: For subjecting Gunderson to a chaotic rant |
|---|
| 1,260 XP, 1,500 GP, Ring of Protection +1 |
Succeed at a Bluff check to scam more money out of Willas Gunderson.
Lastly, you can blame Gunderson for the fate of his mercenaries and for the trouble you had to suffer on his behalf. Succeed at a [Bluff 28] check and the flustered man will throw extra gold at you - to the tune of 3,000 GP to try and appease you.
| Reward: For scaring a better reward out of Gunderson |
|---|
| 1,260 XP, 3,000 GP |
Whatever you say, Willas Gunderson laments this failed operation. Having learned no lessons, however, he resolves merely to try his luck somewhere else. Hopefully the fools he hires have a better end than those at Candlemere Island.
No Comments