

Redcaps in the Ruins
You’ll arrive in a location that looks… well, more like a subterranean version of the Other World than the Abandoned Keep. Who knows what the Guardian of the Bloom’s foul magic is capable of, however? Immediate disarm a trap near some mushroom to the north, then take stock of your options. Three paths branch off from where you appeared, one to the east, one to the north and one to the southwest. You might as well try to secure your rear, first, which means heading southwest, as the other two directions will lead to your ultimate destination, making them far longer paths.
Venture southwest and shortly and abruptly the Other World-like vegetation will yield to man-made (or dwarven-made?) architecture. Form a defensive line at the first set of square pillars in these ruins and send a character into the room to the northwest to provoke some Redcap Tricksters, who are definite steps-down in terms of competition. Their Armor Class is passable and they have Damage Reduction, but their Attack Bonus is a few points lower than most foes you’ve fought this chapter. Defeat them, then continue northwest to find some straggler Redcaps, which are even weaker than the previous ones!
When the Redcaps are dead, loot an alcove to the northeast to find a chest containing a Note With Orders among other treasures. The note seems to detail some quarantine, but the cause is as-of-yet uncertain. Perhaps the remains of another fallen kingdom eradicated by the Bloom? Venture northwest and disarm a trap, then loot the cells to the northeast and southwest, the former of which yields a Torag’s Pendant. Probably Dwarven ruins.
The Candle Puzzle
Go through a door to the northwest and up some stairs, stopping to disarm a trap at the top. At the end of the passage ahead you’ll find an apparent dead-end, although with a successful [Perception 35] check you’ll spot a secret door. If you can’t spot this door, your exploration in this direction is done, but at least you’ll be treated to a chest… a consolation prize, of sorts.
Beyond the secret door you’ll come to a room with seven candles arranged in a hexagram, with one groups of candles in the middle, while the wall to the northeast glows invitingly. That’s right, a puzzle. When you snuff or light any of the candles, another group(s) of candles will light up or blow out. Your goal is to snuff all the candles.
First things first, let’s label them, for ease of instruction. Let’s label the northeastern-most candles #1, and number them in order moving clockwise. With that labeling system in mind, note which candles influence each other:
| Candle Group | Influences Group(s) |
|---|---|
| 1 | 3 |
| 2 | 4 & 5 |
| 3 | 1 & 5 |
| 4 | 2 & 6 |
| 5 | 2 & 3 |
| 6 | 4 |
The center candles can’t be interacted with, and in addition to the candle relationships listed above, keep in mind that whatever candle group you’re interacting with with toggle, too. For example, interacting with candle group #2 will toggle candle groups #4 and #5, as well as #2.
Candle groups #2, #3 and #6 start out lit, and while there are probably many solutions to this puzzle, below you’ll find one that seeks to isolate candle groups #4 and #6, which of course cancel each other out. To do this, toggle the following candle groups, in order: #1, #3, #5, #6, #4, #2, #1, #3, #6.
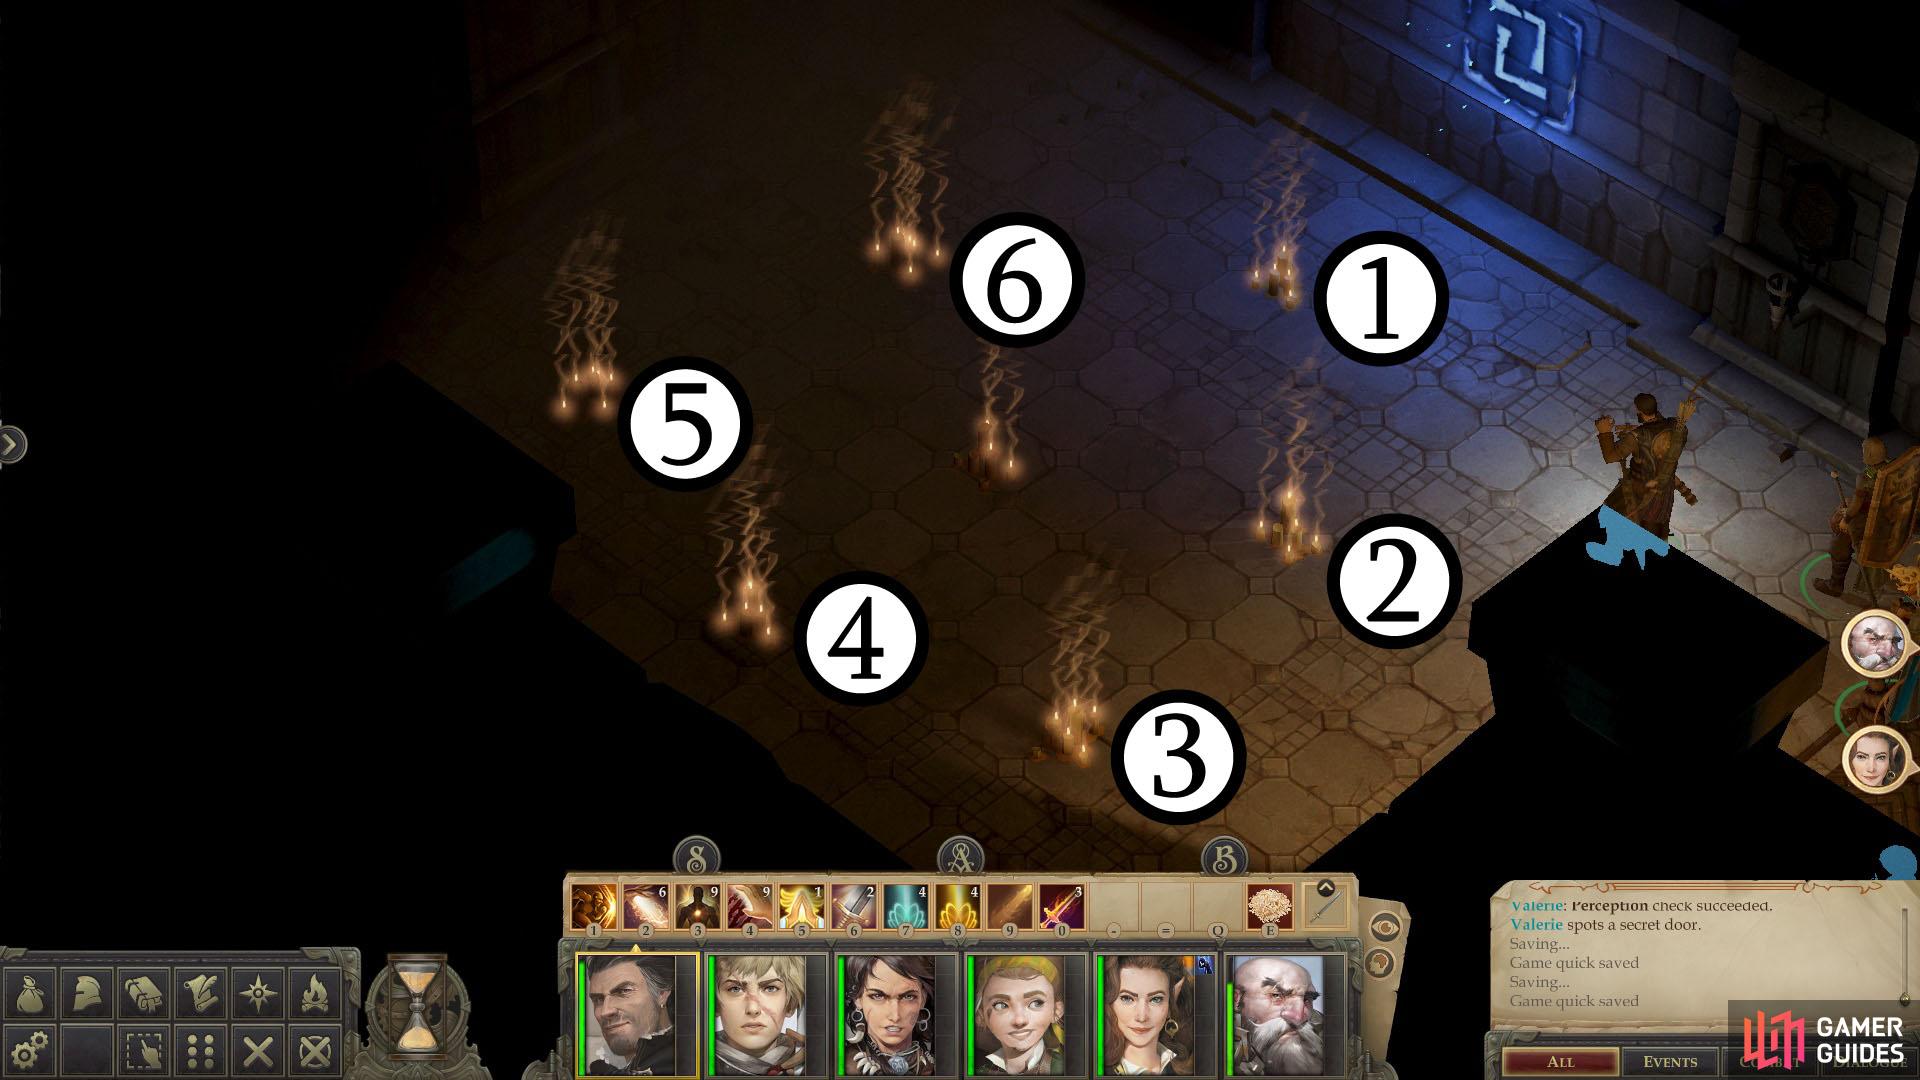
A visual representation of how the candles are labeled.
Once you’ve got the candle groups isolated to the last move, save your game, and ask yourself… do you really want to tamper with this puzzle? Whatever was sealed away was either done to secure some treasure, contain some monster… or both.
The Detained Devourer
Sure enough, when you solve the puzzle by snuffing all the candles the wall to the northeast will lower, and beyond this wall a Ferocious Devourer lurks. This is probably the most dangerous creature you’ve faced thus far, having a high Attack Bonus (high enough that it’ll probably hit even a well-equipped tank nearly every time), a Spell Resistance score that makes offensive spells more or less a waste of time, and worst of all a remarkably high Armor Class… high enough that all but the most potent of warriors probably won’t be able to land a blow with any regularly.
Using every spellbuff at your disposal - Bless, Prayer, Haste, Greater Invisibility, Stoneskin, etc. - is absolutely necessary, as every point of Attack Bonus you can muster makes a difference. You’ll also need to apply Death Ward to protect yourself from its Energy Drain, and have plenty of healing prepared, as it can hit for 30~ damage per strike. If all that’s not bad enough, the beast has upwards of 300 Hit Points and Damage Reduction, meaning this won’t be a short fight.
Aside from spellbuffing there are some tactics you can attempt to employ to even the odds. First, bludgeoning weapons will bypass its Damage Reduction, but it’s probably not realistic to expect you to swap weapons without a dangerous performance hit. Second, you can make a Sunder Armor attempt, which will remove nine points of Armor Class from the monster, moving it from nigh-impossible to hit to merely hard to hit… although your chances of overcoming its Combat Maneuver Defense probably isn’t any better than hitting its full Armor Class, making it a somewhat dubious proposition.
In all honesty, there’s a very good chance you’re just not a match for this foe yet, and if you give it a good try and still can’t overcome the Devourer, remember it for later and move on. On the other hand, if you do vanquish it you can loot it for a variety of treasures, including Bonemail, a suit of Scalemail +4 that gives its wearer immunity to cold and DR 5/bludgeoning, a Belt of Giant Strength +4, an Amulet of Natural Armor +3, a Ring of Protection +2 and a Cloak of Resistance +2.
Spider Chambers
Despite that, send your party to the southwestern passage and form them so your warriors are facing northeast to where you appeared. Send a quick character (preferably with a ranged weapon) up either the northern or eastern passage. You’re looking for a Primal Giant Spider, but they can skitter around, so you can’t be guaranteed down which passage you’ll find the nearest one at any given time, and you don’t want to be caught alone too far from your warriors.
When you spot a Primal Giant Spider, take a shot at it and run back to your party. A host of Primal Giant Spiders will show up from both the northern and eastern passages, but since you’re holed up in the western passage they shouldn’t be able to outflank you. They’re a noticeable step down in quality from foes you’ve been facing, and as long as you can force them to engage your line of warriors you should - with some now-ubiquitous spellbuffs - prevail.
Crush the bugs, then head down the eastern passage they occupied, stopping to loot [Perception 9] a pile of rocks for a Token of the Dryad. No surprise finding one of these there. Continue east to find a chamber where you’ll find a large, wilted flower you can examine, and more importantly, another fork in the path. Before you go running off anywhere, however, be sure to loot a pile of rocks southeast of the wilted plant to score yet another Token of the Dryad.
If you head northwest around a pillar you’ll find the entrance to more ruins to the northwest, while if you instead continue west you can loop around to where you entered the dungeon, disarming traps as you go. Since this ultimately leads back to where you entered this dungeon, so the only real reason to bother with this is for the experience gained from disarming the traps.
Edict
On the other hand if you make your way northeast, then east from the wilted flower you can follow a winding passage that terminates in a small chamber occupied by a Primal Shambling Mound. Despite the prefix, this shambler is only somewhat stronger than the Owlbears you’ve been beating up all chapter, so you shouldn’t have any trouble subduing it. Unfortunately, this Primal Shambling Mound seems to have a case of immortality, so your prowess will prove fruitless.
Instead, you might as well just bypass the beast by casting Invisibility on the sneakiest character in your party, after which you should be able to walk up and loot the treasure chest behind it. Failing that, you can always lure it down the tunnel, and when it’s far enough away from the chest, batter it into submission, run back to the chest and wait for combat to end so you can loot it.
Manage this caper and you’ll come to possess Edict, a Dagger +4 that’s mithral (meaning it counts as silver when it comes to bypassing Damage Reduction) and possesses the “Speed” and “Breaker of Wills” properties. The Speed property gives its wearer an extra attack as their highest Attack Bonus, but does not stack with Haste, while Breaker of Wills will reduce a struck foe’s Will Save by three for one minute. That’s… one hell of a dagger. You’ll also obtain a Token of the Dryad from the same chest.
Gems and Rats
Backtrack to the west and make your way over to the ruins to the northwest of the wilted flower chamber, stopping to pluck another Token of the Dryad from a pile of rocks [Perception 23]. Disarm a trap, then enter the ruins and follow a tunnel to the northeast before going through some doors and climbing some stairs to the northwest.
Atop the stairs you should spot [Perception 25] a secret door to the northwest. If you can find the secret door, you might as well go through it, as some extra treasure awaits you. Beyond the secret door is a small hallway lined with rather difficult traps. Disarm them, then unlock some more doors at the northwestern end of the hallway, beyond which lies a small chamber housing two chests. One of the chests contains some low-quality trinkets, while another contains two Diamonds, a Ruby and two Emeralds - treasure worth a hefty 7,750 GP all told. For some extra experience, pass a [Perception 24] check near the door to find some smashed, petrified rats. Err… okay.
Stone Golems and the Secret Study
Return southeast through the secret door and head down the previously neglected path to the southwest, stopping to disarm a trap. Beyond this trap are a pair of Redcap Savages, who are more in-line as powerful as your standard melee mob in this chapter.
Kill them, continue through some doors to the southwest, head up some stairs, then appraise the situation. At the top of the stairs, along the northern wall, rests a Stone Golem, with a second resting along a wall to the southwest. Between the two you can find [Perception 30] a secret door, but if you bother this door, the golems will animate and attack.
While having a slightly higher Attack Bonus and significantly better Armor Class than most normal critters you’ll be fighting in this chapter, these golems aren’t terribly well protected by Hit Points, something they partially make up for with Damage Reduction. All things considered, they shouldn’t be too hard to best in a straight fight if you’re spellbuffed, but you do need to watch out for their ability to inflict Slow (Will 17), which they’ll use every several rounds.
Given that you can pick the fight whenever you want, you can also strategically summon critters near one of the golems so you can pick off the other, hopefully without ever having to face both at once. This might sound rather profligate, but you’ll likely be using spells to counter the golem’s Slow ability, or you’ll be using them to isolate one, or failing either of those, you’ll be healing more after the fight. Pick your poison.
Defeat the Stone Golems, then go through the secret door they guarded to find a humble study, brimming with forgotten secrets long since sealed away. Interact with a desk and you’ll get… An Illustrated Book Episode!
When this episode starts you’ll immediately attempt a {Knowledge (Arcana) 25] check, which will determine the quality of the information you glean from this event. Attempt an easier [Knowledge (Arcane) 15] check and if you fail the latter you’ll gain no information, whether you passed the first check or not. Fail the harder check and pass the easier check and you’ll learn the words “KHAR GHET”, but not their meaning. Pass both and you’ll learn that the phrase “KAASOR GHET” controls some golems. Surely this will come in handy later.
The other checks in this Illustrated Book Episode just serve to score more loot - a worthy endeavor, to be sure. Pass a [Fortitude 23] check to gain some experience, while passing a [Mobility 25] will net you two Scrolls of Lead Blades, a Scroll of Protection from Chaos, Communal and a Scroll of Stoneskin.
Leave the secret study and search the library to the southeast. Along the northeastern end of the library you can find [Perception 23] a pile of rocks hiding a Torag’s Pendant. There are also numerous books around, most of which aren’t very interesting, but you can find a Message for Guard Captain on a table to the south, which talks about some supernatural - and dangerous - prisoner. Finally search an enclosure formed by bookshelves to find two chests, one of which contains a Robe of the True Master. These robes grant the wearer a +5 Deflection Bonus to Armor Class, a +4 bonus to all Saving Throws and a +2 bonus to Spell Penetration checks, all with no Arcane Spell Failure, making them ideal for your resident Wizard or Sorcerer.
Child’s Room
With that, you’re finally done in this library. Along the western end of the library you’ll find a door to the northwest. Disarm the trap in front of it, then head on through and continue up some stairs to find a hallway lined with opportunities, including side chambers and stairs.
Might as well just explore sequentially. Enter the first room to the southwest with one character to provoke the Redcap Tricksters inside, lure them to the doorway, bottleneck them, then cut them down. Once all four have been dispatched, enter the room and disarm a trap near the first pillar.
As for loot you’ll find a chest near a hexagonal table, a pile of rocks hiding a Leather Scrap Covered in Ancient Runes, a circular container housing a Torn Children’s Book, and a hidden chest [Perception 25] in the chamber’s western corner. This generous chest will yield a Falchion +4 and a Kellid Tribal Fetish.
Having grabbed every piece of loot that caught your attention, be sure to press TAB so you can see the various objects you can interact with, then examine them all.
Paragon of Defenders
Leave the child’s room and continue down the hallway to the northwest, ignoring a flight of stairs to the northeast as you go. You’ll get to them sooner or later. Before long you’ll find another room to the southwest, just be sure to disarm any traps in the hallway that you may come across to avoid any nasty surprises.
In the room in question you’ll find two Dweomercats and a Redcap Savage, none of which should trouble you too much, especially if you can lure them to the doorway and further improve you local numerical superiority. With them vanquished, search a bench to find a book you can read, while along the southwestern end of an altar you’ll find a chest containing The Paragon of Defenders and Torag’s Pendant. The helmet gives its wearer a +2 bonus to Armor Class and a +3 bonus to Intimidate checks, making it a great defensive item. It’s not entirely beneficial, however, as if a companion falls in combat, you’ll need to stay within ten feet of said companion else suffer a -2 penalty to attack rolls and skill checks. For most fights, this is pure upside, and you should strap it on immediately.
Finally, search the altar and pass a [Lore (Religion) 26] check to identity its original purpose as well as the god to whose service it was later converted. Perhaps the fate of these ruins is due to Numerians, rather than the Guardian of the Bloom? Or maybe it’s evidence of sequential civilizations occupying the same space at different times? Or perhaps the Numerians were merely the tool the Guardian of the Bloom used to destroy this dwarven civilization before ultimately turning on the Numerians, too?
High-Level Scrolls
Leave the room where you found the Paragon of Defenders and continue northwest down the hallway to find two rooms, one to the southwest and one to the northeast. The northeastern room is locked by a particularly tough lock [Trickery 42], but if you can get inside you’ll find a chest waiting for you. Be wary, however, as it’s trapped [Perception 36], [Trickery 36]. Bypass all these obstacles and you’ll find a Unicorn’s Horn, a Scroll of Horrid Wilting, a Scroll of Wail of the Banshee, and a Scroll of Waves of Exhaustion. Consider your options carefully before scribing these scrolls - high level scrolls are not to be squandered lightly.
The Good Sister
The southwestern room, however, varies in interest depending on your actions in the previous chapter. If you spared the Defaced Sister in the Sepulchre of Forgotten Heroes and shamed her (via making a [Good] response with your protagonist) you’ll find her waiting for you here. Otherwise… well, she’ll just be some random, well-meaning Defaced Sister. Either way, be sure to ask her questions to learn about who she is, her relationship to the Guardian of the Bloom, and the game the aforementioned nymph has been playing.
When you go to leave, she’ll offer to sacrifice herself for you. This outcome is a foregone conclusion, but if you want to know more, pick the option “You don’t have to sacrifice your life for me.”, followed by “So why did she send you?” and she’ll reveal a powerful weapon entrusted to her by the Guardian of the Bloom for your destruction… or rather, imprisonment, but the technicalities are a small comfort. Possibly a good sign, really, that the nymph is willing to employ such drastic measures to remove you.
If you pick the [Chaotic Good] response, the Defaced Sister will follow you advice and make an attempt at self-preservation and emancipation, no matter how long the odds. The [Neutral Evil] option achieves nothing, and getting the Defaced Sister to sacrifice herself on your behalf earns you the “Good Hope” buff, which will give your party a +2 bonus to attack rolls, damage rolls, saves, skill checks and ability checks for ten minutes.
However the encounter ends, when the Defaced Sister is gone, loot a large chest near the door, then search a smaller chest between some beds. The latter chest is trapped, and the contents aren’t worth taking damage over, so be vigilant.
The Idle Iron Golem
Leave the rooms and venture southeast down the hallway until you reach the stairs to the northeast you neglected earlier. Head up the stairs, form up outside the door, then send one warrior through to provoke the foes beyond. You opponents include five Redcaps (Tricksters and Savages) and two Dweomercats. Nothing special on their own, and if you bottleneck them in the doorway it should be a pretty easy battle.
When you emerge victorious, occupy the sandy room the fae creatures occupied, in which you’ll find some doors to the northeast and an Iron Golem to the northwest. Depending on how your [Knowledge (Arcane)] checks went during the Illustrated Book Episode in the secret study, you may have gained the words necessary to command this golem, and if so, pick the dialogue option [Say the word from the engineer’s diary.] If you’re less certain of the information you gained, you may want to leave this golem alone. Not like it’s all that useful anyways, since it doesn’t follow you around.
Battle: Defaced Sister
Golem or no, make your way through the doors to the northeast and navigate down the trap-filled hallway beyond. At the end of this hallway are two doorways, one to the northeast and one to the northwest. The northeastern doors will eventually lead you to freedom, but sealed doors makes the effort fruitless. That being the case, head through the northwestern doors, first. Be sure to spellbuff as much as possible and make sure everybody is fully healed.
In the room beyond these doors you’ll catch up with your runaway traitor - perhaps for the first time this chapter, depending on whether you helped Jamandi first or not. The traitor isn’t alone, however, being accompanied by a Defaced Sister (whose response to you will vary depending on Tristian’s actions concerning the Oculus at the end of the previous chapter) and perhaps the Guardian of the Bloom, if you came here before completing Hour of Rage.
For her part, the Guardian of the Bloom will reveal the… unhealthy… nature of her relationship with the traitor. If you ask her, the Guardian of the Bloom will reveal her name, otherwise the Defaced Sister will name her mistress - Nyrissa. Afterward you can exhaust the Guardian of the Bloom’s dialogue options to listen to her gloat about her schemes. Failing that, the Deface Sister will rattle on about Nyrissa’s accolades and monologue about her schemes and past conquests. If you met the Guardian of the Bloom here, after she leaves you’ll be left to deal with the Defaced Sister, and this dialogue will play out nearly identically to how it would if you arrived late.
Eventually, however, the Defaced Sister will get down to business, and naturally that means bloodshed. You don’t start out in a great position, as two Redcap Savages lurk in the corners of the room flanking the door. That’s right, this encounter ensures you start out flanked. The Defaced Sister occupies the middle of the room, while two greater foes - a pair of Stone Golems - stand along the northwestern wall. Tristian reprises his old role as a punching bag, and will distract the Iron Golems for at least a little while.
Start out by fleeing the chamber - a feat which should be easy enough if you’re Hasted. This will allow you to confront the Redcaps on more favorable terms, and perhaps avoid the Defaced Sister’s Agonized Wail. Both this attack and her Baleful Gaze require a [Fort 30] check to resist, making it anywhere between inevitable and very likely to harm your characters.
More annoying, perhaps, are her follow up attacks, which include Dispel Magic - one of the first creatures in the game to actively target your buffs. Her own Caster Level shouldn’t be too far away from your own, despite her otherwise inflated stats, so while it’s unlikely she’ll unbuff your entire party, it’ll still be a nuisance.
Deal with the Redcaps quickly, then rush her with your warriors. You’re in for a rough time when it comes to melee, however, as she’s got a stupendously high Armor Class… around as high as the Ferocious Devourer you may have encountered earlier. In addition she of course has Damage Reduction and enough Hit Points to absorb the odd lucky hit - because why not?
Your warriors may struggle to have much of an impact on this boss, but fortunately she has a weakness: she has no Spell Resistance. This means even the humble Magic Missile spell can deal reliable damage to her… even more-so than other spells, since it doesn’t require a ranged touch attack, nor is it subject to her elemental resistances.
As usual, however, debuffs and debilitating spells trump direct damage. The Defaced Sister’s Reflex and Fortitude Saves may be respectable, but they’re not insurmountable, and her Will Save is downright mediocre. Spells like Hold Person or Constricting Coils have a good chance of restraining her for a few rounds, while something like Baleful Polymorph - provided the caster has a high Intelligence score and perhaps Spell Focus (Transmutation) - has a non-negligible chance of working. It may take a few tries, but it only has to work once.
After you defeat (or otherwise neutralize) the Defaced Sister, all that’s left are the two Stone Golems. The battle’s outcome really depends on how quickly you can defeat the Defaced Sister, as if you she debuffs you and you end up having to deal with her and two Stone Golems at the same time, things can get ugly… especially with their Slow ability.
When all your foes are defeated Tristian will speak to you. If he didn’t deal with the Oculus back in Vordakai’s Tomb, he’ll do so now, after which he’ll explain himself, revealing that your encounter with him in the Temple of the Elk was no accident, and that he played a role in some of Nyrissa’s other schemes, as well. Ask him “Tristian… who are you?” to learn about Tristian’s true nature, then exhaust his other dialogue options before ending with “I’ve made up my mind about what to do with you…”. This will allow you to decide Tristian’s future, although your options inevitably boil down to letting him stay in your lands [Neutral Good] or [Neutral], banishing him [Lawful Neutral] or killing him [Chaotic Evil].
Make what decision you will, then loot a chest near a desk to find a Piece of Skymetal and Gloves of Elvenkind, which give the wearer a +5 bonus to Knowledge (Arcana) checks and Concentration checks. The quest Coronation will also start now if you haven’t completed Hour of Rage, and hence started Coronation.
Escaping the Abandoned Keep
Leave the room where you fought the Defaced Sister and head through the doors to the northeast to reach a small chamber occupied by three Redcap Savages. Enter with one character to provoke them, then lead them back to the doorway and bottleneck them for an easy victory. Loot a chest in the eastern corner (obscured by foreground) for some valuables, then head up the hallway to the northwest and loot another chest near a door.
Go through the door to the northeast, then turn down another hallway to the southeast, disarming several traps as you go. When you reach some double doors at the end of the hall, open them, then proceed into the large chamber beyond. The only thing that stand between you and freedom is one more floor trap, after which continue southeast and find your area exit.
Now that you’re done with this questline, you can either head back to your capital and see to some politics by entering you throne room (if you already completed the quest The Twice-Born Warlord) or you can see to whatever barbarian business you still have outstanding, be it Hour of Rage or the aforementioned quest. In any event, you finally have access to Tristian’s services again, provided you didn’t banish or execute him.
The way I've killed things with regeneration when I don't have the proper effect is to do a coup de grace, killed the mound just fine once it was down
You can kill the 'immortal' Shambling Mound by hitting him with a 'Cause Light Wound' or other Negative energy spell, once he is down. Bear in mind that 50% of spells will fail in this dungeon so it might take more than one attempt.
In the secret room/study the two Golems are guarding (the Illustrated Book room) the initial Knowledge Arcana check that initiates the Book episode is DC:23. I passed it and all other checks but saw no mention of learning Golem Control words, at all. However, I did then click on the Golem & the option to "Say the word from the engineer's diary" was available. The Golem then 'Activated Master protection mode'. He does not appear to do anything but he's just idle... until the final showdown. He appeared in round 2 or 3 to assist.
There is also a DC:13 Perception check in the study to spot a tiny object on the wall opposite the door. A very nice 10,000GP value Ring of Acid Immunity (total immunity).
No sign of a Defaced Sister, shamed or otherwise (I killed them all earlier) until the final showdown. She does reveal quite a lot of interesting information at this time before violence ensues.
There is a rather nasty Ability draining trap in the final chamber from which you depart the dungeon. It is located a little way inside the room and is DC:34 to Spot and also to Disarm.
The Idle Golem DOES follow you, and very useful he is - helps kill the Sister and fend off the other golems.
The way I've killed things with regeneration when I don't have the proper effect is to do a coup de grace, killed the mound just fine once it was down