

When you get back to your capital, handle affairs you have at hand, resolve kingdom events, explore, go on side quests, deal with the inevitable attacks from Bald Hilltop (An Ancient Curse, Part Seven)… do whatever it is catches your fancy during this vast stretch of down-time. You could have as much as six months to work with, so time won’t be much of a limiting factor.
Eventually, however, the fun will end and Linzi will come to you with news that Nyrissa’s full assault has begun. What this attack lacks in creativity or subtlety it makes up for in sheer ferocity, as the Bloom has resumed on a massive scale throughout the entire kingdom. Linzi will suggest heading to Thousand Voices, which is located on the western border of Pitax, as this is where the First World is closest to your own world.
Apathy results in annihilation, so you might as well respond to this immediately. Grab whatever potions, scrolls, and alternate weapons you might need - this is going to be a lengthy series of encounters.
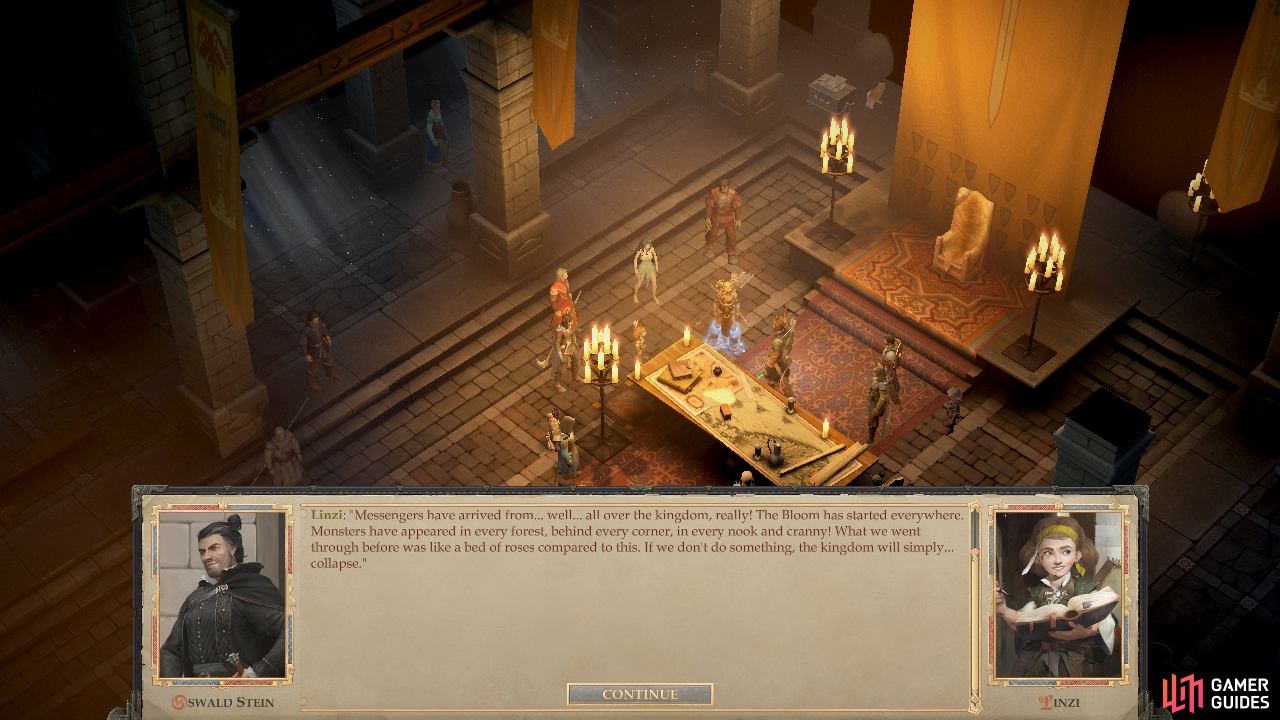
After enough time passes, Linzi will bring news of Nyrissa’s latest assault
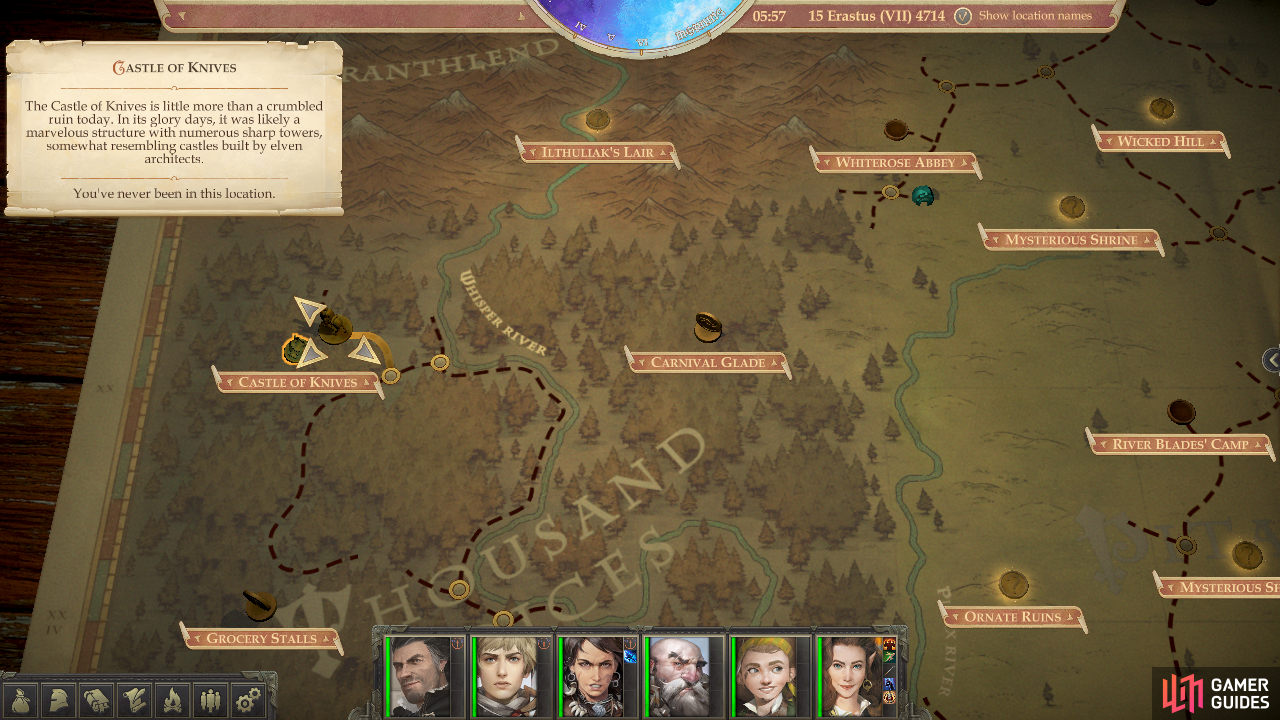
Travel to the Castle of Knives to fend off Nyrissa’s invasion.
Travel: Castle of Knives
When you’re ready, travel to Pitax - you should be able to find your way that far on your own, at least.
- West (path veers northwest along the Pitax River)
- West (along the Pitax River)
- West to landmark: Pitax River Bend
- West
- Northeast (along the Whisper River)
- Northwest (along the Whisper River)
- Northwest (along the Whisper River)
- Northwest
- West (along the Whisper River)
- Northwest (along the Whisper River)
- West
- North (past veers west)
- Southwest to landmark: Castle of Knives
A Pack of Alpha Worgs
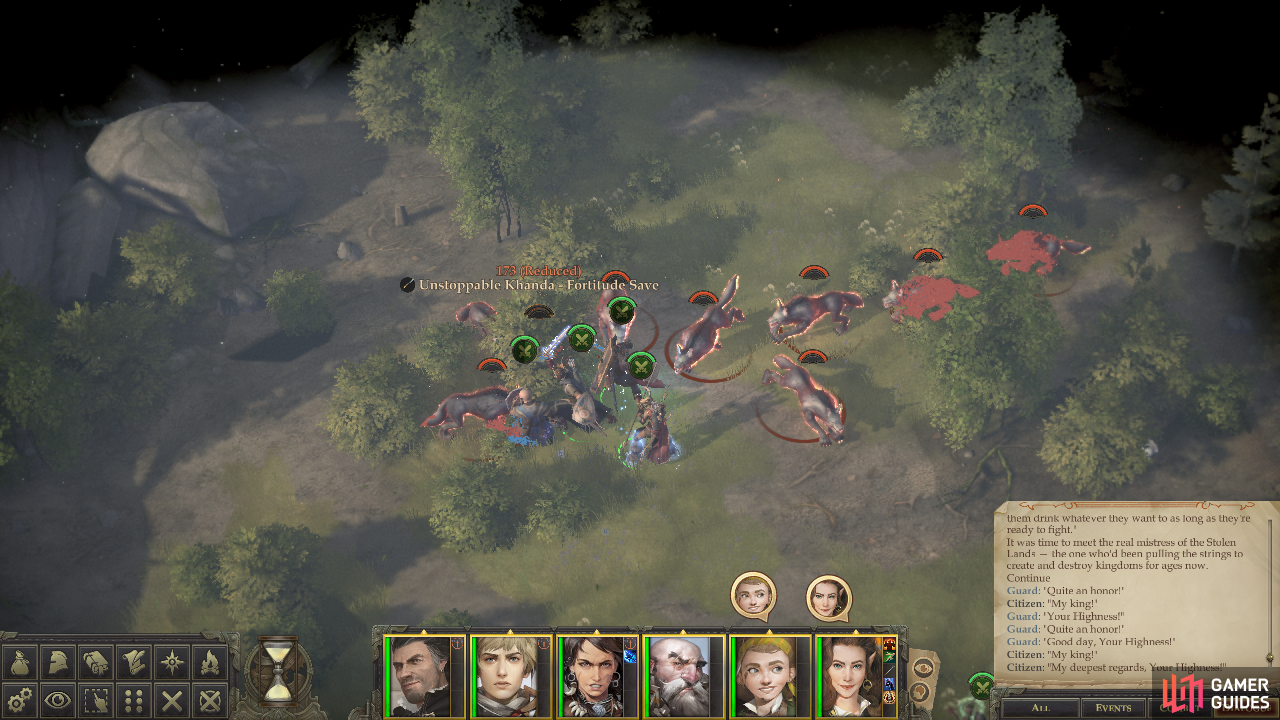
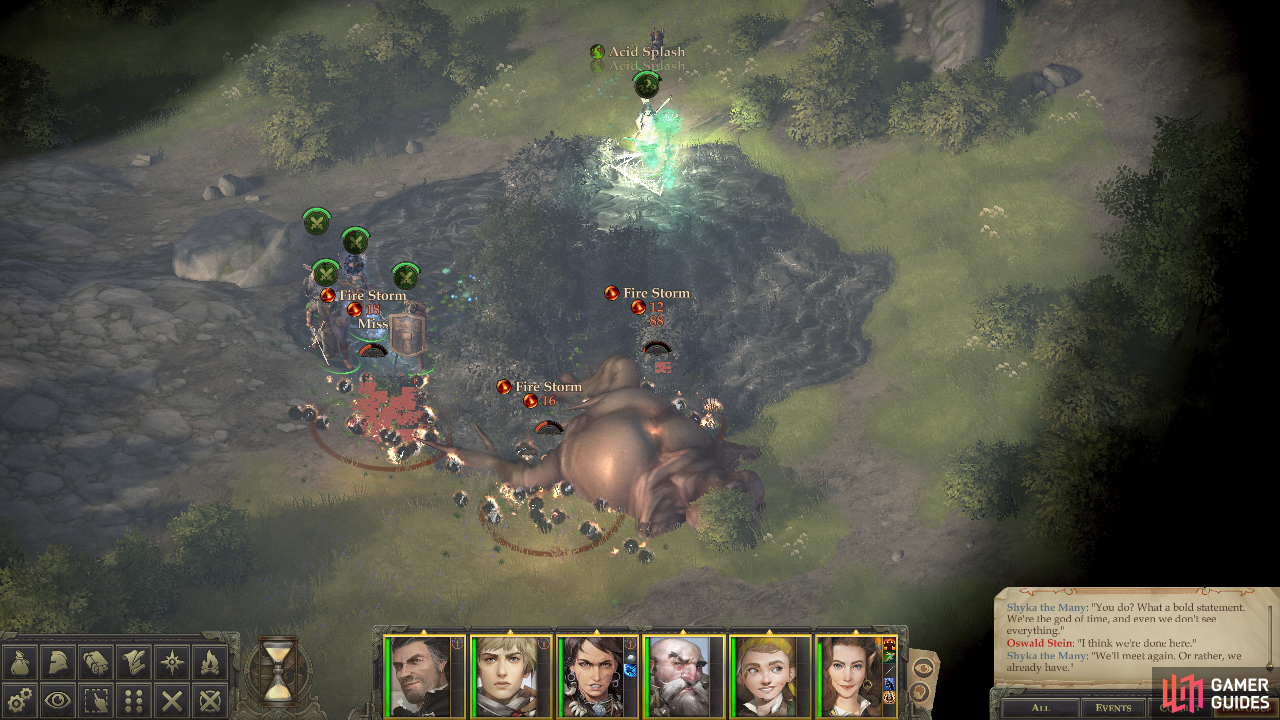
When you arrive at the Castle of Knives area, make your way north to find three Alpha Worgs hiding in some bushes. These enemies are laughably underpowered at this point in the game, but don’t treat them with total contempt, as another several Alpha Worgs lurk to the northeast, and they’ll join in the fight once it starts. You can, of course, frustrate them with a Web spell or similar area-denial magics, but so long as you don’t let a caster get exposed, your warriors should be capable of dealing with these mutts themselves. A pack full of Alpha Worgs? Weird.
Shyka’s Request
Don’t get too cocky, as not all encounters in this area will be as simple. Continue north until you reach a wall of vines and foliage swallowing some stonework ruins. This place stinks of First World fauna, which means you’re probably on the right track. Venture east and you’ll get a keen demonstration of the powers you’ll be contending with, as two beings - the Knurly Witch and the Wriggling Man - argue before resorting to violence. Witness the destruction they unleash on each other, which is ultimately broken up by the appearance of Shyka the Many.
After scaring off the Knurly Witch and the Wriggling Man, Shyka will turn his attention to you, asking if you “got it for us?”. Ask her… him… it?… about the beings whose quarrel you just witnessed and the cause to learn that they seek the First Crown. The Knurly Witch and Wriggling Man are both Nyrissa’s lieutenants, and the bauble they’re fighting over signifies Nyrissa’s favor. The sentimental artifact now lies shattered into three pieces, strewn throughout this forest… and Shyka wants you to retrieve it, promising you aid in your fight against Nyrissa in exchange. Agreeing will start the quest The First Crown after which you can ask him whatever questions you fancy.
Redcaps and Mandragora
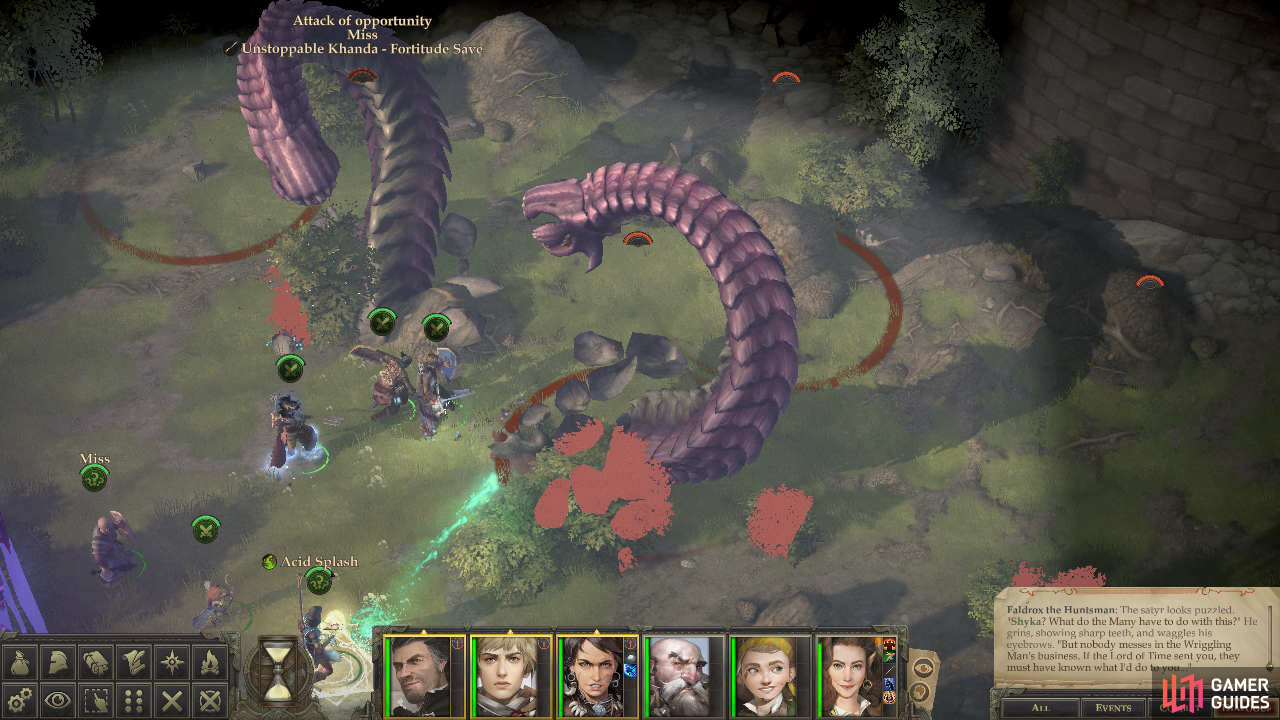
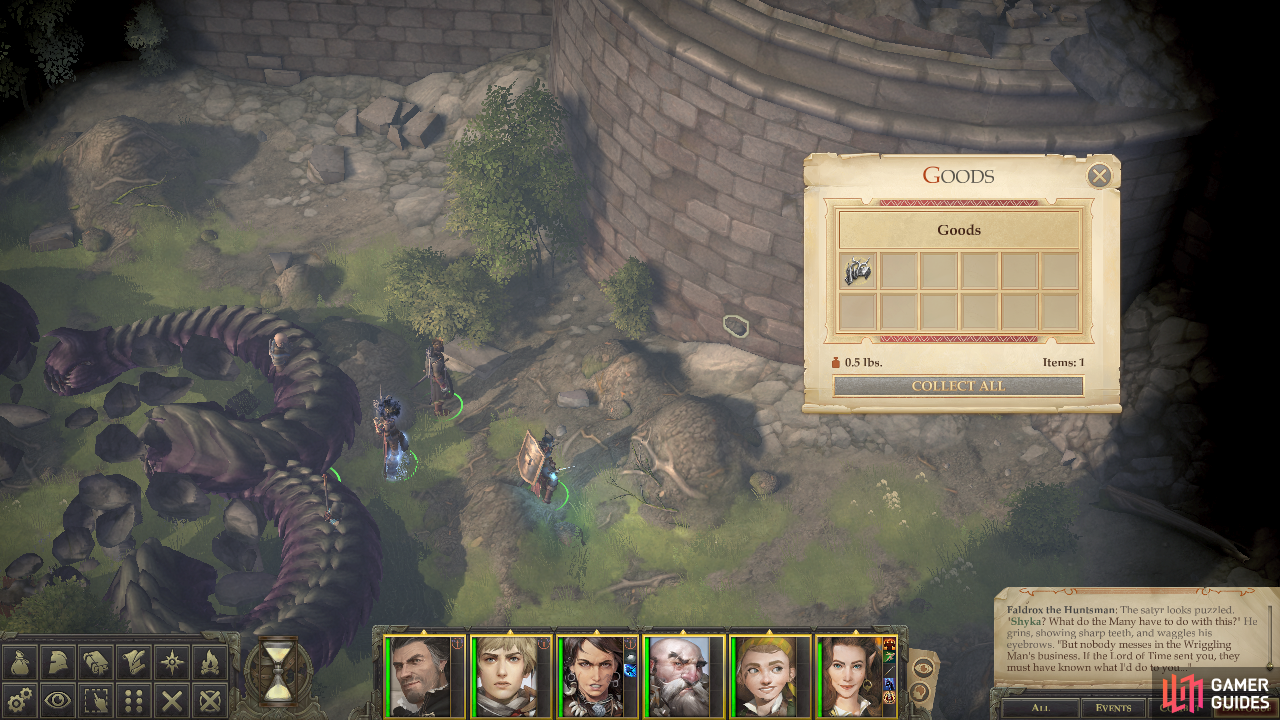
Venture east past where Nyrissa’s antagonistic lieutenants fought, staying near the vine-choked ruins to the north so you can spot [Perception 11] a stone hiding an Ancient Elven Bead. Continue heading east along these ruins and you’ll find yourself confronted by a host of Redcap Tricksters. Only a few will be visible at first, but nearly half a dozen of them lurk in the distance. Unless you have the ability to pass a [Perception 51] check or otherwise see invisible critters (True Sight, Glitterdust, etc.) you’ll just have to suffer them to have this advantage. That said, they’re foes far inferior to yourself, and just like the Alpha Worgs, so long as you keep your casters safe your warriors should be fine. When you’re victorious, loot the Redcaps to score a Token of the Dryad from one of them.
Bombard the Mandragoras with fire magics
then finish them off in melee.
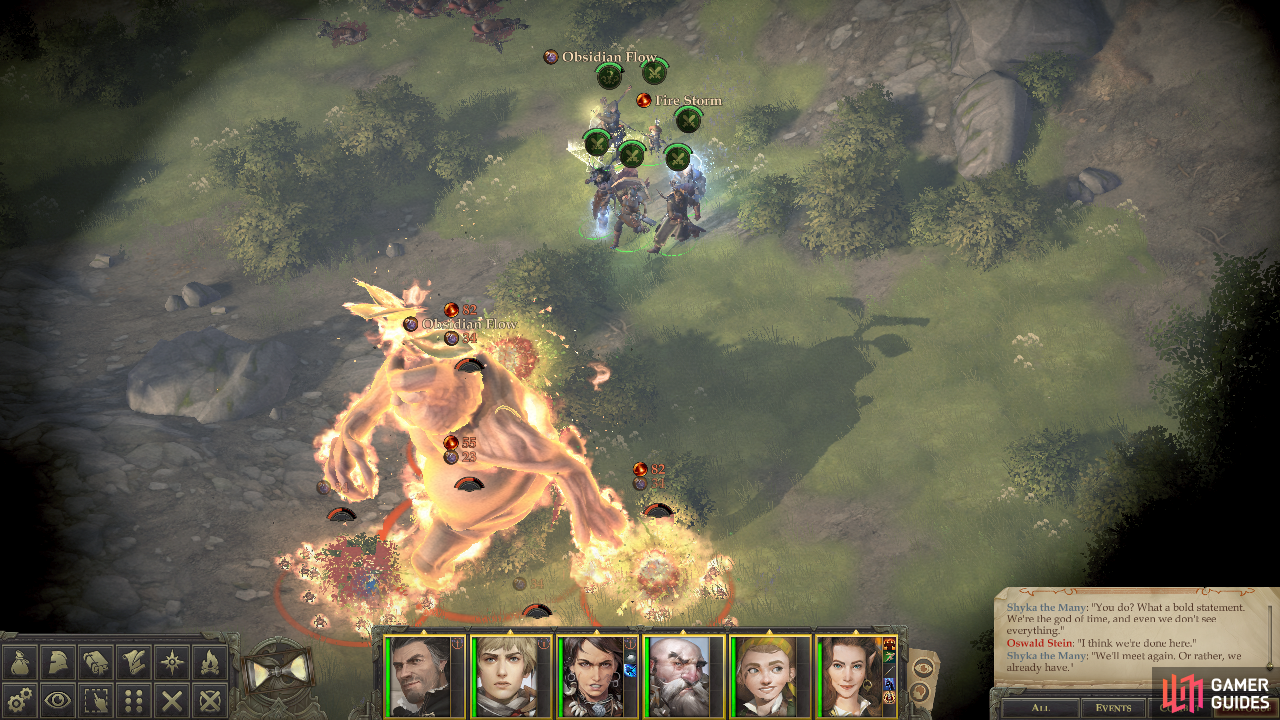
Butcher this horde of Redcaps, the continue east until you find a gate to the north. Ignore the area north of the wall for now and turn south, but be sure to scout ahead with a character using stealth and/or invisibility, as an Immense Mandragora awaits you, along with several Mandragora Swarms. Unlike most swarms you’ve encountered thus far, these swarms have a great store of Hit Points. Fortunately they aren’t outright immune to melee attacks, but still only take half damage from slashing and piercing and full damage from bludgeoning attacks. Their Attack Bonus is somewhat irrelevant, as they, in obnoxious swarm fashion, tend to inflict punishment through sheer proximity. Simply put, they’ll chew through the Hit Points of your warriors will dealing significant Strength drain, further limiting your ability to respond.
That being the case, be sure to spot them out ahead of time and prepare a spell barrage from your casters. Fireball is the bare minimum you’ll need to participate in a meaningful fashion, but ideally you’ll use something with a little more impact, like Firestorm. Tar Pool and Obsidian Flow are both… passable, but since the Mandragora Swarms have a Reflex Save of 20 the odds of them being immobilized by these spells isn’t great, but even a 25%-50% chance is worth trying. It should go without saying, but buffing your warriors significantly before engaging is a wise idea, and generally the weaker the Mandragora Swarms are at the start of the fight, the better your odds will be. That said, don’t be shy about casting two Fire Storms if you have the capability
Focus on the swarms first and once they’ve been defeated, cut down the Immense Mandragora, who is far less troublesome than the swarms. With a Reflex Save of 10, there’s a great chance it’ll be caught up by Tar Pool/Obsidian Flow, and unlike the Swarms it actually has to roll to hit you. It’s Attack Bonus is decent, but nothing your warriors can’t handle. If anything, it’s not much sturdier than the swarms, is far more receptive to damage and far less capable of harming you. The Immense Mandragora will leave behind some trinkets and a Tree Crest Comb when vanquished.
First Crown Fragment - Grieving Treants
From the Mandragora, head southwest to find a crater, around which several Treants and Primal Treants stand guard. Talk to one of the Treants and it’ll accuse you of being one of the Wriggling Man’s minions. When you get a chance to respond, pick the dialogue option [Use Detect Magic] to confirm the presence of the artifact you’re after. Following this, feel free to inquire as to what happened here to learn about their plight - and the allegiance to the Knurly Witch.
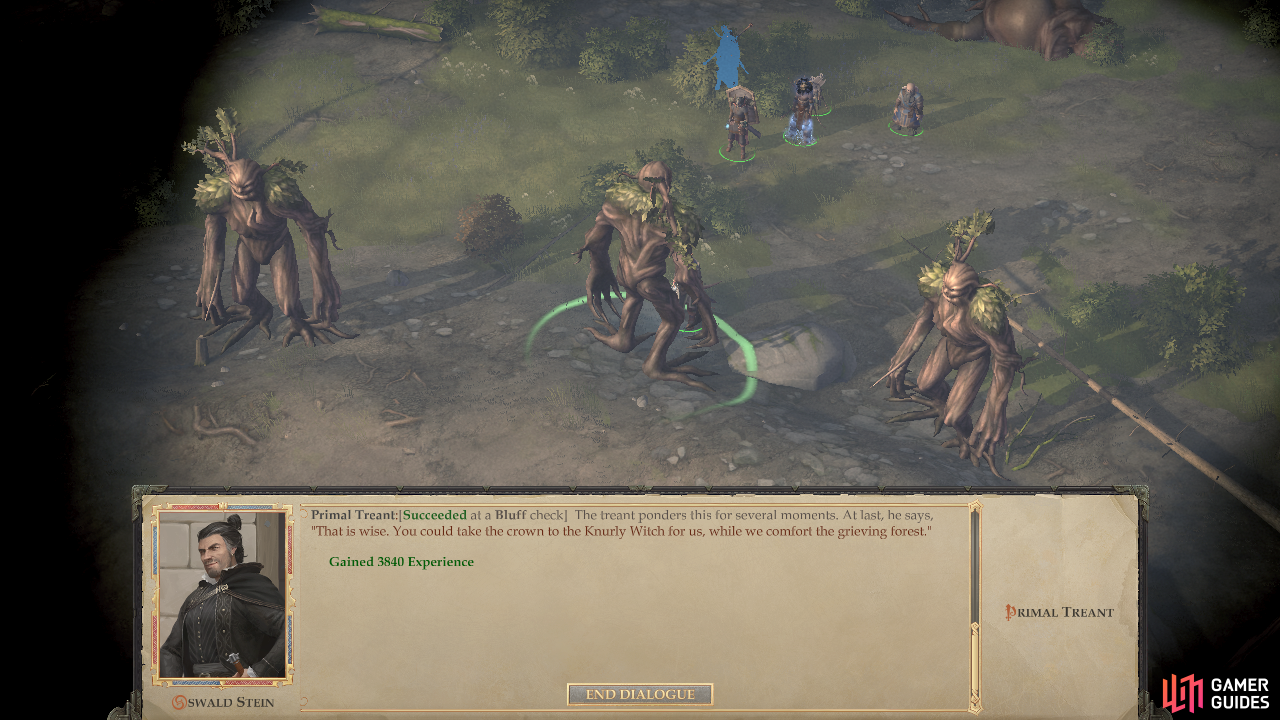
Either talk your way out of fighting the Treants
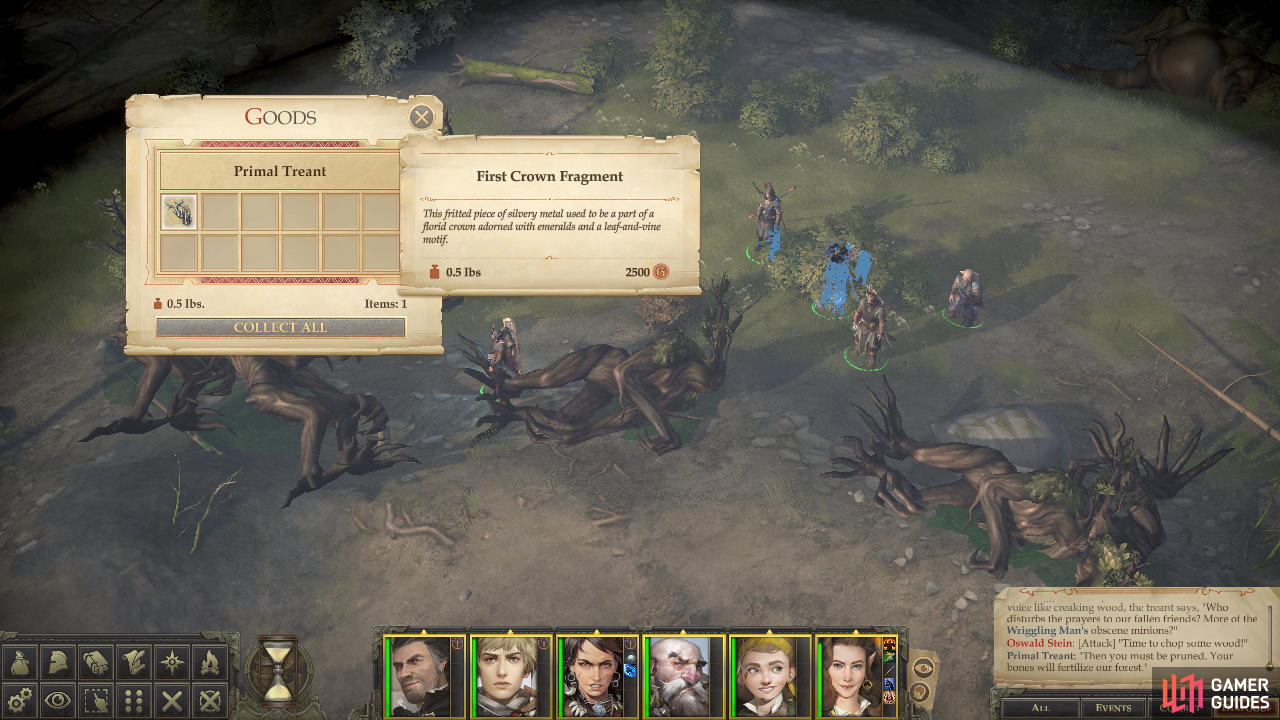
or take the First Crown Fragment from their wooden corpses.
There are two ways to get what you want; violence and bluffing. If you can pass a [Bluff 40] check (can be lowered to [Bluff 35] by first picking the option “Fallen friends? What happened here?”) the Treants will just give you the First Crown Fragment you’re after and walk off. If not, you’ll have to fight for it. Succeeding at the [Bluff 40] check by far offers the most experience for this encounter, so if you can manage it, that’s the way to go.
The Primal Treants are moderately powerful foes, but nowhere near as annoying as the Mandragora Swarms earlier were. They’ve got a fair number of Hit Points, a decent Armor Class, and an Attack Bonus high enough to hit your warriors somewhat regularly, but aside from DR 10/Slashing and Cold Iron and Regeneration 5 (use fire to put them down for good) they’ve got no terribly annoying abilities. Your warriors, sufficiently spell-buffed, should have little trouble exerting their superiority. The normal Treants are virtual non-entities in this fight, being some of the least powerful creatures you’ve encountered in this area thus far. Should it come to violence, hack the trees down and claim the First Crown Fragment from one of the Primal Treants.
First Crown Fragment - Faldrox and Pets
One down, two to go. Return to the gate near where you fought the Redcaps and proceed through it. Continue north until you find a swarm of Elder Purple Worms attacking a tower, commanded by a Satyr named Faldrox the Huntsman. His dialogue is similar in function to the Treants to the south in that you can attempt to handle things through dialogue, or resort to violence. The massive Elder Purple Worms nearby may suggest taking the former approach, but a fight with them is quite manageable, especially if you keep your poor casters a safe distance back.
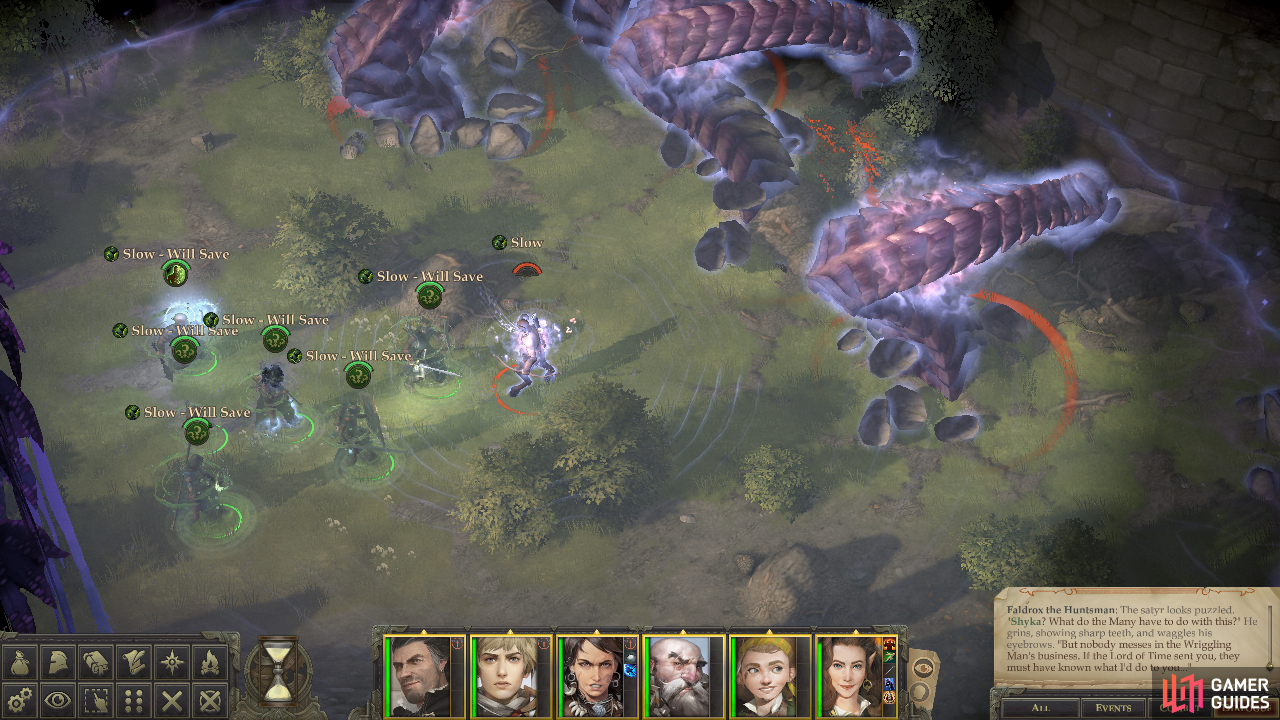
(1 of 3) Faldrox’s main contribution to battle will be spamming Slow as often as possible
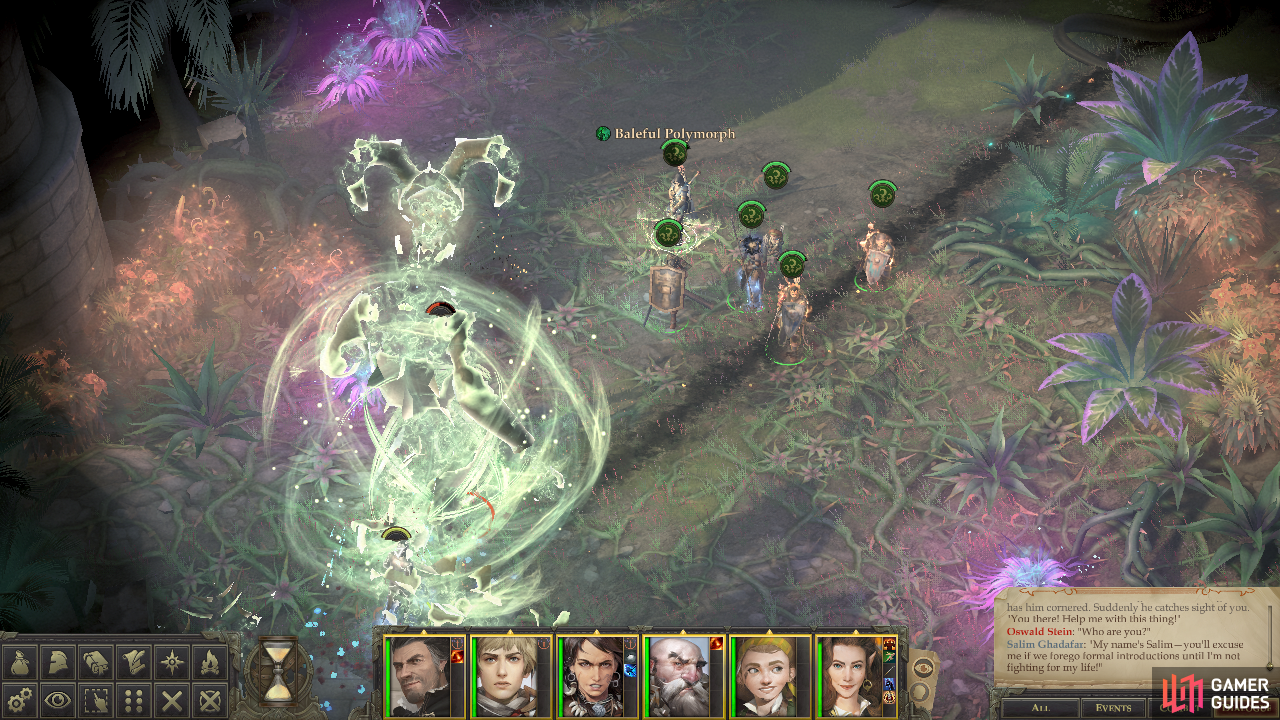
Should you mention Shyka or attack, a fight will break out. Faldrox is a 13th level Bard, and has one major goal in mind for this fight: to repeatedly spam Slow [Will 22] to make you less capable of fending off the Elder Purple Worms, which are the real threat. Faldrox himself has a decent Armor Class, but a pathetically weak Fortitude Save which leaves him vulnerable to Baleful Polymorph or Destruction, both of which should end his role in the battle outright.
The Elder Purple Worms seem more formidable, but their Armor Class is no better than Faldrox’s (good, but by no means insurmountable), nor is their Attack Bonus impressive. If they do hit, however, they’ll attempt to grapple, and there’s little chance any character is going to win a grappling contest with a foe like this. It’s a battle somewhat fraught with peril (especially if you end up Slowed by Faldrox) as one hit can be troublesome, however unlikely that is, and Elder Purple Worms have a good store of Hit Points, if nothing else. Fortunately, they have their own Saving Throw weaknesses - namely Reflex and Will. A simple Phantasmal Web should suffice to stop them in their tracks, while Hold Monster and Chains of Light will hold them more reliably. You may want to start out with Phantasmal Web to keep them at a distance, then resort to Chains of Light of Hold Monster so your warriors can safely dispatch them one at a time, but honestly, if you have 3-to-1 local odds favoring your warriors, you should have little to fear.
Whether you fight Faldrox or not, you’ll have to put down the Purple Worms he was using as living siege engines
after which you can claim the second First Crown Fragment.
Alternatively, you can pass a [Bluff 45] or [Bluff 40] check. The former will get you a massive influx of experience and convince Faldrox to bugger off… but without their master to direct them, his Elder Purple Worms become a bit… well, in his words, nibbly. If you succeed at the lesser Bluff check you’ll get a fine experience reward, but it’ll only serve to provoke Faldrox. Either way, you’ll have to deal with the Elder Purple Worms, so consult the strategies above to emerge victorious.
First Crown Fragment - Salim and the Crag Linnorm
While the best flat experience is gained by succeeding at the [Bluff 45] check, if you for some reason desire riches, Faldrox has some valuable trinkets on him. Generally these are lower-tier magical items that you’ve long since outgrown, but it’s still a consideration. In this case, try your hand at the [Bluff 40] check first, as there’s no reason to turn down thousands of experience if you don’t have to. However you go about it, search the tower wall afterward to find another First Crown Fragment.
After claiming the second piece of the First Crown, continue west between some ruins to the south and forests to the north. Be cautious as you go, however, as more Elder Purple Worms lurk here. Some may be visible, while others will require varying Perception checks to spot while they burrow under the earth. Either way, lead with a well-protected high Armor Class character to buy yourself some time to nail them with debilitating spells when they surface, after which it should just be a matter if cleaning up. Loot a stump to the north to find a Token of the Dryad then continue west.
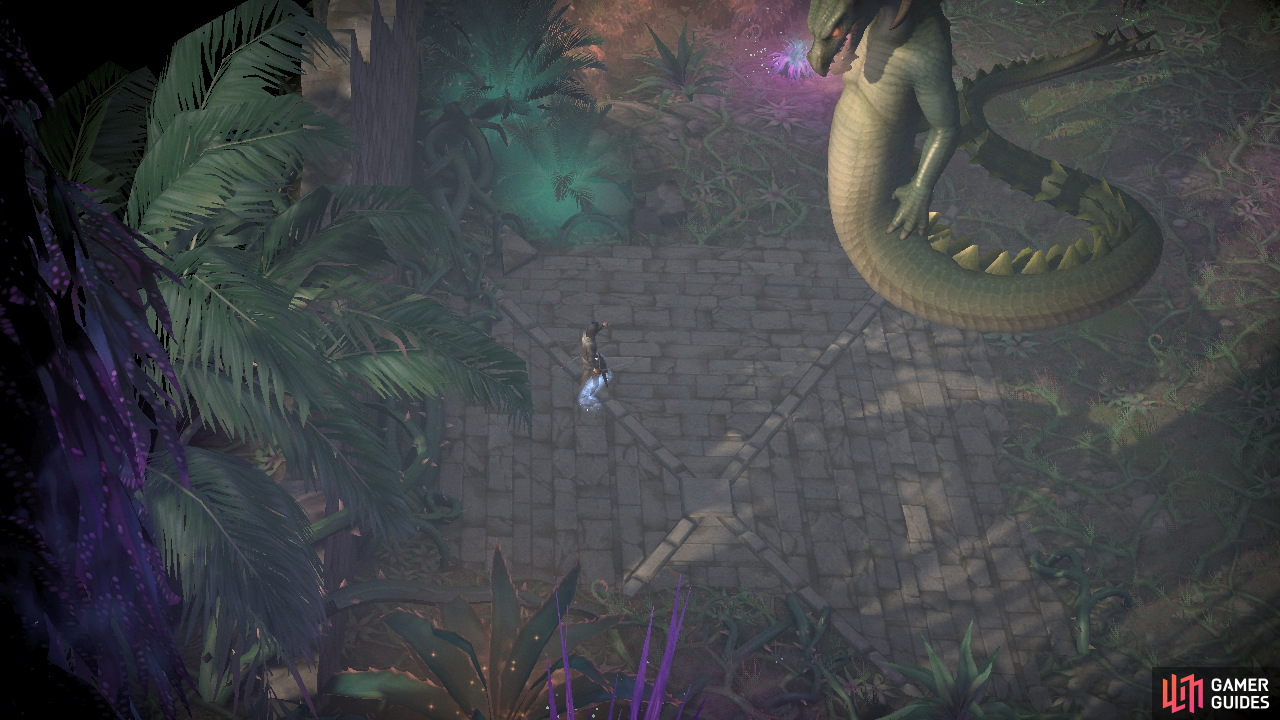
Continue west to find some more scaly foes waiting for you, this time some Poisonous Primal Hydras. More Chapter 2 rejects in over their many heads, their Armor Class is passable enough, but their Attack Bonus just shouldn’t be sufficient to seriously threaten your warriors, in spite of their multiple attacks per round. Chop them down and journey west, then south, to find a man named Salim Ghadafar who is having his own issues with serpentine foes… although in his case he may have you beat, as he’s drawn the ire of a Crag Linnorm.
Salim has found himself the subject of some unwanted attention
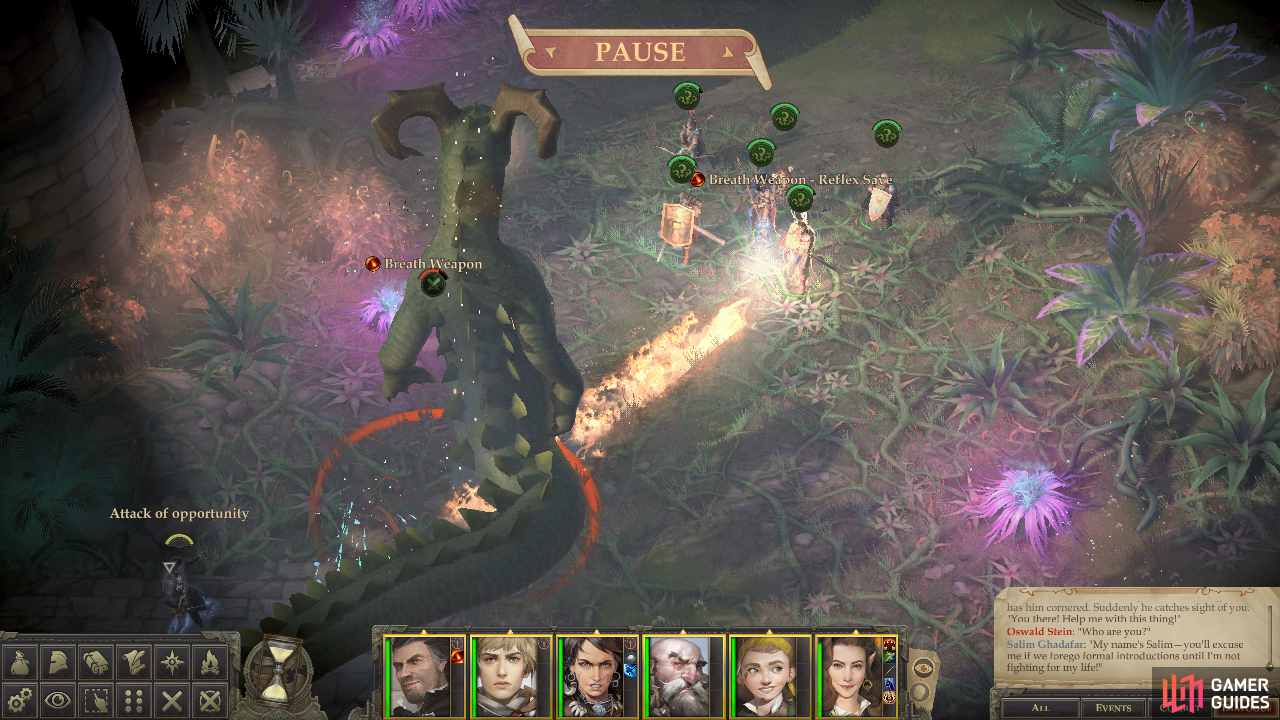
The Crag Linnorm is still a dangerous foe, but at your level you should be better prepared to deal with it.
One of these things was an insurmountable foe Kamelands, but now… now the balance of power has shifted. Granted, a Crag Linnorm is not a foe to take lightly, having a high Armor Class (your warriors will likely struggle to hit it regularly), nearly 300 Hit Points, Damage Reduction 15/Cold Iron and Regeneration 10/Cold Iron, it’ll be a tough fight for even a spell-buffed party. Having resistance to fire (Resist Energy, Protection from Energy) will help a good bit, as its breath weapon can be quite painful while it itself is immune to fire damage.
While Baleful Polymorph will still work on the Crag Linnorm
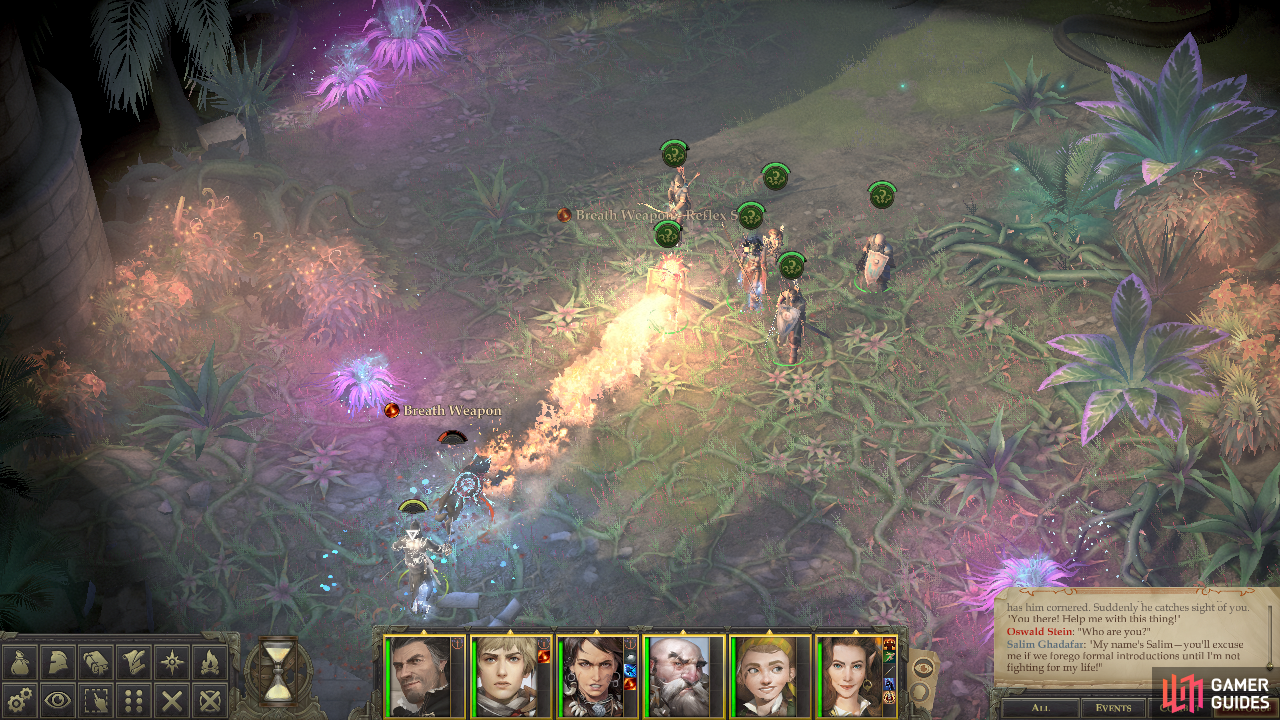
it won’t prevent the polymorphed dragon from using its breath weapon!
There’s no need to rely on warriors alone, however, as aside from buffing, there has to be something your casters can do to even the odds, right? Well… Yes, direct damaging spells (aside from fire) will speed up the process, but your usual tricks will be fairly limited, as the Crag Linnorm is immune to paralysis, entanglement, slow and immobilization. This rules out Phantasmal Web, Chains of Light and Hold Monster, which is a shame because its Will Save is merely good. Insanity will help, effectively afflicting it with permanent confusion, but if you can nail a Baleful Polymorph you’ll make the fight much easier… although it should be noted the Crag Linnorm can apparently still use its breath weapon as a dog. Weird. A character who has maxed their potential for transmutation probably has around a 25% chance of pulling this off, which… well, is kind of par for the course for foes like this, eh?
After the fight, talk to Salim, who acquitted himself well enough in the battle. He’ll reveal he works for Shyka, although he doesn’t seem enamored of either Shyka or his goddess, Pharasma. You can scratch some lore from him and make a moral choice about his old hobby of hunting priests, and if you say “Are you a priest?” you can follow up with the [Lawful Good] response “You’re looking for lost souls? You should visit the ruined village in the Narlmarches.”. As him “What do you mean ‘another one’?” to learn more about this crown you both seek, and what it contains. Finish up by asking for the crown fragment, which he informs you the Crag Linnorm swallowed. Fortunately, Salim has no interest in contesting its ownership, so simply search the Crag Linnorm and claim the final First Crown Fragment.
Or rather, save your game first, because once you have all three pieces you’ll be treated to another Illustrated Book Episode.
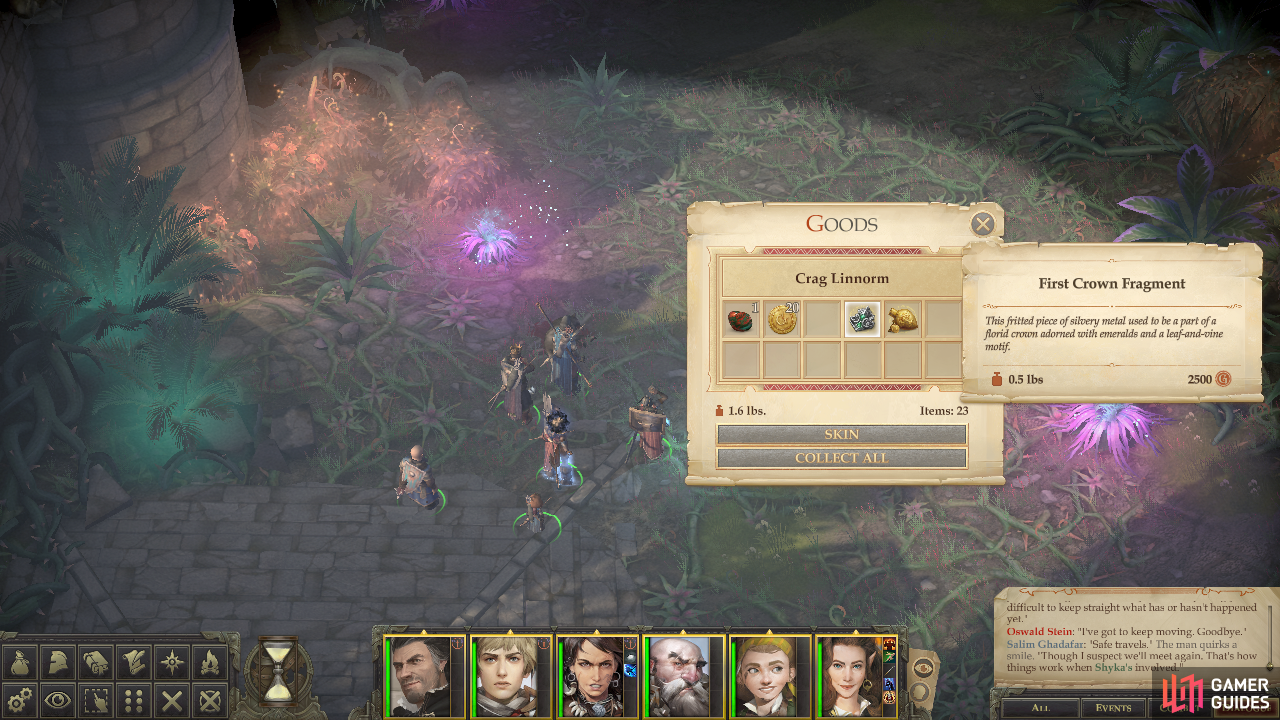
After defeating the Linnorm, loot it for the third and final First Crown Fragment
Once reassembled you’ll be pestered by the ghost within the crown.
Illustrated Book Episode - Lethoriel
- …the truth, of course!
or “You first - who are you?
or “Where are we? Let us out of here!”
Your decision here doesn’t matter, either way, you’ll end up moving to the next five options.
- “Asked him how best to fight Nyrissa and her minions.”
This one sort of depends on what you want to get out of this book event. You can’t make too many impactful decisions with Lethoriel yet, but you can glean some information and experience out of him. If you pick the option “Told him we were his new masters!”, you’ll get a chance to pass a [Bluff 35] check to convince him you killed some enemies of his, after which you’ll find yourself back at the previous questions. Succeeding at the Bluff check is worth a few thousand experience.
If you at any point pick “Asked him about Nyrissa and his imprisonment.” you’ll have to pass a [Will 20] save, which is worth very little experience, but it does open up the dialogue option “…asked him what the chalice was.“, which gets you very little new information.
Likewise picking the option “Asked him more about his kingdom.” gets you scant info and puts you back at whatever unasked questions you have.
By default, then, you must pick “Asked him how best to fight Nyrissa and her minions.” to move on.
- “…asked him what he would do if we set him free.“
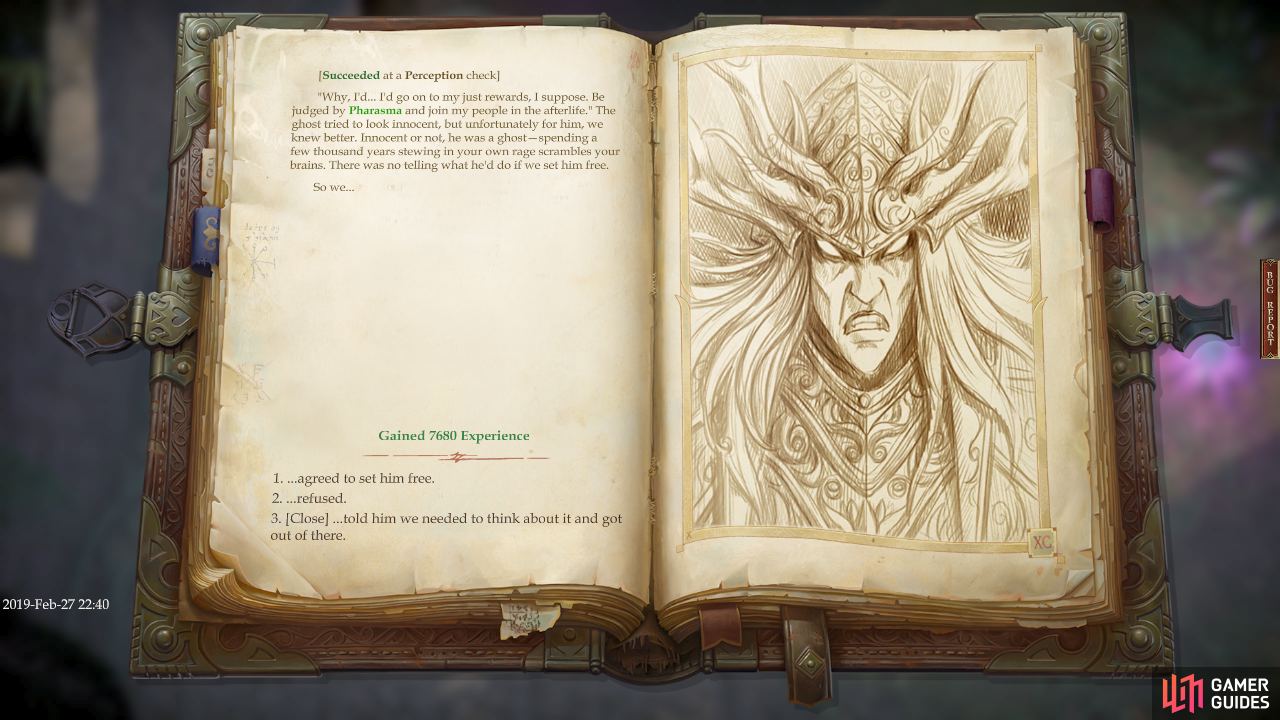
Refusing to free him will just end the book event when the rebuffed ghost throws a fit and kicks you out of whatever realm he summoned you to. Agreeing isn’t much more productive, as you can’t do anything until you return to Shyka. If you pick the suggested option above, however, you’ll get a chance to pass a [Perception 35] check and score several thousand extra experience, so there’s no reason not to attempt it.
- “…agreed to set him free.“
Again, you don’t actually have to make a hard decision about this yet, but offering to free Lethoriel now will give you the option to actually follow through later, so you might as well keep your options open.
After coming to a decision about the ghost’s fate - or simply leaving beforehand - this Illustrated Book Episode will end.
The Ghost in the Crown
There’s more to explore to the east of where you slew the Crag Linnorm, and while it’s of great importance, let’s get this crown back to Shyka. Find Shyka near where the Knurly Witch and the Wriggling Man were fighting and talk to him, where you can waste his time asking for a reward or about the ghost tied to it. Neither of these options really go anywhere, which leaves you with two choices: pick “I’ve got it for you. Here you go.” to hand over the crown or “I’ve got it, but I’m not giving it to you.”
The latter case is almost worth it just for Shyka’s reaction. In either case, Salim will interject and complicate matters by offering to take the crown and safely free the ghost trapped within. The rewards are very similar, whatever you choose. If you keep the crown ([Chaotic Neutral]) you’ll gain experience, and the crown can be used to summon a pair of Ghostly Guards, who are weak to the point of being… well, they might absorb a few hits, but little more. If you give the crown to Salim ([Lawful Good]) or Shyka ([Chaotic Neutral]) you’ll get the same experience reward and 5,000 gold, but lose the crown.

Witholding the crown from Shyka is amusing if for no other reason than his reaction
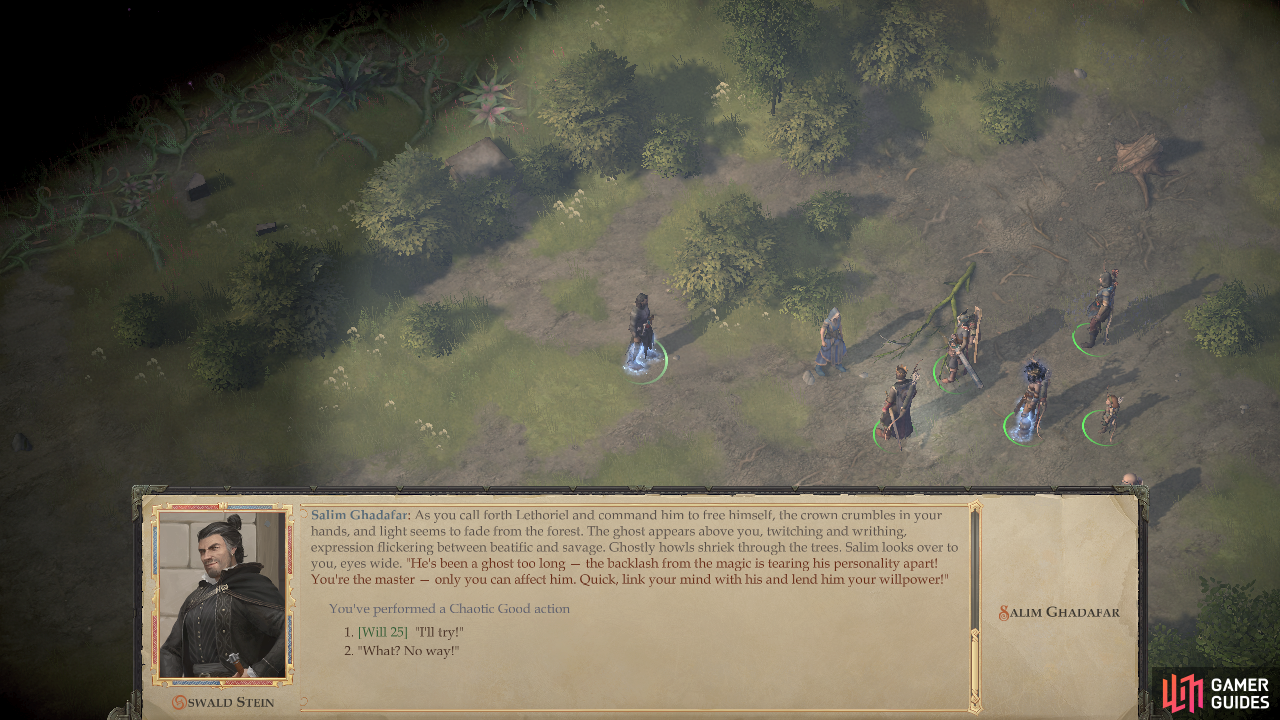
By passing a Will Save you can keep your promise to free the ghost in the crown.
Where things get interesting, however, is if you followed the advice earlier and offered to free the ghost. In this case you’ll get the dialogue option “I’m going to set the ghost free myself.”. If you choose this, you’ll have to pick the option [Free the ghost] “Lethoriel!” to go through with it, your only other options being to change your mind, or try to delay, which Salim will block. Once freed, you’ll need to succeed at a [Will 25] check to help the ghost preserve its sanity, earning you a pittance of experience and a promise of aid when you encounter Nyrissa’s minions. Succeed or fail and you’ll gain and experience reward equal to the one for the above options.
However you resolve this, once Shyka has been consulted and a decision made, the quest ends. There are, however, two more quests you can pursue in this area, although both will force you quit a bit astray. If you want to continue the current main story quest, “Against All Odds”, return back to where you fought the Crag Linnorm with Salim and skip ahead to that section of the guide, otherwise continue on with “The Secrets of Suramgamin”, below.
No Comments