

How you obtain this quest can change depending on when you install the “The Wildcards” DLC. If you have it installed from the start of the game, you’ll get this quest at the end of Chapter 1, during the Baronation section. If you install it later, you’ll get the quest when you’re in your throne room starting early in Chapter 2. Either way, a tiefling named Kaessi will inform you that she has some important news which concerns an area within the Stolen Lands. As the new baron, she’s hoping you can help with the matter.
Visit the house where she’s staying in Tuskdale, to the east of the throne room. Upon entering, Kaessi will seem quite different from the person you first met. There’s a good reason for this; she shares a magical bond with her sister, Kanerah, which was granted to them by a powerful diety. The bond allowed Kanerah to return to life after Kalikke sought any means to make this possible, but it came at a terrible cost. The two switch personalities at random, and both live in the same body. Together, they call themselves Kaessi.
Your choices here aren’t terribly consequential, save for the decision to actually go along with Kaessi’s plan and a few alignment-modifying choices. You’ll also automatically attempt a [Knowledge (Arcana) 20] and a [Lore (Religion) 19] check at the start of the conversation, which will unlock new dialogue options and yield XP if you pass them, but they otherwise don’t drastically influence the outcome of this conversation.
Choose the dialogue option most suited to your character, and then listen to the rest of what Kanerah has to say. It becomes clear that a special artifact, known as the Disk of the Eclipse, is essential to understand the bond between the sisters. As it happens, they know where this artifact might be found; in an area known as Sorrowflow, to the northeast of Tuskdale.
To reach Sorrowflow, take the following directions from your capital:
- Northeast
- North
- Northeast
- Southeast (across the Shrike River)
- East
- Northeast
- Northeast (path winds along Shrike River and Crooked River)
- Northeast (across Crooked River)
- Northwest
- West
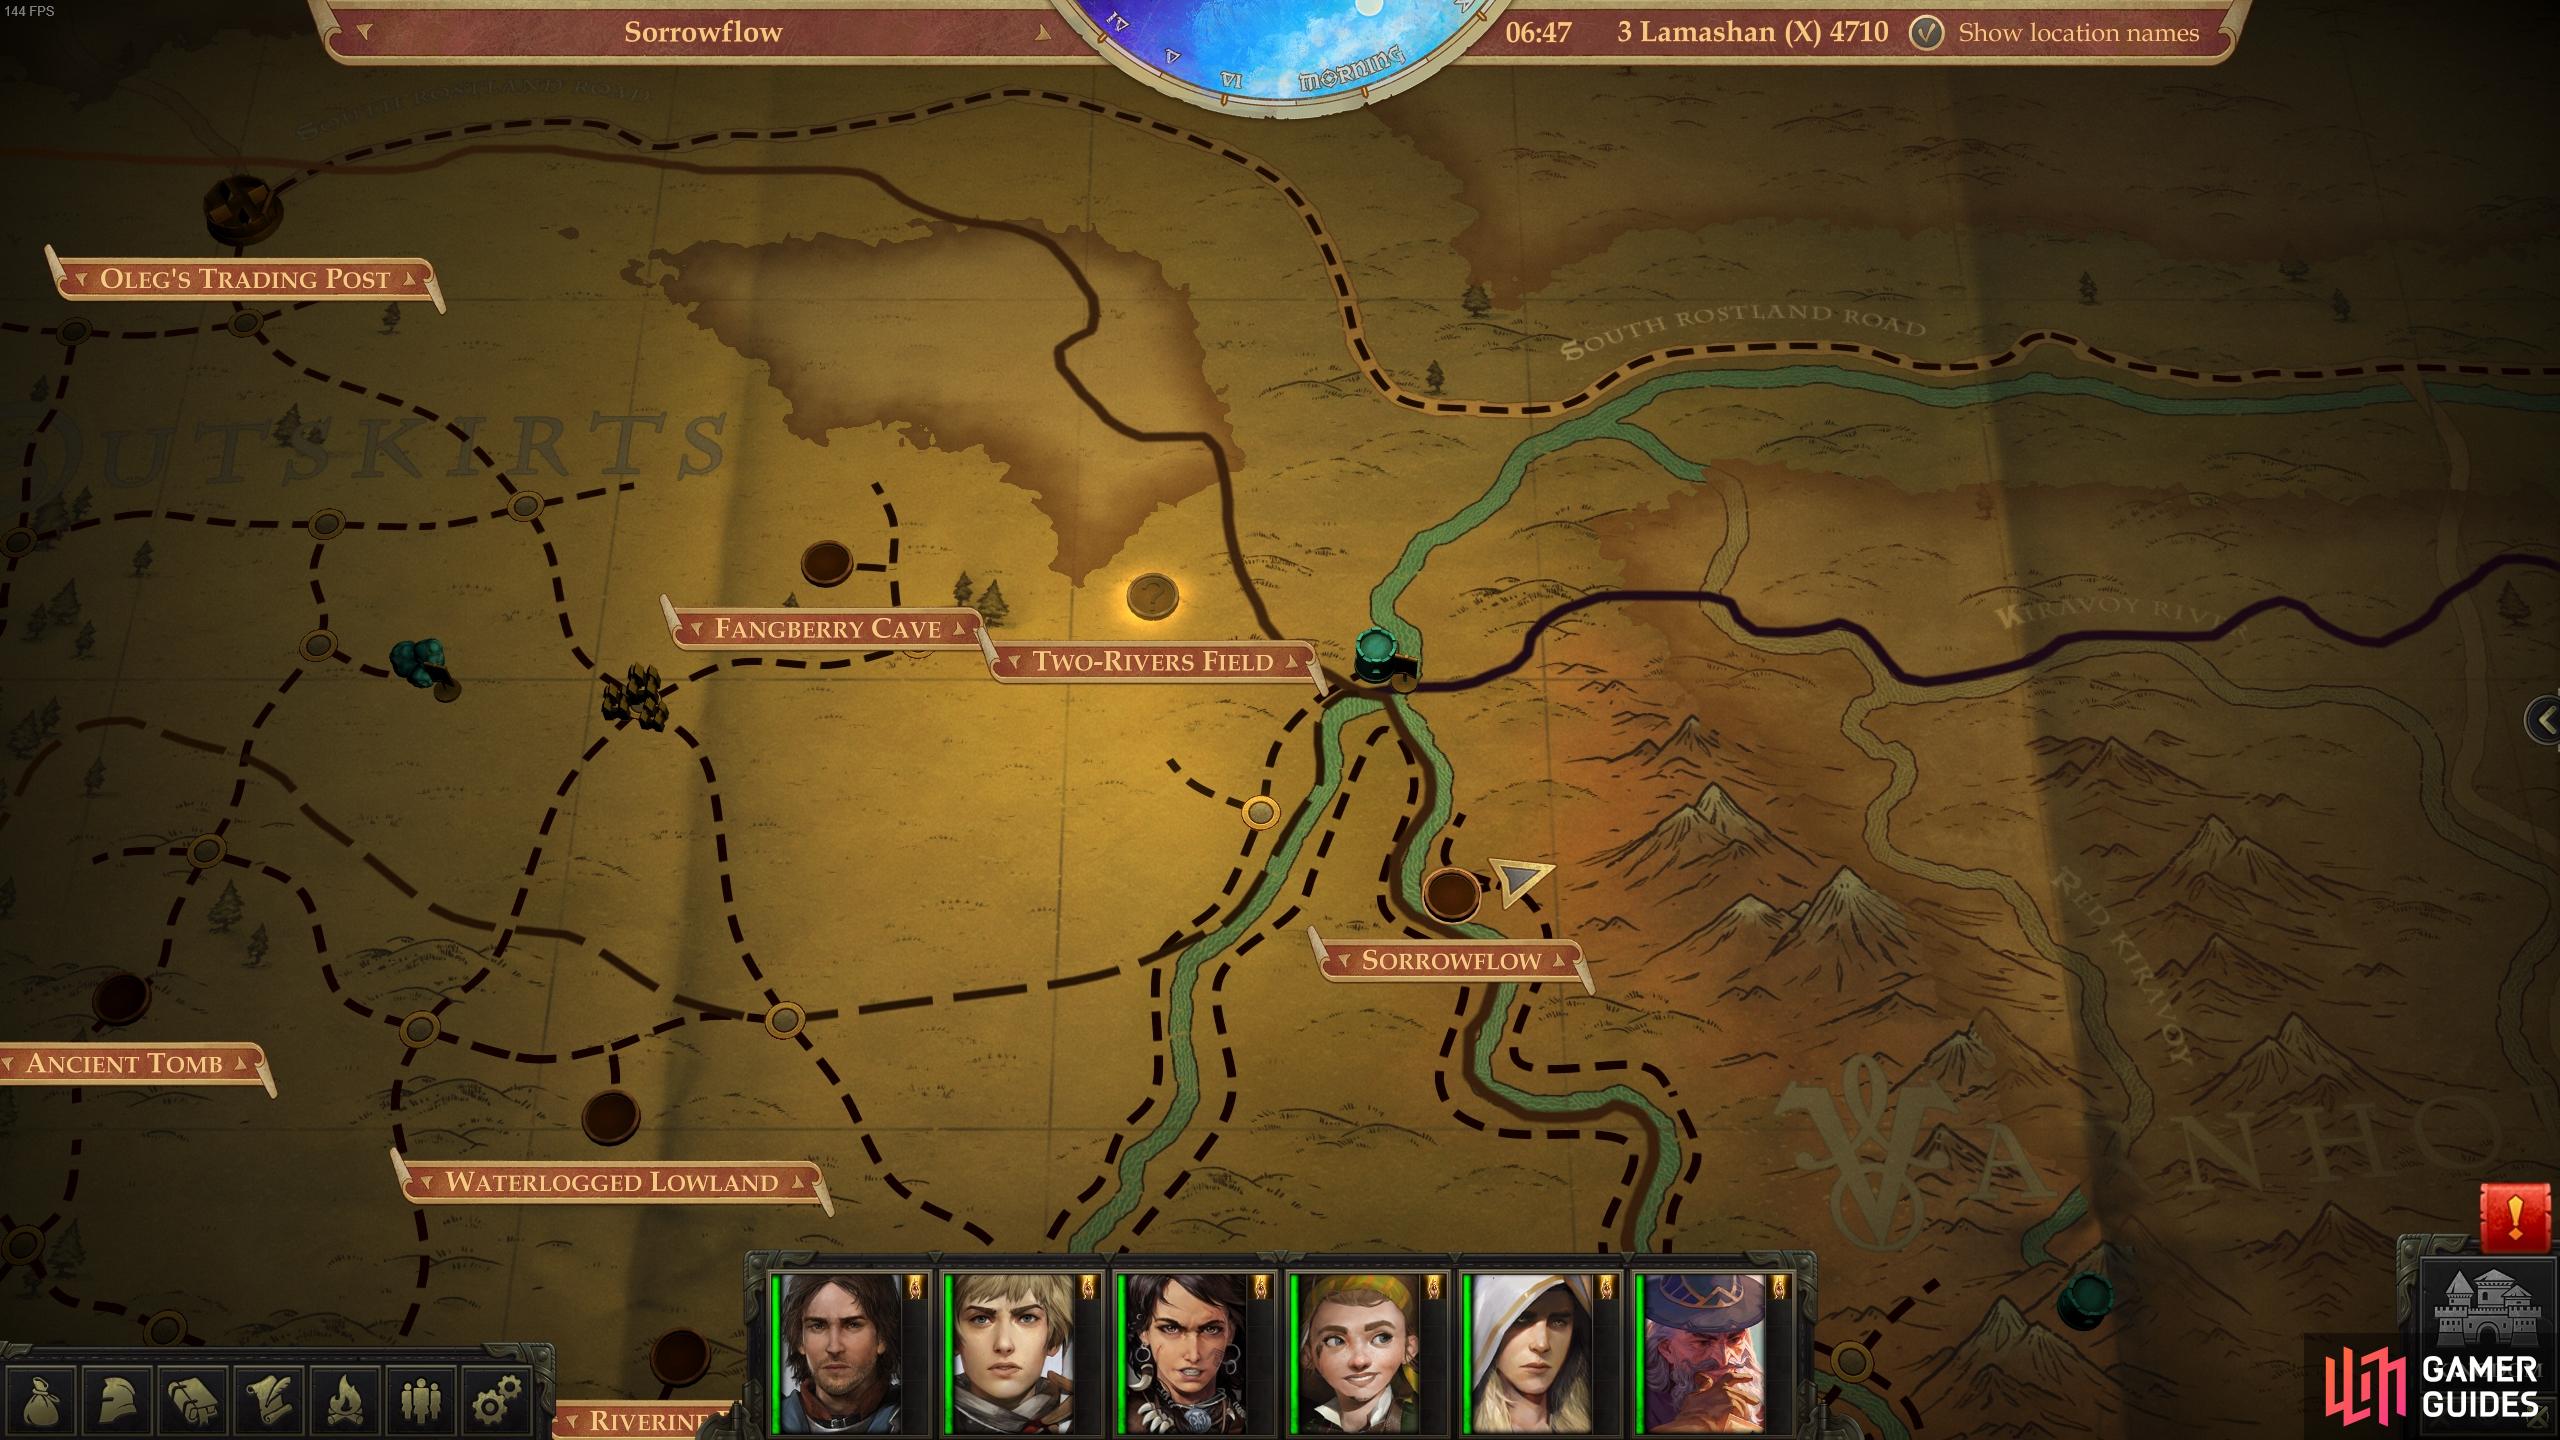
The location of Sorrowflow (centre right) in relation to Oleg’s Trading Post (top left).
Upon entering Sorrowflow, a black screen will eventually turn to a dialogue window with Kalikke. Go through the motions of the initial dialogue until the following option appears:
- [Send away your other companions] “We will go alone from here.”
With your companions gone, be sure to ask Kalikke “What’s our plan?” to earn 90 Experience, and then state that you’re ready to go.
Head northeast from the starting position and then northwest to find a Ferocious Slurk. Despite its name, this toad-like creature won’t cause you any trouble, but is worth dealing with for some minor experience. Further southwest you’ll find more Ferocious Slurks surrounding a fire elemental trap which contains three Medium Water Elementals. While you can leave these be if you wish, you’d be wise to use Kalikke’s Water Blast skill to extinguish each fire surrounding the trap and free the Water Elementals. Doing so will secure their assistance in a fight ahead.
Loot the container to the southwest for some valuables and then head northwest over the ford. Interact with the cliff face to trigger a dialogue screen. If you happen to have a rope in your inventory, you will be able to attempt the climb with an [Athletics 12] check. Otherwise, it’ll be a more difficult [Athletics 18] check… or you could just reload until you succeed unscathed.
Once you’re atop the cliff, head northeast to find a cave entrance behind the waterfall. Enter the cave and defeat two groups of bugs, the first of which (just north from where you entered) consists of Giant Centipedes and a Tremendous Centipede. The latter deal far more damage than the former, as their size indicates, but all of them are poisonous, which can be a nuisance given you don’t have companions to heal you. In a chamber to the west you’ll find a larger, second group of centipedes, including more Giant Centipedes, two Giant Spitting Centipedes, and two Tremendous Centipedes. When both groups are dead, loot a corpse in the first chamber for some baubles and a chest in the second chamber for more interesting loot, including a Wand of Fireball and Bracers of Armor +1.
With that loot collected, turn your attention to the southern end of the western chamber, where you’ll find some rubble [Athletics 24] blocking your way. Be sure to save before you attempt this Athletics check, as failure will result in your party being fatigued.
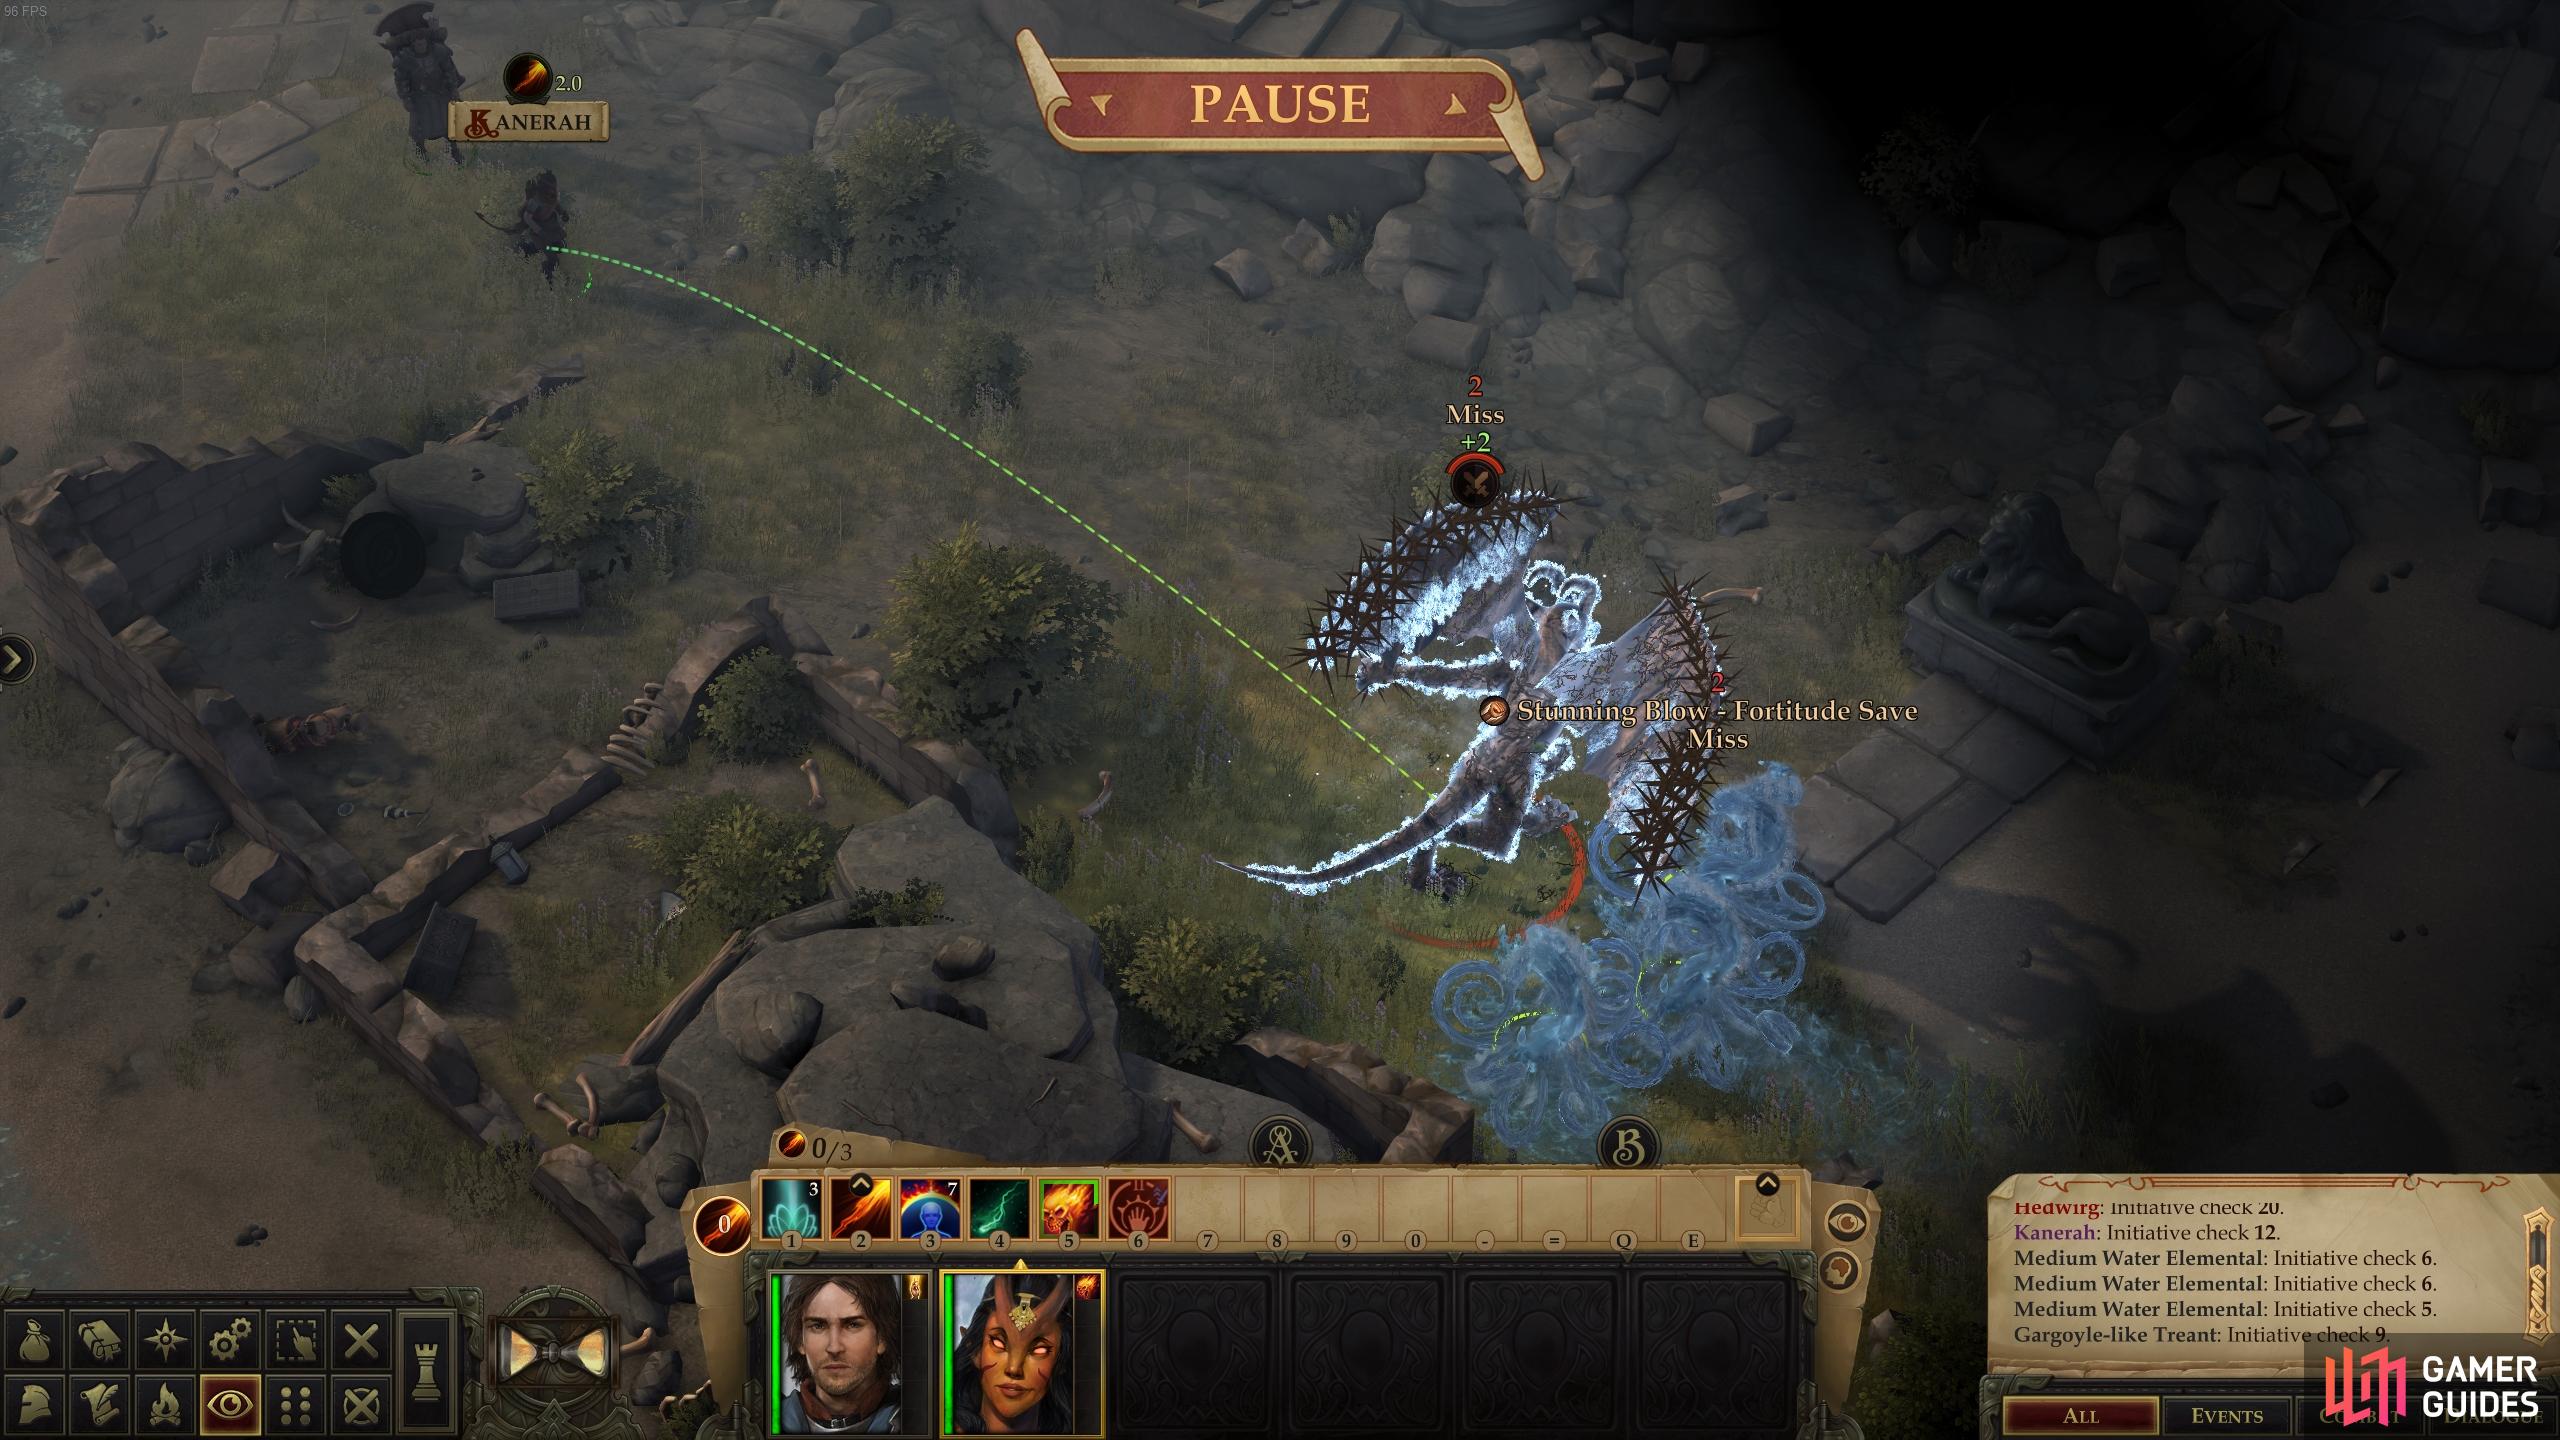
After leaving the cave via the Athletics check, head southwest to find two Gargoyles. They may be imposing, but their Attack and Armor Class are fairly low. All you really have to watch out for are their Damage Reduction 10/magic (by now you should hopefully have a magical weapon of some sort) and their multiple attacks per round. With both Gargoyles dispatched, continue a short way southwest to the ruined tower. After a brief cutscene the location of the Disk of the Eclipse will be revealed to the southwest, along with a much more frightening Gargoyle-like Treant.
At this point, Kalikke will transform into her sister, Kanerah. After a brief discussion you’ll be presented with four options:
- “Let’s fight it! We’ll easily defeat it.”
- “Let’s try to slip past it and take the Disk and the other valuables.”
- “We freed the Water Elementals, who seem friendly. They will help us defeat the Gargoyle.”
- ”I am not ready to attack the gargoyle yet.”
We suggest picking the fourth option first, as it’ll allow you to save and level up Kanerah. Yes, her and Kalikke have different stats and must be leveled up independently. No use fighting the boss of this quest with a subpar sister, is there?
If you feel confident in your combat abilities, there’s no reason why you shouldn’t attempt to fight the monster with just the two of you. However, if you helped the Water Elementals previously, you might as well summon them for aid. Doing so will cause them to emerge from the water to the southeast, thereby taking the brunt of the initial attack from the Gargoyle-like Treant. The nature of this encounter with further change depending on whether you allow the elementals to fight on your behalf while you chat with Kanerah [Lawful Evil] or whether you join them in the fight [Chaotic Good]. In the former case, the Gargoyle-like Treant will start the fight with half its Hit Points missing.
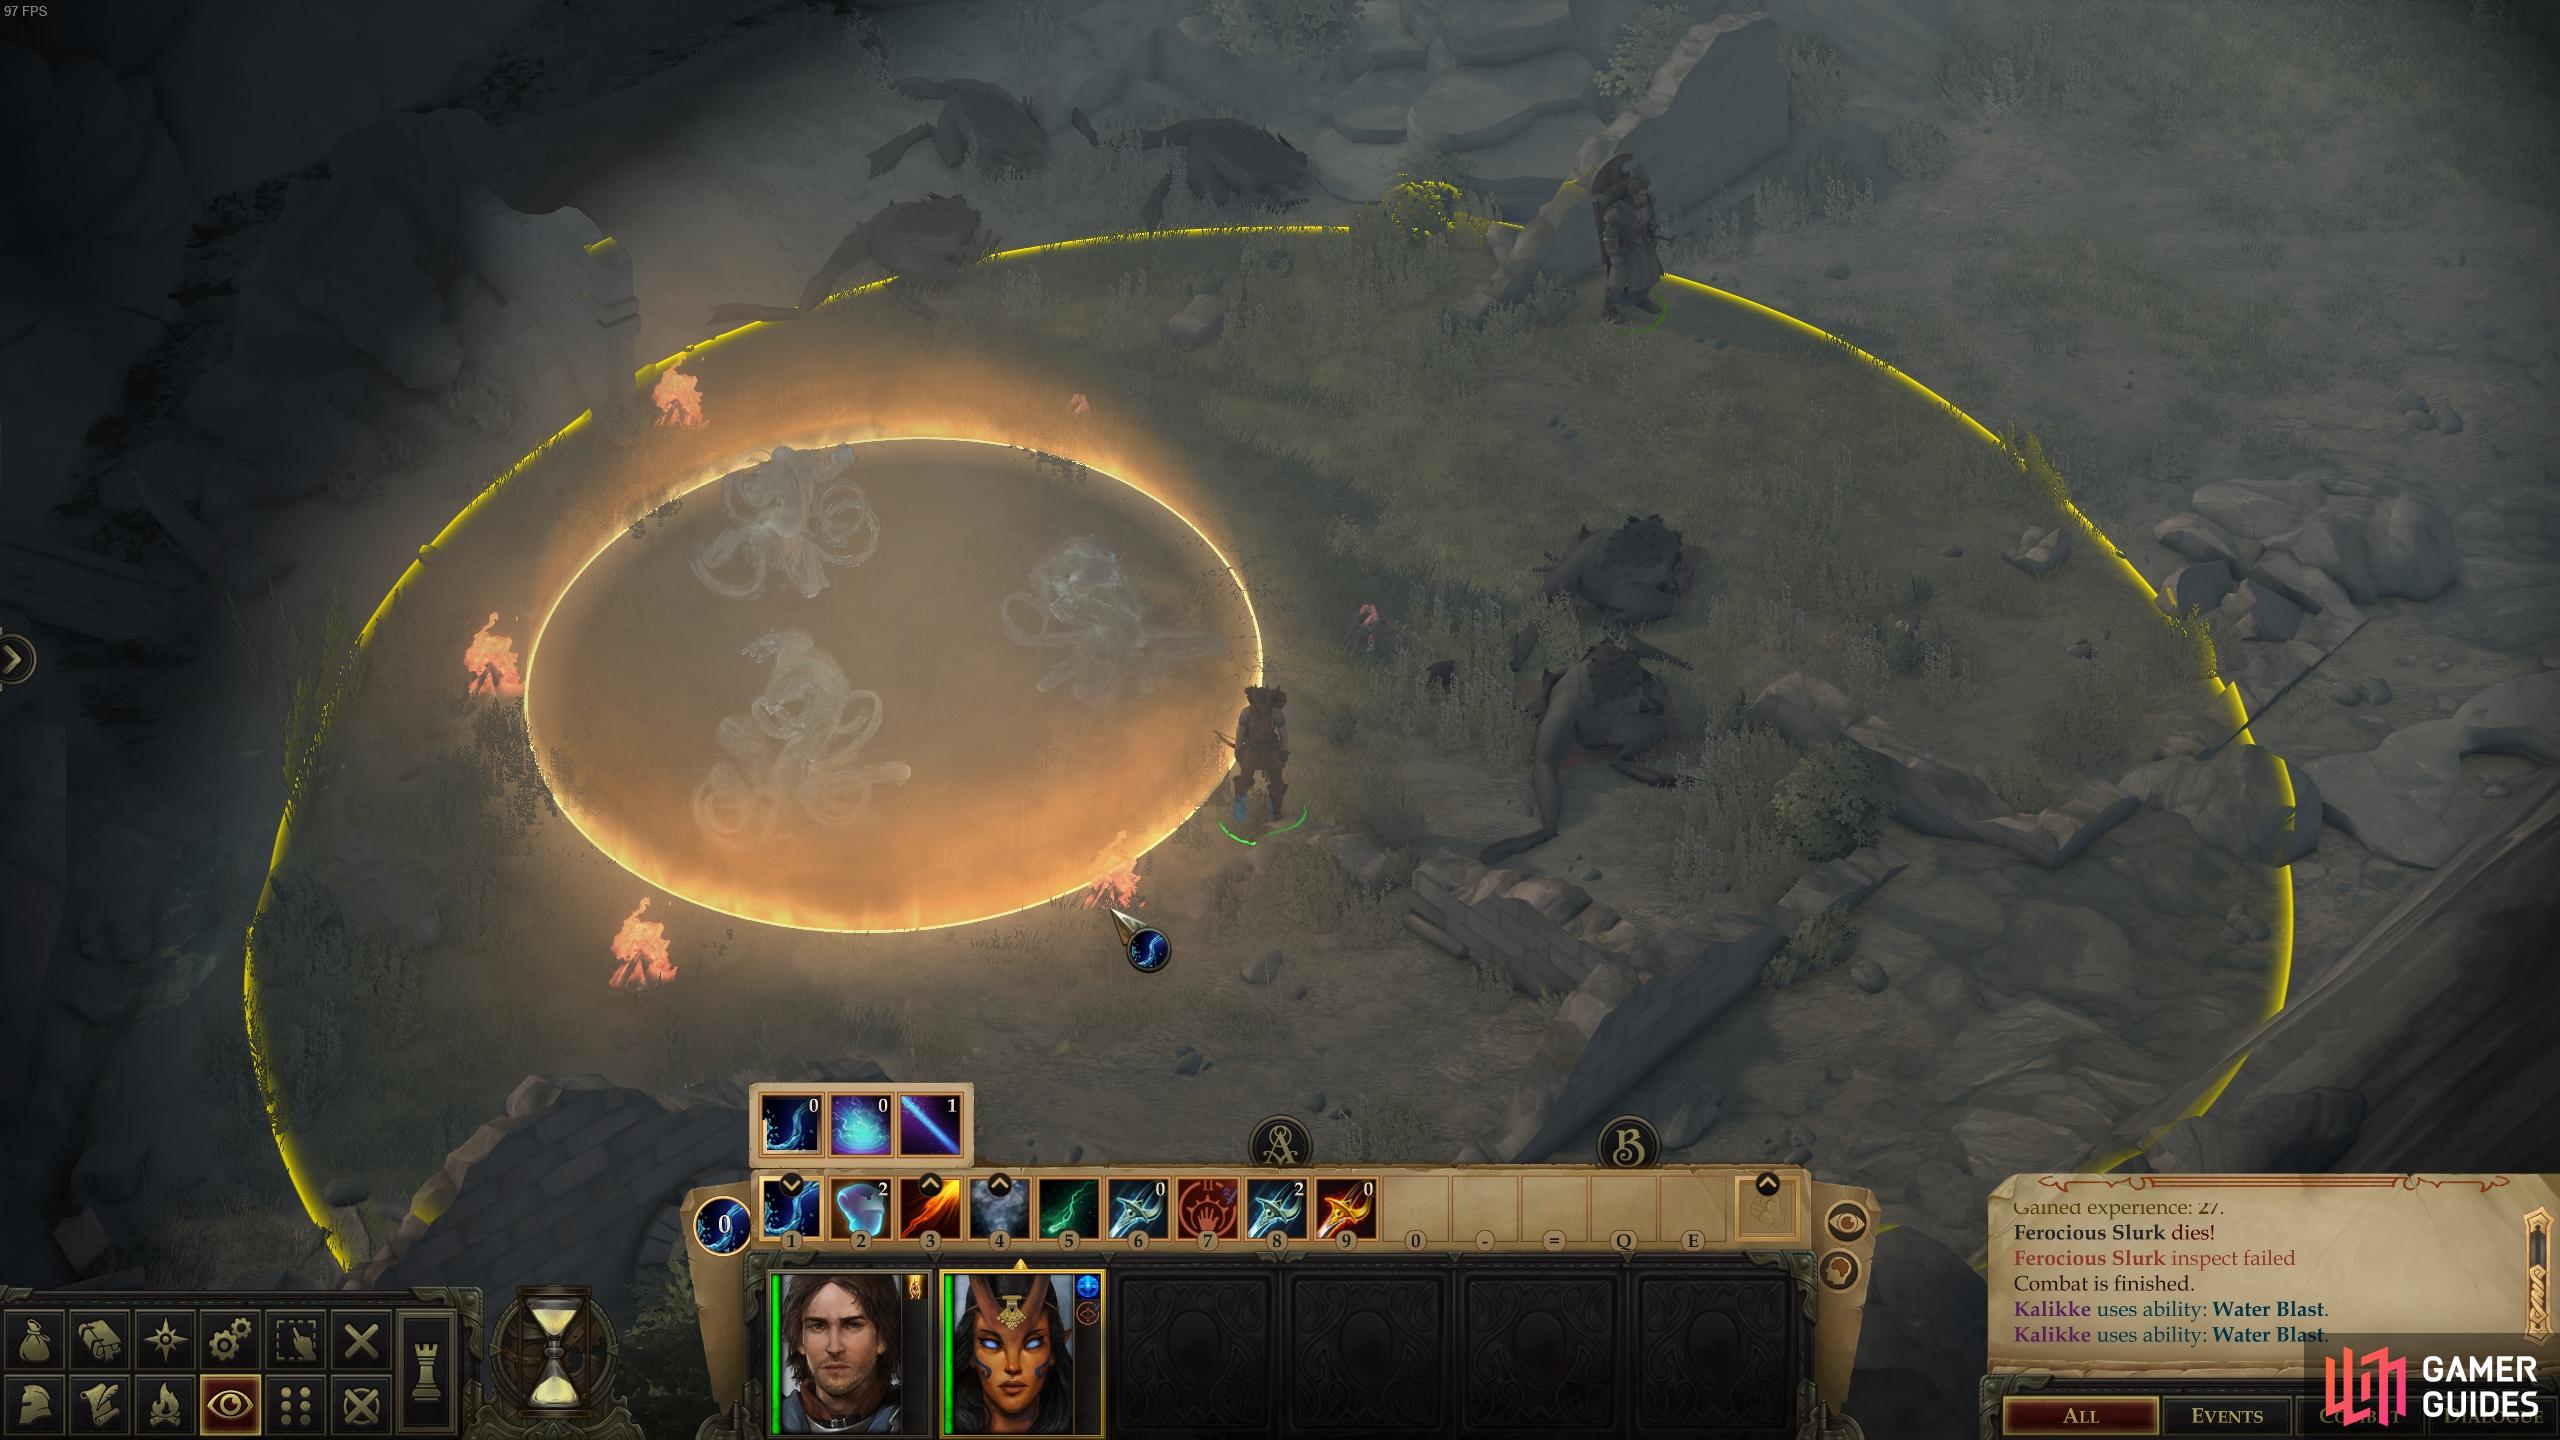
If you haven’t yet extinguished the fires and freed the Water Elementals, there is still time to do so.
Freeing the Water Elementals will secure their assistance in the fight with the Gargoyle-like Treant.
Whether you summon the elementals or not (and whether you help them fight or not), the Gargoyle-like Treant isn’t that difficult of a foe. It deals decent damage across its multiple attacks and can use “Stunning Blow”, but its Attack bonus and Armor Class aren’t very high, and it only has just over 60 Hit Points. Granted, its Damage Reduction 5/Cold Iron and regeneration might be a nuisance, but Kanerah can easily outpace that, whatever your protagonist’s capabilities. Just spam her “Fire Blast” skill as often as possible and hope you don’t get stunned by “Stunning Blow”, as that can really turn the tide against you.
With the Gargoyle-like Treant dead, loot the two chests and corpse near the Disk of the Eclipse (the only somewhat notable loot here is an Amulet of Natural Armor +1), and then interact with the disk to proceed. Be sure to give the disk to Kaessi if you want to keep her as a companion, thereby allowing her to switch between her two personalities at will. If you keep it for yourself, she will leave your party permanently.
Once Kaessi has… absorbed (?) the disk, she will briefly play with her new ability before you’re presented with a few dialogue options. All of these are trivial and have no consequence to further events, but you can choose the [Chaotic Good] option to refine your alignment if you wish. Finally, confirm that you want to keep Kaessi in your party before leaving through the exit to the southeast.
That concludes Sorrowflow. If you’re here after Troll Trouble and have a mind to complete more companion quests while you’re up here, consider going to either the Old Sycamore area or Oleg’s Trading Post depending on whether you want to work on Investigate My Death (Jaethal’s quest) or Shelyn’s Chosen (Valerie’s quest) first. Both are about the same distance away, as the crow flies, but you’re no crow and there’s no northern ford of the Shrike River, so you’ll end up passing by the Old Sycamore area first, which makes us favor Jaethal’s quest.
If you couldn’t handle them earlier, this is another fine opportunity to attempt Ratnook Hill and the Endless Plains area. Finally, don’t forget [The Court Alchemist] while you’re up here, which requires you to travel to Oleg’s Trading Post.
i found this mega cheese thing and im gonna share it lets say u dont want to bother with her and dont want to bother to learn kinetic class(it was a drag for me to learn it too) for whatever reason i dunno why but if u use an ability along with blade for example the ice blade (water/water)(yea i use call of the wild so she was lvl 1 but u can do it with whatever) u can just make her melee dps with the blade kinetic power and then pick at lvl 9 vital strike now let me explain
kinetic blade is a form instead of doing it as a blast u do it with melee attacks for touch armor class i think (its kinda like the warlocks on dnd 3.5 weird)
now vital strike is a standard action that instead of doing 2 atks at lvl 9 u will do 1 atk and roll dices twice then calculate dr its a cool feat for bypassing hard dr
now what u think happens if u use that with blade? u assume it consume blade when u atk hence u get 2 burns right ? 1 per atk like it would normaly..... NO IT DOES NOT actualy u get 0 burn but you say wow thats broken come on oh expletive deleted wait till you hear this
kinetic gets empower and maximize for her blast at 5 and 9 (call of the wild default kinetic at least)
and you say come on Rendrick(thats me) it cant stack along with that and instead of 4-5 burns u get none... OH YEA IT CAN but Rendrick(still me) i cant cast for example maximize becouse i need to spend 5 burn 1 in turn and i just cant ok? but wait u have a buff called Internal buffer that cuts 1 burn so u can do maximize vital strike and do max dmg for 1 atk while doing the blast twice YEA BUT RENDRICK!(yes im rendrick) you can only do that once there is no way that doing vital strike does con.... VITAL STRIKE DOESNT CONSUME THE COOLDOWN FOR THE 1 PER DAY so u can endlessly do it......
well there is only 1 think u cant do this with whip unfortunatly i guess even cheese has a limit i dunno this is obviusly a bug of some sort right? do i feel bad ? no i wont be using her anything since im a Valerie man but hey that means your MC kinetic can do that too so armed with this knowledge have fun if u want more info about the build there is no build this is like wizard where whatever u pick wizard will always be good so have fun