Den A/B/C
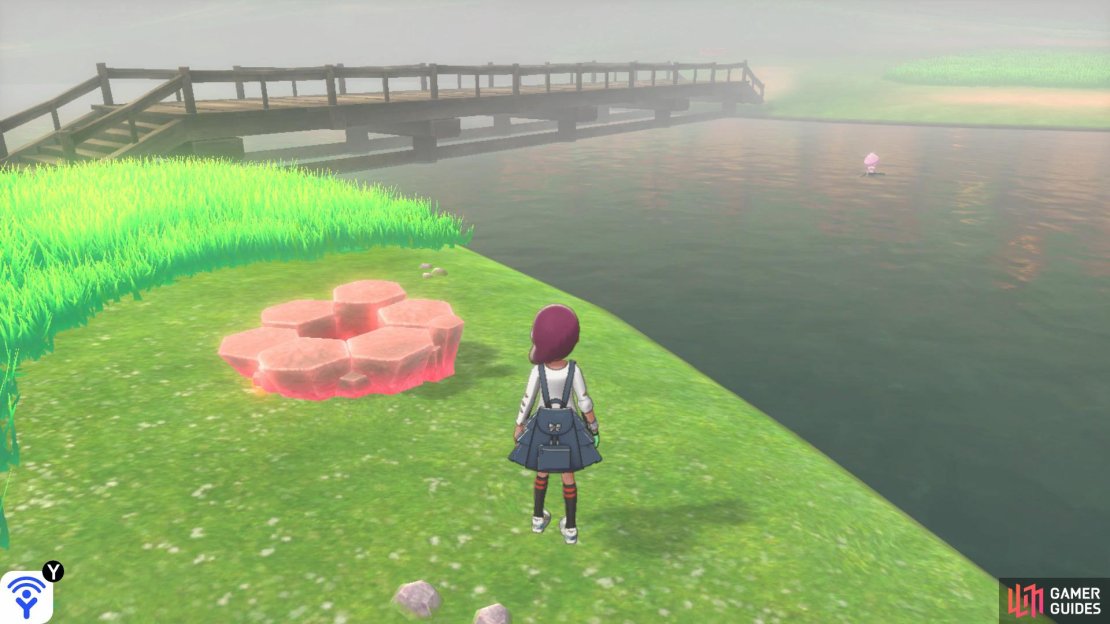
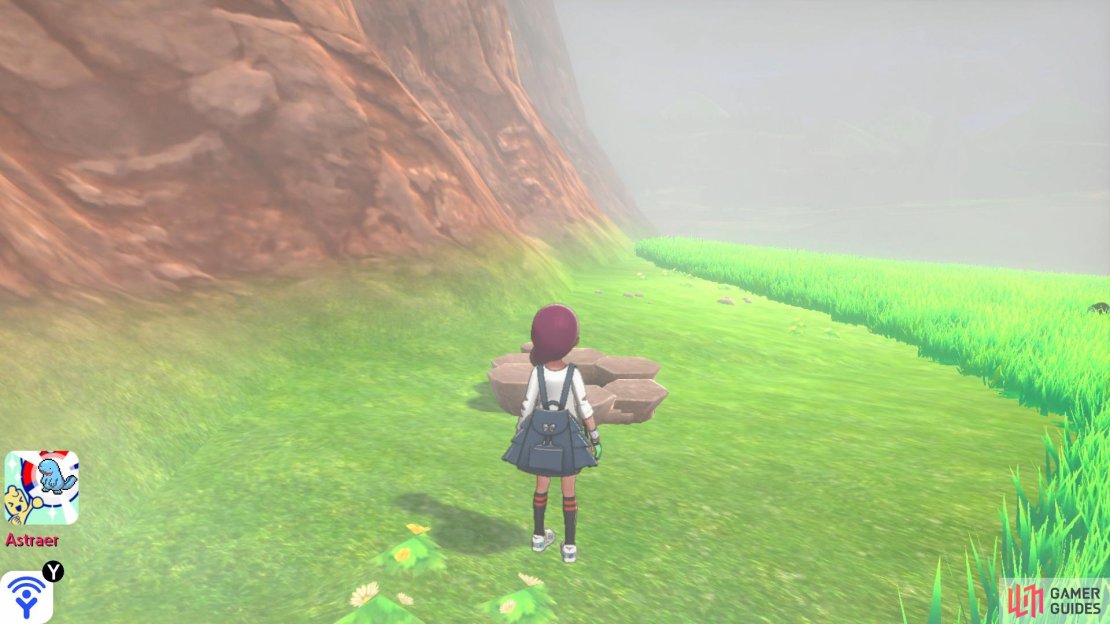
(1 of 3) Den A can be found before crossing the bridge from Rolling Fields
Common Den
| Name | Type | Encounter Rate |
|---|---|---|
 Chewtle Chewtle |
Water | ☆ - 35% |
 Wooper Wooper |
Water/Ground | ☆ - 35% |
 Tympole Tympole |
Water | ☆ - 20%. ☆☆ - 30% |
 Corphish Corphish |
Water | ☆ - 10%, ☆☆ - 30% |
 Shellder Shellder |
Water | ☆☆ - 20% |
 Palpitoad Palpitoad |
Water/Ground | ☆☆ - 20%, ☆☆☆ - 40% |
 Drednaw Drednaw |
Water/Rock | ☆☆☆ - 20%, ☆☆☆☆ - 10% |
 Quagsire Quagsire |
Water/Ground | ☆☆☆ - 20%, ☆☆☆☆ - 20%, ☆☆☆☆☆ - 10% |
 Pyukumuku Pyukumuku |
Water | ☆☆☆ - 20%, ☆☆☆☆ - 20%, ☆☆☆☆☆ - 25% |
 Cloyster Cloyster |
Water/Ice | ☆☆☆☆ - 50%, ☆☆☆☆☆ - 25% |
 Seismitoad Seismitoad |
Water/Ground | ☆☆☆☆☆ - 20% |
 Crawdaunt Crawdaunt |
Water/Dark | ☆☆☆☆☆ - 20% |
Rare Den (Dens A/C only)
| Name | Type | Encounter Rate |
|---|---|---|
 Magikarp Magikarp |
Water | ☆ - 68% |
 Dewpider Dewpider |
Water/Bug | ☆ - 2% |
 Wooper Wooper |
Water/Ground | ☆ - 20%, ☆☆ - 30% |
 Barboach Barboach |
Water/Ground | ☆ - 10%, ☆☆ - 30% |
 Krabby Krabby |
Water | ☆☆ - 20%, ☆☆☆ - 20% |
 Wishiwashi Wishiwashi |
Water | ☆☆ - 20%, ☆☆☆ - 40% |
 Kingler Kingler |
Water | ☆☆☆ - 20%, ☆☆☆☆ - 20% |
 Whiscash Whiscash |
Water/Ground | ☆☆☆ - 20%, ☆☆☆☆ - 20%, ☆☆☆☆☆ - 10% |
 Qwilfish Qwilfish |
Water/Poison | ☆☆☆☆ - 20%, ☆☆☆☆☆ - 35% |
 Quagsire Quagsire |
Water/Ground | ☆☆☆☆ - 40%, ☆☆☆☆☆ - 35% |
 Araquanid Araquanid |
Water/Bug | ☆☆☆☆☆ - 10% |
 Gyarados Gyarados |
Water/Flying | ☆☆☆☆☆ - 10% |
Rare Den (B only)
| Name | Type | Encounter Rate |
|---|---|---|
 Corphish Corphish |
Water | ☆ - 40% |
 Krabby Krabby |
Water | ☆ - 25% |
 Arrokuda Arrokuda |
Water | ☆ - 25%, ☆☆ - 25% |
 Chewtle Chewtle |
Water | ☆ - 10%, ☆☆ - 25% |
 Mareanie Mareanie |
Poison/Water | ☆☆ - 20%, ☆☆☆ - 20% |
 Basculin Basculin |
Water | ☆☆ - 20%, ☆☆☆ - 30% |
 Crawdaunt Crawdaunt |
Water/Dark | ☆☆☆ - 20%, ☆☆☆☆ - 20% |
 Toxapex Toxapex |
Poison/Water | ☆☆☆ - 20%, ☆☆☆☆ - 20%, ☆☆☆☆☆ - 15% |
 Pyukumuku Pyukumuku |
Water | ☆☆☆☆ - 20%, ☆☆☆☆☆ - 25% |
 Gyarados Gyarados |
Water/Flying | ☆☆☆☆ - 30%, ☆☆☆☆☆ - 35% |
 Lapras Lapras |
Water/Ice | ☆☆☆☆☆ - 15% |
 Kingler Kingler |
Water | ☆☆ - 10%, ☆☆☆- 10%, ☆☆☆☆ - 10%, ☆☆☆☆☆ - 10% |
Den D
Den D can be found along the cliff to the north as you head towards East Axewell Lake.
Common Den
| Name | Type | Encounter Rate |
|---|---|---|
 Purrloin Purrloin |
Dark | ☆ - 35% |
 Stunky Stunky |
Poison/Dark | ☆ - 35% |
 Sneasel Sneasel |
Dark/Ice | ☆ - 20%, ☆☆ - 30% |
 Inkay Inkay |
Dark/Psychic | ☆ - 10%, ☆☆ - 30% |
 Pawniard Pawniard |
Dark/Steel | ☆☆ - 20% |
 Liepard Liepard |
Dark | ☆☆ - 20%, ☆☆☆ - 40% |
 Skuntank Skuntank |
Poison/Dark | ☆☆☆ - 20%, ☆☆☆☆ - 35% |
 Weavile Weavile |
Dark/Ice | ☆☆☆ - 20%, ☆☆☆☆ - 25%, ☆☆☆☆☆ - 30% |
 Malamar Malamar |
Dark/Psychic | ☆☆☆ - 20%, ☆☆☆☆ - 25%, ☆☆☆☆☆ - 30% |
 Bisharp Bisharp |
Dark/Steel | ☆☆☆☆ - 15%, ☆☆☆☆☆ - 20% |
 Crawdaunt Crawdaunt |
Water/Dark | ☆☆☆☆☆ - 15% |
 Shiftry (Sword only) Shiftry (Sword only) |
Grass/Dark | ☆☆☆☆☆ - 5% |
 Sableye (Shield only) Sableye (Shield only) |
Dark/Ghost | ☆☆☆☆☆ - 5% |
Rare Den
| Name | Type | Encounter Rate |
|---|---|---|
 Nickit Nickit |
Dark | ☆ - 35% |
 Zigzagoon Zigzagoon |
Dark/Normal | ☆ - 35% |
 Scraggy (Sword only) Scraggy (Sword only) |
Dark/Fighting | ☆ - 20%, ☆☆ - 30% |
 Vullaby (Shield only) Vullaby (Shield only) |
Dark/Flying | ☆ - 20%, ☆☆ - 30% |
 Sneasel Sneasel |
Dark/Ice | ☆ - 10%, ☆☆ - 30% |
 Liepard Liepard |
Dark | ☆☆ - 20%, ☆☆☆ - 20% |
 Linoone Linoone |
Dark/Normal | ☆☆ - 20%, ☆☆☆ - 40% |
 Thievul Thievul |
Dark | ☆☆☆ - 20%, ☆☆☆☆ - 20%, ☆☆☆☆☆ - 10% |
 Pangoro Pangoro |
Fighting/Dark | ☆☆☆ - 20%, ☆☆☆☆ - 20%, ☆☆☆☆☆ - 20% |
 Weavile Weavile |
Dark/Ice | ☆☆☆☆ - 20%, ☆☆☆☆☆ - 25% |
 Scrafty (Sword only) Scrafty (Sword only) |
Dark/Fighting | ☆☆☆☆ - 40%, ☆☆☆☆☆ - 25% |
 Mandibuzz (Shield only) Mandibuzz (Shield only) |
Dark/Flying | ☆☆☆☆ - 40%, ☆☆☆☆☆ - 25% |
 Obstagoon Obstagoon |
Dark/Normal | ☆☆☆☆☆ - 15% |
 Hydreigon (Sword only) Hydreigon (Sword only) |
Dark/Dragon | ☆☆☆☆☆ - 5% |
 Tyranitar (Shield only) Tyranitar (Shield only) |
Rock/Dark | ☆☆☆☆☆ - 5% |
Den E/F
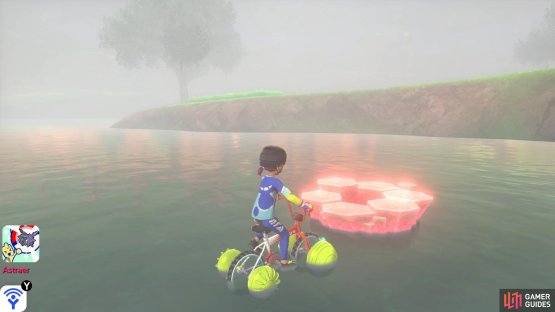
(1 of 2) Den E can be found in the lake itself and is the western of the two
Den E can be found in the lake itself and is the western of the two (left), while Den F can be found by heading to eastern edge of the lake. (right)
Common Den (Den E only)
| Name | Type | Encounter Rate |
|---|---|---|
 Magikarp Magikarp |
Water | ☆ - 35% |
 Mantyke Mantyke |
Water/Flying | ☆ - 35% |
 Remoraid Remoraid |
Water | ☆ - 20%, ☆☆ - 30% |
 Chinchou Chinchou |
Water/Electric | ☆ - 10%, ☆☆ - 30% |
 Wailmer Wailmer |
Water | ☆☆ - 20%, ☆☆☆ - 10% |
 Basculin Basculin |
Water | ☆☆ - 20%, ☆☆☆ - 30% |
 Octillery Octillery |
Water | ☆☆☆ - 20%, ☆☆☆☆ - 10% |
 Mantine Mantine |
Water/Flying | ☆☆☆ - 20%, ☆☆☆☆ - 20%, ☆☆☆☆☆ - 10% |
 Lanturn Lanturn |
Water/Electric | ☆☆☆ - 20%, ☆☆☆☆ - 20%, ☆☆☆☆☆ - 25% |
 Wailord Wailord |
Water | ☆☆☆☆ - 50%, ☆☆☆☆☆ - 25% |
 Wishiwashi Wishiwashi |
Water | ☆☆☆☆☆ - 20% |
 Gyarados Gyarados |
Water/Flying | ☆☆☆☆☆ - 20% |
Common Den (Den F only)
| Name | Type | Encounter Rate |
|---|---|---|
 Shellos Shellos |
Water | ☆ - 35% |
 Krabby Krabby |
Water | ☆ - 35% |
 Corphish Corphish |
Water | ☆ - 20%, ☆☆ - 30% |
 Chewtle Chewtle |
Water | ☆ - 10%, ☆☆ - 30% |
 Binacle Binacle |
Rock/Water | ☆☆ - 20% |
 Pyukumuku Pyukumuku |
Water | ☆☆ - 20%, ☆☆☆ - 40% |
 Kingler Kingler |
Water | ☆☆☆ - 20%, ☆☆☆☆ - 10% |
 Crawdaunt Crawdaunt |
Water/Dark | ☆☆☆ - 20%, ☆☆☆☆ - 20%, ☆☆☆☆☆ - 10% |
 Barbaracle Barbaracle |
Rock/Water | ☆☆☆ - 20%, ☆☆☆☆ - 20%, ☆☆☆☆☆ - 25% |
 Gastrodon Gastrodon |
Water/Ground | ☆☆☆☆ - 50%, ☆☆☆☆☆ - 25% |
 Jellicent Jellicent |
Water/Ghost | ☆☆☆☆☆ - 20% |
 Drednaw Drednaw |
Water/Rock | ☆☆☆☆☆ - 20% |
Rare Den
| Name | Type | Encounter Rate |
|---|---|---|
 Magikarp Magikarp |
Water | ☆ - 68% |
 Feebas Feebas |
Water | ☆ - 2% |
 Arrokuda Arrokuda |
Water | ☆ - 20%, ☆☆ - 30% |
 Chewtle Chewtle |
Water | ☆ - 10%, ☆☆ - 30% |
 Mareanie Mareanie |
Poison/Water | ☆☆ - 20%, ☆☆☆ - 20% |
 Basculin Basculin |
Water | ☆☆ - 20%, ☆☆☆ - 40% |
| Quilfish | Water/Poison | ☆☆☆ - 20%, ☆☆☆☆ - 20% |
 Toxapex Toxapex |
Poison/Water | ☆☆☆ - 20%, ☆☆☆☆ - 20%, ☆☆☆☆☆ - 18% |
 Pyukumuku Pyukumuku |
Water | ☆☆☆☆ - 20%, ☆☆☆☆☆ - 35% |
 Gyarados Gyarados |
Water/Flying | ☆☆☆☆ - 40%, ☆☆☆☆☆ - 35% |
 Lapras Lapras |
Water/Ice | ☆☆☆☆☆ - 10% |
 Milotic Milotic |
Water | ☆☆☆☆☆ - 2% |


No Comments