

Den A
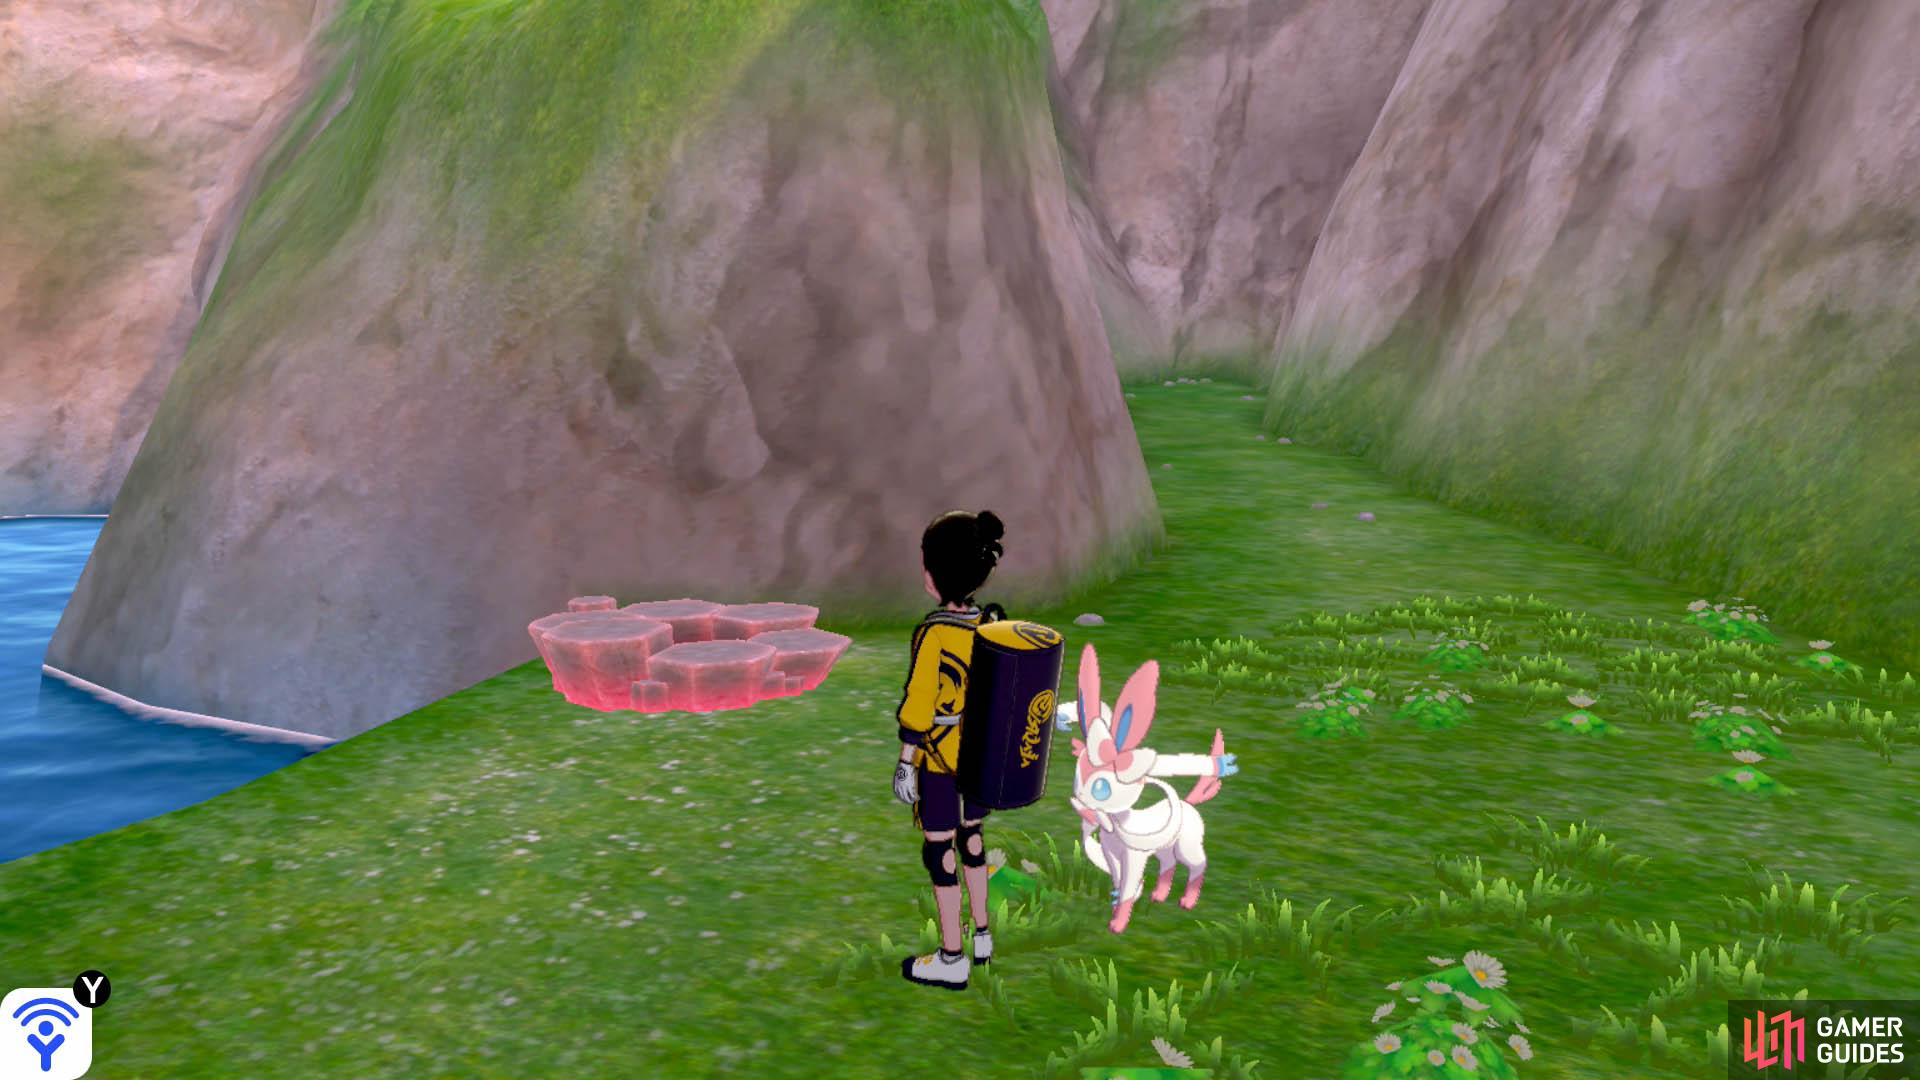
At the start of the narrow part of land opposite Honeycalm Island, on the side of the mainland. It’s where TR19 Tri Attack is.
Common Den
| Name | Type | Encounter Rate |
|---|---|---|
 Chansey Chansey |
Normal | ☆☆☆/☆☆☆☆/☆☆☆☆☆ - 5% |
 Jangmo-o [Sword] Jangmo-o [Sword] |
Dragon | ☆ - 60%, ☆☆ - 30% |
 Goomy [Shield] Goomy [Shield] |
Dragon | ☆ - 60%, ☆☆ - 30% |
 Horsea Horsea |
Water | ☆ - 40%, ☆☆ - 25% |
 Applin Applin |
Grass/Dragon | ☆☆ - 25%, ☆☆☆ - 30% |
 Seadra Seadra |
Water | ☆☆ - 20%, ☆☆☆ - 25% |
 Druddigon Druddigon |
Dragon | ☆☆☆ - 25%, ☆☆☆☆ - 40%, ☆☆☆☆☆ - 25% |
 Hakamo-o [Sword] Hakamo-o [Sword] |
Dragon/Fighting | ☆☆☆ - 15%, ☆☆☆☆ - 25% |
 Sliggoo [Shield] Sliggoo [Shield] |
Dragon | ☆☆☆ - 15%, ☆☆☆☆ - 25% |
 Gyarados Gyarados |
Water/Flying | ☆☆☆☆ - 15%, ☆☆☆☆☆ - 20% |
 Flapple [Sword] Flapple [Sword] |
Grass/Dragon | ☆☆☆☆ - 15%, ☆☆☆☆☆ - 20% |
 Appletun [Shield] Appletun [Shield] |
Grass/Dragon | ☆☆☆☆ - 15%, ☆☆☆☆☆ - 20% |
 Kingdra Kingdra |
Water/Dragon | ☆☆☆☆☆ - 15% |
 Kommo-o [Sword] Kommo-o [Sword] |
Dragon/Fighting | ☆☆☆☆☆ - 15% |
 Goodra [Shield] Goodra [Shield] |
Dragon | ☆☆☆☆☆ - 15% |
Rare Den
| Name | Type | Encounter Rate |
|---|---|---|
 Blissey Blissey |
Normal | ☆☆☆/☆☆☆☆/☆☆☆☆☆ - 5% |
| Horsea |
Water | ☆ - 60%, ☆☆ - 30% |
| Druddigon |
Dragon | ☆ - 40%, ☆☆ - 25%, ☆☆☆☆ - 15%, ☆☆☆☆☆ - 20% |
 Turtonator [Sword] Turtonator [Sword] |
Fire/Dragon | ☆☆ - 25%, ☆☆☆ - 30%, ☆☆☆☆ - 15%, ☆☆☆☆☆ - 20% |
 Drampa [Shield] Drampa [Shield] |
Normal/Dragon | ☆☆ - 25%, ☆☆☆ - 30%, ☆☆☆☆ - 15%, ☆☆☆☆☆ - 20% |
| Jangmo-o [Sword] |
Dragon | ☆☆ - 20%, ☆☆☆ - 25% |
| Goomy [Shield] |
Dragon | ☆☆ - 20%, ☆☆☆ - 25% |
| Seadra |
Water | ☆☆☆ - 25%, ☆☆☆☆ - 25% |
| Hakomo-o [Sword] | Dragon/Fighting | ☆☆☆ - 15%, ☆☆☆☆ - 25% |
| Sliggoo [Shield] |
Dragon | ☆☆☆ - 15%, ☆☆☆☆ - 25% |
 Noivern Noivern |
Flying/Dragon | ☆☆☆☆ - 15%, ☆☆☆☆☆ - 20% |
| Kingdra |
Water/Dragon | ☆☆☆☆☆ - 20% |
| Kommo-o [Sword] |
Dragon/Fighting | ☆☆☆☆☆ - 15% |
| Goodra [Shield] |
Dragon | ☆☆☆☆☆ - 15% |
Den B
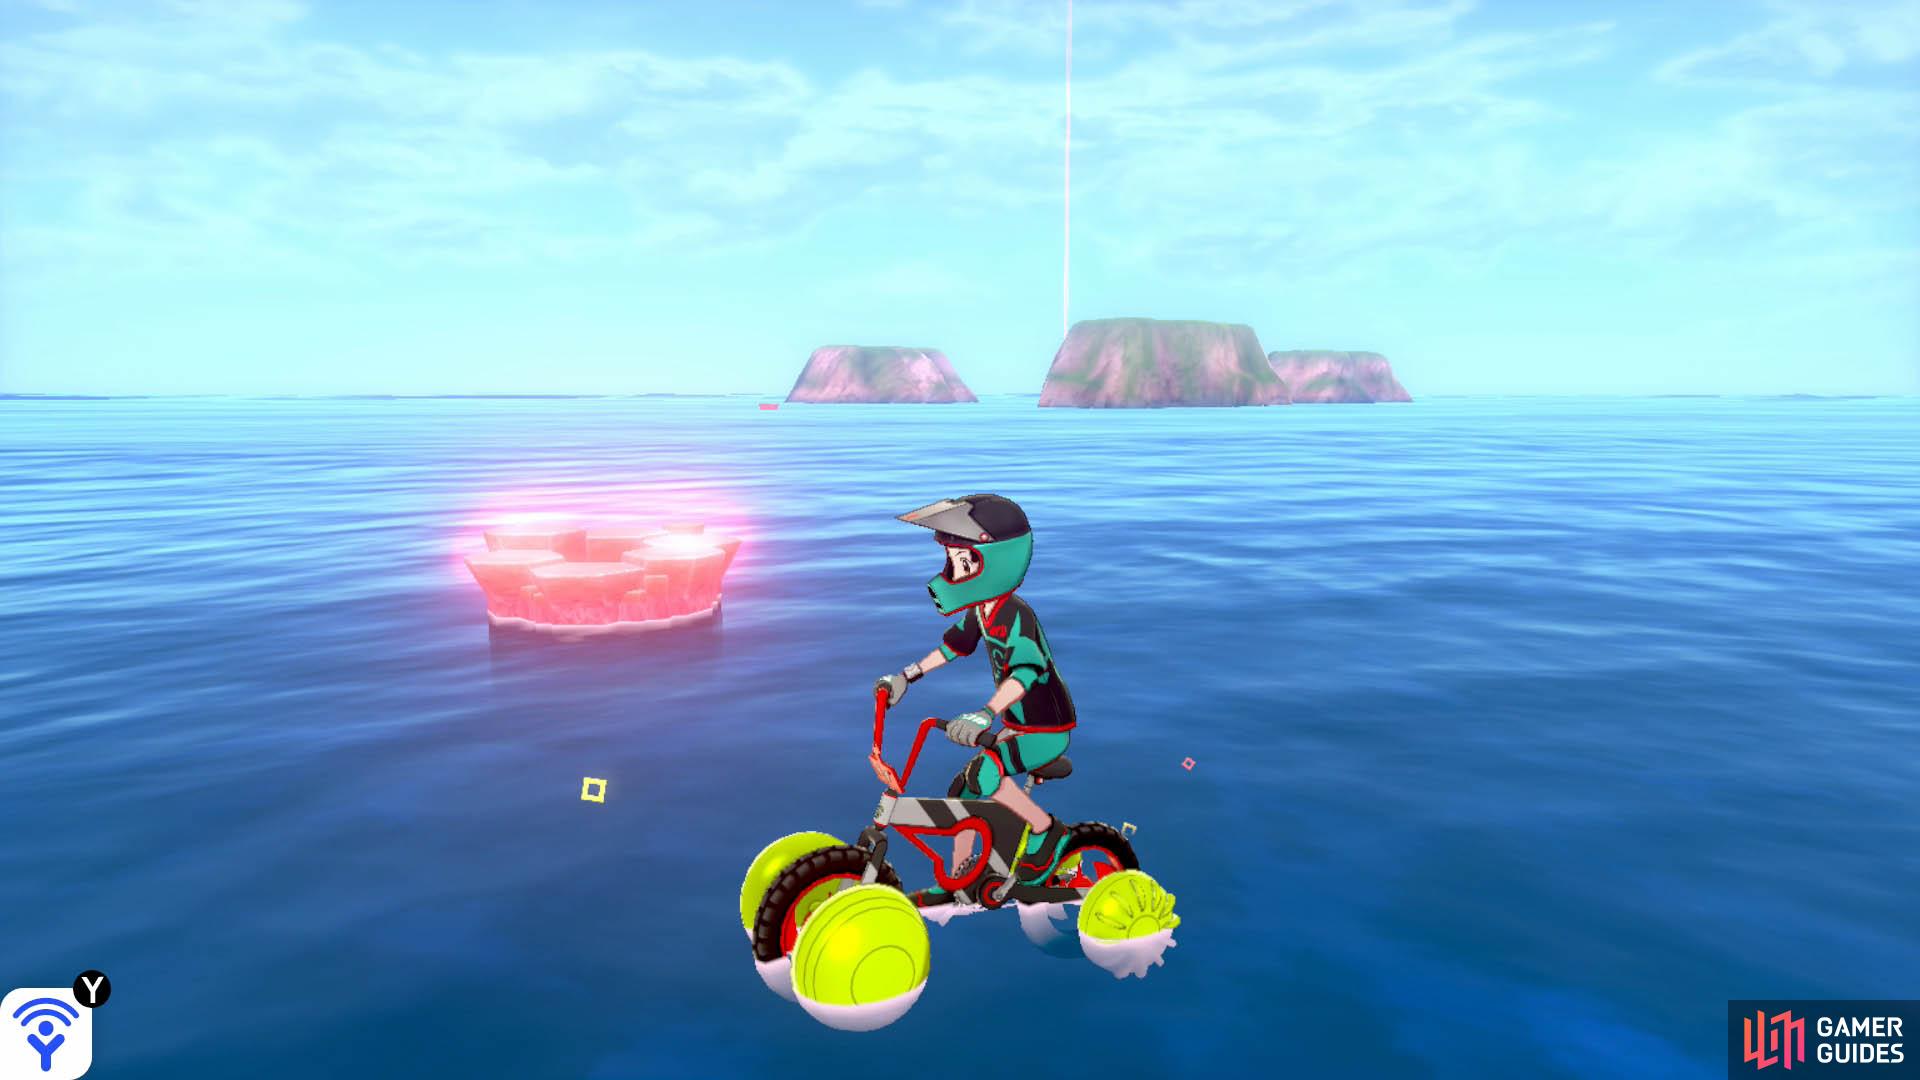
From Den A, it’s in the sea to the right of Honeycalm Island, when facing the island.
Common Den
| Name | Type | Encounter Rate |
|---|---|---|
| Chansey |
Normal | ☆☆☆/☆☆☆☆/☆☆☆☆☆ - 5% |
 Mienfoo Mienfoo |
Fighting | ☆ - 60%, ☆☆ - 30% |
 Clobbopus Clobbopus |
Fighting | ☆ - 40%, ☆☆ - 25% |
| Mienfoo |
Fighting | ☆☆ - 25%, ☆☆☆ - 30% |
 Scraggy [Sword] Scraggy [Sword] |
Dark/Fighting | ☆☆ - 20%, ☆☆☆ - 25% |
 Croagunk [Shield] Croagunk [Shield] |
Poison/Fighting | ☆☆ - 20%, ☆☆☆ - 25% |
 Passimian [Sword] Passimian [Sword] |
Fighting | ☆☆☆ - 25%, ☆☆☆☆ - 25% |
 Scrafty [Sword] Scrafty [Sword] |
Dark/Fighting | ☆☆☆ - 15%, ☆☆☆☆ - 40%, ☆☆☆☆☆ - 20% |
 Toxicroak [Shield] Toxicroak [Shield] |
Poison/Fighting | ☆☆☆ - 15%, ☆☆☆☆ - 40%, ☆☆☆☆☆ - 20% |
 Mienshao Mienshao |
Fighting | ☆☆☆☆ - 30%, ☆☆☆☆☆ - 60% |
 Grapploct Grapploct |
Fighting | ☆☆☆ - 25% [Shield], ☆☆☆☆ - 25% [Shield], ☆☆☆☆☆ - 15% |
Rare Den
| Name | Type | Encounter Rate |
|---|---|---|
| Blissey |
Normal | ☆☆☆/☆☆☆☆/☆☆☆☆☆ - 5% |
| Mienfoo |
Fighting | ☆ - 60%, ☆☆ - 30% |
| Scraggy [Sword] |
Dark/Fighting | ☆ - 40%, ☆☆ - 25% |
| Croagunk [Shield] |
Poison/Fighting | ☆ - 40%, ☆☆ - 25% |
 Sawk [Sword] Sawk [Sword] |
Fighting | ☆☆ - 25%, ☆☆☆ - 30%, ☆☆☆☆ - 15%, ☆☆☆☆☆ - 20% |
 Throh [Shield] Throh [Shield] |
Fighting | ☆☆ - 25%, ☆☆☆ - 30%, ☆☆☆☆ - 15%, ☆☆☆☆☆ - 20% |
| Mienshao |
Fighting | ☆☆ - 20%, ☆☆☆ - 25% |
 Falinks Falinks |
Fighting | ☆☆☆ - 25%, ☆☆☆☆ - 25%, ☆☆☆☆☆ - 15% [Shield] |
| Passimian [Sword] |
Fighting | ☆☆☆ - 15%, ☆☆☆☆ - 25% |
| Mienshao |
Fighting | ☆☆☆ - 15% [Shield], ☆☆☆☆ - 15% [Sword], ☆☆☆☆ - 40% [Shield] , ☆☆☆☆☆ - 20% |
| Scrafty [Sword] |
Dark/Fighting | ☆☆☆☆ - 15%, ☆☆☆☆☆ - 20% |
| Toxicroak [Shield] |
Poison/Fighting | ☆☆☆☆ - 15%, ☆☆☆☆☆ - 20% |
| Grapploct |
Fighting | ☆☆☆☆☆ - 20% |
 Sirfetch’d [Sword] Sirfetch’d [Sword] |
Fighting | ☆☆☆☆☆ - 15% |
Den C
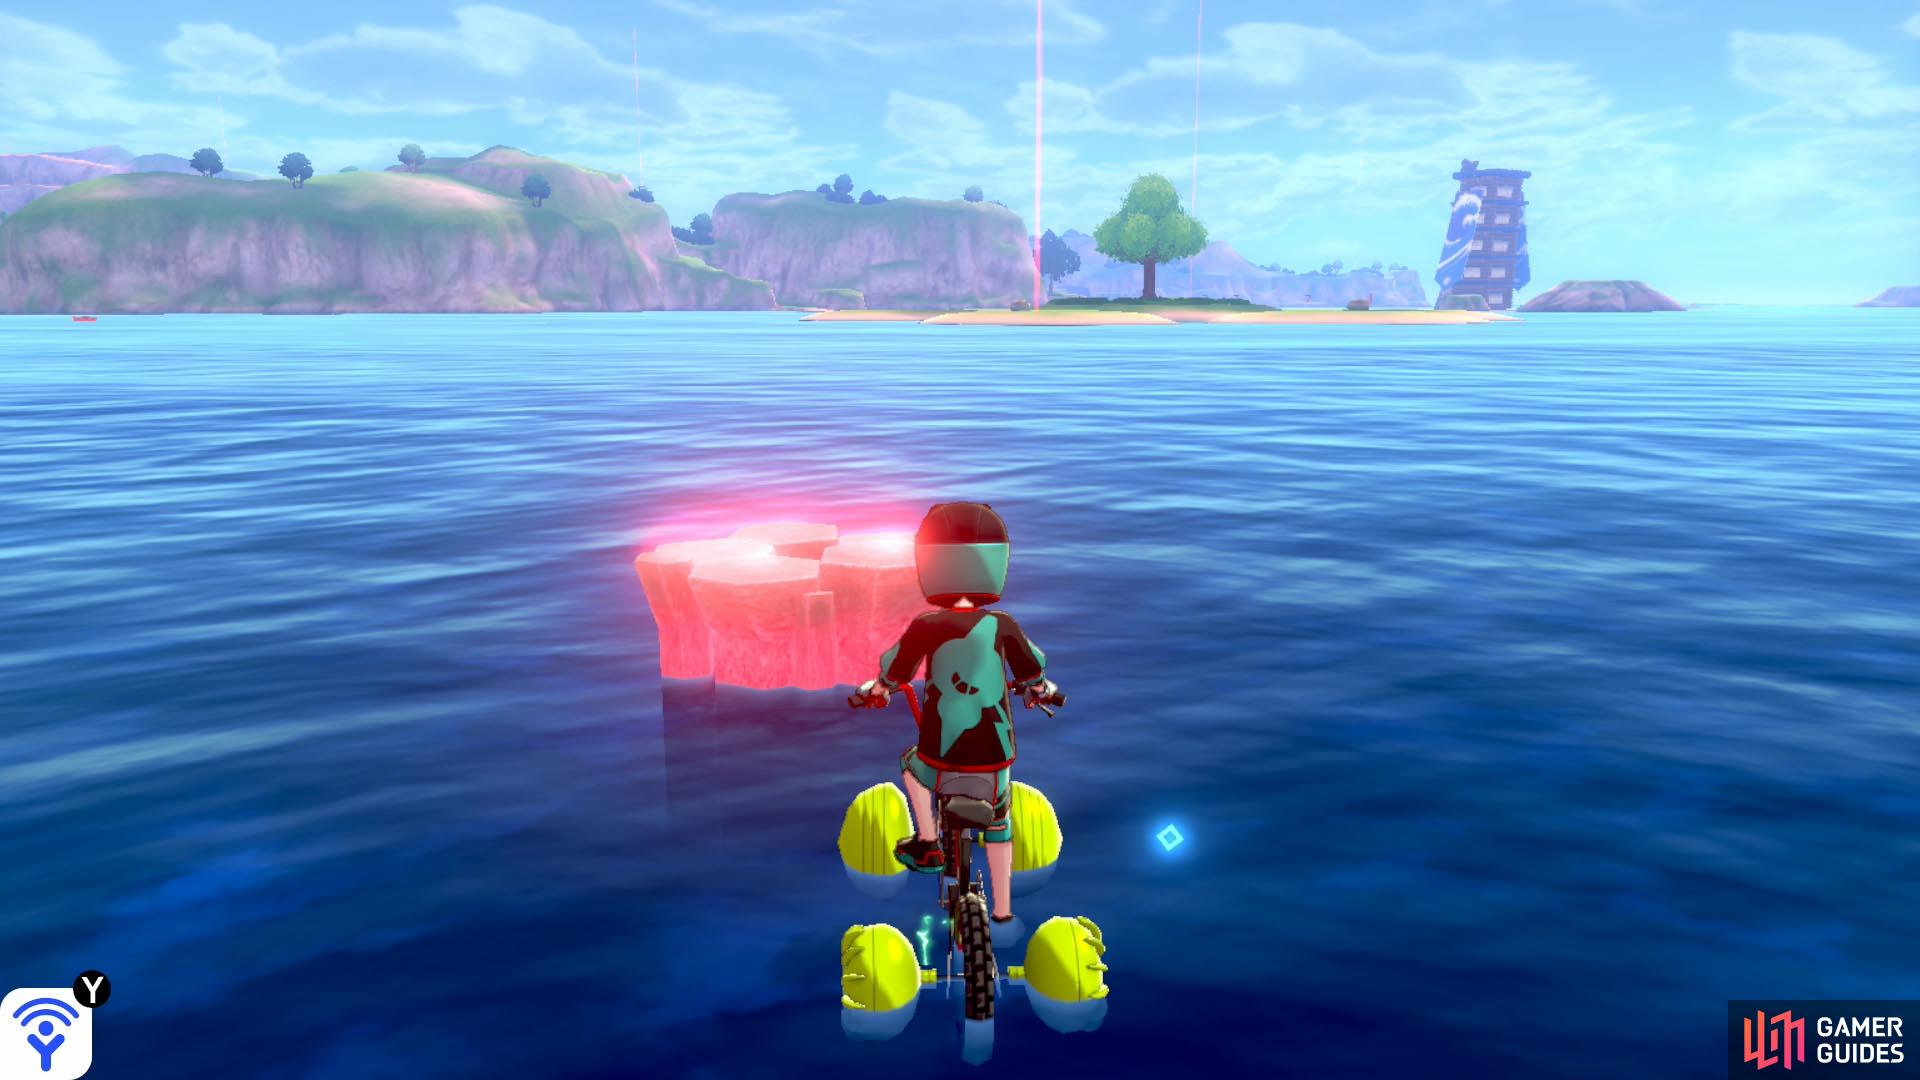
From Den B, turn so that Honeycalm Island is on your left. It’s straight ahead, in the middle of the sea.
Common Den
| Name | Type | Encounter Rate |
|---|---|---|
| Chansey |
Normal | ☆☆☆/☆☆☆☆/☆☆☆☆☆ - 5% |
 Dedenne Dedenne |
Electric/Fairy | ☆ - 60%, ☆☆ - 30%, ☆☆☆ - 25%, ☆☆☆☆ - 40%, ☆☆☆☆☆ - 25% |
 Magnemite Magnemite |
Electric/Steel | ☆ - 40%, ☆☆ - 25% |
 Shinx Shinx |
Electric | ☆☆ - 25%, ☆☆☆ - 30% |
 Morpeko Morpeko |
Electric/Dark | ☆☆ - 20%, ☆☆☆ - 25% |
 Luxio Luxio |
Electric | ☆☆☆ - 15%, ☆☆☆☆ - 25% |
 Magneton Magneton |
Electric/Steel | ☆☆☆☆ - 15%, ☆☆☆☆☆ - 20% |
 Pincurchin Pincurchin |
Electric | ☆☆☆☆ - 15%, ☆☆☆☆☆ - 20% |
 Luxray Luxray |
Electric | ☆☆☆☆☆ - 15% |
 Magnezone Magnezone |
Electric/Steel | ☆☆☆☆☆ - 15% |
Rare Den
| Name | Type | Encounter Rate |
|---|---|---|
| Blissey |
Normal | ☆☆☆/☆☆☆☆/☆☆☆☆☆ - 5% |
| Shinx |
Electric | ☆ - 60%, ☆☆ - 30% |
 Pichu Pichu |
Electric | ☆ - 40%, ☆☆ - 25% |
 Pikachu Pikachu |
Electric | ☆☆ - 25%, ☆☆☆ - 30% |
| Pincurchin |
Electric | ☆☆ - 20%, ☆☆☆ - 25% |
| Luxio |
Electric | ☆☆☆ - 25%, ☆☆☆☆ - 25% |
 Raichu Raichu |
Electric | ☆☆☆ - 15%, ☆☆☆☆ - 25% |
 Boltund Boltund |
Electric | ☆☆☆☆ - 15%, ☆☆☆☆☆ - 20% |
| Dedenne |
Electric/Fairy | ☆☆☆☆ - 15%, ☆☆☆☆☆ - 20% |
 Manectric Manectric |
Electric | ☆☆☆☆ - 15%, ☆☆☆☆☆ - 20% |
| Luxray |
Electric | ☆☆☆☆☆ - 20% |
| Magnezone |
Electric/Steel | ☆☆☆☆☆ - 15% |
Den D
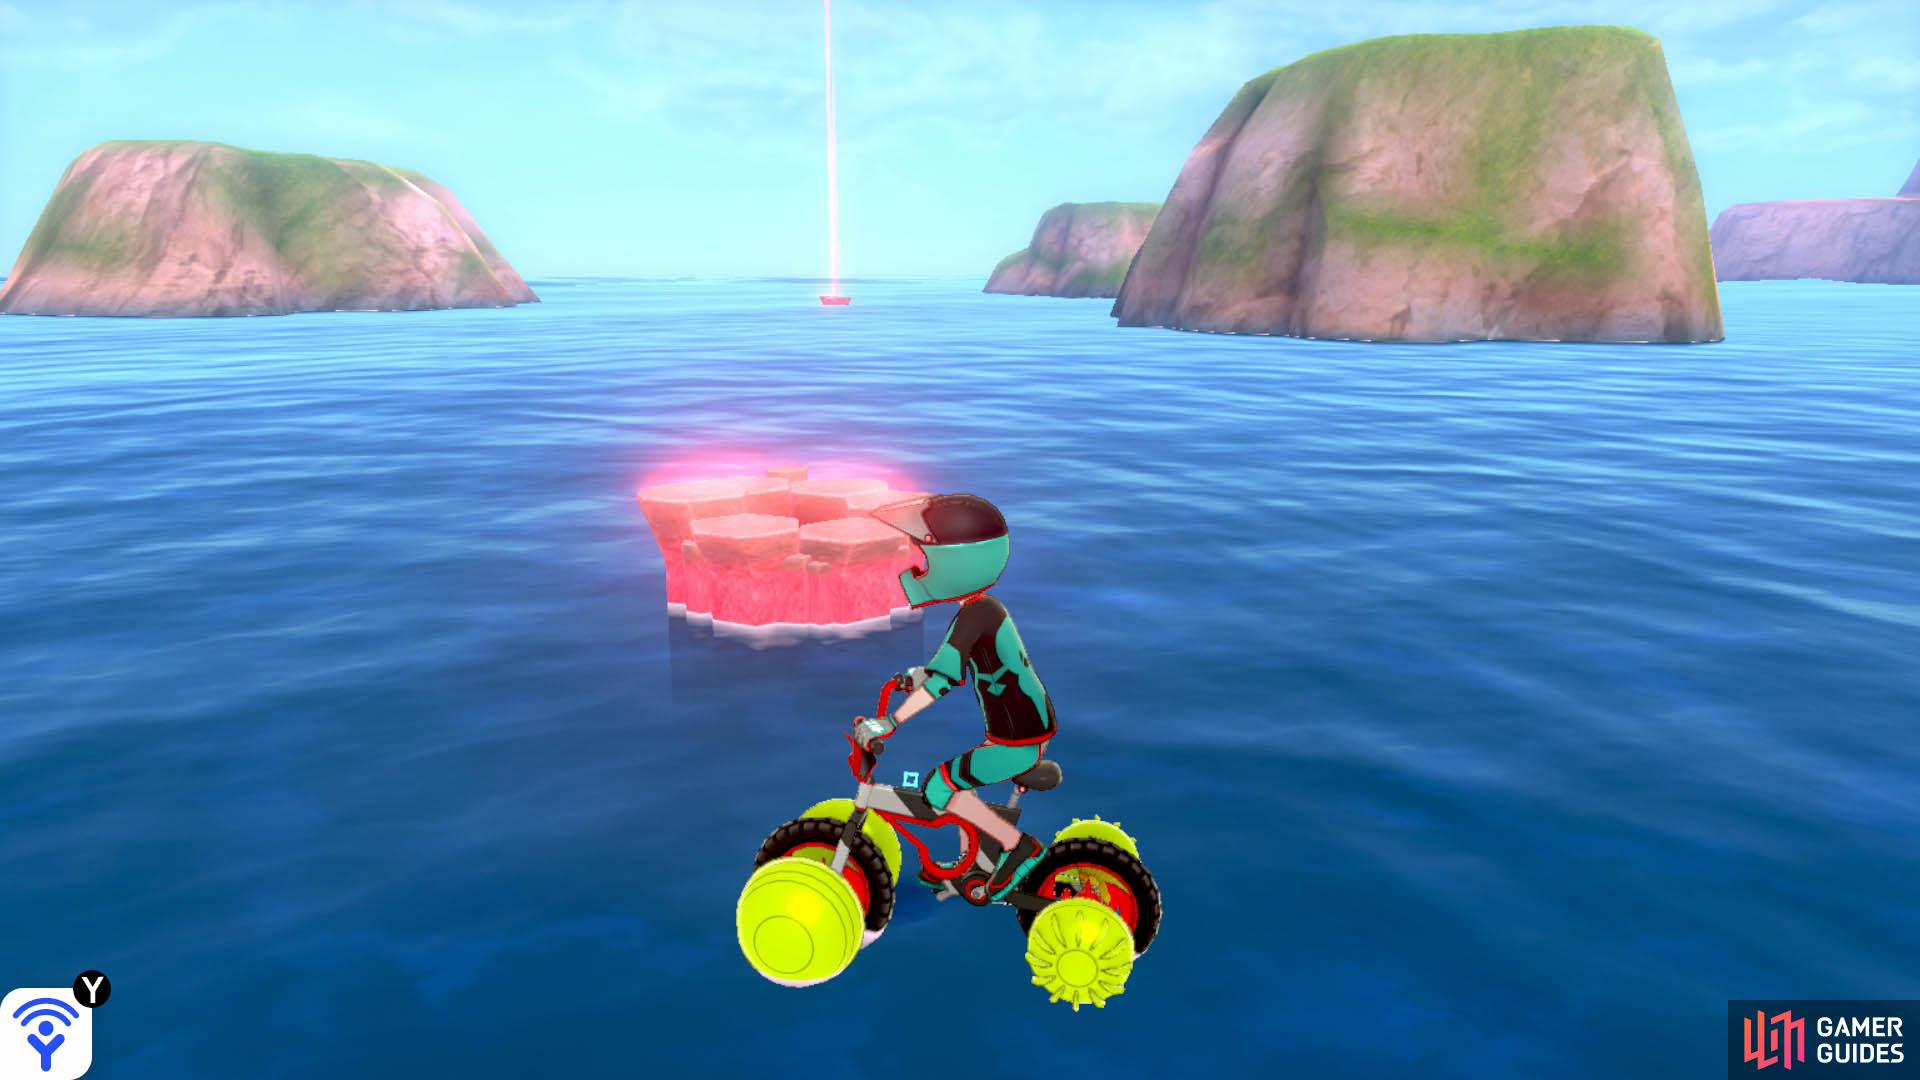
Head towards the trio of rocky islands, opposite the Training Lowlands. This den’s right near those islands.
Common Den
| Name | Type | Encounter Rate |
|---|---|---|
| Chansey |
Normal | ☆☆☆/☆☆☆☆/☆☆☆☆☆ - 5% |
 Carvanha Carvanha |
Water/Dark | ☆ - 60%, ☆☆ - 55%, ☆☆☆ - 30% |
 Pawniard Pawniard |
Dark/Steel | ☆ - 40%, ☆☆ - 25% |
 Zorua Zorua |
Dark | ☆☆ - 20%, ☆☆☆ - 25% |
 Sharpedo Sharpedo |
Water/Dark | ☆☆☆ - 25%, ☆☆☆☆ - 25%, ☆☆☆☆☆ - 15% |
 Malamar Malamar |
Dark/Psychic | ☆☆☆ - 15%, ☆☆☆☆ - 40%, ☆☆☆☆☆ - 20% |
 Drapion Drapion |
Poison/Dark | ☆☆☆☆ - 15%, ☆☆☆☆☆ - 25% |
 Bisharp Bisharp |
Dark/Steel | ☆☆☆☆ - 15%, ☆☆☆☆☆ - 20% |
 Zoroark Zoroark |
Dark | ☆☆☆☆☆ - 15% |
Rare Den
| Name | Type | Encounter Rate |
|---|---|---|
| Blissey |
Normal | ☆☆☆/☆☆☆☆/☆☆☆☆☆ - 5% |
| Zorua |
Dark | ☆ - 60%, ☆☆ - 55%, ☆☆☆ - 30% |
| Carvanha |
Water/Dark | ☆ - 40%, ☆☆ - 25% |
 Inkay Inkay |
Dark/Psychic | ☆☆ - 20%, ☆☆☆ - 25% |
 Krokorok Krokorok |
Ground/Dark | ☆☆☆ - 25%, ☆☆☆☆ - 25% |
| Malamar |
Dark/Psychic | ☆☆☆ - 15%, ☆☆☆☆ - 25% |
 Thievul Thievul |
Dark | ☆☆☆☆ - 15%, ☆☆☆☆☆ - 20% |
| Zoroark |
Dark | ☆☆☆☆ - 15%, ☆☆☆☆☆ - 20% |
| Sharpedo |
Water/Dark | ☆☆☆☆ - 15%, ☆☆☆☆☆ - 20% |
 Liepard Liepard |
Dark | ☆☆☆☆☆ - 20% |
 Krookodile Krookodile |
Ground/Dark | ☆☆☆☆☆ - 15% |
Den E

Meanwhile, the final den is in the middle of the three rocky islands.
Common Den
| Name | Type | Encounter Rate |
|---|---|---|
| Chansey |
Normal | ☆☆☆/☆☆☆☆/☆☆☆☆☆ - 5% |
 Chinchou Chinchou |
Water/Electric | ☆ - 60%, ☆☆ - 30% |
 Clauncher [Sword] Clauncher [Sword] |
Water | ☆ - 40%, ☆☆ - 50%, ☆☆☆ - 30% |
 Skrelp [Sword] Skrelp [Sword] |
Poison/Water | ☆ - 40%, ☆☆ - 50%, ☆☆☆ - 30% |
 Staryu Staryu |
Water | ☆☆ - 20%, ☆☆☆ - 25% |
 Wailmer Wailmer |
Water | ☆☆☆ - 25%, ☆☆☆☆ - 25% |
 Wishiwashi Wishiwashi |
Water | ☆☆☆ - 15%, ☆☆☆☆ - 25% |
 Wailord Wailord |
Water | ☆☆☆☆ - 15%, ☆☆☆☆☆ - 25% |
 Lanturn Lanturn |
Water/Electric | ☆☆☆☆ - 15%, ☆☆☆☆☆ - 20% |
 Starmie Starmie |
Water/Psychic | ☆☆☆☆ - 15%, ☆☆☆☆☆ - 20% |
 Clawitzer [Sword] Clawitzer [Sword] |
Water | ☆☆☆☆☆ - 15% |
 Dragalge [Shield] Dragalge [Shield] |
Poison/Dragon | ☆☆☆☆☆ - 15% |
| Sharpedo |
Water/Dark | ☆☆☆☆☆ - 15% |
Rare Den
| Name | Type | Encounter Rate |
|---|---|---|
| Blissey |
Normal | ☆☆☆/☆☆☆☆/☆☆☆☆☆ - 5% |
| Clauncher [Sword] |
Water | ☆ - 60%, ☆☆ - 30% |
| Skrelp [Shield] |
Poison/Water | ☆ - 60%, ☆☆ - 30% |
| Staryu |
Water | ☆ - 40%, ☆☆ - 25% |
| Wailmer |
Water | ☆☆ - 25%, ☆☆☆ - 30% |
 Pelipper Pelipper |
Water/Flying | ☆☆ - 20%, ☆☆☆ - 25% |
| Lanturn |
Water/Electric | ☆☆☆ - 25%, ☆☆☆☆ - 25% |
| Seadra |
Water | ☆☆☆ - 15%, ☆☆☆☆ - 25% |
| Clawitzer [Sword] |
Water | ☆☆☆☆ - 15%, ☆☆☆☆☆ - 40% |
| Dragalge [Shield] |
Poison/Dragon | ☆☆☆☆ - 15%, ☆☆☆☆☆ - 40% |
| Lanturn |
Water/Eletric | ☆☆☆☆ - 15%, ☆☆☆☆☆ - 20% |
| Starmie |
Water/Psychic | ☆☆☆☆ - 15%, ☆☆☆☆☆ - 20% |
| Sharpedo |
Water/Dark | ☆☆☆☆☆ - 15% |
No Comments