
After escaping the clutches of the Drukhari in their home of Commoragh, Rogue Trader’s Chapter 4 starts in the familiar place of Janus via the webway atop the tower of the Reaving Tempest Spire. Although you are free from the Drukhari, this chapter has its own challenges from the Cult of the Final Dawn to Rogue Traders while dealing with the fallout of your colonies when you were away. This walkthrough will take you through each main quest and guide you through them as you attempt to fix the problems that have arisen since your capture. Here is a list of the quests chronologically to help you navigate the Chapter. You can select these to jump to that respective quest.
Since your disappearance, things have gone from bad to worse in Chapter 4.
Chapter 4 Start
Immediately after exiting the webway, you’ll be in Janus, where you fought Muaran in Chapter 2. You’ll be met by an elderly man who goes by Eklendyl who doesn’t seem best pleased to see you with a non-human in your retinue. You’ll have a couple of choices here, but none of them will make a difference, so select to answer him however you like. Furthermore, you can ask him various things regarding what’s happened since your disappearance before asking him to get you a shuttle that will take you back to your ship.
Back on the ship, you’ll be met with a scene from a relieved crew before they start telling you what has happened. Go through the dialogue which will update your journal with various quests, but when Vigdis asks you about what happened, you can tell him the truth, or lie. Although it’s up to you, ideally you’ll want to lie, or at least let them know that Yrliet is sorry for what she did as she is arguably one of the stronger companions, and you wouldn’t want to lose her now.
If you’ve been progressing the Nomos side quest, it’ll ask you what great deed you did, to which you can tell it what transpired in the dark city if you want. Furthermore, it’ll ask you a few more questions. Even though the answers don’t matter right now, they are shaping what Nomos will be like in the future. If you give good answers, Nomos will become a better being. The opposite is true if you give bad answers.
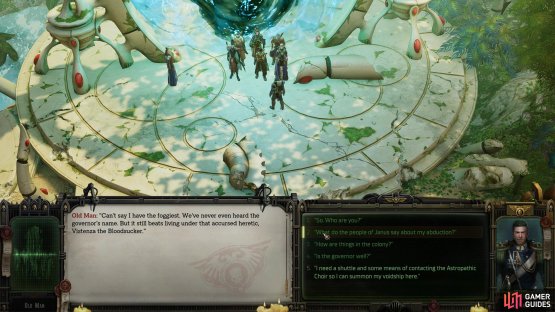
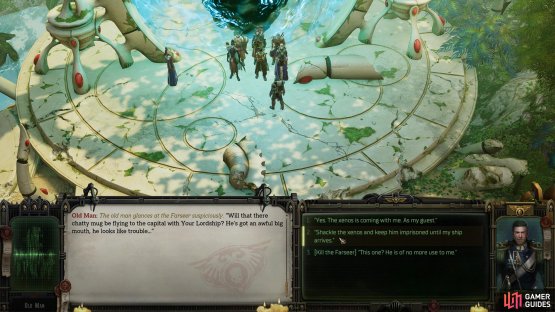
(1 of 2) When you get back to Janus, tell the Old Man you need a shuttle to get back to your ship.
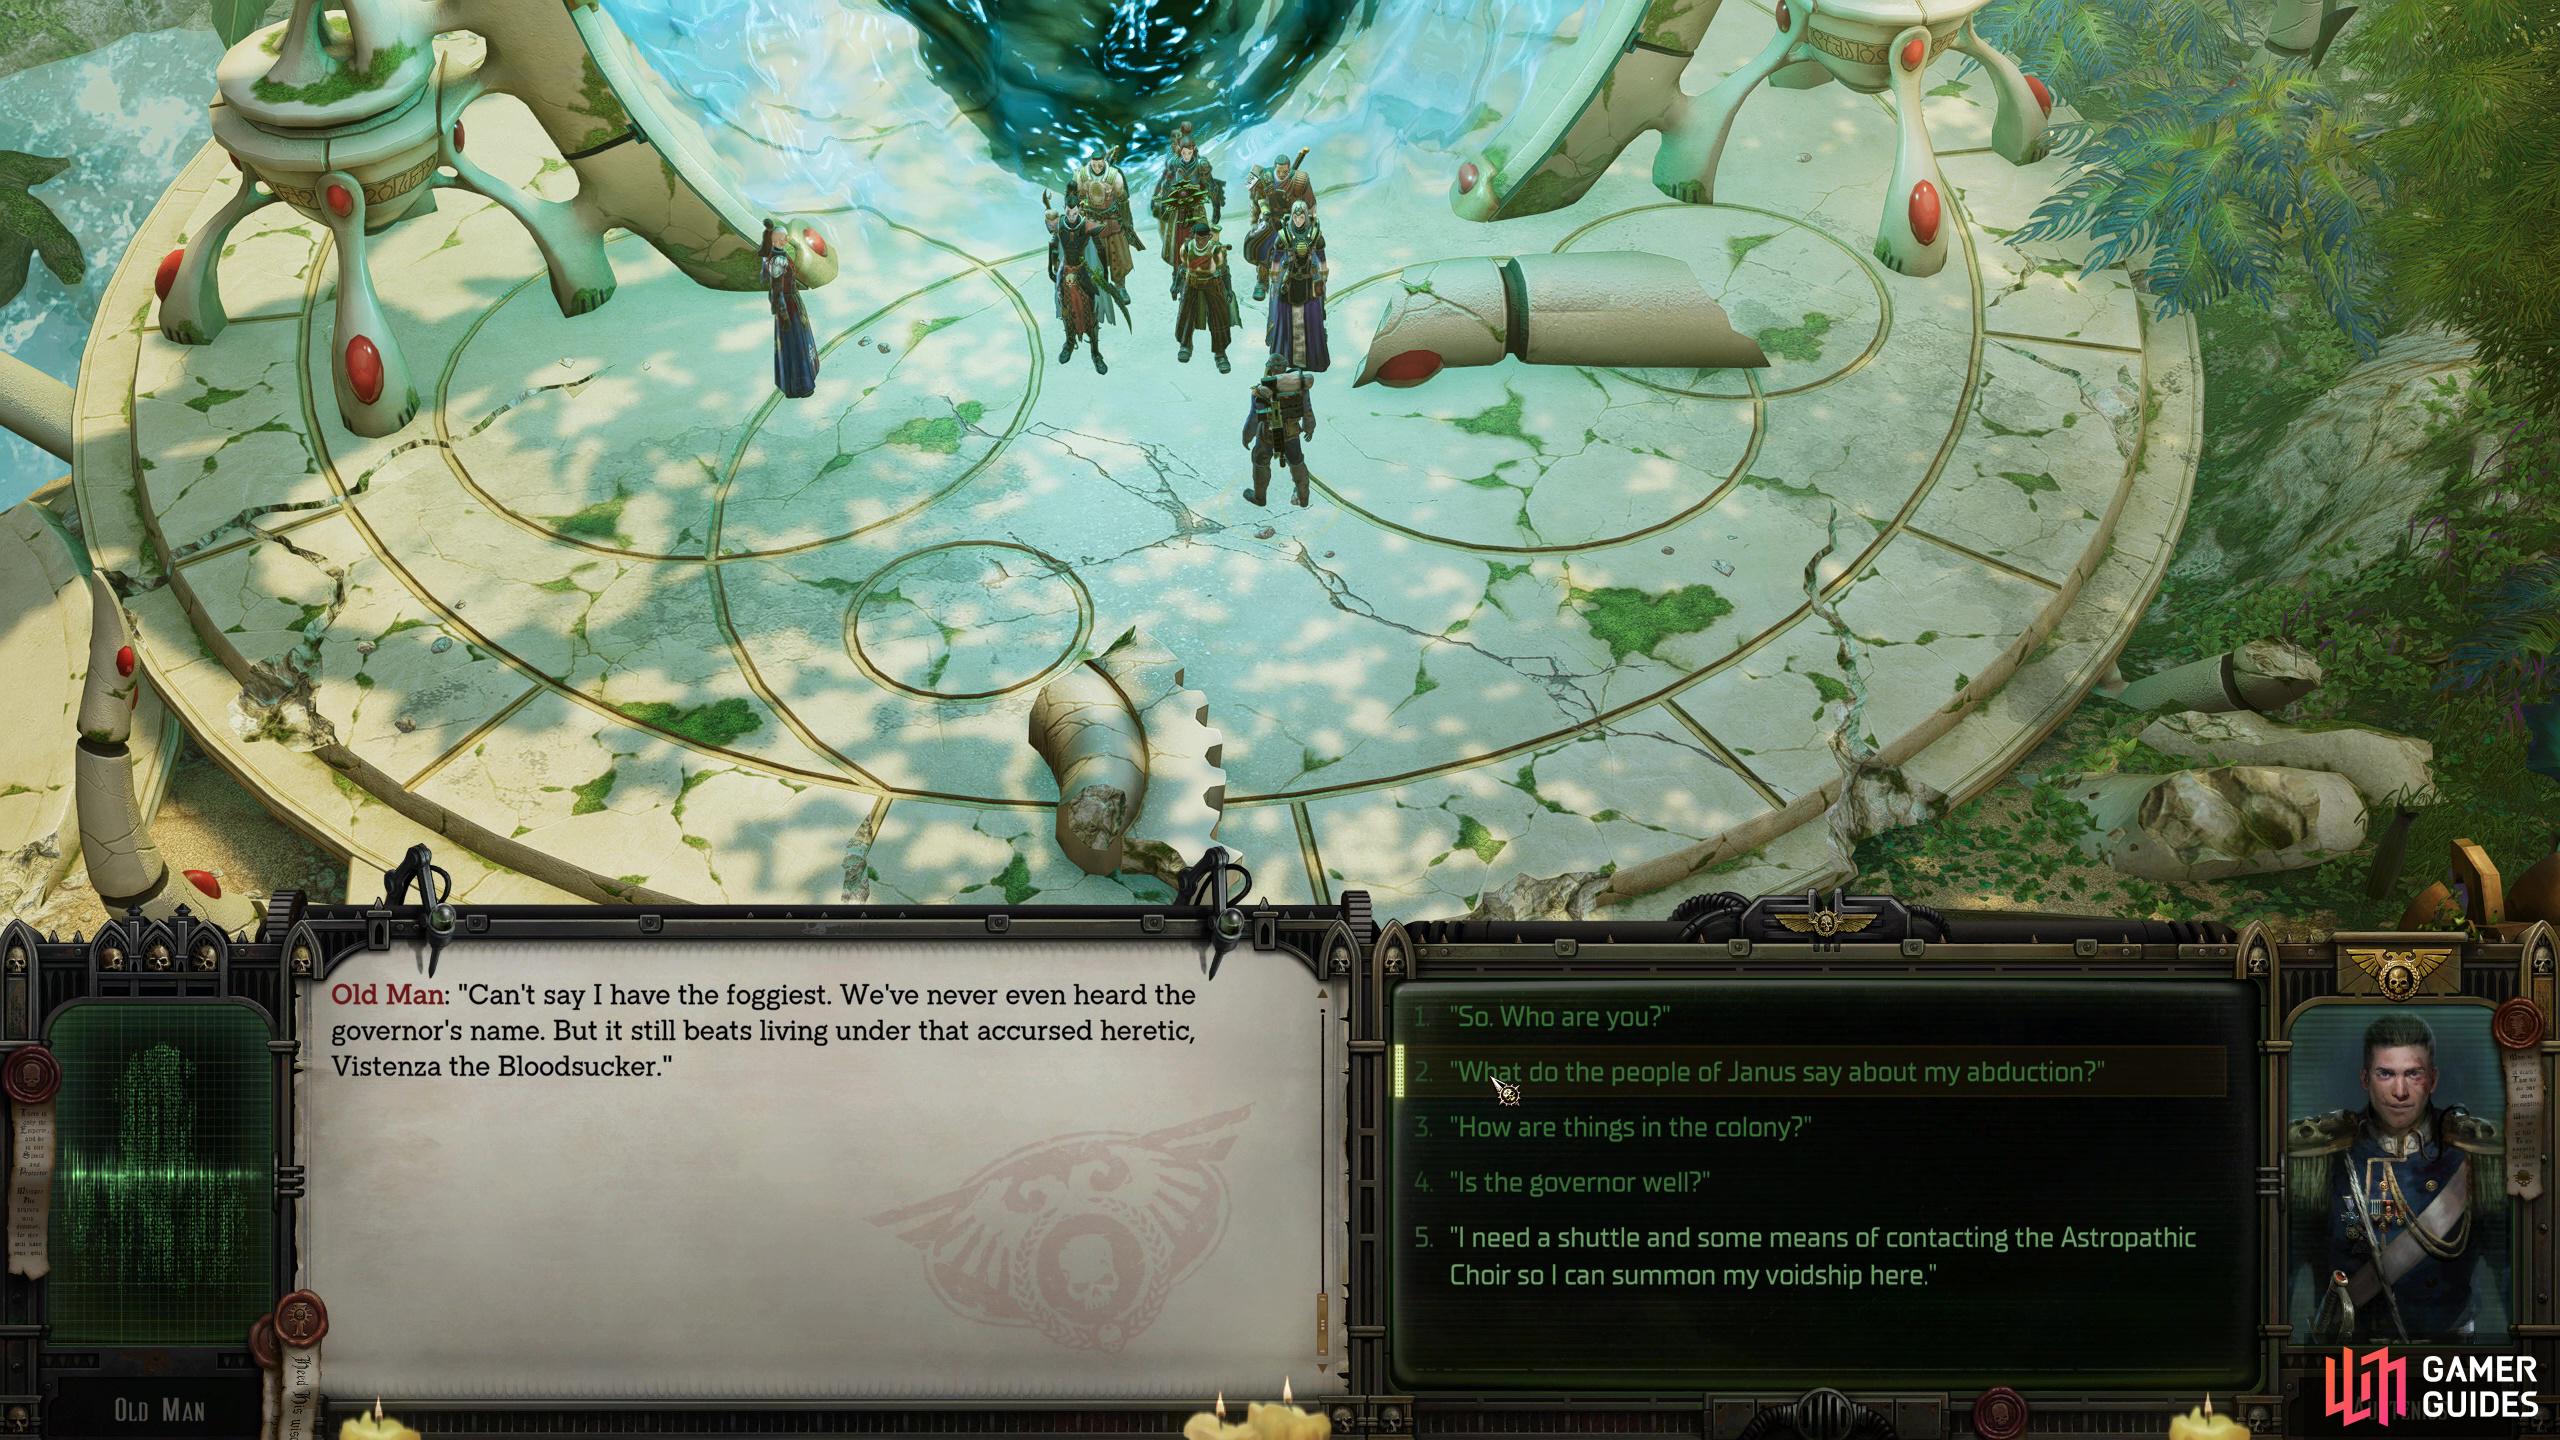
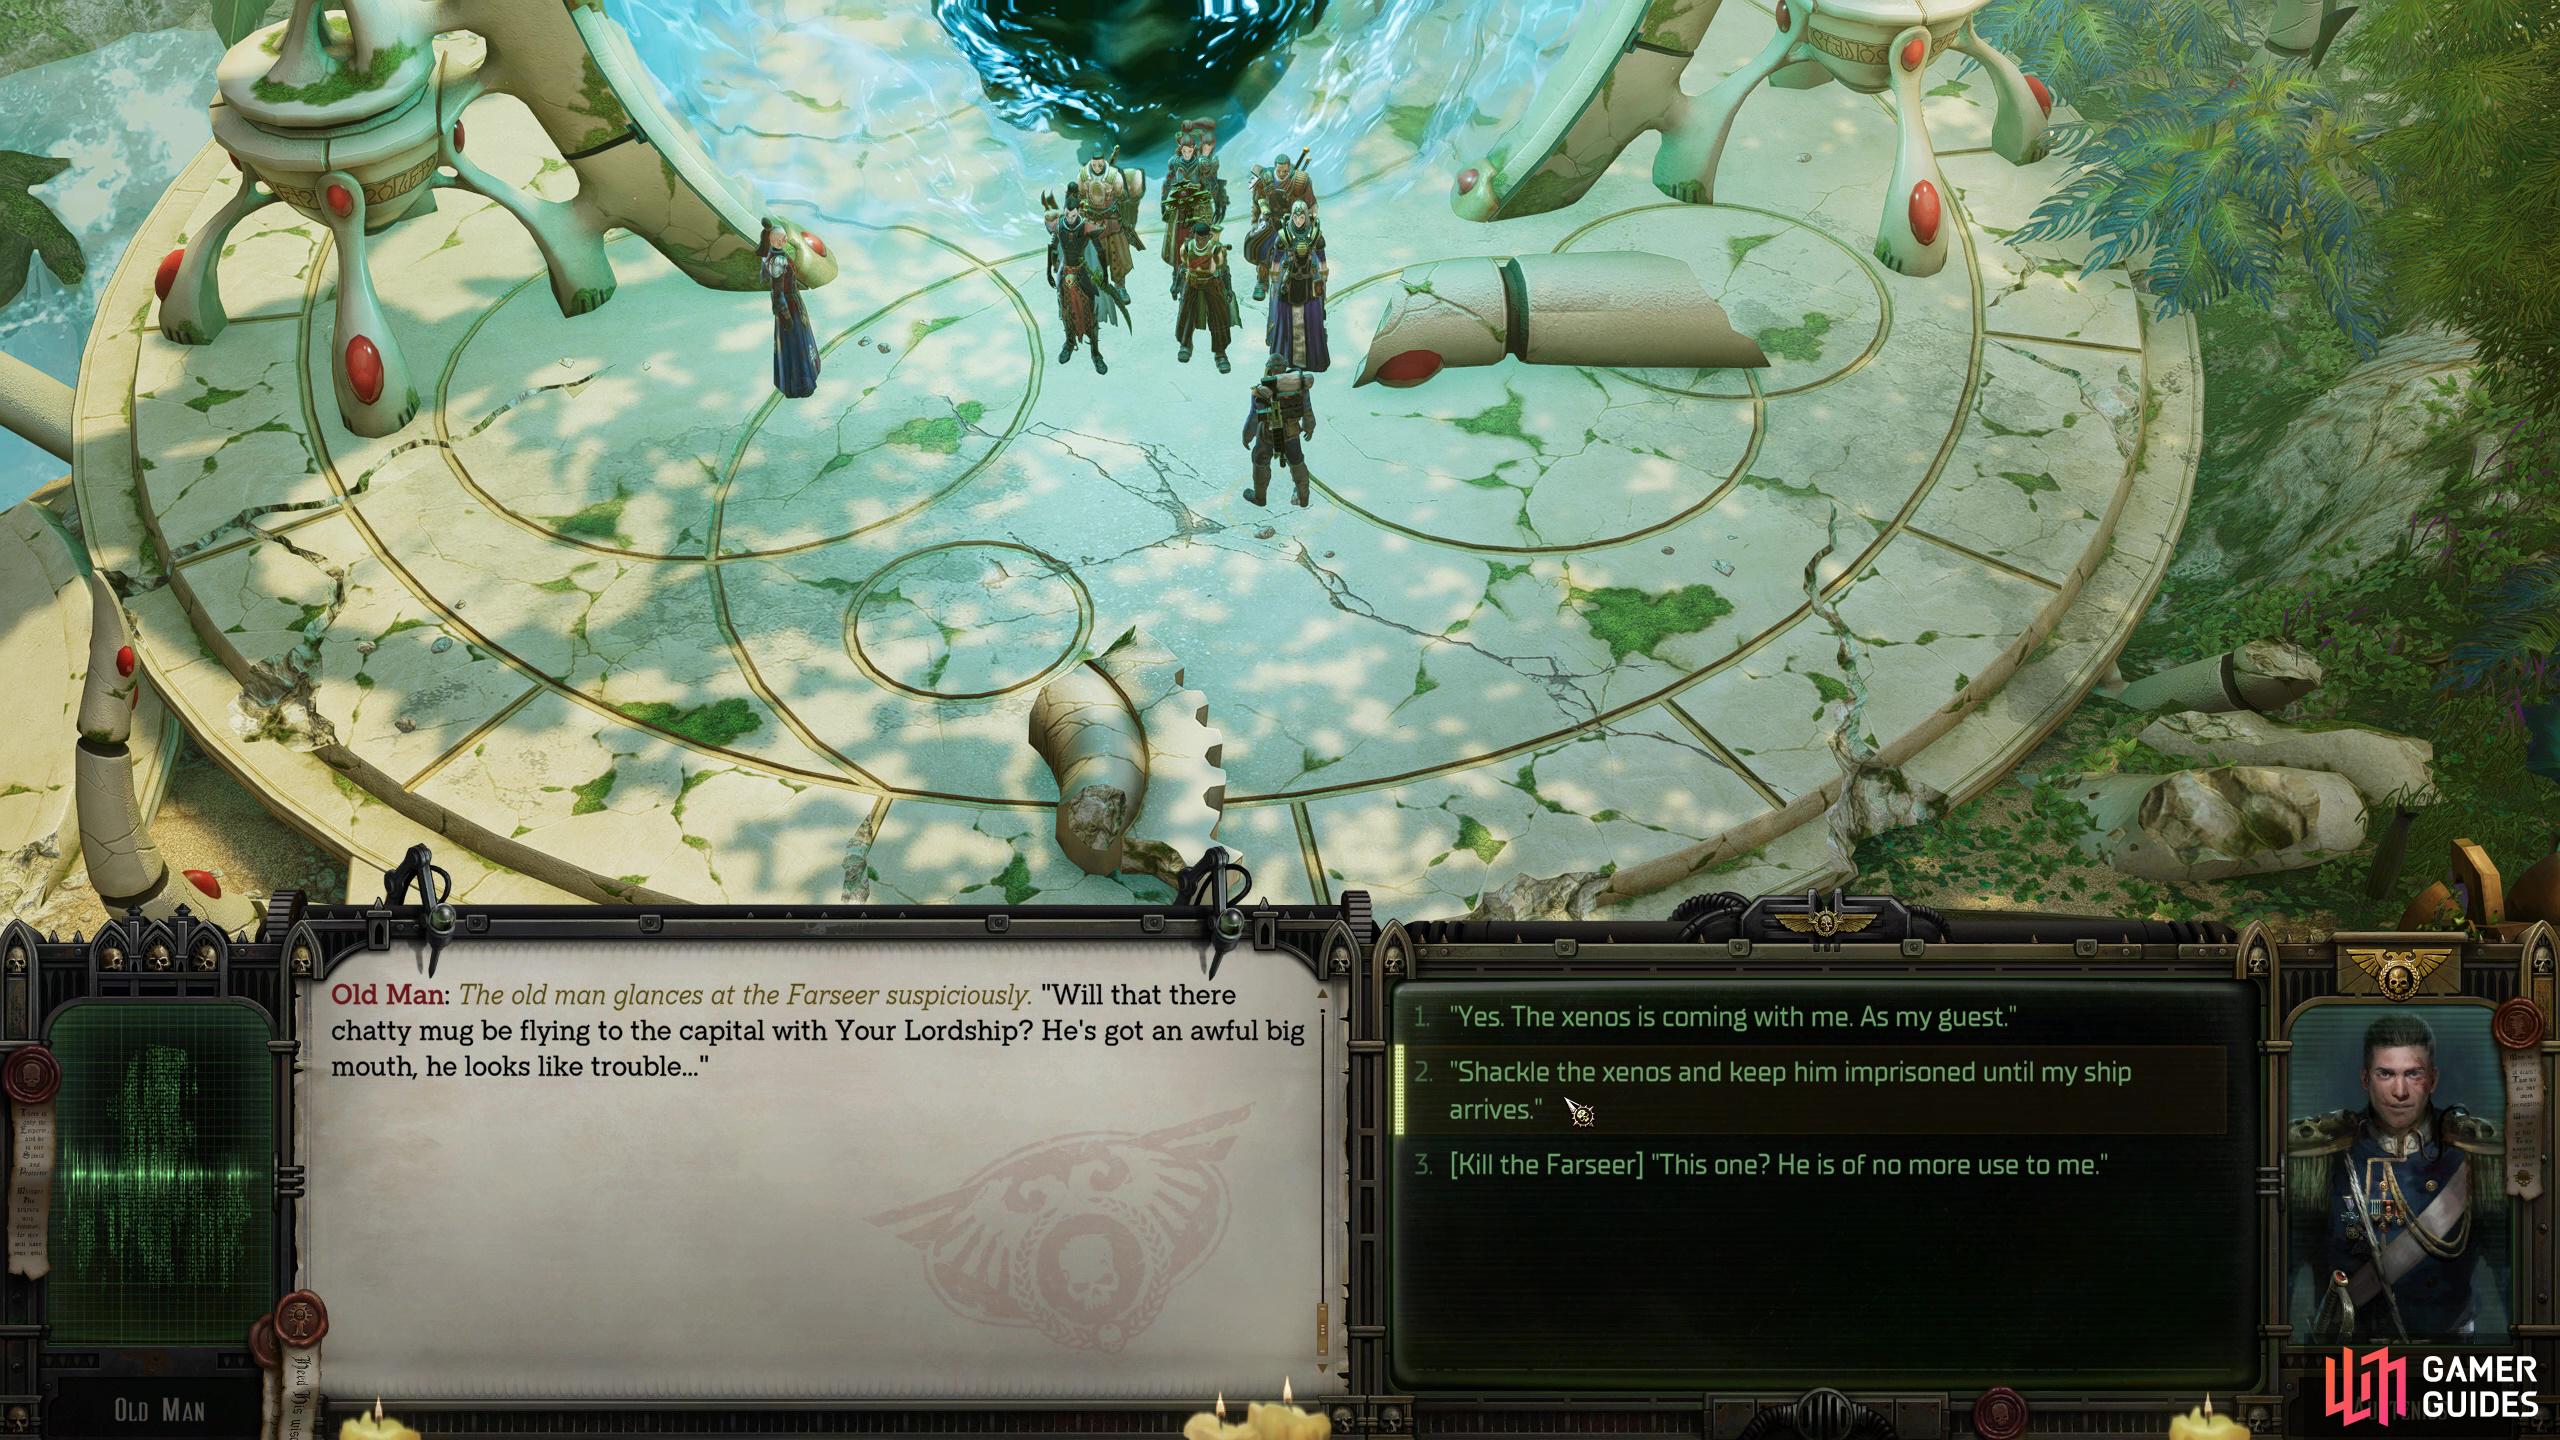
When you get back to Janus, tell the Old Man you need a shuttle to get back to your ship. (left), If you’re feeling particularly nasty, you can kill him after. (right)
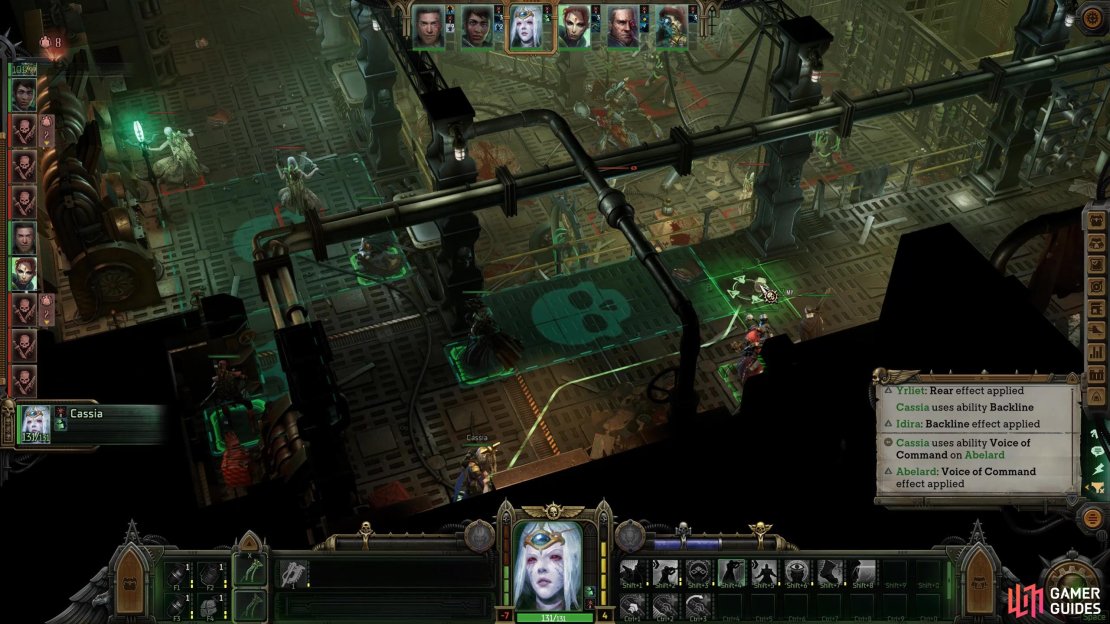
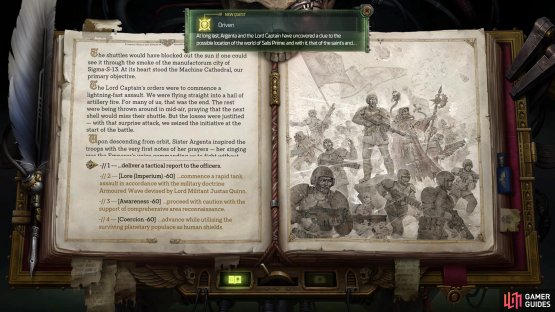
When you receive the report from Vigdis, you’ll unlock the first two main quests of the chapter: The Lord Inquisitor and the Lord Captain, and Hunting Grounds, which can be done in any order, but we recommend putting off Hunting Grounds a bit as it has some difficult battles there. Now, you’ll have a few companions talk to you, which will update their companion quests. ![]() Abelard will tell you that his family is accused of betraying House von Valancius. Tell him that you will personally take part in the investigation to get the Blood Ties quest. Next up is Idira, who will tell you about a mysterious door that could solve all her problems. Agree to help her find it to accept The Door quest. Shortly after, Jae will tell you about her crew who has been kidnapped, and the ransom is her certificate. Tell her you will help her when you reach Footfall to get the Rat Hunting quest.
Abelard will tell you that his family is accused of betraying House von Valancius. Tell him that you will personally take part in the investigation to get the Blood Ties quest. Next up is Idira, who will tell you about a mysterious door that could solve all her problems. Agree to help her find it to accept The Door quest. Shortly after, Jae will tell you about her crew who has been kidnapped, and the ransom is her certificate. Tell her you will help her when you reach Footfall to get the Rat Hunting quest.
Finally, your entire retinue will head into your chambers, demanding something be done with Yrliet. Now, you can execute her if you want, she deserves it, but like we said earlier, she is arguably one of the stronger companions in the game, and she still has some important story segments left with one of them being tied in with the Hunting Ground main quest. The best way to handle this situation is to tell her to apologize to the group, and to leave it there. When the party leaves, you can comfort Yrliet if you want, but neither side will be happy with this outcome, either way, that will be the end of it.
With all that out of the way, you’ll regain control, and you can progress the story. It’s been a while since you checked on your colonies, so you should probably do that, and then trade all the cargo you acquired in Commoragh into the various merchants. Finally, speak to Vigdis to get the Oversized Asteroid rumor before you leave the ship. If you want to do the companion quests first, you can find them in the following places:
- Abelard: Blood Ties - Dargonus
- Idira: The Door - Quetza Temer
- Jae: Rat Hunting - Footfall
The Lord Inquisitor and the Lord Captain Part 1
As you make your way to Footfall in the Furibundus system, you’ll get an event on the ship regarding ![]() Marazhai provided you recruited him in the last chapter, which will begin his quest line: Soulless. The short of it is that the Warp has made him lose his mind, and he’s freaking out. Help him out, and when you get the option of what to do with him, give him a compartment to stay in which will keep him happy. When you reach Footfall, the Inquisition has declared martial law on the station, which means you’ll need special permission to dock. Fortunately, Incendia has provided you with this, and she will be at the docks to greet you. Jae will remind you of her situation but tell her you’ll deal with this later unless you plan on doing it now.
Marazhai provided you recruited him in the last chapter, which will begin his quest line: Soulless. The short of it is that the Warp has made him lose his mind, and he’s freaking out. Help him out, and when you get the option of what to do with him, give him a compartment to stay in which will keep him happy. When you reach Footfall, the Inquisition has declared martial law on the station, which means you’ll need special permission to dock. Fortunately, Incendia has provided you with this, and she will be at the docks to greet you. Jae will remind you of her situation but tell her you’ll deal with this later unless you plan on doing it now.
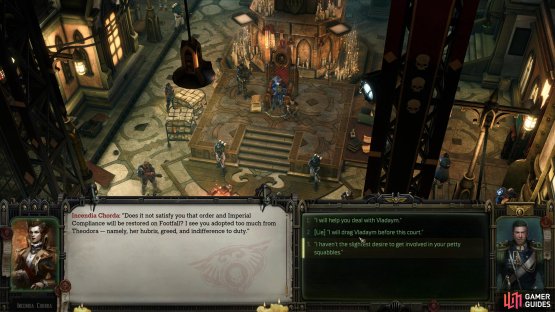
You’ll only be able to select the Atrium for now, which is weird considering you should only be able to land at the docks. Anyway, head down the stairs to the west to get a macabre scene, and then head north while picking up all the cargo along the way until you get another scene, but this time with Incendia enacting her law that soon turns into a conversation with her. Go through the various dialogue options with her, and at some point, she will offer you the pleasure of indicting your crimes. If you’re Heretical - Votary, you can use a forbidden spell that will make her writhe in pain when she tries, while also rewarding you with +20 Heretical. Despite the availability of a weapon draw option, it is not possible to kill her at this time. However, there are a couple of additional conviction choices that can be made if one holds the votary rank of the Iconoclast or Dogmatic conviction.
When you’re done talking to her, she’ll tell you that you need to arrest the former liege, Vladaym Tocara who’s allegedly instigating a riot as it’s your duty to the Emperor. Even Hieronymus has gone there to do that just now. You can disagree with this order, but you’ll miss out on a bit of story, and you’ll just have to wait anyway, so you may as well agree to it. You don’t have to arrest him straight away, as you can side with him if you want. This will give you the quest “The Great Judgement” which you can do now if you want, or you can do it later. Either way, this quest will be put on hold until Calcazar summons you.
This will be continued after the second part of the Hunting Grounds quest. Now, you can do either the Hunting Grounds or The Great Judgment quest. It doesn’t matter which one you choose, as you’ll need to do both anyway. We will cover Hunting Grounds next because it is listed next in the journal in that order.
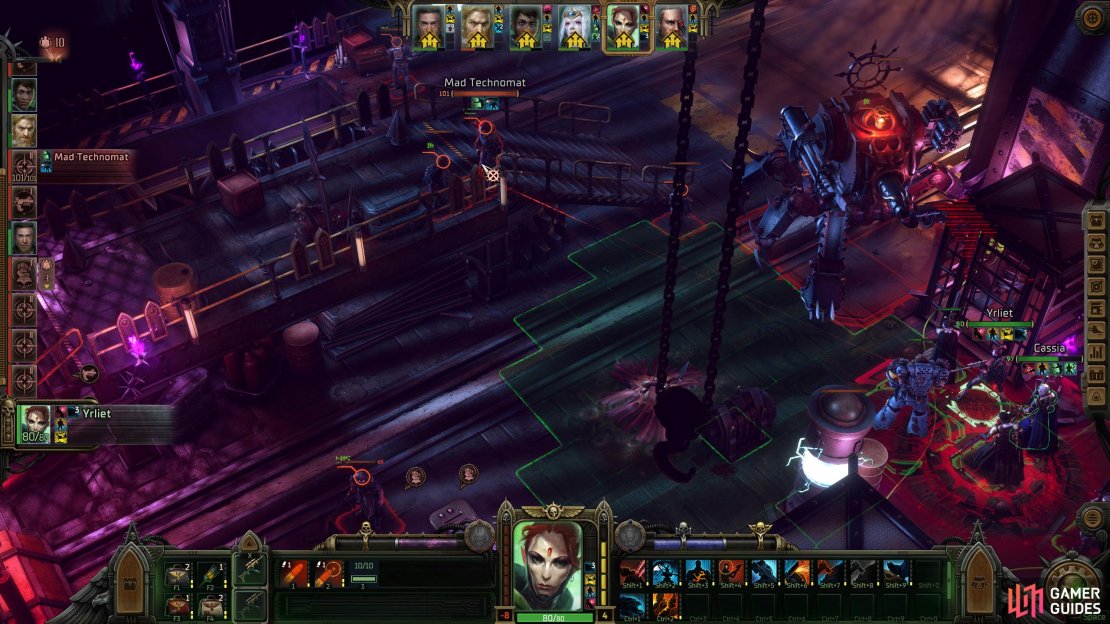
(1 of 2) If you recruited Marazhai in Chapter 3, you’ll get his Soulless quest at the start of Chapter 4. Give him his hunting grounds to keep him happy.


If you recruited Marazhai in Chapter 3, you’ll get his Soulless quest at the start of Chapter 4. Give him his hunting grounds to keep him happy. (left), Incendia wants you to deal with Vladaym. Regardless of what you choose, she isn’t asking you, she’s telling you. (right)
Hunting Grounds Part 1
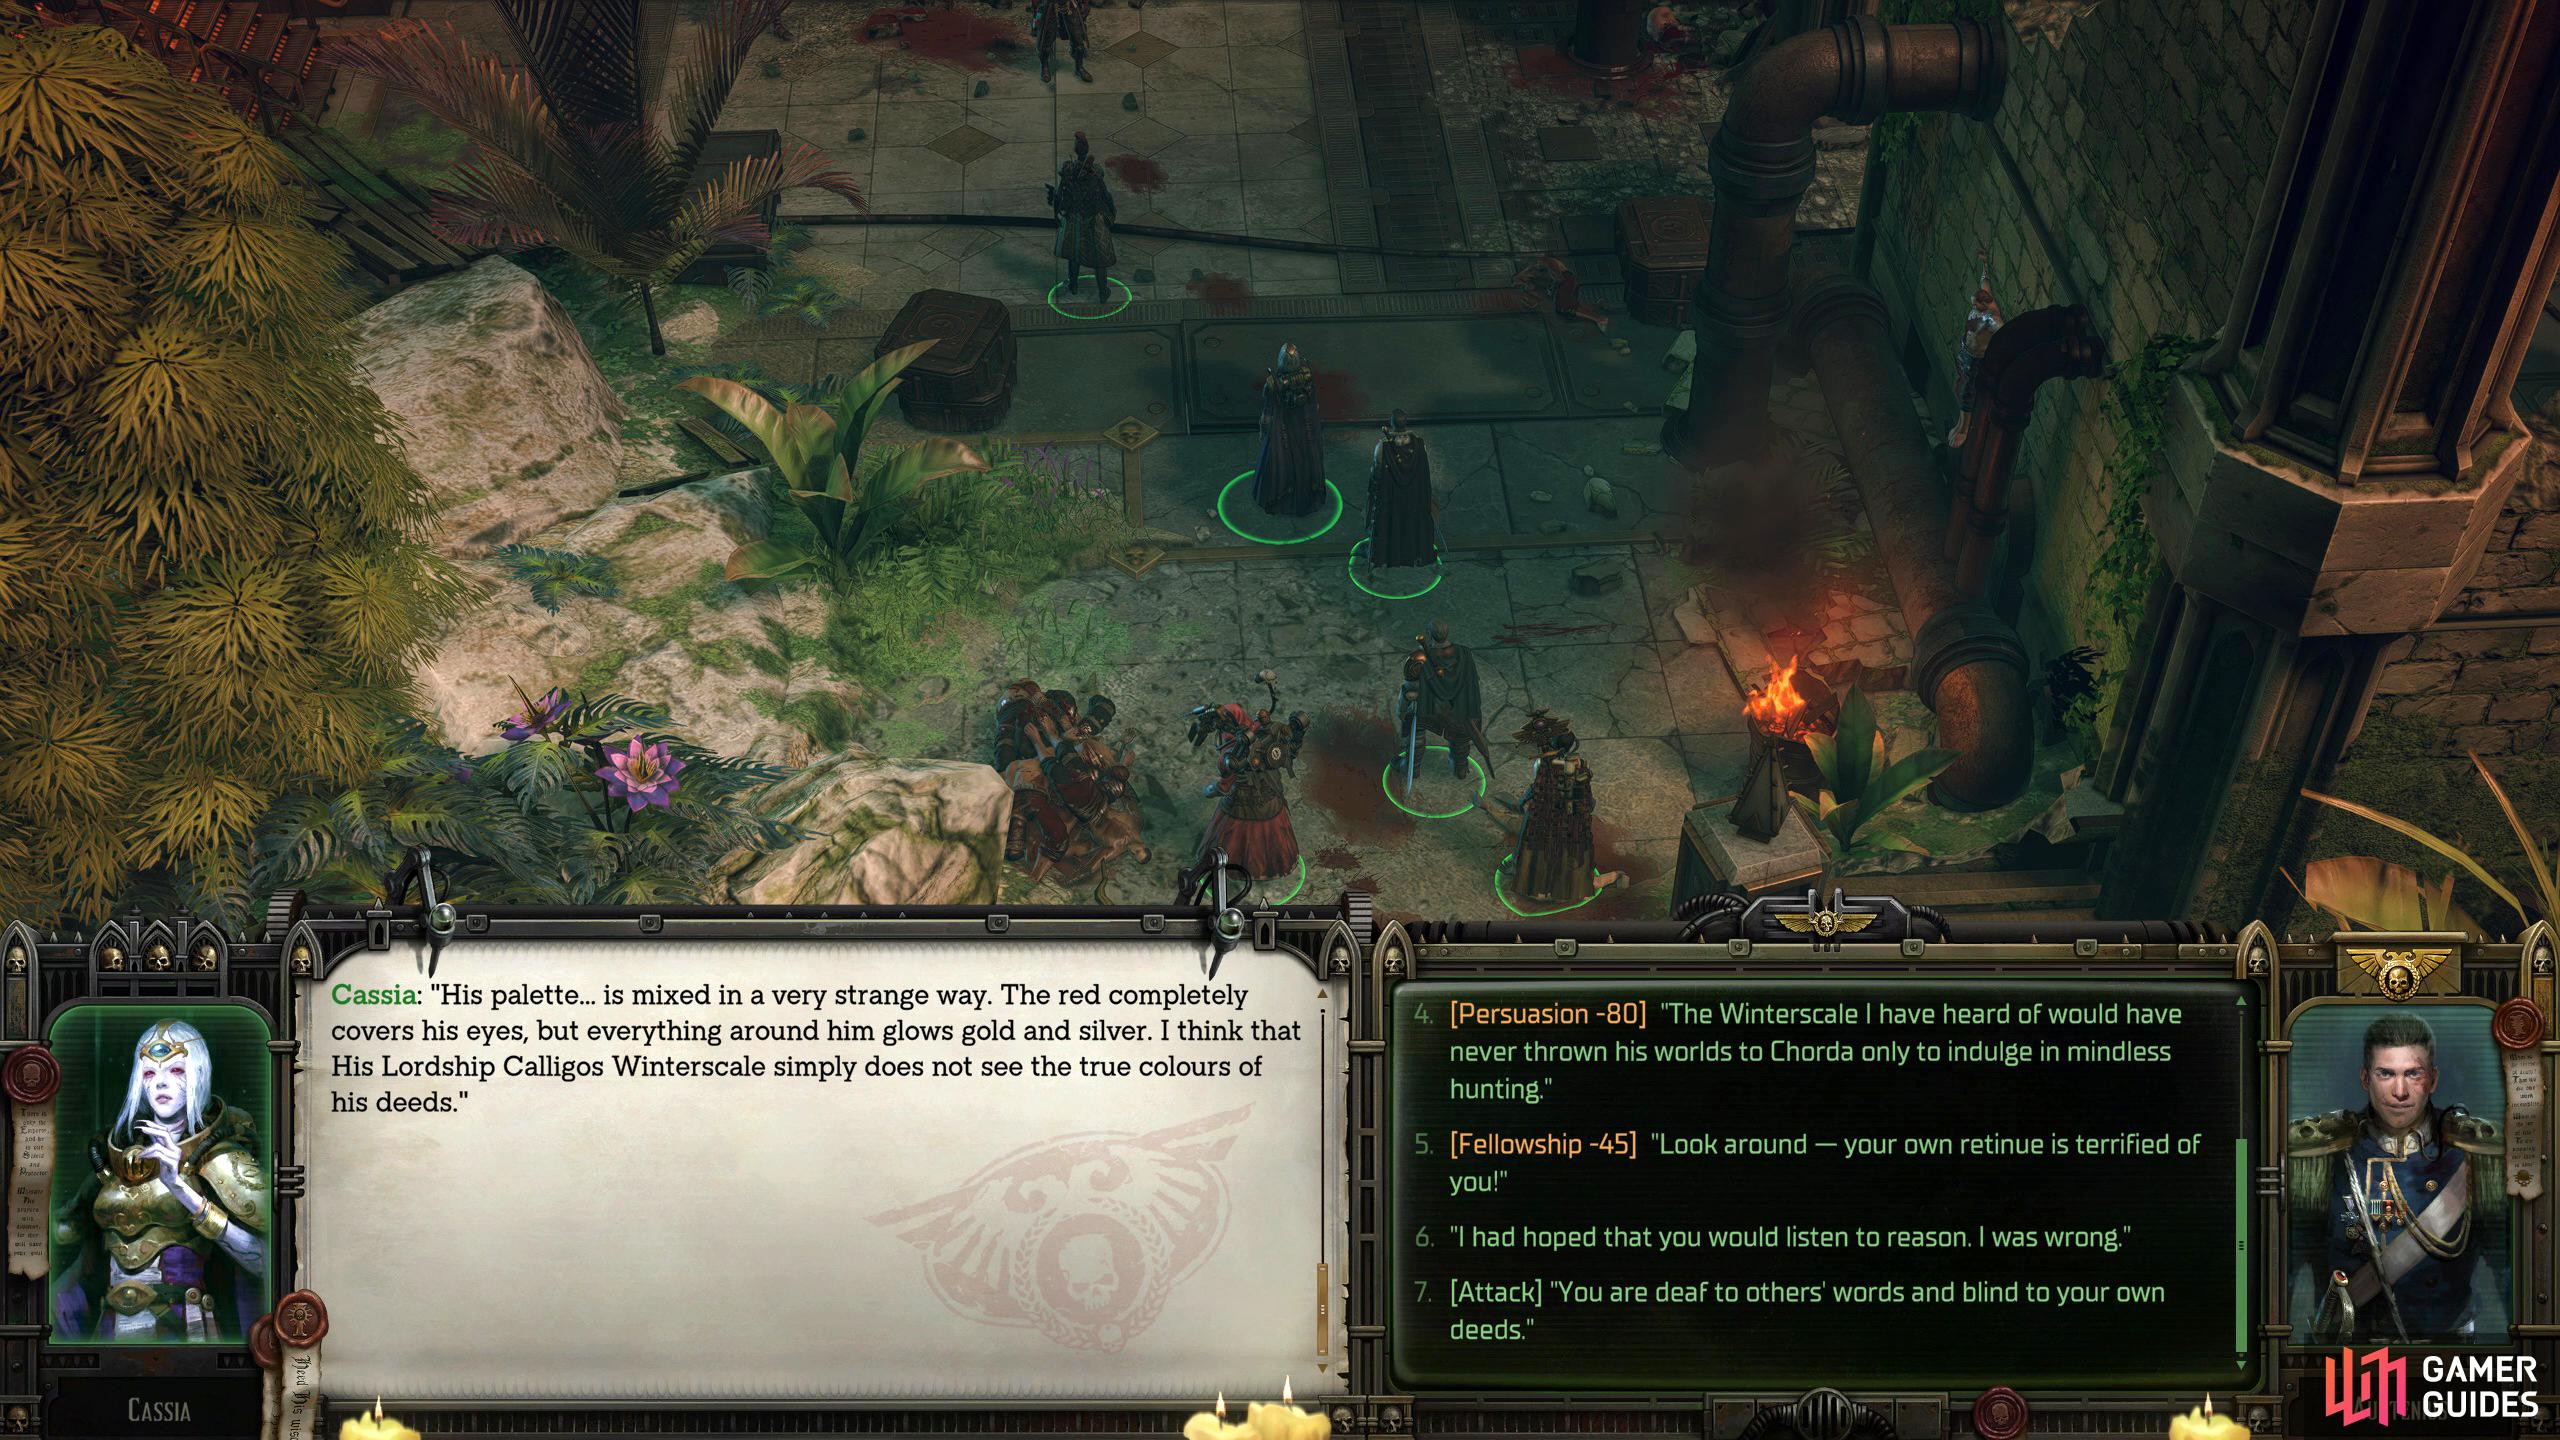
For this quest, rumor has it that ![]() Calligos Winterscale has been ignoring his duty to the Koronus Expanse and is spending his time hunting instead. Head to the Nameless Star system situated on the east of the Koronus Expanse and go to Quetza Temer. When you enter the system, you’ll be contacted by Vigdis who’ll tell you that the flagship of Calligos is positioned above Quetza Temer. Idira will interrupt your conversation and tell you that the door is here and that it’s close by. Tell her to calm down while you deal with the Calligos problem first, and then hail the Emperor’s Vow when given the choice.
Calligos Winterscale has been ignoring his duty to the Koronus Expanse and is spending his time hunting instead. Head to the Nameless Star system situated on the east of the Koronus Expanse and go to Quetza Temer. When you enter the system, you’ll be contacted by Vigdis who’ll tell you that the flagship of Calligos is positioned above Quetza Temer. Idira will interrupt your conversation and tell you that the door is here and that it’s close by. Tell her to calm down while you deal with the Calligos problem first, and then hail the Emperor’s Vow when given the choice.
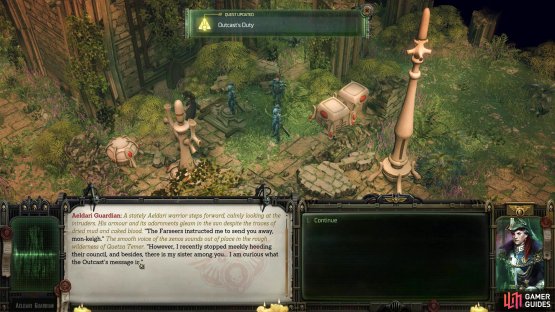
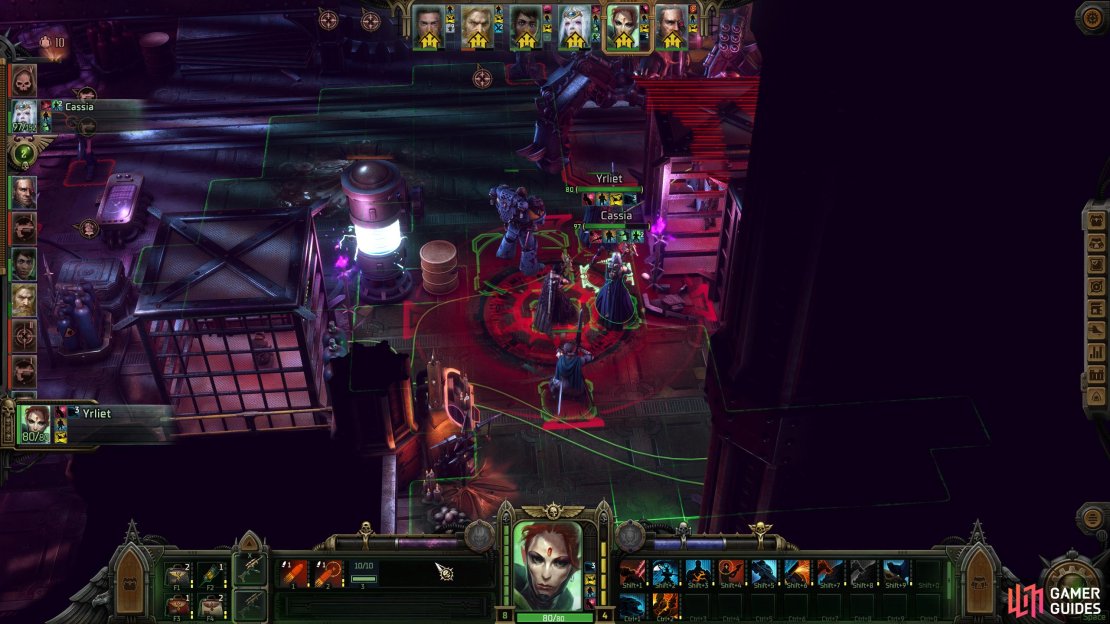
This will put you through to Calligos Winterscale’s Vox Master, Erbreght who will plead for you to help his lord. Apparently, Calligos downed an Aeldari ship which crash-landed in Quetza Temer, and he pursued them to finish them off. It’s been 30 days since, and there is no sign of him. During the conversation, Yrliet will jump in and ask for your help finding them, and if you agree, it’ll start her companion quest: Outcast’s Duty. When you get the chance, tell her you will try to end things peacefully. After the conversation with the Vox Master, enter Quetza Temer, and you’ll find yourself in a forest which you will soon find is a maze of maps. Follow our in-depth Quetza Temer Guide on how to complete the quest. You won’t be able to finish this quest until you complete The Great Judgment. The conclusion of this quest will be covered after the following quest.
(1 of 2) Quetza Temer is a maze where you’ll go through the same maps over and over again.


Quetza Temer is a maze where you’ll go through the same maps over and over again. (left), Eventually, you’ll find Calligos and the Aeldari. This will update Yrliet’s quest Outcast’s Duty, which has huge ramifications. (right)
The Great Judgment
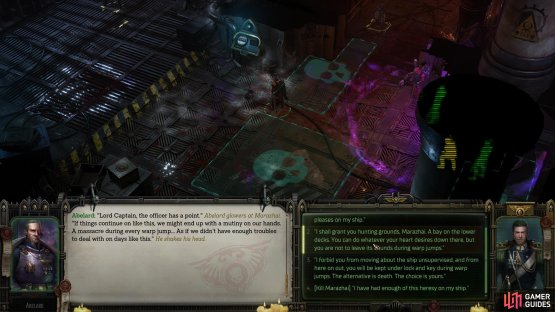
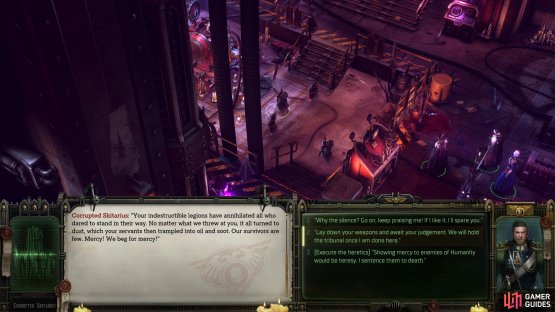
Once you’re finished with the Hunting Grounds quest, make your way back to Footfall, and head to the bar in Martyr’s Endurance. Once there, you’ll get a scene between Vladaym and Ryzza. As you eavesdrop on the conversation, he is trying to get Ryzza to join him against Incendia, but she’ll notice you and tell him his plan is a suicide pact before she leaves. When you get the chance to speak, you can shoot down Vladaym right now by selecting the [Dogmatic] option, otherwise go through the dialogue except that. Eventually, he will ask if you have any help to spare. Ask him what he expects from you, and he’ll ask you if you can bring Incendia to the bar by telling her his location. This way, he can exploit her overconfidence.
He will then give you a compelling reason why you should help him if you ask him, “Why would I take part in that?” Shortly after, you will have an important choice to make. You’ll have two Heretical choices, with one of them needing you to be of the Votary rank. Then you’ll have an Iconoclast option and the same Dogmatic choice you had earlier. All of them minus the Dogmatic choice will help Vladaym which will shortly end up in a battle, so “take a look around” if you want to save it first. Our character is a heretic, so naturally, that is the option we chose, but there is a way to avoid a battle with Incendia, and that is by selecting the Iconoclast - Fanatic option in the following scene, but the odds of you having that at this point is slim to none. If you do decide to help Vladaym, the quest will update, and you will fail the “Arrest Vladaym” objective, but you will gain the “Lure Incendia to the Adeptus Amasecus” objective in its stead. Once you’ve selected your choice, make sure you look around first, as there are some things you can do to make the upcoming battle easier.
-
Get Hieronymus on your side: If you don’t, he will join the battle on Incendia’s team. You can do this by selecting the “Reverend, I want to stop Incendia. Help me” which will give you a few options to convince him, with the Iconoclast choice being the easiest to pass.
-
Get Ryzza and Octaviana to help: Ryzza will be in her usual spot, and you’ll need to say to her that “Vladaym needs your help”, and then either pass her checks or pay her off. Octaviana, on the other hand, will be behind the bar and can be convinced by saying “Her help would be of use”, and then passing the following checks.
-
Place Fuel Barrels: You can set up some fuel barrels at the bottom and top of the stairs next to Vladaym. When the battle starts, Incendia will come from these stairs. This allows you to make her entrance more “explosive”.
-
Additional Cover: To be fair, the cover in the room where Vladaym is more than enough, but you can set up some barricades in Ryzza’s room if you want to.
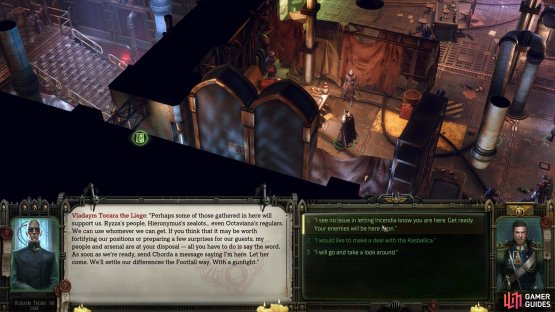
(1 of 2) Tell Vladaym you see no issue in letting Incendia know where he is. A battle with Incendia will immediately follow.


Tell Vladaym you see no issue in letting Incendia know where he is. A battle with Incendia will immediately follow. (left), Use the room Vladaym was originally in for cover, and let the enemy come to you. (right)
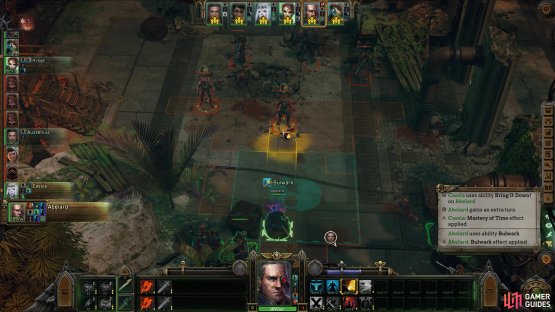
When you’re ready, tell Vladaym “I see no issue in letting Incendia know you are here. Get ready. Your enemies will be here soon.” Once you select this, you’ll get a short scene immediately followed by a battle with Incendia, and if you didn’t convince him, Hieronymus. This battle is surprisingly easy, especially if you park most of your party behind the cover where Vladaym was when you entered the bar except for your tank, who you’ll want nearer to Incendia. Make sure the tank keeps ![]() Bulwark up at all times, and buff them with
Bulwark up at all times, and buff them with ![]() Cassia/Officer, and you’ll be fine. Then you can take out the enemies one at a time.
Cassia/Officer, and you’ll be fine. Then you can take out the enemies one at a time.
If you have Yrliet as an Operator and Bounty Hunter/Assassin while equipped with a sniper, she will one-shot most enemies. Once the battle is over, you can choose what to do with Incendia’s body. It doesn’t matter what you do with it but sending it back to House Chorda seems fair game. Finally, Vladaym will ask you what you want to do about Footfall which will give you some conviction choices, so decide whatever fits your playstyle. When you’ve done with the dialogue, the quest will be complete.
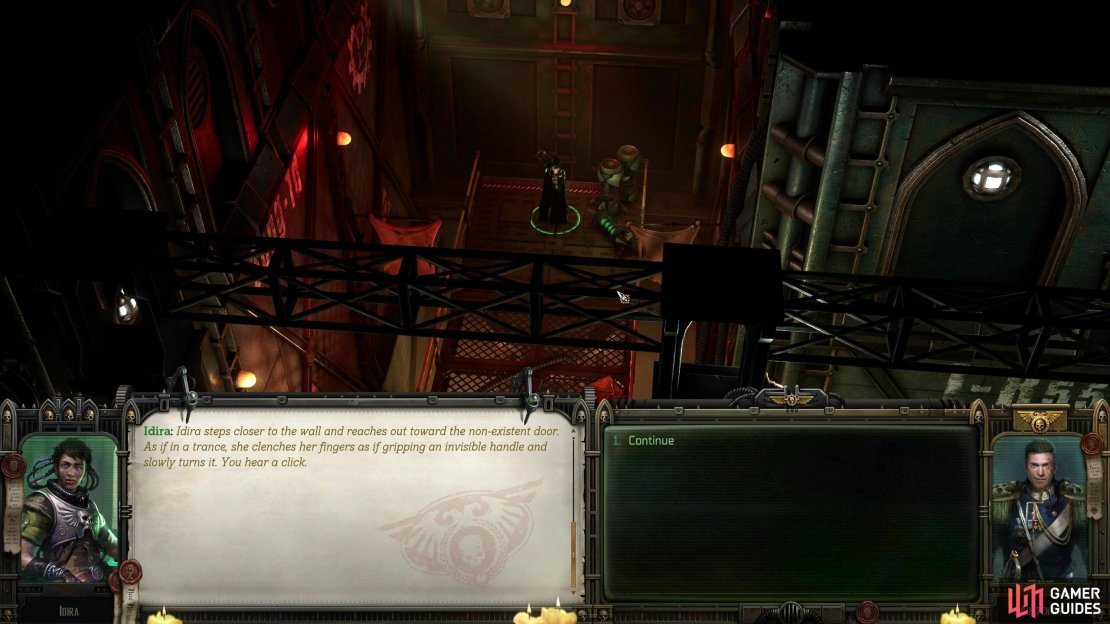
Lair of the Haemonculus
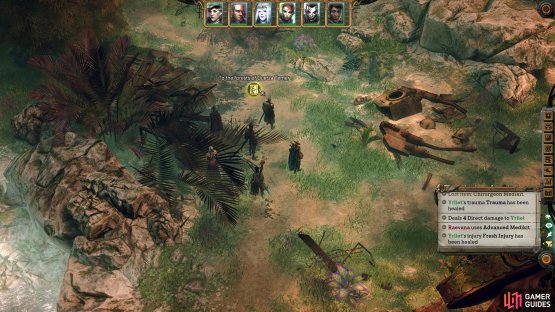
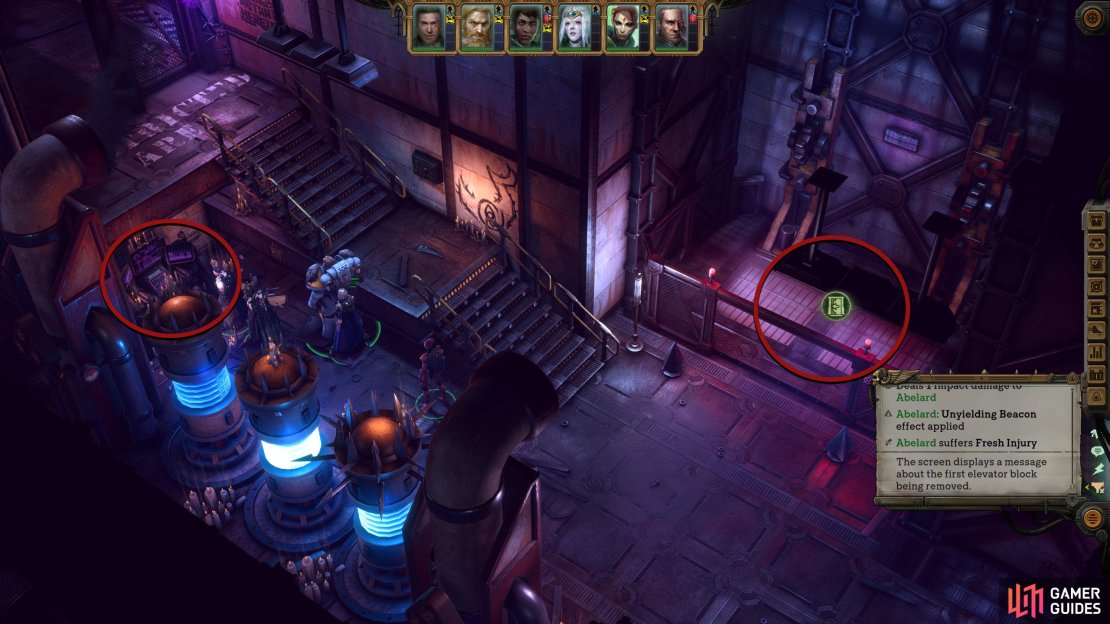
You’ll get this quest midway through the Hunting Grounds quest. Complete Hunting Grounds first, and when you leave the planet, click on it again to find the Haemonculus’ Laboratory location, and Idira will mention that the door from her visions is in there, but for now, tell her you’ll go there after you assess the situation first. Select the location and enter the laboratory. Inside, head into the door in the north near the entrance for some cargo, with one needing you to pass a [Tech-Use] check, and then head south at the intersection for some more cargo including a hidden bag near the bed which will unveil itself to you if you pass an [Awareness] check.
Return to the intersection and take the northern corridor around the corner to find a Cogitator with a [Logic] check. This won’t do anything for you other than give you a paltry amount of XP. Opposite the Cogitator is a hidden door that you can enter provided you pass the [Awareness] check. Inside the room, you’ll find a trap in the center, disarm it, and head into the adjacent room and disarm the myriad of traps in there too. In this room, you’ll find the powerful ![]() Toxic Flamer weapon in the southwest corner and the Strange Log note on the desk by the window. Go back the way you came, and continue following the corridor northeast, and get ready for a battle.
Toxic Flamer weapon in the southwest corner and the Strange Log note on the desk by the window. Go back the way you came, and continue following the corridor northeast, and get ready for a battle.
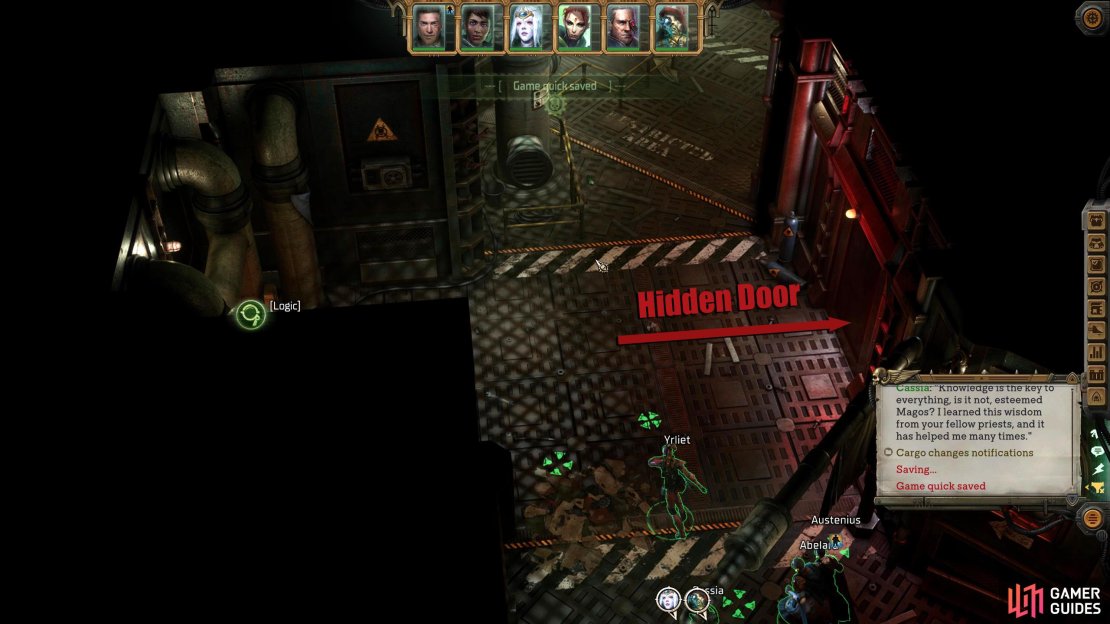
(1 of 3) Near the entrance of the Lair, there is a door that needs an Awareness check. You will find the Toxic Flamer inside.
This battle will pit you against numerous Foul Aberrations, and an Alpha and Beta Grotesque. The former will die almost immediately, but the latter two enemies may cause you a problem. For the most part, you can stay where you enter the room, and use the pillars for cover while you send your tank down the ladder to occupy the Grotesques. Focus the party to take out the Foul Aberrations first, while your strongest DPS helps the tank. When the party has dealt with the lesser threats, help the DPS and tank take out the Grotesques. You shouldn’t have much trouble with this battle, the Grotesques are the only real threat, and they won’t be able to do much provided you keep your tank alive through buffs and medikits. Once you’ve dealt with them, pick up the loot from the corpses, the goods on either side of the door you entered from (one requires an [Awareness] check), and then jump over the fallen bookshelf via the [Athletics] check.
Follow the corridor down the slope to an intersection with a door straight ahead. To your south is the door for Idira’s companion quest, aptly named “The Door”. The locked door opposite the slope has some cargo in there, while the north corridor is the correct way to go. So, follow the path north, while disarming the myriad of traps along the way, until you reach the room at the end. Inside this room is a boss fight, so make sure the party is fit, everyone has been leveled up, and a manual save is made, and then go into the room to find Tervantias the Archmachinator.
Tervantias Boss Guide
After the scene, go through the dialogue choices before you select either “Draw your weapon” or “Attack”. When the Prep Phase begins, you’ll notice there isn’t much cover, so just use whatever you can find such as the railing and the bio-founts, but make sure the tank is at the front. This battle has a gimmick. There are eight bio-founts (green chambers) around the area, and these will continuously summon Foul Aberrations who aren’t particularly difficult to defeat, but they buff Tervantias, or more as he uses them to buff himself. So, your priority at the start of the battle is to destroy all eight bio-founts and the numerous Foul Aberrations who are already in the arena.
While your party is dealing with that, start sending your tank (use Bulwark asap) toward Tervantias, and taunt him to keep him preoccupied, and then if you have a strong ranged DPS, preferably one who has a sniper (Yrliet) start taking out the Cronos Matriarch Engine. How easy this is depends on how you’ve built your party. For example, Yrliet should be able to take out the Cronos in no more than two or three turns. Abelard (tank) with Bulwark should barely take any damage, and most of the Foul Aberrations should die in one-to-two attacks.

(1 of 2) At the end of the Haemonculus Lair, you’ll find Tervantias, and a boss battle will follow.

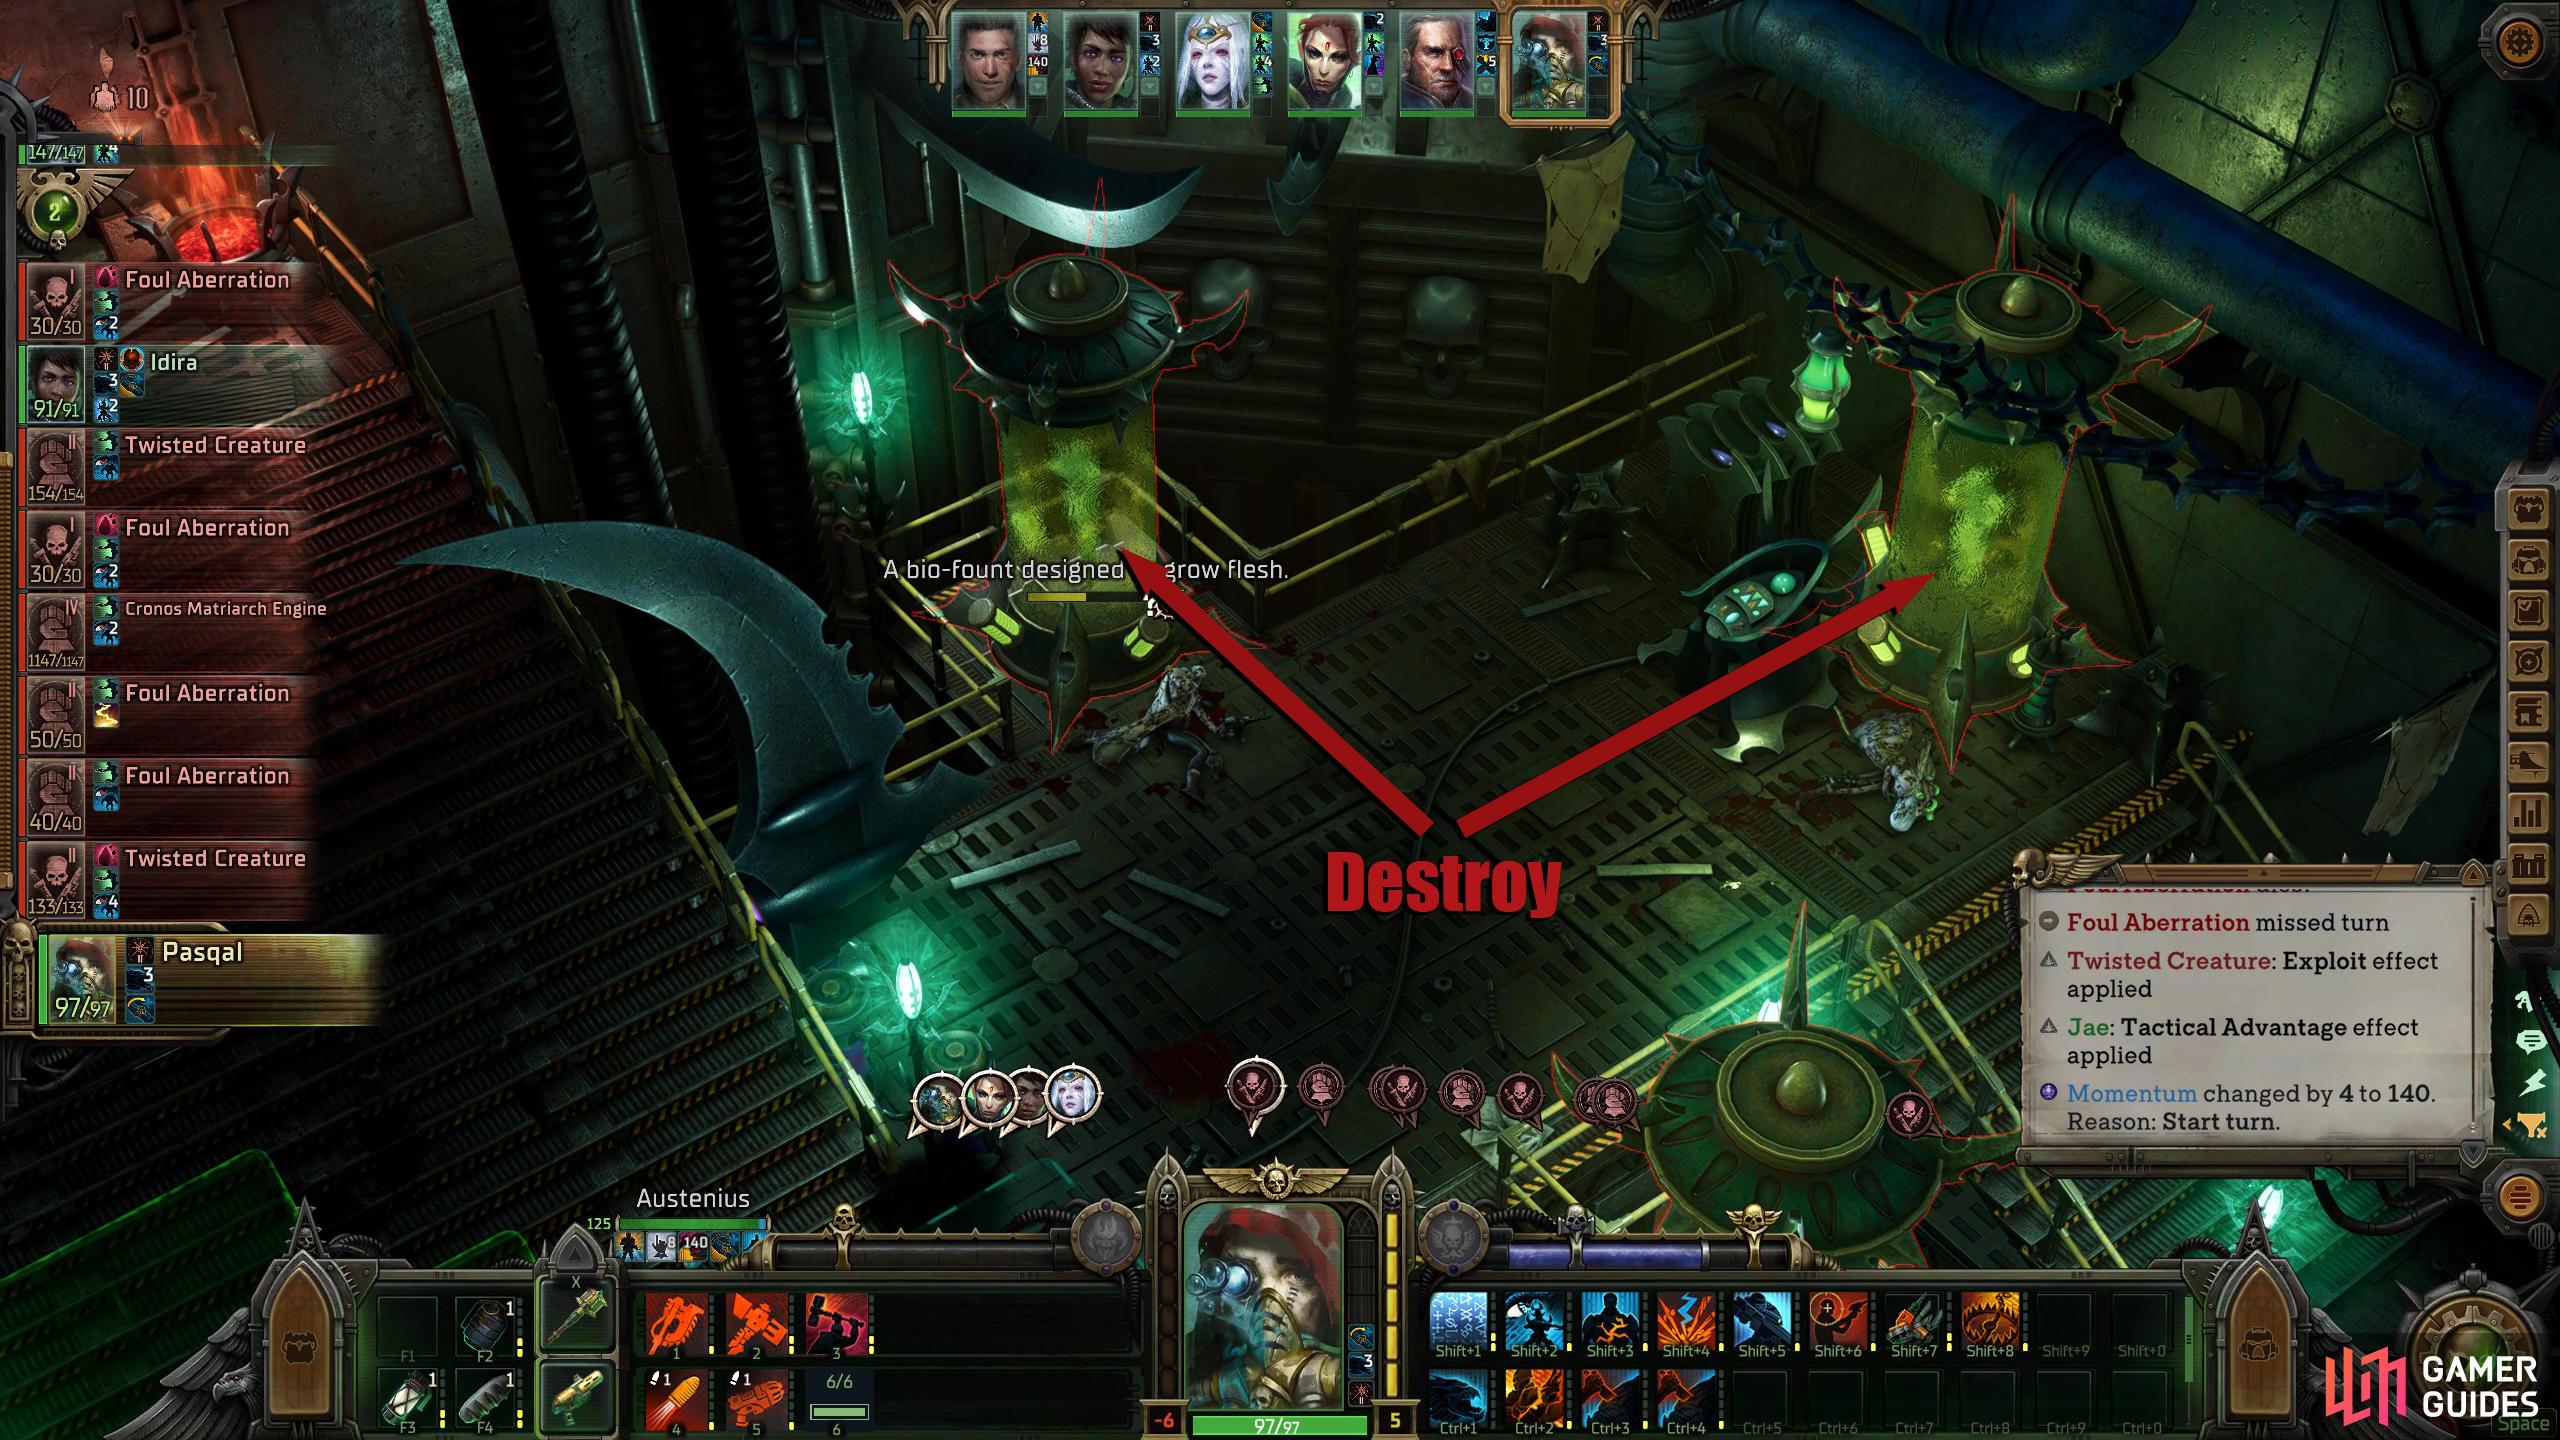
At the end of the Haemonculus Lair, you’ll find Tervantias, and a boss battle will follow. (left), During the fight, make sure you destroy the bio-founts, otherwise they will continually spawn Aberrations. (right)
Once you’ve dealt with the Foul Aberrations, the bio-founts, and the Cronos Matriarch Engine, it’s time to focus on Tervantias. Start by moving your party toward him (be careful of the traps hidden around the room), and make sure you stay behind cover, and away from your tank as Tervantias should be targeting them. The reason you need to deal with the Aberrations and the bio-founts first is that at every turn, Tervantias will get a Blood Barrier around himself, and this will give him stacks of it that will heal him for 10% for every bleeding creature in the arena. Naturally, he has a weapon that applies bleed, and he’ll use it on his minions to buff himself further. Once the enemies and bio-founts are dead, he’ll only gain it from what party members have bleed on them, and if your tank is doing its job properly, it shouldn’t be anyone.
Having status effects on his enemies in this battle is what Tervantias thrives on. Once you take that away from him, he only has his weapons, which can deal respectable damage to your party, but not your tank with Bulwark. All that’s left to do now is finish Tervantias once and for all. Move the party up away from the tank (the burst shot from Tervantias’ weapon will hit them) and go to town on him. He shouldn’t last past a turn or two.
Once the battle is finished, loot the room, and then investigate the hole in the floor atop the stairs at the back of the room. This will bring up two dialogue checks [Awareness] and [Demolition]. Pass the checks, and the quest will be completed. Now, it’s time to leave the lab, unless you need to do Idira’s companion quest “The Door” which you found earlier. When you try to leave, you’ll get a report from Vigdis on the Vox caster regarding Quetza Temer, which will update that quest. Select “Return to the Village”, and you’ll finish off the Hunting Ground quest.
Hunting Grounds Part 2
When you get to the village, you’ll find Calligos and his small army, who seem to have murdered the entire village. Now, there are a couple of ways this can go down, a battle with Calligos and friends, or with Calligos coming to his senses, but getting injured in the process. The correct conclusion to this quest depends on how you’ve been playing the game but note that Calligos’ actions are a result of Mort controlling him, so you may want to spare him. Either way, we’ll cover both options below.
How to Save Calligos
The preferred method of dealing with this situation. Select the following dialogue options to save Calligos.
- This massacre is your doing, is it not?
- What happened to you, Calligos? What have you become?
- [Fellowship] choice.
- [Persuasion] choice.
- The blame does not lie with you, Calligos. You were manipulated by malevolent powers.
After the last choice, a scene will play out, and Calligos will survive, but be badly injured. Now, you can finish him off if you like, and no battle will occur, or you can save him by selecting “Don’t move. I will call for help.” Now select, “I will take you to Emperor’s Vow”. This will end the dialogue and quest. Although he’s still lying on the floor, and his party is just standing there, he does survive (his deeds will appear at the end of the game). Head back to your voidship, and exit the system into the Koronus Expanse, where you’ll get a Vox cast from Vigdis saying that the Lord Inquisitor has summoned you.

(1 of 2) You need to pass both of the checks, and then tell Calligos the blame is not on him, otherwise, you’ll face a difficult battle.

You need to pass both of the checks, and then tell Calligos the blame is not on him, otherwise, you’ll face a difficult battle. (left), This fight is no joke, all the foes here are tough, and what’s worse is the reward isn’t worth the trouble. (right)
Calligos Boss Guide
In all honesty, outside the battle itself, this isn’t worth doing. The fight is difficult, arguably over-tuned, and although you may be able to loot them after, it’ll be all the stuff you’ve picked up throughout the game. Saying that, if you want to do the fight for lore, or the challenge itself, read below for some tips. This battle consists of Worten the Grey (Warrior/Vanguard), Calligos Winterscale (Warrior/Officer), Trevor Kassini (Navigator/Psyker), Mercenary Sslyth (Soldier/Bounty Hunter), and Magos Gillenia Zetta (Operator with a Melta Gun). Not only is this a strong party, but their stats are high too, making it almost impossible to taunt, or crowd control them.
Calligos will rush the back line after buffing up his retinue, Worten will either help him against your back line, or if you place the tank near him, he’ll rush the tank. Trevor will buff up the party while debuffing yours, Sslyth will nuke your party with its ![]() Blaster, hitting multiple party members, and finally, Magos will debuff your party, and hit multiple members with the Melta Gun. All of these are priority targets, but Trevor should probably go first due to his strong buffs such as Reveal Light. Calligos should go next due to him attacking the back line (you could argue he should go first). Next up should be Sslyth, as its Blaster hurts, and if you don’t get lucky with dodges, it’ll decimate your party. Finally, take out Magos before your attention goes to Worten. The reason for this is when you defeat Worten, he’ll turn into a Bloodletter with full health again. Here are some tips that worked for us:
Blaster, hitting multiple party members, and finally, Magos will debuff your party, and hit multiple members with the Melta Gun. All of these are priority targets, but Trevor should probably go first due to his strong buffs such as Reveal Light. Calligos should go next due to him attacking the back line (you could argue he should go first). Next up should be Sslyth, as its Blaster hurts, and if you don’t get lucky with dodges, it’ll decimate your party. Finally, take out Magos before your attention goes to Worten. The reason for this is when you defeat Worten, he’ll turn into a Bloodletter with full health again. Here are some tips that worked for us:
- Drop the difficulty: Seriously, this is a difficult battle, and even on normal it’ll still be a challenge.
- If you have a Psyker (Idira?) capable of casting
 Foreboding, keep it up on as many members as possible.
 - Have Cassia cast
 Glimpse of Fate and
  Reveal the Light to as many people as she can while giving the extra turn to Yrliet if you have her.
 - Focus on one enemy at a time. They have a lot of health and even higher stats…they won’t go down easily.
- Should go without saying, but always stay in cover otherwise your members will almost instantly.
As evident from the above, this battle is exceedingly challenging, even surpassing the last boss in the game, and yields limited rewards in terms of loot. Therefore, it is recommended that this option is chosen solely for its challenge or compatibility with the choices you have made throughout the game. After the battle, the quest will end. Head back to your voidship, and exit the system into the Koronus Expanse, where you’ll get a Vox cast from Vigdis saying that the Lord Inquisitor has summoned you.
The Lord Inquisitor and the Lord Captain Part 2
When you reach the Expanse, you’ll be told by Vigdis that Calcazar wants you back at Footfall. Make your way south to the Furibundus system, and head to the Liege’s Residence. Make a manual save here as you can end up losing half your party depending on your conviction. What he has to say will depend on what you’ve done throughout the game, but if you chose the Heretical path (and I assume Dogmatic), you will have a chance to repent. This option becomes available after Frosher gives him a drink. If you don’t “repent sincerely”, you will lose Yrliet, ![]() Ulfar, and
Ulfar, and ![]() Argenta for good at the beginning of the next quest. If you do want to repent, select these choices after selecting “Repent Sincerely”.
Argenta for good at the beginning of the next quest. If you do want to repent, select these choices after selecting “Repent Sincerely”.
- [Bend your knee and drink from the flask.]
- God-Emperor, our shepherd and warden…
- In my torment, I seek salvation from the corruption…
- Master of Mankind, my life belongs to You…
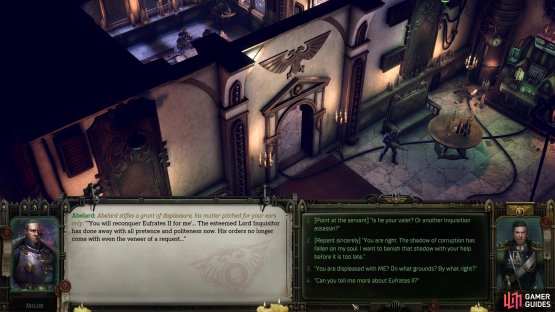
This will set your conviction to neutral, but you will lose all of your conviction ranks, including any abilities that are provided. After you’ve humiliated yourself in front of the Lord Inquisitor, he’ll have a mission for you, head to Eufrates II, and deal with the issues there while settling the differences between the commanders. You can turn him down, but he’s not asking you as a favor, it’s a command, and you’ll have to go anyway. This will complete the quest and give you the following quest “The Siege”.
(1 of 2) This is the only time you can reset your conviction to neutral.


This is the only time you can reset your conviction to neutral. (left), If you don’t repent, and you’re Heretical, Ulfar, Yrliet, and Argenta will leave for good. (right)
The Siege
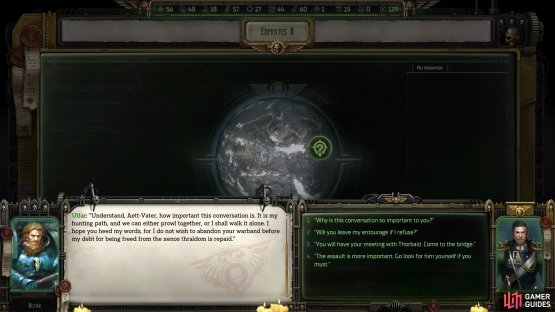
The first thing you need to do is hold a war council in Emperor’s Palm. Head back to the voidship, and you may have a small battle on your hands if you didn’t deal with the quarantine situation earlier in the game. Fortunately, it is one enemy, and it’ll die in one hit. When you’re back on the ship, exit the Furibundus system, and head to Emperor’s Palm which is situated on the western center of the map.
You won’t have been here before, so make your way to the Nolla Septum system (below Cranach) as it will have a path leading from it to your destination. This will be a dangerous route, so if you have any navigator points left, use them here to make your journey less perilous. When you enter the Emperor’s Palm system, make your way to Eufrates II and summon the commanders to the bridge.
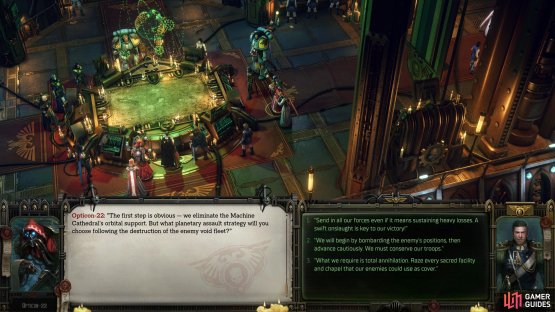
Go through the small talk, and you’ll find out why the planetary assault hasn’t occurred yet. Thorbald and Opticon-22 are at an impasse on how to go about the assault. This is where you come in, you can ask them both about their plans and decide which one to act upon. Once you’ve made your mind up, tell them you’ll present your plan and select one of the three options:
- Send in all our forces… - Opticon-22
- We will begin bombarding the enemy’s position… - Thorbald
- What we require is total annihilation
There’s not a “right” answer here, so go with what sounds the best to you. After the council, exit the ship, scan Eufrates II, and then select “Orbital Battle”.
(1 of 2) Select which plan you want to go with, Opticon-22, or Thorbald.

Select which plan you want to go with, Opticon-22, or Thorbald. (left), When you enter Eufrates II, you’ll get an orbital battle. Try to stay in front of the large cruiser to avoid unnecessary damage. (right)
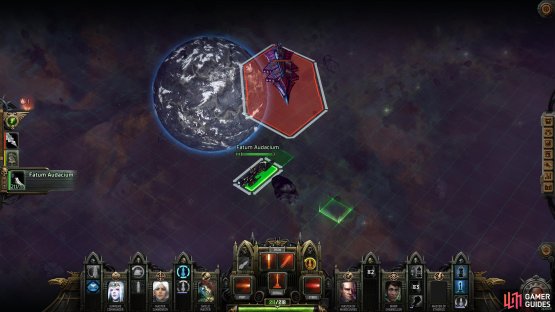
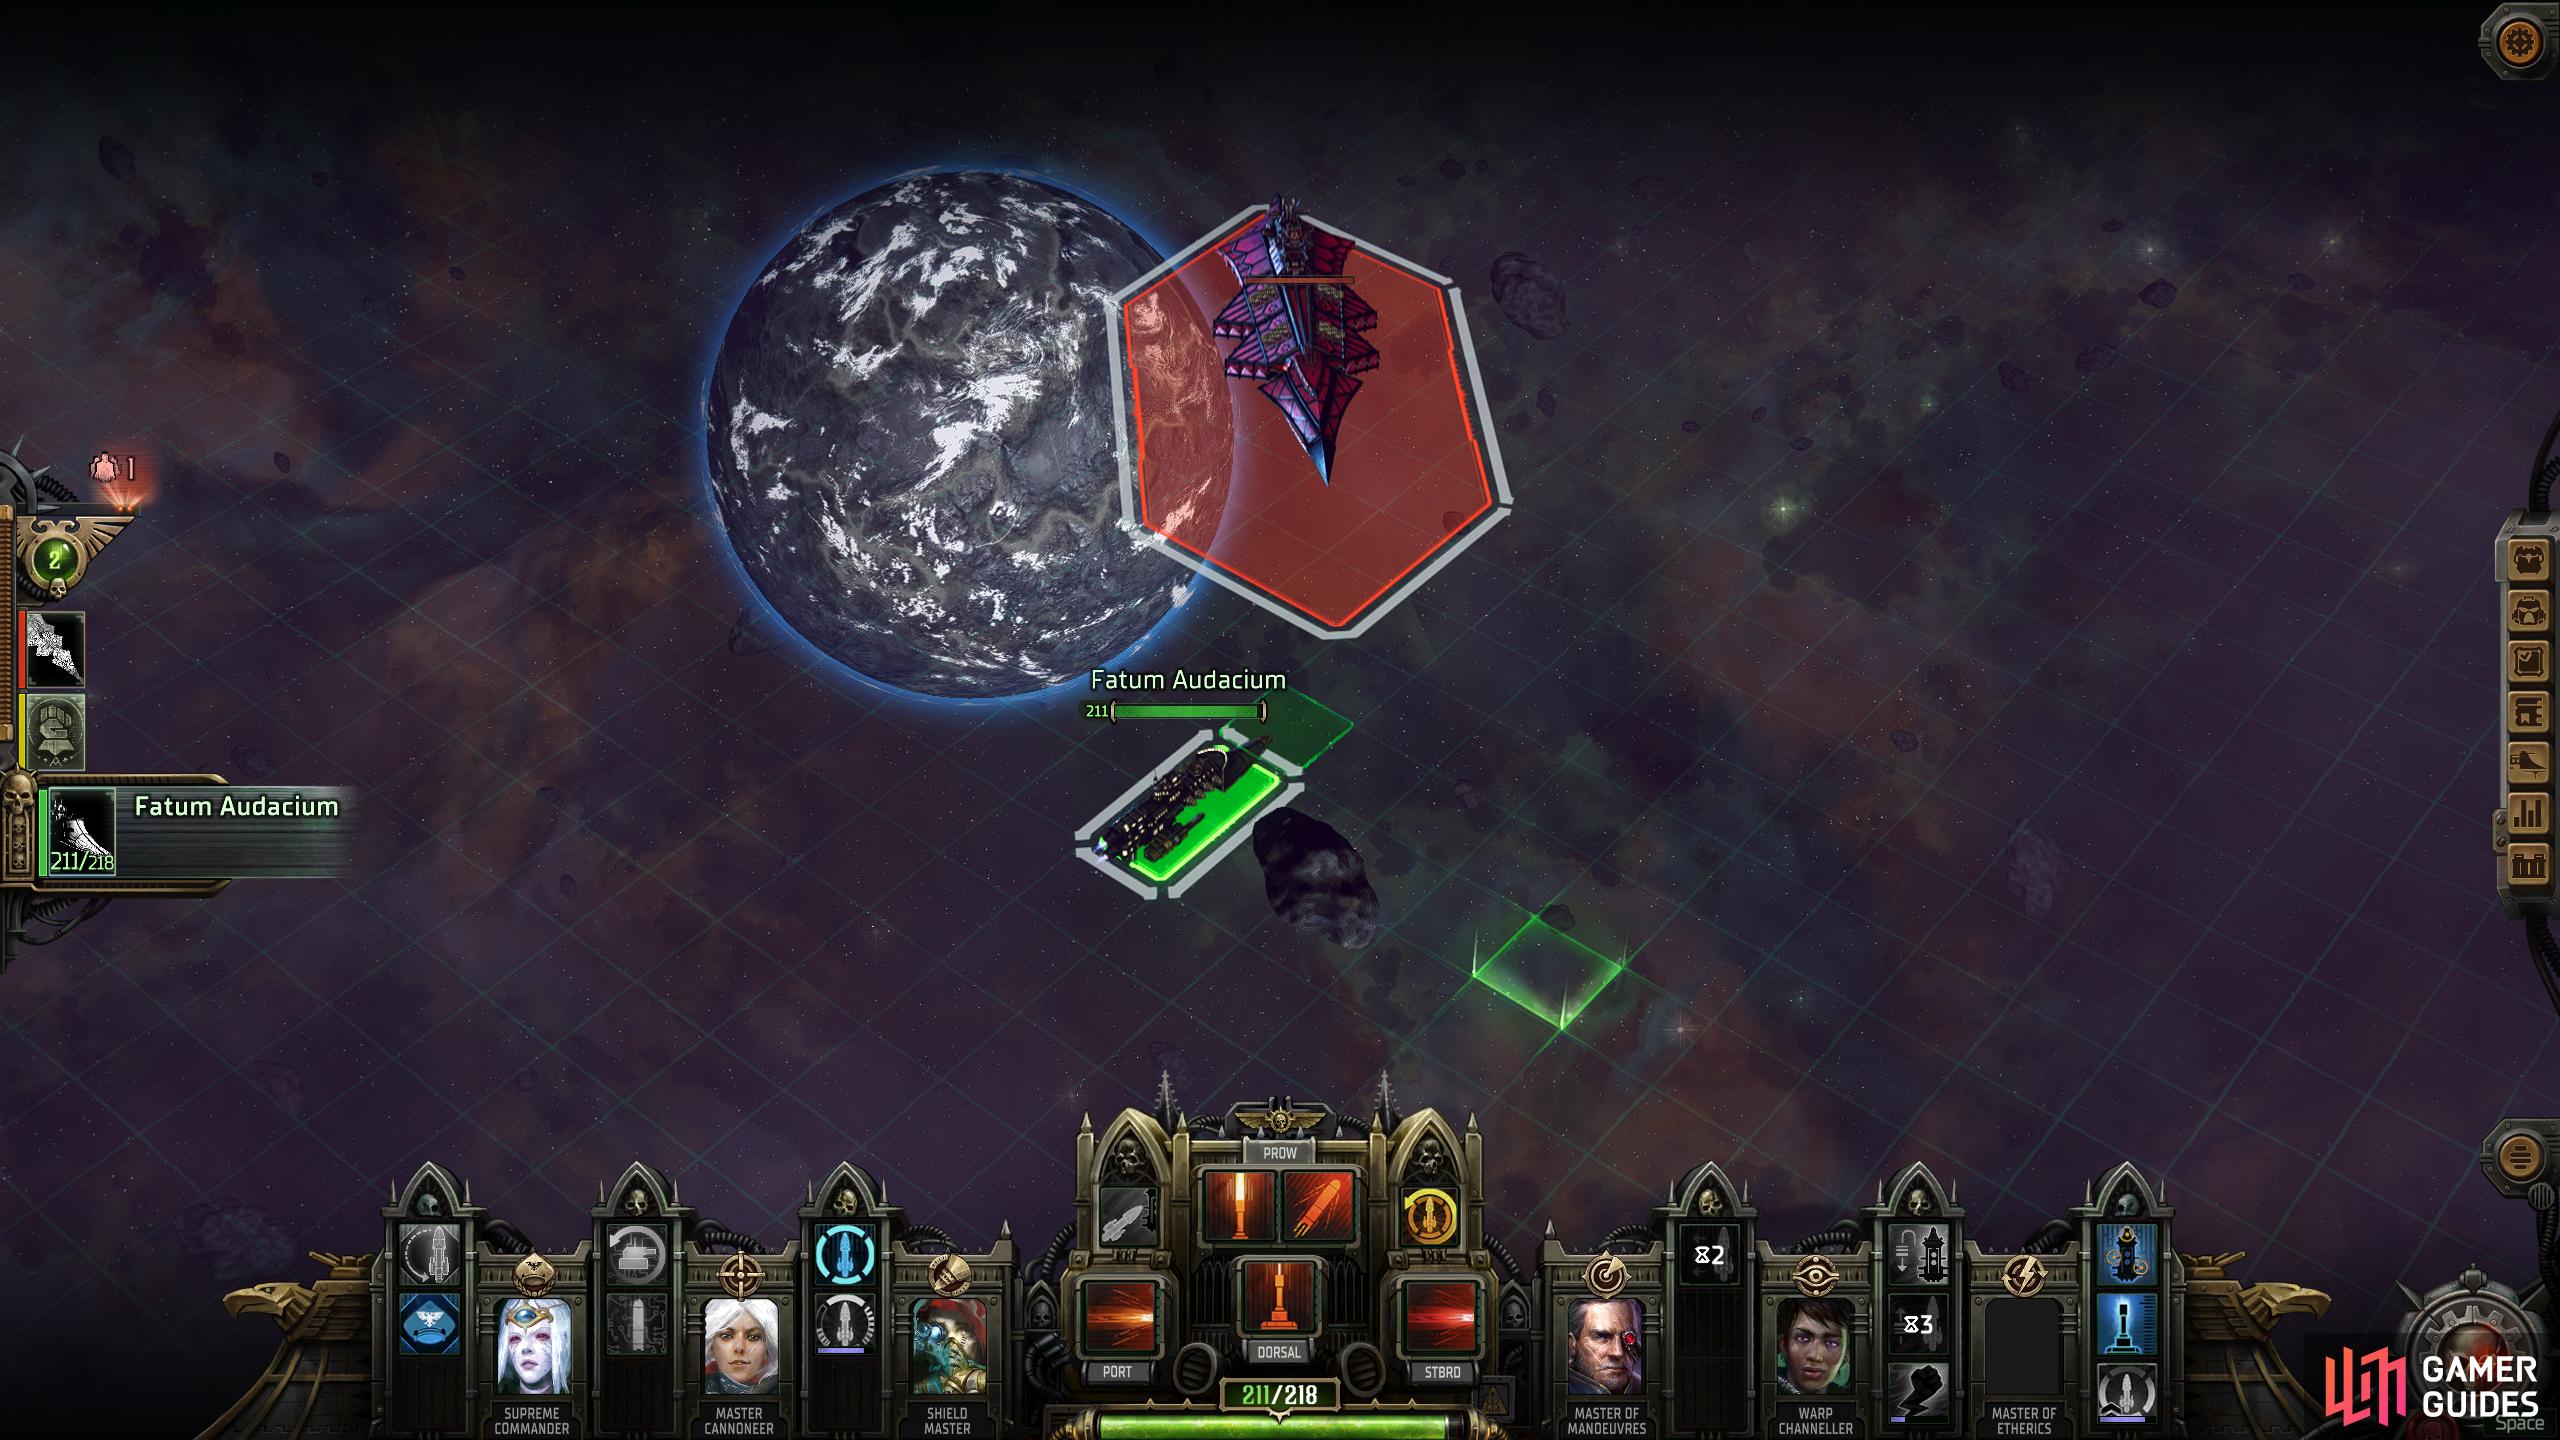
Orbital Battle
Before you can land on Eufrates II, you’ll need to take out their air support in a space battle. Now, the way that you handle this battle depends entirely on what upgrades, and weapons you have, but one thing that won’t change is your opposition. You’ll be going up against one ship, but it has a lot of health as well as shields. Also, it’ll get multiple attacks per turn, which it’ll use to summon Swiftdeath Fighters; small ships that deal respectable damage. Another thing the ship can do is use “Warp Rift”, which leaves purple clouds around the arena, and when you travel through them, you’ll take damage. This restricts your movement.
The best way to handle the battle is to stay close, and to the front of the ship, as this will limit what attacks it can hit you with. Then, when you get your next turn, use your port/starboard weapons on the Swiftdeath fighters while you use your prow, dorsal, and torpedoes on the main target. If you have to travel through the Warp Rifts, try to use a Shallow Jump to avoid taking damage from them. Unfortunately, if it isn’t available, you’ll have to take the damage.
Planetary Assault - How to Start Ulfar’s Companion Quest
Once the ship battle is over, interact with Eufrates II again, and this time you’ll be able to select “Foothold”. If you have Ulfar, and he didn’t desert you, he’ll want you to let him talk to Thorbald, and if you don’t, he’ll leave your retinue. Agree to his demands, and you’ll speak to Thorbald with him. Go through the dialogue, and when he asks to be by your side for the assault, agree to it to start his companion quest “The Baleful Howl”.
When you’re ready, select Foothold on Eufrates II, and immediately, you’ll get a book sequence. Pressing continue will unlock Argenta’s companion quest “Driven”. Make your way through the book scene by selecting the choices you can pass as these are all fairly high checks, and when you get to the [![]() Weapon Skill] check regarding Doomscream, select it for the Unhallowed Bellow Bolt weapon. Once the book scene is done with, you’ll be in the Machine Cathedral.
Weapon Skill] check regarding Doomscream, select it for the Unhallowed Bellow Bolt weapon. Once the book scene is done with, you’ll be in the Machine Cathedral.
(1 of 2) Tell Ulfar that he will have his meeting with Thorbald, which will start his companion quest.


Tell Ulfar that he will have his meeting with Thorbald, which will start his companion quest. (left), When you select Eufrates II again, you’ll get a book sequence as well as Argenta’s quest, Driven. (right)
Machine Cathedral Walkthrough
Machine Cathedral is a large area with numerous difficult challenges at every turn. It’s also the place where you can get the secret companion Uralon, if you progressed The Call of the Edge quest up until this point (requires Heretical). As you head to the Machine Cathedral, you’ll get a scene involving the Space Wolves and Uralon. Your goal here is to reach Uralon, which isn’t easy. If you’re playing a Heretical run, you can’t do anything regarding recruiting him until you reach him. During the scene, you’ll notice an old acquaintance, Kunrad, remember him? You’ll get to speak to Uralon and Kunrad during the scene, where you can try to pry some information out of them on what they’re doing here. There is a Dogmatic choice too, but we’re not sure what that does right now (we’ve done Heretical and Iconoclast).
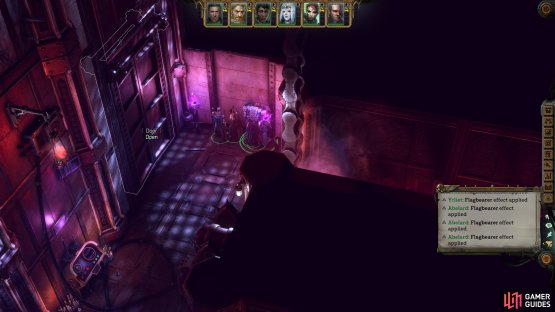
Regardless, the Space Wolves will stay behind and fire upon Uralon while you enter the following room with Thorbald. Go through the dialogue with him, and soon you’ll regain control. There are a few lockers you can loot in this room, and there’s a Cogitator behind a door to the left, but you won’t be able to get there now. Head further into the room, and you’ll get a scene with some Corrupted Skitarius who will ask for mercy. Now, you can fight them if you want, but alternatively, you can tell them to lay down their weapons, and they’ll do just that which will save you a fight while also giving you 1000 XP and their weapons.
Loot the cargo box near them, and then you’ll have a decision to make. There are a few ways you can go here, west will lead to a boss fight against the Incongruous Defiler, east will lead to a difficult battle with enemies from the Warp, although you can avoid these, and some side rooms. Head east first, but don’t go into the large room up the stairs (battle), instead go down the stairs at the end, and go around the corner (ignore the door to the south). When you go around the corner, you’ll find two doors, one requiring a [Tech-Use] check, and the other requiring you to pass an [Awareness] check to see it.
(1 of 2) Tell the heretics to lay down their weapons, and they’ll oblige. Saving you from a battle.


Tell the heretics to lay down their weapons, and they’ll oblige. Saving you from a battle. (left), Head east, and you’ll come to a door requiring you to pass a Tech-Use check. The wall next to it is a hidden door containing a unique weapon. (right)
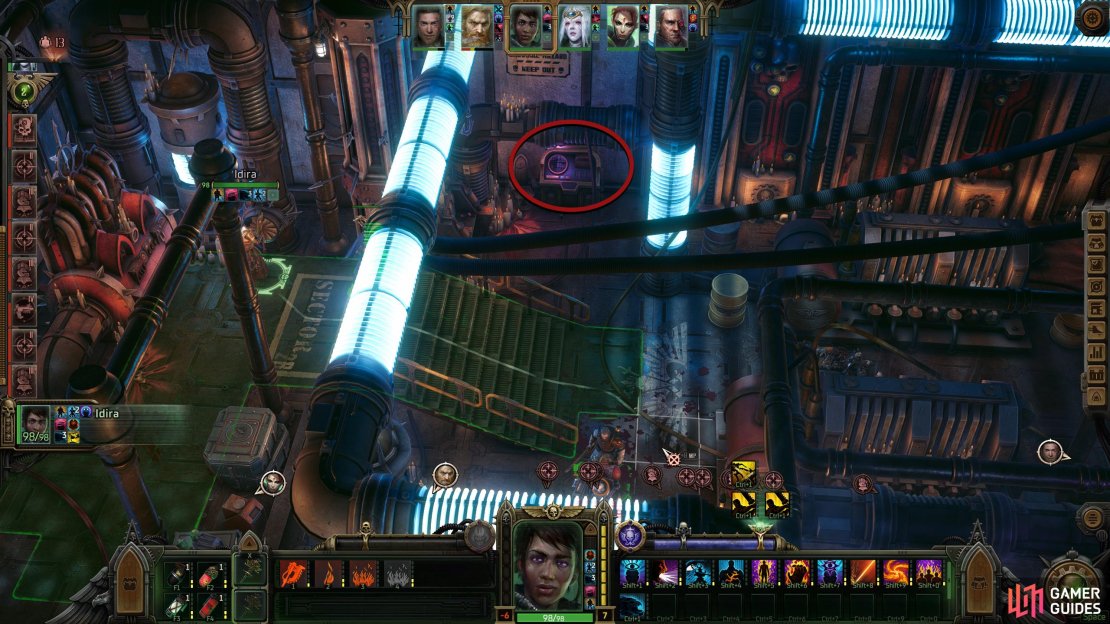
Inside the hidden door, you’ll find some loot. Most of it will be cargo, but you will find the Untainted Sacrament ![]() Chainsword in the container at the back, which will come in handy for the warp battle later. Now open the Tech-Use door, and you’ll find a few things here. Firstly, there are a couple of traps to disarm. Once they’re taken care of, interact with the Cogitator by the stairs, and it’ll open the door at the top of the stairs which leads back to where you started, but more importantly, it deactivates the first lock on the elevator. At the top of the stairs is a locked safe containing cargo, so pick that up if you want, and then go down the nearby elevator to the Main Generator Sanctum.
Chainsword in the container at the back, which will come in handy for the warp battle later. Now open the Tech-Use door, and you’ll find a few things here. Firstly, there are a couple of traps to disarm. Once they’re taken care of, interact with the Cogitator by the stairs, and it’ll open the door at the top of the stairs which leads back to where you started, but more importantly, it deactivates the first lock on the elevator. At the top of the stairs is a locked safe containing cargo, so pick that up if you want, and then go down the nearby elevator to the Main Generator Sanctum.
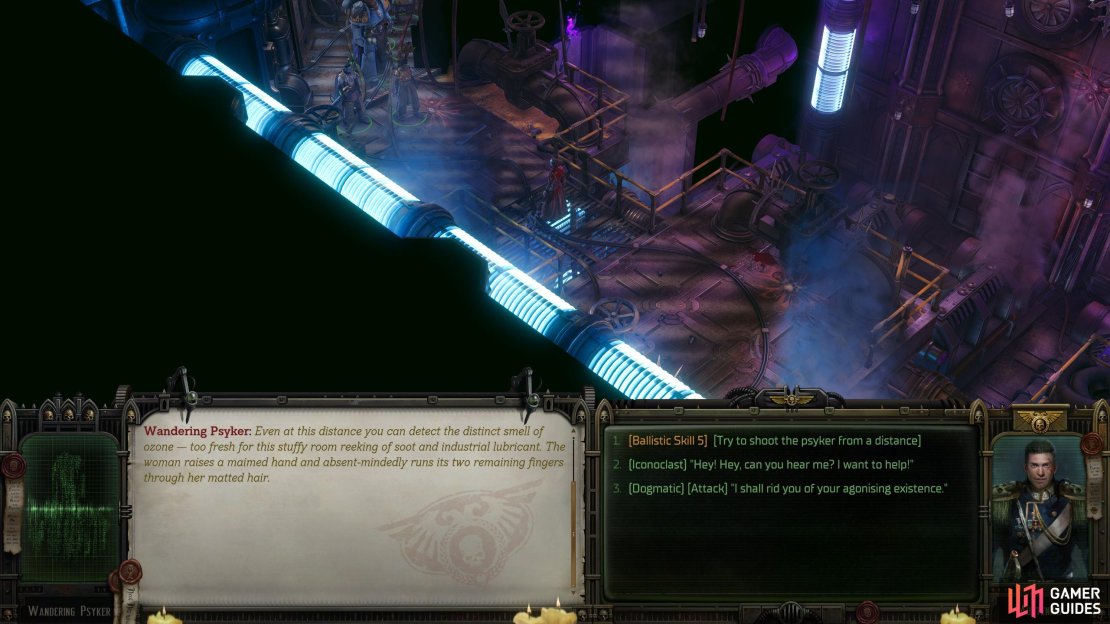
Make your way down the corridor while disarming the numerous traps along the path, and then interact with the Cogitator [Tech-Use] to create a bridge. Go across the bridge, loot the safe, and head through the narrow trap-filled corridor. When you head into the open, you’ll find a Wandering Psyker. You can either shoot it [![]() Ballistic Skill], help [Iconoclast], or attack, [Dogmatic]. Whatever you choose, the Psyker cannot be saved, but you will gain conviction points if you select one of those choices. Picking Iconoclast will cause her to explode, leaving behind a warp barrier that requires a [Lore Warp] check to dispel.
Ballistic Skill], help [Iconoclast], or attack, [Dogmatic]. Whatever you choose, the Psyker cannot be saved, but you will gain conviction points if you select one of those choices. Picking Iconoclast will cause her to explode, leaving behind a warp barrier that requires a [Lore Warp] check to dispel.
Regardless of your choice, jump across the gap via the [Athletics] check at the end of the platform, collect the nearby loot, and blow up the nearby wall that has a [Demolition] check. In the next room, you’ll trigger a battle with Mad Technomats, Skitarius, and Servitors. This is a regular battle with a twist. Around the room, you’ll find three possessed cogitators, which will zap you with Lightning Arc should you get close to them. When destroyed, they will spawn Pink Horrors, or a Voracious Pink Horror.
(1 of 3) Regardless of your choice, the Wandering Psyker will explode into a cloud of the warp.
There is one to the left of the doorway (if your camera is looking into the room), one in the center, and one at the back-right of the room. What you want to do here is move your party away from the possessed cogitators, defeat the enemies in the room, and then take out each possessed cogitator individually, dealing with the spawns, so Pink Horrors who’ll turn into Blue Horrors upon death. Repeat this for each cogitator to finish the battle. Once the battle is finished, pick up the loot including the cargo boxes, and enter the side room where you’ll find another cargo box and a dead end…or is it? Walk up to the wall, pass the [Awareness] check, and open the secret door. This will lead you behind the room where you’ll find traps, a corrupted cogitator you can interact with, and a warp barrier.
Disarm the traps, and then interact with the cogitator, which will give you a list of options. Check for the presence of data-crypts, and pass the following [Logic] check, or failing that, the [Tech-Use] check that will come from failing it. This will give you the Dented Data-Crypt, but before you leave the cogitator, break it first. Go through the corridor and remove the warp barrier. Disarm another trap and then take the lift at the end to the Main Tech-Sanctum. In the next room, don’t move a muscle, and make a save. This room will have you battle a difficult boss, so make sure you’ve leveled up if needed, consumables equipped, and equipment updated as you will need it.

(1 of 3) In the side room from the last battle, there is a hidden door. Follow the path it leads to, and enter the next area.
Incongruous Defiler Boss Guide
When you’re ready, interact with the nearby cogitator to unleash the Psykers. This will deal approximately a third of the health to every enemy in the room except the boss and destroy one plasma battery. The boss has a passive called Electro Overcharge, and this will give it +50% armor, +15% armor penetration, +10 deflection, and +5 to all characteristics for each stack which stacks to four, one for every plasma battery in the room. That’s a lot of buffs, so you’ll want to destroy them before fighting the boss. You’ll find the plasma batteries in each corner of the room, and you’ll want to send one or two members around the room to take them out. If you have an Assassin that has the ![]() Elusive Shadow ability, use them because that will make them unable to be targeted by the enemy, provided there is another member alive. However, if you don’t have one, you’ll need to hide behind cover every turn to avoid getting shot by the numerous enemies in the arena.
Elusive Shadow ability, use them because that will make them unable to be targeted by the enemy, provided there is another member alive. However, if you don’t have one, you’ll need to hide behind cover every turn to avoid getting shot by the numerous enemies in the arena.
While your saboteurs are destroying the batteries, the rest of the party needs to take out the other enemies. Unfortunately, you’ll need to keep moving from cover to cover while doing this due to the boss having an attack called “Havoc Barrage”. This will target two areas with giant red circular targets that will unleash two rockets at their location. This will deal major damage to anyone inside the circles, while simultaneously leaving behind fire on the floor.
Once you’ve taken out the enemies and batteries, have your tank get the attention of the boss, and position it so it exposes its back. The reason for this is that the boss takes 50% extra damage from attacks that hit its back due to the passive “The Bigger the Target”. When you deplete the boss’s health the first time, it’ll replenish to full, but it will take more damage. Note that the boss will also receive a 20% recovery of wounds after every turn it has. Finally, if that wasn’t enough, it will have an extra turn each time it’s attacked by a party member, so make sure it’s on your tank, and you’re only attacking it with your high damage-dealing party members. Here are some good tips for this battle:
- The boss has relatively low
 Willpower, especially when all batteries are destroyed, making it susceptible to stun grenades, and Psyker abilities.
 - Glimpse of Fate (Cassia/Navigator) is extremely useful in this battle to dodge attacks.
- Foreboding (Idira/Psyker) is an area of effect dodge on the party.
- A sniper-wielding Assassin can deal godly damage to the boss by using this combo:
 Aim for the Opening >
  Sworn Enemy > Damage buffs such as
  Reckless Strike (Warrior) or/and
  Intimidation > - Finish with
  Killing Edge. Depending on what passives you choose, you can expect to deal between 1-2k damage per shot.
 - The Bulwark ability should be on your tank at all times. This is a priority.
- If you have an Assassin, Elusive Shadow is a must (unless they’re the only one alive).
- Make sure that Cassia/Navigator/Grand Strategist buffs up the tank as much as they can. Reveal Light is particularly strong.
- A
 Fireproof Cape is handy here, as is the
  Saturated Cape (for tank).
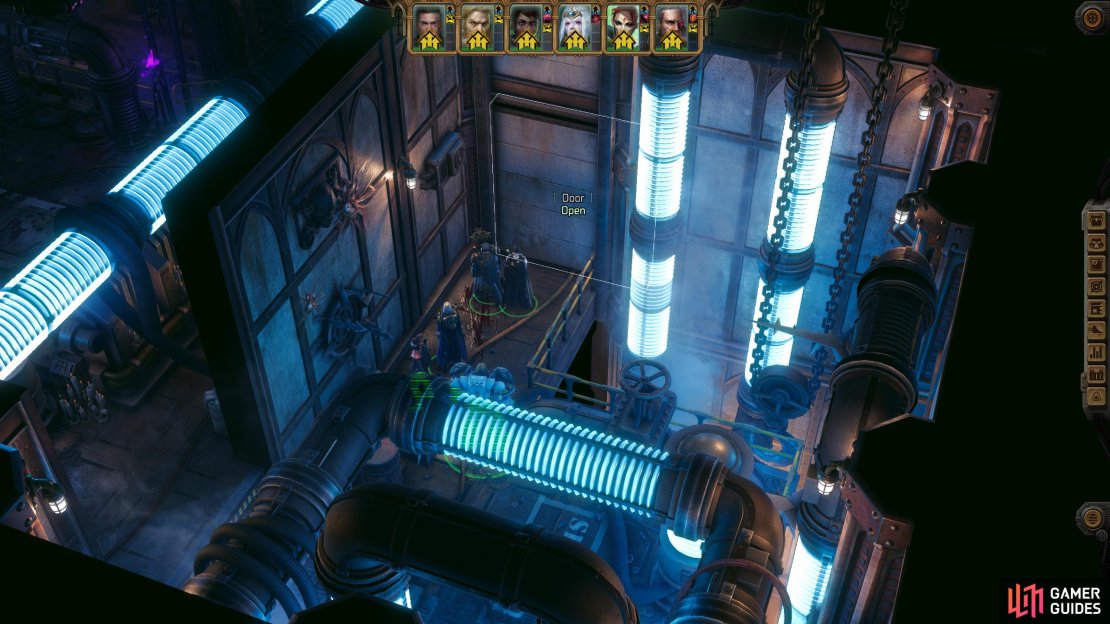
Once the grueling battle is over, loot the place, especially the box on the south side of the room, for a pair of ![]() Enforcer Corrupted Boots. When you’re done looting, head back to the corridor you started the battle in, but follow it north, while disarming the [Lore [Warp] traps. Go down the stairs, loot the locked box for some cargo, and head down the corridor, disarming more traps. At the end is another control cogitator, and interacting with it will unlock the second elevator lock as well as the nearby door. Head back to the stairs, take the passage next to it, and head further north until you reach a door leading to the prayer halls, and go through it to the next area.
Enforcer Corrupted Boots. When you’re done looting, head back to the corridor you started the battle in, but follow it north, while disarming the [Lore [Warp] traps. Go down the stairs, loot the locked box for some cargo, and head down the corridor, disarming more traps. At the end is another control cogitator, and interacting with it will unlock the second elevator lock as well as the nearby door. Head back to the stairs, take the passage next to it, and head further north until you reach a door leading to the prayer halls, and go through it to the next area.

(1 of 3) Destroy the plasma batteries to weaken the boss’s buff.
Prayer Halls
Proceed west down the stairs, dispel the warp barrier, make a save, and use a Machine Rite Set on the cogitator (or pass the check). This will deal damage to the enemies for the next battle, which consists of three Chaos Marines (four if you count the Word Bearer Assailant), three Corrupted Ruststalkers, and some random cultists. This battle looks harder than it is, provided you have a decent party. The Ruststalkers are half-dead due to the cogitator, and the Chaos Marines are the same as when you first fought them, meaning that they’re not as much of a threat anymore. Take out the Word Bearer Assailant first with a well-placed sniper shot or two and let the Ruststalkers run up to you. When the Chaos Marines start approaching you, send your tank down to meet them while being buffed with Bulwark. Now, focus on defeating each marine one at a time, and you shouldn’t have too many problems.
Once the battle is over, loot the corpses, open the box near the southern door for the Ragefire Plasma Gun, and then head into the adjacent room to the north. When you walk in, several warp barriers will appear on the ground. If you want to get through the room taking no damage, move each character through the room single file. However, it doesn’t do a lot of damage, so you can just walk through it, although you may get a fresh injury. While you’re going through the room, make sure you open the cargo boxes there, with one requiring an [Awareness] check. Follow the winding path north, and eventually, you’ll reach a room with another boss battle, Doomscream to be specific. Make a save, heal up, and head into the room for a scene.


(1 of 2) Make sure you interact with the Pressure Control Panel as it will damage all the enemies in the room.
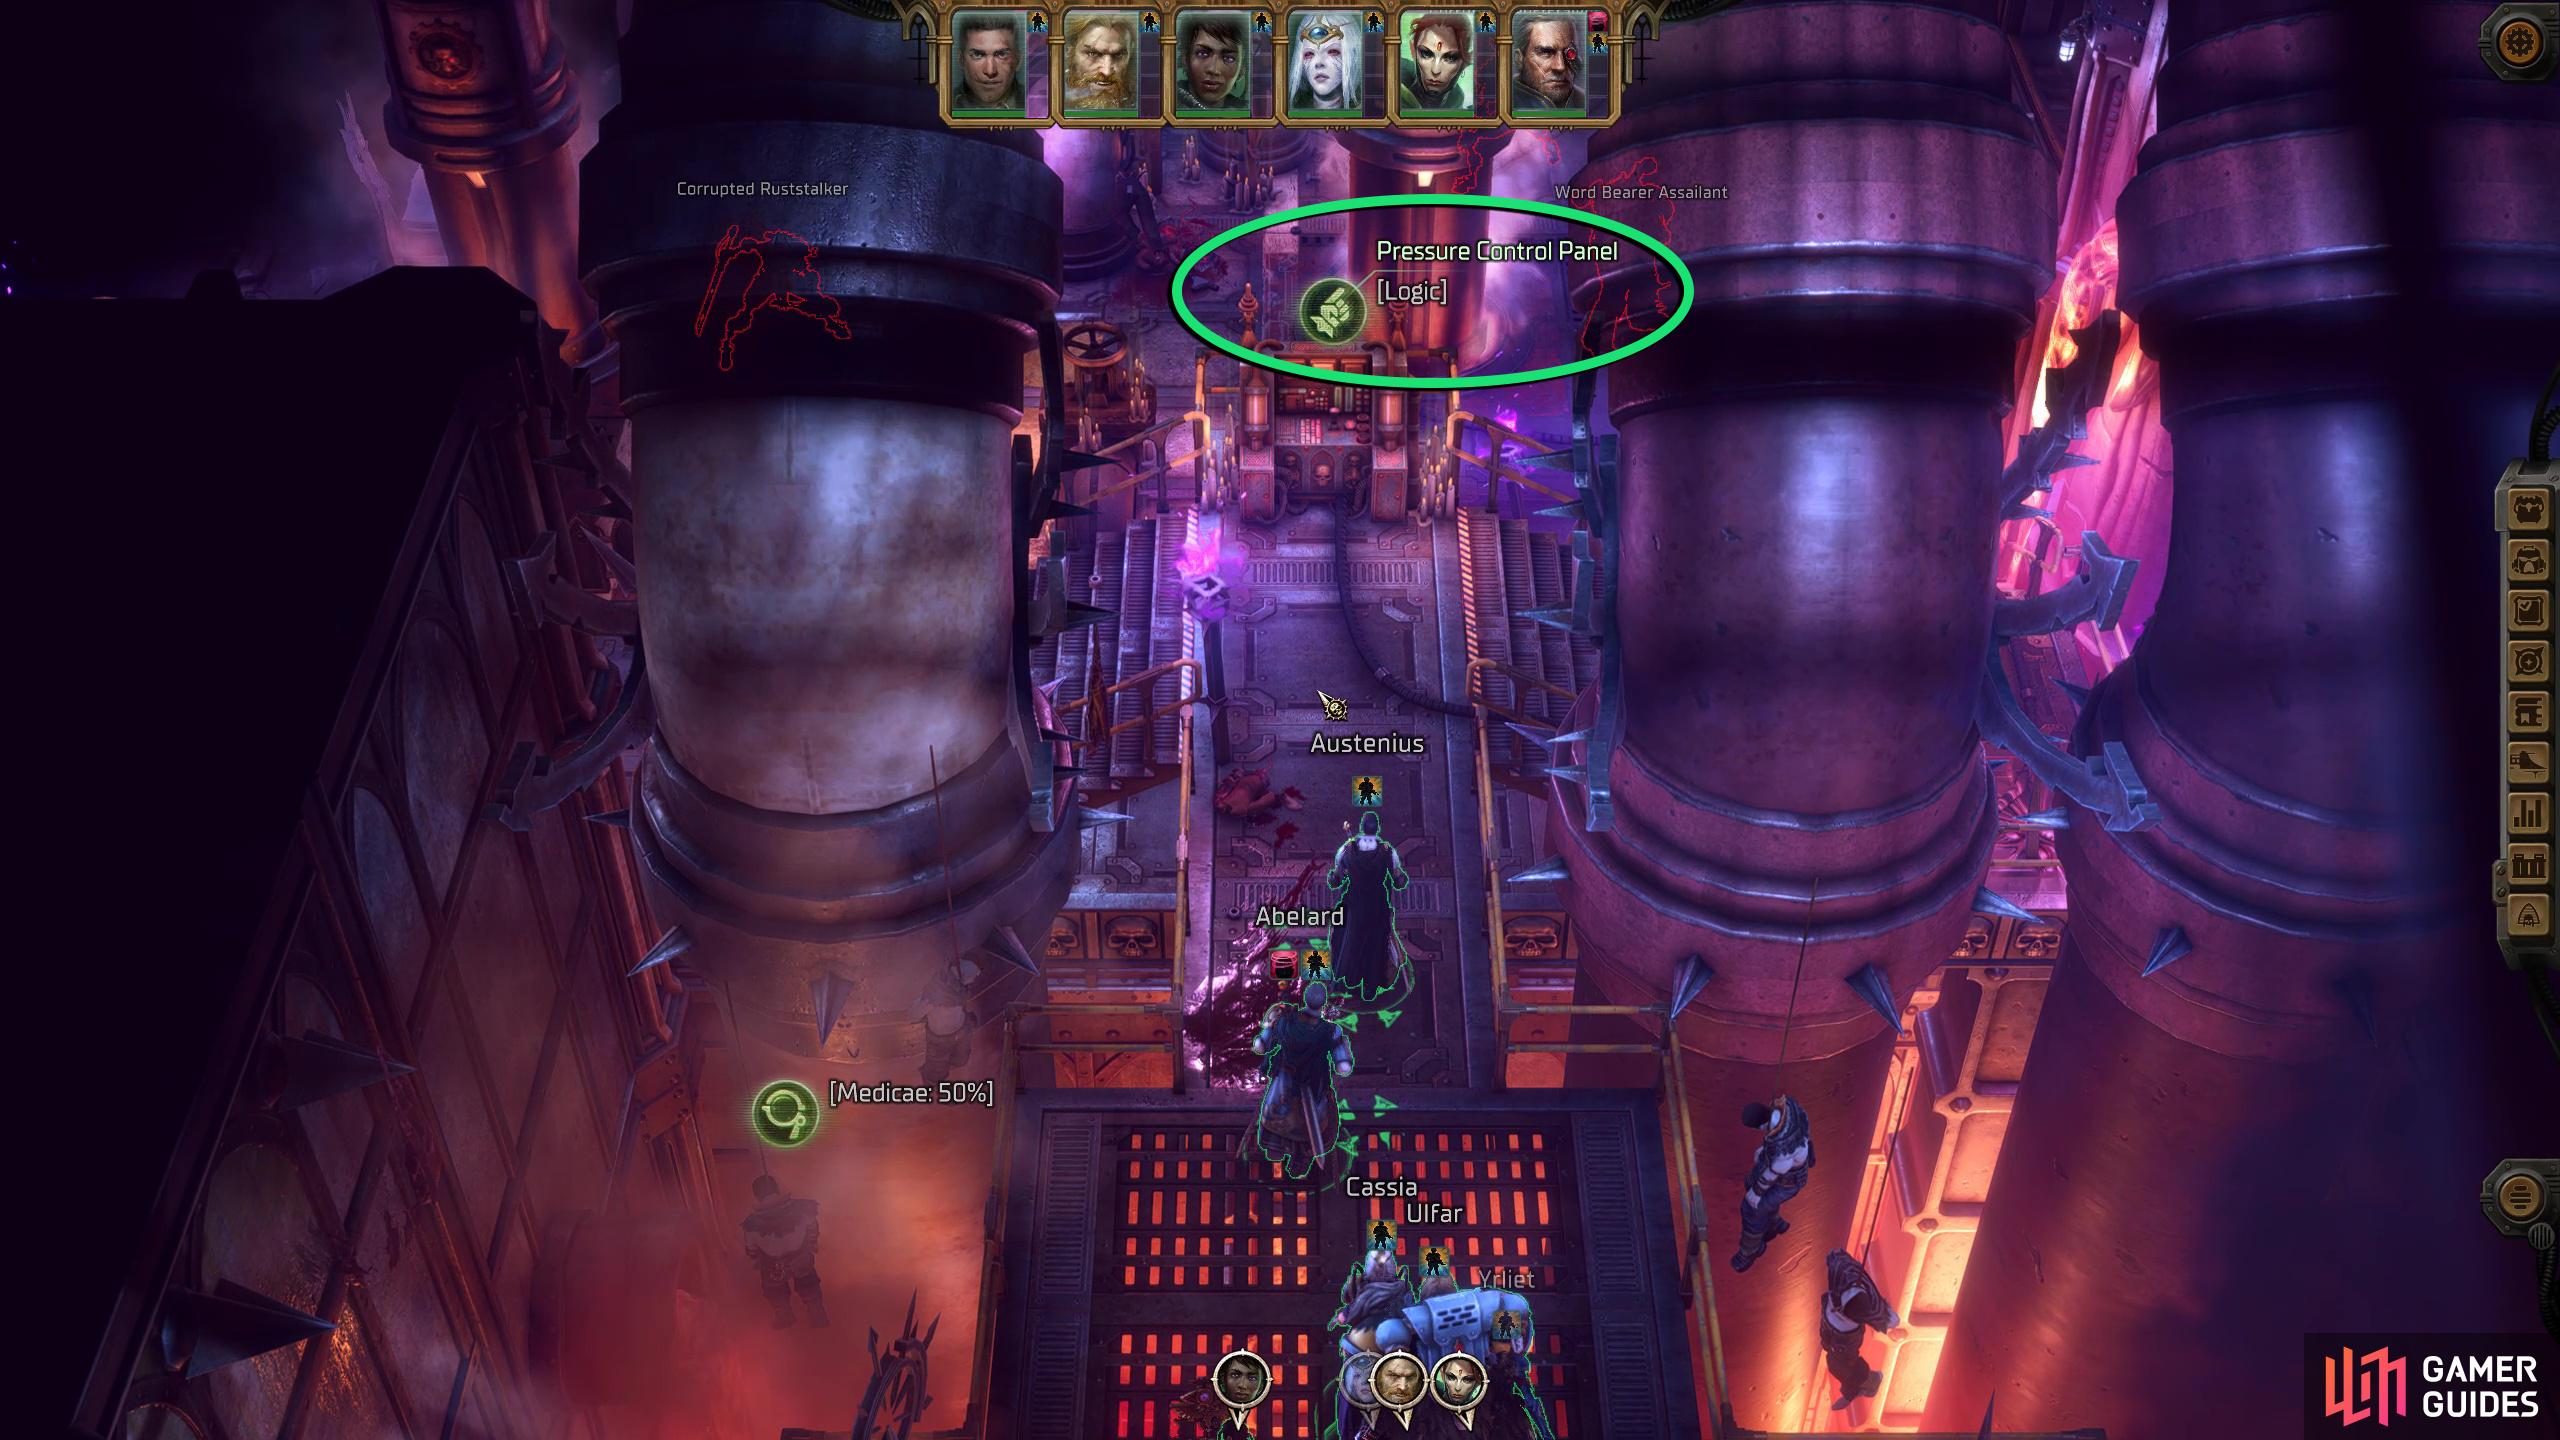

Make sure you interact with the Pressure Control Panel as it will damage all the enemies in the room. (left), Keep the party up top, but have your tank meet the Word Bearer. (right)
Doomscream Boss Guide - The Baleful Howl
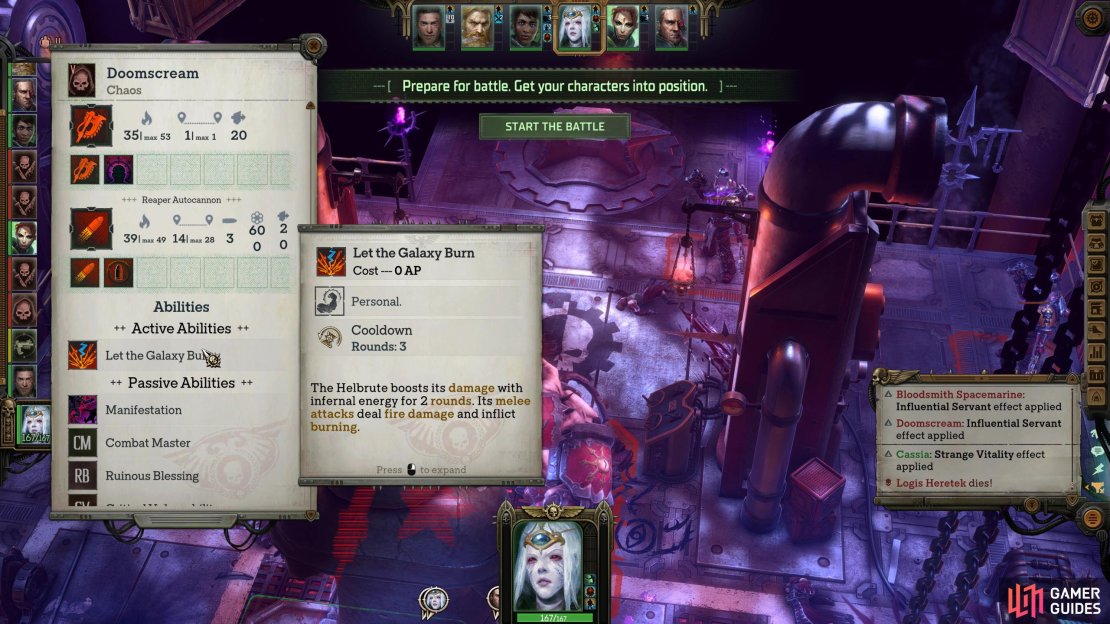
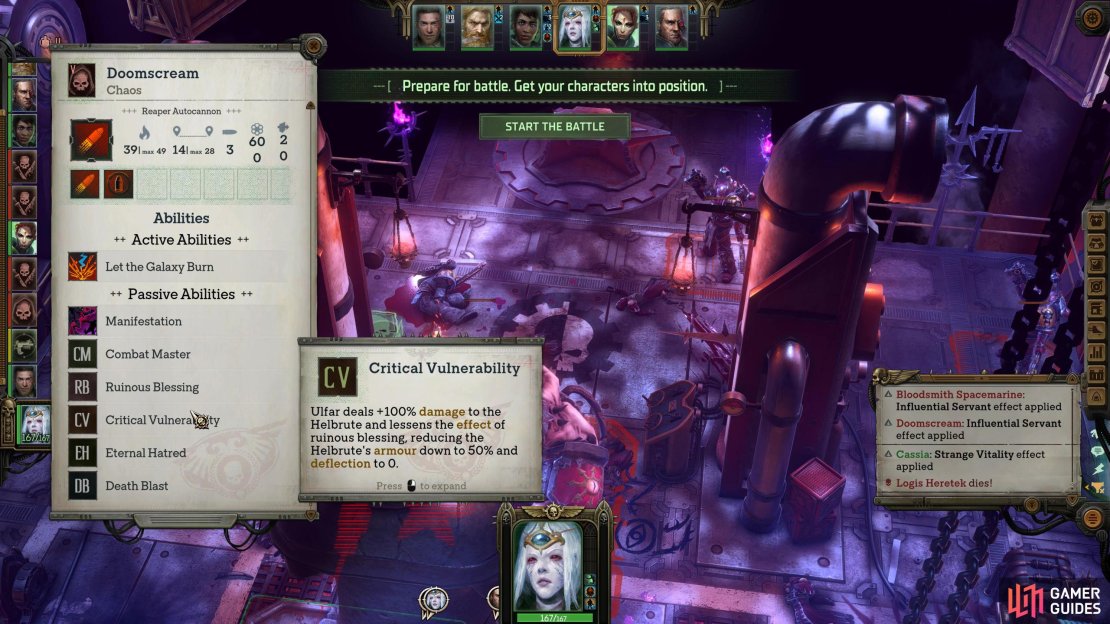
You’ll get some dialogue choices during this scene, but they don’t have any impact, so pick what you like. On to the battle, you’ll be up against the Helbrute, Doomsceam, and three Bloodsmith Space Marines. This battle is all about Ulfar as Doomscream has a passive called “Critical Vulnerability” which allows Ulfar to deal 100% more damage to Doomscream while also reducing the effect of “Ruinous Blessing” as well as its armor to 50%, and defection to 0. Like most Helbrutes, they have a passive which allows them to regain wounds at death, or in Doomscream’s case, at 5% health. This will restore 50% of wounds while also increasing their damage. In terms of offense, the main things to watch out for are Doomscream’s “Let the Galaxy Burn” attack, which will boost its damage for two rounds allowing it to deal fire damage with its melee attacks and inflict burning (Saturated Cape is a must for the tank). The other is “Ruinous Blessing” which grants Doomscream 100% armor and 40 deflection. Also, if your melee attacks fail a Willpower test when attacking it, they’ll get the burning status for two rounds.
There’s not much to say about the Bloodsmith Space Marines outside of trying not to target them with perils of warp, as it’ll grant them another turn. They’re space marines, so expect respectable damage, and defense. Most of this battle will be you buffing up Ulfar, so he doesn’t die, and your tank, so they can take some damage away from the party, and more importantly, Ulfar. The other party members need to take out the Space Marines. You don’t need to do anything special against them, just make sure your weaker characters are far away from them, as they have a lot of movement. Simply chip away at them, and take them down with your Assassins and Bounty Hunters. You may notice an NPC during the battle called Halbrandt. This Space Wolf will buff Ulfar throughout the battle with Howl of Russ, which will increase his damage by 100%. Aside from that, he’ll deal significant damage to your foes when he feels like it. Once the boss is defeated, Ulfar and Halbrandt will have a poem battle, and regardless of your dialogue choices, Ulfar will be happy with the outcome. Before you leave, make sure you loot the corpses for the Helbrute Horn Trophy accessory.
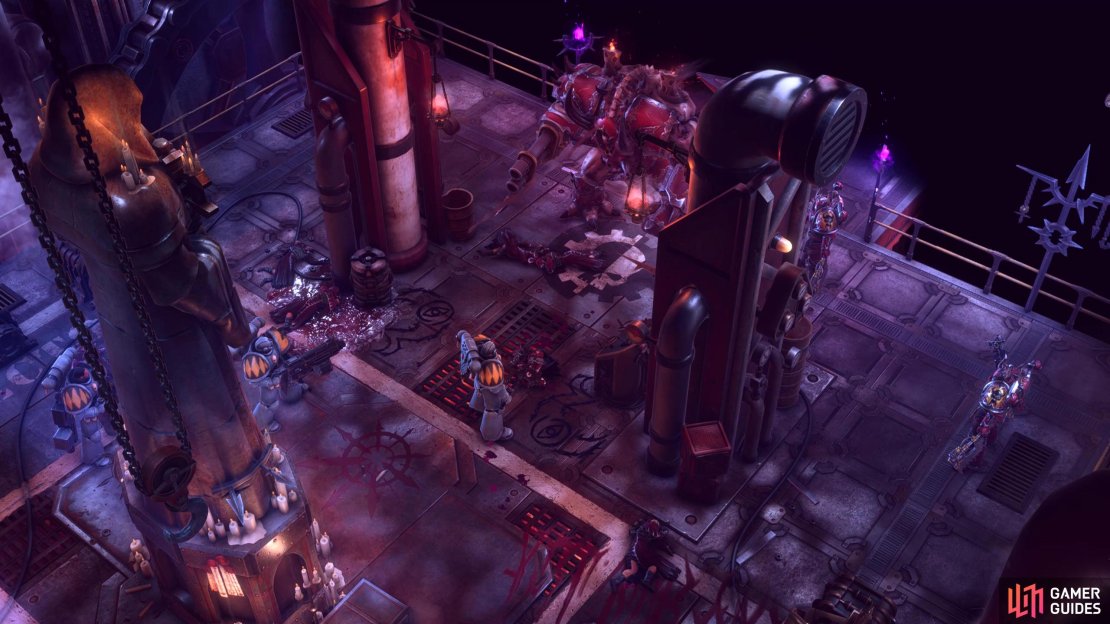
(1 of 4) Doomscream is the boss in Ulfar’s The Baleful Howl quest.
The Siege Continued
Return to the entrance of the room and exit it via the stairs going down (not up). Follow the path to the end, and head north at the intersection to find a locked box containing the Omnispex accessory. Head south through the trap-filled corridor, make a save, and go around the corner to enter the Tenebrum.
Tenebrum
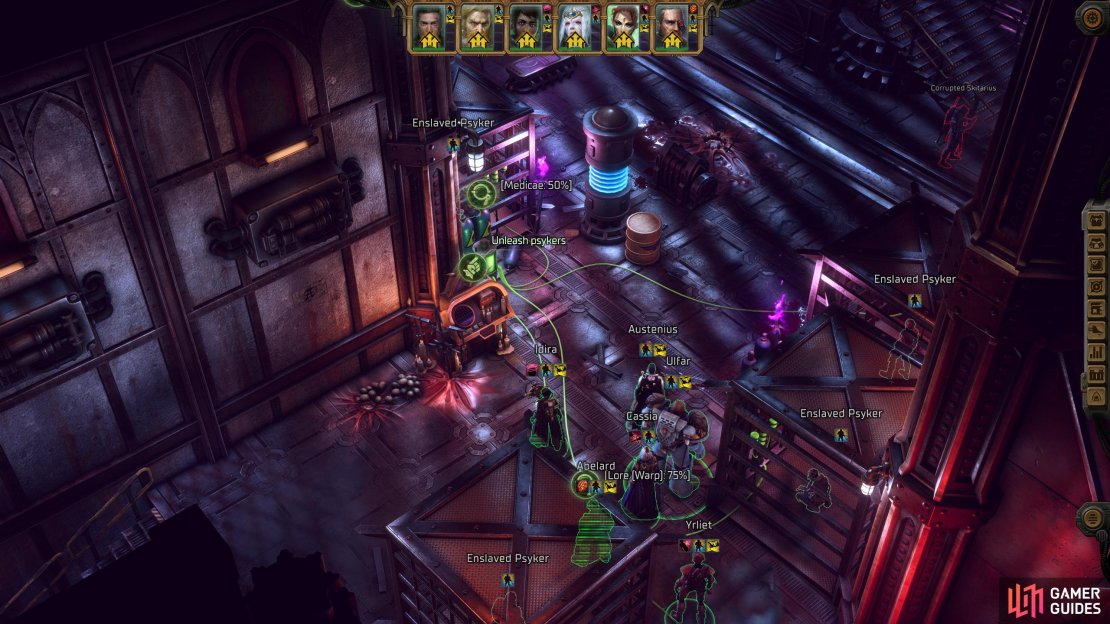
As soon as you enter the area, you’ll be greeted by a scene. When you regain control, head toward the center to talk to Uralon. If you are of the Heretical conviction, you can begin your recruitment of Uralon as a secret companion. Check out our in-depth Recruit Uralon guide. If not, you’ll have to fight him, Kunrad, three Word Bearers (Space Marines), and a bunch of Corrupted Tech-Priests. Note, if you are recruiting Uralon, you’ll do battle with the Space Wolves instead.
Uralon Boss Guide
Uralon has the Officer and Arch-Militant archetypes and will spend most of the battle buffing up the Word Bearers, or summoning daemons. At times, he will charge in to attack you, and when he does, he can attack multiple times per turn, so make sure they’re on the tank. Kunrad, is almost useless in this battle, but he will debuff you with Operator skills, and then attack you with Lightning Arc. Finally, the Corrupted Tech-Priests should go down in one to two hits and shouldn’t cause you too many problems. The most difficult part of this battle by far is the Chaos Marines. If you take them out, you win the fight. You will want to focus one down at a time, as they can cause all types of mayhem to your party, especially if they use Fanatical Zealot, as this can give them three or four attacks per turn.
In the Prep Phase, use the nearby cover where you entered from, with the tank being the furthest ahead. You will want to keep pushing your tank forward, toward Uralon while buffing them with Bulwark, ![]() Wall of Rockcrete, and
Wall of Rockcrete, and ![]() Endure. Furthermore, buff them with Reveal Light (Cassia), and Glimpse of Fate. If you have Idira, or someone with Foreboding, place that around the back line. The first thing you need to do is take out the Word Bearer immediately due to it being right next to the party, and it can hit multiple members at once. If you can, use your crowd-control spells, or grenades to keep them stationary, however, you may struggle to pass the Willpower checks.
Endure. Furthermore, buff them with Reveal Light (Cassia), and Glimpse of Fate. If you have Idira, or someone with Foreboding, place that around the back line. The first thing you need to do is take out the Word Bearer immediately due to it being right next to the party, and it can hit multiple members at once. If you can, use your crowd-control spells, or grenades to keep them stationary, however, you may struggle to pass the Willpower checks.
In general, take out the Word Bearers first, then Kunrad, and finally Uralon. The summons from Uralon, and the Corrupted Tech-Priests should die as the battle plays out such as counterattacks, etc. The hardest part of the fight is the beginning, and if you struggle, try reloading your save as you might get your turns earlier. Once Uralon is defeated, you’ll get a scene with Uralon making Kunrad a sacrifice to the Chaos god, and another battle will begin.
(1 of 4) Uralon is one of the last bosses of Chapter 4 unless you join up with him, and then it’ll be the Space Wolves.
Edge of Daybreak Boss Guide
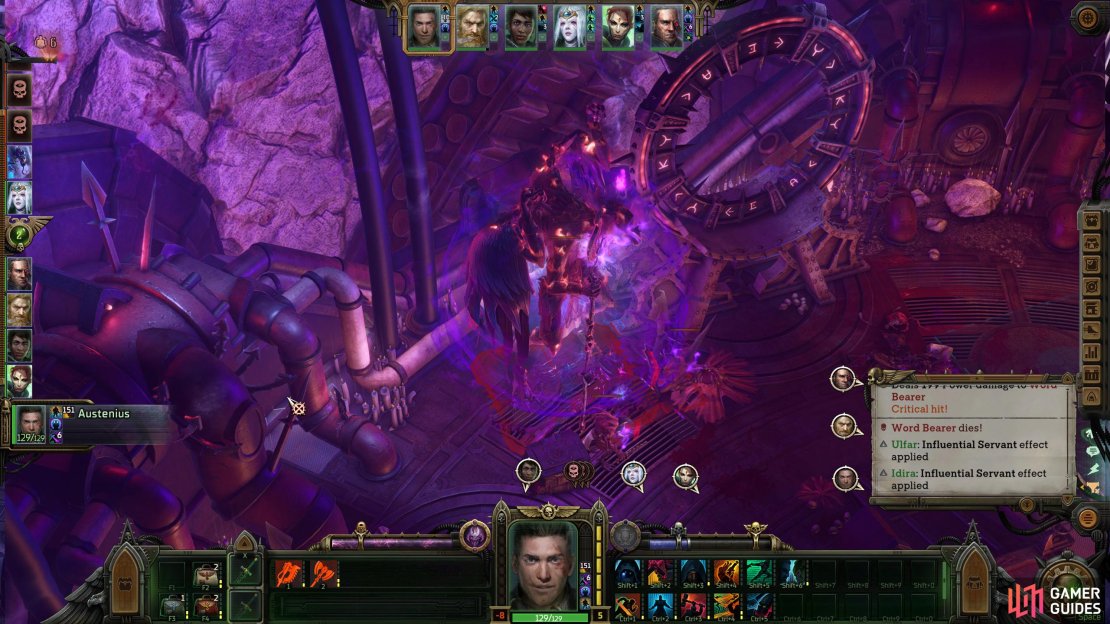
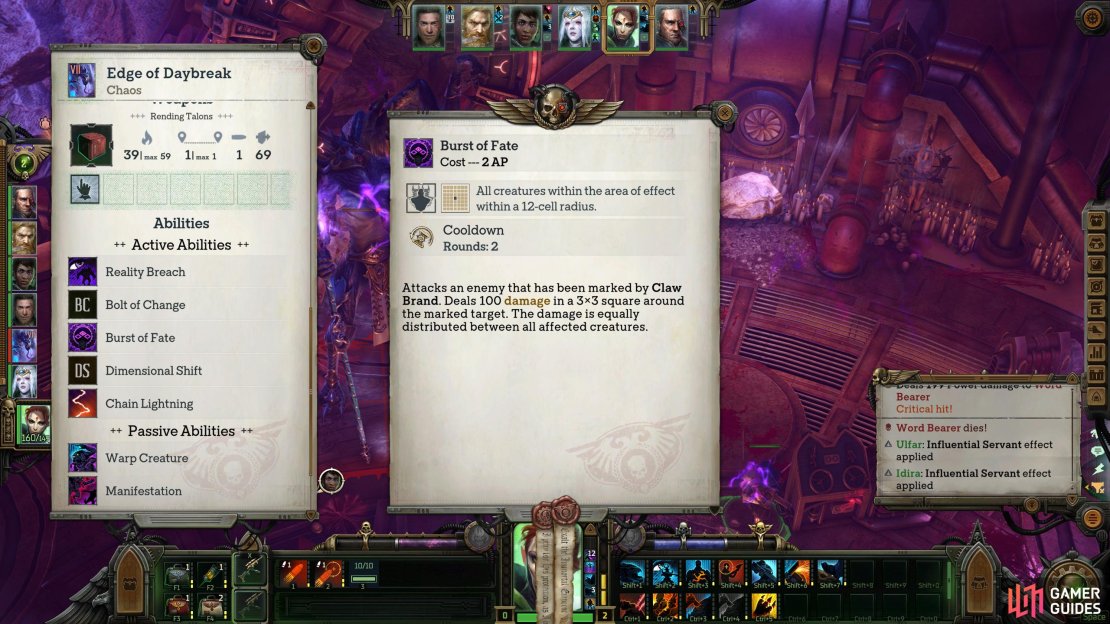
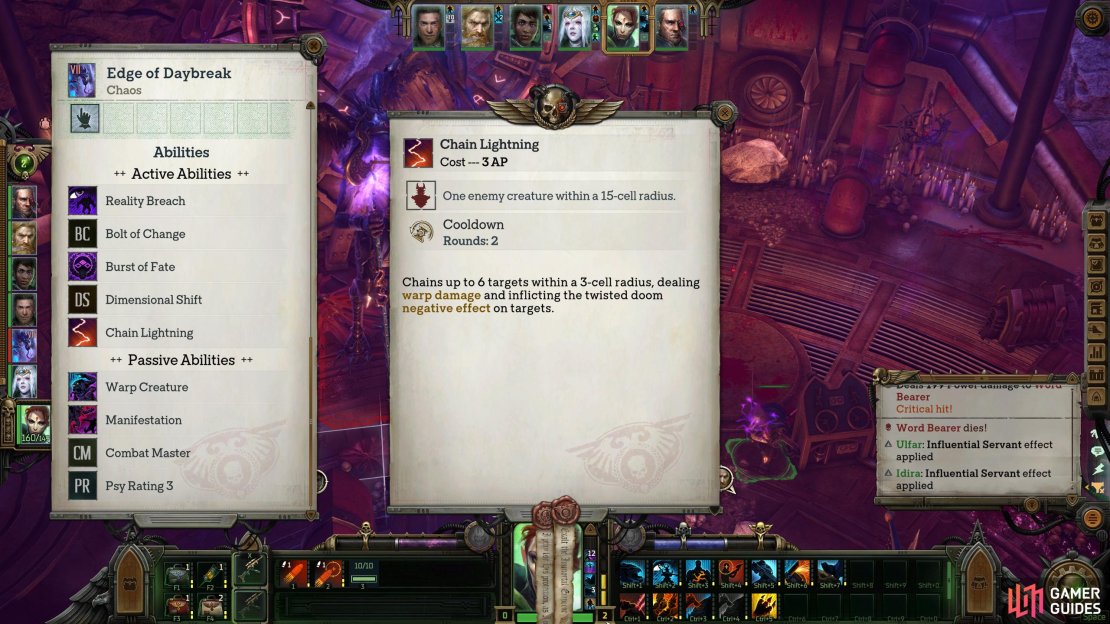
If you chose the Heretical route, you won’t have to fight this monstrosity. If you didn’t, read on. This is a true boss fight. Daybreak has 6.2k health on normal, and 10.1k on Unfair. It predominantly deals warp damage, so the ![]() Mend Reality ability will come in clutch here. In terms of its attacks, it will try to apply the mark of fate on a party member with its melee attack, and then use Burst of Fate on them which will deal 100 damage (normal) in a 3×3 square around the marked target. This damage gets shared with each party member inside the square. Then it has Chain Lightning, which can target up to six party members within a three-cell radius, which will deal warp damage and apply the Twisted Doom effect on them. Finally, it can summon four Pink Horrors, and a Herald of Tzeentch every few rounds. If that wasn’t enough, it can teleport too.
Mend Reality ability will come in clutch here. In terms of its attacks, it will try to apply the mark of fate on a party member with its melee attack, and then use Burst of Fate on them which will deal 100 damage (normal) in a 3×3 square around the marked target. This damage gets shared with each party member inside the square. Then it has Chain Lightning, which can target up to six party members within a three-cell radius, which will deal warp damage and apply the Twisted Doom effect on them. Finally, it can summon four Pink Horrors, and a Herald of Tzeentch every few rounds. If that wasn’t enough, it can teleport too.
The flow of the battle is to defeat summons (always four Pink Horrors, and a Herald) due to one of them giving Daybreak “Deceptive Shield” which pretty much makes it invincible. When the shield is down, use your Heroic Acts, and your hardest-hitting attacks. When one of your party members gets marked, make sure you group at least two party members near the marked one to share the damage while also applying defensive abilities to each of them. That’s pretty much the battle. Note, that every time you kill a Pink Horror or a Herald, they will spawn two Blue Horrors upon death. These are easy to kill (one to two hits), but it’s worth knowing. The Warrior’s ![]() Break Through ability is strong against these, and if they’re equipped with
Break Through ability is strong against these, and if they’re equipped with ![]() Lady Xue’s Ritual Blade, they can one-shot them.
Lady Xue’s Ritual Blade, they can one-shot them.
Once the Edge of Daybreak has been put down, loot the area, and then interact with the machine in the middle to report that Uralon is dead. On your way up the elevator, you’ll get a scene with some dialogue options and checks. This is mainly for lore and information, so don’t worry too much if you fail the checks. When the scene ends, the quest will be completed, and you’ll immediately unlock the Questions and Answers quest.

(1 of 5) Edge of Daybreak can be a difficult boss if you don’t know how to deal with its attacks.
Questions and Answers
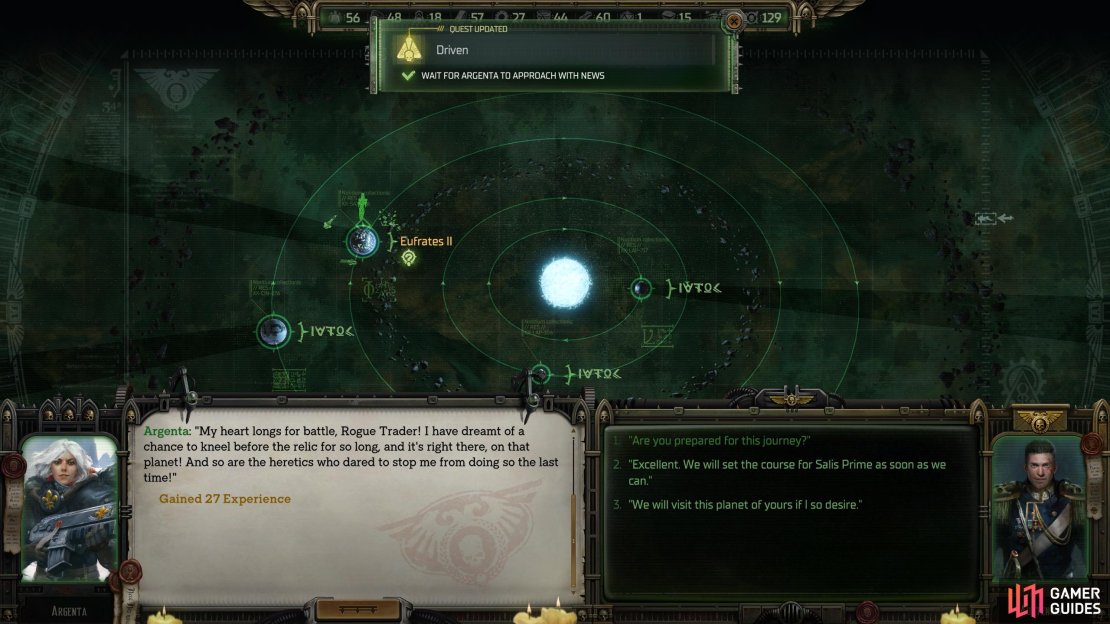
Exit to the map via the nearby door, and you’ll be back on your ship. If you did Ulfar’s quest, you’ll get a scene with him and Thorbald which will end up in you receiving the ![]() Singer of Fearsome Sagas axe as a reward. Once the scene has finished, exit to the map, and if Argenta hasn’t abandoned you, her “Driven” quest will update, and you can now go to Salis Prime. The main quest suggests you demand answers from the Lord Inquisitor, so make your way back to Footfall. As you try to leave, Pasqual’s quest “Let the Cycle Be Discontinued” will get added to your journal. Go there now if you want, but when you’re ready, continue your journey to Footfall, and then go to the Liege’s Residence. Make your way to the back room, and you’ll find that Calcazar is nowhere to be seen. However, Froscher will be, so ask where the Lord Inquisitor has gone, and it’s clear he has no intention of telling you. When you demand him to tell you, he tries to attack you but fails miserably.
Singer of Fearsome Sagas axe as a reward. Once the scene has finished, exit to the map, and if Argenta hasn’t abandoned you, her “Driven” quest will update, and you can now go to Salis Prime. The main quest suggests you demand answers from the Lord Inquisitor, so make your way back to Footfall. As you try to leave, Pasqual’s quest “Let the Cycle Be Discontinued” will get added to your journal. Go there now if you want, but when you’re ready, continue your journey to Footfall, and then go to the Liege’s Residence. Make your way to the back room, and you’ll find that Calcazar is nowhere to be seen. However, Froscher will be, so ask where the Lord Inquisitor has gone, and it’s clear he has no intention of telling you. When you demand him to tell you, he tries to attack you but fails miserably.
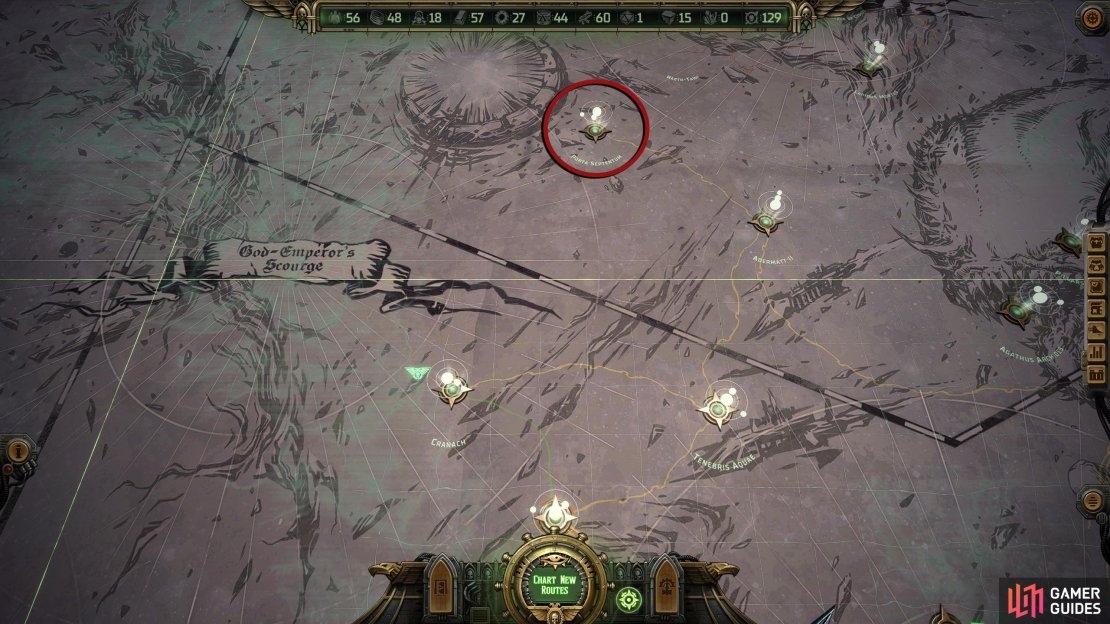
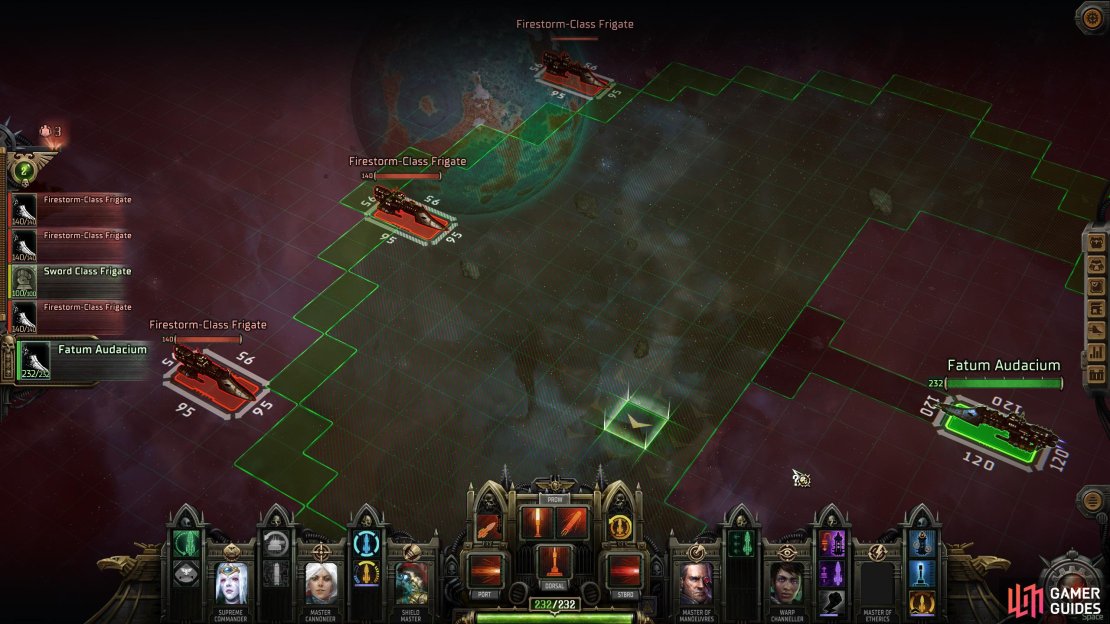
You’ll get a few dialogue checks here but passing them will only give you a small amount of XP, so don’t worry about passing them as you’ll just beat the answers out of him anyway. Exit Footfall and you’ll get a short scene with the factions. Go through the dialogue, and then make your way to Porta Septentum which is situated in the northwest of the Expanse, above Cranach. When you enter the system, you’ll get a message telling you that this is the point of no return. Once you go through the warp gate, you won’t be able to do anything else but the story. This includes quests, colony projects, and merchants, so make sure you’ve done everything you need to. When you’re ready, head to the Inquisition Flotilla, and you’ll get into a ship battle against three ![]() Firestorm-Class Frigates. Although it depends on your difficulty, this isn’t the most difficult battle you’ve faced, and you shouldn’t have too many problems provided you have upgraded your ship. Once you’ve defeated the Frigates, you’ll get boarded by Aishara which will end up in battle regardless of what you say.
Firestorm-Class Frigates. Although it depends on your difficulty, this isn’t the most difficult battle you’ve faced, and you shouldn’t have too many problems provided you have upgraded your ship. Once you’ve defeated the Frigates, you’ll get boarded by Aishara which will end up in battle regardless of what you say.

(1 of 4) When you get back on the ship, Thorbald and Ulfar will have a conversation resulting in finishing Ulfar’s quest.
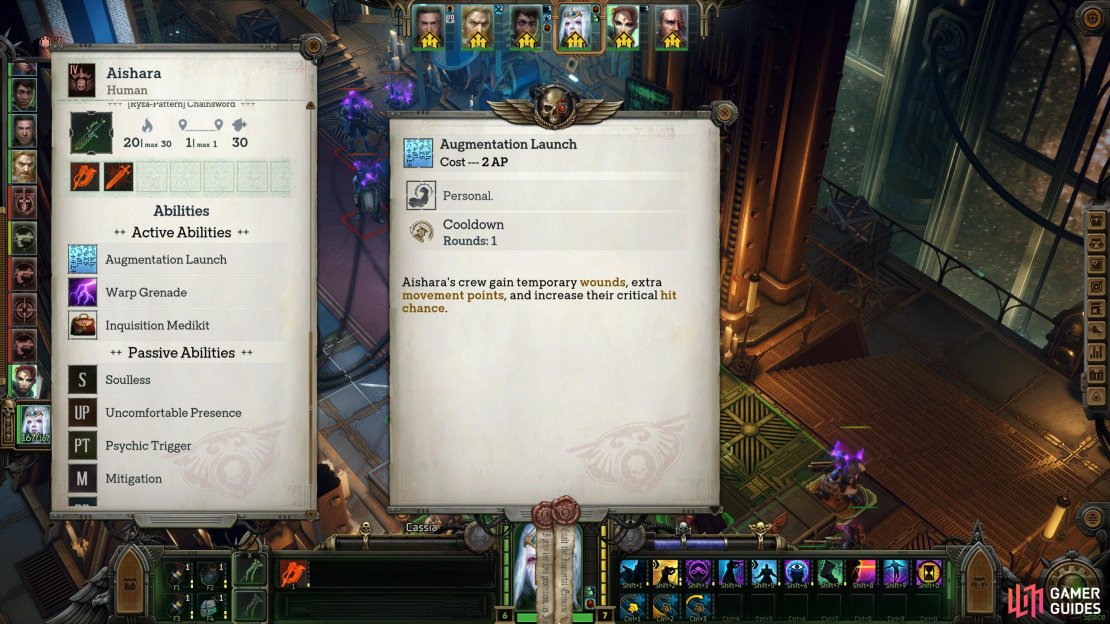
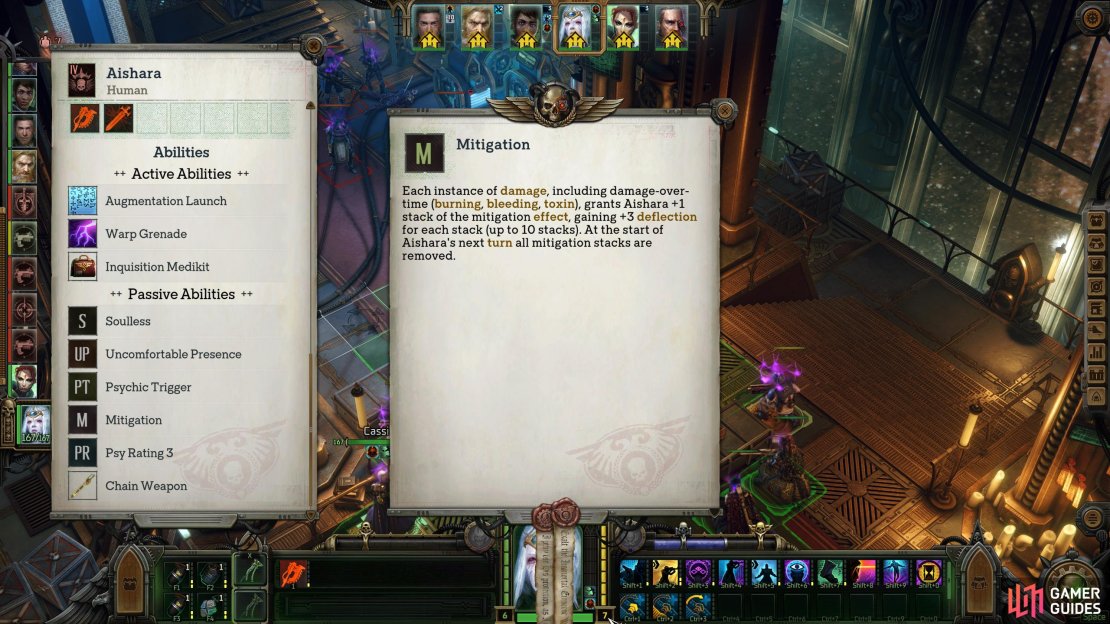
Aishara Boss Guide
This isn’t too difficult, but Aishara is capable of dealing significant damage. Her deadliest attack is her ![]() Flamer, or Warp Grenade, but she can buff up the entire group’s temporary wounds, movement points, and critical hit chance. Another thing to keep an eye on is whether her Psychic Trigger passive is active. If it is, attacking her with Psychic skills will grant her an extra turn.
Flamer, or Warp Grenade, but she can buff up the entire group’s temporary wounds, movement points, and critical hit chance. Another thing to keep an eye on is whether her Psychic Trigger passive is active. If it is, attacking her with Psychic skills will grant her an extra turn.
Finally, she will gain stacks of mitigation each time she’s attacked, including damage over time abilities, granting her +3 Deflections for each stack. Also, it’s worth noting that all of her crew can heal themselves for a moderate amount of wounds. Although this may sound challenging, you can defeat Aishara within one turn. Simply, target her from the start, and she won’t live to turn two. That means the rest of her group won’t have much threat outside their weapons. Now, all you need to do is clean up.
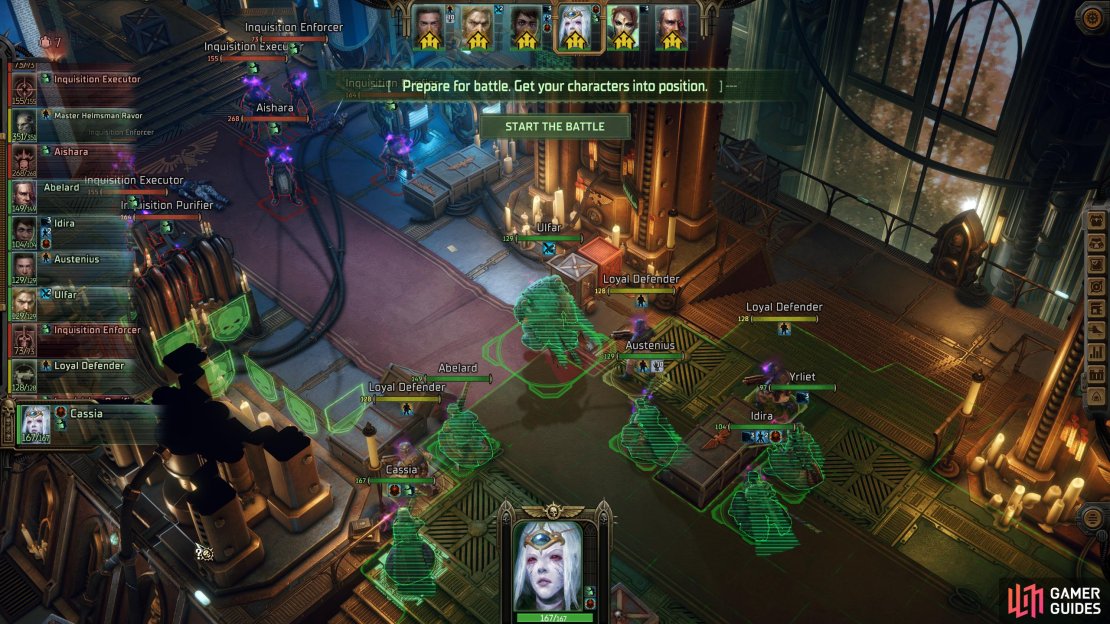
(1 of 3) Unlike other bosses where you would focus on taking out the other enemies first. Here, you’ll want her gone asap, as the enemies get stronger the longer she’s alive.
Questions and Answers Part 2
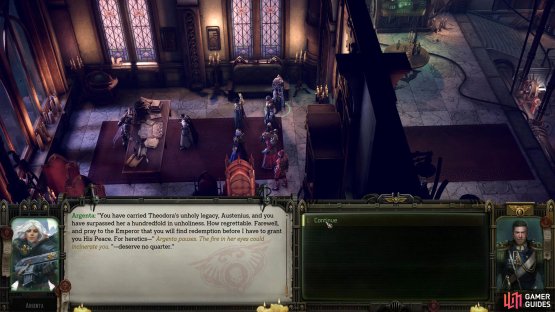
When they’re dealt with, you’ll get a scene on the ship. There is a convoy of shuttles requesting an audience, so let them aboard. The person who comes aboard will change depending on your conviction, and the choices you’ve made throughout the game. If you saved Calligos back in Quetza Temer, and you’re not Heretical, it will be him. If you’re Heretical, and did what Uralon asked, it will be him instead, and we can assume the same for Incendia. Depending on if you meet the prerequisites, one of these will join you as a secret companion. Once the conversation is over, you’ll get a scene, marking the end of Chapter 4.
No Comments