

This page details how to find and kill ![]() Solarus the Immaculate, one of the Soul Shard bearer bosses in V Rising. We’ll cover how to reach the
Solarus the Immaculate, one of the Soul Shard bearer bosses in V Rising. We’ll cover how to reach the ![]() Fortress of Light in the Silverlight Hills, how to defeat the boss including an overview of his attacks, and recommended weapons / abilities for the fight.
Fortress of Light in the Silverlight Hills, how to defeat the boss including an overview of his attacks, and recommended weapons / abilities for the fight.
Solarus the Immaculate is a level 86 Soul Shard boss in V Rising.
| Quick Jump | – | – |
|---|---|---|
| Attacks | Strategy | Recommended Weapons |
| Recommended Spells | Rewards | – |
Where to Find Solarus the Immaculate
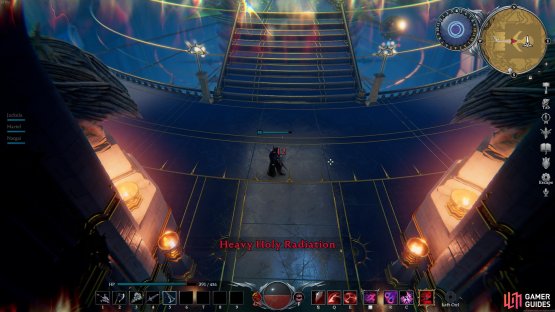
The Fortress of Light is located in the eastern part of the Silverlight Hills (Map Marker), directly east of Brighthaven, or north of the ![]() Emberleaf Grove. You can enter the fortress on foot, but you’ll need a high level of Holy Resistance inside. If you don’t have any, you’ll be taking a significant amount of damage over time for the duration of the fight. The best way to improve your Holy Resistance to a sufficient level to counteract the holy radiation is by crafting a Holy Resistance Potion. This will give you +50 Holy Resistance for one hour, which is more than enough to negate it. You can obtain the recipe by defeating
Emberleaf Grove. You can enter the fortress on foot, but you’ll need a high level of Holy Resistance inside. If you don’t have any, you’ll be taking a significant amount of damage over time for the duration of the fight. The best way to improve your Holy Resistance to a sufficient level to counteract the holy radiation is by crafting a Holy Resistance Potion. This will give you +50 Holy Resistance for one hour, which is more than enough to negate it. You can obtain the recipe by defeating ![]() Meredith the Bright Archer (Map Marker). To craft the flask, you’ll need 60 Sunflowers, one
Meredith the Bright Archer (Map Marker). To craft the flask, you’ll need 60 Sunflowers, one ![]() Grave Dust and an Empty Bottle.
Grave Dust and an Empty Bottle.
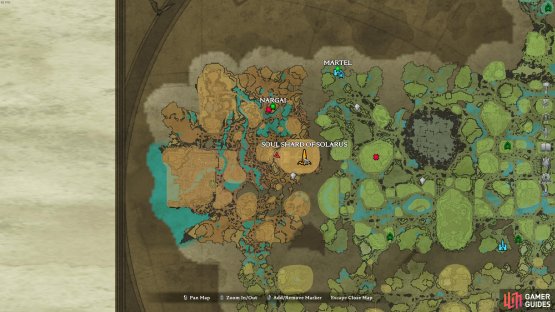
(1 of 2) The Fortress of Light is located in eastern Silverlight Hills.


The Fortress of Light is located in eastern Silverlight Hills. (left), If you enter the Fortress of Light without sufficient Holy Resistance, you’ll sustain Holy Radiation Damage. (right)
Solarus the Immaculate Attacks
Light Orbs
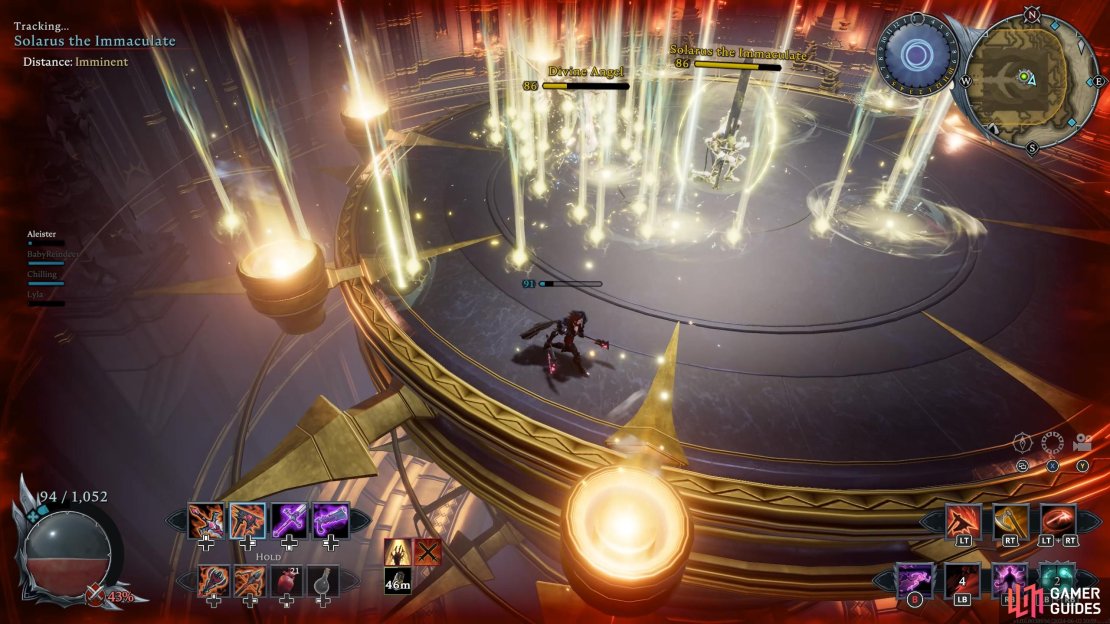
Solarus will run into the center where two light orbs will spawn either side of him. These orbs will unleash more orbs around the entire arena. Run to the back of the arena and sidestep or dodge the odd orb that comes toward you.
Holy Charge
The Charge attack from Solarus is almost always followed by holy light orbs emanating in a triangular shape from his body, so you’ll need to be ready to avoid these at the same time as the charge. Wait until Solarus gets close and dodge through the charge. If your dodge is on cooldown, run to the side of him.
Swipe Attack
This is a swift swipe attack with a decent range which follows an arc in front of Solarus. It will sometimes be followed by a second swipe to the left, so it’s best to remain at a distance until you’re sure that the attack has finished.
Spinning Wheels
This is a two-hit attack with the first being a horizontal swipe followed up with a downward slash. The final part of this will unleash spinning wheel that splits into two. These wheels will go back and behind Solarus in an X (cross) shape. Dodge toward Solarus and attack him from behind. If you’re directly behind him, the wheels will miss you.
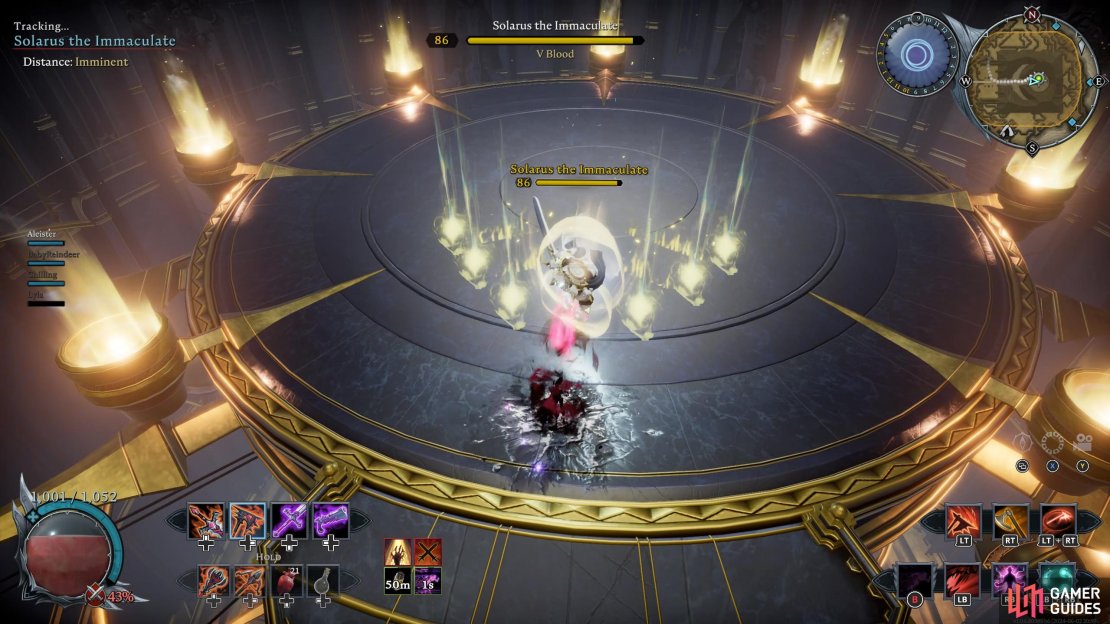

(1 of 4) Light Orbs: Solraus will place two orbs in the center that unleash numerous orbs of light around the arena.
Light Rays
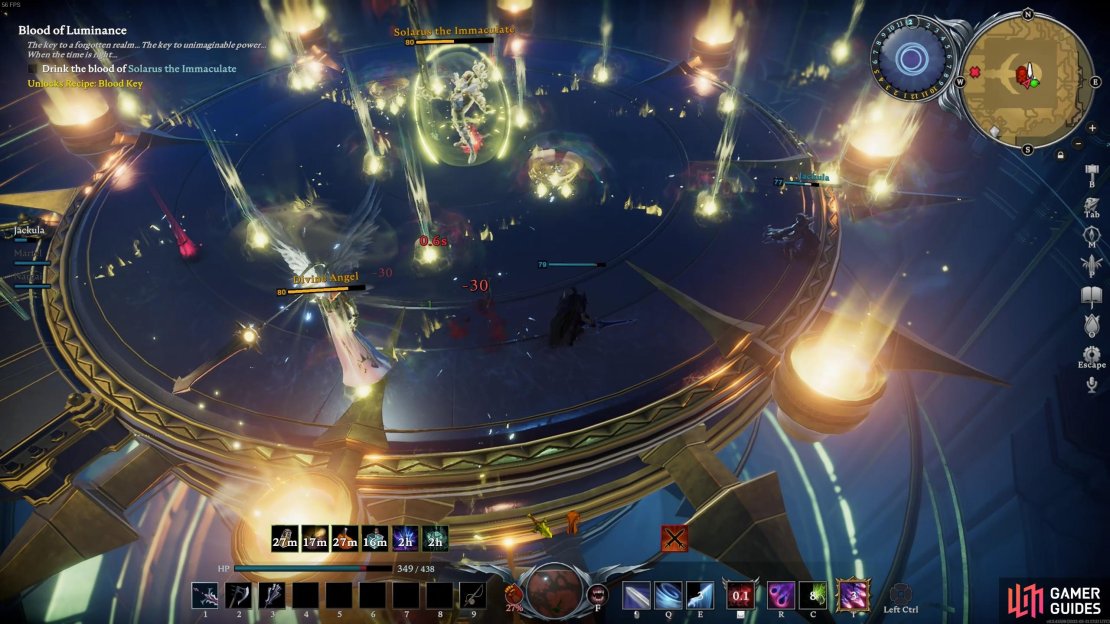
Solarus will stab his sword into the ground unleashing a barrage of light rays. These will move side to side as the travel toward you. Stand at the back of the arena in line with Solarus and by the time the rays get to you, they should miss you. You may get hit by the last ray or two, so be ready to dodge if this happens.
Holy Barrier - Beams of Light
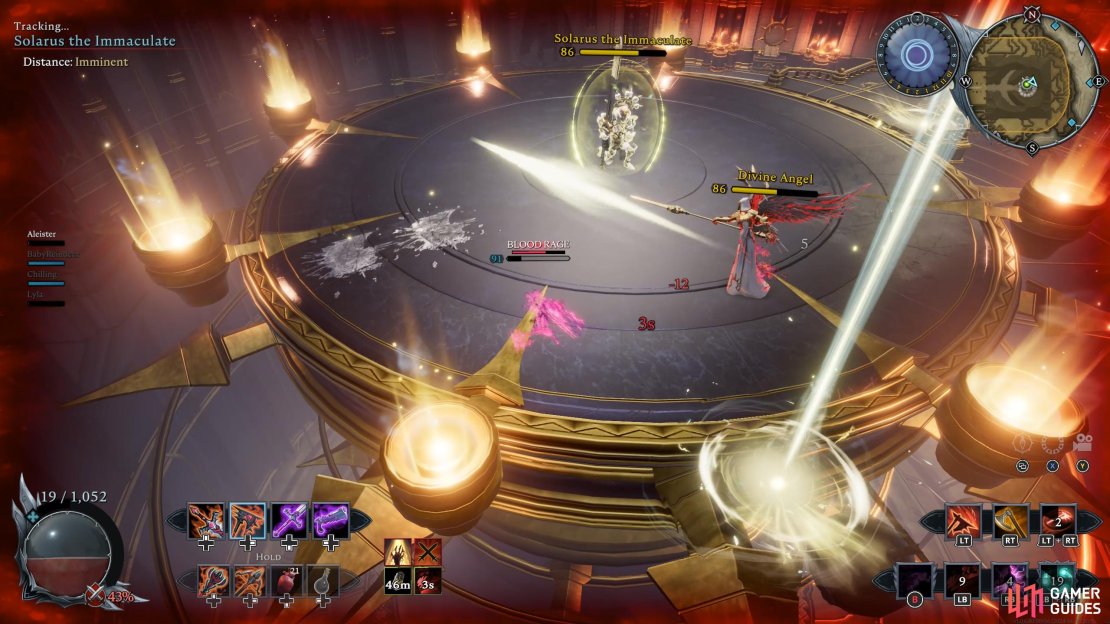
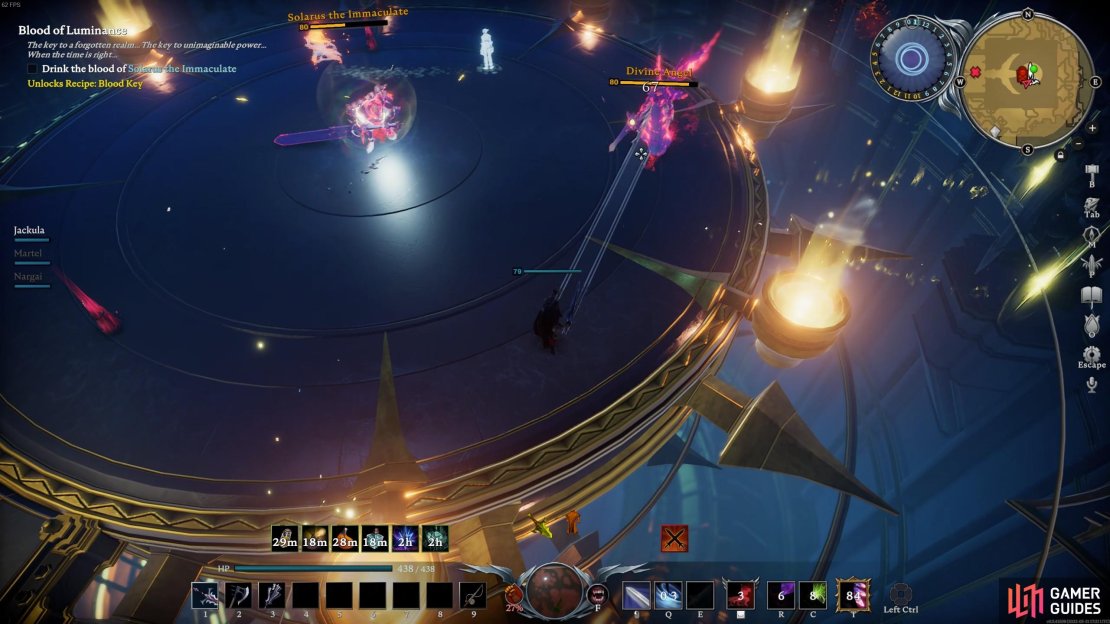
When Solarus’ health gets below 20%, he’ll place a holy barrier on himself and cast beams of light that travel across the arena. During this phase, Solarus will slowly regenerate health, and will continue to do so until you reduce the Divine Angel’s health to zero. We recommend reducing the Divine Angels health to 25-35% before Solarus gets into this phase otherwise he’ll regenerate a lot of health. The beams of light are easier enough to avoid but the Divine Angel is no joke and dealing with both at the same time can be difficult. You want to defeat the angel as soon as possible, but avoid taking unnecessary damage.
Divine Angel Attacks - Charge and Thousand Spears
The Divine Angel is capable of charging in a similar way to Solarus, which can inflict a significant amount of damage if you’re caught by it. The angel can also swipe twice with their spear, or stab forwards in a similar way to the ![]() A Thousand Spears attack.
A Thousand Spears attack.
Divine Angel Attack - Light Rays
The Divine Angel will sometimes cast holy light rays at you. This is identical to the ones that Solarus casts, and have the same precautions. What makes this more difficult is Solarus will also attack, so be ready to avoid his attacks too. If Solarus also does Light Rays, stand in the corner and pray that no rays hit you.
Divine Angel - Balls of Light
During the Divine Angel phase, the angel will occasionally fire out balls of light at your location. This will be a set of three balls. Easy enough to avoid this attack, simply move side to side to avoid them.
Divine Angel - Holy Barrier/Fallen Angel
When you deplete the Angel’s health, it’ll use the same barrier that Solarus uses. When the shield ends, it’ll heal, and get back up again, but this time as a Fallen Angel that will attack Solarus provided you don’t attack it yourself.
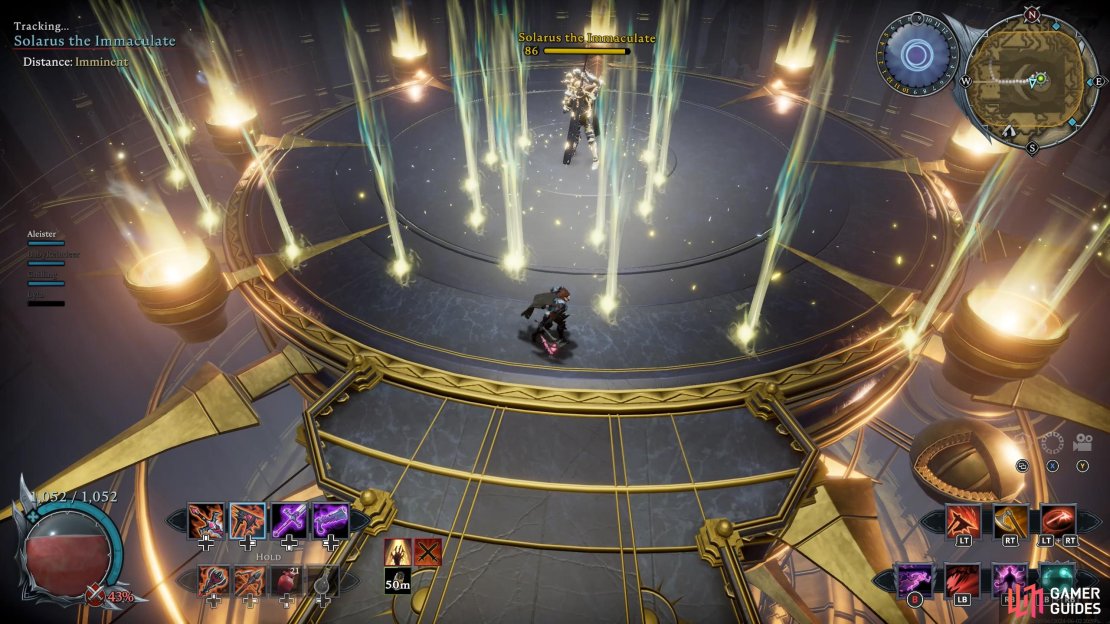


(1 of 5) Light Rays: Solarus will unleash a wave of light rays that move side to side.
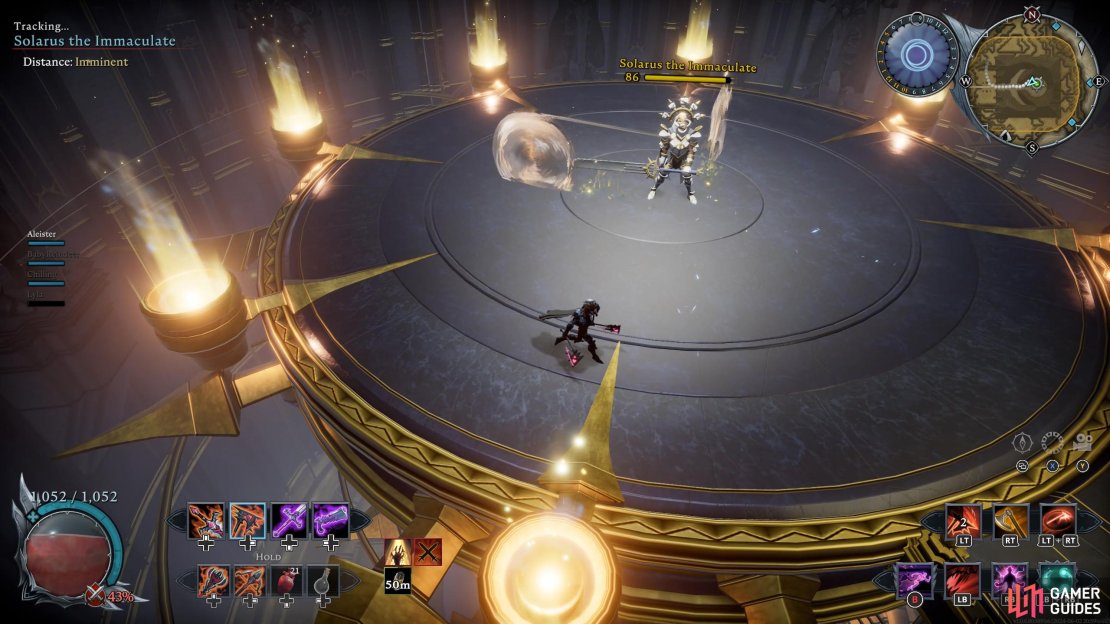
Solarus the Immaculate Strategy
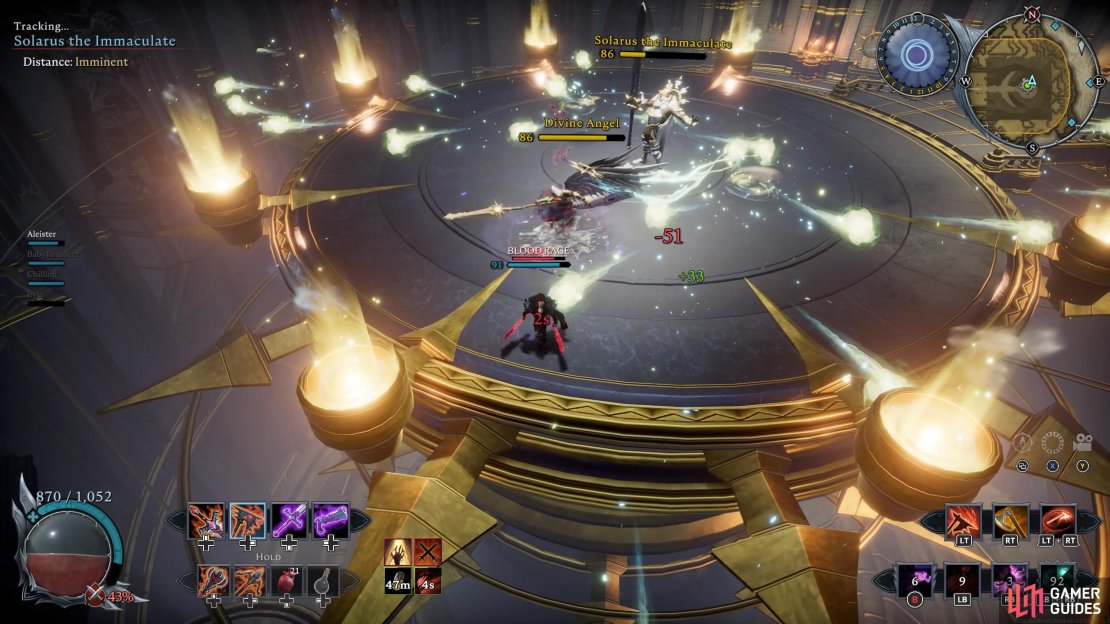
This fight can be broken down into four main phases. The first involves you fighting Solarus alone, until he reaches 50% health. The second phase of the fight begins here, as a Divine Angel will spawn as an ally of Solarus, and you’ll need to deal with both until Solarus reaches around 20% health. At this third phase, Solarus will stand in the centre of the platform and cast a holy barrier around his body, making him invulnerable to damage as he regenerates his health. You will need to defeat the Divine Angel by bringing them down to 1 health, at which point they’ll turn into a Fallen Angel, marking the fourth phase. Solarus will now heal back to 90% health and remove his shield before re-entering the fight. From this point on, the Fallen Angel will begin attacking Solarus, aiding you in the fight, but it can still turn on you if you’re not careful. The best way to avoid damage from the Fallen Angel is to not hit it with any attacks, allowing it to focus on Solarus.
With the four main phases of the fight noted, you can focus on how to avoid the attacks from Solarus. The main attacks you’ll be facing throughout the fight will be the holy light orbs, so once you learn the pattern of these and how to navigate them, the rest of the fight becomes much more simple. The melee strikes from Solarus are relatively few and far between compared with the holy light orbs, so you don’t need to focus on him too much as you’re trying to avoid the orbs. Pay close attention to where each light orb is moving, and try to move out of the way by walking, saving your dash (travel skill) for a last second escape if necessary. The light orbs are slow enough to allow you to walk around most of them without needing to dash around them.

(1 of 3) The Divine Angel will enter the fight when Solarus is around 50% health.
The most important thing throughout this fight is to maintain consistent damage on Solarus. The longer the fight goes on, the more likely it is that your health will be whittled down by the holy light orbs, or the odd melee strike catching you off guard. The most damaging basic ability that you can use here is ![]() Chaos Volley, allowing you to strike twice in quick succession while staying at a safe distance away from the boss. The ability will also apply a Damage over Time effect on the boss and it has excellent range, allowing you to kite Solarus around the entire platform if necessary. Aside from this, given that Solarus is often stationary as he uses some of his holy light orb attacks, the
Chaos Volley, allowing you to strike twice in quick succession while staying at a safe distance away from the boss. The ability will also apply a Damage over Time effect on the boss and it has excellent range, allowing you to kite Solarus around the entire platform if necessary. Aside from this, given that Solarus is often stationary as he uses some of his holy light orb attacks, the ![]() Howling Reaper skill (from the Reaper melee weapon) is an excellent option to inflict consistent melee damaging, while also staying at a safe distance. You can combine these two rotations with the odd
Howling Reaper skill (from the Reaper melee weapon) is an excellent option to inflict consistent melee damaging, while also staying at a safe distance. You can combine these two rotations with the odd ![]() Tendon Swing or basic melee attack, or any other damaging basic ability that you might prefer using.
Tendon Swing or basic melee attack, or any other damaging basic ability that you might prefer using.
Once the Fallen Angel enters the fight, you’ll need to be a bit more careful in terms of not hitting it with Area of Effect attacks, thereby drawing its attention to you. Other than that, the fight is fairly simple once you’ve mastered the attack patterns from Solarus. Use the ![]() Blood Rage or
Blood Rage or ![]() Power Surge abilities to keep you health topped up when
Power Surge abilities to keep you health topped up when ![]() Wisp Dance is on cooldown.
Wisp Dance is on cooldown.
Recommended Weapons
| Primary Melee | Secondary Melee | Ranged |
|---|---|---|
| Epic or Legendary Ancestral Reaper | Epic or Legendary Ancestral Axes | Epic or Legendary Ancestral Pistols |
The potential length of this fight calls for the use of some of the best weapons in the game, so you’ll want to craft one of the Ancestral Weapons, preferably Legendary, but Epic will suffice. You can get these by acquiring Great Stygian Shards by participating in the Rift Incursions in the Ruins of Mortium. You can find out more about this by reading our Endgame Guide.
The Reaper is an excellent choice due to the Howling Reaper skill dealing significant damage provided the boss doesn’t move away from its hits. The same goes for the Axes ![]() X-Strike skill. Both are great weapons, but the Reaper will give you more range while the Axes will give you attack speed and another attack that acts like a dodge (
X-Strike skill. Both are great weapons, but the Reaper will give you more range while the Axes will give you attack speed and another attack that acts like a dodge (![]() Frenzy).
Frenzy).
The Pistols will always be a viable option against any boss that can be kited, and Solarus is no exception. You can maintain a safe distance from Solarus relatively easily while using ![]() Fan the Hammer, alongside regular hits. In many ways this is the safest option if you don’t like the idea of getting too close to Solarus for melee strikes, but it can also leave you vulnerable to the holy light orbs as they move outwards from Solarus, although like the Axes, it will give you another dodge-like attack with
Fan the Hammer, alongside regular hits. In many ways this is the safest option if you don’t like the idea of getting too close to Solarus for melee strikes, but it can also leave you vulnerable to the holy light orbs as they move outwards from Solarus, although like the Axes, it will give you another dodge-like attack with ![]() Explosive Bullet.
Explosive Bullet.
Recommended Spells
| Travel | Basic 1 | Basic 2 | Ultimate |
|---|---|---|---|
| Veil of Chaos |
The above abilities provide a good balance of survivability and damage output. Veil of Chaos allows you to dash twice in a row if necessary (before the recast timer runs out), while leaving behind two phantoms of your body which explode after a few seconds, inflicting 50% magic damage. and igniting the target. These won’t always connect with Solarus, but if you can align it properly it’s a good way to inflict some extra damage.
Chaos Volley is the undisputed champion of basic ability damage spells. It inflicts more damage than almost any other skill, and is executed swiftly while providing excellent range and a Damage over Time effect. The second basic skill can be switched around, although we recommend Blood Rage, Power Surge, or both. The former will give you a movement speed boost, a minor heal, and health leech. The latter will also give you enhanced movement speed while also giving you increased attack speed, and allowing your regular attacks to inflict Ignite. Both of these can be equipped with +duration jewel as well as the remove negative effect passive.
In terms of Ultimate abilities, it’s difficult to beat ![]() Chaos Barrage for pure damage output, although, if you want an Ultimate that heals and deals damage, take Wisp Dance. Another good shout is
Chaos Barrage for pure damage output, although, if you want an Ultimate that heals and deals damage, take Wisp Dance. Another good shout is ![]() Ice Block, which negates damage while it heals you. All of them are great Ultimates, but for safety, we recommend Wisp Dance.
Ice Block, which negates damage while it heals you. All of them are great Ultimates, but for safety, we recommend Wisp Dance.
Solarus the Immaculate Rewards
You’ll receive the following rewards upon defeating Solarus the Immaculate:
| Name | Description |
|---|---|
| Pedestal of Solarus | Summons a fallen angel to fight for you for 15s. Attacks made by the fallen angel inflict amplify that increases damage taken by 25% for 5s |
| +31.9 Spell Power, 10% chance on primary hit to spawn a |
|
| Dracula’s Boots Recipe | Contains recipes for |
No Comments