
Lightcrystal is a material native to the Flooded Forest. It’s required for many equipment–most notably the 5th tier of Kamura weapons.
“Many scour the Flooded Forest for this faintly-glowing, adamantine substance.”
| Carry | Rarity | Value |
|---|---|---|
| 99 |
Rarity 4 | 1150z |
How to Get Lightcrystal
Flooded Forest

Best places to farm Lightcrystal.
Lightcrystals can be mined from white or blue minining outcrops in the Flooded Forest. There’s a higher chance of finding them from white mining outcrops, so prioritize those if you can.

1. Inside the ruins on the highlands in-between the area 8 and 9 battlegrounds.
1: Inside the ruins on the highlands in-between the area 8 and 9 battlegrounds. There are stairs leading up to the entrance from the north-east.
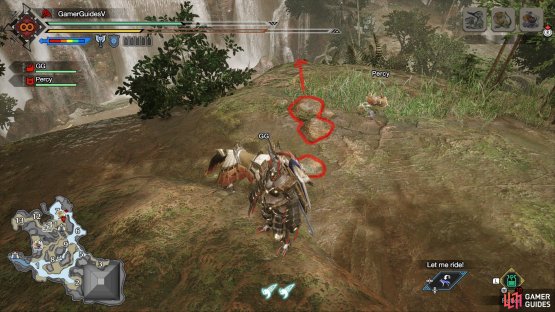
(1 of 2) 2a. Climb to the top of the highlands between areas 6 and 7. Then drop down from these stones.


2a. Climb to the top of the highlands between areas 6 and 7. Then drop down from these stones. (left), 2b. Press the A button to hang in mid-air and reach the cave on the cliff face. (right)
2: Inside a small cave up a cliff near the north face of the highlands in-between areas 6 and 7. North from the Sub-Camp. You can use your wirebugs to climb up from Area 7.
Or you can drop down from the top of the highlands. Look for a pile of three stones pointing to where you should go.
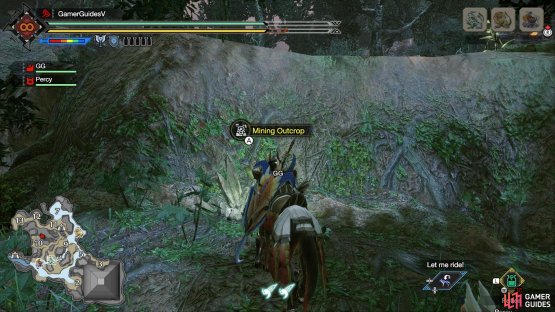

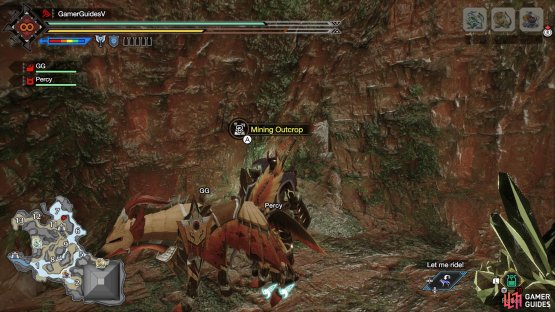
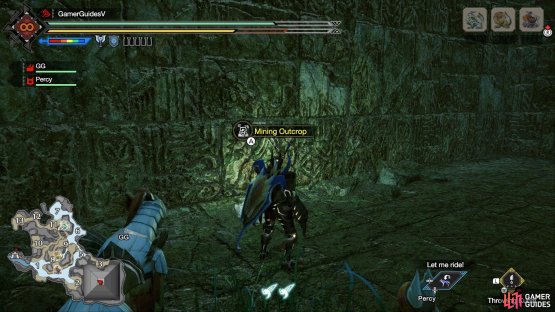
(1 of 2) 3. A short distance north of the big hole near the Area 10 battleground.


3. A short distance north of the big hole near the Area 10 battleground. (left), 4. The far south-east corner of the map, next to the great pyramid. (right)
3: North-east from the Area 10 battleground, there’s a big hole in the ground, sandwiched between highlands. This mining outcrop is a short distance north of the big hole.
4: The far south-east corner of the map, next to the great pyramid.
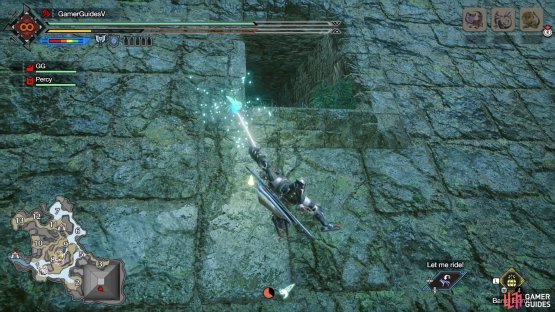
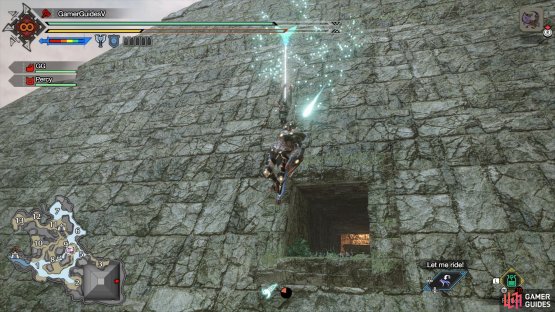
(1 of 2) 5a. In a room accessibla via the south-facing slope of the great pyramid.


5a. In a room accessibla via the south-facing slope of the great pyramid. (left), 5b. You can reach it by dropping down from the top of the pyramid or climbing up. (right)
5: In a room inside the great pyramid, accessible from the south. Use the great wirebug in Area 2 to reach the halfway point of the pyramid. From there, use your own wirebugs to climb up to the top. Next, go around to the south and drop down to the entrance that’s halfway up the slope. Don’t hesitate to press  to stop yourself. When you reach the room, be wary of a gap in the middle of the floor.
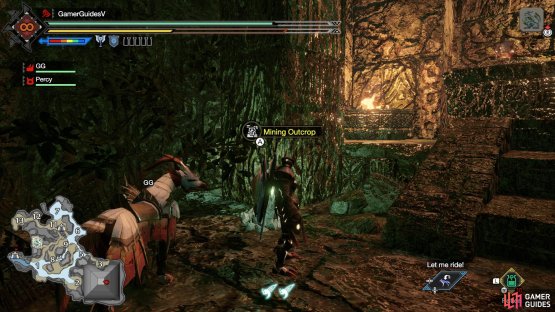
(1 of 2) 6a. In a room accessibla via the east-facing slope of the great pyramid.


6a. In a room accessibla via the east-facing slope of the great pyramid. (left), 6b. Likewise, you can drop down from a higher level or climb up. (right)
6: In another room inside the great pyramid, accessible from the east. From the previous node, go back outside and then carefully drop down below, back to the halfway point. Make your way around to the east side of the pyramid. Look down and you should see another entrance you can drop down to.
Quest Rewards
There’s a small chance of receiving Lightcrystal from certain Village 3-star and Hub 2-star quests.
| Quest | Reward | Rate |
|---|---|---|
| Village 3-star: Obnoxious Lord, Noxious Monster |  Lightcrystal x1 Lightcrystal x1 |
5% |
| Village 3-star: Breath of the Past | Lightcrystal x1 |
5% |
| Village 3-star: Ladies of the Lake | Lightcrystal x1 |
5% |
| Hub 2-star: Hide, Hide, Hide! | Lightcrystal x1 |
5% |
What Equipment Can You Make With Lightcrystal?
Lightcrystals are needed to forge/upgrade a lot of weapons and armor.
Forge Weapons

The Altair I Dual Blades.
| Weapon | Type | Material Required |
|---|---|---|
| Kamura Cleaver V | Great Sword | Lightcrystal x2 |
| Kamura Blade V | Long Sword | Lightcrystal x2 |
| Kamura Sword V | Sword and Shield | Lightcrystal x2 |
| Altair I | Dual Blades | Lightcrystal x2 |
| Kamura Glintlbades V | Dual Blades | Lightcrystal x2 |
| Drill Lance I | Lance | Lightcrystal x2 |
| Babel Spear I | Lance | Lightcrystal x3 |
| Kamura Spear V | Lance | Lightcrystal x2 |
| Kamura Gunlance V | Gunlance | Lightcrystal x2 |
| Kamura Hammer V | Hammer | Lightcrystal x2 |
| Kamura Chorus V | Hunting Horn | Lightcrystal x2 |
| Magia Charm I | Hunting Horn | Lightcrystal x2 |
| Kamura Iron Axe V | Switch Axe | Lightcrystal x2 |
| Kamura C. Blade V | Charge Blade | Lightcrystal x2 |
| Magia Pitareen I | Insect Glaive | Lightcrystal x2 |
| Princess Regalia I | Insect Glaive | Lightcrystal x2 |
| Rielle Nulo I | Insect Glaive | Lightcrystal x2 |
| Kamura L. Bowgun V | Light Bowgun | Lightcrystal x2 |
| Kamura H. Bowgun V | Heavy Bowgun | Lightcrystal x2 |
| Kamura Iron Bow V | Bow | Lightcrystal x2 |
| Mud Shot I | Bow | Lightcrystal x3 |
| Felyne Bow I | Bow | Lightcrystal x2 |
Upgrade Weapons
| Weapon | Type | Material Required |
|---|---|---|
| Axeblade I | Great Sword | Lightcrystal x3 |
| Eager Cleaver I | Long Sword | Lightcrystal x1 |
| Keen Edge I | Long Sword | Lightcrystal x1 |
| Ivory Rabbit II | Long Sword | Lightcrystal x2 |
| Fighter Sword | Sword and Shield | Lightcrystal x1 |
| Carapace Mace I | Sword and Shield | Lightcrystal x1 |
| Secta Unu | Sword and Shield | Lightcrystal x1 |
| Gelid Mind I | Dual Blades | Lightcrystal x1 |
| Heat Lance II | Lance | Lightcrystal x2 |
| Fiore Nulo White I | Gunlance | Lightcrystal x1 |
| Frozen Core II | Hammer | Lightcrystal x1 |
| War Hammer I | Hammer | Lightcrystal x1 |
| Vicello Nulo Green I | Hunting Horn | Lightcrystal x1 |
| Khezu Axe | Switch Axe | Lightcrystal x1 |
| Regas Hyper | Charge Blade | Lightcrystal x1 |
| Rielle Nulo Green I | Insect Glaive | Lightcrystal x1 |
| Rielle Nulo I | Insect Glaive | Lightcrystal x1 |
| Cross Blitz | Light Bowgun | Lightcrystal x1 |
| Jaeger I | Light Bowgun | Lightcrystal x1 |
Forge Armor

Utsushi (visible) armor for males.
| Armor | Type | Material Required |
|---|---|---|
| Almudron Helm | Head | Lightcrystal x2 |
| Barioth Mail | Torso | Lightcrystal x2 |
| Basarios Vambraces | Arm | Lightcrystal x1 |
| Ingot Greaves | Leg | Lightcrystal x1 |
| Jelly Hat | Head | Lightcrystal x1 |
| Khezu Mail | Torso | Lightcrystal x1 |
| Kulu-Ya-Ku Helm | Head | Lightcrystal x1 |
| Pukei-Pukei Helm | Head | Lightcrystal x2 |
| Rathian Helm | Head | Lightcrystal x2 |
| Utsushi Braces (H) | Arm | Lightcrystal x1 |
| Utsushi Greaves (H) | Leg | Lightcrystal x1 |
| Utsushi Braces (V) | Arm | Lightcrystal x1 |
| Utsushi Greaves (V) | Leg | Lightcrystal x1 |
| Channeler Hope | Arm | Lightcrystal x1 |
| Channeler Hakama | Leg | Lightcrystal x1 |
| Medium’s Prayer | Arm | Lightcrystal x1 |
| Medium’s Hakama | Leg | Lightcrystal x1 |
| Wroggi Mail | Torso | Lightcrystal x1 |
No Comments