The 1st Day - Pictures
Approach the store after you gain control then talk using the reaction command button (Triangle). After some more chit-chat, target the cat using R1. Turns out everyone thinks the group is thieves, so the scene shifts to the sandlot. When you gain control of Roxas you’ll have to choose one of the Struggle weapons:
Prioritize unusual attacks - +1 Magic
Prioritize defense - +1 Defense
Prioritize offense - +1 Strength
The battle against Seifer isn’t much, you can just constantly attack to parry and deal damage to him until he drops. A Dusk steals the camera so chase it to the Old Mansion. Capture it to start a battle, but you can’t actually hurt it. Swing a few times and a scene will take over; Roxas obtains the Keyblade. With the Keyblade in hand you can now defeat the Dusk. Use the Reaction Command Reversal to get easy hits in and beat the Nobody.
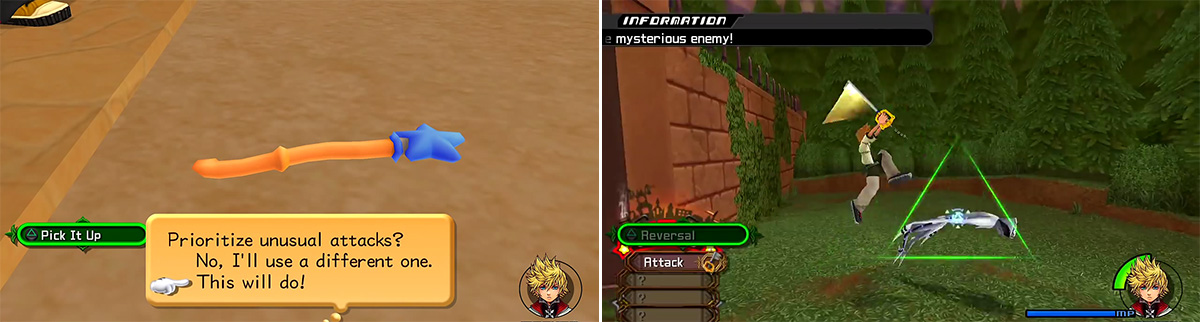
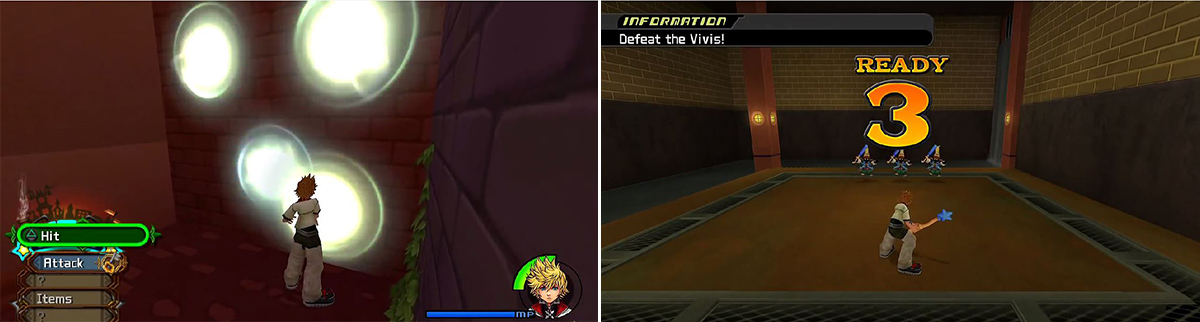
Choosing one of the items boosts a specific stat by 1 (left). The Reversal move allows you to get in some easy hits on the Nobody (right).
The 2nd Day - Munny
Save your game when given the opportunity. Afterwards, Pence comes in and you get the Twilight Town Map . Head up to the Market Street: Station Heights for a quick scene. Your objective is to collect a bunch of Munny and meet with the group at Station Plaza. There are several mini-games you can play at this point to collect the Munny you need. The fastest and simplest ones are Mail Delivery and Junk Sweep.
Mail Delivery
The objective is to deliver five letters as fast as you can. The first person is straight ahead, the bird is next, then another person. With three down, grind on the railing and let it throw you at the second bird then sharply turn around to find the final person.
- 50 Munny - Under 00:20:00
- 30 Munny - Between 00:20:00 and 00:59:99
- 10 Munny - 01:00:00 or higher

There are a few mini games you can complete to earn Munny.
Cargo Climb
You need to hit the bag of cargo up the hill and it can be a little hard; use a three-hit combo and try to stay straight. After three combos the bag will pop up in the air. If you strike it at this point you’ll hit it a long distance up the hill. You’ll have to do this twice to get the cargo into the disposal.
- 50 Munny - Under 00:30:00
- 30 Munny - Between 00:30:00 and 00:59:99
- 10 Munny - 01:00:00 or higher
Grandstander
The job is to juggle the ball up in the air as long as possible. You get a total of 5 chances and you lose one if the ball hits the ground. The best way to break 20+ hits is to get the ball in the corner.
- 50 Munny - 20+ hits
- 30 Munny - Between 5 and 19 hits
- 10 Munny - Less than 5 hits
Poster Duty
You have to go around the Tram Common putting up 20 posters. A lot of them come in groups of three and it’s easy to just smash Triangle to get them up. Start on the west side for nine quick posters and move to the tram to reach a 10th in a tricky spot. The remaining 10 are simple enough to find.
- 100 Munny - Under 01:30:00
- 50 Munny - Between 01:30:00 and 01:59:99
- 30 Munny - 02:00:00 or higher
Bumble-Buster
There are two groups of four bee swarms that you need to take out. It’s not hard but they spread out so get them while they’re clumped up.
- 50 Munny - Under 00:20:00
- 30 Munny - Between 00:20:00 and 00:59:99
- 10 Munny - 01:00:00 or higher
Junk Sweep
You have to break 9 pieces of junk in as few hits as possible. It’s easy to achieve because nothing changes each time you play. From the start run to the back right and swing to the back left; this should knock out 4 pieces of junk. Now swing diagonally from the back right to the front left to clean up the rest. You should get 7-10 hits every time.
- 50 Munny - 10 or fewer hits
- 30 Munny - Between 11 and 14 hits
- 10 Munny - 15 or more hits
Once you’ve collected at least 200 Munny you can talk to Hayner at the Station Plaza. Your reward depends on how much Munny you collected. Just note that the game will automatically progress if you obtain 2000 Munny:
AP +1 - 200-1199 Munny
AP +2 - 1200+ Munny
Roxas will obtain the Munny Pouch but it gets stolen during the scene.
The 3rd Day - Dive to the Heart
Head out to the Station Heights for a scene. Afterwards, you’ll have to fight another Dusk. Like before, you cannot damage it with a Struggle Club. The Dive to the Heart commences and Roxas appears in the Station of Serenity. You have to choose a weapon at this point. You’ll have a choice between the Dream Sword, Dream Rod, or Dream Shield. This choice affects the level at which you’ll learn abilities so it really depends what type of “class” you wish to play as in the beginning. More of warrior, mage or defender type. You will eventually learn all the abilities regardless of your choice. You’ll gain +1 Magic anyway, whatever you choose.
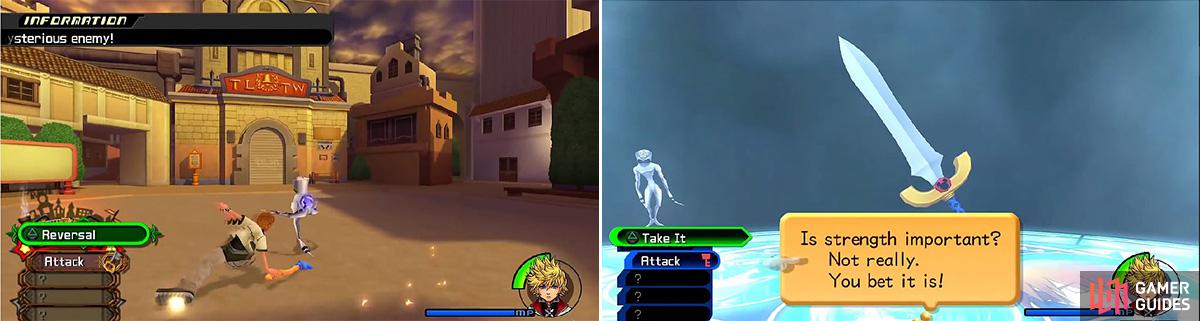
You will meet a new enemy here but you can use Reversals on it (left). You will also get a chance to choose your initial character build (right).
Monster - Dusk
Dusks are weak and offer a Reaction Command to easily defeat them. It is possible to hit them twice, use Reversal, then repeat until it dies.
Defeat the three Dusks that attack now that you have the Keyblade. You’ll gain the first Bonus Level and learn Aerial Recovery once you’ve defeated them. Next, open the chest using Triangle to acquire a Potion . You’ll be given a chance to save before heading to the Station of Calling. Head up the ramp and defeat three more Dusks then open the chest to find another Potion . Continue to the last platform to fight three more Dusks. Go through the door to fight the Twilight Thorn.
BOSS - Twilight Thorn
The battle against Twilight Thorn always starts the same way. Roxas is locked up and you’ll have to use Reaction Commands to get free. First is Key Counter, then a Lunarsault.The final one is important, Break Raid will stun the Twilight Thorn and let you get some hits in on it’s head. At this point you just need to avoid attacks then counter. Jump over the swipe attack and use Triangle to dodge the Tendrils of Darkness . Dodging this attack usually lifts you up towards it’s head, so give it a few good hits. When Twilight Thorn puts it’s head on the ground and starts to fire lots of Tendrils of Darkness you’ll want to dodge and focus on defeating the Creepers that appear to regain valuable hit points. You’ll likely repeat the initial Reaction Command sequence which is to your benefit since you get easy damage and a stun.
Reward: HP +5, Guard.
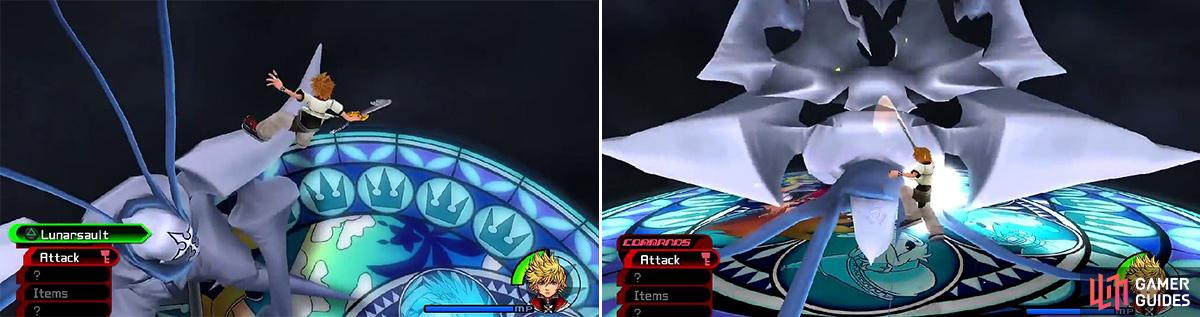
Lunarsault (left) is one of three Reaction Commands you must complete at the start. Pummel the head where you can (right) to get in plenty of damage.
The 4th Day - Struggle Tournament
Equip the Guard ability once you get control of Roxas again. Talk to people if you want and save your game. If you head to the Back Alley you can brawl with Seifer; it’s an easy 13 Experience Points if you wanted to level up. Check the rules then talk to the man in the center of the arena to start the Struggle Tournament. Your first match is against Hayner, who uses both aerial and ground combinations in addition to his lunging attack. It’s easy to just get a few hits in and take enough spheres to get the lead, then just run around till time expires.
Next up is Vivi, he uses fast attacks and his club gets large when he swings. Like with Hayner, it’s simple enough to get a lead then run around. The world freezes again and you’ll have to face three Dusks. Afterwards you’ll meet Axel, who wants to take Roxas, conscious or not.


BOSS - Axel
You can’t lose this fight but if you want to beat Axel it’s not that hard. Axel uses front attacks so jumping to the side then attacking works every time. When Axel crouches down he will dash behind Roxas and use his chakrams to deal moderate damage; just jump to the side to avoid them. If Axel yells, “Don’t make me angry!” then run away or take heavy damage. Counter all of his attacks with a three-hit combo and you’ll win quickly.
Reward: Scan
You still have to fight Setzer, but he’s a push over. If you win the battle you’ll get the Champion Belt , lose and it’s just a Medal . Regardless, you get “ The Struggle “ Trophy and later the Crystal Orb .
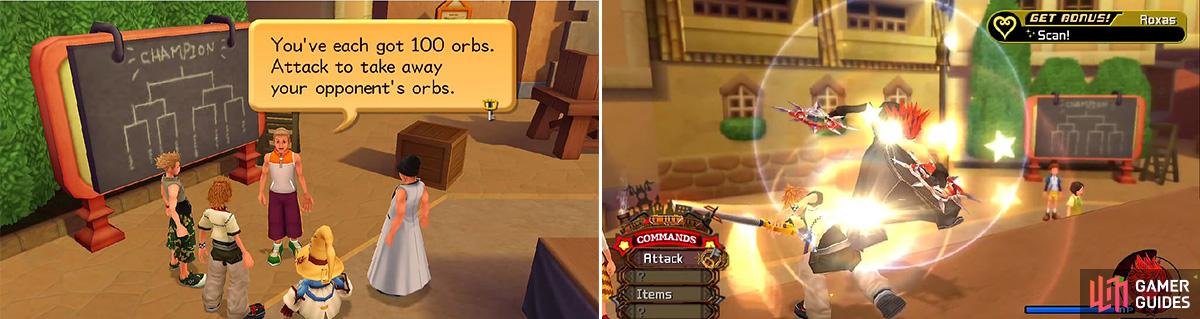
You must attack your opponent enough to get 200 orbs and avoid being attacked (left). Axel himself is pretty easy this first time (right).
The 5th Day - The Seven Wonders of Twilight Town
Head through the Station Plaza to reach Central Station. From here you’ll ride the train to Sunset Station. If you talk to Pence you can view a map of the wonders. The Spooky Steps is already checked off, so head to Sunset Terrace to find the other wonders. Start off by gathering the treasure then jump atop the tram in the center of the area and up to the roof where a chest holds an Ability Ring . Drop down to reach another chest; this one has a Potion . Head to the top left of the map across the stream to find a third chest with a Hi-Potion then check outside the entrance to Sunset Hill for a Potion .
Go to the top-right area and go into the dead end alley. Balls start flying out of the wall, just dodge them and touch the wall using Triangle – “ The Friend from Beyond the Wall “ is solved. Head west and into the Tunnelway to find Vivi. You’ll have to battle a bunch of Vivis that continuously spawn. Once you beat them all you’ll have solved “ The Moans from the Tunnel “. Exit the tunnel and check the southwest section where a waterfall is located. Defeat the Shadow Roxas and you can cross off “ The Doppelganger “ as a wonder.
Visit Sunset Hill to investigate The Animated Bag . Check out the bag and it starts moving around. Jump on it using Triangle and jump over the trashcans when you get close to them (or you can just smash Triangle). Next up is the Ghost Train Mystery, so head back to Sunset Hill. After the long scene, make your way to the Old Mansion for the final wonder.
You must find the Seven Wonders around Twilight Town.
The 6th Day - The Old Mansion
Head to the Back Alley and you’ll be forced to fight some Nobodies. A new one, the Assassin, will appear.
Monster - Assassin
This Nobody will spend most of the fight underground. It will wrecklessly swing at you making it easy to Guard. Once Guarded the Assassin is stunned leaving it open for several attacks. It’s best to leave them for last in a fight because of their low threat, but if you get the Reaction Command for Fail-Safe use it to defeat the Nobody instantly.
Fight your way to the Old Mansion and beware the Assassins that come in groups. At the Old Mansion, head to the Dining Room to the left. Clear out the Nobodies and open the chests for a Potion and Elven Bandana . Return to the Foyer and head to the window where you’ll spot a chest with a Hi-Potion . Take the left set of steps for a chest with a Potion then continue around to the White Room. You’ll receive Namine’s Sketches and the Mansion Map after the scene.
Return to the Foyer and enter the Library on the opposite end, but don’t pass up the chest with the Potion on your way. Open the chest in this room for a Hi-Potion then proceed to the Computer Room. Take a chance to save here then enter the Basement Hall. Clear out the Nobodies then get ready to face Axel again.
BOSS - Axel 2
You can lose this fight, unlike the previous one. Axel starts the fight by making the floor a fiery one. Try to get a combo finisher on Axel as it’ll force him behind the flames he created. This is good because you can use the Overtaker Reaction Command to guard against his next attack which leads to the Clear Light Reaction and purges the fire from the floor. Axel still has all of his other attacks so jumping to the side and then countering is the best way to get in a lot of damage. Take advantage of dual-wielding the Keyblades to get in large powerful combos and you’ll win pretty easily.
Reward: HP +5
Continue to the next room and claim the Hi-Potion then enter the final room to start a scene that leads to control of Sora.
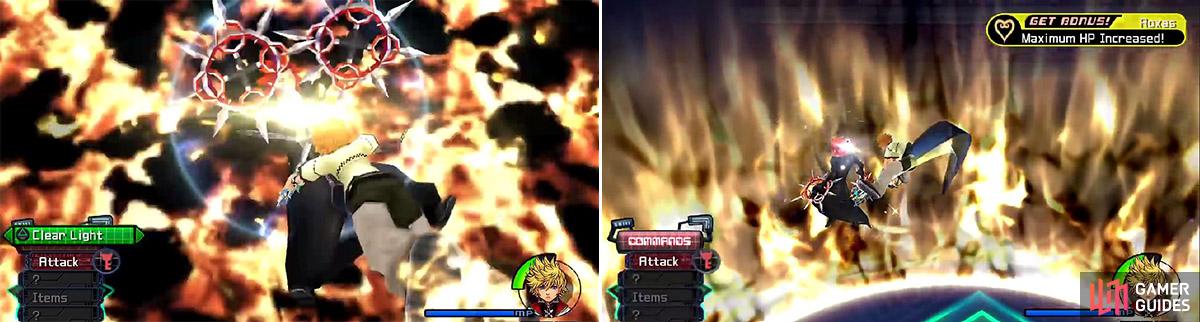
Using Clear Light (left) will clear the flames from the battlefield. After this, you can get in many combos to end the fight quickly (right).


WTF? This is just noz3r0's guide from gamefaqs, I don't even mean it's similar, it's literally word for word the exact same guide...
Yeah, I know your current stuff is internal.
It was just weird when comparing guide qualities to see it's literally the same guide just in a better format. This is licensed but I see my original comment could imply different so apologies on that.
Yes this guide was published in 2015 where we worked with two GameFAQs authors on it and licensed it. These days our internal team produces content :)