The Games Games
As per the usual, Unversed await as you enter this world. The one new Unversed that could give problems is the Buckle Bruiser. You have to immobilize them or get behind them in order to inflict damage. Move north to the Coliseum Gates and after the scene check the corners and behind pillars to find three chests with Mega-Potion, Mega Attack Recipe and Fire Strike then behind another set of pillars is the Balloon Sticker . To reach it, jump and swing the Keyblade, then continue to the Vestibule.
Open the chest for the Olympus Coliseum Map then talk to Hades to enter the games. If you don’t feel confident in taking down enemies in a short amount of time, equip a bunch of Magnet and Thunder commands to quickly group up and destroy the masses. Shotlock will be good for Buckle Bruisers and Chrono Twister since they are harder to kill. Rounds 7-8 you can use Shotlock if needed and on Round 10, Magnet followed by Thunder should eliminate most of the Jellyshade.
Coliseum Qualifier
| Round | Unversed | Time Limit |
|---|---|---|
| 1 | Scrapper x3 | 30 Seconds |
| 2 | Bruiser x1, Vile Phial x1 | 15 Seconds |
| 3 | Spiderchest x3 | 30 Seconds |
| 4 | Buckle Bruiser x1 | 20 Seconds |
| 5 | Shoegazer x5 | 15 Seconds |
| 6 | Red Hot Chili x2, Blue Sea Salt x2, Yellow Mustard x2, Axe Flapper x1 | 40 Seconds |
| 7 | Buckle Bruiser x3 | 40 Seconds |
| 8 | Monotrucker x2, Chrono Twister x2 | 30 Seconds |
| 9 | Bruiser x1, Mandrake x5 | 30 Seconds |
| 10 | Jellyshade x30 | 30 Seconds |
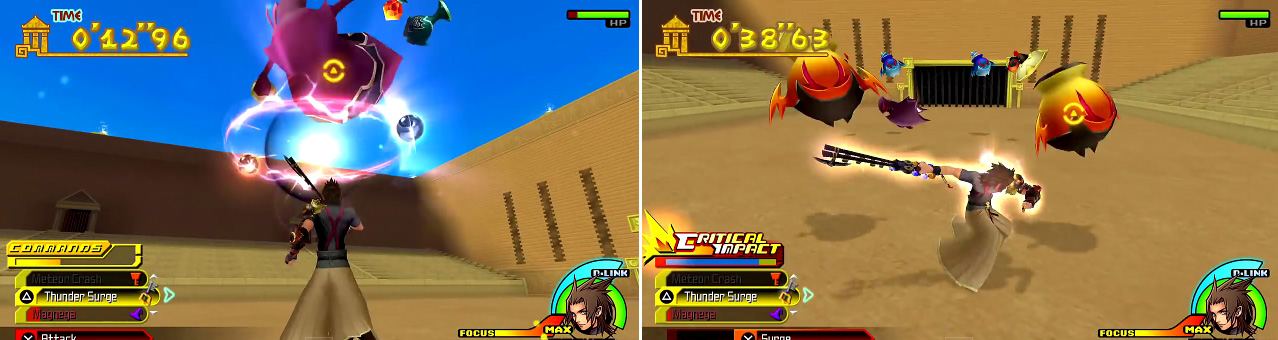
Magnega (left) is perfect for grouping enemies together so you can kill them faster. As you progress further, the enemies get stronger (right) and there are more of them.
Prizes
| Prize Category | Name |
|---|---|
| Power Up | Maximum HP Up |
| Command | Sonic Impact |
After you win take some time to save and change your Command Deck back to your preferred fighting style. The upcoming boss is vulnerable to a number of status effects however, so a good strategy is to equip status inflicting attacks like Freeze Raid, Stun Edge, and Ignite. Be sure to keep a healing command because you can potentially take a lot of damage quickly. Talk to Hades to initiate the next battle.
BOSS - Zack
You will fight Zack twice consecutively and the first go around you can simply pummel him. During the second fight he will unleash the deadly Meteor spell and lengthy combos that easily leave Terra in critical condition. Your best bet is to stay on the offensive against Zack and keep him immobilized. Shotlock is immensely recommended during this fight and healing should be top priority whenever you have less than full health. Leaf Bracer, an ability you most likely have by now, will allow you to heal more easily and is safer. Once More and Second Chance will also be more than helpful if you managed to get those abilities already. If you haven’t then maybe you will have Aqua’s level 2 D-Link for Auto-Life which will also do the trick. Remember that immobilizing him is the key and also to use Shotlock to become immune during his combo attack.
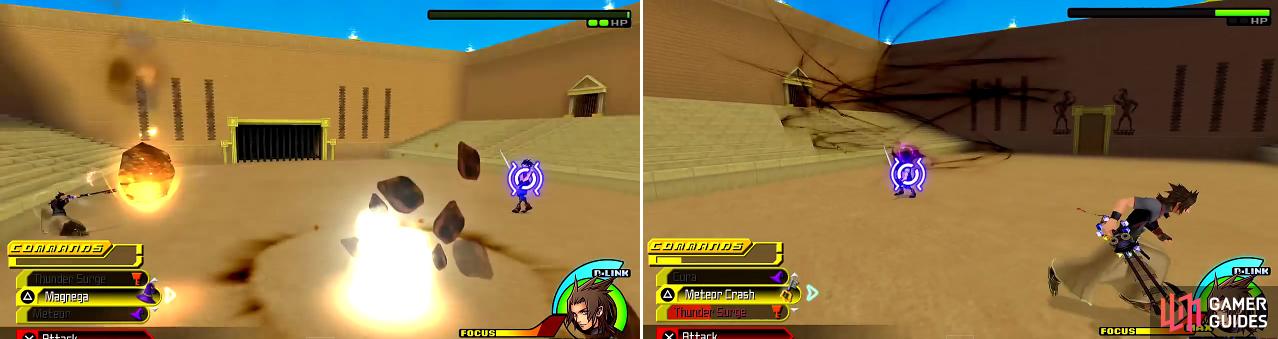
Zack uses Meteor (left) which you will need to avoid by dashing around. If you see him start to use a skill (right) then unleash Shotlock or another strong attack on him to finish him.
Prizes
| Prize Category | Name |
|---|---|
| Power Up | Deck Capacity +1 |
| Dimension Link | Zack |
| Keyblade | Mark of a Hero |
After defeating Zack you should return to the Coliseum to find Prize Pods in the southeast corner of the southern area, Town Near Thebes. You can also talk to Hercules to participate in a mini-game and net a few new commands including Sonic Blade . Head over to Deep Space once you’re all finished up.
Unversed Mission - Shade Jelly
Location : Town Near Thebes
Reward : Stopga
1 Star: 1’00“00+
2 Star: 0’31“00 - 0’59“00
3 Star : 0’00“01 - 0’30“59
The trick here is to defeat all 300 Shade Jelly using clearing commands like Magnega and Meteor, Mega Flare, Thundaga, etc… There really isn’t much else to it, just stack some heavy commands and go to town.
No Comments