Taking Down the Organization
Check out the computer for a scene with King Mickey then head down the Corridors again. Defeat the Heartless and Nobodies, this includes new enemies in the Dancer and Crimson Jazz. After the scene you’ll be back at the Postern. If you have High Jump Lv2 and Aerial Dodge you can get Edge #4 down at the bottom now. The hole in the wall leads to the Cavern of Remembrance, a brand new area in the Final Mix. You can enter now, but it’s not advised.
Monster - Dancer
Dancers move around nimbly and kick to deal damage to Sora. In addition, a Dancer can grapple Sora and toss him for around 30% of his HP. The easiest way to deal with Dancers is to use Magnet.
Monster - Crimson Jazz
Crimson Jazz are relatives of the Emerald Blues and are essentially a powered up version of the Red Nocturne from the first game. They use powerful Fire magic to cause explosions in a chain that follow Sora and can deal very heavy damage. To avoid this, move quickly or use Reflect. There are two versions of the Mine attack, some are small and the others are few but large. Crimson Jazz are immune to Fire and take full damage from Blizzard so utilize that spell to deal with them. They can also use a Shockwave if you get too close.
Continue to the Restoration Site where you’ll square off with more Nobodies. Once they are defeated yet another scene takes over. From the Bailey head down into the new area to square off with your first Organization XIII member.
BOSS - Demyx
Demyx may claim to be a lousy fighter but he has quite an arsenal of attacks and makes for a tough battle. Right from the start you’ll have to deal with his Water Dancers. He shouts “Dance Water, Dance!” before using this move and you’ll face it more than once. You must defeat all the Dancers before time runs out or you are defeated. The best way to tackle this obstacle is to hit one then use the Reaction Command “Wild Dance” to quickly defeat a large number of them; repeat until they are defeated.
Demyx himself will begin attacking at this point. He uses a myriad of attacks: Water Dash, Bubble Blaster, Bubble Drop, Water Finish, and Pillar Cast. The first move involves Demyx dashing forward and forming a circle of pillars around him. Get in close or far away, just don’t be inbetween to avoid that move. Bubble Blaster can be Guarded or Reflected, but Bubble Drop requires you to move. Water Finish is used after Demyx shouts, “Get to the beat!” and he’ll strike with his Sitar sending out numerous pillars of water. It’s a hard attack to dodge, sometimes easier to get hit the first time then use Aerial Dodge to avoid the next. Lastly, Demyx can just use a simple Pillar Cast where water pillars chase Sora.
Now and again you’ll get the opportunity to use “Show Stealer” when Demyx starts marching towards Sora, “Ain’t it a blast?” This move will stun Demyx for a little while and allow you to get in some good damage. Throughout the battle try to avoid using Drive Forms because battles against Organization XIII have a higher chance to change into Anti-Form which could be lethal in this battle.
Rewards : Armor Slot (Sora), Blizzard Element (Sora), Blizzard Boost (Donald), HP +5 (Goofy)
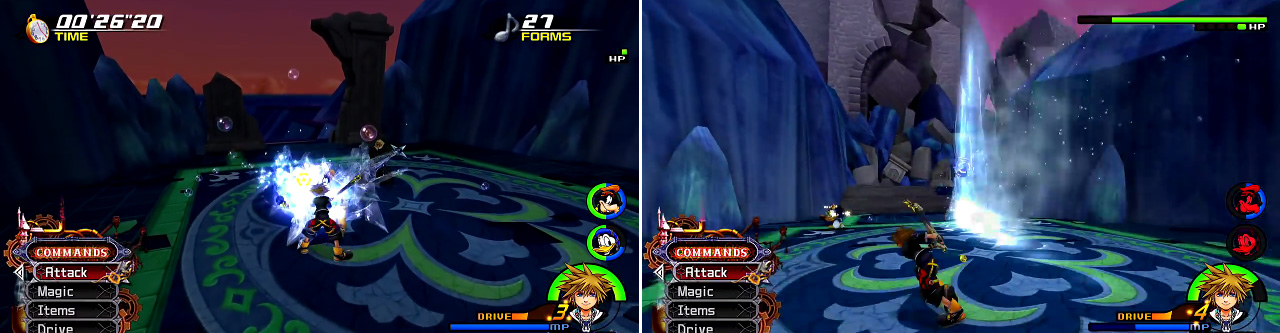
Deymx summons Forms (left) that you must defeat within the allotted time. Use Reaction Commands. Watch our for the water jets Demyx shoots out (right).
Battle of 1000 Heartless
During the scene Goofy gets taken out so he won’t be in the party for this fight. You’ll have a series of fights where Tifa, Leon, and Cloud aid Sora. Enter the Crystal Fissure where you’ll get Goofy back and acquire another Cure Element . Open the four chests here to claim the following: Torn Pages (17/43) The Great Maw Map (18/43), an Energy Crystal (19/43), and an AP Boost (20/43). Save your game and head into the next area.
In this next battle you are responsible for defeating 1000 Heartless. The best way to do this is using the Reaction Commands “Rising Sun” and “Sparkle Ray” to obliterate large chunks at a time. It’s a pretty fun battle and you’re sure to gain a bunch of experience points from it.
BONUS : Guard Break (Sora)
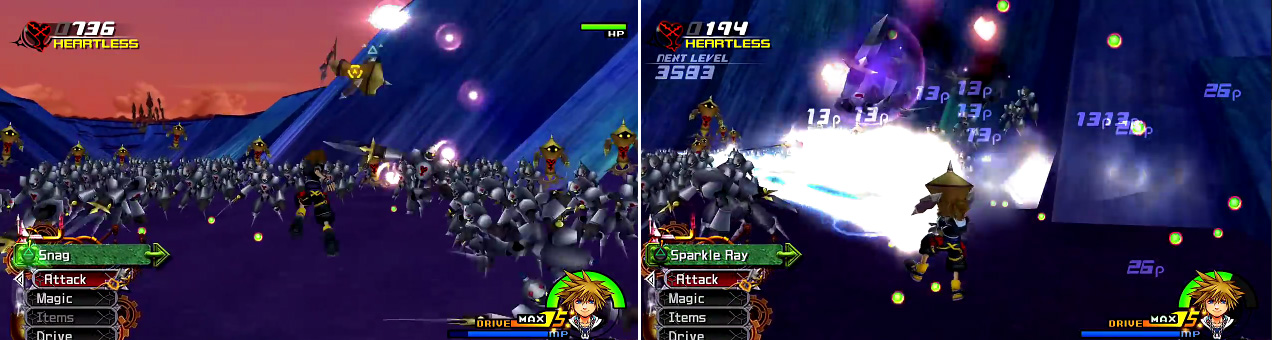
You can use the gold Heartless as weapons. Snag them (left) and then use Sparkle Ray (right) to defeat multiple Heartless in a row.
Monster - Neoshadow
Neoshadows attack in clusters like the normal Shadows. They are faster and stronger than them however and fight more strategically. Watch for when they start to move then strike them with a combo to easily defeat them. In a group, use the Reaction Command “Wind Dance” also referred to as “Aerial Dance” to deal substantial damage to the Neoshadows and end the battle with little damage incurred.
Another scene takes place and afterwards you obtain Secret Ansem’s Report 1. The next scene that takes place is exclusive to the Final Mix. In the end you wind up with some Ice Cream and a Picture . Return to Hollow Bastion and open the two chests in the Restoration Site to obtain the Moon Recipe (15/43) and an AP Boost (16/43). Head back to the Postern and talk to Yuna then open the chest to receive the Gull Wing Keyblade (21/44). If you return to the Borough you’ll find Neoshadows and can grab the Twilight #4 puzzle piece with Aerial Dodge and High Jump Lv2. Since you are here, you may as well visit Pooh.
No Comments