The group called the Mushroom XIII consists of thirteen Mushroom Heartless that wear black coats like the Organization XIII. They each have a specific requirement to fulfill and completing the challenge for all results in a reward from the final Mushroom. Once defeated, a Mushroom drops one of the Tranquil materials. Even-numbered Mushrooms drop Shields and odd-numbered Mushrooms drop Staves. For winning at the highest requirement (the Goal) you will receive a Premium Mushroom for odd numbers and Limited Mushroom from even numbers.
Goals are given for B/A/S ranks. Only a B is required for journal completion. B/A/S Ranks give 0/10/100% chances of getting a Limited Mushroom or Premium Mushroom.
Mushroom I
Location : The World That Never Was - Memory’s Skyscraper
Goal : Hit the mushroom 70 times
Rank A : Hit the mushroom 94 times
Rank S : Hit the mushroom 99 times
Drops : Pleasure Mushroom, Pleasure Mushroom+, Precious Mushroom, Precious Mushroom+, Premium Mushroom, Tranquil Shard, Tranquil Stone, Tranquil Gem, Tranquil Crystal
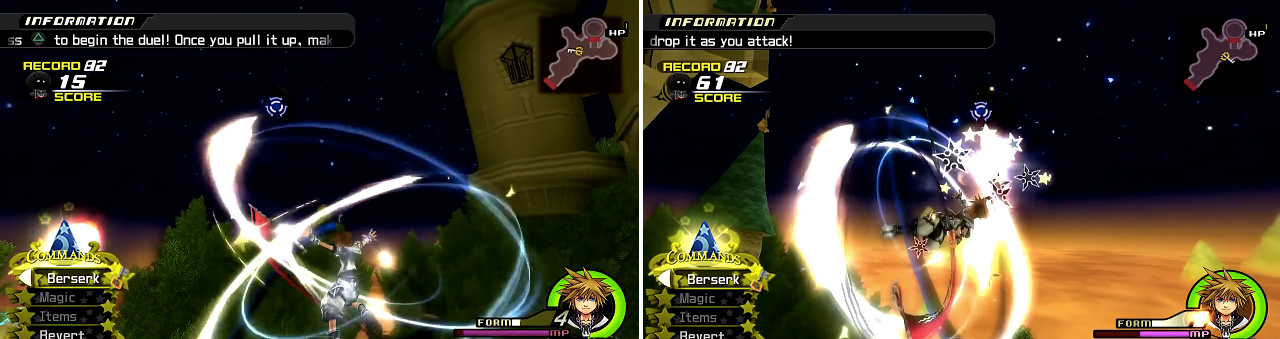
Unequip all Combo Plus and equip all Negative Combo that you have, then equip Fenrir. Start the battle in Wisdom Form then use the “Reversal” Reaction Command to confuse Mushroom I. This leaves it open for a slight second, allowing you time to get a full combo in and being in Wisdom Form you’ll reach the maximum of nine hits before Mushroom I recovers. Repeat this several times to achieve at least the Goal (Rank B).
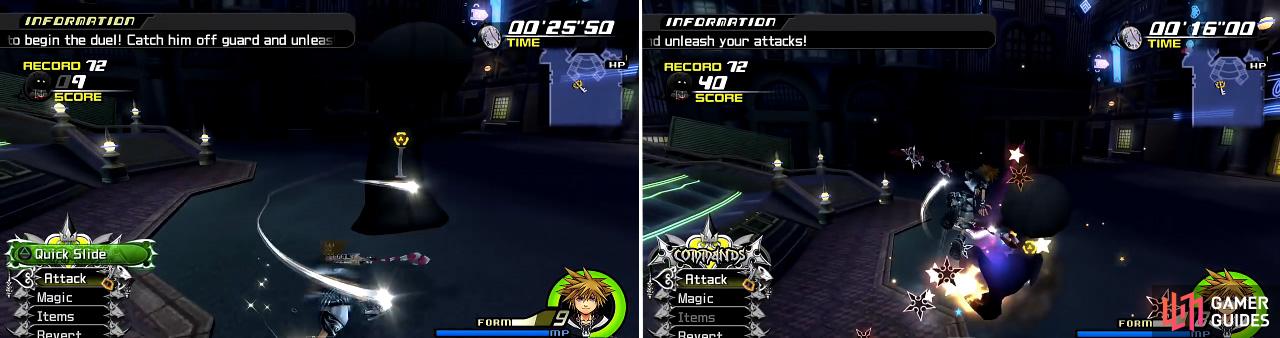
Using the Reversal (left) allows you to slide behind him and combo him (right).
Mushroom II
Location : Halloween Town - Christmas Tree Plaza
Goal : Avoid 80 attacks
Rank A: Avoid 97 attacks
Rank S : Avoid 99 attacks
Drops : Happy Mushroom, Happy Mushroom+, Palatial Mushroom, Palatial Mushroom+, Limited Mushroom, Tranquil Shard, Tranquil Stone, Tranquil Gem, Tranquil Crystal
The best way to defeat this Mushroom is in Final Form. Start the battle then head to the wall and jump, followed by Square to Guard. Sora will float in the air reflecting the attacks constantly. Avoiding the attacks increases points but hitting the Mushroom with its own attacks does as well. When Mushroom II fires a large attack just use Reflect.

You will be bombarded so just do your best to guard the attacks. You can Reflect attacks back at the Mushroom (right) for a higher score.
Mushroom III
Location : Beast’s Castle - Bridge
Goal : Score 450 points
Rank A : Score 495 points
Rank S : Score 500 points
Drops : Pleasure Mushroom, Pleasure Mushroom+, Precious Mushroom, Precious Mushroom+, Premium Mushroom, Tranquil Shard, Tranquil Stone, Tranquil Gem, Tranquil Crystal
Equip all Draw skills and equipment that you have, including Follow the Wind. When you start, Mushroom III will float around dropping orbs that must be collected. It seems hard but if you stay directly in the middle of the bridge and just Quick Run back and forth you’ll always have Draw to pick up the orbs that reach the edges. Essentially, just follow the Mushroom back and forth – a tactic best done with the camera set to manual so you can lock it in position.

Air Gliding around will help you mop up orbs quickly as well dashing in general when the Mushroom gets too far away.
Mushroom IV
Location : The Land of Dragons - Palace Gate
Goal : Defeat 85 mushrooms without taking damage
Rank A : –
Rank S : –
Drops : Happy Mushroom, Happy Mushroom+, Palatial Mushroom, Palatial Mushroom+, Limited Mushroom, Tranquil Shard, Tranquil Stone, Tranquil Gem, Tranquil Crystal
This challenge is fairly simple and is best completed in Wisdom Form. Use wide sweeping circles to stay far away while taking out Mushroom IV. Do not Lock-On, the Auto-Lock feature will target the closest Mushroom and that is the safest method of not getting hit.
Stay in Wisdom Form and shoot from a distance as well as glide around to avoid attacks.
Mushroom V
Location : Agrabah - The Cave Of Wonders: Treasure Room
Goal : Wake the mushroom within 10 seconds
Rank A : Wake the mushroom within 4 seconds
Rank S : Wake the mushroom within 3 seconds
Drops : Pleasure Mushroom, Pleasure Mushroom+, Precious Mushroom, Precious Mushroom+, Premium Mushroom, Tranquil Shard, Tranquil Stone, Tranquil Gem, Tranquil Crystal
Unequip all Combo Plus and equip all Negative Combo, then equip Fenrir. Switch to Limit Form so you can get a quick Finisher in, then spam Thunder a few times. With high enough Strength and Magic you can reach 3 seconds fairly easily.

Use powerful attacks for this Mushroom. Combos or Thunder with high magic work well.
Mushroom VI
Location : Olympus Coliseum - Underworld Caverns: Atrium
Goal : Defeat all the mushrooms within 45 seconds
Rank A : Defeat all the mushrooms within 35 seconds
Rank S : Defeat all the mushrooms within 31 seconds
Drops : Happy Mushroom, Happy Mushroom+, Palatial Mushroom, Palatial Mushroom+, Limited Mushroom, Tranquil Shard, Tranquil Stone, Tranquil Gem, Tranquil Crystal
Boost your Magic so it is high as possible and enter Final Form. Start the challenge then defeat the first Mushroom with a strike. After this, Lock-On and use Thunder to defeat entire waves of Mushrooms. This makes Mushroom VI one of the simpler challenges because Thunder hits so many at once.
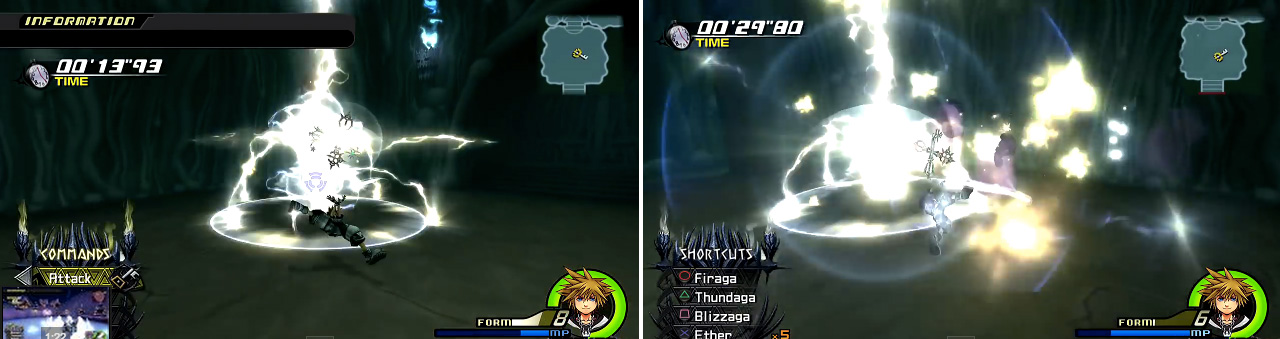
Thundaga for this Mushroom works a treat as it hits multiple enemies and can clear out a wave in one hit.
Mushroom VII
Location : Twilight Town - Tunnelway
Goal : Defeat the mushroom within 10 seconds
Rank A : Defeat the mushroom within 4 seconds
Rank S : Defeat the mushroom within 3 seconds
Drops : Pleasure Mushroom, Pleasure Mushroom+, Precious Mushroom, Precious Mushroom+, Premium Mushroom, Tranquil Shard, Tranquil Stone, Tranquil Gem, Tranquil Crystal
This Mushroom is a pain because it knocks you around and chases quickly. The best way to win is to raise your Magic as high as possible then use Reflect followed by Thunder. This combination can kill Mushroom VII in time for Rank S.
Make sure to Reflect attacks (left). If you get hit (right) this will pretty much kill your chance of getting an S Rank.
Mushroom VIII
Location : Twilight Town - The Tower
Goal : Juggle the mushroom 85 times
Rank A: Juggle the mushroom 97 times
Rank S : Juggle the mushroom 99 times
Drops : Happy Mushroom, Happy Mushroom+, Palatial Mushroom, Palatial Mushroom+, Limited Mushroom, Tranquil Shard, Tranquil Stone, Tranquil Gem, Tranquil Crystal
Equip Combo Plus as much as possible and have the Fatal Crest equipped. Take off MP Haste, MP Hastera, and MP Rage then start the battle using Thunder until you are out of MP. This immediately gets a lot of hits up and puts you into Berserk Charge mode. Now you can follow with Aerial Combos until the final hit knocks Mushroom VIII away. At this point you can use Thunder again or Trinity Limit to shoot your score upwards to Rank S.
Being in Berserk mode and repeatedly attacking will make juggling this Mushroom much easier.
Mushroom IX
Location : Hollow Bastion (Radiant Garden) - Castle Gate
Goal : Spin the mushroom 75 times without stopping
Rank A : Spin the mushroom 97 times without stopping
Rank S : Spin the mushroom 99 times without stopping
Drops : Pleasure Mushroom, Pleasure Mushroom+, Precious Mushroom, Precious Mushroom+, Premium Mushroom, Tranquil Shard, Tranquil Stone, Tranquil Gem, Tranquil Crystal
Start with Wisdom Form and just use Thunder until you are out of MP. Continue firing with Wisdom Shot, equipped with Rumbling Rose and Finisher Plus abilities, to really rack up the spins.
Berserk mode can also be helpful here but Wisdom Form is the best way to achieve an S Rank.
Mushroom X
Location : Port Royal - Isla De Muerta: Moonlight Nook
Goal : Defeat the mushroom within 55 seconds
Rank A: Defeat the mushroom within 37 seconds
Rank S: Defeat the mushroom within 36 seconds
Drops : Happy Mushroom, Happy Mushroom+, Palatial Mushroom, Palatial Mushroom+, Limited Mushroom, Tranquil Shard, Tranquil Stone, Tranquil Gem, Tranquil Crystal
The trick to getting Rank S is by using Donald’s Limit Flare Force. Stand back and watch the real Mushroom X then use Duck Flare, then Rocket Flare from a distance. Megaduck Flare is available at this point, so lock onto the real Mushroom X and let him have it. While the Limit is going off, be sure to pummel the Mushroom as well. Use an item to recover your MP and do this again; it should only take two rounds of this.
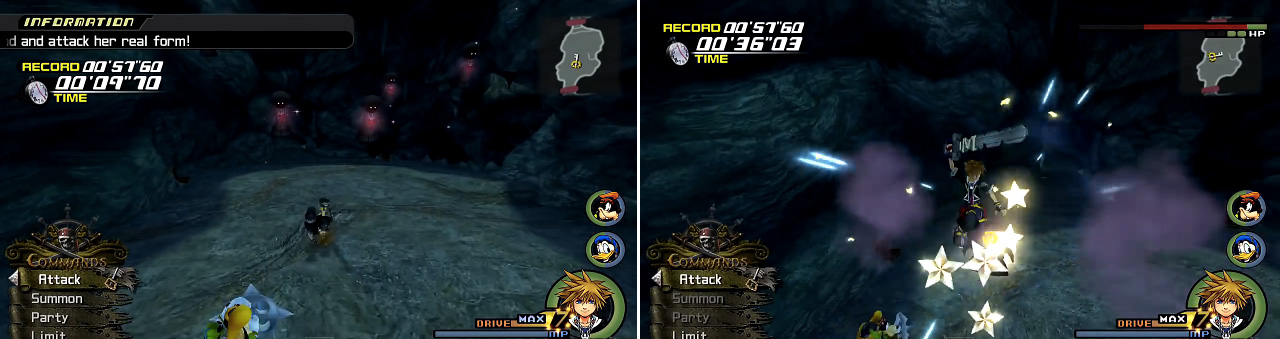
You must watch where the Mushroom goes to find the real one (left). After you find it, attack it to deal damage. Normal attacking will not get you the S Rank however.
Mushroom XI
Location : Timeless River - Waterway
Goal : Reduce the counter to 0 within 19 seconds
Rank A : Reduce the counter to 0 within 16 seconds
Rank S : Reduce the counter to 0 within 15 seconds
Drops : Pleasure Mushroom, Pleasure Mushroom+, Precious Mushroom, Precious Mushroom+, Premium Mushroom, Tranquil Shard, Tranquil Stone, Tranquil Gem, Tranquil Crystal
Equip all Finisher Plus and Negative Combo abilities, obviously getting rid of Combo Plus then equip Rumbling Rose. Start in Wisdom Form then begin the challenge. The objective is to keep a medium distance while firing quickly to get the added Finisher damage.

Stay at medium range in Wisdom Form and just shoot the Mushroom as often as you can.
Mushroom XII
Location : Twilight Town - The Old Mansion
Goal : Kill 40 mushrooms in 30 seconds
Rank A : Kill 47 mushrooms in 30 seconds
Rank S : Kill 50 mushrooms in 30 seconds
Drops : Happy Mushroom, Happy Mushroom+, Palatial Mushroom, Palatial Mushroom+, Limited Mushroom, Tranquil Shard, Tranquil Stone, Tranquil Gem, Tranquil Crystal
This is another challenge best completed with Wisdom Form. Lock your camera to an overhead view then move back and forth through the middle. Use short bursts so you aren’t doing a super combo, one hit should be enough to defeat a Mushroom. Thunder is useful for enemies you can’t see. If you are having trouble then use Berserk Charge in Wisdom Form.
Wisdom Form is essential for this challenge too. You can also use Thunder for any enemies you can’t see or to kill faster.
Mushroom XIII
Location : Hollow Bastion - The Great Maw
Goal : N/A
Drops : Winner’s Proof, Tranquil Proof
If you have completed at least Rank B (Goal) on the other 12 Mushrooms then Mushroom XIII rewards you for a job well done.


No Comments