

Medicinal Salvebrush
Aloy is a bad liar, but fortunately Rost’s convictions and authority are pretty feeble, so she gets to keep her metal trinket. A short time later, Aloy will be presented with a bow - it’s time to learn how to survive in the wilds. What could a bow designed for a six year old possibly kill? Squirrels? One would suspect it wouldn’t be worth the effort to even craft such a tool, but nevertheless, it’s tutorial time.
Your first lesson concerns Salvebrush - because in the future, there are magical healing herbs that can instantaneously heal traumatic injury. Post-apocalyptia doesn’t sound too bad, in some ways. Follow Rost forward a short distance and press [Triangle] to harvest the Medicinal Salvebrush, which will partially fill up your Medicine Pouch. The current contents of your Medicine Pouch are denoted by the green bar under your health bar, a red segmented bar, both of which are at the top left of your screen. Press the [Up] button to consume Salvebrush Berries, which depletes your Medicine Pouch in proportion to the amount of healing desired - the longer you press the button the more berries you’ll eat, the more your green (medicine) bar will drain, filling your red (health) bar. Don’t worry, Salvebrush Berries are common throughout the world, as long as you’re willing to forage you should always have an ample supply at hand.
Stealth and Distractions
Mastering your stealth skills is crucial as you play. The game will call on them time and again so practice!
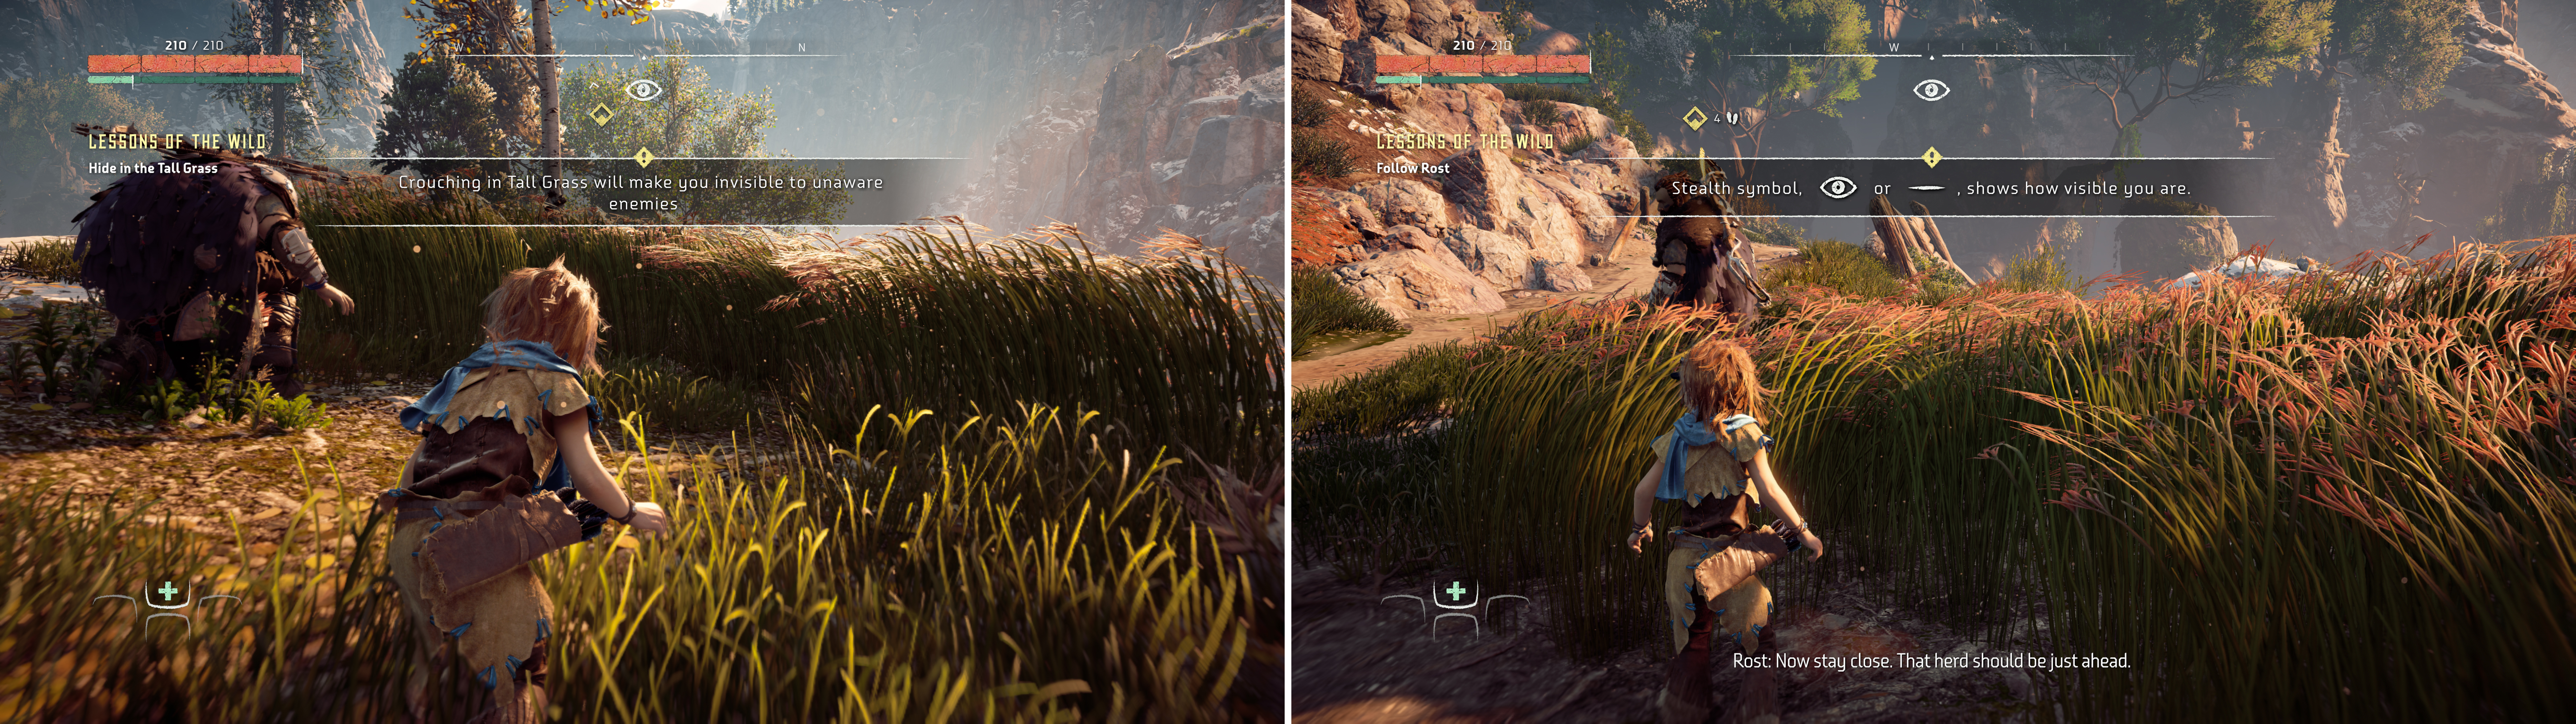
Follow Rost again and he’ll talk a bit about machines, before you will finally encounter some of the critters. Press the [Square] button when prompted to crouch, which doesn’t just help you navigate tight spaces, but also counts as stealth mode in this game. You’ll make less noise and be less visible while crouched, but to be fully hidden you’ll need to follow Rost into the tall red grass. Note the Stealth Symbol (eye icon) at the center of your compass - it rates your visibility, which generally tracks how easy you are for enemies to detected. A full eye means you’ll fully observable, while a closed eye means you’re hidden in cover, and the more noise you make, the more brackets will appear on either side of the eye.
Rost will command you to remain still as he talks about the machine walking around, which he calls a Watcher - these small robots serve as sentries for other robots, sounding an alarm when they spot threats and summoning allies to deal with said threats. You can tell when you’re detected through various means - as an enemy becomes aware of you, a circle will fill up yellow, and when it’s full the enemy will become suspicious. Suspicious enemies will start actively looking for threats, moving to investigate whatever alerted them. In this state, further detection will result in the yellow detection circle to start to fill up red - if the circle turns fully red, the foe will fully detect you and turn hostile. A white circle outside of the yellow or red alert icon will indicate how much time the enemy will continue to search for you. If you successfully hide from an enemy with a red alert icon, it’ll deplete back to the yellow suspicion circle, which in turn will deterioriate back down to the default unwary status. As an added visual cue, the Watcher’s eye determines its awareness - blue means unaware, yellow means suspicious, and red means hostile.
When the Watcher passes, follow Rost south-west to another patch of grass and wait for a second one to pass, then repeat the process again by sneaking north to a third patch of grass. After you’re in the clear, follow Rost until you spot another human in the distance, although the physical divide is, again, less of an issue than the cultural one. Trail Rost across two bridges and he’ll introduce you to the timid Strider robot by scaring them off - which will allow you to see the detection circle in action.
Your next task is to pick up some Rocks, at Rost’s behest, of course. They can be found immediately after the second bridge, so scoop up as many Rocks as you wish (at least three). Rost will then continue on to a tree up ahead and explain his plan - you’ll need to lure a Watcher to Rost by throwing one of those handy-dandy Rocks you picked up a moment ago. After explaining this, Rost will take cover in some grass on the ground below you and you’ll shortly be prompted to execute his plan. How you can hear him calling to you but the Watcher can’t is anyone’s guess. Must be why they’re called “Watchers” and not “Listeners”, eh? Anyway, throw the Rock at the location to the west, which is marked by the icon (not the yellow quest icon) by holding down the [Down] button, positioning the aiming arch, then releasing the [Down] button. Succeed and the Watcher’s eye will turn yellow and it’ll move close to Rost - close enough for him to perform a stealth kill. Neat.
Aloys First Hunt
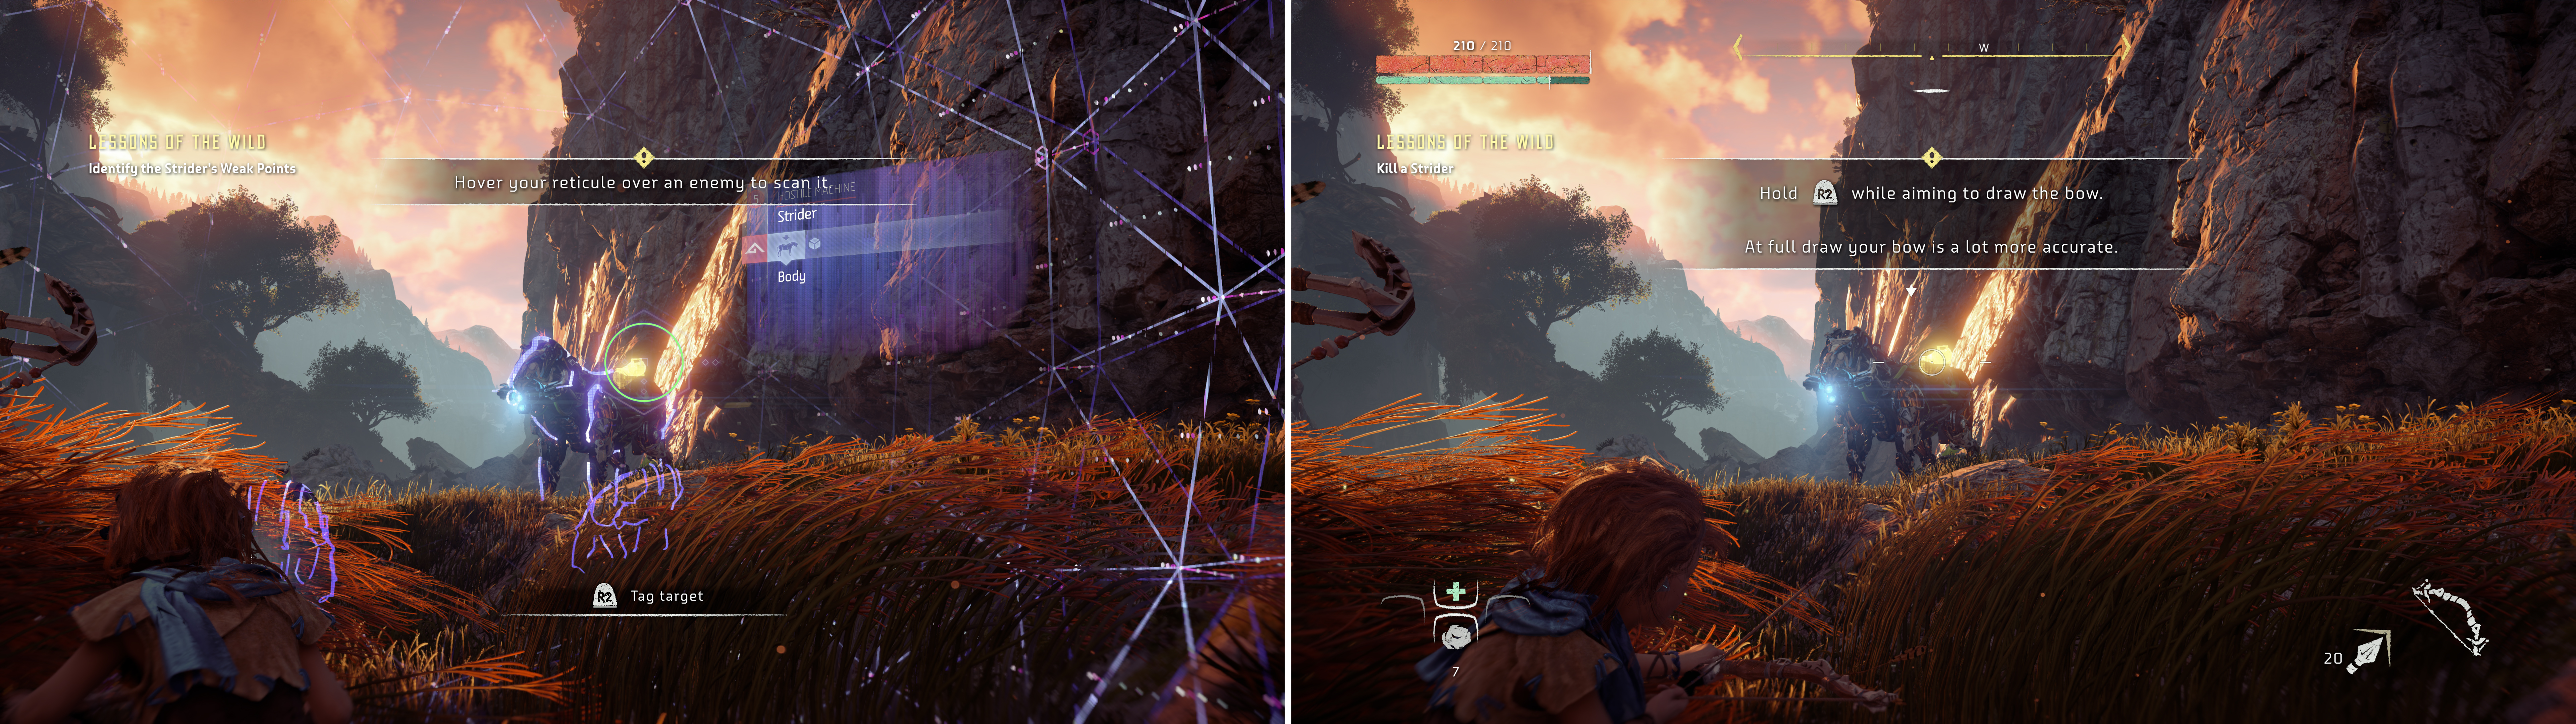
Scanning new enemies (left) is almost essential on harder difficulties. Get used to this and practice timing your shots (right) now.
Once the Watcher is disposed of, wait for Rost’s command and drop down some ledges to the west to reach him. Hold down the [Triangle] button near the Watcher when prompted to search its remains and claim some Metal Shards. Metal Shards serve as currency in post-apocalyptia, and they also are used to craft arrows. Yep, you’re literally shooting away money every time you use your bow. Fortunately, they’re an abundant resource. After you have some Metal Shards - courtesy of the scrapped Watcher - you’ll be instructed to gather some Ridge-Wood. Two stalks of it can be found to the northwest and north. Harvest them, then hold down the [L1] button to open up the Weapon Wheel, then hold down [X] to craft a Hunter Arrow Pack - in magical videogame land, one Metal Scrap and two pieces of Ridge-Wood turn into ten Hunter Arrows. Convenient.
Follow Rost again and sneak into a patch of grass near some Striders. Time to make your first kill. At Rost’s prompting, engage Focus mode by pressing the [R3] button, then scan the nearby Strider to reveal its weaknesses, namely the Blaze Canister on its back, which will glow yellow when the Strider is scanned. When the scan is complete, disable Focus mode and Aloy will answer. After he continues to deny the usefulness of your old world trinket he’ll prompt you to take down the Strider. Hold down [L2] to aim, then hold down [R2] to draw your bow. The more you draw, the more accurate your shot will be, and the game spits on all notions of archery - you can hold your bow drawn with no effort whatsoever, so there’s no reason why you shouldn’t take a fully-charged shot here. Aim for the Blaze Canister and shoot it off, but don’t get complacent, as that won’t be enough to dispatch the Strider. Aim subsequent shots at its eye, but keep in mind that while its eye is a weak spot, it’s nowhere near as vulnerable as the Blaze Canister. Pelt it with arrows until it falls, and if it moves to charge, press the [Circle] button to roll out of the way.
The Rescue
After the Strider has fallen and its herd has fled, approach the ruined machine and loot the remains. Rost will congratulate you before a noise draws his attention. Follow him once again (press [L3] to sprint) until you arrive at the scene of the commotion. The Nora hunter you saw earlier has gotten himself into some trouble, and unimaginative Rost discounts him as dead. Aloy, however, with the power of her device and sheer hard-headedness decides to take matters into her own hands, and Rost, inept as ever, fails to check Aloy’s impulsiveness.
When you’re back in control you’ll be hidden in some tall grass. Activate Focus mode and scan the Watcher near you, and while your cursor is over the scanned robot, press the [R1] button to highlight its tracks. This will reveal a series of triangles on the ground denoting the Watcher’s route, which should give you an edge in evading the machine. Wait for it to pass, then sneak over to another patch of grass to the southwest. From here turn west to find another Watcher, scan it, highlight its path, then when it’s facing west move over to the grass near it. Once there, you need merely wait for it to work its way to the eastern part of its route before you continue sneaking southwest, under a broken tree and to a stream. At this point turn south and head for some more tall grass, being wary of the Watcher that patrols nearby.
Make it to the tall grass across the stream and scan the next Watcher here, then wait for it to make its way to the eastern or western-most end of its route before sneaking south into another patch of grass. You should now be in the clear, just head south through the grass and turn east to reach the Nora boy. Talk to the boy (Teb) by pressing [Triangle] near him, then quickly make your way east. There’s only one more Watcher in your way, and you know the routine by now. Just wait for the Watcher to make it to the eastern end of its patrol (where it will waste time scanning the environment) and sneak east into the second patch of grass, then wait for it to make another rotation and when it’s scanning again, continue east to a third patch of grass. Now all you need to do is wait for it to head west, then continue east to reach safety.
Rost will finally see the value in Aloy’s “toy”, religious purity will once again get in the way of common gratitude, and Aloy will stomp off. Shortly afterwards Aloy will be again inconvenienced by the intolerance due to outcasts, and this time you’ll get a choice of how to respond - your first of many reaction choices you’ll be given throughout the game. Aloy can respond one of three ways, she can CONFRONT the problem, she can use her INSIGHT to mitigate the situation, or she can pick the HEART option, which usually allows her to express compassion or her conviction. In this particular case, Aloy’s CONFRONT impulse will be checked by Rost’s impeccable archery, INSIGHT will use a bit of aggression to neutralize an ongoing threat, while the HEART option will defuse the situation in a way without making Aloy out to be aggressive.
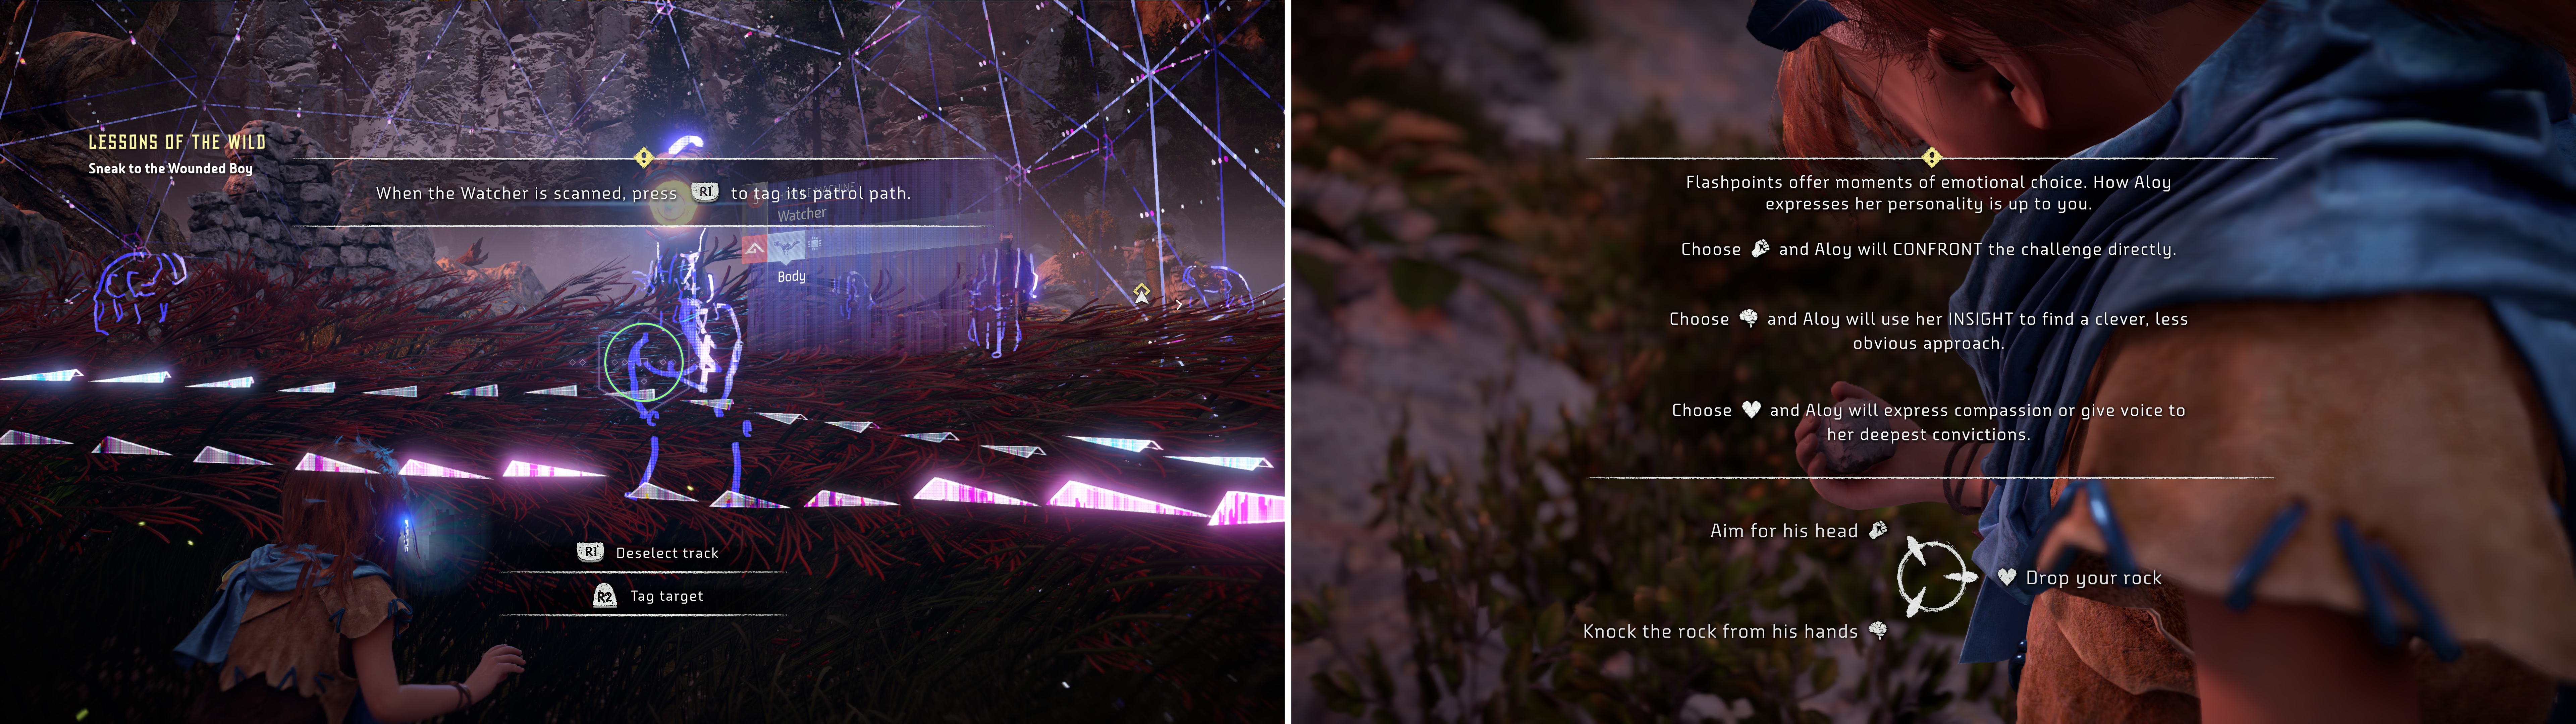
Scan the Watchers then highlight their tracks (left). Story dialogue options happen periodically through the game (right) and how you respond is up to you.
Do what you wish, then enjoy a montage as Aloy leaves her childhood behind in the single-minded pursuit of the Matriarch’s boon.


No Comments