
This page details a guide for how to complete the Shield Breaker Muspelheim Challenge in God of War Ragnarok. We’ll cover how to defeat the Einherjar Captain and the Fierce Stalker boss, including when you can damage them and when you need to kill the additional enemies such as Reavers, Nightmares, Dark Elves, Gulons, and Draugr.
| Objective |
|---|
| Kill grunts to break the Elite enemy’s shield |
How to Complete the Shield Breaker Muspelheim Challenge in God of War Ragnarok
How to Defeat the Einherjar Captain in the Shield Breaker Challenge
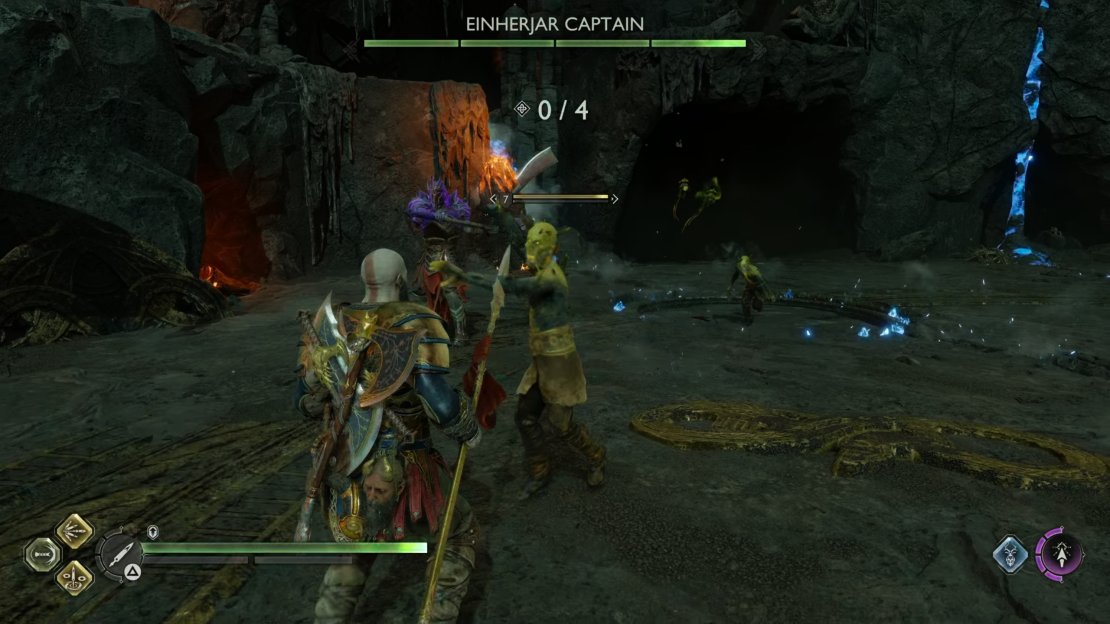
This is a unique Muspelheim Challenge which consists of you fighting an elite Einherjar Captain boss at its core, while fighting off various groups of enemies throughout the challenge. The key to completing this challenge is to understand that you won’t be able to damage the Einherjar Captain at all while there are other minor enemies alive on the battlefield. The word “minor” is used somewhat lightly here, since although each of the additional enemies which consist of Reavers, Nightmares, Dark Elves, Gulons, and Draugr are much less powerful than the Einherjar Captain Boss, they still have slightly more health than their regular counterparts, making them more difficult to kill, especially while dealing with the Einherjar Captain boss.
| Wave | Enemies | Objective |
|---|---|---|
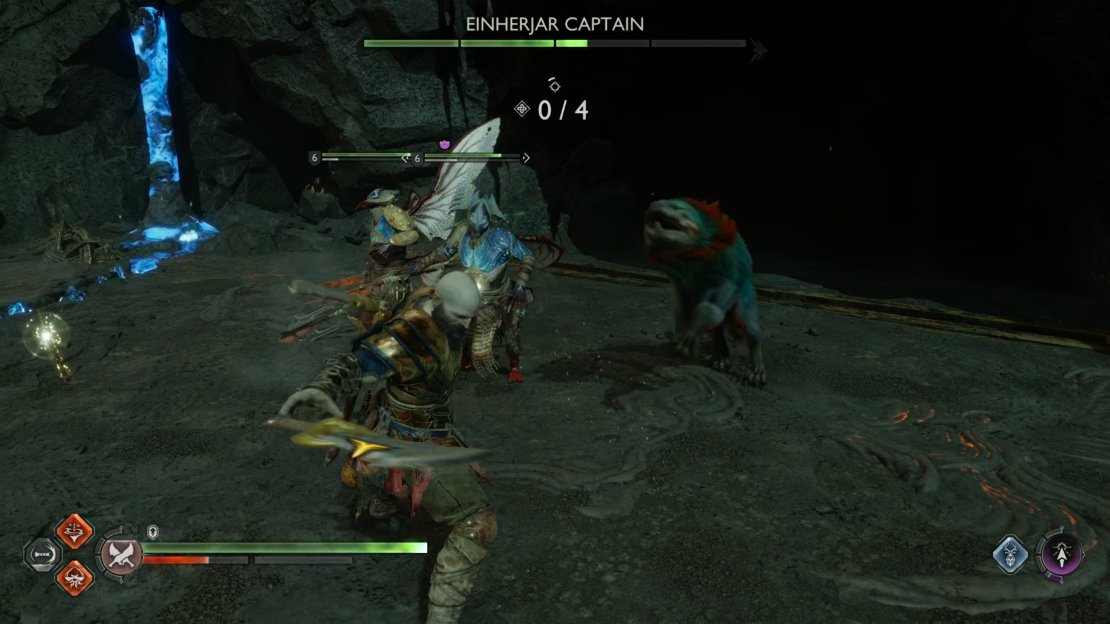
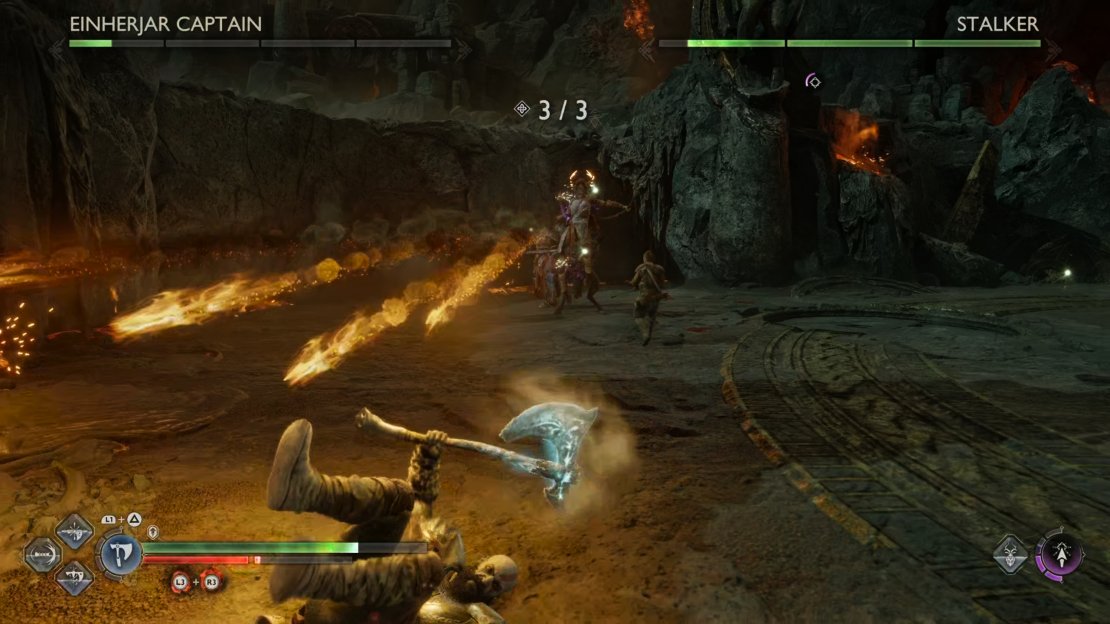
| 1 | 2x Reaver, 2x Nightmare | The Einherjar Captain is immune to damage until you kill the Reavers and Nightmares |
| 2 | 2x Dark Elf, 2x Gulon | The Einherjar Captain is immune to damage until you kill the Dark Elves and Gulons |
| 3 | Stalker boss, 3x Draugr | The Stalker and Einherjar Captain are immune to damage until you kill the three Draugr |
As you can see in the table above, there are three main waves to this challenge, and new types of enemies are introduced in each one. You will only be able to damage the Einherjar Captain for a short period of time between each wave, so you should save your most damaging Runic Attacks or abilities from Relics / Sword Hilts for those moments if possible. With that said, you may want to kill all of the additional enemies as quickly as possible and focus on the boss using melee or ranged combos, which is a perfectly viable tactic as well. If you’re struggling with avoiding the main attacks from the boss while there are multiple enemies around, this may be the best option for you.
The first two waves in this challenge are fairly easy, especially since you should have encountered plenty of Reavers, Nightmares, Dark elves, and Gulons before at this point in the game, so you should know their attack patterns reasonably well. If you’re still having trouble avoiding some of their attacks, you can always resort to some of your most damaging Runic Attacks to get them down quickly. As a reminder, the key with the Nightmares is to kill them quickly with as many ranged attacks as possible, including the use of arrows from your Companion (either Atreus or Freya).
(1 of 3) You will face two Reavers and two Nightmares in the first wave.
Another thing to remember here is that the Reavers will almost always explode a few moments after you kill them, so it’s important to get out of their melee range as soon as possible. The Dark Elves can be evasive, but you can bring these down both with ranged attacks and melee combos, while avoiding their flashing orbs which will temporarily blind you if you’re hit by them. The Dark Elves will often place these in front of them as they back off, so try not to mindlessly run towards the Dark Elves whenever you see them retreat. Instead, wait for the orbs to explode at a distance so they don’t hit you. The Gulons are much more simple in their attack patterns and they will likely run straight into your melee combo range.
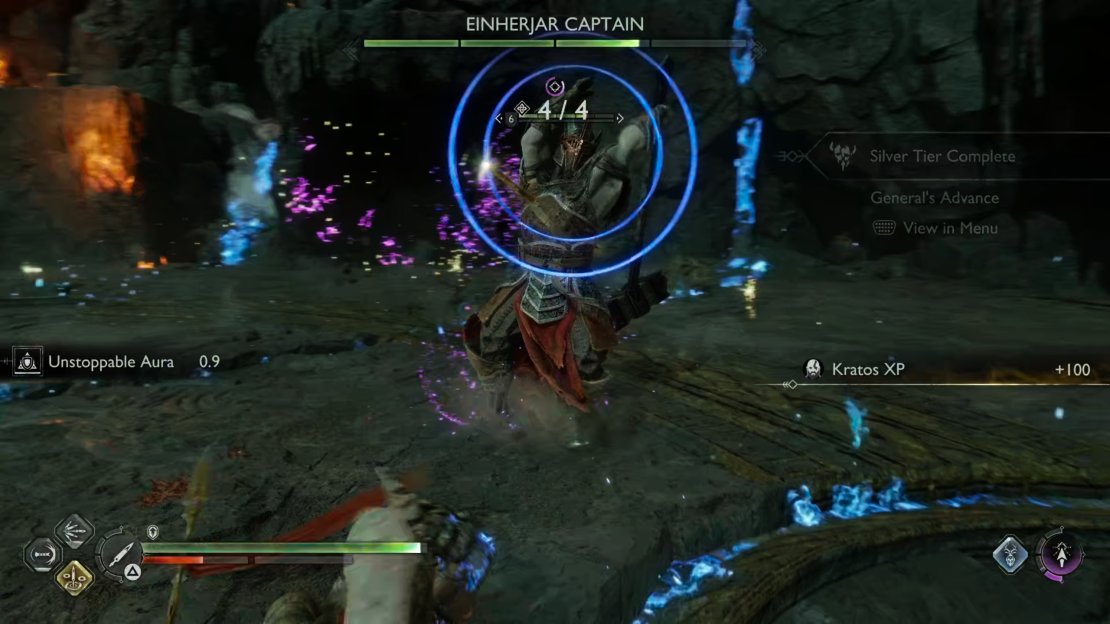
The main concern you’ll have while trying to defeat each of these enemies is the attack patterns of the Einherjar Captain themselves. The boss doesn’t have an enormous range of attacks so it shouldn’t take too long to become familiar with all of them. The most damaging are those which utilize Bifrost damage, such as the Bifrost wall which the boss can cast multiple times in a row. It should be easy enough to avoid this with a quick dodge to either side of the wall, as shown in the gif below. You will also need to learn when to block / parry, and when to dodge specific melee attacks, also shown in the gif below.
As a general rule, you can block or parry any regular melee attack which has a yellow ring indicator, or no ring indicator at all. However, the only way to avoid red ring attacks is to dodge them, or you can sometimes use Runic Attacks or Relic / Sword Hilt abilities to interrupt them. The Hilt of Gram is a good Sword Hilt to use for this, and one you should have by now since it’s acquired early on in the game. Dodging is the more reliable method to stop these attacks since most Runic Attacks, Relics or Sword Hilts have long cooldowns, but they work just the same if you’re in a tight spot.
Other than the main attacks described above, the Einherjar Captain will also use some attacks which are preceded by concentric blue rings. The only way to interrupt these is by double tapping  to use your shield ability, but you will need to make sure that you’re within melee range of the boss, as this won’t work if you’re too far away. For this reason it’s a good idea to stay as close to the Einherjar Captain as possible throughout the fight, so that you avoid a situation where the boss is about to use the concentric blue ring attack, but you’re too far away to interrupt it.
How to Kill the Stalker (Untamed Fury) Boss in the Shield Breaker Challenge
The third and final wave of this challenge introduces the Stalker boss, which is essentially a version of The Untamed Fury. You won’t be able to damage this boss until you’ve killed all three Draugr which spawn alongside it, so be sure to focus on killing them first and don’t waste any useful abilities on the Stalker boss in the process. These Draugr have slightly more health than their normal counterparts, but they don’t have any additional special attacks other than their melee combos, and they will sometimes launch lava balls at you, but these can be blocked, parried, or avoided by dodging.
The fight with the Stalker boss will function in much the same way as the one with The Untamed Fury, so you should have some experience in bringing this one down. If you haven’t faced that boss yet, the page linked above has some detail on how to find her, and how to avoid most of her attacks. This boss is quite swift and evasive, capable of stepping back away from melee range in a split second, which can cause you to miss landing Runic Attacks if you’re not careful. The boss has multiple melee attacks in the form of hoof stomps and kicks, which can hit you either while you’re facing her or while you’re behind her.
You will also find that this version of the Stalker boss is capable of firing three fire arrows at you. There’s very little warning of this other than a yellow ring indicator, and the boss will raise her arms slightly as she draws the bow. You can block or parry this attack if you’re quick enough, but you can also dodge left or right to avoid it. Dodging backwards or forwards will often result in you being hit by the arrows, so a sense of where to dodge, not just when to dodge, is important.
Another ranged attack that the Stalker can use is grabbing you with her rope and then pulling you in to pummel you with her hoofs. You’ll see a red ring indicator when this is about to be executed, so you can dodge out of the way. The Stalker boss can be just as deadly from range as she can be in melee, but you have one advantage from range: you can hit her head / antlers with the Leviathan Axe or Draupnir Spear, which will stun her for a few moments at specific times. Mimir will usually comment by telling you to hit this area when the Stalker is vulnerable, so be sure to listen out for that and take advantage of it.
One thing to keep in mind is that if you take too long killing the Stalker and Einherjar Captain, another wave of Draugr (and sometimes lesser Einherjar) will spawn, so you’ll need to kill them again before you can inflict any damage to either boss. However, the Draugr can provide some relief if you have a build which benefits from stun grabs, such as the one detailed on our Endurance Challenge page. The most important gear here is the Nidavellir Chest Armor and Battle-Scarred Sauroter Spear Handle. The former provides you with a Health Burst when stun grabbing enemies, and the latter a Rage Burst, both of which can be used on the Draugr to replenish vitals.
So long as you understand the basic principles of this fight in terms of when you can hit the Einherjar Captain and Stalker boss, and when you need to focus on the additional enemies in stead, you shouldn’t find this one too difficult. You’ll need to stay on your toes and make good use of Runic Attacks, Relic or Sword Hilt abilities when necessary, and be ready to avoid the most deadly attacks from the bosses. It may take you a few attempts to learn the attack patterns from each boss and how to avoid them, but you’re better off learning these as soon as possible to avoid panicking whenever you see those red ring or concentric blue ring indicators.
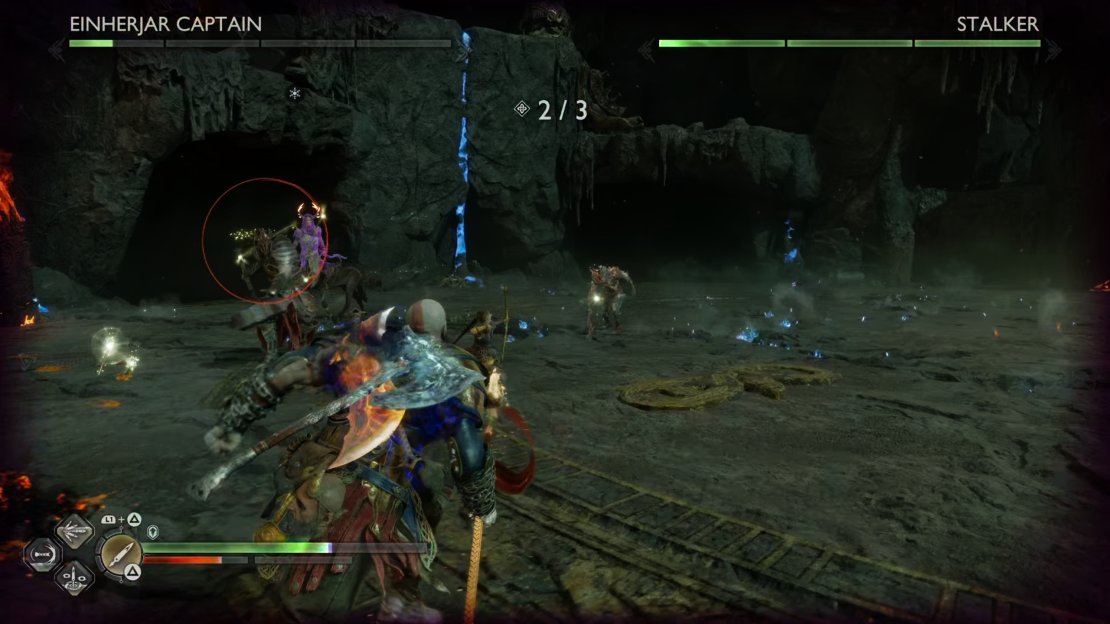
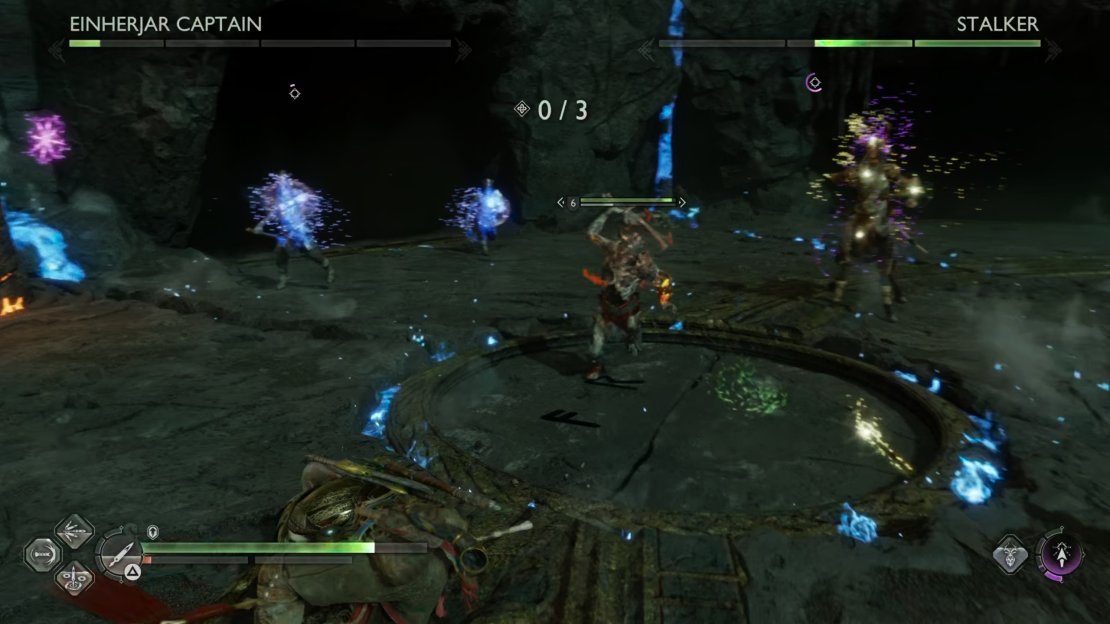
(1 of 3) In the third wave, kill the Draugr first, then the Einherjar Captain, then the Stalker
Shield Breaker Muspelheim Challenge Rewards
All of the below rewards can be earned repeatedly each time that you complete this challenge, other than the Muspelheim’s Force Amulet of Yggdrasil Enchantment. If you want to see what this enchantment does alongside many others, see our comprehensive page on them here:
| Reward | Quantity |
|---|---|
| Kratos XP | 1500 |
| Companion XP | 1500 |
| Blazing Embers | 2 |
| Smouldering Embers | 3 |
| Glowing Embers | 1 |
| Divine Ashes | 2000 |
| Hacksilver | 40000 |
| Muspelheim’s Force (Unique Amulet of Yggdrasil Enchantment) | 1 |
No Comments