
![]() Seeker’s Tokens are Dragon’s Dogma 2 ‘s big collectible hunt. There are 240 of them to find and we have crafted a handy route map to discover them all. There are plenty of rewards from the Seeker’s Token list at Guild halls, ranging from unique rings, to pretty sweet armor, and special
Seeker’s Tokens are Dragon’s Dogma 2 ‘s big collectible hunt. There are 240 of them to find and we have crafted a handy route map to discover them all. There are plenty of rewards from the Seeker’s Token list at Guild halls, ranging from unique rings, to pretty sweet armor, and special ![]() Mage staves that allow them to resurrect themselves, among other specialties. To help you through the track, we are here to assist Arisens worldwide with finding all Seeker’s Tokens in Dragon’s Dogma 2. If you’re looking for a more logical walkthrough, with recommended routes of each region, tips and more, then you’ve come to the right place.
Mage staves that allow them to resurrect themselves, among other specialties. To help you through the track, we are here to assist Arisens worldwide with finding all Seeker’s Tokens in Dragon’s Dogma 2. If you’re looking for a more logical walkthrough, with recommended routes of each region, tips and more, then you’ve come to the right place.

This map will assist you with finding all Seeker’s Tokens in Dragon’s Dogma 2.
Seeker’s Token Regional Locations
Before continuing, we have managed to find around 220 of the tokens on our Dragon’s Dogma 2 interactive map.
With that said, here’s a Table of Contents of the regions broken down for the Seeker’s Token locations in Dragon’s Dogma 2.
- North Vermund Seeker’s Token Locations
- Southeast Vermund Seeker’s Token Locations
- Vernworth Seeker’s Tokens Locations
- Sacred Arbor to Harve Village
- Border Rest Seeker’s Token Locations
- Battahl Seeker’s Token Locations
- Southern Battahl
- Volcanic Island Seeker’s Token Locations
North Vermund Seeker’s Token Locations
Since North Vermund is the area that you start the main game in, we recommend the order in a way you’ll naturally explore the game via main storyline quests. Please note that the tokens on the far east side of the image will require main story progression to get you through the locked down checkpoint.
In addition, the caves along that road range from being somewhat dangerous to very dangerous. We advise returning to the ![]() Waterfall Cave to get the two tokens when you’re around level 20, thanks to to the difficulty of the
Waterfall Cave to get the two tokens when you’re around level 20, thanks to to the difficulty of the ![]() Chimera inside.
Chimera inside.
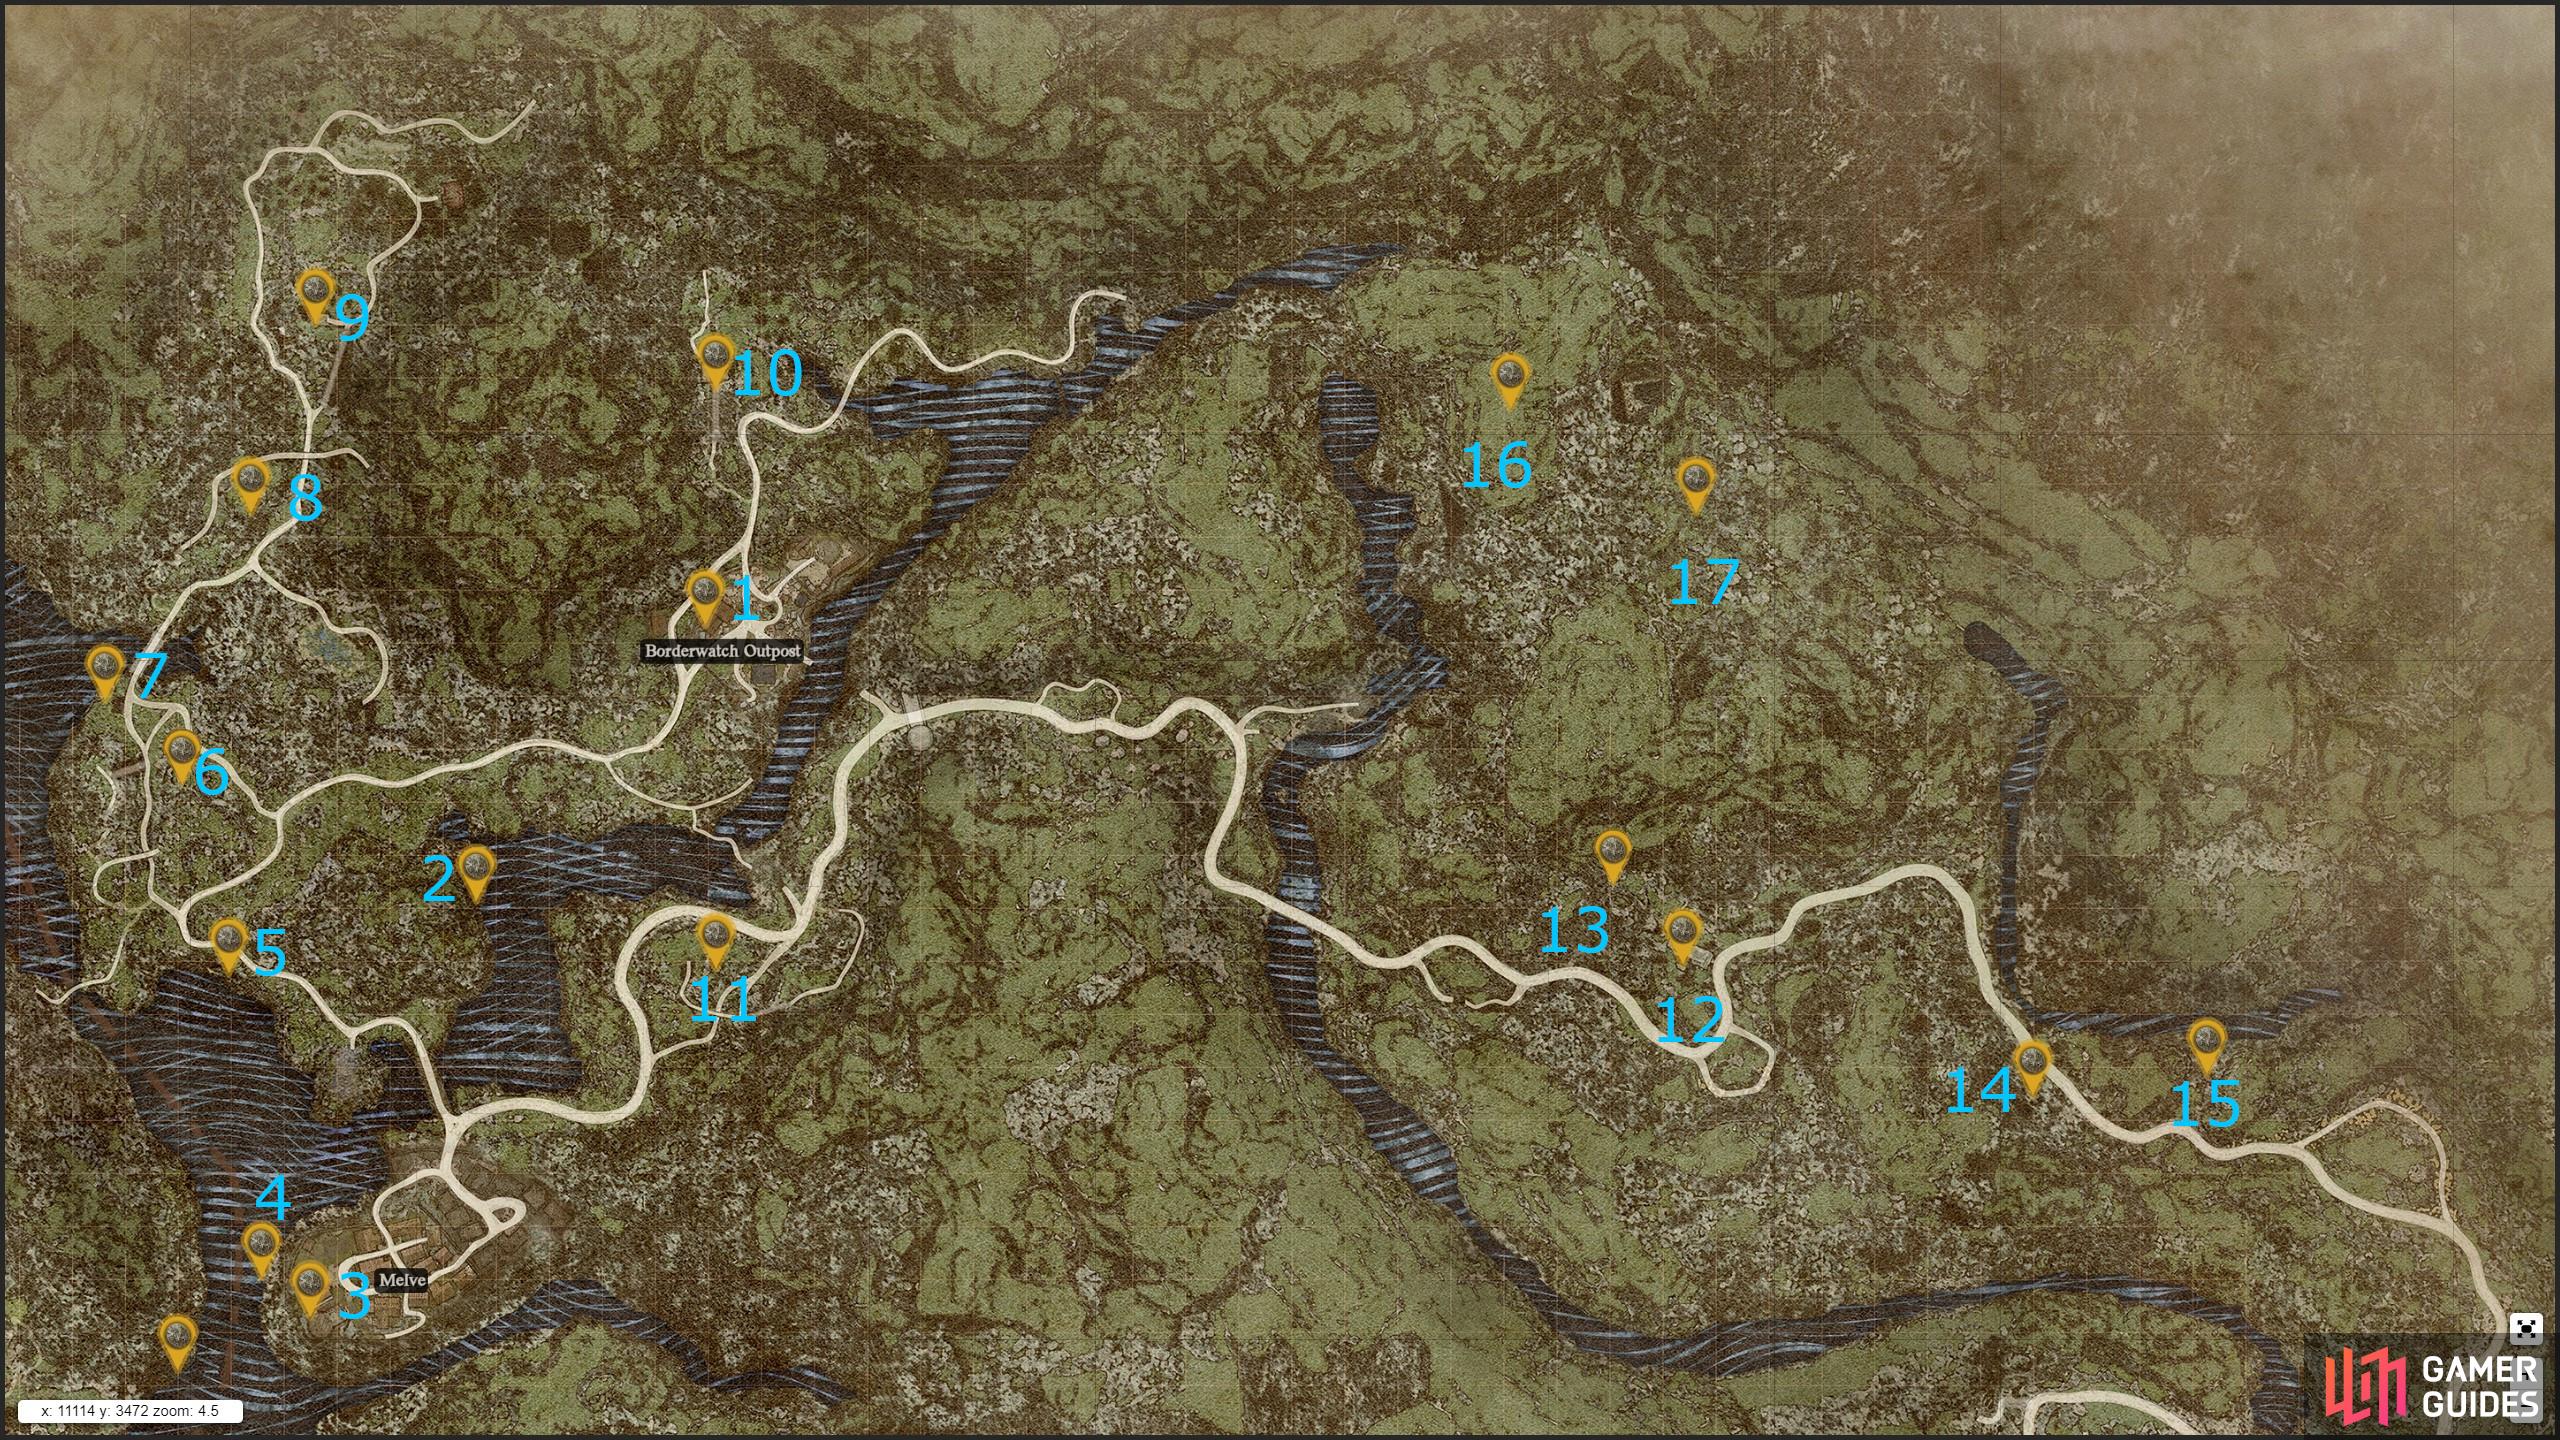
Here are all the Seeker’s Token locations in Northern Vermund that we know of.
| Token | Description | Map Marker |
|---|---|---|
| 1 | On top of the Commissary roof in |
Map Marker |
| 2 | On the cliff near the waterfall north of |
Map Marker |
| 3 | Next to the ballista on the western tower in |
Map Marker |
| 4 | Near the waterfall on the northwest coast of |
Map Marker |
| 5 | Follow the main road heading over the northern bridge of |
Map Marker |
| 6 | From Token 5, travel north towards a cliffside between the the roads you’re coming up to. On the northern side of the cliff should be a |
Map Marker |
| 7 | On the far western bridge, leading to the mountains, check the cliffside near the campfire for a |
Map Marker |
| 8 | Head into the mountains west of |
Map Marker |
| 9 | Ascend up the mountain trail and as you climb up, check for a statue. You’ll find a |
Map Marker |
| 10 | Go through |
Map Marker |
| 11 | Travel northeast from |
Map Marker |
| 12 | Along the main road leading east from Borderwatch Oupost. Travel along the road till you meet the ruin called |
Map Marker |
| 13 | Right above the |
Map Marker |
| 14 | Beside a ladder in the |
Map Marker |
| 15 | Proceed through the |
Map Marker |
| 16 | Look for a ledge inside the |
Map Marker |
| 17 | On the next floor up inside the |
Map Marker |
Southeast Vermund Seeker’s Token Locations
In this section, we’ll recommend an order for players to take based on starting at ![]() Vernworth City. Note that some of these locations, like the
Vernworth City. Note that some of these locations, like the ![]() Nameless Village, will require you to complete main story quests that take you to the Nameless Village to make it easier to access. Outside of that, most in the area should be accessible via exploring.
Nameless Village, will require you to complete main story quests that take you to the Nameless Village to make it easier to access. Outside of that, most in the area should be accessible via exploring.
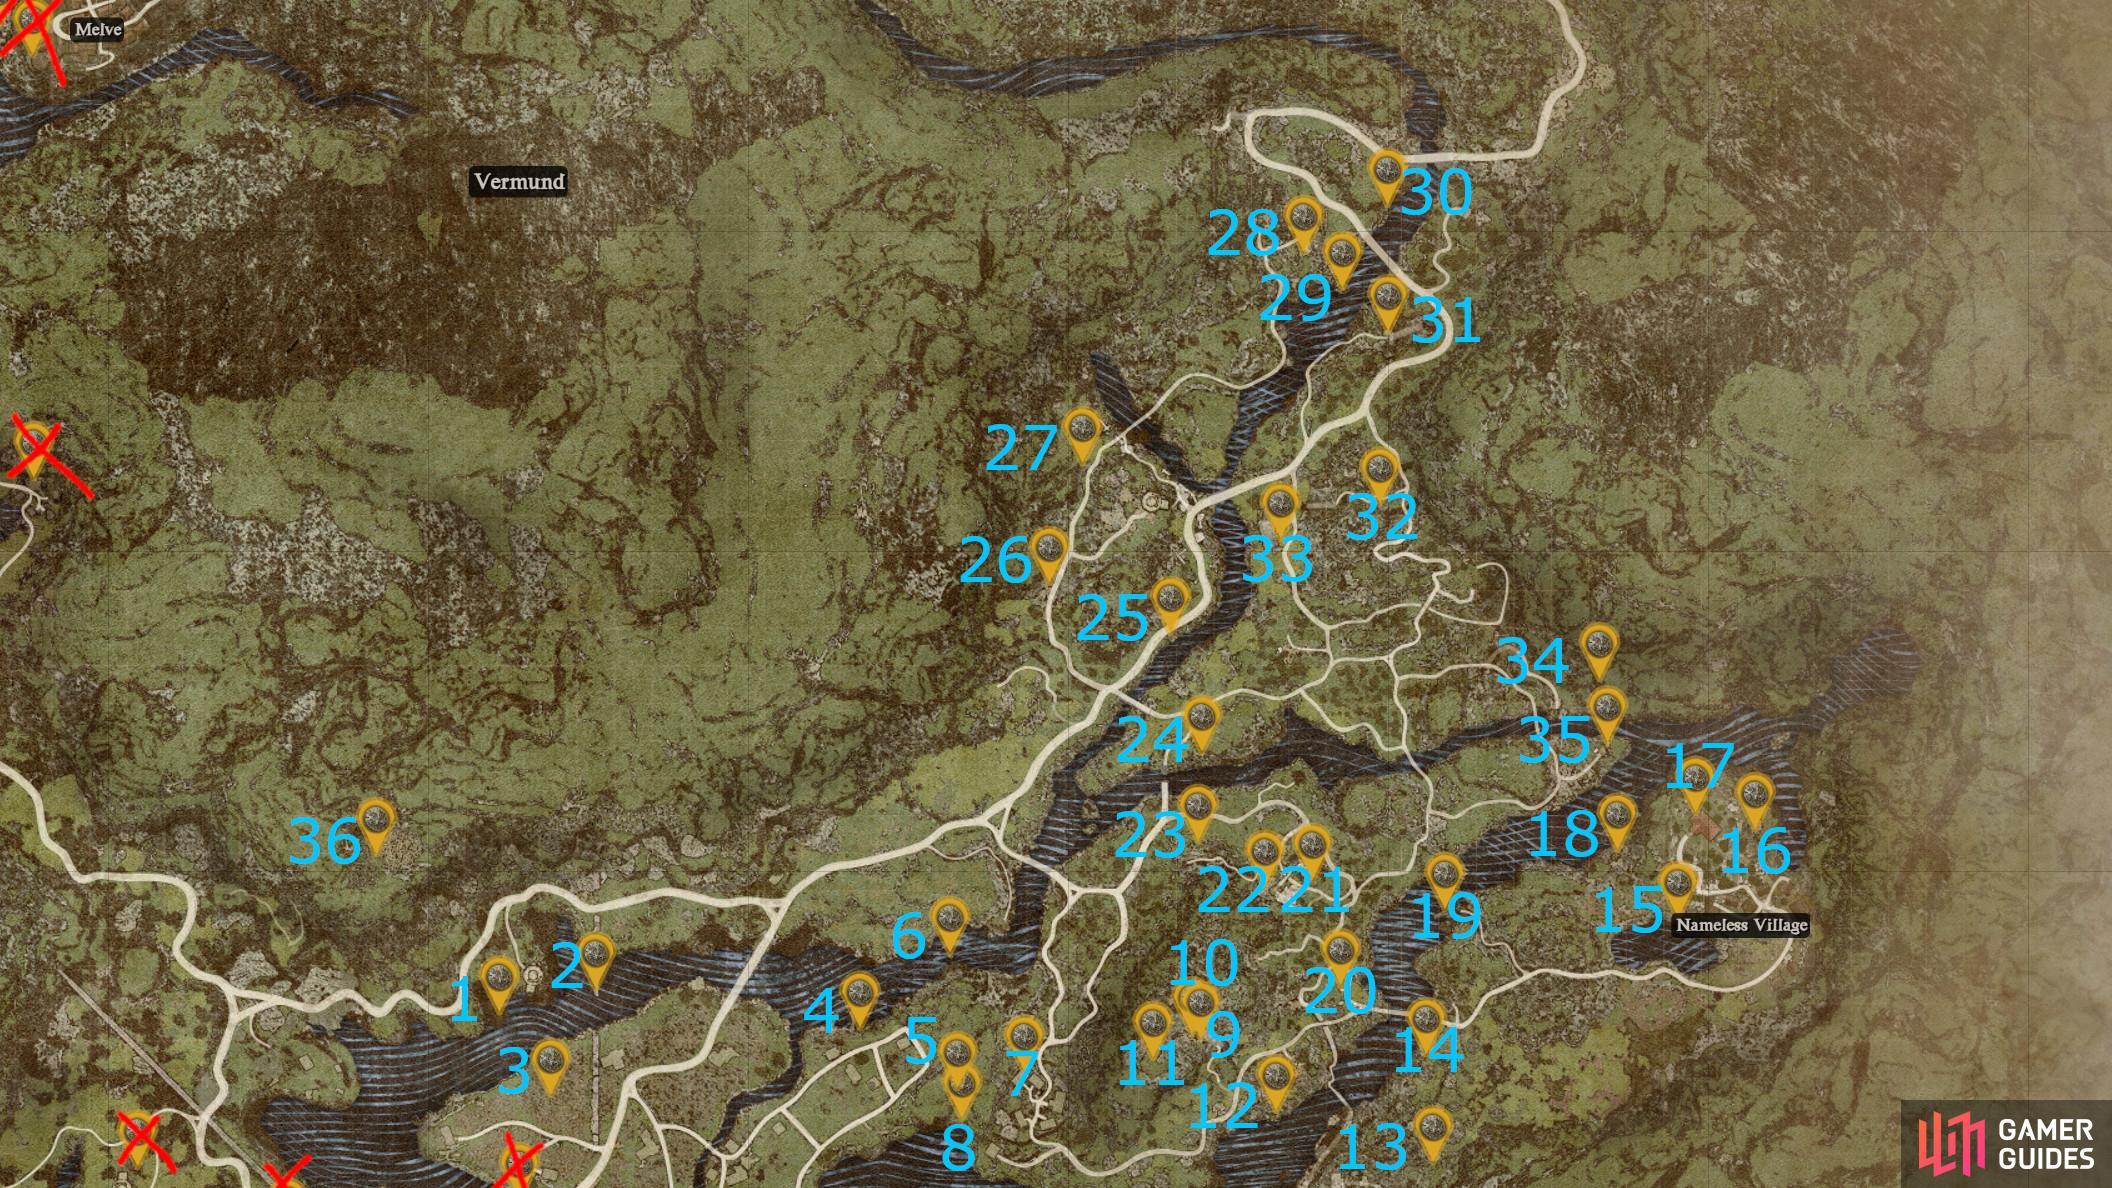
Here are all the southeast Vermund region Seeker’s Token locations you can find.
| Token | Description | Map Marker |
|---|---|---|
| 1 | Go to the main road directly north of the city. You’ll find the Token along the rocks by the river, near the |
Map Marker |
| 2 | Continue following the main road north of the city eastward. You should come across a ruined viaduct going towards the farming village. Along the top of the ruin over the water is a |
Map Marker |
| 3 | Go over the bridge leading south towards the other end of the ruined viaduct in the farming village area. You’ll find the Token along the grass in a farm to the west of the middle section of the ruined bridge. Line yourself up with the fourth viaduct pillar from the water, then head west to a small gap in the wheat. | Map Marker |
| 4 | Follow the smaller farming village’s east road to where the smaller river meets the wider river, and you should find the |
Map Marker |
| 5 | Head south and over the sea’s coastline, You should find a small cliff to the east near the end of the road. There’s a small dip by the tree next to the cliff edge that you can run and jump to easily climb up, but movement skills make it easier to climb. You’ll find a |
Map Marker |
| 6 | Go north over the river and then stick to the shoreline. You should find the |
Map Marker |
| 7 | Follow the main road east from Marker 7, then south into the |
Map Marker |
| 8 | Inside the Coastal Cave, which you can access by going to the western coastline from the Ruined Village. | Map Marker |
| 9 | From the |
Map Marker |
| 10 | Inside the |
Map Marker |
| 11 | Continue through the |
Map Marker |
| 12 | Head back out of the |
Map Marker |
| 13 | Go to the |
Map Marker |
| 14 | Go back over the main road between markers 12 and 13, then follow the main bridge towards |
Map Marker |
| 15 | Follow the track to the |
Map Marker |
| 16 | Travel towards the Old Manor building atop the village, then go to the northeast corner of it. There should be a Token overlooking the water. | Map Marker |
| 17 | Enter the Old Manor House at the end of the village. There should be a hole to the floor above near the |
Map Marker |
| 18 | Travel to the far west of the village towards the river. Follow the edge of the river till you see a Token on the cliff side, approximately north of the western edge of the lake if you need to line it up better. | Map Marker |
| 19 | Travel west along the main road leading from |
Map Marker |
| 20 | Head back over the bridge you took to get towards |
Map Marker |
| 21 | Move further north from the |
Map Marker |
| 22 | Continue traveling west of the ruin and climb the cliff. There should be a Token near the cliffedge overlooking the ruin. | Map Marker |
| 23 | Follow the pathway further west from the ruin marker, and then look towards a cliff near the |
Map Marker |
| 24 | Continue west from the main road and then use the main roads to cross over to the northern section. Turn right from the main road to head towards the broken bridge, and look for the rocks near the pathway for the next |
Map Marker |
| 25 | Go west and then north along the main road. You’ll come across a ruin along with the |
Map Marker |
| 26 | Continue west along the main road near the lake. You should see a wooden bridge heading south at top of the waterfall. There will be a waterfall here, with the Token near on some pebbles under the water. You should see it faintly glowing under the water just before the waterfall and brine begins. | Map Marker |
| 27 | Travel further north up the road at the ruins, and check left to find a ledge on the cliff. You can climb up with light encumbrance or some jumping support to reach a |
Map Marker |
| 28 | Continue traveling north from the road you’re on, all the way you can take it. At the end of the trail you’ll get a northern and eastern split. Take the eastern track to the Token. | Map Marker |
| 29 | Move southeast from the 28th marker, and you should find a statue along the cliffside near the water by the bridge. There’s a token at the statue. | Map Marker |
| 30 | Scale yourself down the hill, towards the |
Map Marker |
| 31 | Travel south down the bridge and then follow the main road. You should come to a turning, so stick to the main road. Follow it down, and then there should be a side road that takes you northwards near the river. Continue following the track towards the end, and you’ll find a |
Map Marker |
| 32 | Travel out of the road, go back to the main road, and then travel east along it. You now want to go south at the first turning. Follow that along until you reach a right turning, follow the road up, and grab the |
Map Marker |
| 33 | Between the |
Map Marker |
| 34 | Head southeast, as if you were following the roads towards the river facing the |
Map Marker |
| 35 | Travel south from this point over the river, and then turn left to the eastern tip of the second river, directly facing the |
Map Marker |
| 36 | Go into |
Map Marker |
Vernworth Seeker’s Token Locations
The Vernworth City Seeker’s Tokens are fairly dense, with many in quick succession of each other. It should be easy to find these Tokens whenever you’re ready. Some of the Tokens are locked behind certain objectives, however. We’ll have noted which ones in the description if necessary.

Here are all the Seeker’s Token locations in Vernworth city.
| Token | Description | Map Marker |
|---|---|---|
| 1 | Inside the Fountain in the Market Square. | Map Marker |
| 2 | Enter |
Map Marker |
| 3 | Go to the western edge of the city, following the path next to Clovia’s Barberie. You’ll find a statue at the end of the road, with a |
Map Marker |
| 4 | On top of the western gate. Climb the wall and then climb up the gate’s tower to get the |
Map Marker |
| 5 | Follow the western gate out of the city and go under the bridge on the opposite side of the river. | Map Marker |
| 6 | Go to the western road leading into the Noble Quarter. You’ll find a small white fountain near the road, with the |
Map Marker |
| 7 | Go behind the Chapel in the Noble Quarter, and look for the circular well. The |
Map Marker |
| 8 | On top of |
Map Marker |
| 9 | Climb up Baldwin’s House to enter the Sewer gate next to their house. Go through the sewer tunnel, and then turn right into the closed off tower pipe. The |
Map Marker |
| 10 | On the eastern part of the Castle’s Rampart. Requires climbing skills, such as the ice block, |
Map Marker |
| 11 | Travel to the southwest corner of the castle grounds, and look for a way to get on the outside of the castle walls. You should find the |
Map Marker |
| 12 | Move towards the Masquerade ball/dance hall building in the castle grounds. Climb the roof to find a |
Map Marker |
| 13 | Move north towards the |
Map Marker |
| 14 | Head into the Slums, and then access the Gracious Hand’s ruined tower. Requires you to complete the Heel of History quest to access it. Go to the room where the cargo is located and then look towards the northeast corner for the Token on the floor. | Map Marker |
| 15 | Travel to the northern wall near the northern city gate and look for the Token on the outside part of the wall. Overlooking the farming territory. | Map Marker |
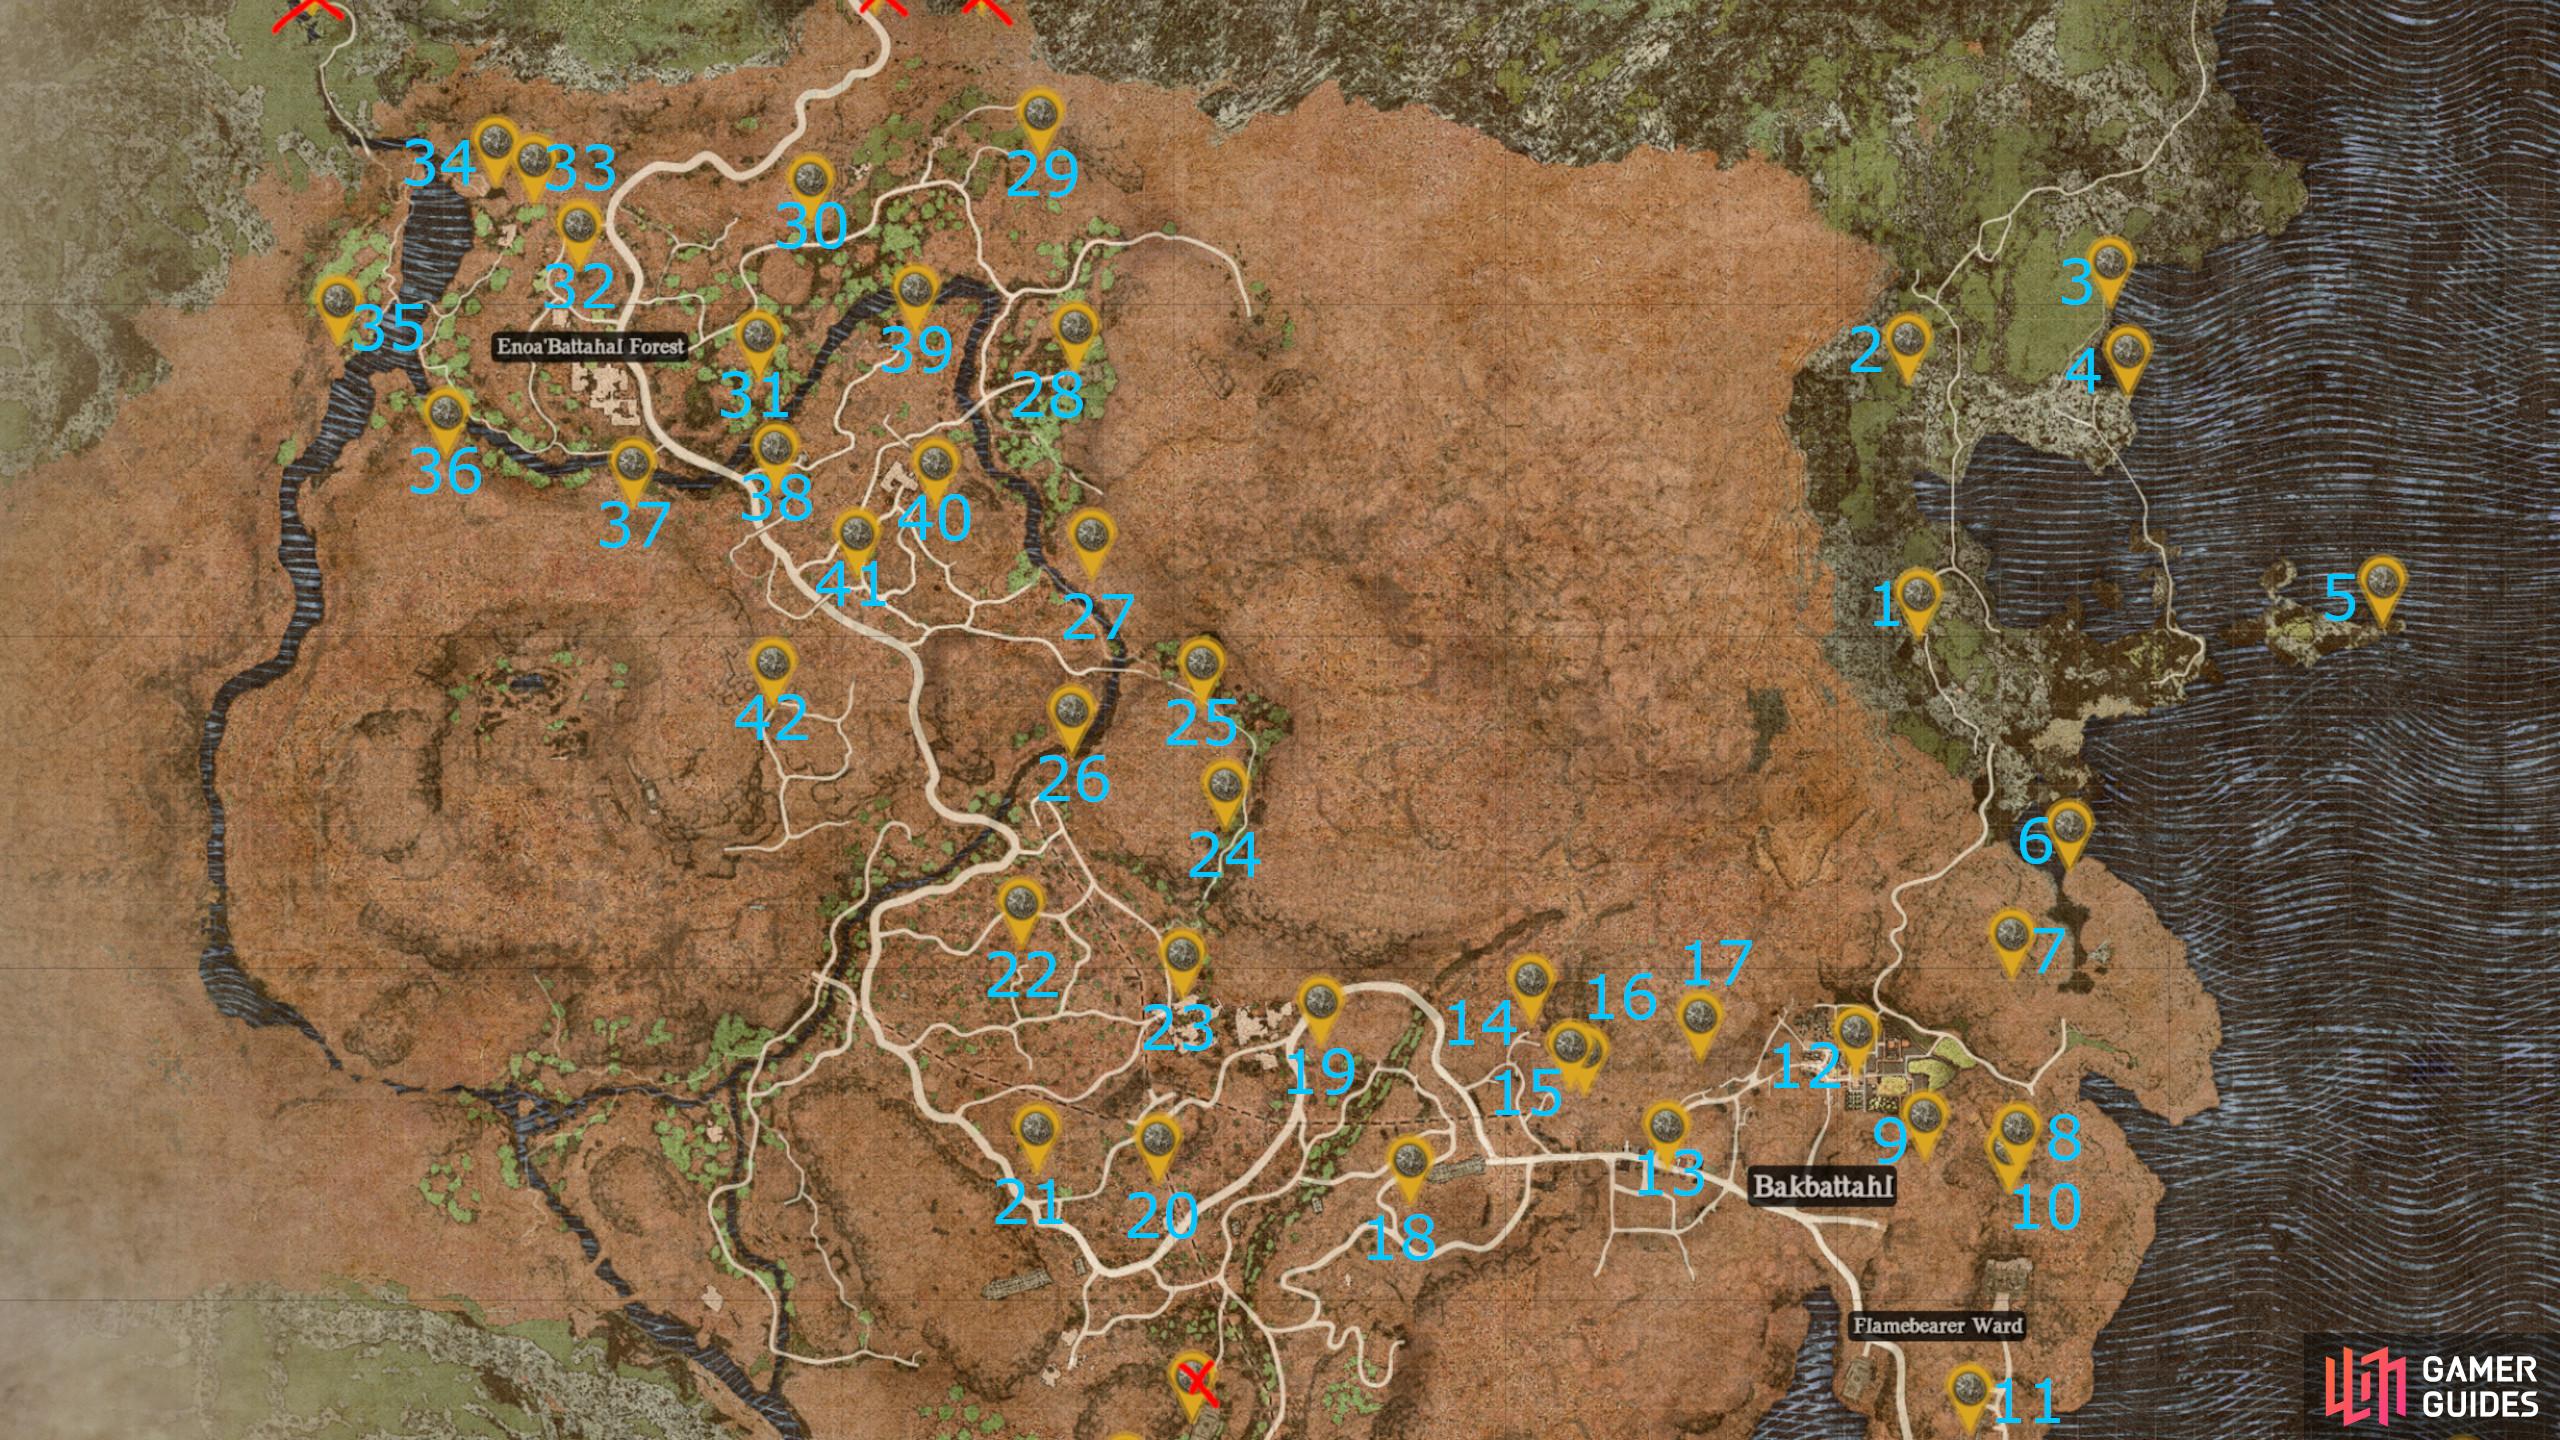
Sacred Arbor to Harve Village
Western Vermund is a crazily large region of the map. So, expect many journeys and routes to grab all of these Seeker’s Tokens. Again, this area is very large, filled with verticality and hidden troves, and will be stuff we naturally update as time goes on.

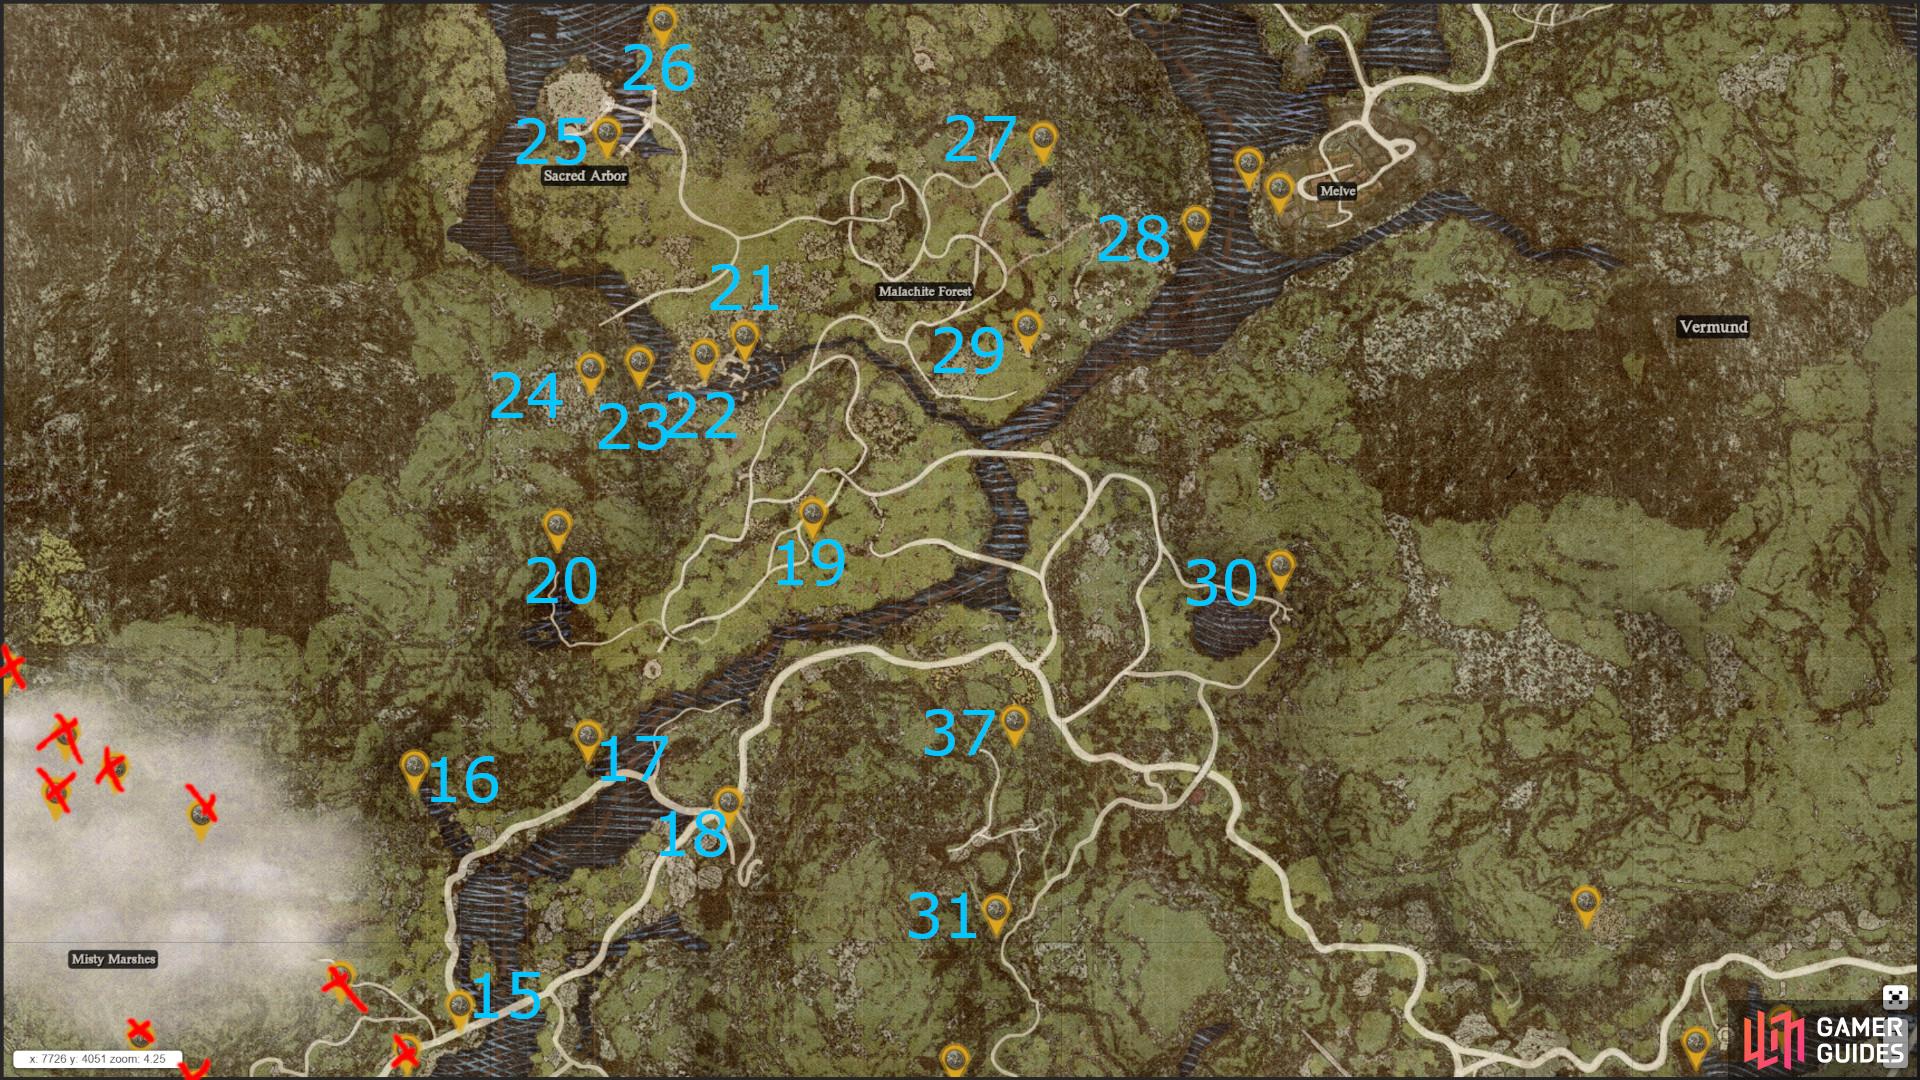
(1 of 2) Here are all the Seeker’s Token locations near Vernworth and Harve Village.
Here are all the Seeker’s Token locations near Vernworth and Harve Village. (left), Further north, you’ll find all the Seeker’s Token Locations near the Sacred Arbor and Elven lands. (right)
| Token | Description | Map Marker |
|---|---|---|
| 1 | Cross the western bridge from |
Map Marker |
| 2 | Follow the southern coastal road towards Harve village. When the river delta meets the sea, look for a |
Map Marker |
| 3 | Continue following the southern coastal road to |
Map Marker |
| 4 | Continue along the southern coastal road, and when you cross the bridge directly northeast of |
Map Marker |
| 5 | Head inside |
Map Marker |
| 6 | Travel north from |
Map Marker |
| 7 | Continue north and follow the road along the river. Turn right, and then take the road south back towards |
Map Marker |
| 8 | Go back to where you were for |
Map Marker |
| 9 | Follow the coastal road leading from Harve to the bend before the |
Map Marker |
| 10 | To the immediate north of the |
Map Marker |
| 11 | Go north up the road from the bridge into the woodland area, and then turn left along a dirt path towards a cabin guarded by an |
Map Marker |
| 12 | Take the dirt path heading east and then come across another abandoned building along the main road from the Theodracus the Second Bridge leading into the woodland. You’ll need to jump from the cart on to the tent, and then onto the wooden structure’s roof to access the |
Map Marker |
| 13 | From the previous Token, follow the main road over the river, then head south and stick to the riverbed. Where the green on the map gets darker, you should find a |
Map Marker |
| 14 | Go back over the main road and then follow the pathways up the hillside in between both bridges. You should climb up to find a statue, climb it till you reach the stone statue surrounded by |
Map Marker |
| 15 | Under the large wooden bridge north of the previous Token. Cross over to the other side of the bridge, then go under it. You’ll find it in shallow waters. | Map Marker |
| 16 | Follow the road north from the wooden bridge, and you should come across a road leading east. Continue to travel north towards the waterfall and you should find a |
Map Marker |
| 17 | Go back to the main road and travel east. Go over the first bridge, but when you reach the second a short distance away, go north slightly to the side of the river. You’ll find a Token along the side of the river. | Map Marker |
| 18 | Travel over the bridge now till you reach a |
Map Marker |
| 19 | Cross over the river to the north of the area, and then travel west along the road. You should come across a large hill with a |
Map Marker |
| 20 | Continue west from the previous Token until you reach the |
Map Marker |
| 21 | Continue north into Malachite Forest and then travel west towards the ruin by the lake. On the far east side of the ruin you can find a |
Map Marker |
| 22 | On top of a large ruin piece in the |
Map Marker |
| 23 | Go west of the ruin and enter the cave called the |
Map Marker |
| 24 | Go into the |
Map Marker |
| 25 | Travel north from the ruin to the |
Map Marker |
| 26 | Find |
Map Marker |
| 27 | Travel east along the main road, and follow the road that goes slightly northeast towards the large mountains. You should find a lake. There is a Seeker Token just north of the |
Map Marker |
| 28 | Now you need to travel to the very far right of the Malachite Forest overlooking the river near |
Map Marker |
| 29 | Travel southwest from Token 28 to find a ruin between two roads, near the river. Climb it to find a |
Map Marker |
| 30 | You now need to head back towards the large mountains near |
Map Marker |
| 31 | Travel southwest from the |
Map Marker |
| 32 | From the previous toke, you need to climb up the mountain to your west. You should be able to use |
Map Marker |
| 33 | On a cliff to the south of the mouth entrance to Trevo mine. Check the rocky and dirty climbing spots to reach this point overlooking the entrance to the mine. | Map Marker |
| 34 | Inside a puddle near the riftstone of Trevo mine. | Map Marker |
| 35 | Go west from Trevo mine and cross over the stream. There will be a ledge with a |
Map Marker |
| 36 | Follow the road leading up the cliffside towards the scaffolding overlooking the water source west of the previous token. You should see a mossy cliff edge with the Token atop it. | Map Marker |
| 37 | Go through Trevo mine, enter and clear the cave, and come out through the back of the cave. Climb the ladder, and you should find a path leading outwards. From there, look left for a small save in the hill, and you should find a Token inside. | Map Marker |
| 38 | Travel southeast from |
Map Marker |
| 39 | Continue east along the road, and you should find a very small |
Map Marker |
| 40 | Travel south from the previous marker and make your way to the main road going east with a bridge over the river. Once over the river, travel north, follow the river, and check the rocks near the waterfall for a hidden |
Map Marker |
Checkpoint Rest Town Seeker’s Token Locations
![]() Checkpoint Rest Town and the entire western area of Vermund is very large and spirally. We’ve started the route from the bridge from central Vermund and will take you around the mountainside a few times. However, if you would prefer to make your own route from Checkpoint Rest town that is fine.
Checkpoint Rest Town and the entire western area of Vermund is very large and spirally. We’ve started the route from the bridge from central Vermund and will take you around the mountainside a few times. However, if you would prefer to make your own route from Checkpoint Rest town that is fine.
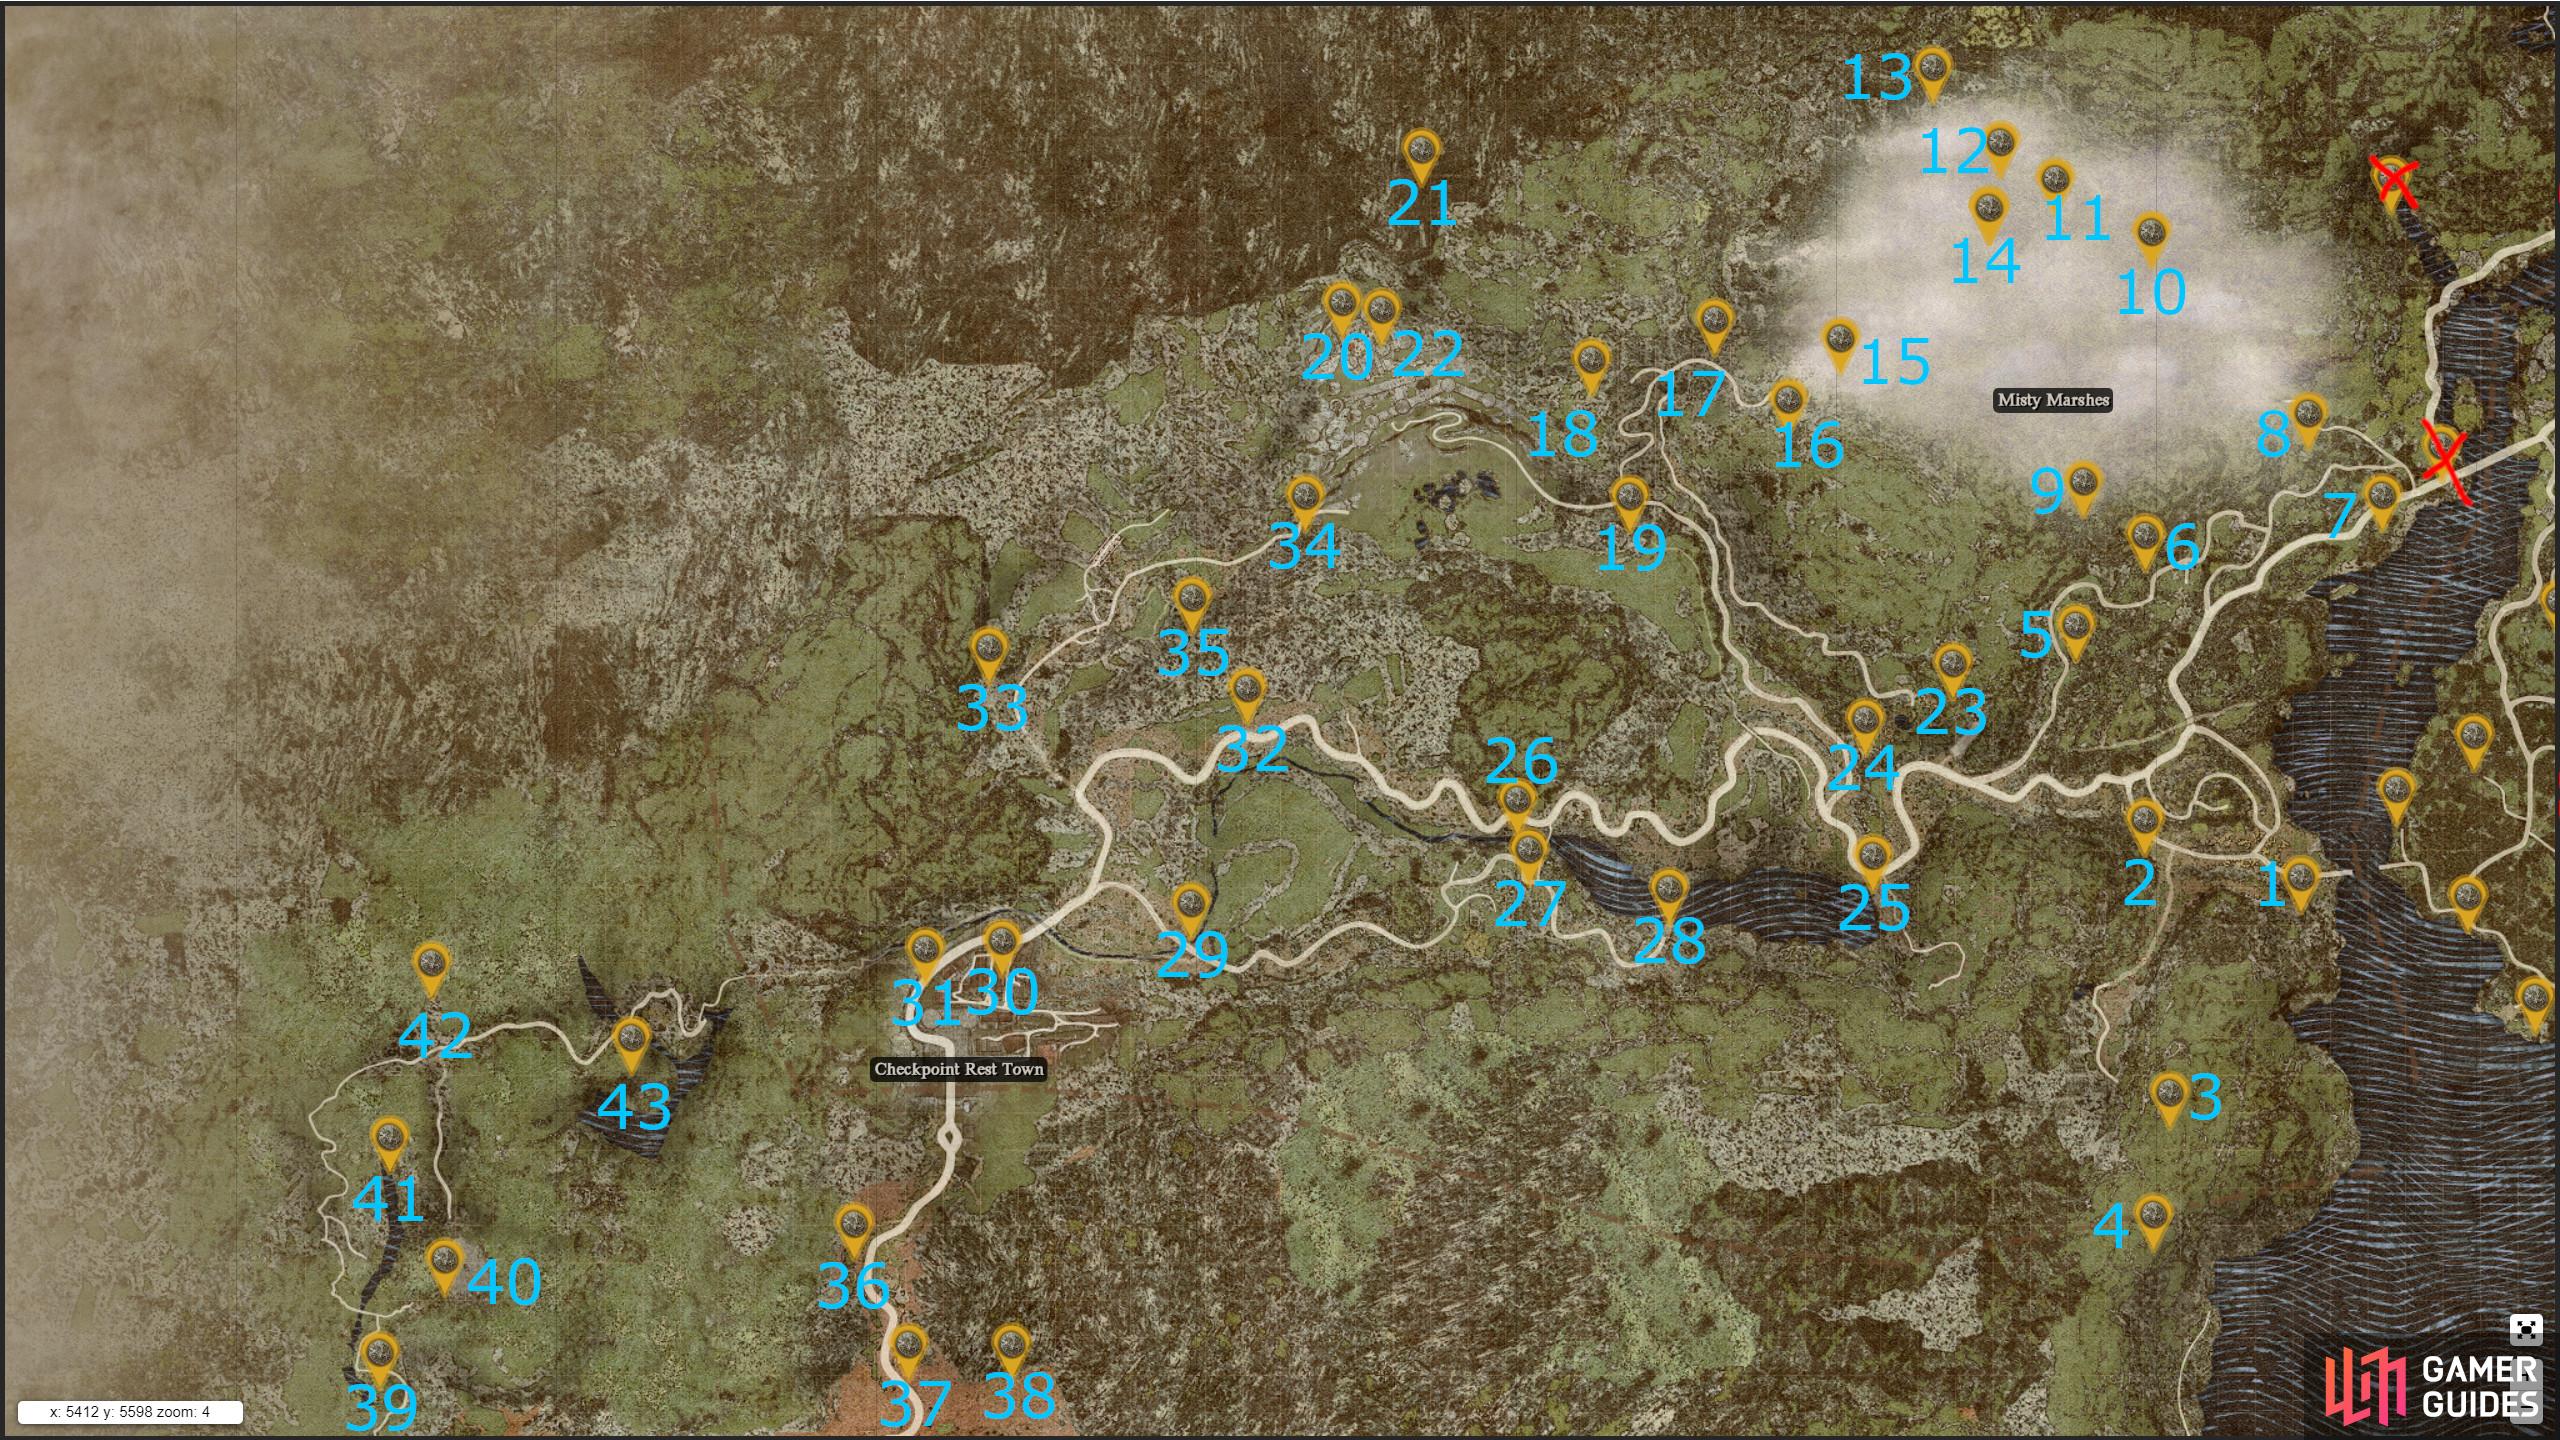
Here are all the Seeker’s Token locations we are aware of in and around Checkpoint Rest Town.
| Token | Description | Map Marker |
|---|---|---|
| 1 | From the Bridge of Theodocius the Second, travel west, follow the dirt path south slightly, and then turn east again and go over the grassy pathway. It should bring you to a chest with a rock behind it. The |
Map Marker |
| 2 | Go back towards the main road where it meets the dirt path, then look west towards the cliffside. There is a |
Map Marker |
| 3 | Travel south along the dirt trail and enter the |
Map Marker |
| 4 | Inside the Guerco Cave, you’ll find another |
Map Marker |
| 5 | Return from the cave and travel north, taking the main road west. There should be another part of the road that travels north. The road will bend to look like a ‘C’, and at the bottom of the C is a statue on the hill, potentially guarded by a |
Map Marker |
| 6 | Continue following that road northeast, and then the ‘U’ shape bend in the road, and you should find a ruin with a |
Map Marker |
| 7 | Travel further east on the road, and head towards the main river near the large wooden bridge. Look for the ‘U’ bend by the riverbed, and you should find a token overlooking the river from the cliff ledge. | Map Marker |
| 8 | Take the thin path northwest from the wooden bridge. Continue along the road and just before the road sharply bends right, look for a |
Map Marker |
| 9 | Stick to the cliffside south of the Misty Marshes. Line yourself up with the middle of the marsh, and you should be able to track ledges with the Forested |
Map Marker |
| 10 | Travel the road leading to the eastern entrance to the Marsh and then move northeast towards the |
Map Marker |
| 11 | Travel northwest to a landmark called the |
Map Marker |
| 12 | Go north of the |
Map Marker |
| 13 | Continue northwest towards the cliffs. Another Token can be found among them. | Map Marker |
| 14 | Travel back southeast towards the |
Map Marker |
| 15 | Travel southwest to the western entrance of the Misty Marshes. You’ll find a |
Map Marker |
| 16 | At the western entrance to the Misty Marches, there is a cave called |
Map Marker |
| 17 | Go the the |
Map Marker |
| 18 | Continue to travel west and follow the short path to a ruined tower. The |
Map Marker |
| 19 | Travel directly south from the tower to where the road meets another road. There’s a ruin above it with the |
Map Marker |
| 20 | Travel northwest along the pathway to the castle. On the ‘S’ part of the entrance to the castle, you should find a trebuchet you can place boulders on that slings off o odestroy a boulder after a few attacks. Destroy the boulder to access a new route for a future token. From there go between the castle walls and you can find a |
Map Marker |
| 21 | Climb the scaffolding near the previous token, and drop into the grassy area north of the wall. You’ll find a cave entrance called |
Map Marker |
| 22 | On the southeastern part of the castle behind a ladder near the tower. Feel free to leave the cave from the previous token and turn left to get to that tower easily from the cave. | Map Marker |
| 23 | Go back to the the ruined tower near the Marshes, following the road further up the hillside that leads to overlook the main road. You’ll find some bushes at the end of the path with a small graveyard. The toke is hidden via path behind the bushes, guarded by |
Map Marker |
| 24 | Go inside the Ruined tower overlooking the two bends in the nearby roads. There is a Seeker Token on the tower balcony right at the top of the tower. Need to parkour around the destroyed wall to reach it | Map Marker |
| 25 | Travel south from the tower on the main road towards the lake. The northeastern edge of the lake has a rock with a token on top of it. | Map Marker |
| 26 | Continue west along the main road near the lake. You should see a path heading south at the thin point of the water source. There will be a waterfall here, with the Token near it by the side of the path. | Map Marker |
| 27 | Travel south over the waterfall to the Dilapidated wall. You’ll find the Token amongst the rubble. | Map Marker |
| 28 | Follow the winding pathway southeast towards the ruined bridge. At the edge of the bridge’s hole should be a Token teetering on the edge. | Map Marker |
| 29 | Travel far west towards |
Map Marker |
| 30 | Inside Checkpoint Rest. Climb to the roof of the Smithy. You should be able to climb Morris’ Apothecary to reach this roof. | Map Marker |
| 31 | Follow the large stone road towards the Checkpoint Gate. To the right of the road, you can find a ledge you can climb on which will allow you to path towards the gate on the road. Climb up and you should see a Token on the archway. | Map Marker |
| 32 | Travel north along the road out of Checkpoint Rest, and then on the second right turning go east. After the ‘V’ bend in the road, you should see a very small cave with the Token inside it. | Map Marker |
| 33 | Go back west and then travel north at the turning. When that road starts bending northeast, you should find a rock to the left side of the road with the Token atop it. | Map Marker |
| 34 | Go towards the rock you blew up using the Trebuchet at the castle to find the |
Map Marker |
| 35 | To the south in the cliffs is a high up cave called |
|
| 36 | Return to |
Map Marker |
| 37 | Continue down the path and grab the ledge on the left side for a Token. You can climb up from the broken sandstone wall by the cliff ledge. | Map Marker |
| 38 | Go further east from the road into Battahl, and grab the coin along the northern edge of the desert between the road and the bend in the mountain. | Map Marker |
| 39 | Travel west through the Battahl desert, and then head northwest back toward Vermund. You’ll find a rock at the edge of the waterfall near the path with the |
Map Marker |
| 40 | To the east of this road you should find a place called |
Map Marker |
| 41 | Continue up the road north, and you should come across a waterfall. There’s a ledge above the Waterfall with a |
Map Marker |
| 42 | Continue traveling up the road north, and then follow it eastward. When there’s a turning that goes south, go north into the ruin on the hill for the next Token. | Map Marker |
| 43 | Continue east along the road, and when the road dips southeast, follow it to the cliff edge for a Token. | Map Marker |
Battahl Seeker’s Token Locations
The area around Battahl is rather large, mob dense and vertical thanks to all the cliffs and hillsides. We recommend that you take great caution exploring the Battahl area, as it can get very chaotic compared to most other areas in the game. If you’re a little confused about a Seeker’s Token location, then chances are it is on an annoying ledge. Depending on the Vocation you’re running we recommend trying different spots to climb up cliffsides and work your way around, as some classes are much better tan others for getting around this rocky hellscape.
Moreso, we recommend starting inside the ![]() Bakbattahl city, due to the various routes that you can go through to claim the Seeker’s Token locations through this area.
Bakbattahl city, due to the various routes that you can go through to claim the Seeker’s Token locations through this area.
Here are the locations and recommended orders for the North Battahl Seeker’s Token Locations.
| Token | Description | Map Marker |
|---|---|---|
| 1 | Take the north exit from |
Map Marker |
| 2 | Continue north along the road and go over the chasm. To the northwest of the campfire, you should find a |
Map Marker |
| 3 | From the campfire near the previous token, travel east along the path, following along the cliffside. There should be a token above the Dragonforged cave facing the eastern sea. | Map Marker |
| 4 | Stick to the cliffside and move southeast. You’ll find another |
Map Marker |
| 5 | Continue south from the Dragonforged Cave and cross over the water following the shallow path. To the east you should find a wagon by the sea, with a |
Map Marker |
| 6 | Head back into the City and then go north towards the cliffside of the Flame Palace/Laboratory. It should bring you to a cliffside facing north, with a Token nearby. | Map Marker |
| 7 | Head back south, and you should find an entrance into the mountainside of the capital. One way should take you to the Gaol. Get yourself a |
Map Marker |
| 8 | Continue through the tunnels to reach the |
Map Marker |
| 9 | Look for a stairway area that goes further down, as at the bottom there’s a skeleton of a dragon where you can find a Token in its remains. | Map Marker |
| 10 | Continue up the spiral stairs back into the |
Map Marker |
| 11 | Head south out of the Palace and come across the Forbidden Palace History Chamber. You should find a |
Map Marker |
| 12 | Head back into the center of |
Map Marker |
| 13 | Go southwest from the center of town towards the market area. You should find a |
Map Marker |
| 14 | Move towards the |
Map Marker |
| 15 | Climb up Ropeway Station 1, just to the south of the Great Riftstone. Get up on the cliffside, and then look for a pillar with a |
Map Marker |
| 16 | Look for a large pillar near the Inn and get to the pillar by being on the cliff near Token 15. | Map Marker |
| 17 | From the cliffside, continue east towards the Rare Book Sands store in town. You’ll find some rocks behind the stand, which are easier to access by dropping down from the cliffs. | Map Marker |
| 18 | Now it’s time to exit Battahl. Go along thesouthwest road closest to |
Map Marker |
| 19 | From the previous token, travel northwest near the roads next to |
Map Marker |
| 20 | Travel the thinner road leading west from the last token, and enter the |
Map Marker |
| 21 | Travel out of the Tomb and head west. Look for a headless statue, where you can find the next Token location. | Map Marker |
| 22 | Travel north, and look for a mountain type terrain between the Rope station 2 and the |
Map Marker |
| 23 | Travel east towards the |
Map Marker |
| 24 | Travel north from the last token, and stick towards the cliff near the ravine path with the trees and brushes. There is a |
Map Marker |
| 25 | Continue north where you can find the Riftstone where the road bends. There’s a rock opposite the Riftstone with the |
Map Marker |
| 26 | Travel southwest from the last Token, towards the northeastern tip of the Ropeway 2 Station where it hits the cliffside of the waterfall. You shall find a breakable rock near the waterfall, hiding the Token. | Map Marker |
| 27 | Continue north and look for the path you can jump across to reach a ledge over the river. There’s a |
Map Marker |
| 28 | Continue north till you come to the |
Map Marker |
| 29 | Travel further north, ignore the first right turning, and then turn right at the second turning, this should lead you to a |
Map Marker |
| 30 | Travel west along the main road, and you should come across a bluffy area. Above you to the right should be some rocks to climb up the hill, towards the |
Map Markere |
| 31 | Look southwest from your previous token, and the third closest bluff with |
Map Marker |
| 32 | Continue northwest, and climb a rock face with the |
Map Marker |
| 33 | Travel northwest from the last Token, towards the greenery you can see on the map. The Token is along the cliff edge of that area. | Map Marker |
| 34 | Travel west and cross the gap over the water source. Go north, then east, and you can find a |
Map Marker |
| 35 | Travel southwest of the waterfall, towards the |
Map Marker |
| 36 | Travel east and look for the river flowing in the same direction. You now need to make it to the other side of the river the best you can. At the far western edge of the river is an elevated rock with a |
Map Marker |
| 37 | Further east of the south side of the riverbank is another |
Map Marker |
| 38 | Where the main road meets the river, you’ll find a white tent by the side of the main road. There is a |
Map Marker |
| 39 | Continue along the road leading northwest from the tent. It should bring you to the |
Map Marker |
| 40 | Travel south to the |
Map Marker |
| 41 | Travel southwest along the road directly leading away from the |
Map Marker |
| 42 | Travel directly south, over the campfire, and then follow the road south and then west. You should find a road that leads directly up the slope to the cliff ledge that this Token is located on. | Map Marker |
South Battahl Seeker’s Token Locations
To continue through the Battahl region, you now need to head back to Bakbattahl, and start heading south. Note the southern part of the region is pretty dangerous, with the Wyrmblood Forest area notoriously challenging, thanks to ![]() Medusa and various Dragon spawns. Thankfully, you won’t need to go to the Medusa pathway, but, you will need to move towards
Medusa and various Dragon spawns. Thankfully, you won’t need to go to the Medusa pathway, but, you will need to move towards ![]() Dragonsbreath Tower, which you need to defeat a dragon to collect the Tokens around the area. The forest is a gauntlet of mob density, with Harpies, Wolves,
Dragonsbreath Tower, which you need to defeat a dragon to collect the Tokens around the area. The forest is a gauntlet of mob density, with Harpies, Wolves, ![]() Wargs, and other smaller bosses along the way too. Make sure you’re ready to fight as you get the remaining Tokens to the southwest and beyond.
Wargs, and other smaller bosses along the way too. Make sure you’re ready to fight as you get the remaining Tokens to the southwest and beyond.
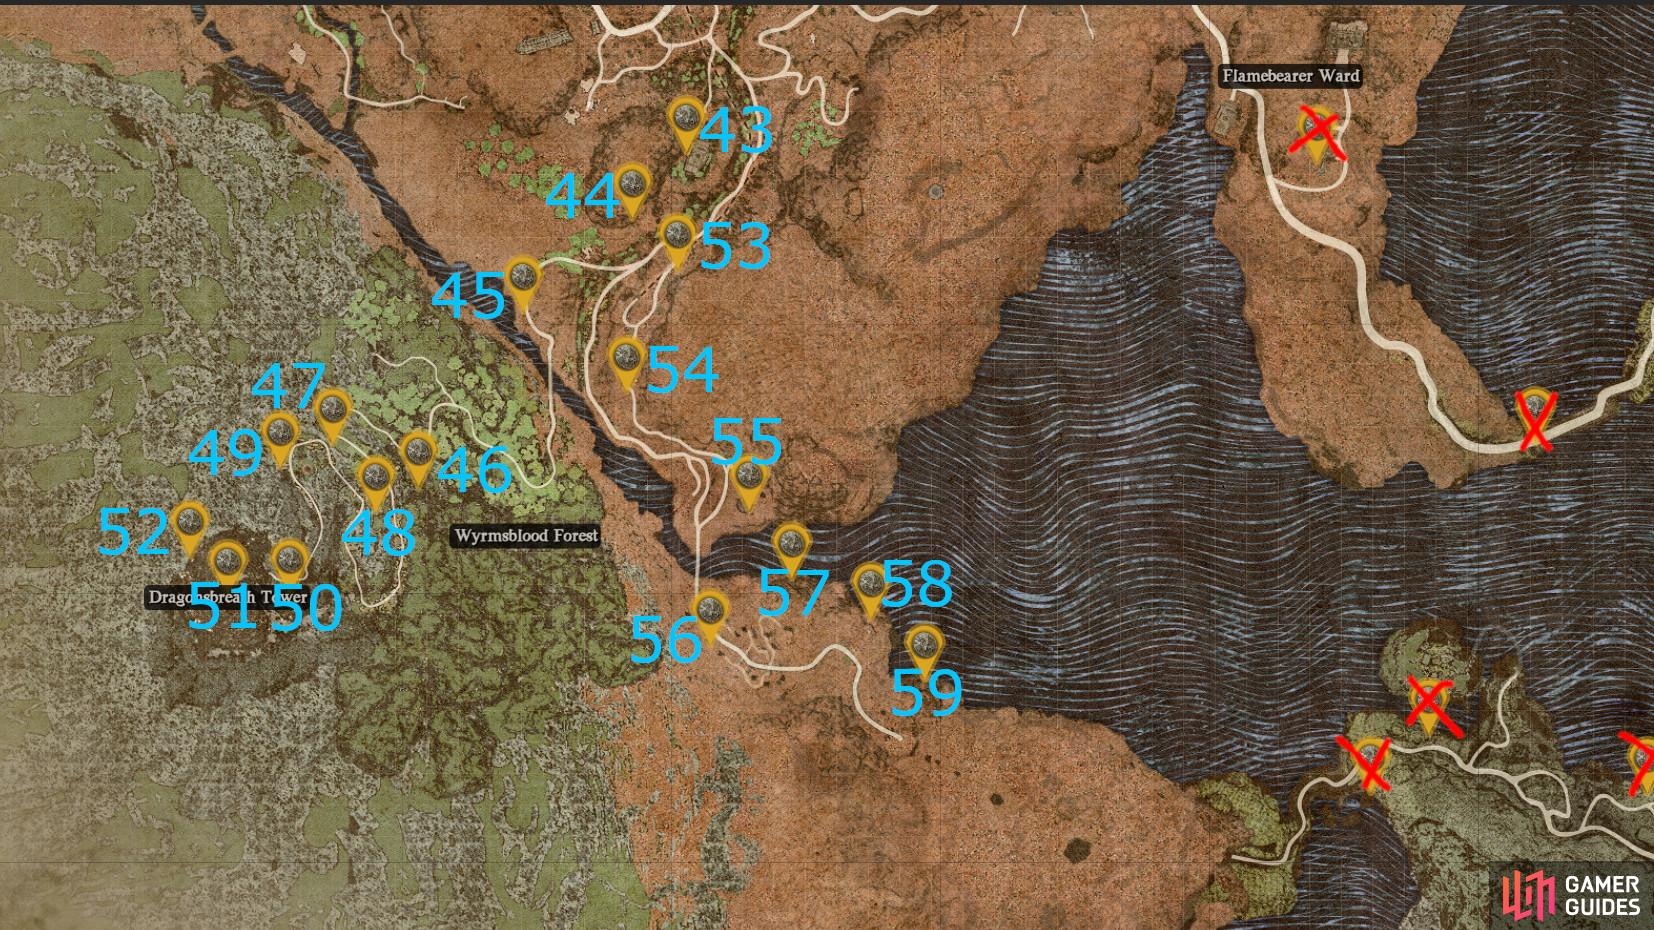
The final grind for Battahl requires journey into very dense enemy areas to claim the remaining Seeker’s Token locations in Dragon’s Dogma 2.
| Token | Description | Map Marker |
|---|---|---|
| 43 | Travel southwest from the city and then follow the main road towards a ruined building by the side of a bluff. Climb the outside of the ruin near the chest to reach the Token on the south side of the building’s outer elevated edge. | Map Marker |
| 44 | Continue moving southwest, keeping to the cliff. When you reach the part near the Riftstone, look for a way to the cliff ledge to its west as there’s a |
Map Marker |
| 45 | Again, continue your pathing towards the southwest. When the road curls towards the river, keep an eye out for a ledge to climb up for another Token hidden away on a ledge. | Map Marker |
| 46 | Enter the Wyrmblood Forest, and then continue your path west towards the |
Map Marker |
| 47 | On the same stretch of road look for a pillar to climb as that can lead you to a ledge. Continue north on that ledge towards a |
Map Marker |
| 48 | Continue heading up the road and then head north over the swaying wooden bridge where you’ll see a leafless tree next to a rock formation to your left. Drop to the grassy platform below and follow the narrow grassy ledge north to find the Token. | Map Marker |
| 49 | Continue with your journey along the road to the Tower, and when you get to the final bend, look for a stone block that can climb up a ledge. Again, a Token is located on the ledge. | Map Marker |
| 50 | Follow the road right below the tower, and then look for the pillar that has fallen to act as a ramp up the stone cliff. The Token is on the rock further up from it. | Map Marker |
| 51 | Fight your way up |
Map Marker |
| 52 | On the northern wall at the top of Dragonsbreath. You must jump from the platform above where you fell the dragon. | Map Marker |
| 53 | Return to the main road southwest of Battahl, then take the main road going southeast instead. When you get to the fork in the road near the Ruin for Token 43, look for a ledge you can climb near the easternmost road. | Map Marker |
| 54 | Find the large viewpoint statue, climb over the stone bridge to the west, follow the rocks around and look down, the Token is on the next ledge below, before the sleeping |
Map Marker |
| 55 | To the southeast, you should find a bridge near a river. Near the bridge is a tower. Go to the rear of the tower for a |
Map Marker |
| 56 | Cross the bridge to the bandit camp. Stay on the south side of the camp, and you should find a way to climb a cliff ledge. Go west along the ridge and you should find a |
Map Marker |
| 57 | Go to the northeastern tip of the bandit camp, then head north to the edge overlooking the river and the sea estuary. There should be a token overlooking the edge. | Map Marker |
| 58 | Follow the cliff edge to the southeast, and you should find a statue. The Token is on the ledge below the statue, once again facing the water. | Map Marker |
| 59 | Climb up the mountainside to the south in the bandit hideout. Then proceed east over the mountain tunnel. You should find a |
Map Marker |
Volcanic Island Seeker’s Token Locations
Now it’s time for the final area of the game, the Volcanic Island. This tiny region is only unlocked after players complete the New Godsway main storyline quest. This then brings you south towards the Volcanic island as part of the game’s main storyline. Feel free to progress through the main storyline, but don’t start the ![]() Legacy quest at the
Legacy quest at the ![]() Excavation Site, as it is the final main quest in the game. Saying that, you need to make your way through to the Excavation Site since there is a Token there.
Excavation Site, as it is the final main quest in the game. Saying that, you need to make your way through to the Excavation Site since there is a Token there.
Moreso, due to the events of the main storyline, you may have a few bridges destroyed. We advise waiting some time if you need the bridges back up and running as a way of getting around the Volcanic Island. It shouldn’t too much of an issue getting around but it is worth noting just in case.

Here are all the Seeker’s Token locations in the Volcanic Island that we know of. This should now tick you over the fabled 220 Seeker’s Tokens to get the final rewards.
| Token | Description | Map Marker |
|---|---|---|
| 1 | Go South from |
Map Marker |
| 2 | Follow the road to a tiny island where Harpies gather. On the northern tip of the island should be a |
Map Marker |
| 3 | Follow the bridge (if it is repaired) or take the route through the water to the cliffside and then head north to get back on track. Go to the road closest to the water after the bridge and look for the beach to get the Token. | Map Marker |
| 4 | Continue back on the road near the coast, and then take the first turning right. While on that path you should be able to climb up a rock overlooking the |
Map Marker |
| 5 | Travel down the road and turn right over the bridge (if the bridge is not there then back around to the cliffside near where you came from the water crossing.) When you get to the point where the bridge meets the fork in the road, you should find a grassy area you can climb that allows you to reach a Token. | Map Marker |
| 6 | Travel all the way southeast, leading you along the main road to the |
Map Marker |
| 7 | Return from your trip from the |
Map Marker |
| 8 | Take the road leading northwest from the western edge of town, and climb the grassy hill. As the roads starts to bend south, you should find a Token parallel to it on the hill. | Map Marker |
| 9 | Travel south of the last Token and look for another cliff along the road immediately ahead of you. There’s another Token up on a ledge that you can climb up via the stones along the road. | Map Markre |
| 10 | Continue down the path southwest from the |
Map Marker |
| 11 | Move slightly further west, and head to the upside-down u shape in the cliff overlooking the sea. You should find a |
Map Marker |
| 12 | Travel west from the main road near the previous Token, then travel south when the road bends down. Follow the direction south towards the cliffside, then turn west along the cliff edge overlooking the path to the south. You should find a |
Map Marker |
| 13 | Go back to the main road to your north and then move west. When the road meets the west, east, and south forks in the road, you should find a cliff to the north where you can climb up to get a Token. | Map Marker |
| 14 | Travel west near to where the path starts going exclusively back to the Battahl desert. You should come across a campsite along the road south of the island. Above that campfire is a ridge, which you can climb up and access to the west. Follow it around until you can climb up, then turn right and go back to the ledge overlooking the campfire for the Token. | Map Marker |
| 15 | Follow the pathway west, and before it goes through the straight towards Battahl, go south towards the beach. You should find a rock by the east side of the beach hiding a Token. | Map Marker |
And there you have it, you should now have gathered over 220 Seeker’s Tokens, allowing you to unlock every single reward available from the Guild Vocation halls. Congratulations on the epic grind and completing this big collectible hunt!

 Sign up
No Comments